Home Management V1 - Introduction
by clementchin96 in Circuits > Raspberry Pi
701 Views, 5 Favorites, 0 Comments
Home Management V1 - Introduction

In this mini project, we aim to learn a little more on how we can make use of AWS for our IoT set up.
What we will end up with is a simple home monitoring system.
- It tracks basic temperature/humidity values and display then accordingly on the webapplication.
- It also turns on an LED based on the light values of the room, this is done to save power.
- When a postman or a visitor arrives at the door, he/she can press the doorbell of the apartment that they are here for and the home owner will be alerted, they then can send a short message and it will be shown on a LCD screen at the door for the visitor.
- Making use of AWS Polly, we will be able to convert the text into speech so that the visitors can have also have an audio feedback from the home owner.
- The webapp is there for the home owner to monitor their home statistics, a live webcam service is also available using the motion server.
Without further ado, lets find out how we can accomplish all these things!
Home Management V1 - Setting Up


What you need:
- 3 x Raspberry Pi 3
- 3 x T-Cobbler Kit
- 3 x Breadboard
- Assorted Jumper Cables
- 3 x LED
- 2 x Buttons
- 1 x DHT Sensor
- 1 x MCP3008
- Assorted Resistors
- 1 x LCD Screen
- 1 x USB webcam
To set up, we first set up the room pi setup.
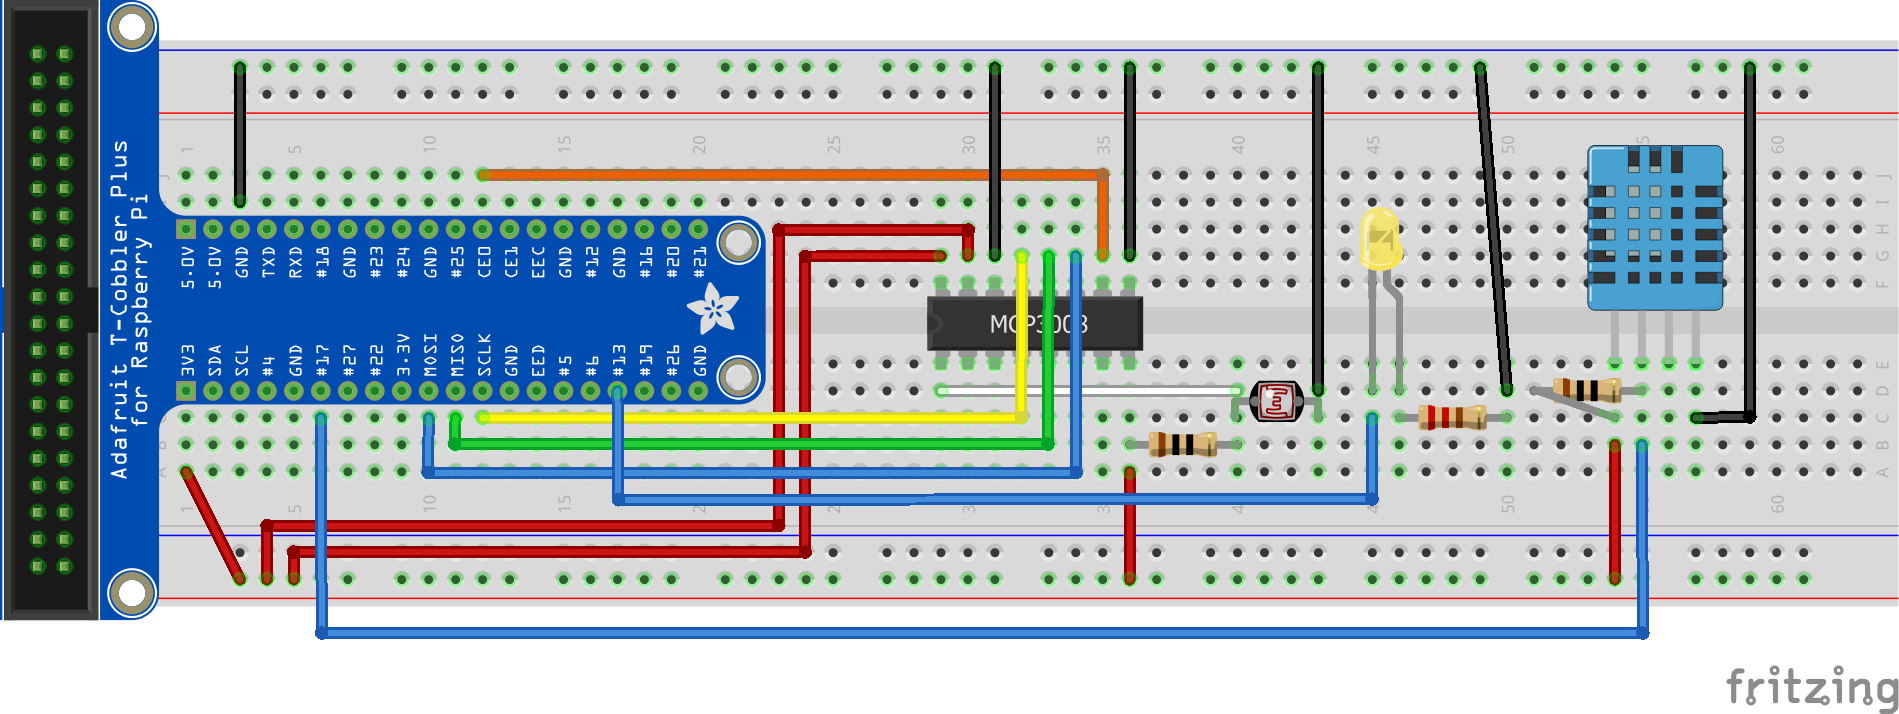
It contains an MCP3008 to convert analog to digital signal of the light sensor. We also include an LED connected to GPIO13 to lit up the room if it get too dim. For the management of temperature and humidity levels, we have a DHT sensor connected to GPIO17. We will set up 2 identical setups like this to replicate 2 different rooms for 2 different home owners to monitor their home.
This leads us to the server setup which will serve a few functions, for example, as a webserver for the GUI of the website. It also controls the decisions for the pi, like turning the lights on etc.
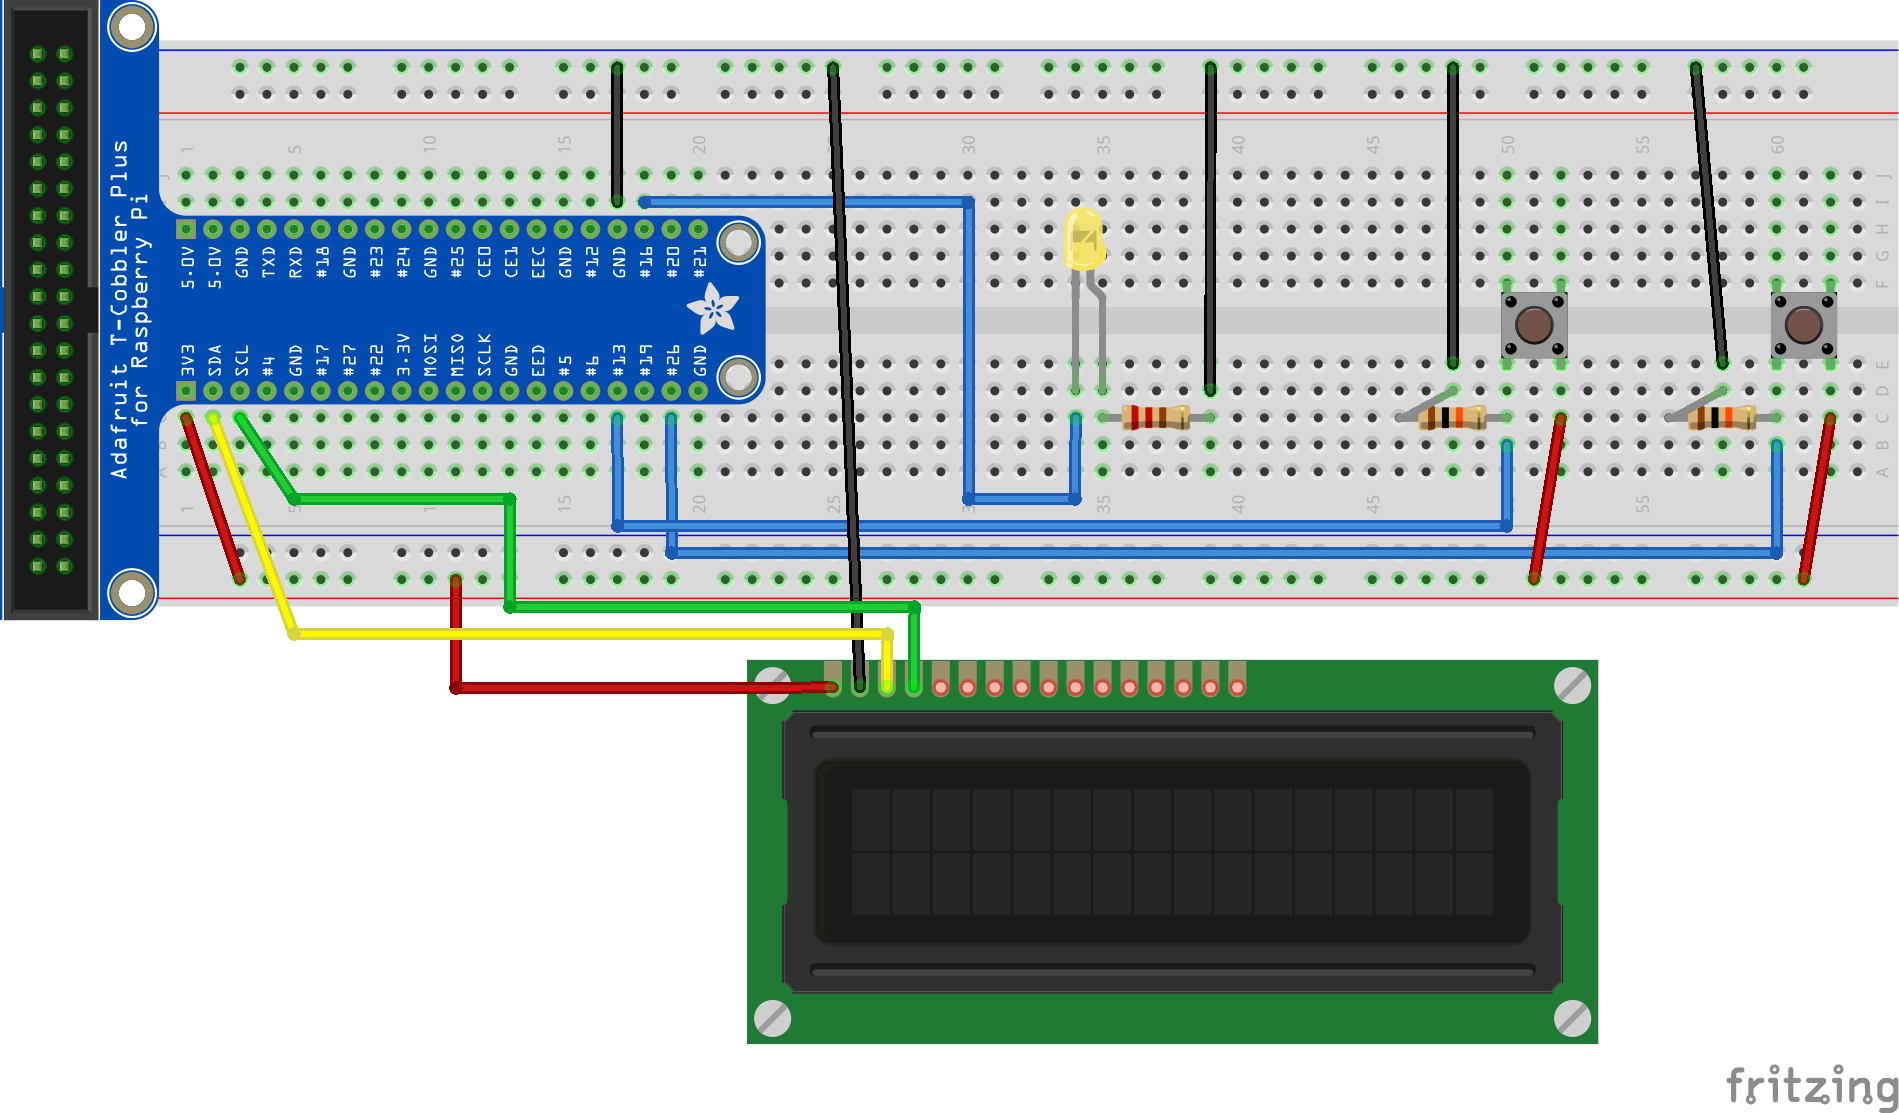
As this will be placed near the door, we also have buttons that serve as doorbells which, when pressed, will sound the doorbell for the respective homes.
For this server setup, we have 2 buttons that represent the doorbell of the houses. It also has an LED to serve as a visual indicator when the doorbell is pressed. The LCD connected to this set up will be used to display messaged typed by the home owner to the visitor.
Home Management V1 - Installing/doing the Prerequisites

Accessing our AWS account
If you are a student, you can login at https://www.awseducate.com/signin/SiteLogin
- Click on AWS Account on the top right of the page
- You'll be redirect to another page, click on 'Go to your AWS Educate Starter Account'
- Go into your console after 'starting your lab'
If you are not a student, you can login at https://aws.amazon.com/console/
- Sign in to your console
- Under your name drop down, click on 'My Security Credentials'
- Out of the options, click on 'Access Keys (Access Key ID and Secret Access Key) and create your new access key
After those steps, we can begin to familiarize ourselves with what AWS has to offer, we will start with DynamoDB as we will be making use of that service for this project.
We can search for DynamoDB and click on 'Create Table'
Creating and registering the Pis as a thing
When we are logged in, here are the steps to register the pi's as a thing
- search for 'AWS IOT'
- On the left handpane, select 'Registry' and click on 'Things'
- When prompted to give your thing a name, just let your creativity flow and give it a meaningful name (:
- Next we will click on security on the left hand pane and click on 'Create Certificate' to generate a set of credentials
- Remember to save the 4 things provided to you! The Certificate, a public key, a private key and also the root CA and click on 'Activate'
- We will not attach a policy to the thing we have just recreated by clicking on attach a policy and keying in the following configurations and then clicking on 'Create'
- Name: MyRaspberryPiSecurityPolicy
- Action: iot.*
- Resource ARN:*
- Allow: Checked
- We now have to attach the policy to the thing by clicking on 'Security' > 'Certificates' and right clicking the thing and selecting 'Attach Policy'
What do we need to install on the pi?
- Server
- Flask - sudo pip install flask
- Boto - sudo pip install -U boto
- Boto3 - sudo pip install -U boto3
- Motion - sudo apt-get install motion
- Room
- Boto - sudo pip install -U boto
- Boto3 - sudo pip install -U boto3
- AWS Python Library - sudo pip install AWSIoTPythonSDK
Home Management V1 - Apartment 1 Scripts
In the apartment's pi, we have 3 scripts.
- room1_monitor.py - This script sends room details to the dynamoDB every specific interval. It also sends light values via MQTT to the server for the server to make decisions
- testonled.py - This script will listen to the server's instructions on whether toturn the LEDs on or off.
- doorbellReceiver.py - This script will listen for doorbell presses at the main lobby, it will then play the doorbell.mp3 audio clip
Home Management V1 - Apartment 2 Scripts
In the apartment's pi, we have 3 scripts.
- room1_monitor.py - This script sends room details to the dynamoDB every specific interval. It also sends light values via MQTT to the server for the server to make decisions
- testonled.py - This script will listen to the server's instructions on whether to turn the LEDs on or off.
- doorbellReceiver.py - This script will listen for doorbell presses at the main lobby, it will then play the doorbell.mp3 audio clip
Home Management V1 - Server Scripts
- server.py - for the webserver (covers connection to connection to AWS dynamoDB, Controlling of LCD screen from the webapplication and also sound output)
- subtolight.py - to subscribe to the MQTT publisher for the room light values
- buttons.py - doorbell, when pressed will publish ring to the rooms
Home Management V1 - Drawbacks and Learning Experience
We have learnt a great deal on this project and we acknowledge that our program can be optimized further if given the time. We would also separate the webapplication from the front door doorbell server for security purposes.