Hollow Clock V


The popular Hollow Clock 4 is now thoroughly improved and refined.
- The ring is much thinner and neat (only 7mm) with indexes.
- There are no screw heads on the exterior (except the center of the hands).
- USB-C power inlet is placed on the back of the base.
- Ratchet mechanism makes the clock reliable against the slippage (out of step) of the weak stepper motor.
- Accuracy of the clock is much improved by the crystal oscillator of RP2040 based microcontroller.
- Easy time adjustment method (pull out the display ring, adjust, then insert to the base) is carried over from the previous model, but the ring is now securely fixed.
- Totally redesigned to exploit the texture of build plate and layer lines. Frontal surfaces of the clock are textured by the build plate.
July 13, 2024 : Back cover for "Seeed Studio XIAO" series microcontroller is added.
If you have some questions, please use "comments" feature of this page. Do not use personal message function to solve your specific problem because I receive so many messages. Share your question, it is worth for everyone, and the other people faced to the similar problem might answer it. If you have essentially personal question (such as license of this design) , use personal message system.
LICENSE NOTE
The former "Hollow Clock 4" was released under the CC BY-NC-SA license (give appropriate credit, non-commercial, remix should be released under the same license). However, many unofficial products based on my design are sold here and there. Some YouTubers earn many viewers without giving credit, so most viewers are misled about who the original author is. Therefore, I made the license conditions clear here. Basically, this clock also follows the CC BY-NC-SA license. More specifically, please be mindful of the following licensing conditions:
- [make] You can make the clock based on my design for yourself.
- [give] You can give away the clock based on my design to your relatives and friends for free.
- [sell] If you want to sell the clock based on my design, please contact me in advance. Once I give permission to sell the clock, I will list the URLs in the description of my YouTube video. A monthly report is mandatory.
- [tube] If you publish videos based on my design, you must clearly show the original in your video. More specifically, refer to the original in the video content. A link to my YouTube video or this page should be shown in the description, card, etc.
Supplies


Material
- motor : 28BYJ-48 geared stepper motor and driver board comes with (around 3USD per unit) . You can find at Amazon, AliExpress
- microcontroller : Waveshare RP2040-Zero, Seeed Studio XIAO ESP32C6 or their compatibles, without pin headers.
- magnets : Three 8x3mm neodym (neodymium) magnets. You can find at Amazon, AliExpress. I found that actual thickness of some 3mm magnets is 2.6mm. It does not matter.
- screws : Assortment of 2mm flat head tapping screws. You can find at Amazon, AliExpress
- Thin electric wires
- Superglue
- Lubricant (silicone oil spray)
Tool
- Screw driver
- Soldering iron
- Knife, scraper and/or file to remove debris, smoothen surfaces and chamfer corners of printed matter
Print Parts


- Print all parts with supplied posture.
- No support needed for all the parts.
- Print the hour hand with 15% or less infill density (it should be sufficiently light).
- To give different color for the index of "rotor-case-front", please change the material at height=0.6mm (the depth of the gap of the index ring is 0.75mm). You can give the color to the "hour-hand" in the same way.
- "min-colored-hand" is optional. Instead of giving different color by the filament changing method, you can stick the part afterwards. The frontal surfaces of "rotor-case-front", "hour-hand" and "base-front" is the touching surface of build plate, so the texture of the build plate is transferred. Therefore, it is better to print "min-colored-hand" separately to give consistent texture to it.
June 5, 2024 : "base-front" and "base-rear" are slightly improved for reliable USB-C connection.
Aug 21, 2024 : base-rear for Seeed studio XIAO is added.
Feb. 10, 2025 : Larger version of the driver board comes with 28BYJ-48 stepper motor is reported. "base-front-wider-slot.stl" is an additional version for this type of driver board. The slot for the micro controller / motor driver is expanded 1.6mm.
Downloads
Electronics


Hardware
- Remove ULN2003 IC in prior to make more space for soldering.
- It is recommended to trim (cut) the four pins of pin header of ULN2003 driver board for the ease of soldering.
- Solder pins (D2-D5 for WaveShare RP2040-zero, D1-D4 for Seeed Studio XIAO ESP32C6) to the input of driver board directly. Please be careful not to touch tiny chips on the microcontroller by soldering iron.
- Solder wires from 5V and GND to the driver board.
- If you use Seeed Studio XIAO ESP32C6 microcontroller, please solder the board upside down. The dedicated back cover is supplied.
- The other type of Seeed Studio XIAO board could be used also, but the port mapping in the source code should be changed.
Software
- Flash the test-code.ino (for WaveShare RP2040-zero board) to your microcontroller using Arduino IDE, and confirm that the motor rotates properly. If you use Seeed Studio XIAO microcontroller, edit the port mapping.
- Then Flash the clock code.
- If you do not want to install Arduino IDE, pre-compiled binary files (.uf2) are provided. Press and keep BOOTSEL button, then connect the microcontroller to the USB. Next, drag&drop the .uf2 file to the mounted drive. You can download them from https://drive.google.com/drive/folders/1Fh-l1GblGoBmaBqNNlFwvSwlz9wEHW--?usp=sharing
Assemble


Please take a look at the assembly guide video shown above.
Display ring
- Attach the hour hand by a screw. Please be careful not to protrude from the front side.
- Insert two magnets to the hour rotor.
- Stack the rotors and set the cover from above. Magnet slots are at upper side.
- Turn over the ring, then fit the back cover and fix it using two screws.
- Insert the magnet to the hour hand and fix it using superglue. The neodym magnet is dangerous for children, so please fix it securely.
Base
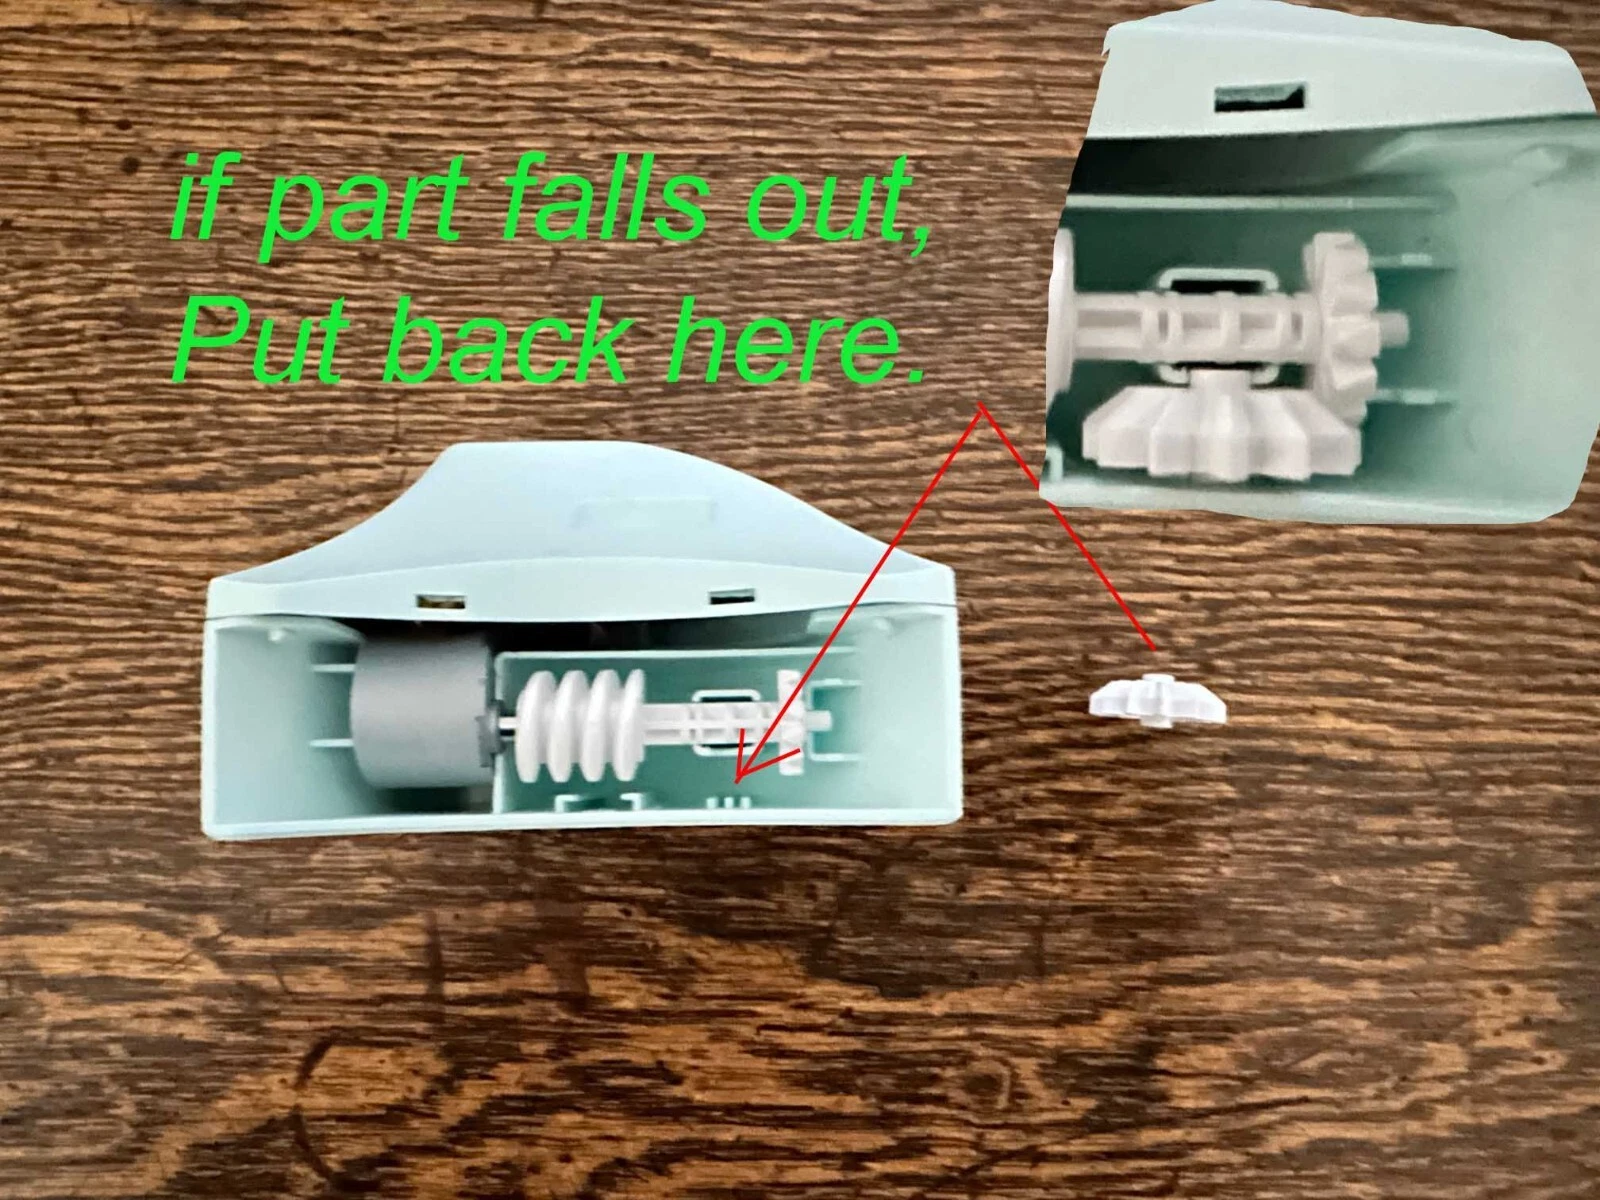
- Set min-drive-gear to the axis, then attach the ratchet using a screw. Loosen the screw a bit to make the parts movable.
- Insert the motor axis to the worm gear, then attach it to the case. Insert the driver board to the slot.
- Twist the cable connecting the board and the motor.
- Insert the top of the twisted cable into the vacant space behind the board. The rear cover has a space for the cable.
- Attach the rear cover. Be careful not to pinch the cable.
- Fix the rear cover by three screws.
- Set the display ring and test it.
Troubleshooting
- Lubricants (light silicone oil) is helpful to reduce the friction. Do not apply too much lubricants or the parts stick each other, especially the touching surface of min and hour rotors.
- The ideal motion of the motor depends on the free play of the gears. If the clock advances two minutes at once, please decrease the value named "SAFETY_MOTION" in the source code.
- If your clock is sufficiently smooth, you can remove the ratchet hook to make the clock silent. In this case, give small number for "SAFETY_MOTION" value (0 is not recommended).
Enjoy and Distribute


Essential ideas
Magnet-based hollow clocks (Hollow Clock 4 and V) are realized by three key ideas (inventions).
- T-shaped magnet arrangement makes the ring and the hand thin and neat. It also stabilizes the position of the hour hand.
- Reduction gear train with worm and bevel gears in the base is highly original. This is essential to make the base compact.
- Easy, intuitive and quick time adjustment is possible without twisting small knob or pushing buttons repeatedly, by the detachable display ring to release the engagement of the gears.
Why do I emphasize licensing issues so much?
Many people sell clocks based on not only the essential inventions described above but also 3D data and code published under CC BY-NC-SA license. There are a lot of videos without referring the original on YouTube. Examples are as follows.
- Many unlicensed Hollow clock 4 found at eBay : https://x.com/shiura/status/1709129101888622612
- Tons of short clips without credit in YouTube : https://x.com/shiura/status/1783796840456229024
- The exterior is redesigned, but most of the parts are not designed from scratch but modified from my design : https://hollowclocks.com/, internal https://i.ebayimg.com/images/g/IoMAAOSwly1lQQkT/s-l1600.webp
License conditions
My first priority is the pleasure of sincere hobbyists who understand good maker culture, so I decided to release the data of this clock as before. Basically, this clock also follows the CC BY-NC-SA license. More specifically, please be mindful of the following licensing conditions:
- [make] You can make the clock based on my design for yourself.
- [give] You can give the clock based on my design to your relatives and friends for free.
- [sell] If you want to sell the clock based on my design, please contact me in advance. Once I give permission to sell the clock, I will list the URLs in the description of YouTube video. A monthly report is mandatory.
- [Tube] If you publish videos based on my design, you must clearly show the original in your video. More specifically, refer to the original in the video content. A link to my YouTube video or this page should be shown in the description, card, etc.