Highly Customizable Smart Clock
by Zero To Infinity in Circuits > Clocks
2380 Views, 15 Favorites, 0 Comments
Highly Customizable Smart Clock
Build an Easy to Customize Smart Clock with ESP32
This Instructable will guide you through creating a customizable and internet-connected smart clock using an ESP32 microcontroller. This clock goes beyond just displaying the time; it leverages features like:
- Remote Alarm Setting: Configure alarm times through a user-friendly smartphone app, eliminating the need to physically interact with the clock.
- LED Display: A ring of 12 LEDs provides a clear way to visually represent functions like alarms, timers, notifications, and more.
- Server Connection: The ESP32 connects to a custom server to retrieve data like alarm times
- Webhooks: This is where the real customization begins. Third party services, self-written code, and more can interact with the smart clock with a single HTTP request. Don't want to learn JavaScript to extend the server's functionality? No problem! Just fire up a Python script that POSTs to the server to start a routine or pulse the LEDs.
- Routines: A future upgrade. Make different types of alarms, all configured in the app. Pomodoro technique, morning medication, and reminders.
- Voice Assistant: The Android and iOS apps are only a few lines of code away from having Google Assistant or Siri support.
This project is perfect for hobbyists with some experience in electronics and coding.
What you'll learn:
- Connecting an WiFi-enabled ESP32 to a server
- Timing events with RTOS
- Persistant storage
- Creating a smartphone app with remote connectivity to the clock
As you may have gathered, there are three main components of this project: the server, the ESP32, and the mobile app. Each of these alone could make for a lengthy Instructable, and each uses specific frameworks and tools you may not have knowledge of, but have many alternatives (eg: Flutter for mobile app development). That is why I hope you treat this Instructable as a high-level overview of how a smart clock can be planned, designed, and implemented, so that you can piece together your own using the tools and experience you have.
I am a high school student in Washington that's always excited to share projects with the world.
Supplies
- ESP32 development board
- 12x WS2812B LEDs
- Breadboard and jumper wires
- Power supply
- Speaker (Optional)
- Smartphone (can substitute with desktop)
- Server platform (e.g., Raspberry Pi, cloud service, laptop)
Code: https://github.com/roy-rishi/smart-clock
Design Data Flow
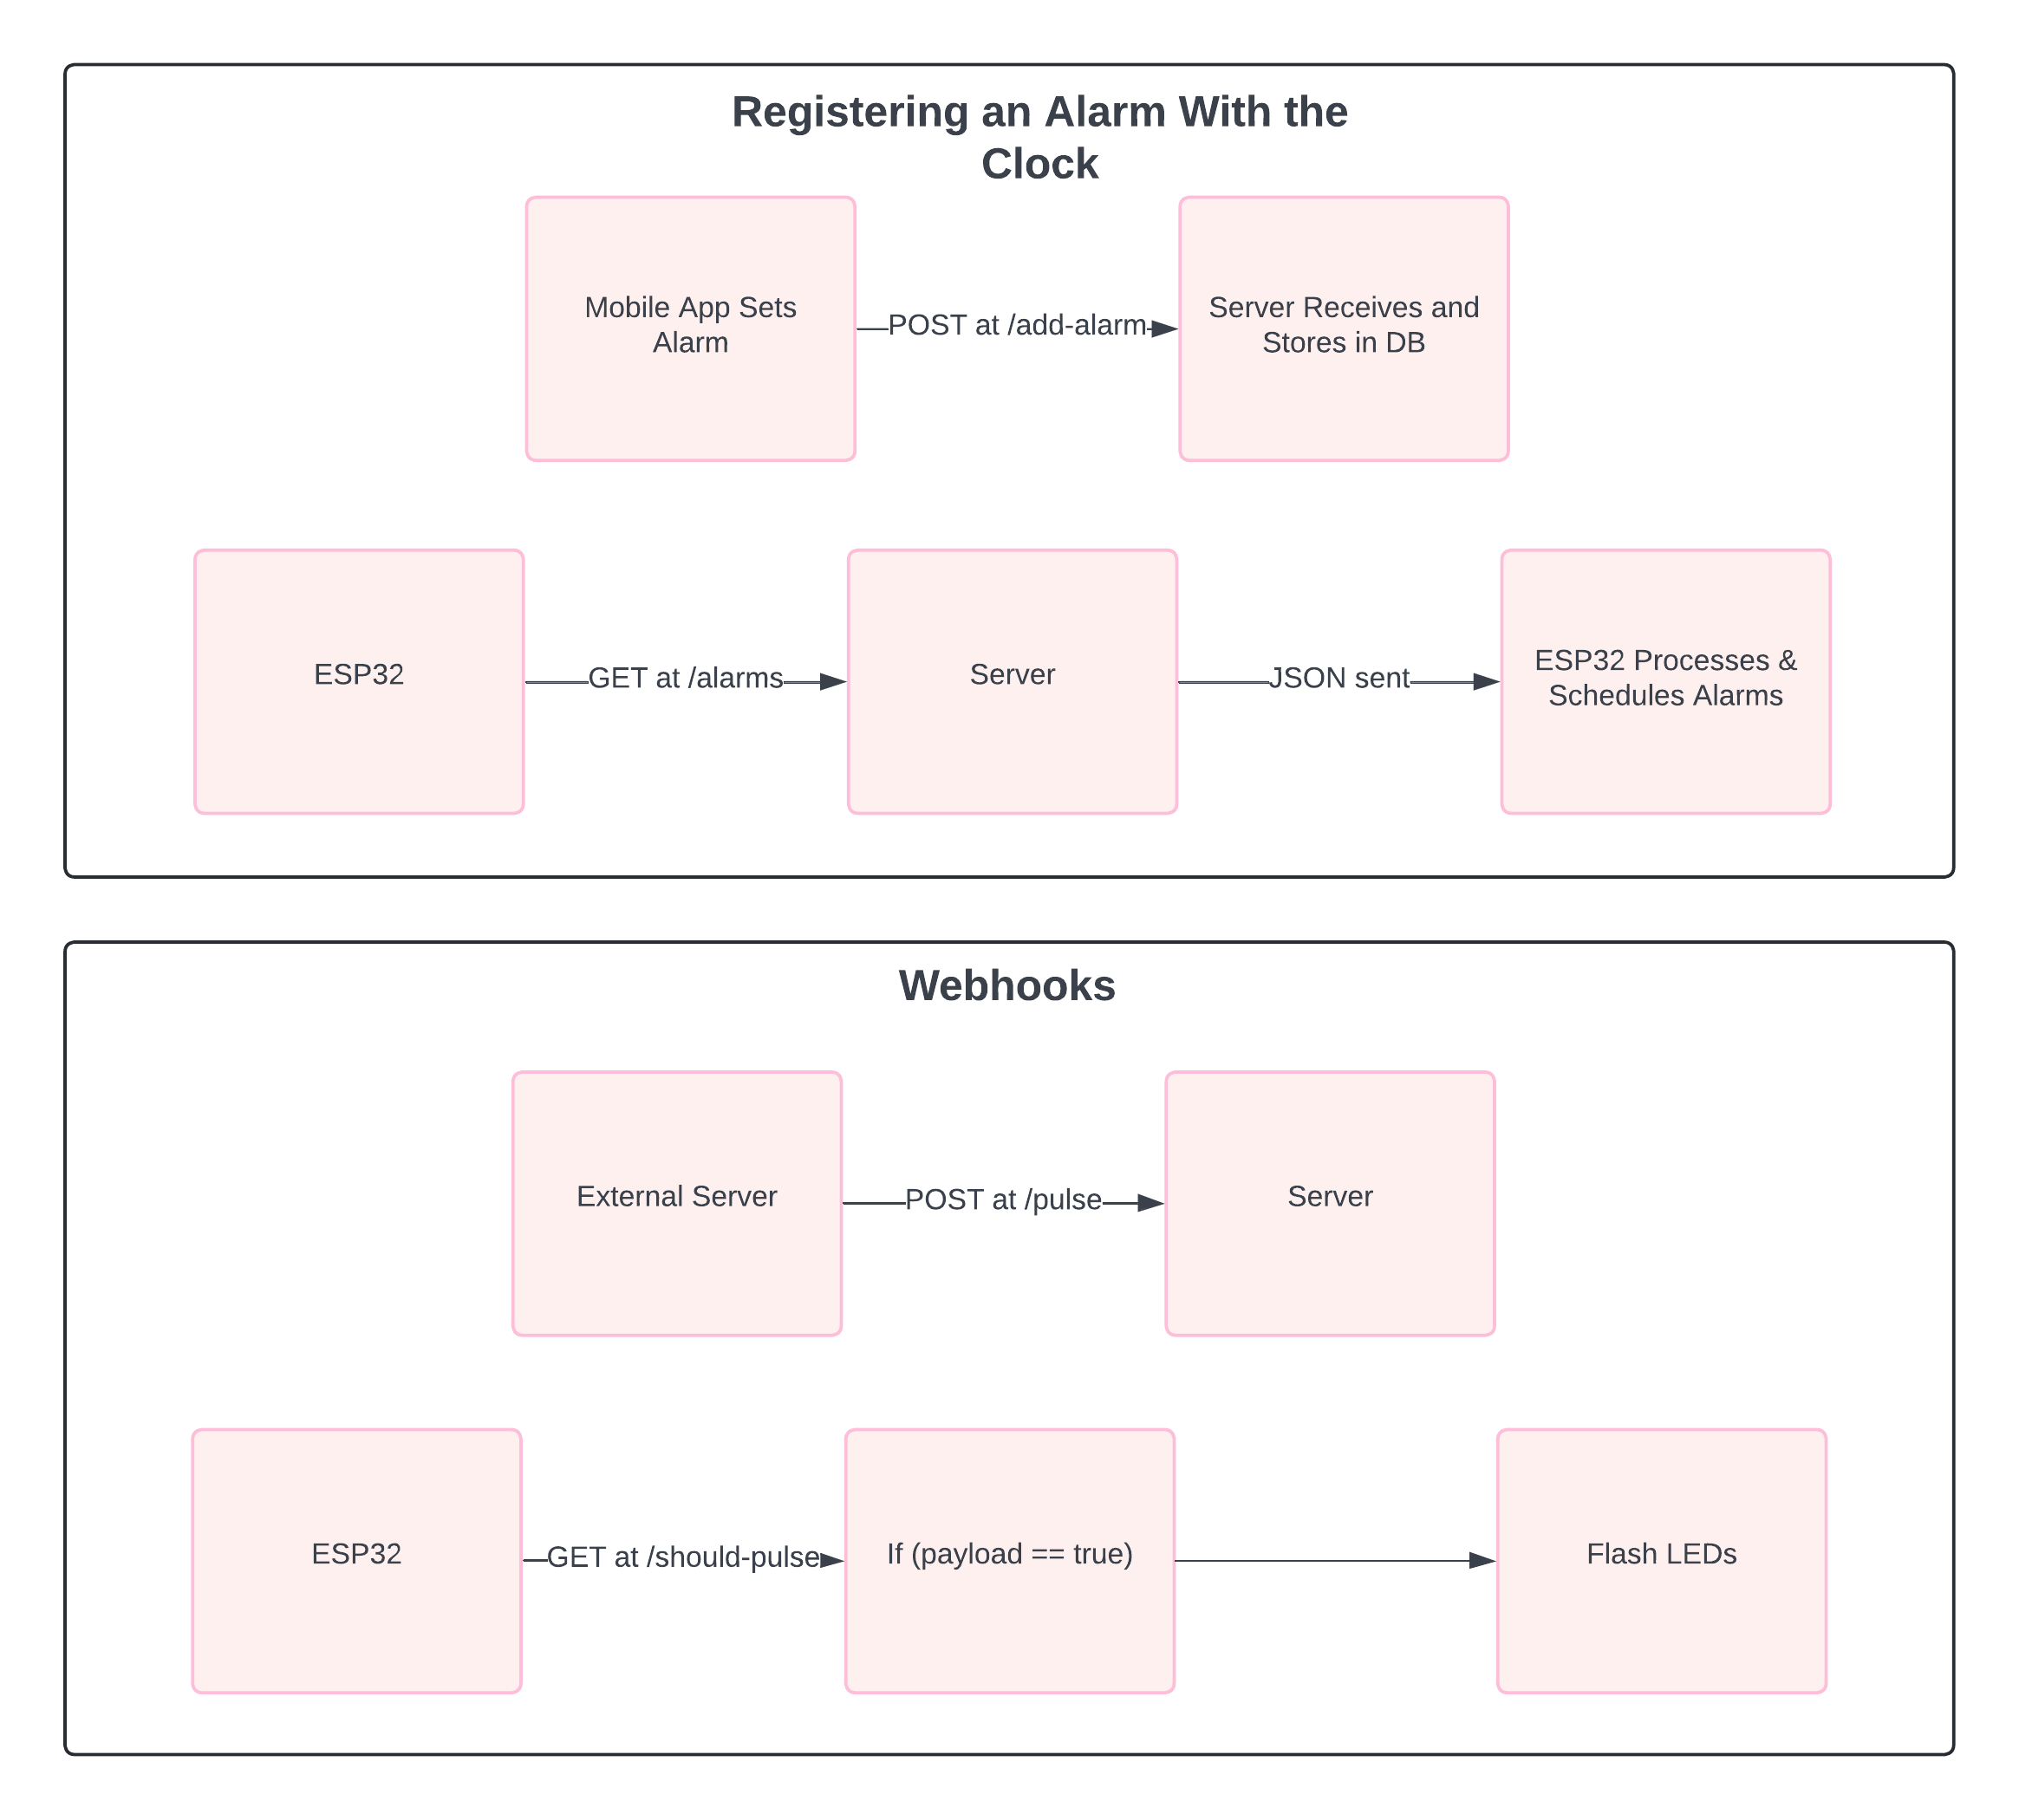
Here's a breakdown of how data flows from the mobile app, through the server, and to the ESP32 clock:
- Mobile App Sets Alarm: On your app, you'll enter the desired alarm time. The app will then process this information.
- App Sends Data: The app communicates with your server using an internet connection (like WiFi or cellular data). This communication typically utilizes a well-defined method called an API (Application Programming Interface). The app sends the alarm time data (e.g., device ID, specific time) in a structured format, JSON
- Server Receives and Stores: The server receives the data packet from the mobile app. It verifies the data and stores it in a database or similar storage solution. This storage allows the server to maintain information even if the ESP32 disconnects or restarts.
- ESP32 Queries Server: At pre-defined intervals (or potentially triggered by an event), the ESP32 on your clock actively checks the server for updates. This querying process also uses the server's API.
- Server Responds: The server receives the request from the ESP32. It checks its storage for any data relevant to that specific ESP32 (identified by a unique device ID). In this case, the server searches for any pending alarms associated with the ESP32's device ID.
- Data Delivered to ESP32: If an alarm is found for the ESP32, the server transmits the entire alarm data (including time) back to the ESP32 in a structured format (JSON).
- ESP32 Processes Data: The ESP32 receives the data from the server. It parses the data (e.g., using JSON parsing libraries) to extract the relevant information (alarm time).
- ESP32 Takes Action: Based on the retrieved alarm time, the ESP32 can activate the LEDs (or speaker) at the designated time or perform other actions based on your programming (e.g., light up specific LEDs in a sequence).
The diagram above describes this flow. (Advanced: websockets are tool that can be used to send data to the ESP32, without it needing to query the server. This is a slightly more efficient workflow, but requires more advanced server-side and client setup.)
Implement the Server-side Code
This code implements a server using the Express framework for Node.js and manages communication between the mobile app and the ESP32 clock. Here's a breakdown of the main tools and techniques used, along with explanations for important code snippets:
1. Dependencies and Server Setup:
- express: This is a popular Node.js framework for building web applications. It provides a structured way to handle incoming requests and send responses.
- body-parser: This middleware helps parse incoming request bodies, allowing access to data sent from the mobile app (typically in JSON format).
- dotenv: This allows loading environment variables from a .env file, which is a secure way to store sensitive information like passwords.
- sqlite3: This module provides an interface for working with SQLite databases. Here, it's used to store alarms and potentially clock information.
2. Database Connection:
The code establishes connections to two separate SQLite databases:
- alarms.db: This database stores information about alarms, including time (hour, minute) and potentially a routine associated with the alarm.
- clocks.db (not used in the provided code snippet): This database might be intended for future use to store information about registered clocks (e.g., unique IDs, access credentials).
// open db
let alarms_db = new sqlite3.Database("./db/alarms.db");
let clocks_db = new sqlite3.Database("./db/clocks.db");
3. Server Endpoints:
The code defines several endpoints (URLs) that handle different functionalities:
- / (GET): This is the landing page. It simply responds with a message confirming the server is running.
- /verify (POST): This endpoint handles user authentication. It checks for an Authorization header in the request and extracts a Bearer authentication token (encoded in base64). It compares this token with a value stored securely in the environment variable process.env.PASS. If valid, it responds with "Valid", otherwise it sends an error message (401: Unauthorized).
app.post("/verify", (req, res) => {
    console.log("\nPOST /verify");
    const auth_header = req.headers.authorization;
    if (!auth_header)
        return res.status(401).send("Unauthorized request");
    let auth = null;
    try {
        auth = new Buffer.from(auth_header.split(" ")[1], "base64").toString();
    } catch (err) {
        return res.status(400).send(err.message);
    }
    if (auth == process.env.PASS)
        return res.send("Valid")
    return res.status(401).send("Invalid")
});
- /add-alarm (POST): This endpoint is crucial for adding alarms. It first performs basic authentication as in the /verify endpoint. Then, it extracts the alarm details (hour, minute, routine) from the request body and inserts them into the Alarms table in the alarms.db database. Upon successful insertion, it responds with "Added alarm" and sets a flag shouldUpdateAlarms to true. This flag is used in another endpoint to tell the ESP32 if it needs to check for new alarms. The ESP32 polls this other endpoint twice a second.
app.post("/add-alarm", (req, res) => {
    console.log("\nPOST /add-alarm");
    // ... authentication logic
    alarms_db.run("INSERT INTO Alarms(Hour, Minute, Routine) VALUES(?, ?, ?)",
4. Exposing the server to the world
This brings out some of the advantages to having a server. By exposing the server to the internet, you can update the clock's alarms from anywhere. Clock's need to be reliable, and this helps ensure that you can always set an alarm. The clock does not rely on a continuous internet connection, and will continue to run alarms that it has already stored in RAM. However, power-persistent storage is only provided by requesting /alarms from the server.
Cloudflare provides an easy solution to do this if you already have a domain, but there are other options. Alternatively, you can stick to keeping the server accessible only from your home network.
Implement the Mobile Application

Let's explore how a mobile application built with Flutter (or any other framework) can interact with the server to set alarms for the ESP32 clock.
Key functionalities of the mobile app:
- Alarm Setting: The app should provide a user interface for users to set alarm times (hour, minute) and optionally add a descriptive routine associated with the alarm.
- Authentication: Before sending alarm data to the server, the app should implement a basic authentication mechanism. As the serverThis can involve prompting the user for a username and password, which are then sent to the server for verification.
Adding Alarms and Server Interaction:
- User Sets Alarm: When the user sets an alarm through the app's interface, the app gathers the details (time, routine - optional).
- Prepare Data Packet: The app creates a data packet containing the alarm details (potentially including a unique identifier for the phone) and the user's authentication credentials.
- Secure Communication: The app sends the data packet to the server endpoint (/add-alarm) using a secure HTTPS connection. This helps protect sensitive information like the user's password during transmission.
- Server Verification and Storage: Upon receiving the request, the server performs the following actions:
- Authentication: It verifies the user's credentials using the provided username and password.
- Data Processing: If authentication is successful, the server extracts the alarm information from the data packet.
- Database Storage: The server stores the alarm details in the Alarms table of the alarms.db database.
- Update Flag: The server sets a flag (shouldUpdateAlarms) to true to indicate new alarms are available.
- Server Response: The server sends a response to the app, typically a success message ("Added alarm") or an error message if something went wrong during processing.
Security Considerations (Applicable to any Framework):
- Basic Authentication: While basic authentication is a simple approach, it's important to understand its limitations. The username and password are transmitted in base64 encoding, which is not a secure encryption method. For production use, consider implementing more robust authentication mechanisms like token-based authentication with secure key exchange.
- HTTPS: Enforce HTTPS communication between the app and the server to encrypt all data transmission, protecting sensitive information like passwords.
- Secure Password Storage: Avoid storing user passwords directly on the phone. Implement secure methods like hashing passwords before storing them for additional protection.
Framework Independence:
These core concepts of sending data packets with user credentials, secure communication (HTTPS), and server-side authentication can be implemented using any mobile app development framework (e.g., Flutter, React Native, Kotlin/Java for Android, Swift/Objective-C for iOS). The specific syntax and libraries might differ, but the overall principles remain the same.
Embedded Microcontroller Code for ESP32
RTOS (Real-Time Operating System)
- FreeRTOS is a lightweight real-time operating system scheduler that allows you to run multiple tasks (for all intended purposes, threads) on a microcontroller like the ESP32. This enables the ESP32 to perform various actions "concurrently" without getting blocked by the delay() function provided by Arduino.h
- This makes code more modular, and allows you to use the delay() function to accurately time events
- Tasks can be developed separately, while still running seemlessly alongside themselves
- FreeRTOS is used to create separate tasks for:
- Timing when to fire alarms
- Animating LEDs
- Doing all of this at once
Checking for Alarms and Setting Time
- The code uses WiFi connection and HTTPClient library to communicate with the server.
- The getAlarms function retrieves a JSON list of alarms from the /alarms endpoint on the server
- The loadAlarms function parses the retrieved JSON data into a usable format.
- The setAlarms function iterates through the retrieved alarms and calculates the delay (milliseconds) until each alarm is due.
- To get the current time, the code retrieves the GMT offset and uses the configTime function to set up time synchronization with an NTP server. Then, it uses the getLocalTime function to get the current hour and minute.
- Based on the delay and current time, a separate task (runAlarmStandard) is created for each alarm using xTaskCreate. This task waits for the calculated delay and then triggers the alarm actions (potentially including flashing LEDs or playing a sound).
void runAlarmStandard(void *pvParameters)
{
  alarm_data_t *data = (alarm_data_t *)pvParameters;
  long value = data->value;
  Serial.print("RUNNING ALARM in ");
  Serial.println(value);
  delay(value);
  Serial.println("\nALARM ALARM ALARM");
  xTaskCreate(alarmFlashes, "", 2048, NULL, 2, NULL);
  vTaskDelete(NULL);
}
- The runAlarmStandard task waits for the specified delay before triggering the alarm actions
- vTaskDelete(NULL) deletes the current task after it finishes.
bool shouldUpdate()
{
  // ... (code to get response from /should-update endpoint)
  return payload == "true";
}

bool shouldPulse()
{
  // ... (code to get response from /should-pulse endpoint)
  return payload == "true";
}
- These functions utilize the server's /should-update and /should-pulse endpoints to determine if the ESP32 needs to check for new alarms or respond to a pulse command (potentially for visual feedback), respectively.
So, What Can You Do With All This Custom Code?
You can very easily extend the functionality of this clock to make it your own. Even without touching the server's or ESP32's code, you can provide advanced functionality using webhooks. Here are some things I can them for:
- Notifications: When I receive a text message, my clock will light up to let me know. This was incredibly easy to set up, all I had to do was add SERVER_URL/pulse as a webhook to my Bluebubbles server. When I receive a message, Bluebubbles POSTs to my server.
- Control from anywhere. A Raycast script, a Spotlight replacement for macOS, can control my clock right from any application, even with global keyboard shortcuts.
- Custom repeat parameters for alarms. Choosing which day of the week for an alarm to play isn't granular enough? A simple python script running on the same server can decide when to POST to the server (not tested, may require additional work) to run an alarm. Calendar integration and more are possible.