Golioth.io | IoT Platform Series #3 (Part 1)
by Common9899 in Circuits > Electronics
392 Views, 1 Favorites, 0 Comments
Golioth.io | IoT Platform Series #3 (Part 1)


Golioth is an IoT platform that provides cloud services for embedded devices. Enabling everything that our devices need from the cloud, including device messaging, security, updates, analytics, and more.
They chose the Zephyr Project™, as the basis of their first embedded offering. Zephyr is an open-source, safe, secure, and flexible RTOS under the Linux Foundation. We offer the Golioth SDK - built on top of the Zephyr SDK - which we can use to quickly bootstrap an IoT application.
Supplies


Get PCBs for Your Projects Manufactured

You must check out PCBWAY for ordering PCBs online for cheap!
You get 10 good-quality PCBs manufactured and shipped to your doorstep for cheap. You will also get a discount on shipping on your first order. Upload your Gerber files onto PCBWAY to get them manufactured with good quality and quick turnaround time. PCBWay now could provide a complete product solution, from design to enclosure production. Check out their online Gerber viewer function. With reward points, you can get free stuff from their gift shop.
Golioth Console and Device(virtual) Setup
Register for an account at console.golioth.io. The steps will help us provision with setting up our first device. Enter the Project Name > Device name, and that's it. All that you need to set up the device.

1 / 4
We shall require the PSK_ID and PSK later, during the ESP32 configuration. (available on the dashboard as well)
For recognition, we can even create a blueprint. The hardware device it will link with. Go to the blueprint section and click Create a Blueprint. All the codes required in this project can be accessed from here.

This step will create will blueprint for the device you will be working on. Visit the Devices section to view your device.

Dependencies to Install on PC (Windows)
1. Package Manager: Chocolatey
Run Powershell and run the below command to install Chocolatey
Set-ExecutionPolicy Bypass -Scope Process -Force; [System.Net.ServicePointManager]::SecurityProtocol = [System.Net.ServicePointManager]::SecurityProtocol -bor 3072; iex ((New-Object System.Net.WebClient).DownloadString('https://community.chocolatey.org/install.ps1'))
exit
After the installation of chocolatey, we need to give the 'choco' path environment variable.
1. Search 'edit system environment' > click first application (System Properties/Control Panel)

Open 'Environment Variables' > now for the root user to make changes in system variables and for the account user in User variables.
2. Double-click on the 'Path' variable. Click 'Browse' and add a new path variable. Browse to the chocolatey installed folder - C:\ProgramData\chocolatey\bin in my case. This will add the path to the table.

Now, use the choco command to run and install the below dependencies.
Packages - ninja gperf python git dtc-msys2 wget unzip
choco feature enable -n allowGlobalConfirmation
choco install cmake --installargs 'ADD_CMAKE_TO_PATH=System'
choco install ninja gperf python git dtc-msys2
Now, make sure python is installed in the system. From here, it is recommended to install further dependencies and tools in Python's Virtual Environment, so that the versions remain local to the project. To start the virtual environment, use the below command to open the directory and then activate the,
cd golioth-zephyr-workspace\.venv
.\Scripts\activate
We should see (.venv) on our prompt, which means that the environment has been activated. Now, Run the below command to install another dependency. All the codes required in this project can be accessed from here.
2. Git Manager: west (meta-tool for build and flashing).
pip install west
Install Golioth Zephyr SDK
Using west, install the Zephyr SDK and install it on the PC.
cd c:\
west init -m https://github.com/golioth/golioth-zephyr-sdk.git --mf west-zephyr.yml golioth-zephyr-workspace
After installation/initiation, update the SDK with the latest release.
cd golioth-zephyr-workspace
west update
(In case the update fails, redo the above step. If the problem persists, comment below the query)
Next, let us configure the CMake file (automatically)
west zephyr-export
After configuration, let us install the extra dependencies as per requirement -
pip install -r C:\golioth-zephyr-workspace\zephyr\scripts\requirements.txt
Now, click to download the main Zephyr SDK toolchain (Windows) to use the Golioth with ESP32 (or any other device). After downloading, unzip the folder and double-click on setup.cmd file. This will install the toolchain on the PC.
Install Espressif (ESP32) Binary Blobs
Go back to the Zephyr directory and install the requirements -
Use west to install the WiFi and Bluetooth binary blobs necessary for building Espressif projects.
cd c:\golioth-zephyr-workspace
west blobs fetch hal_espressif
Now, test the functionality by building a minimal script (from the zephyr directory)
cd zephyr
west build -b esp32 samples\basic\minimal -p
Credential Configuration Setup
Go to the directory, golioth-zephyr-workspace/modules/lib/golioth/samples/hello and open prj.conf file, and add the below fields -
CONFIG_GOLIOTH_SAMPLE_WIFI_SSID="YOUR_NETWORK_NAME"
CONFIG_GOLIOTH_SAMPLE_WIFI_PASSWORD="YOUR_NETWORK_PW"
CONFIG_GOLIOTH_SYSTEM_CLIENT_PSK_ID="DEVICE_CRED_ID"
CONFIG_GOLIOTH_SYSTEM_CLIENT_PSK="DEVICE_PSK"
Sending 'Hello' Message to Cloud
From the directory golioth-zephyr-workspace/modules/lib/golioth, run the below command to build the firmware
west build -b esp32 samples/hello -p
Connect the ESP32 to the PC with the USB port. Now, let us flash the firmware to the hardware
west flash --esp-device=SERIAL_PORT
Here, SERIAL_PORT is the USB Port to which our ESP32 is connected. For example -
west flash --esp-device=COM3
(How to find the Serial Port number?)
After flashing is successful, the board connects to the wifi network and then the cloud. And starts sending data to the cloud log as well.
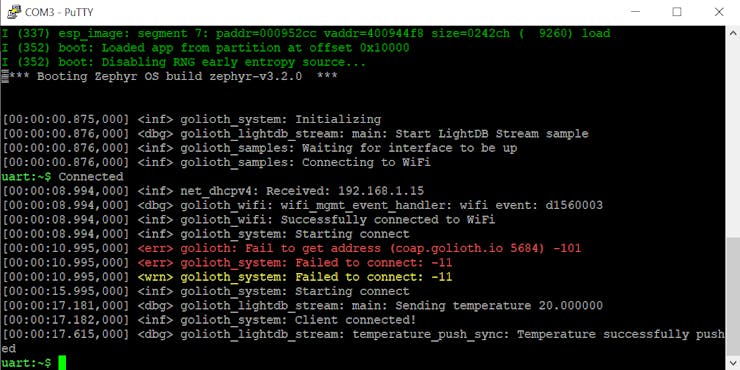
Using Putty, we can monitor the Serial interface of the COM port. Make sure to select the correct port and baud rate as 115200

In the below slides, we can see that the Connection is set up with wifi and then network.
Now, visit the Devices section, click on the Device, and open the Logs tab. The latest message will be visible every 5 seconds.
chocolatey
Sending Sample Data to LightStream
Go to the directory, golioth-zephyr-workspace/modules/lib/golioth/samples/lightdb_stream and open prj.conf file, and add the below fields
CONFIG_GOLIOTH_SAMPLE_WIFI_SSID="YOUR_NETWORK_NAME"
CONFIG_GOLIOTH_SAMPLE_WIFI_PASSWORD="YOUR_NETWORK_PW"
CONFIG_GOLIOTH_SYSTEM_CLIENT_PSK_ID="DEVICE_CRED_ID"
CONFIG_GOLIOTH_SYSTEM_CLIENT_PSK="DEVICE_PSK"
From the directory golioth-zephyr-workspace/modules/lib/golioth, run the below command to build the firmware
west build -b esp32 samples/lightdb_stream -p
Flash the build and check the serial monitor to check the status.
If successful, visit the Devices section, click on the Device, and open the LightSteam tab.

This was only sample data generated from a python script from the samples folder for using Golioth.iobaud rate