Getting Started With Analog.IO and Electric Imp
by analogio in Circuits > Wireless
1587 Views, 26 Favorites, 0 Comments
Getting Started With Analog.IO and Electric Imp
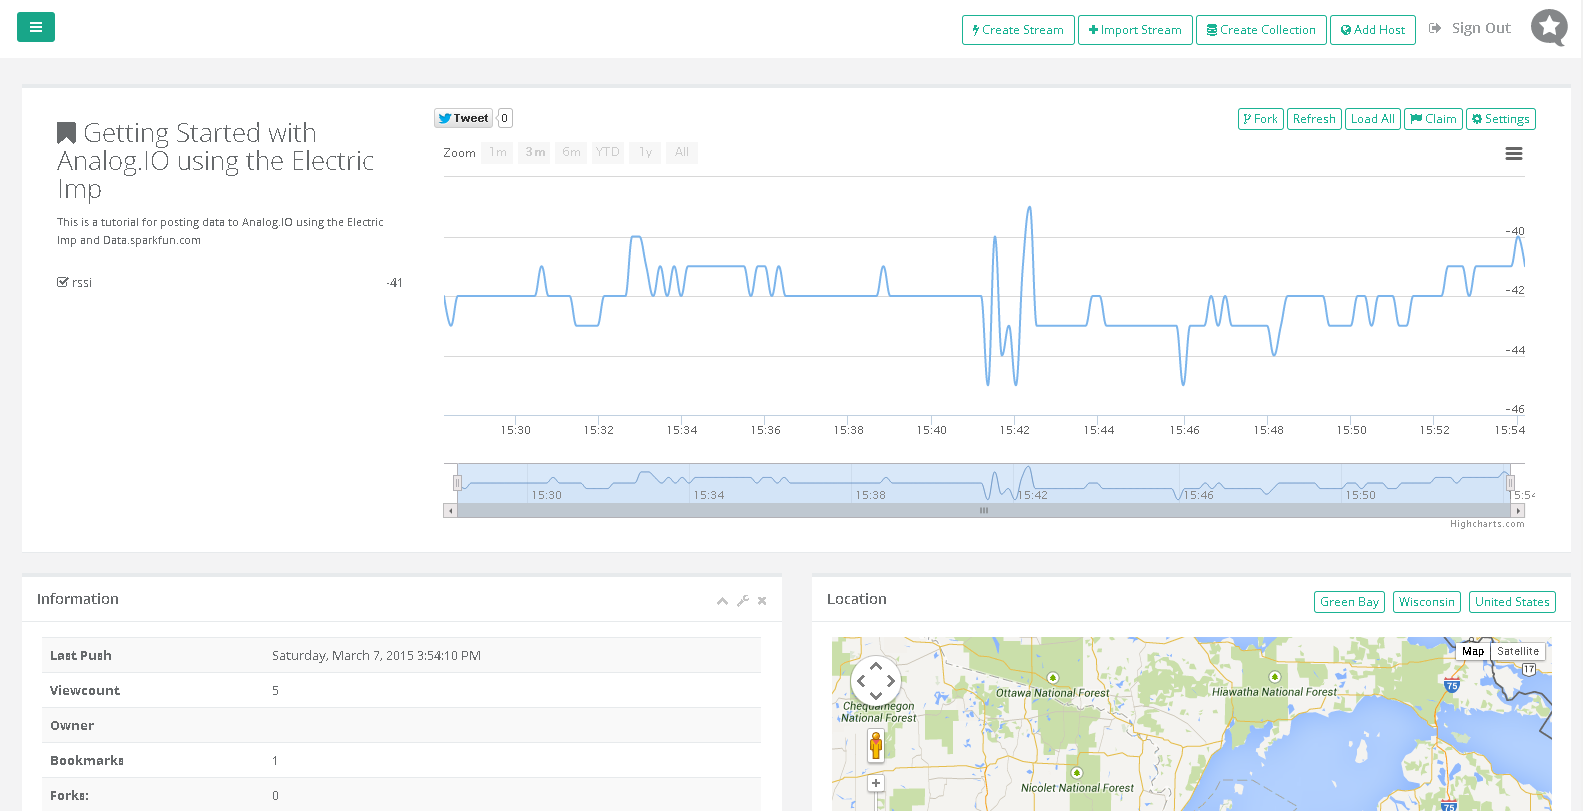
Analog.io is a new website dedicated to sharing data streams from internet of things connected devices. Analog.io allows you to view your data through a web-browser wherever you are in the world. You control the data that is being plotted through an embedded device. Analog.io is community driven and embraces open source. Our first project is a data analysis frontend for phant.io hosted by data.sparkfun.com. We're also working on adding instructables to many popular development boards. Let's work together to build IoT devices that solve annoyances in our life, not add more. This is the first instructable for Analog.io where we wanted to walk through getting your data up to the cloud.
The intent of this instructable will be to use a popular WiFi connected device called the Electric Imp. We will then publish data to data.sparkfun.com and view the graphs of the data through Analog.io. This instructable will take you one hour if you are unfamiliar with the Electric Imp. Let's get data published to the cloud using Analog.io!
If you have trouble with this instructable, please refer to these two instructables below on getting started with the Electric Imp. They go into more detail on how to use the hardware.
Buy Your Hardware
First things first, let's make sure you buy your hardware to stream data to the cloud!
- An electric imp (currently available on Sparkfun, Adafruit, and Amazon) - $30
- An electric imp breakout board (Adafruit and Amazon) - $12.50
- 5V USB wall charger (Sparkfun or any 5V/330mA source) - $4 (This is optional as you can power from your PC)
- A mini usb cable (Sparkfun or one you have lying around) - $4
Parts total: $50.50
For this instructable the only tools you willl need are:
- A computer with internet access and a USB port.
- A smartphone with access to the BlinkUp App for the Electric Imp
Now that we have the hardware, let's get building.
Connect the Hardware
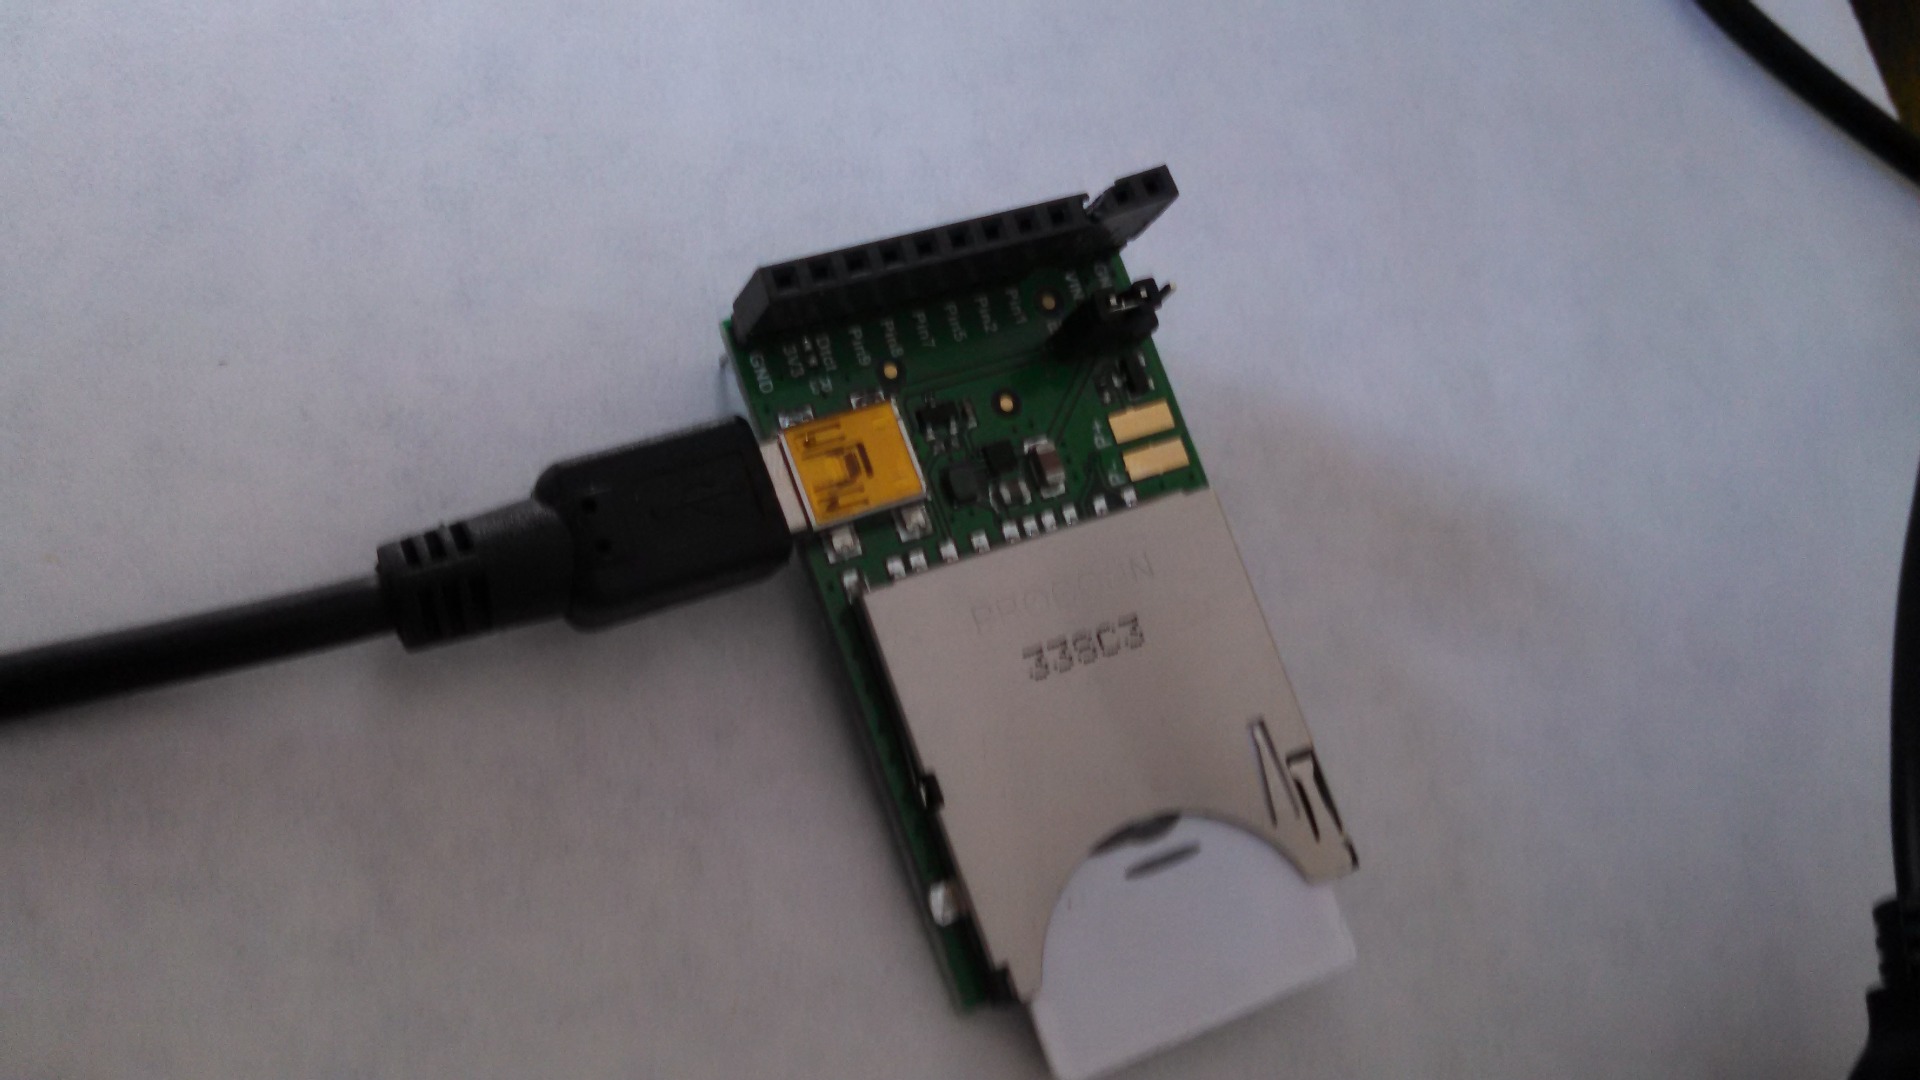
- Check the jumper
Make sure the jumper on your breakout board is set to connect the middle pin and the "USB" pin. Check the photos if you're not sure. If your imp doesn't power up when you click it into the socket, double-check the jumper.Plug in the imp.
- Plug the miniUSB cable in
Grab your miniUSB cable and plug it in from the breakout board to an open USB port on your computer.
- Plug in your Imp SD Card
Insert your imp into the socket on the breakout board, and it should start to blink red or orange (unless you've connected it before on this network, in which case it will just connect again). Congrats! You're powered up and ready to blink up and program.
- BlinkUp
If you haven't already registered as an electric imp developer, you'll need to do that now. Head to electricimp.com to sign up (it's free). You'll also need to download the electric imp app on your smart phone, which is also free - just search for "electric imp". Log into the app with the same account credentials you used to register at ide.electricimp.com. Once you're logged in, add your wireless network to the list of networks in the electric imp app. If you're on iOS, it will prompt you to allow it to use the network you're already on, and you'll just need to add the password yourself. To add a new network manually, select "other network" and type in your SSID and password. Check the "save this network" button!Once you've added the network, you're ready to configure the device with BlinkUp. Make sure the imp is powered up. If it's powered up but stopped blinking, reset the power by "push-pushing" the card (push once to disconnect, count to 3, push again to reconnect) so you can be sure it's listening for the BlinkUp signal. Hold the screen of your phone against the top edge of the imp and press "send BlinkUp" in the electric imp app. The screen on your phone will begin to blink quickly for about 10 to 20 seconds, then stop. The imp should blink green once ("got it!"), then start to blink red/orange ("found the network, connecting to the electric imp server"). After a second or so, the imp should be able to phone home to the electric imp server, and will start to blink green. You're connected. Excellent.Now it's time to program the imp! Head to the next step.
Create a Data.sparkfun Stream
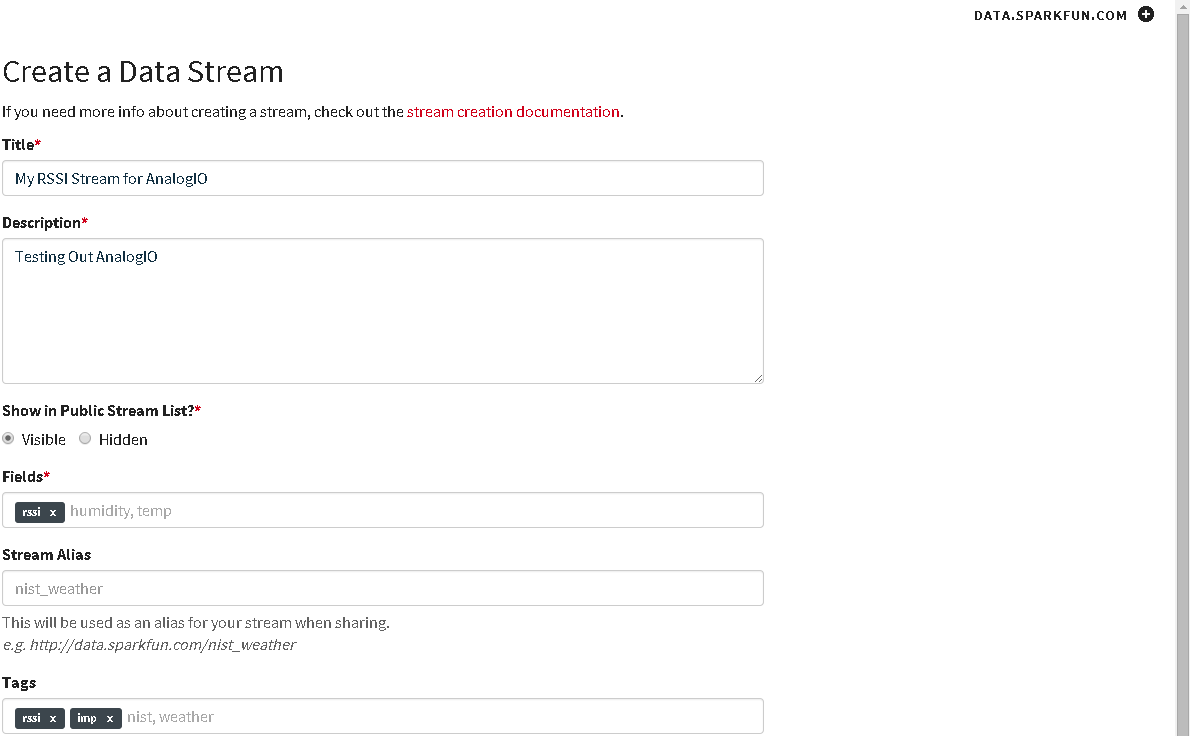
To connect your Electric Imp to Sparkfun, you'll first need to create a new Sparkfun Data Stream. Head to data.sparkfun.com and click on "Create" on the right side of the page.
You'll need to fill in a few details about your new stream: a title, a description, and some data fields. What you call the data fields is important: make sure you create a field called "rssi". The electric imp code is set up to post the rssi data with this field name, and if the fields don't match, your code will throw errors. You can create other fields if you want, too, but the only one you need (and the only one your code is already set up to use) is "rssi". Once you've filled in the details and clicked "save", you'll be taken to a page with the keys to your new stream. Save the public and private keys from this page.You'll need to add these keys to your electric imp agent code in order to tell your Electric Imp which Sparkfun Data Stream to post the data to.
Save the stream URL you configured, too - it'll be a quick and easy place to see your data arrive in the Sparkfun stream. Get ready to paste your keys on the next step!
For the next step, let's write code on the electric imp to push data to data.sparkfun.com.
Writing Code for the Electric Imp

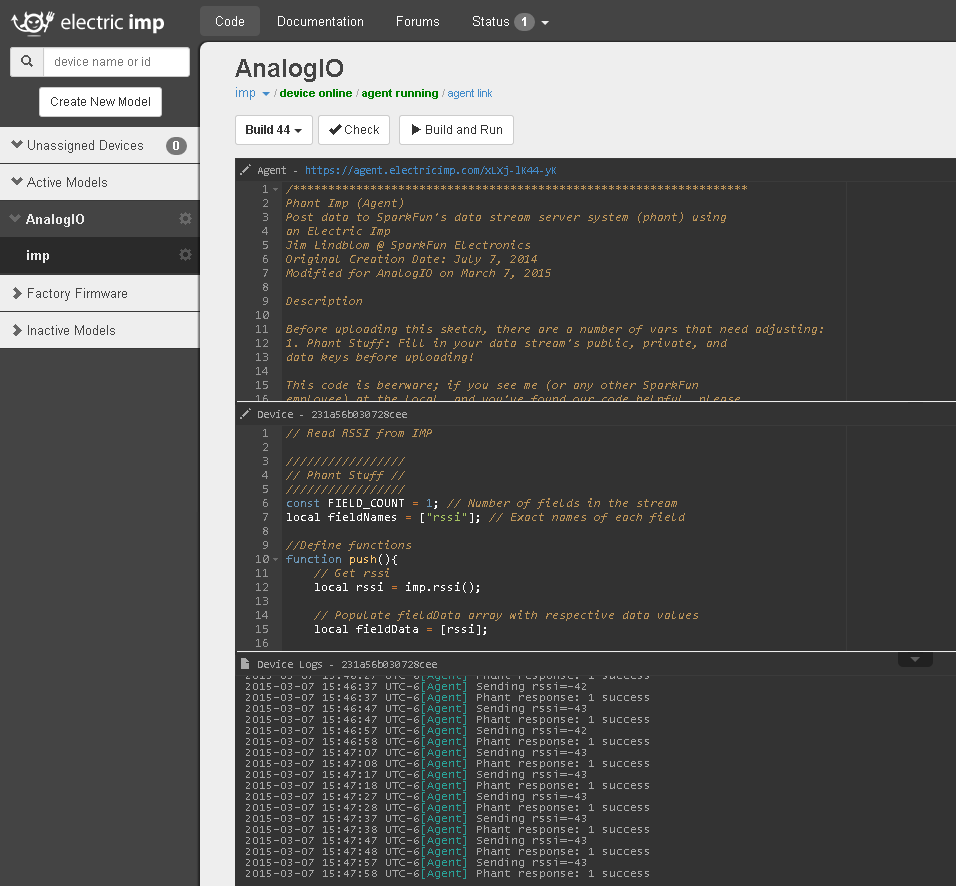
Point your browser to electricimp.com again and log in. This takes you back to the IDE window.
If you've connected this imp breakout board before, it will pop back up in the IDE under the model it was last a part of. If this is a brand-new breakout board, it will appear in the IDE's left-hand nav panel under "New Devices", at the top of the panel. You'll see a little number in this panel showing the number of new devices there waiting to be configured - probably just one! Click "New Devices" to see the list of new devices. Again, if you've never configured this device before, it won't have a name, so it will default to a long hex string (this device's Device ID). Click on the small gear next to the device name to open up the settings for the device. This is where you can name the device and assign it a model. Go ahead and name it whatever you like, and create a new model by typing a name for your new model in the model drop-down and pressing enter. When you hit "save changes", you'll be taken to the code window for this new model, and you'll see your new device is now listed under that model in the left-hand nav.
A model has two parts: an agent and a device. The device firmware is simply the code that runs on the imp itself. The agent is that device's partner - a tiny server that runs in the electric imp cloud. The device and agent can send information back and forth, and the agent can talk to the rest of the internet and has its own URL. You get to write code for both of them.
Or you can use the code that's already written for you. Head to github, and notice that there are two files here - one for the agent and one for the device. Accordingly, there are two windows for you in the IDE - one will say "agent" and the other "device". Copy the correct code into each window. If you hit "Build and Run" now, you'll see the device read the rssi value and then go to sleep, If everything is working correctly you should be able to go into your data.sparkfun.com stream via your public URL and see the RSSI values showing up! If you want to see my stream up and running, check it out here.
Creating Your Stream at Analog.io
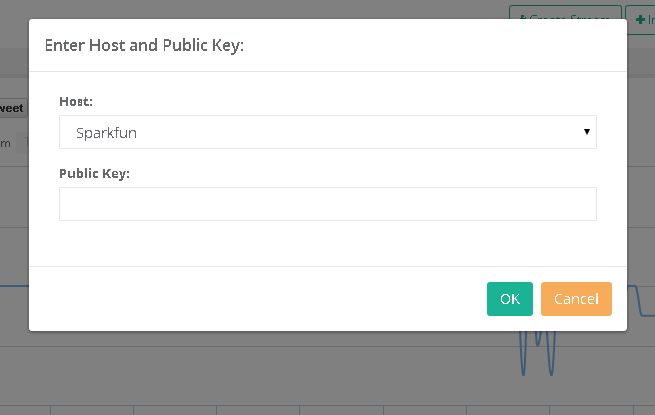
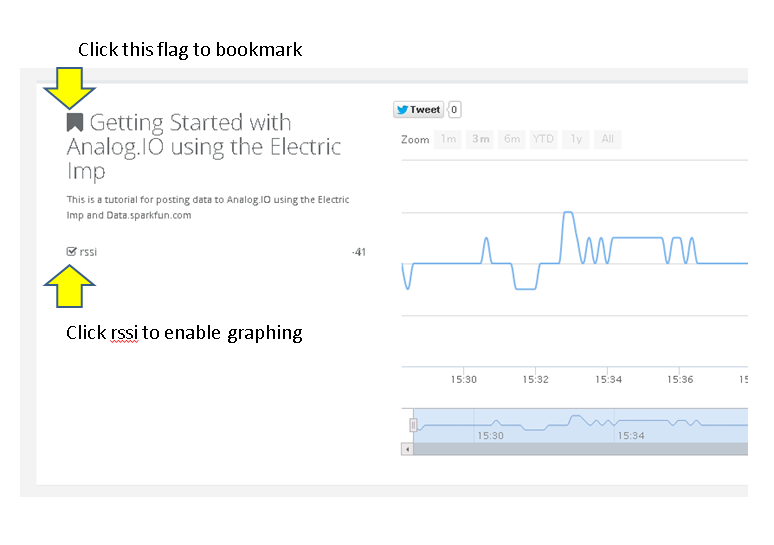
Navigate to Analog.io and sign up for an account. Once you are logged in do the following steps:
1.) On the upper right , click the "Import Stream" button
2.) Then select "Sparkfun" as your import and copy and paste your data.sparkfun.com public key. Hit "ok" and you are done! You now have an Analog.io front end for visualization.
3.) In the graphing area, just click the box next to "rssi" and it will start plotting the data.
4.) Finally, hit the bookmark by the name of your stream to easily save your stream for future visits!
If you want to see my stream running, you can see it anytime here!
We hope you start using the site and please provide feedback so we can make improvements! We look forward to seeing you at Analog.io.