Getting Started With STM32 Black Pill and STM Cube IDE to Blink Onboard LED Using HAL Programming
by ayannn001 in Circuits > Microcontrollers
46 Views, 0 Favorites, 0 Comments
Getting Started With STM32 Black Pill and STM Cube IDE to Blink Onboard LED Using HAL Programming

The STM32 black pill is a development board that is based on the STM32F103C8T6 microcontroller. It is a low-cost board that is great for learning and experimenting with STM32 microcontrollers. In this tutorial, we will use the STM32 cube IDE to create a simple project to blink the onboard LED using HAL programming
Supplies
Before we get started, you'll need to make sure you have the following:
- An STM32 black pill development board
- STM32 cube IDE installed on your computer
- A USB cable to connect the board to your computer
Open STM32 Cube IDE and Create a New Project
- Open STM32 cube IDE on your computer
- Go to File > New > STM32 Project
- Select your board from the list of devices. For the black pill, select STM32F103C8Tx
- Choose a project name and location, and click Finish
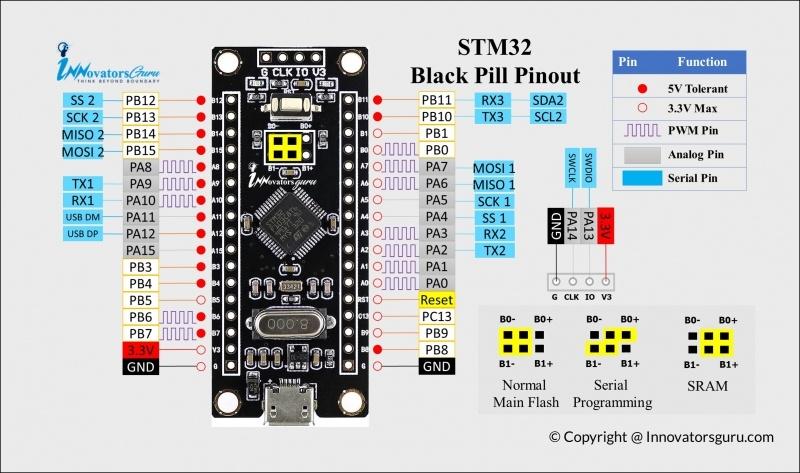
Select PA5 Pin As Output for the Onboard LED
In the Pinout & Configuration tab, select PA5 pin as output for the onboard LED.
Initialize the GPIO Pin and Blink the LED
- In the Project Manager tab, expand Src folder and double click on main.c to open the main source file.
- In the main function, add the following code to initialize the GPIO pin and blink the LED:
/* Configure GPIO pin */
__HAL_RCC_GPIOA_CLK_ENABLE(); // Enable GPIOA clock
GPIO_InitTypeDef GPIO_InitStruct = {0};
GPIO_InitStruct.Pin = GPIO_PIN_5; // LED pin is PA5
GPIO_InitStruct.Mode = GPIO_MODE_OUTPUT_PP; // Output push-pull
GPIO_InitStruct.Speed = GPIO_SPEED_FREQ_LOW; // Low speed
HAL_GPIO_Init(GPIOA, &GPIO_InitStruct); // Initialize GPIOA
/* Blink LED */
while (1) {
HAL_GPIO_TogglePin(GPIOA, GPIO_PIN_5); // Toggle LED
HAL_Delay(500); // Wait for 500ms
}
Build and Flash the Code
- Connect the black pill board to your computer using a USB cable.
- In the Project Manager tab, click on the hammer icon to build the project.
- Once the project is built, click on the play button to flash the code onto the board
Verify the LED Is Blinking As Expected
The onboard LED should now be blinking at 500ms intervals. Verify that the LED is blinking as expected.
Conclusion
In this tutorial, we learned how to use the STM32 cube IDE to create a simple project to blink the onboard LED of the STM32 black pill development board using HAL programming. This tutorial is perfect for beginners who want to get started with STM32 black pill and STM cube IDE. I hope you found this tutorial helpful! If you have any questions or feedback, please feel free to leave a comment.