Get Lost: a Collaborative Maze Game
by jatr3612 in Circuits > Arduino
1379 Views, 3 Favorites, 0 Comments
Get Lost: a Collaborative Maze Game


Collaborators: James Tran, Jackson Greer, Max Epperson
For our project, we wanted to create a collaborative experience between two players where the commands of one player lead the action of another player. In our interactive game, one player will complete tasks while being blind of the objective. The other player will give out commands to complete the task but have no control over the game. Both players must work together to accomplish as many tasks as possible in a short amount of time.
Interactive systems require at least two parties to cycle through listening, thinking, and communicating. For our game, users will be challenged to immerse themselves inside an interactive system to experience the process with another person and an object. This reflects how work is done outside of university classes. Whether it is research or industry, working collaboratively to complete an objective is crucial for solving problems and making new discoveries. Essentially, our game will be a platform that will let users experience the importance of collaboration.
We decided to make a game called "Get Lost." It is a collaborative maze game, where there is a physical user and a computer user. The physical user can only see the player and goal positions while the computer user can only see the maze walls. Both users have imperfect information and must work together to move their player icon to the goal area. We created this experience by creating both a large wall controller for the physical user, and a p5js game for the computer user. The wall controller will have 4 directional inputs (buttons) for the physical user to interact with as well as a NeoPixel grid to provide feedback.
First, we made a cardboard prototype of our game because it required quite a bit of playtesting. While the steps in this Instructable will outline how to create the final project, much of the game design, logic, and fabrication ideas came from our prototype. We started the prototype with a simple circuit made with 4 arcade buttons and an Arduino Nano Every. Once we confirmed that the buttons could send digital signals to the Arduino, we started to tease out the NeoPixel logic for our game. Although we did not have the NeoPixels at the time, the logic was greatly influenced by the fact that our “grid” was essentially a long number line rearranged to look like a grid. Therefore, the concept of X and Y coordinates was out of the picture, and every position could be represented with a single number. This changed what it meant to move in the 4 directions and what maze borders would be.
With the NeoPixel logic figured out, we designed 5 mazes each with a fixed wall configuration, player start position, and goal area position. A pair of players would complete the 5 mazes in succession, and if they finish before time runs out, the game would prompt the players to switch between the commander (computer user) and the driver (physical user).
In terms of code, most of the game logic occurs on the Arduino end, and the P5JS end mostly prints out the maze and stats like time and number of goals reached. Through serial communication, reaching the goal area using the arcade buttons would change the maze on P5JS. After creating the prototype, we proceeded with the steps below to create our final project.
Here is a link to a short video of our prototype.
Supplies
Required Software
- P5JS environment
- Arduino environment
- p5.serialcontrol
Required Hardware
See the attached PDF for quantity, links, and pricing
- NeoPixel Rolls
- Plywood Sheets
- Arcade buttons
- Arduino Nano Every
- Solid Core Wire Pack
- Breadboards
- 15ft USB to MicroUSB
- Solder Roll
- Hot glue Pack
- Command Strips
- Resistor Pack
- Heat Shrink Tubing
- Acrylic Sheet
- Duct Tape
- Printer Paper
- Wood Glue
- Linseed Oil
Downloads
Solder the NeoPixel Grid

From the NeoPixel roll, we cut 8 strips of NeoPixels with 8 NeoPixels each. We had to solder wires to them, so we cut 24 pieces of solid core wire that were 10 inches each. It helped to have three different colors of wire and cut eight pieces for each color. The colors gave us a way to keep track of ground, pin, and power so that the direction of the NeoPixels was consistent. Essentially, we soldered a very long strip of NeoPixels where the wires allowed us to bend the strip into a grid. After soldering each strip, we covered the connections with hot glue to strengthen them. With the NeoPixel strip bent into an 8 x 8 grid, we laser cut a sheet of acrylic with holes for each NeoPixel. Then, we secured the grid to the acrylic sheet with duct tape.
Construct the Physical Circuit

We built the circuit for our physical controller represented with the schematic above. For each of the arcade buttons, we had to solder on 2 pieces of wire that were 20 inches long. Then, we secured the connections with the heat shrink tubes. This Arduino Nano Every Diagram was super useful for figuring out which pins to use.
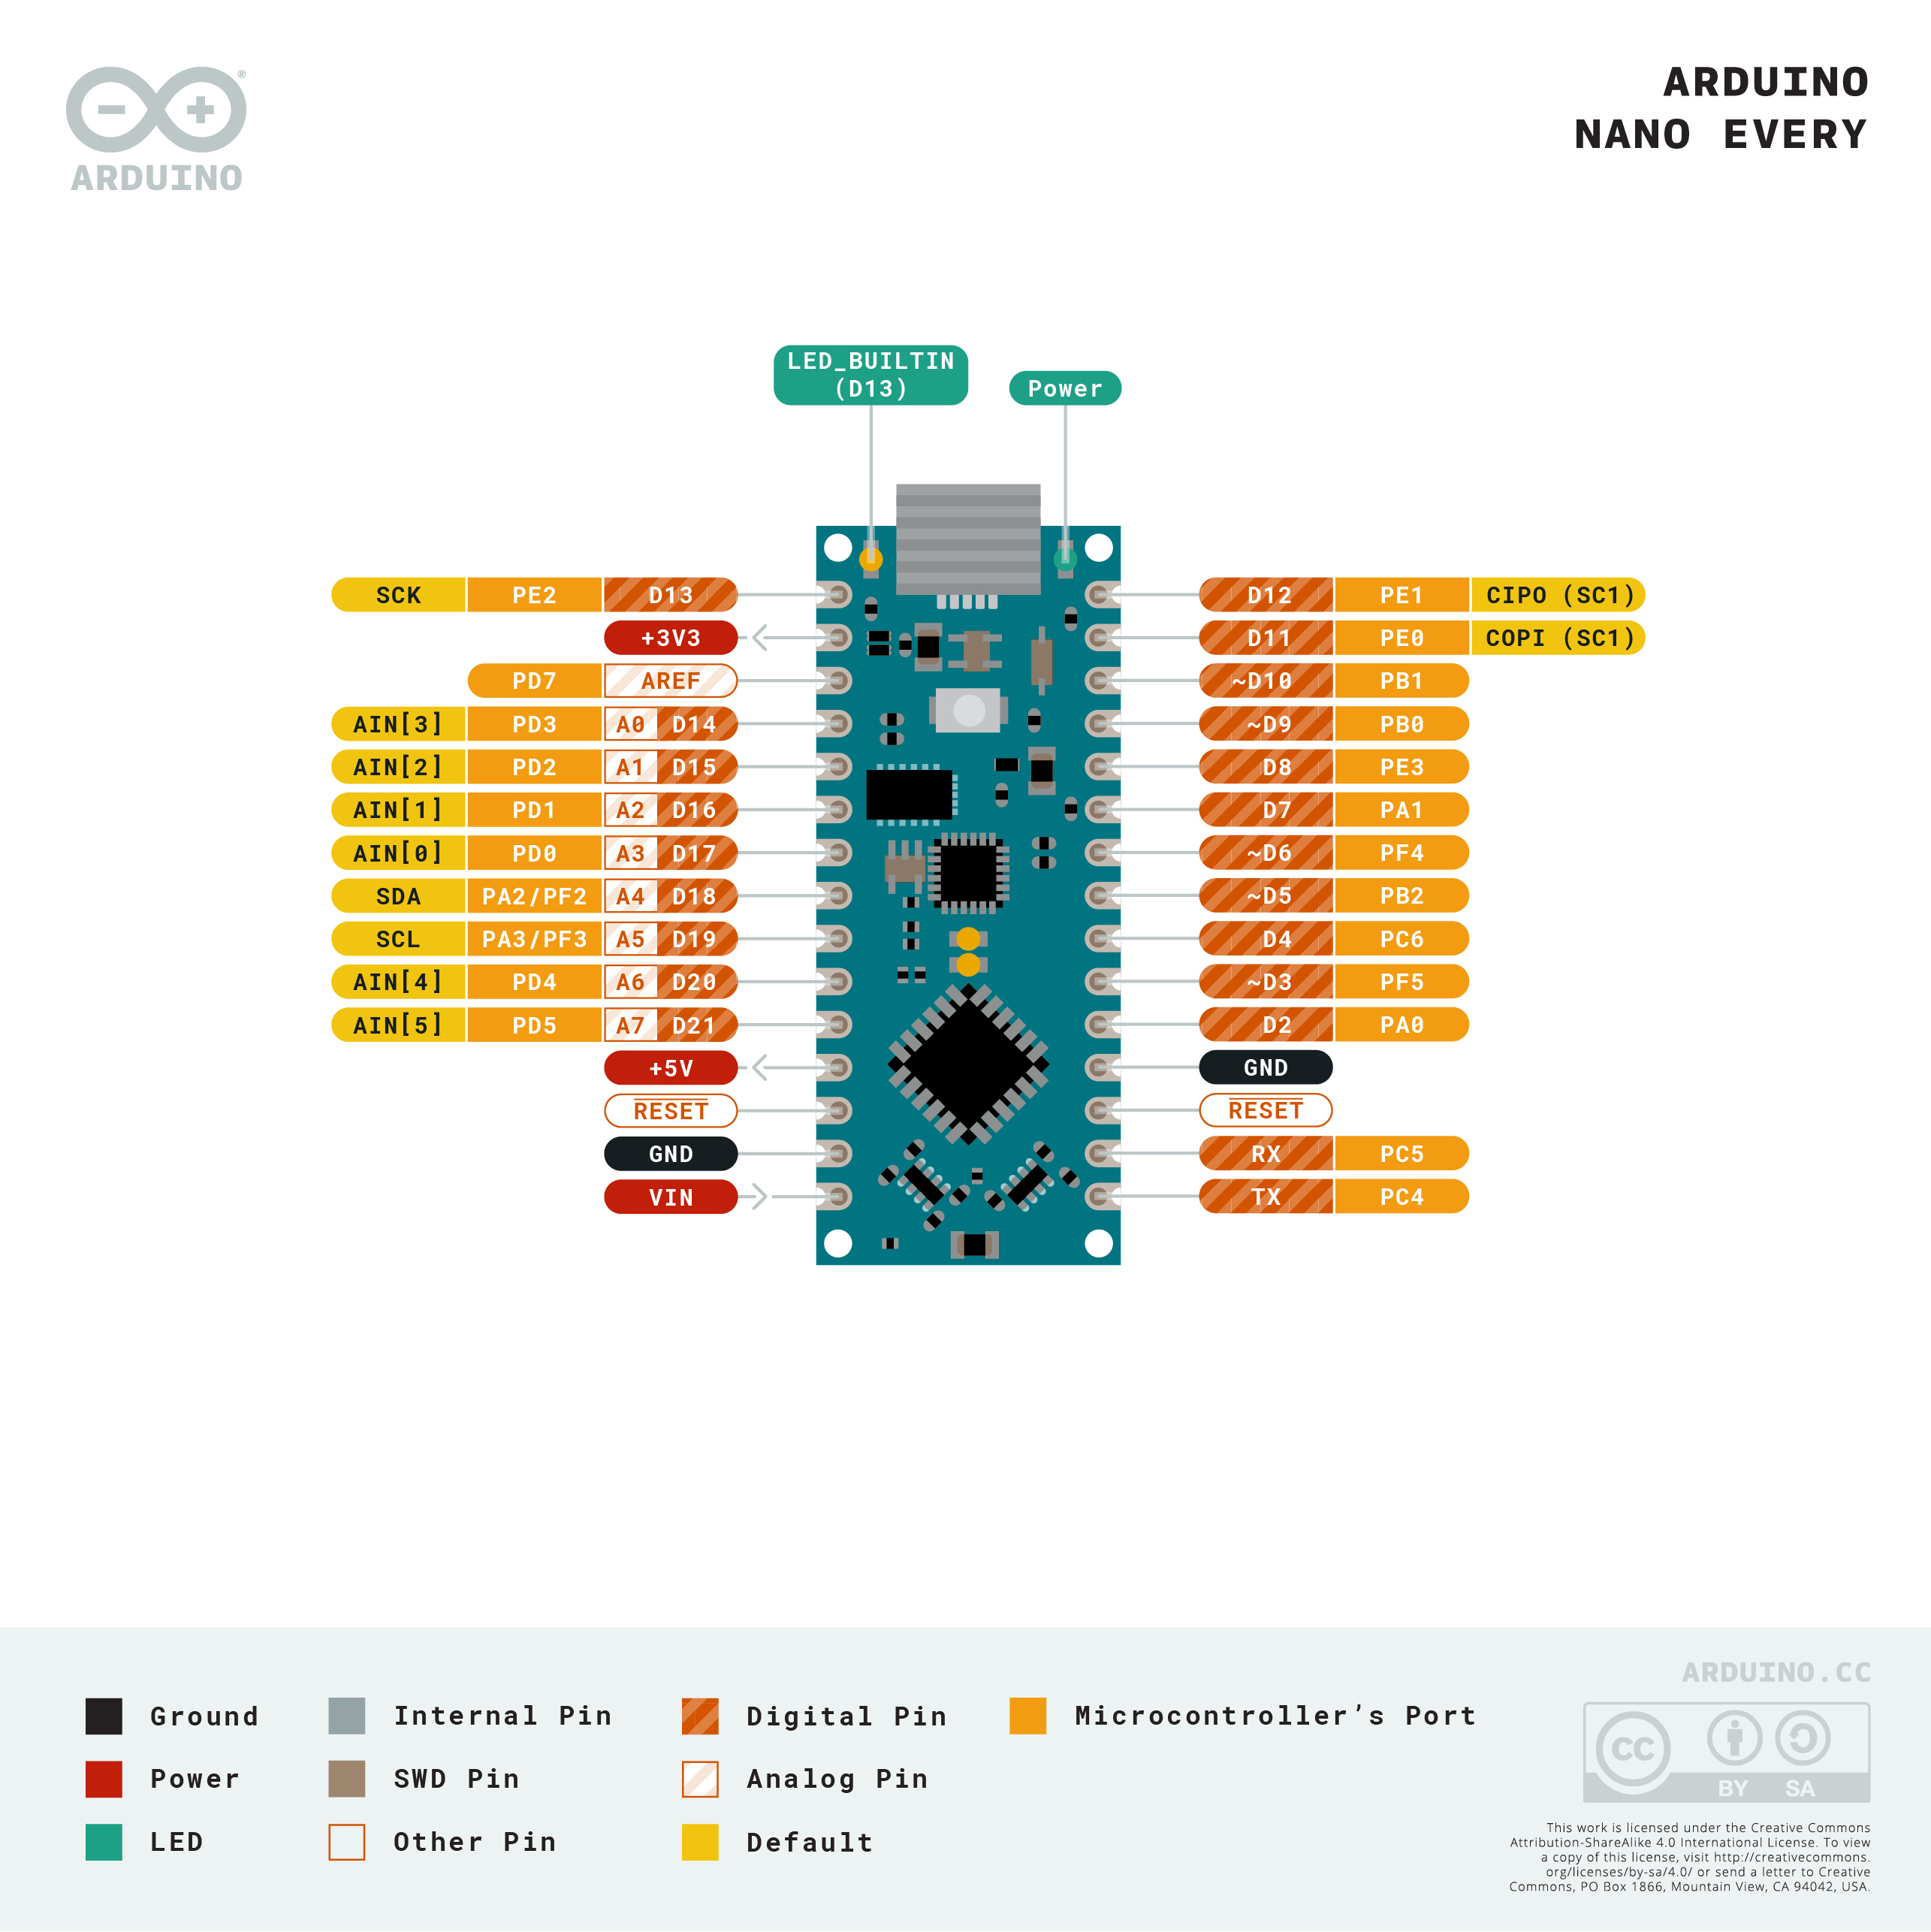
Here are images of a prepared arcade button, the zoomed in circuitry, and the zoomed out circuitry.
Apply the Code
.png)
For first time users, setting up the code will require P5JS, an Arduino environment, and p5.serialcontrol. The code for our game is located in this Github repository. The first thing you need to do is plug in your Arduino Nano Every into your computer and upload the Arduino code into it. Just copy and paste the code from Maze-Object.ino into your Arduino environment. After compiling and uploading, you should be ready for p5.serialcontrol. Next, you need to open up p5.serialcontrol, and open your serial port. The name of your port will be important for P5JS. To prevent Arduino from accessing the serial monitor, you can close out of your Arduino environment. While the main code for P5JS is in the Github repository, there are multiple files you will need to include. It is much easier to just open this P5JS sketch. You want to find the line, serial.open('[portName]'). Change the port name into the the name of yours, and then you can run the sketch. To put the game in full screen, just click the sketch window. Make sure to test that your circuit works before making the enclosure.
Build the Enclosure


For our physical controller, we used MakerCase to design a 22 x 16 x 4 inch enclosure with finger slots. Then, we downloaded an SVG of the box plans from that site and modified it in Adobe Illustrator. These modifications included holes and arrow etchings for the arcade buttons, an opening and etched labels for the NeoPixel Grid, and a hole for the 15 foot USB to MicroUSB cable. Once the enclosure plans were finished, we laser cut the pieces and assembled them into our physical controller using wood glue.
Put Everything Together


Just to give our controller a more finished look, we sanded the surface and applied linseed oil. We then installed the breadboard, arcade buttons, and NeoPixel grid. The breadboard had to be secured to the inside of the enclosure with command strips. In terms of the arcade buttons, they needed to be disassembled, screwed into each hole, and then reassembled. For the NeoPixel Grid, we secured it to line up with the labels using duct tape. We also laser cut, etched, and sanded an acrylic sheet to diffuse the light from the NeoPixels. The sheet had the same dimensions as the NeoPixel grid opening and sat on top of the grid. We taped paper in between the grid and the acrylic sheet for extra diffusion.
Play the Game

With both the physical controller and code done, the game was complete. If you followed along to build this game yourself, you can start the game by following the directions in Step 3. Once your game is set up, you will need a partner to fully experience "Get Lost." One of you will be the driver. Your job is to press the buttons on the physical controller to move your player icon to the goal. The player icon is a blue light on the NeoPixel grid; the goal is the green light. Your partner will be the commander. Their job is to view the maze and direct you through the maze walls. How many goals do you think your pair can reach?