Gadget Helmet

For years I have played Halo and other such games thinking "how cool would it be to have a helmet like Master Chiefs?" After having a look around Instructables, I have decided to make my own as no others are similar to what I had in mind.
Note: I have not actually built this product and I have very little skill in electronics.
Note: I have not actually built this product and I have very little skill in electronics.
What You Need
A full-face helmet
A cheap walkie-talkie set or, if they have a headset, you can use a more expensive two-way radio
At least two small LED torches
One or two pocket fans or computer vent fans
A gas mask
Glue
A knife of some description
Drill
Other miscellaneous items
Preparation

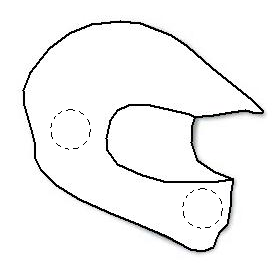
Get the helmet and remove any removable parts (padding, etc.) that can be put back in at the end. Put the helmet on and slide your finger to where one of your ears is. Hold your fingers there and take the helmet off and mark where your fingers are with a permanent marker. Put the helmet on again, this time marking where your mouth is.
Comm. Unit


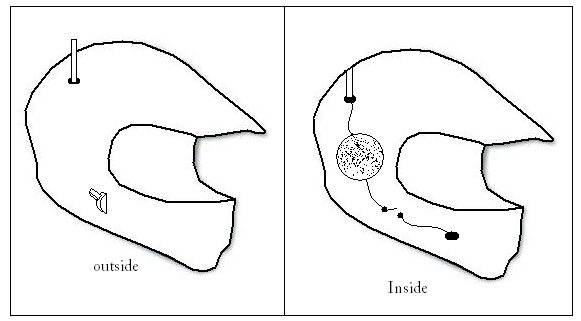
I’m not sure how the innards of a walkie-talkie are set out so you may have to change this slightly. Take apart one of the walkie-talkies and draw a circle around the ear-mark that is the size of the speaker. Cut or drill the circle out deep enough so that the speaker fits in there without sticking out too much but not so deep that it goes through the helmet. Drill another hole nearby, this time going through the helmet. Make the hole fairly small, just large enough for the cables attached to the switch/button. Cut another hole near the side of the mouth to cradle the microphone. Cut channels between these holes to hold the cables and hot glue everything into place. Glue the switch/button on the outside of the helmet so that you can press it with your hand. If the walkie-talkie has an antenna, then drill a hole going out the top of the helmet and push that through there.
If you are using a headset then you could either take it apart and lay it out similar to the walkie-talkie or you can simply glue it to the inside of the helmet. I suppose if you want you could also just put it on before putting on the helmet. The batteries can be attached to the back of the helmet.
If you are using a headset then you could either take it apart and lay it out similar to the walkie-talkie or you can simply glue it to the inside of the helmet. I suppose if you want you could also just put it on before putting on the helmet. The batteries can be attached to the back of the helmet.
Ventilation Mask


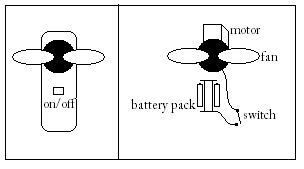
Pocket Fan: Take apart the fan so that you are left with the battery pack, the fan and the motor with all cables still attached. Measure the diameter of the fan and cut a hole near the mouth of the helmet that is similar in size to the fan. Connect the batteries to an accessible place and hide all of the wires in holes. Make a frame out of wire that will hold the fan in the centre of the hole and connect everything together so that when the fan is turned on then you breathe cool air.
Computer Fan: I do not know how to connect the fan to a power supply, so you will need to figure that out. Cut a hole at the mouth of the helmet that will house the fan. Connect the power supply to the back of the helmet and run the cables through the inside, drilling a hole to get them to the back.
For both the pocket and computer fans, glue some fine chicken wire or other grille over the whole so that you do not get your tongue caught in the fan. Cover all of the outer workings of the fans by gluing the gas/ventilation mask over the mouth. I have not included an image of the computer fan as I assume that the circuit would be similar.
Light


There are two options for this and both are reasonably simple. Drill a whole the circumference of the torch, making sure that it stays inside the helmet and does not breach the inner or outer wall, other than the entrance hole. Slide the torch into the hole and slide it back out whenever you want to turn it on or off. Alternatively you could take the torch apart or make your own torch using batteries, wires and a light source. Drill a similar hole as above but also drill other holes for cables to go to the switch and battery pack which can be attached to the side and back of the helmet.
Extras
At this stage in the creation process, you can add any other features and gadgets that you can or that you have access to. These may include a camera, a screen on the inside of the helmet, a rear view mirror or anything that you would like your helmet to have.
Cosmetics

If you have access to carbon fibre then you can shape or smooth the helmet with it. Paint the helmet any colour you like although I suggest that you search Instructables for information on how to paint items such as this. If you would like to paint it multiple colours then make the outline out of tape and take the tape off after painting. This will create a straight line rather than a crappy spray line.
Hints and Tips

Step 7: Hints and tips-When painting, try to avoid painting the ventilation area as I assume it would lower air flow. You may need to remove the mask or cover it and other electronics while painting.
-Keep in mind that this helmet will not be worthy to use for an actual motorbike or other risky situations.
-You may need to move the features around so that no cables or parts are in the same place.
-A small projector could be put onto the visor for a HUD
-I believe that all of the electronics can be connected to one battery pack situated on the back of the helmet.
-magnifying lenses could be added to the visor
-Ventilation and lights can be cut almost anywhere on the helmet.
-All switches can be put on longer cables and be placed on a wrist band or similar product.
-Comment on this Instructable if you see any problems with the design or any features to add.
-Please send me pictures if you actually make this product, or anything of similar design.