Fume Extractor


.gif)
.gif)
Greetings.
So here's something COOL, a DIY Fume Extractor made completely from scratch.
The Goal here was to make a simple to make Fume Extractor for daily use.
Its body is made up of 3D Printed parts and the motor controller is based on Attiny13 MCU that uses a Mosfet IC to control the Motor Via PWM Signal that we control with a button.
It has three modes for working, One first button press, Motor Runs at 100% Speed.
The second Button press reduces the motor Speed by up to 50%, Third Press turns Motor OFF.
It is powered by a single 3.7V 2200mAh Lithium Cell and uses a Micro Drone Motor as Exhaust Fan and its backup is more than 4 hours in 100% Mode and 8 Hours in 50% Mode.
This Instructables is about the whole built Process of this project so let's get started.
Supplies
Here are things that were used in this built-
- Custom PCB
- Attiny13A
- TP4056
- AO4406 Mosfet IC
- 10K Resistor
- 0805 LEDs RED and BLUE
- 1K Resistor
- Type C Port
- 3D Printed Body
- Micro Motor and its FAN
- 3.7V 2200mAh Lithium Cell
- ON-OFF Button
- Button
CONCEPT


This Fume Extractor project is based on my previous Handheld Fan Concept.
I noticed while using the Handheld fan that it can also be used as an exhaust for intaking smoke fumes from one side and collecting the carbon or suspended particles on a filter placed on another side.
I Prepared a basic Box-like model in Fusion360 that contains the same Micro DC Motor as the handheld fan project and houses a custom circuit board for controlling the state of the motor with a Mosfet and Microcontroller.
On the Backside, there's an additional part that will hold the filter material and act like a filtering unit for the exhaust.
SCHEMATIC
.jpg)
Here's the schematic that I prepared and it consist of three parts that include a TP4056 IC Setup for charging Lithium cell properly, an Attiny13A MCU Setup that is the brain of this project, and the A04406 IC Setup that is configured in mosfet as a switch setup for controlling the load which is in our case the DC Motor.
This Schematic is the same as my previous DIY Handheld fan project.
TP4056 contains two indicator LEDs, RED and BLUE, red is for low battery and Blue is for full charging.
I also added a Type C Port for charging input.
Attiny13A is connected with the Gate of A04406 IC through a 10K Resistor, we control motor speed by providing the gate a PWM Signal through the Attiny MCU.
As for Flashing the Attiny, I've added a CON6 Header Pin with ISP Pins of Attiny so I could connect a programmer with it to burn the bootloader and upload code in it.
PCB DESIGN


I finalize the Schematic and then converted it into a Board file, then I started working on the PCB File.
As for the shape of the PCB, I used measurements from fusion360 and prepared the board outline first, then I placed all the components in their place and connected them all by tracks and shapes from both layers.
PCBWAY
.gif)
.gif)

I finished the PCB Design and exported the Gerber data which I uploaded on PCBWAY's Quote page for placing an order.
I choose BLUE Soldermask for this project with white silkscreen and received the package next week.
As for the quality of the PCBs, I was Blown away by how each board was top-notch and great with no errors whatsoever.
PCB ASSEMBLY
the PCB Assembly Process will have the following steps.
- Solder Paste Dispensing
- Pick & Place Process
- Hotplate Reflow
- THT Components
SOLDER PASTE DISPENSING
.gif)
The first step is to apply solder paste to each component pad.
We use Regular Sn-Pb solder paste that has a melting temp of 140 to 270 °C.
PICK AND PLACE
.gif)
We then used an ESD Tweeaser to carefully pick and place each SMD component in their assigned place one by one which took like 30 Seconds tops but the result was a perfect PCB with all the components placed in their location.
HOTPLATE REFLOW
.gif)
.gif)
After the "PICK & Place Process", we carefully lifted the whole circuit board and place it on my DIY SMT Hotplate which is also homemade just like this project.
After a few mins when the hotplate reaches the Solderpaste melting TEMP, all the components will get soldered by this Hot Reflow process.
THT COMPONENTS
.gif)
.gif)
.gif)
In the end, we add THT Components to the PCB. (Switch, Button, JST Connector, and the Capacitor)
PROGRAMMING THE ATTINY13
.gif)
.gif)
Attiny13A is an AVR MCU that can be flashed via an ISP Programmer like USBASP, or we can make a simple ISP Programmer by using an Arduino Uno or Nano board.
- We go to Example sketches> Arduino as ISP and upload it into the Arduino Nano board.
- Next, we add a 1uf Capacitor between RST and GND Pin, this will stop Arduino to reset during the flashing process (Add capacitor after uploading the Arduino as ISP Sketch)
- Now go to this link and download the Attiny13 Core files- https://github.com/MCUdude/MicroCore
- Next, we wire Attiny13A's SPI Pins with Arduino Pins according to the attached wiring diagram.
- we then go to tools and change the MCU and choose Attiny13.
- We select the right port and change the programmer to "Arduino as ISP"
- Next, we click on Burn Bootloader, if the wiring is correct, you will see a "Done burning Bootloader" message.
- At Last, we go to the sketch menu and select "upload using programmer" and the board will get flashed with the sketch which was opened at that moment.
For flashing the MCU, I used my existing AVR Flasher which is an Arduino Nano that runs Arduino as ISP Sketch.
To connect the programmer with Attiny's SPI Pins, I used a makeshift Header pin socket that connects the SPI Pins of Attiny with Arduino Nano.
Here's the main code I used-
const int switchPin = 4;
const int FANPin = 0;
int FANMode = 1;

void setup()
{
    pinMode(FANPin, OUTPUT);
    pinMode(switchPin, INPUT_PULLUP);
    digitalWrite(FANPin, LOW);

}
void loop()
{
    if (digitalRead(switchPin) ==LOW)
    {
        FANMode = FANMode + 1;
        if (FANMode == 4)
        {
            FANMode = 1;
        }
    }
    if (FANMode == 1)
    {
        digitalWrite(FANPin, LOW);
        delay(200);
    }
    else if (FANMode == 2)
    {
        digitalWrite(FANPin, HIGH);
        delay(200);
    }
    else if (FANMode == 3)
    {
        analogWrite(FANPin, 50);
        delay(200);
    }
    //delay(200); // see text
}
TESTING THE MAIN BOARD
.gif)
.gif)
For testing the main board, we first solder the positive and negative to the main board's motor ports.
Then we connect the lithium cell to the JST connector on the board.
We first switch ON the board and then use the Button to change the state of the motor.
3D MODEL AND 3D PRINTING PROCESS
.gif)

As for the 3D Printed parts, We need to print the following parts for the built-
- Front Body
- Lid
- Motor Mount
- Net
- Net Lid
- Stand
We print them with two colors of PLA, white and Red.
A 1mm nozzle was used to print each part with a layer height of 0.32mm and an infill of 40%.
MAIN ASSEMBLY
.gif)
.gif)
.gif)
.gif)
.gif)
.gif)
.gif)
.gif)
.gif)
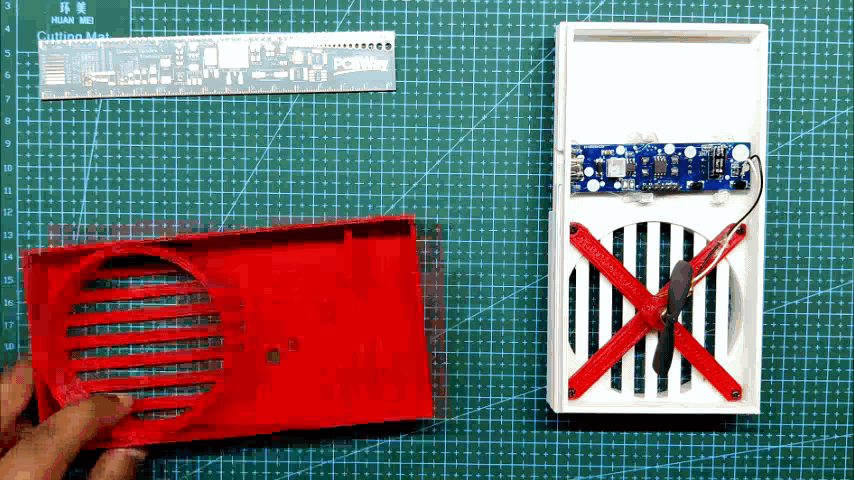
- We start the main assembly by first adding the motor into the motor mount. motor mount screws also hold the net in its place.
- We then place the motor mount in the Lid part by using M2 Screws.
- Next, we add the circuit in its place, for securing it, we use hot glue.
- We then add the battery to the Front Body by using hot glue and connect the battery's harness with the circuit through the JST connector.
- We close the Front body with a lid and secure them using four M2 Screws.
- We now add a stand on both sides of the fume extractor.
- We place some cotton in the Net and place the Net lid on it by using some screws.
- The fume Extractor now is completed.
RESULT
.gif)
.gif)

Here's the result of this built, Fume extractor is sucking up all the smoke around it and the project is now completed.
Smoke is being absorbed by the cotton layer, after a few days of use, we need to change the cotton layer as it will turn yellowish because of the smoke.
FURTHER IMPROVEMENTS
This project does work but the fan needs to be swapped with a proper 12V PC Fan.
If we change the Fan, we also need to make changes in the main board as right now it can drive 3-5V things. A buck converter needs to be implemented in the circuit to provide Attiny13 5V and 12V will be fed to the mosfet for controlling the DC Motor.
This is for Version 2 which will be made shortly.
This is it for today folks, thanks PCBWAY for supporting this project.
Leave a comment if you need any help regarding this project.
Will be back with Version 2 Soon.
PEACE