From Blink to Blynk, an IoT Journey on the Wings of NodeMCU ESP-12E
by mjrovai in Circuits > Wireless
31772 Views, 215 Favorites, 0 Comments
From Blink to Blynk, an IoT Journey on the Wings of NodeMCU ESP-12E
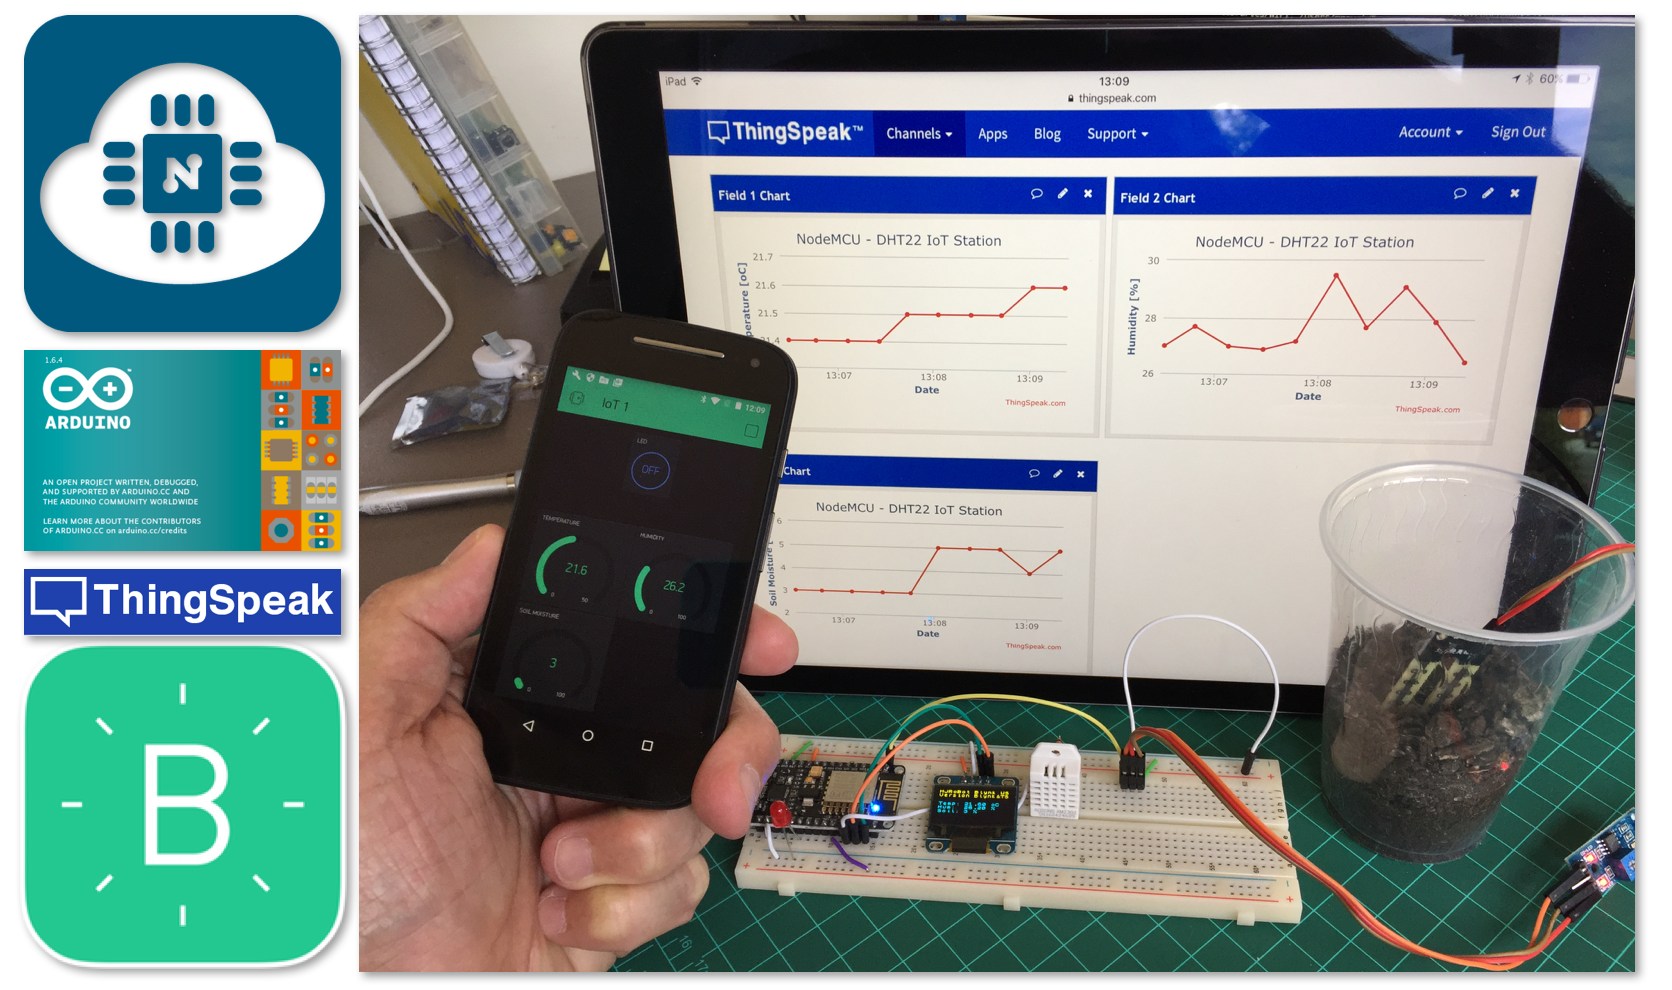
This tutorial is one of "IoT BUILDERS" contest winners, sponsored by IBM. Thanks a lot for all votes! ;-)
With this tutorial, we will learn how to handle with this fantastic little device, the NodeMCU ESP-12E Development Kit V. 1.0.
The overall idea will be:
- Blinking a single LED
- Connect the ESP to an OLED display
- Capturing local data from digital and analog sensors
- Upload data to an IoT service as Thinkspeak
- Display and control "things", using smartphone app's as BLYNK
Bill of Material
The NodeMCU
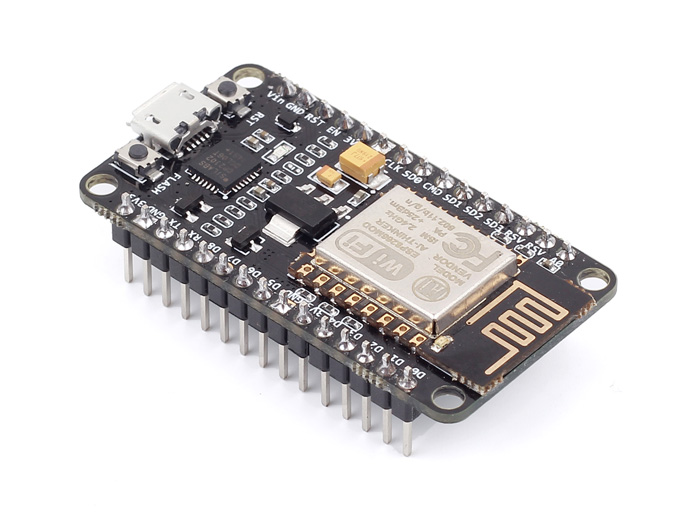
The NodeMCU ESP-12E is the integrated version of the popular ESP8266, a Serial to Wi-Fi System On a Chip (SoC) that appeared for the first time in 2013, been released on following year. The ESP8266 was developed by the Shangai-based company Espressif Systems, an IC manufacturer focused on the development of RF chips, particularly Wi-Fi.
There are several modules in the market that use the ESP8266 chip, they are named ESP-NN, where NN is a number 01, 02, ..... 12, sometimes followed by a letter. These modules typically carry the ESP8266 SoC, flash memory, a crystal, and in most cases, an onboard antenna. In the link you can find the full list of ESP8266 based devices found in the market: ESP8266 Module Family.
The 2 more important modules are without doubt, the ESP-01 and the ESP-12E.
The ESP-01 have been used extensively in IoT projects were size and cost matters, but not number of GPIOs (there are only 2 digital type available). I have explored this module on several basic tutorials:
https://www.instructables.com/id/The-ESP8266-Part-1...
https://www.instructables.com/id/The-ESP8266-Part-2...
https://www.instructables.com/id/The-ESP8266-Part-3...
Also the ArduFarmBot Project, a fully automated Arduino based tomato home farm, was developed using the ESP-01.
The ESP-12E Development Board (NodeMCU DevKit 1.0)
To further increase the usability of the ESP-12E module for rapid prototyping, power regulation and USB connectivity were added. The ESP12E includes:
- Silicon Labs CP2102 USB to Serial UART adapter IC,
- NCP1117 3.3VDC Voltage Regulator,
- Micro-USB connector,
- Additional GND, Vin, 3.3VDC signals for easy access during development.
In short, this development board for the ESP8266 SoC inside the ESP-12E module is out-of-the-box ready for you to connect it to your computer, install USB drivers, and start writing programs that connect to your Wi-Fi network!
Technical Specifications
- Support STA/AP/STA+AP 3 working modes;
- Built-in TCP/IP protocol stack, support multiple-channel TCP Client connection (max 5);
- 0~D8, SD1~SD3: used for GPIO, PWM (D1-D8), IIC, ect; the driven ability can be arrived at 15mA;
- AD0: one-way 10 bits ADC;
- Power input: 4.5V~9V(10VMAX), support USB powered and USB debug;
- Working current: ≈70mA(200mA MAX, continue), standby<200uA;
- Transmission data rate: 110-460800bps;
- Support UART/GPIO data communication interface;
- Support update firmware remotely (OTA);
- Support Smart Link;
- Working temperature:-40℃~+125℃;
- Driven mode: double large-power H bridge driven
- Weight: 7g.
A great site were I learned a lot about the ESP 8266 family is: What Is The ESP8266 And Why Is It So Popular?
What a pity, that seems that the the ACROBOTIC Industries site seems to stop to been updated.
Installing the NodeMCU Board at Arduino IDE
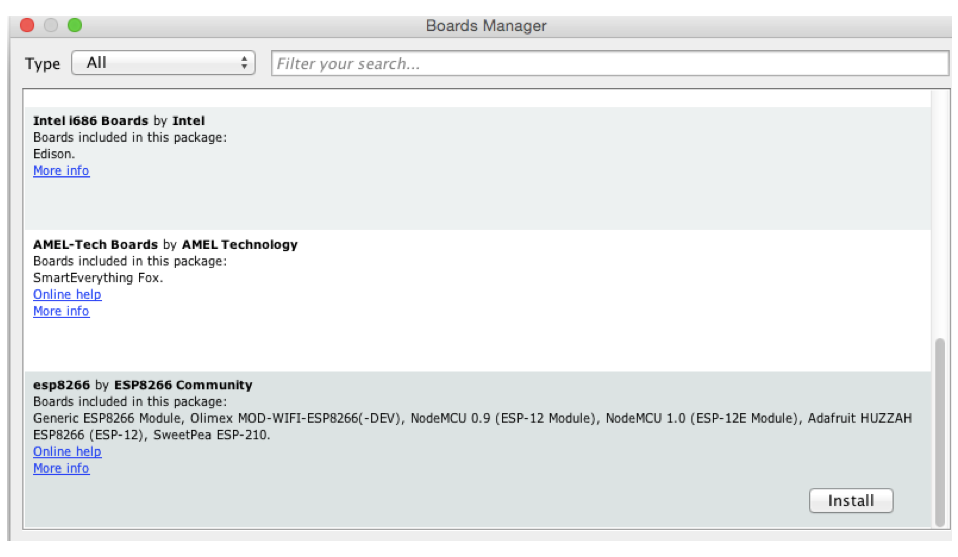
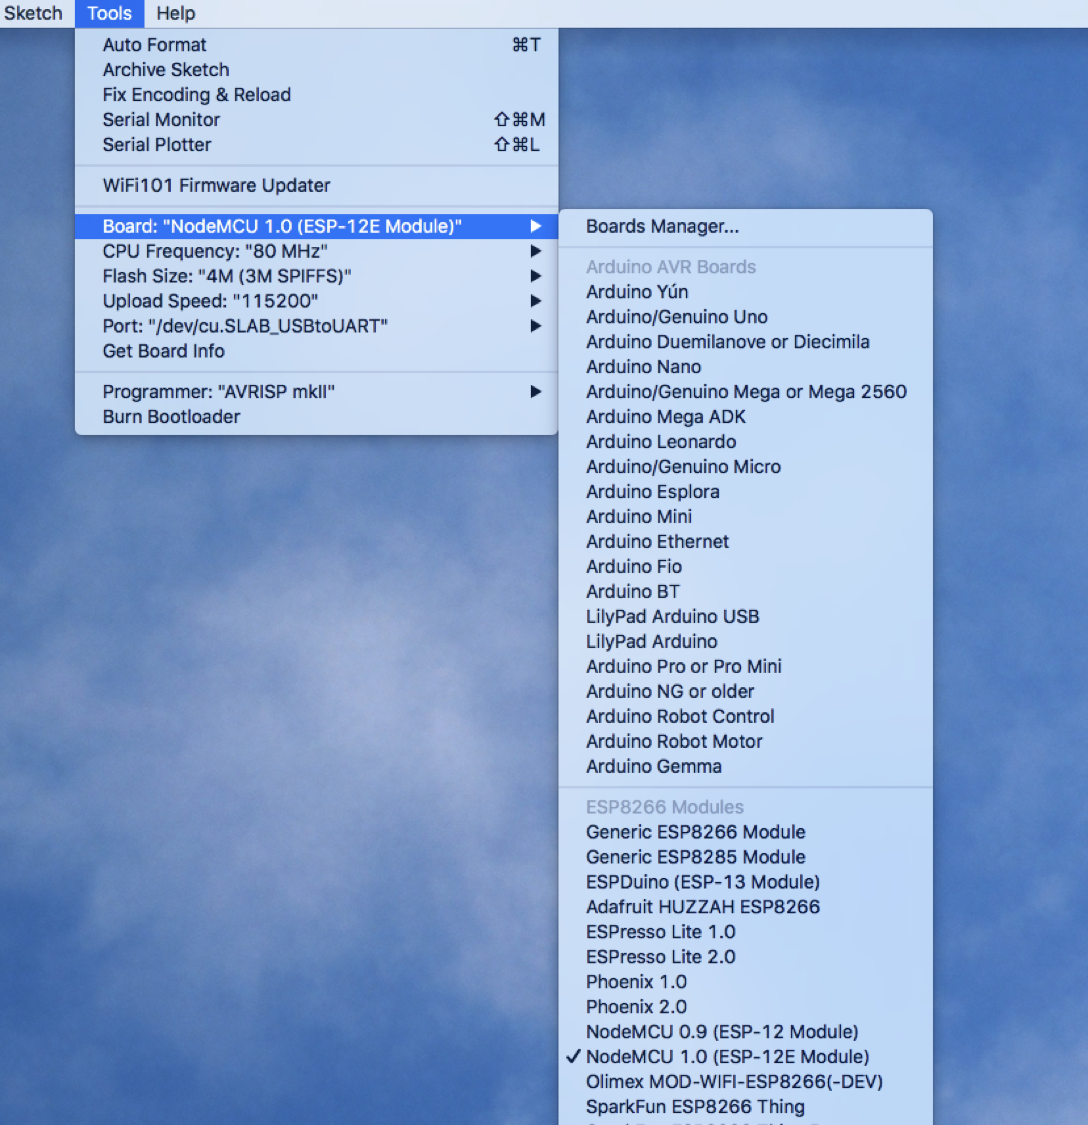
If you want to program and use the NodeMCU (and the ESP-01) as a regular Arduino, the good news is that it is possible to write custom firmware and load it on the chip ("Flash it"). It is important to remember that any new "custom firmware" will replace anything previously stored in the chip's flash memory, including the original firmware loaded at factory where the AT commands were common used. Although we can use the manufacturer's SDK to develop our custom firmware, it is much easier to use the good and old Arduino IDE.
Let's start:
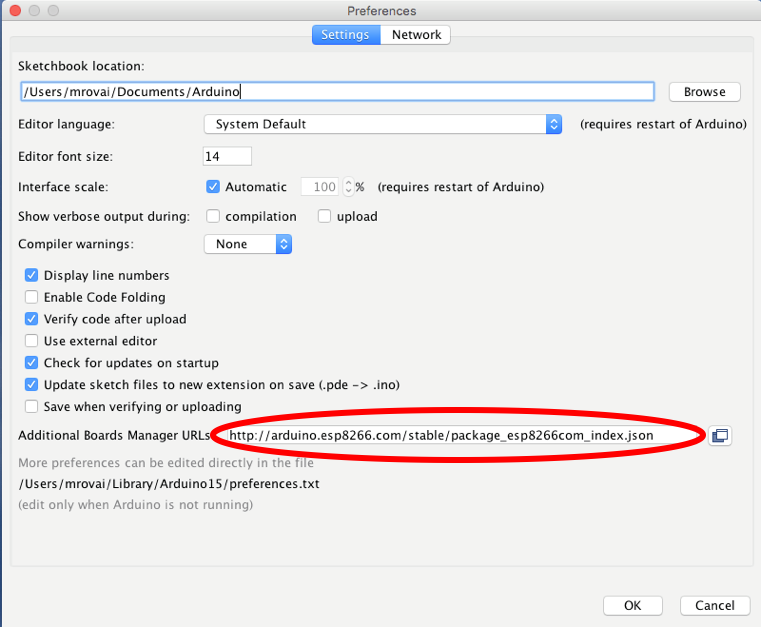
- In the Arduino IDE open the PREFERENCES window and enter the URL (marked in red in the above photo) into the Additional Boards Manager URLs field, and select OK.
-
http://arduino.esp8266.com/stable/package_esp8266com_index.json
-
- Select the MENU option Tools → Board → Boards Manager...and scroll down and to locate the option esp8266 by ESP8266 Community which should be the last item on the list, and click INSTALL
- Installing The USB Drivers: The USB to Serial UART module included on the board is the Silicon Labs' CP2012, for which we usually need to install the readily available Virtual COM Port (VCP) drivers. In the case of my MAC, the device file created to communicate with the CP2102 has the name /dev/cu.SLAB_USBtoUART. You can find the appropriate drive for your computer at following link: CP210x USB to UART Bridge VCP Drivers
- After restarting the Arduino IDE we can now select the board we're using from the menu option Tools → Board → NodeMCU 1.0 (ESP-12E Module). Then, we specify the correct CPU Frequency (Tools → CPU Frequency: "" → 80MHz) and Upload Speed (Tools → Upload Speed: "" → 115200). Finally, the last step is to select the correct option for the Port (Tools → Port → /dev/cu.SLAB_USBtoUART).
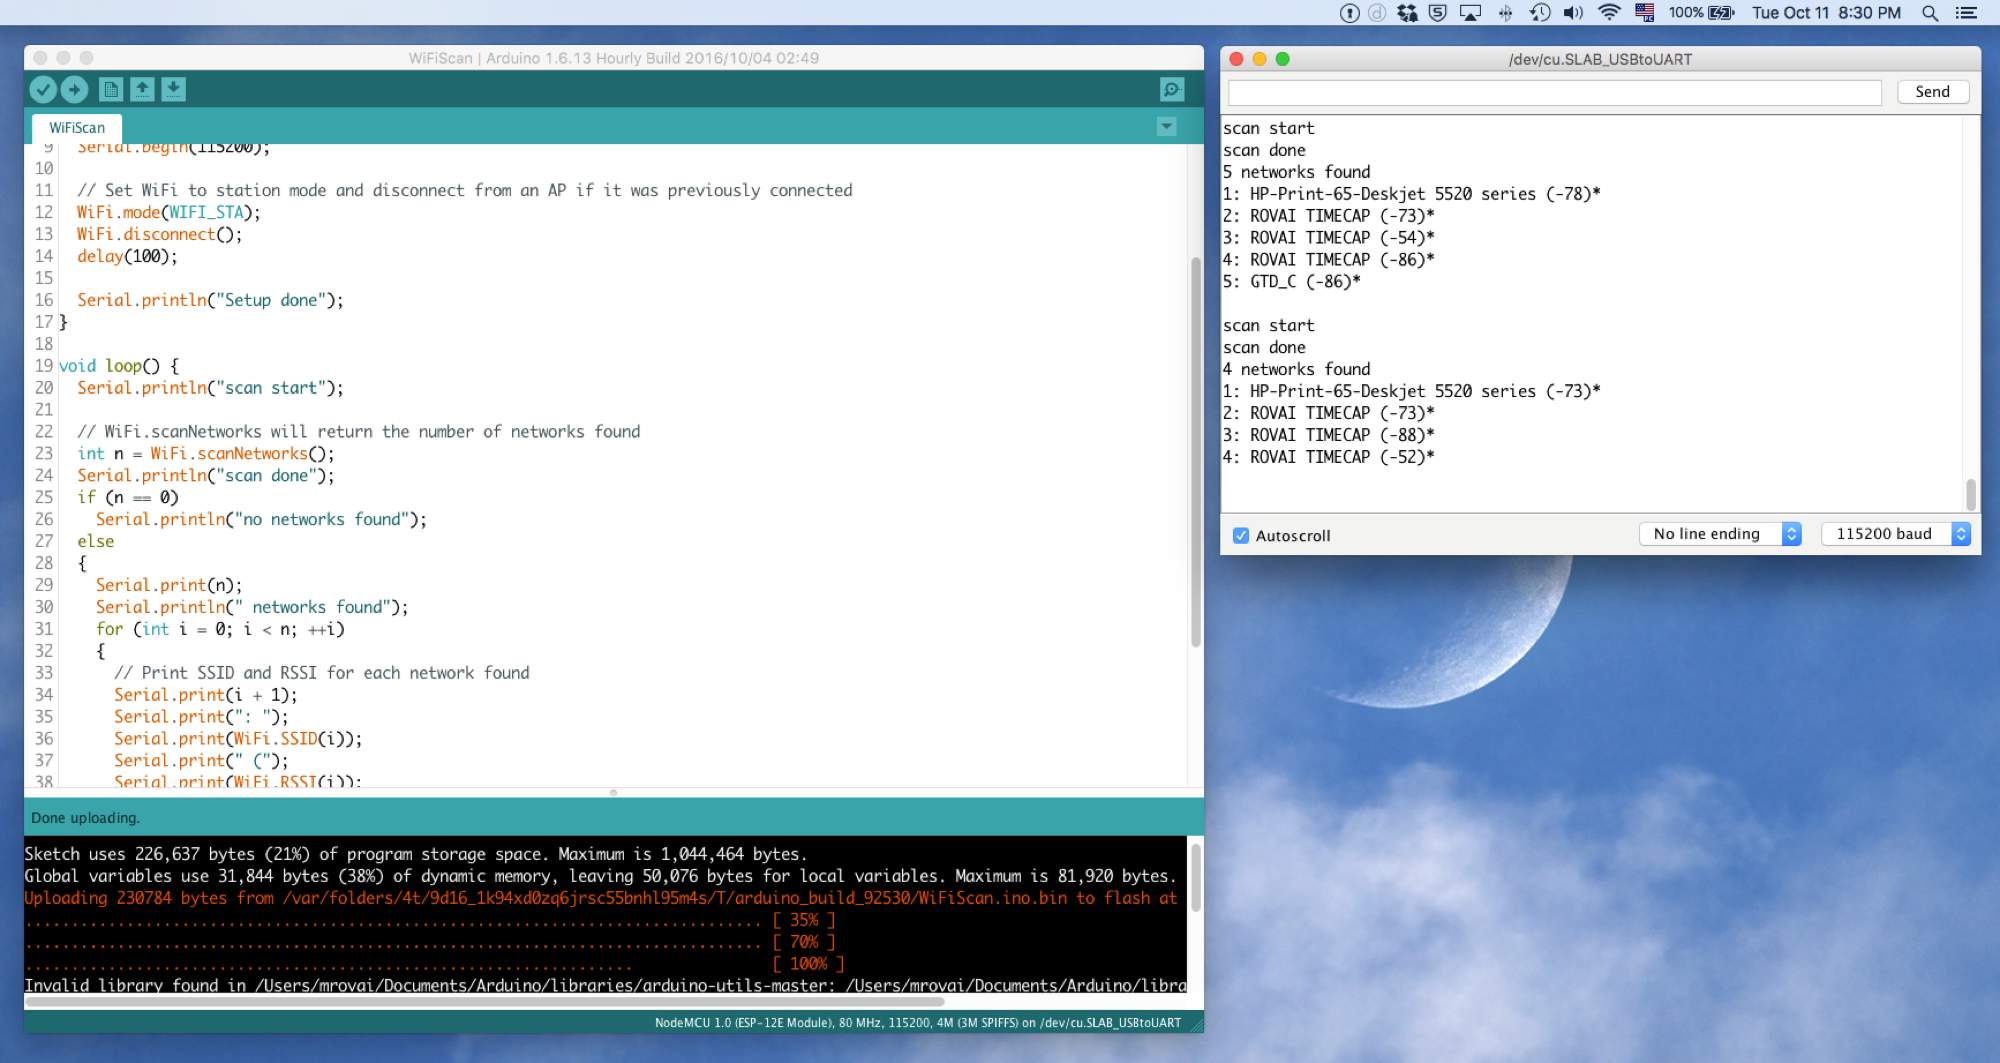
At this point we are ready to write our own firmware and upload it, but let's first try one of the examples File → Examples → ESP8266WiFi → WiFiScan. After uploading it, we can open the Serial Monitor window and observe the results. Note that we need to match the baud rate, so check that 115200 is selected from the drop down menu!
Blinking a LED
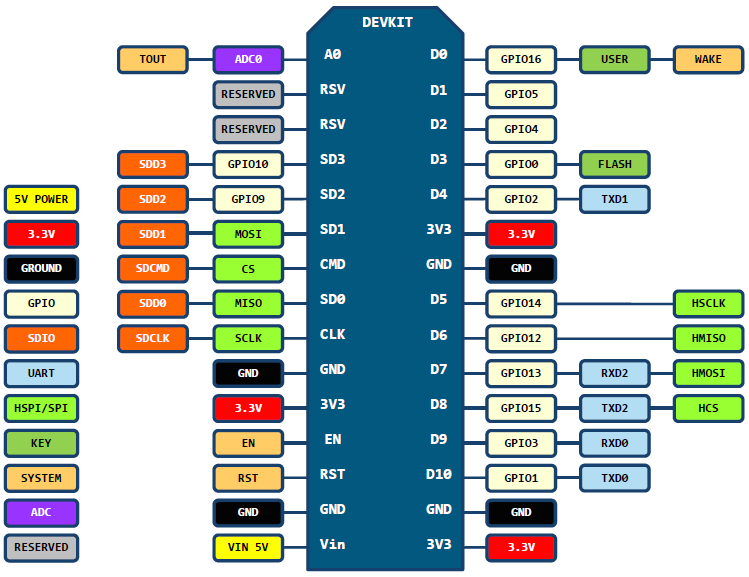
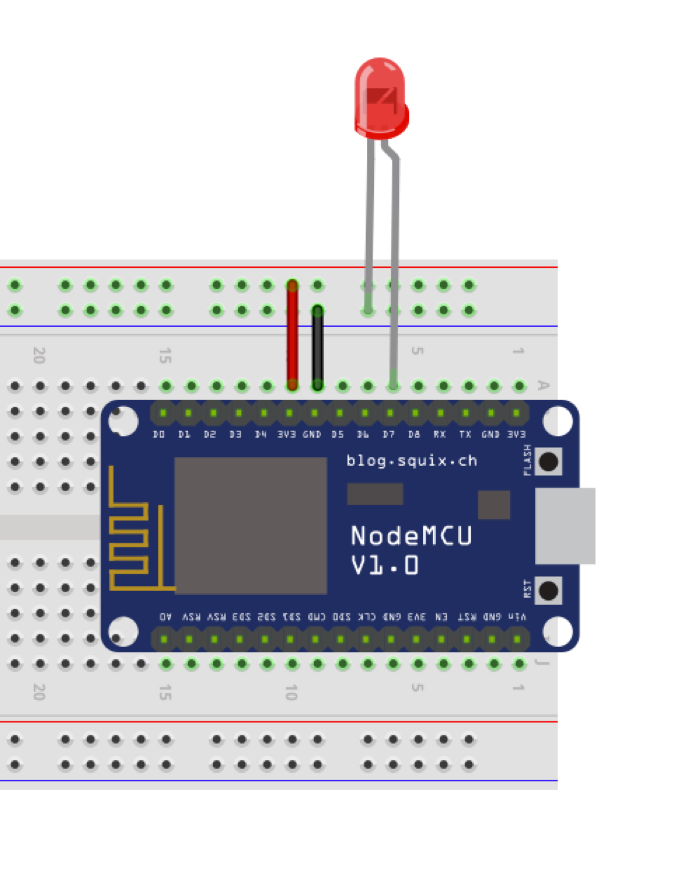
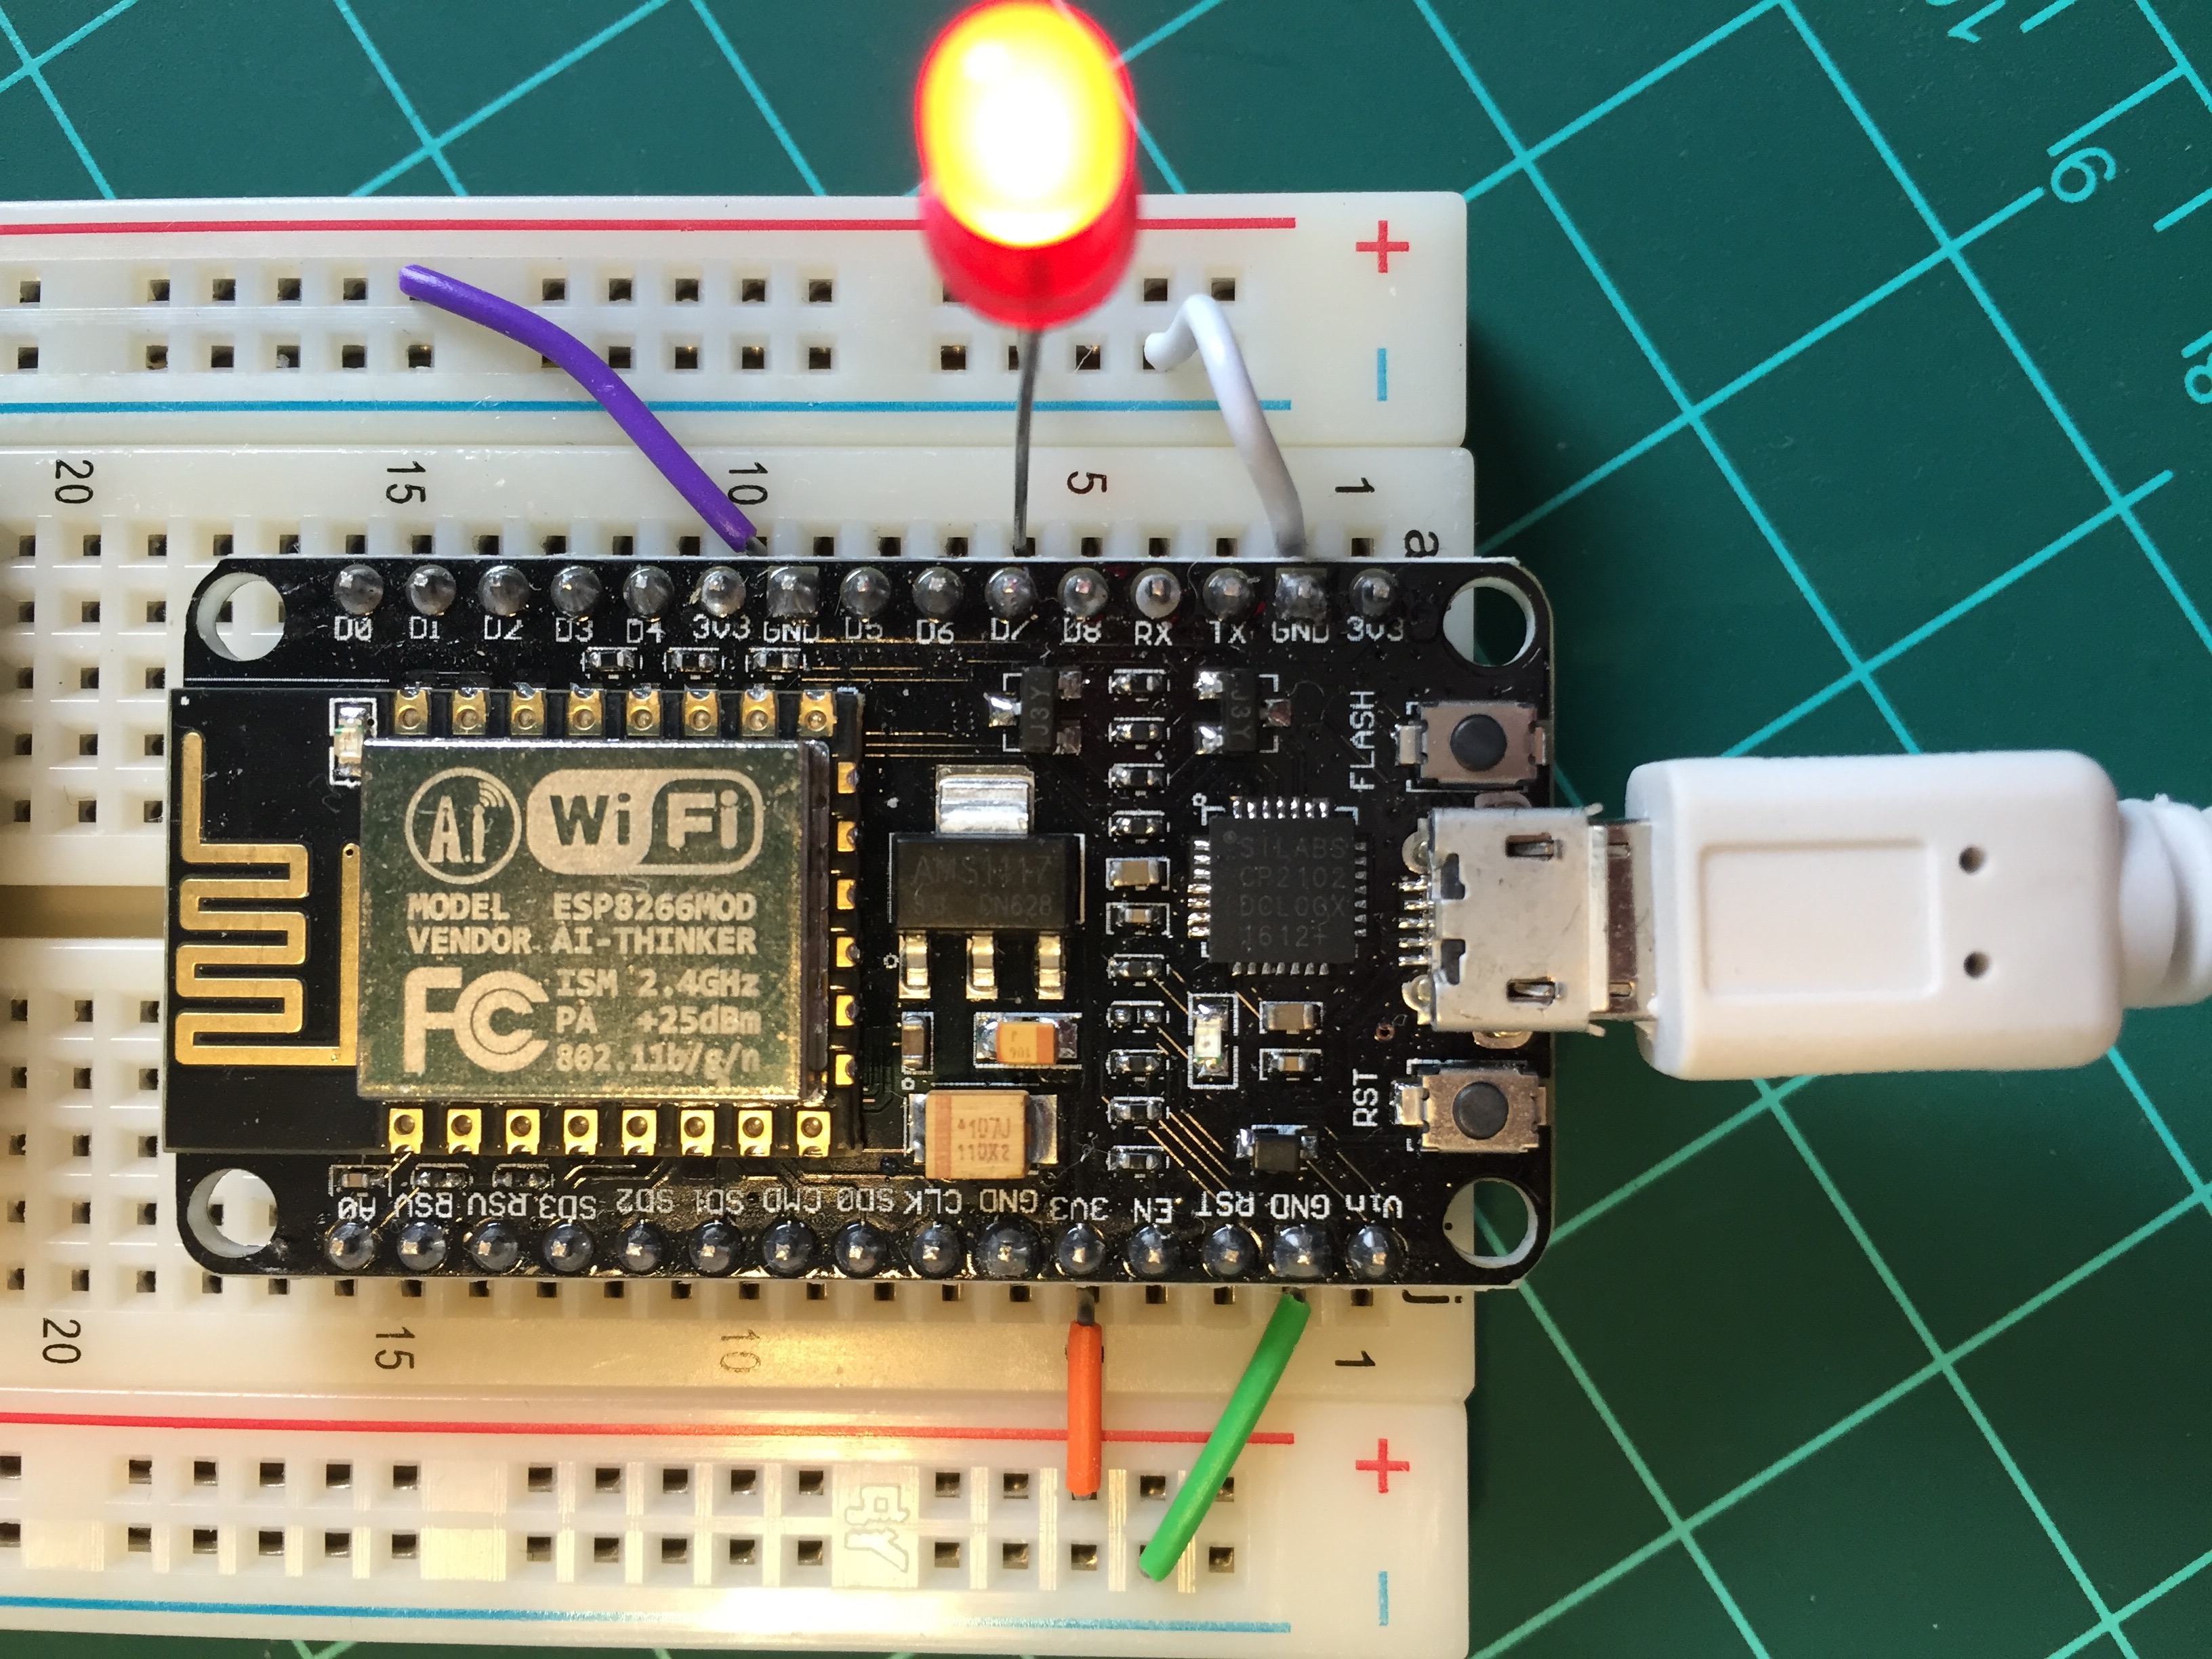
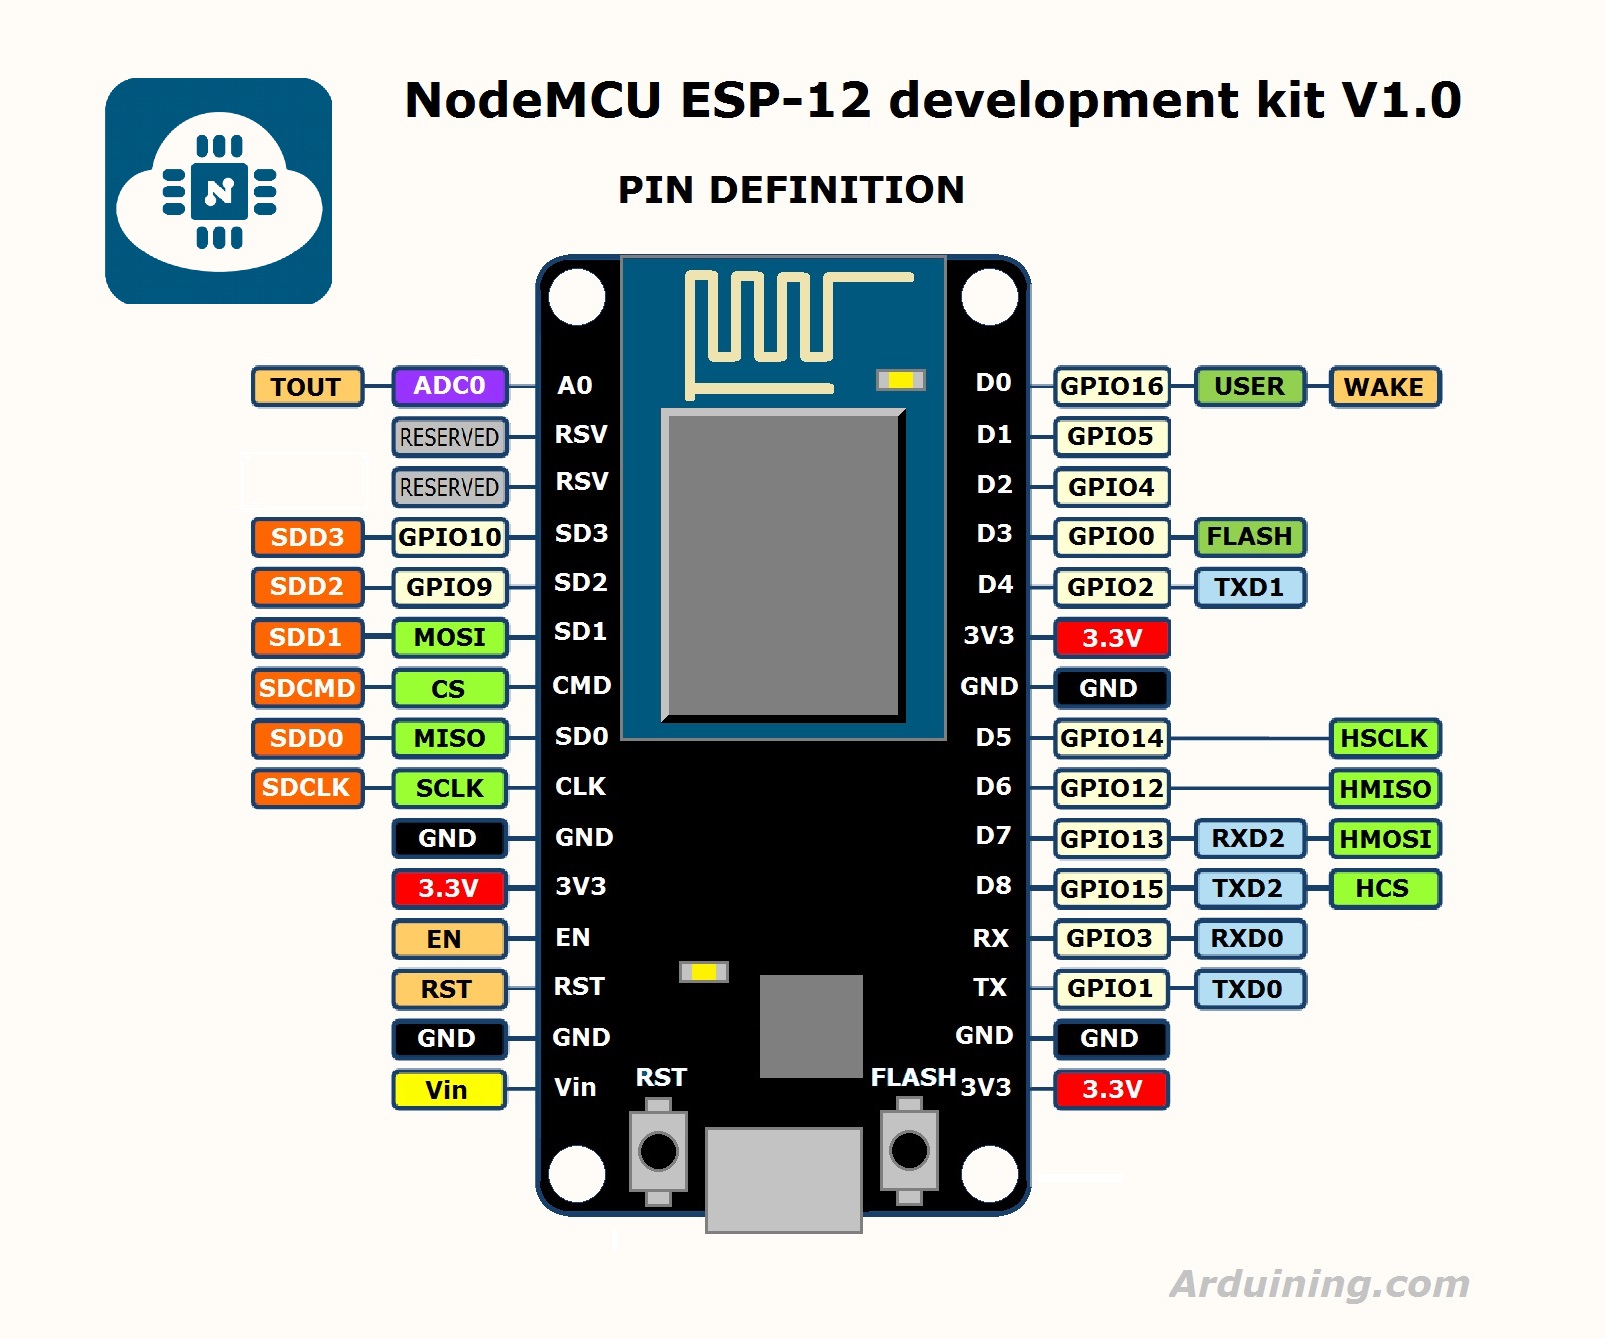
The "Hello World" of any new HW project without any doubt, is a LED blinking. To connect a LED to your ESP-12E, you can use any of its digital GPIO. The above pin diagram shows the Pin layout of 2nd generation ESP8266 NodeMCU development board. In our case, we will use pin D7 or its equivalent on Arduino GPIO13. You can test the code using or "D7", or "13". both ways will work. The D7 Pin does not need an external resistor to power the LED (it has one internally). Bellow a simple code for blinking a LED:
/**********************************************
  Blink
  Connected to pin D7 (GPIO13) ESP8266 NODEMCU
 **********************************************/

#define ledPin 13
// # #define ledPin D7

void setup()
{
  pinMode(ledPin, OUTPUT);
}

void loop()
{
  digitalWrite(ledPin, HIGH);
  delay(1000);
  digitalWrite(ledPin, LOW);
  delay(1000);
}
There are a relation between some of NodeMCU and Arduino pins as described bellow:
- Esp ==> Ardu
- D0 ==> 16
- D1 ==> 5
- D2 ==> 4
- D3 ==> 0
- D4 ==> 2
- D5 ==> 14
- D6 ==> 12
- D7 ==> 13
- D8 ==> 15
- D9 ==> 3
- D10 ==> 1
Bellow the code:
Downloads
Using the 0.96" OLED Display
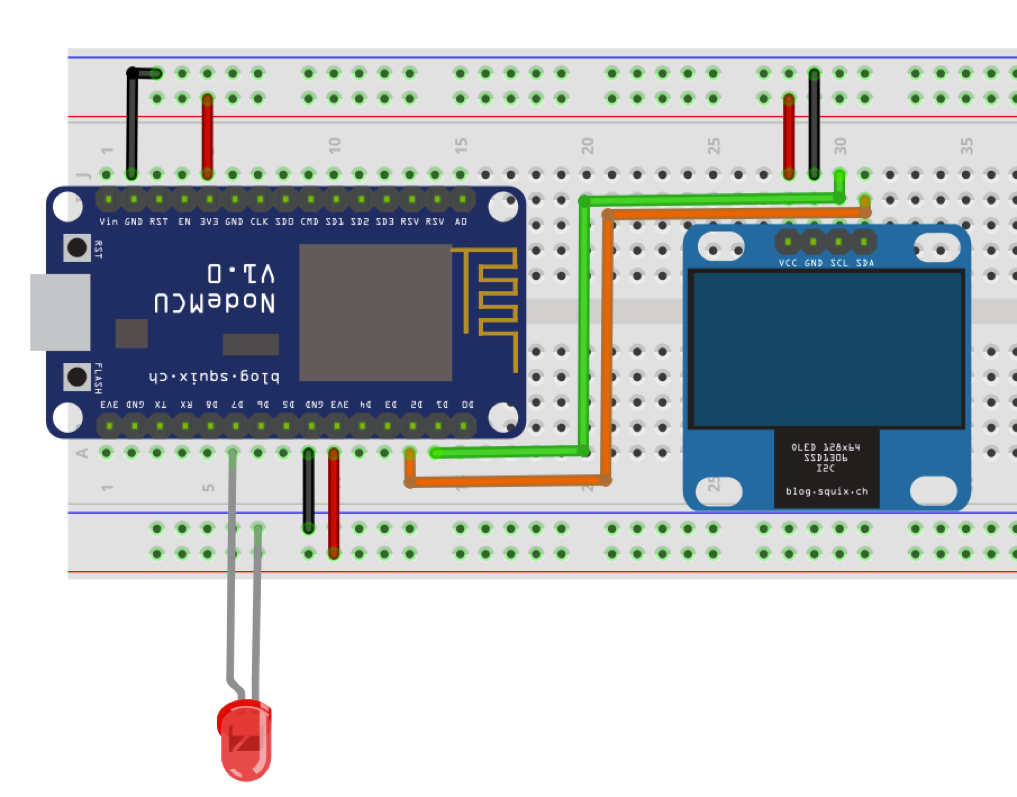
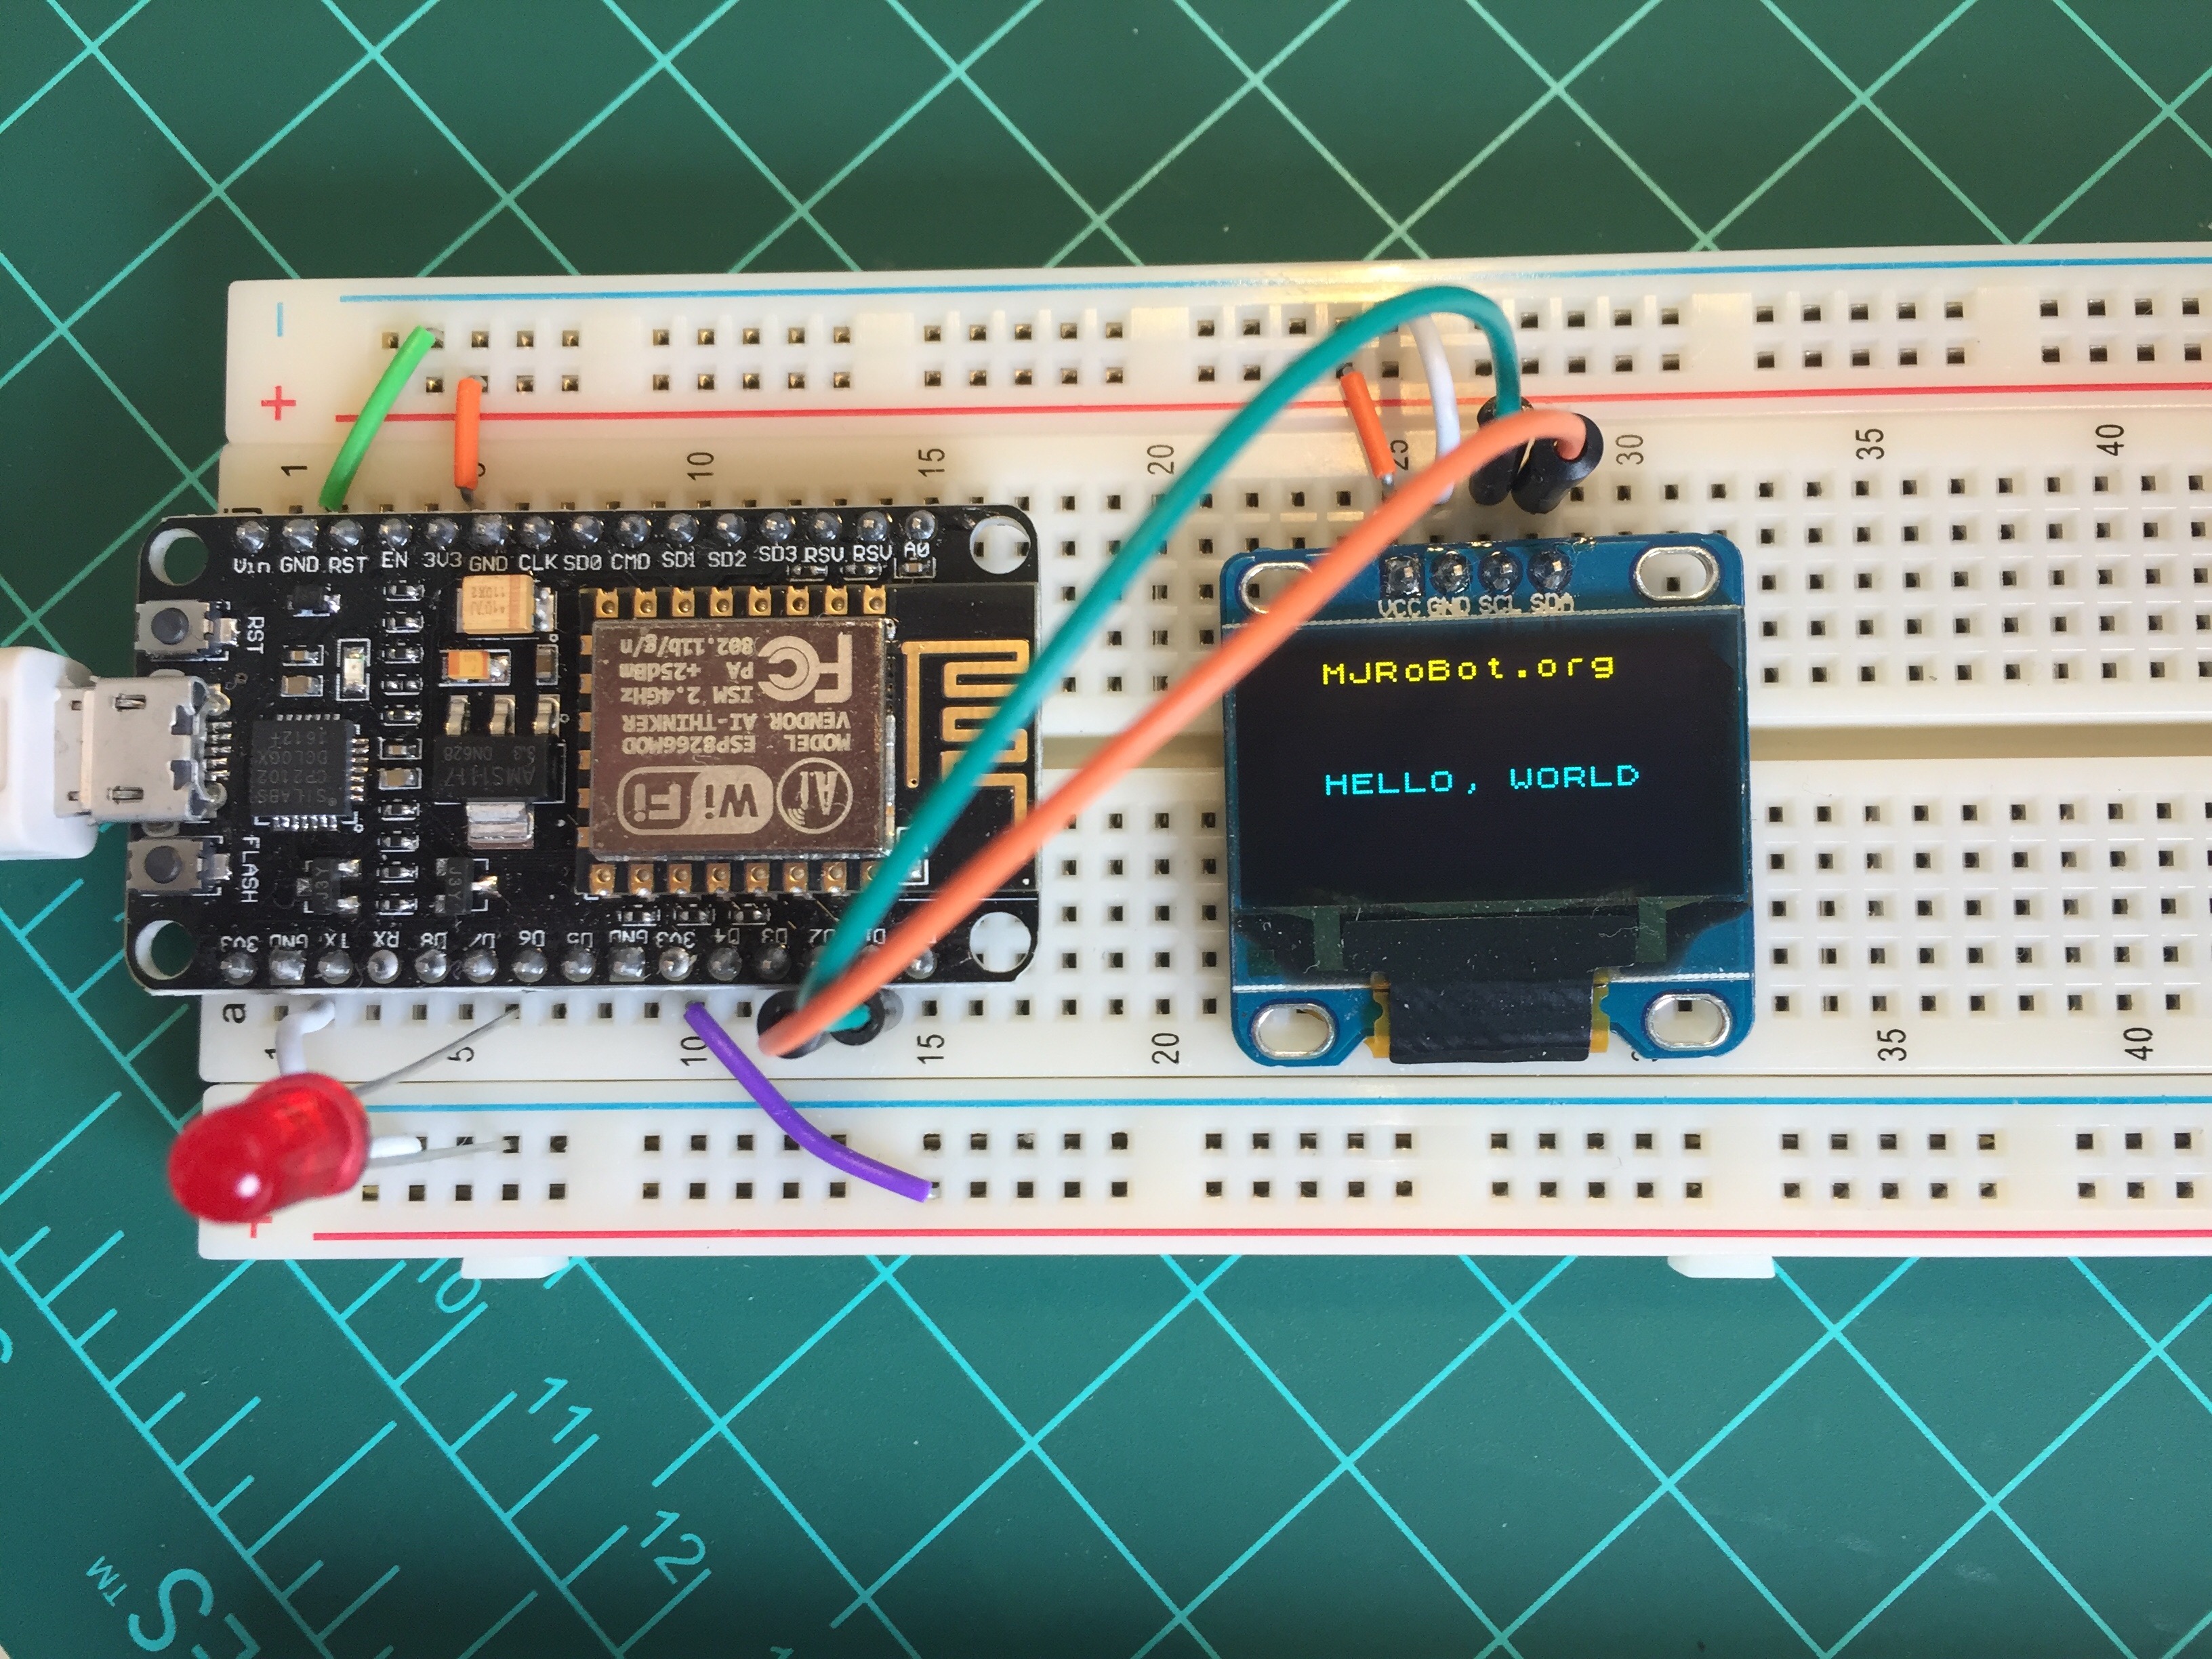
A great companion for our ESP-12E is a small OLED Display. It can be very useful on IoT projects to display your local data, debug your programs on site, etc. The model used on this tutorial is the OLED 128 x 64 SSD 1306 I2C. Looking the name we know that this display has as main characteristics:
- 128 pixels at horizontal and 64 pixels at vertical. So if you use 8x8 characters, we will get a "16X8" Display (8 lines of 16 characters each).
- Its is a I2C display, so we will connect it to the NodeMCU I2C pins, using:
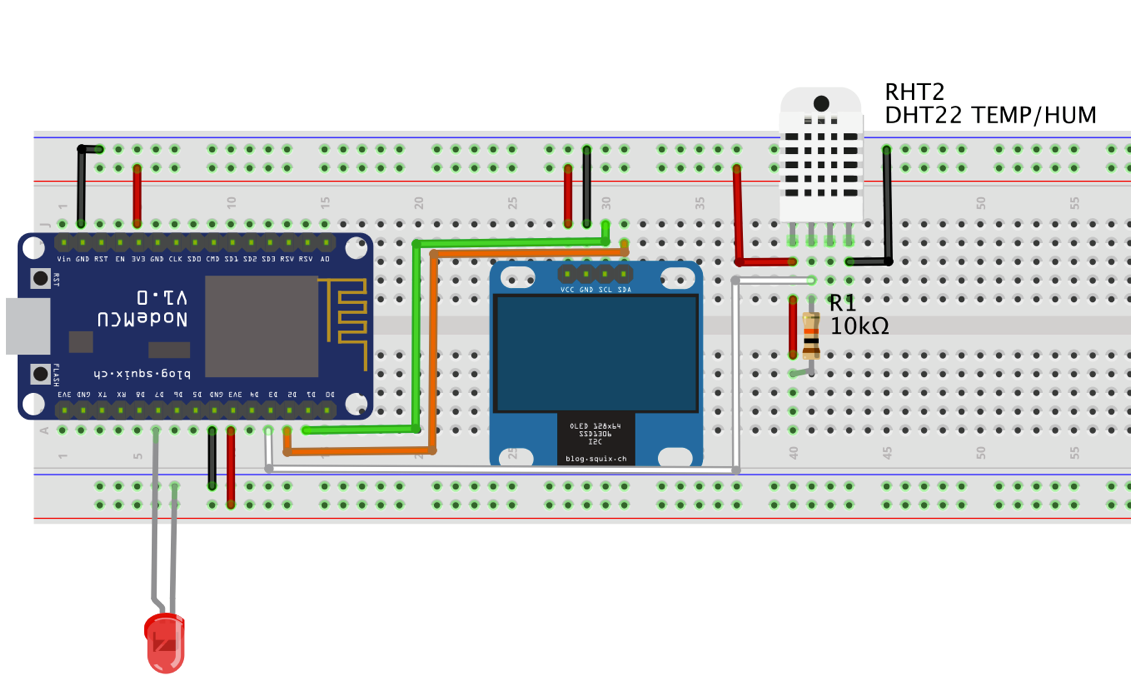
- SCL ==> D1 (5)
- SDA ==> D2 (4)
Another important characteristic of the SSD1306 is that you can power it with 3.3V, so its possible to connect the device directly to nodeMCU module. (see above electrical diagram).
Once we have connected the display, let's download and install its library on our Arduino IDE. We will use the ACROBOT library version:
Once you have re-started the IDE, the library should be already installed. Let's now, upload the bellow sketch to test our OLED display:
/***********************************************************************
*  NodeMCU and OLED display "Hello World"
*  Based on original code developed by: Makerbro at <a href="https://acrobotic.com/"> https://acrobotic.com/
</a>
*  MJRoBot 12Oct16
************************************************************************/

#include <Wire.h>
#include <ACROBOTIC_SSD1306.h>

void setup()
{
  Wire.begin();
  oled.init();                      // Initialze SSD1306 OLED display
  oled.clearDisplay();              // Clear screen
  oled.setTextXY(0,0);              // Set cursor position, start of line 0
  oled.putString("  MJRoBot.org");
  oled.setTextXY(4,0);              // Set cursor position, start of line 4
  oled.putString("  HELLO, WORLD");
}

void loop()
{
}
Note that when you do not define a different size of text character, the default is 8X8. To define a different one, you can use: oled.setFont(font5x7);
Bellow the code for "Hello World" test:
Downloads
NodeMCU As a Local Weather Station Using DHT22
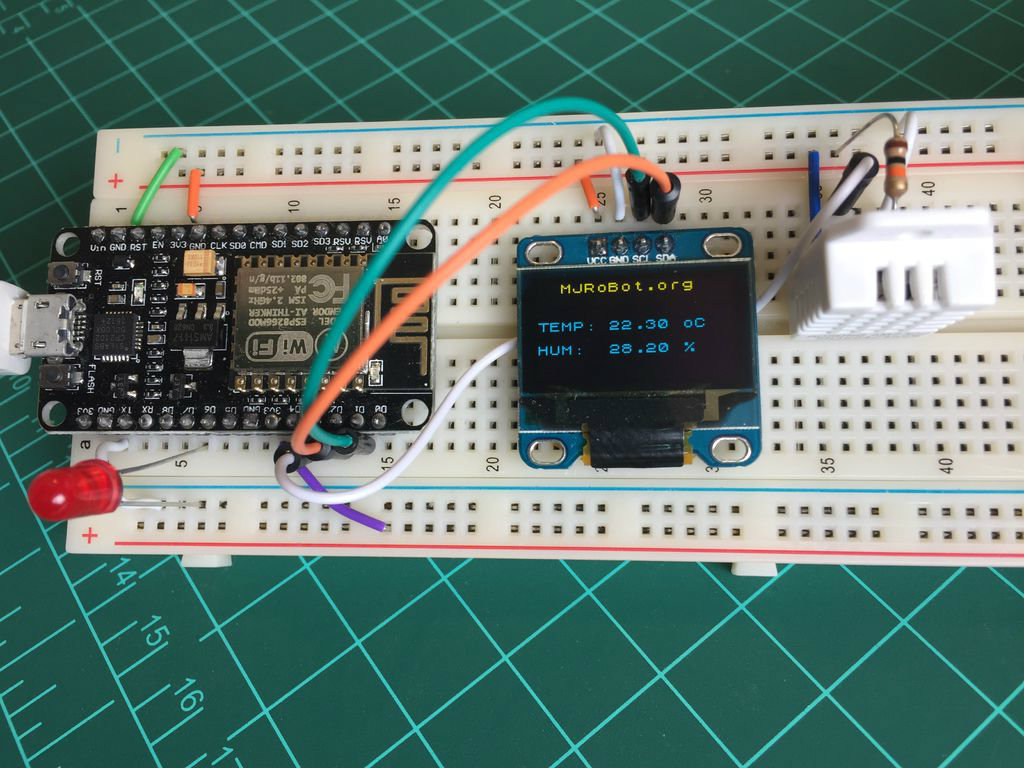
One of most used sensors for capturing weather data is the DHT22 (or it's brother DHT11), a digital relative humidity and temperature sensor. It uses a capacitive humidity sensor and a thermistor to measure the surrounding air, and spits out a digital signal on the data pin (no analog input pins needed).
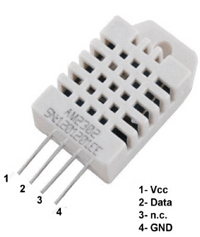
The sensor should be powered between 3.3V and 5V and will work from -40oC to +80oC with an accuracy of +/- 0.5oC for temperature and +/-2% for relative Humidity. It is also important to have in mind that the its sensing period is in average 2seconds (minimum time between readings). The site of Adafruit provides a lot of information about both, DHT22 and its brother DHT11. For more details, please visit: DHT22/11 Tutorial page . The DHT22 has 4 pins (facing the sensor, pin 1 is the most left) :
- VCC (we will connect to 3.3V from NodeMCU);
- Data out;
- Not connected and
- Ground.
Once usually you will use the sensor on distances less than 20m, a 10K resistor should be connected between Data and VCC pins. The Output pin will be connected to NodeMCU pin D3 (see the diagram above). Once the sensor is installed at our module, download the DHT library from Adafruit github repository and install it in your Arduino's Library file. Once you reload your Arduino IDE, the "DHT sensor library" should be installed. Run the DHT Sensor code bellow to verify that everything is running OK:
Downloads
Using Analog Sensors
The NodeMCU has one 10 bits Analog Digital Converter (ADC) integrated. When compared with an Arduino UNO that has 6 ADCs "Ports" or the Nano that has 8, seems that the NodeMCU lack of those abilities. But this is not necessarily true. First, the Arduino has in fact only one internal integrated ADC that must be multiplexed to read their multiple analog inputs. So, we can do exactly the same with the NodeMCU.
For example, suppose that you must read 2 analog sensors:
- LDR: to measure light
- Soil Moisture Hygrometer to measure soil humidity
What we should do is to "source" individually each one of those sensors every time that you need to read one of them. In order to do that, you must set-up one of the GPIOs as OUTPUT, putting it at HIGH level. to learn more about read multiple analog inputs, please see the instructable: Multiple analog inputs using one analoge pin
Soil Moisture Sensor
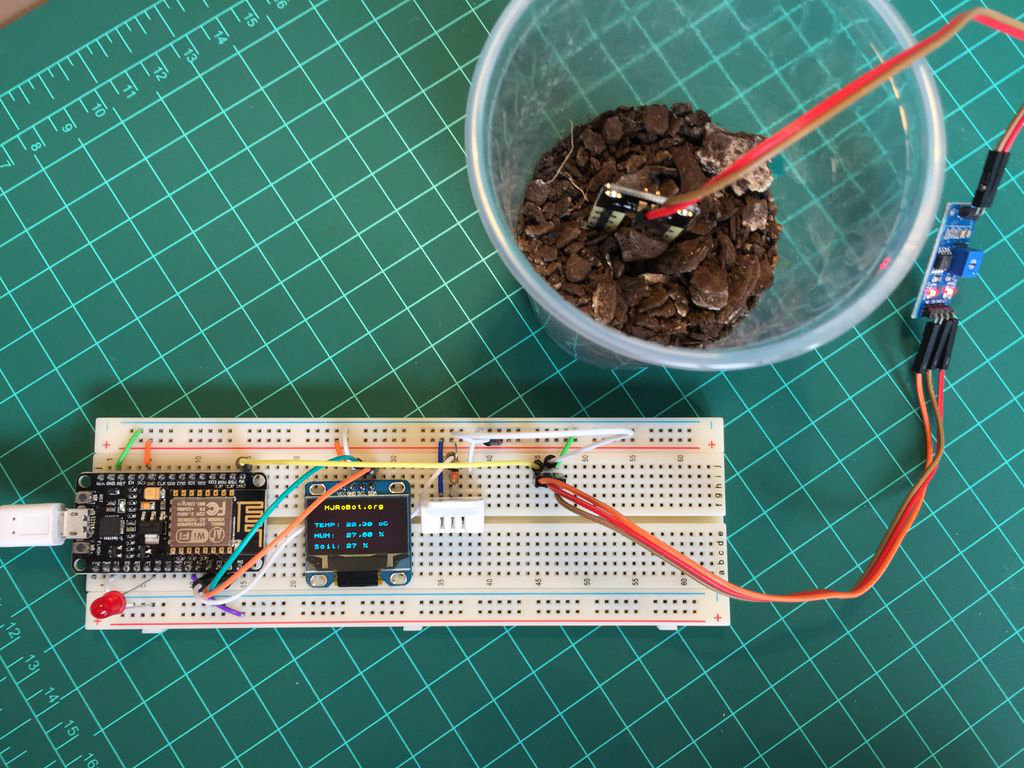
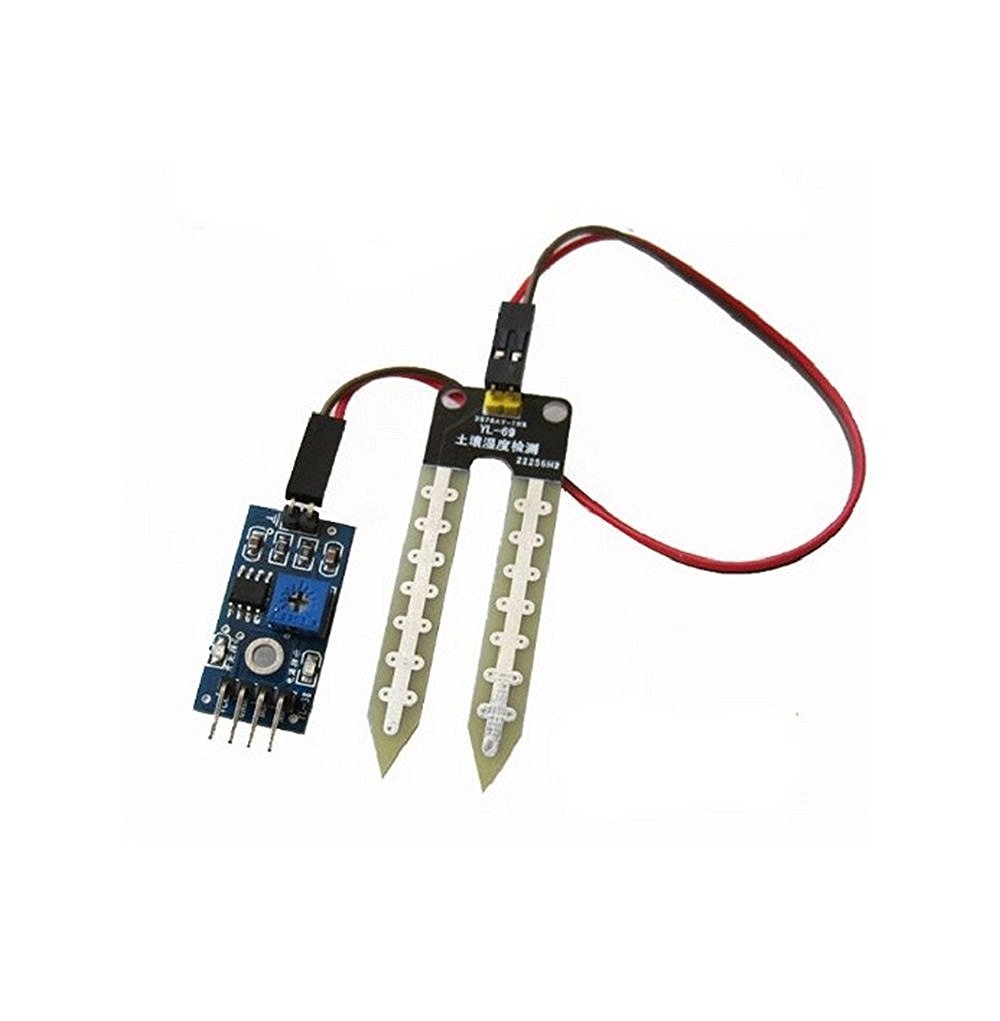
Let's connect on analog sensor to our project here. On the ArduFarmBot Project we explored how to work with a Soil Moisture Hygrometer to measure soil humidity. There, we have explored a DIY type of sensor, here let's use a electronic one, very common in the market: the YL-69 sensor and LM393 Comparator module soil medium Hygrometer.
The LM393 module has 2 outputs, one digital (D0) that can be set-up using the potentiometer that exist on it and an analog one (A0). This module can be sourced with 3.3V, what is very convenient when working with an NodeMCU. What we will do, is install the LM393 4 pins as bellow:
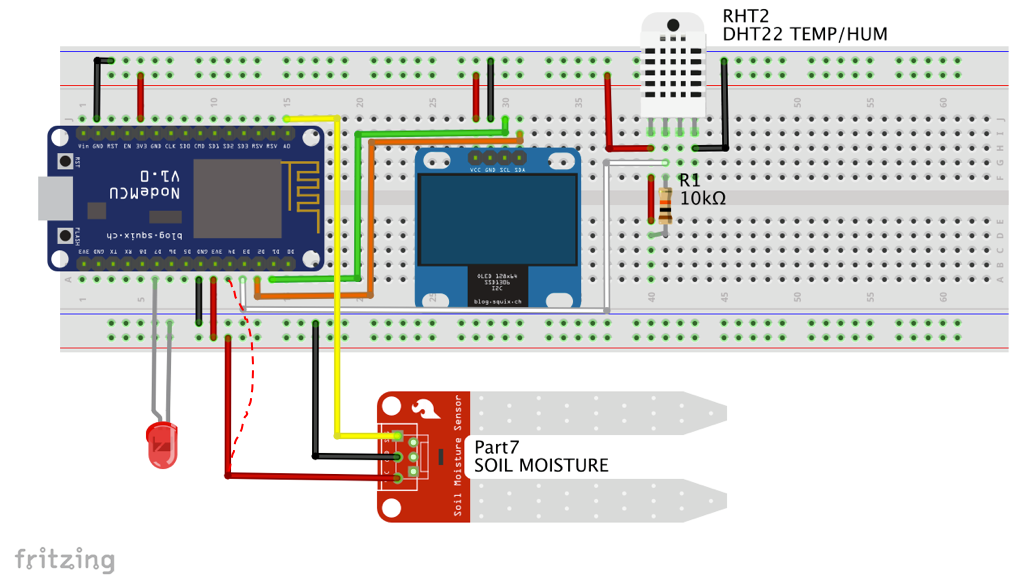
- LM393 A0 output to A0 NodeMCU A0 input
- LM393 VCC to NodeMCU VCC or to NodeMCU GPIO D3*
- LM393 GND to NodeMCU GND
- LM393 D0 open
Note that on Fritzing diagram above an equivalent 3 pin Soil Moister sensor was used for reference only (I did not find the appropriated module for drawing). Also it's important to note that the correct is to connect the Sensor VCC to a Digital Pin as output, so the LM393 will be powered only when we need a read. This is important no only to save power, but also to protect the probes from corrosion.
* I left here the 2 options of sensor powering, because at least in the case of my sensor and module, I realized that the NodeMCU didi not loaded with the D3 connected. Also I had eventual errors due the power consumption. If you power the LM393 direct to VCC, the code does not need to changed. It is worked fine.
A simple routine can be written to read the analog port:
/***************************************************
 * Get Soil Moister Sensor data
 **************************************************/
void getSoilMoisterData(void)
{
  soilMoister = 0;
  digitalWrite (soilMoisterVcc, HIGH);
  delay (500);
  int N = 3;
  for(int i = 0; i < N; i++) // read sensor "N" times and get the average
  {
    soilMoister += analogRead(soilMoisterPin);
    delay(150);
  }
  digitalWrite (soilMoisterVcc, LOW);
  soilMoister = soilMoister/N;
  Serial.println(soilMoister);
  soilMoister = map(soilMoister, 380, 0, 0, 100);
}
Few comments about the above routine:
- The sensor data is captured 3 times and an average is taken.
- We use MAP to setup the range in percentage.
- Making a "short circuit" at the sensor probes (equivalent to "100% of humidity") we got a value of around 0 at ADC output and
- Leaving it "in the air" " the value displayed at Serial Monitor would be around 380.
Bellow the complete code for this stage of project:
Downloads
Uploading the Sensor Data to ThinkSpeak.com
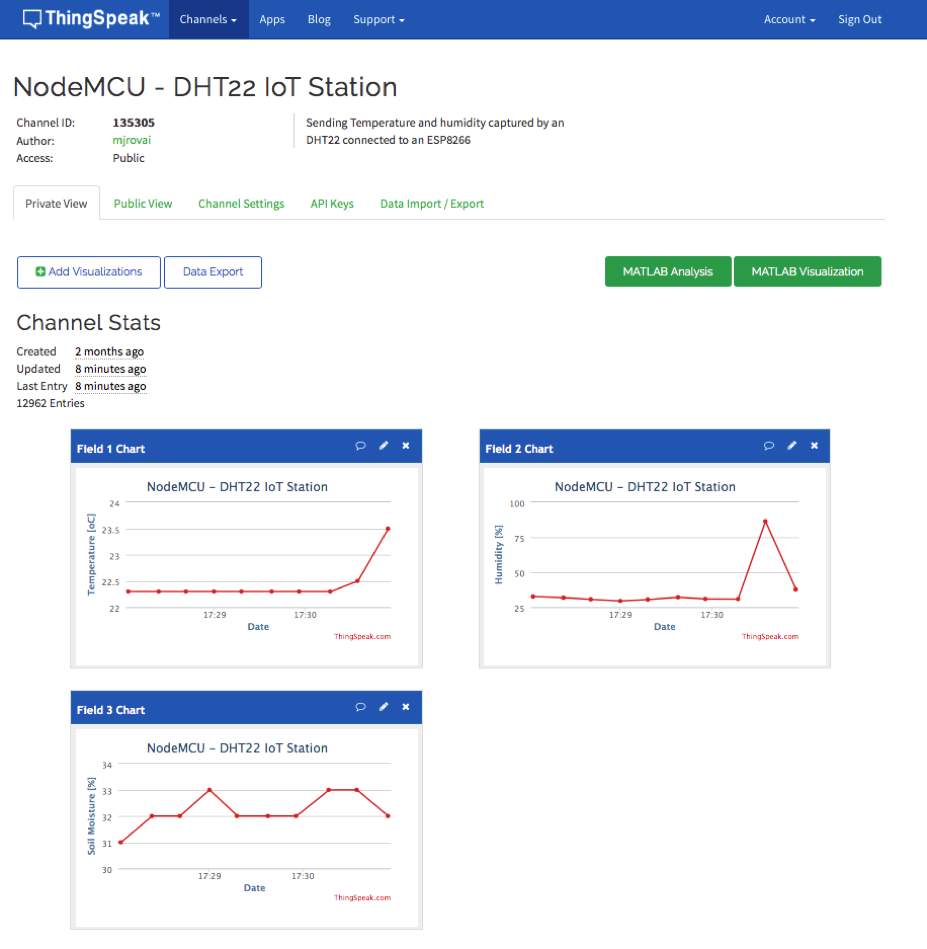
So far, we have only used the NodeMCU ESP12-E as a regular and ordinary Arduino board. Of course we have only "scratched" the real potential of this spectacular little chip and now is the time to take-off to heaven! Or better to the stars! Ehr...to the cloud! ;-)
Let's begin!
- First you must have an account at ThinkSpeak.com
- Follow the instructions to create a Channel and take note of your Channel ID and Write API Key
- Update the bellow code with your WiFi network and Thinkspeak credetials
- Run the program on IDE
Let's comment the code most importnat parts:
First, let's call the ESP8266 library, define the WiFi client and define your local Router and Thinkspeak credentials:
/* ESP12-E & Thinkspeak*/
#include <ESP8266WiFi.h>
WiFiClient client;
const char* MY_SSID = "YOUR SSD ID HERE";
const char* MY_PWD = "YOUR PASSWORD HERE";
const char* TS_SERVER = "api.thingspeak.com";
String TS_API_KEY ="YOUR CHANNEL WRITE API KEY";
Second, let's include a new library very important on IoT projects: SimpleTimer.h:
/* TIMER */
#include <SimpleTimer.h>
SimpleTimer timer;
Third, during setup(), we will initiate serial communication, call the function connectWiFi() and define the timers. Note that the line of code: timer.setInterval(19000L, sendDataTS); will call the function sendDataTS() every 19 seconds, in order to upload data to ThinkSpeak channel.
void setup()
{
  ...
  Serial.begin(115200);
  delay(10);
  ...
  connectWifi();
  timer.setInterval(19000L, sendDataTS);
  ...
}
At last but not least, during the loop(), the only command needed is to initiate the timer and that's it!
void loop()
{
  ...
  timer.run(); // Initiates SimpleTimer
}
Bellow you can see the two important functions used to handle Thinkspeak communication:
ESP12-E connection with your WiFi network:
/***************************************************
 * Connecting WiFi
 **************************************************/
void connectWifi()
{
  Serial.print("Connecting to "+ *MY_SSID);
  WiFi.begin(MY_SSID, MY_PWD);
  while (WiFi.status() != WL_CONNECTED)
  {
    delay(1000);
    Serial.print(".");
  }
  Serial.println("");
  Serial.println("WiFi Connected");
  Serial.println("");
}
ESP12-E sending data to ThinkSpeak:
/***************************************************
 * Sending Data to Thinkspeak Channel
 **************************************************/
void sendDataTS(void)
{
   if (client.connect(TS_SERVER, 80))
   {
     String postStr = TS_API_KEY;
     postStr += "&field1=";
     postStr += String(temp);
     postStr += "&field2=";
     postStr += String(hum);
     postStr += "&field3=";
     postStr += String(soilMoister);
     postStr += "\r\n\r\n";

     client.print("POST /update HTTP/1.1\n");
     client.print("Host: api.thingspeak.com\n");
     client.print("Connection: close\n");
     client.print("X-THINGSPEAKAPIKEY: " + TS_API_KEY + "\n");
     client.print("Content-Type: application/x-www-form-urlencoded\n");
     client.print("Content-Length: ");
     client.print(postStr.length());
     client.print("\n\n");
     client.print(postStr);
     delay(1000);
   }
   sent++;
   client.stop();
}
Downloads
Introducing BLYNK
On Blynk website we can understand that:
"Blynk is a Platform with iOS and Android apps to control Arduino, Raspberry Pi and the likes over the Internet. It's a digital dashboard where you can build a graphic interface for your project by simply dragging and dropping widgets."
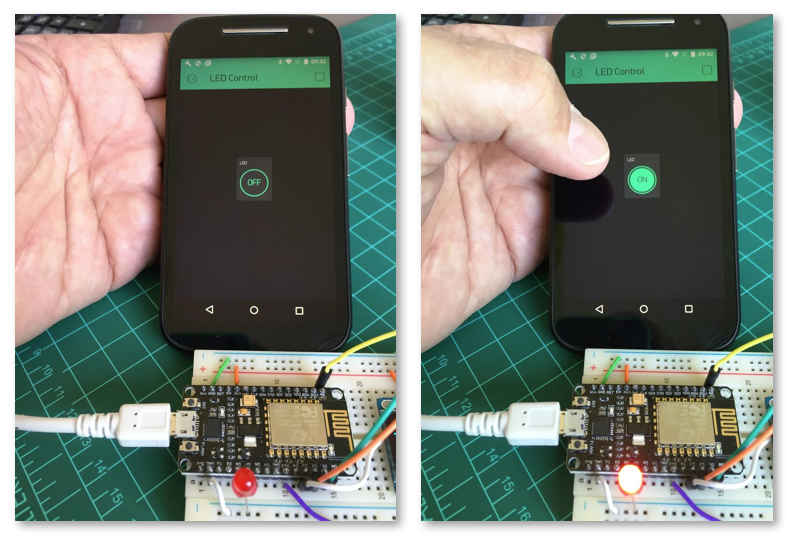
It is really very easy to built IoT projects using BLYNK. Let's start learning how to control our LED, using a smartphone. For that, follow the steps:
- Download BLYNK app for Apple Iphone or Google Android
- Install BLYNK Library for Arduino. Note that you will download the zip file (There are 5 files there that you must manually install in your Arduino Library).
- We will use the LED already installed on our ESP-12E D7 port
- Once the Arduino IDE is reloaded, open the sketch: Examples ==> Blynk ==> Boards_WiFi ==> ESP8266_Standalone
#define BLYNK_PRINT Serial    // Comment this out to disable prints and save space
#include <ESP8266WiFi.h>
#include <BlynkSimpleEsp8266.h>

// You should get Auth Token in the Blynk App.
// Go to the Project Settings (nut icon).
char auth[] = "YourAuthToken";

// Your WiFi credentials.
// Set password to "" for open networks.
char ssid[] = "YourNetworkName";
char pass[] = "YourPassword";

void setup()
{
  Serial.begin(9600);
  Blynk.begin(auth, ssid, pass);
}

void loop()
{
  Blynk.run();
}
The above code is basically what you need to install on your ESP12-E to run your BLYNK IoT projects. Do not forget to change the communication speed to 115.200 bauds and enter with your local Router and BLYNK project credentials.
Now, let's open our app at the SmartPhone:
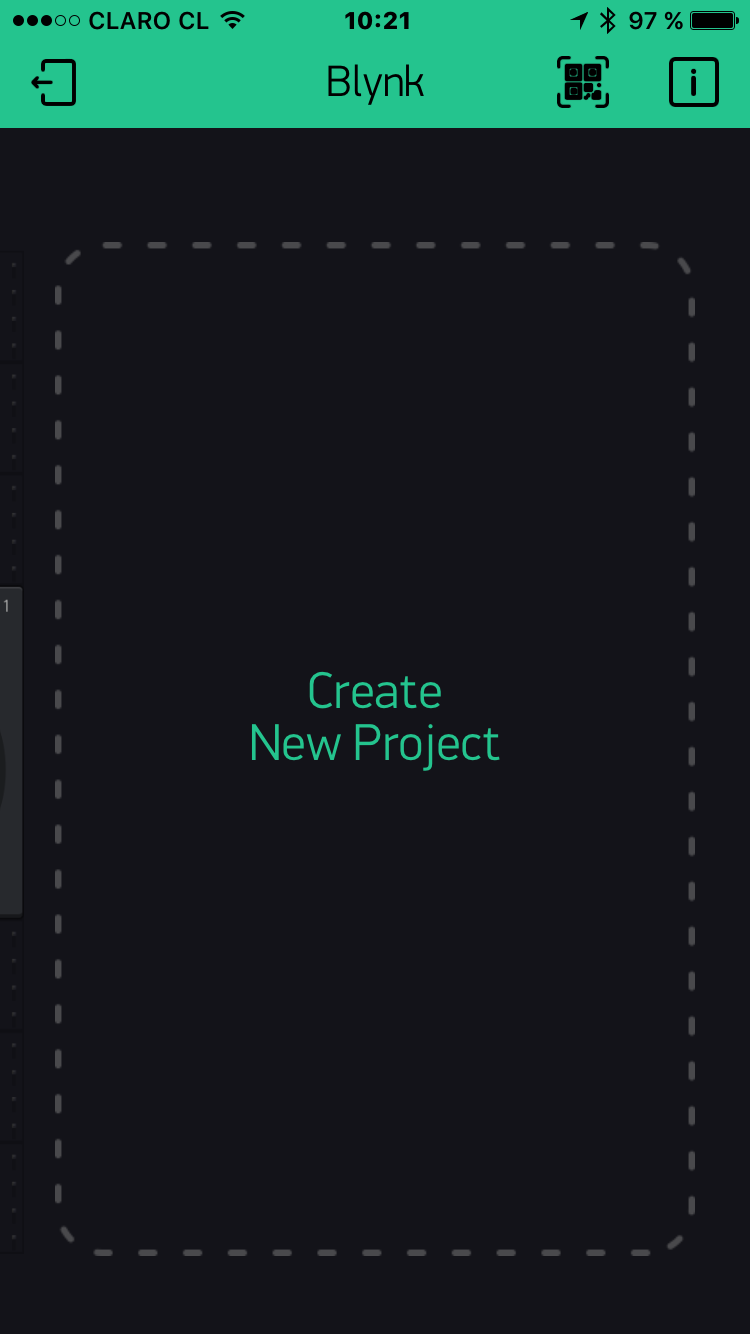
- Open Blynk app.
- Tap on "Create New Project" screen
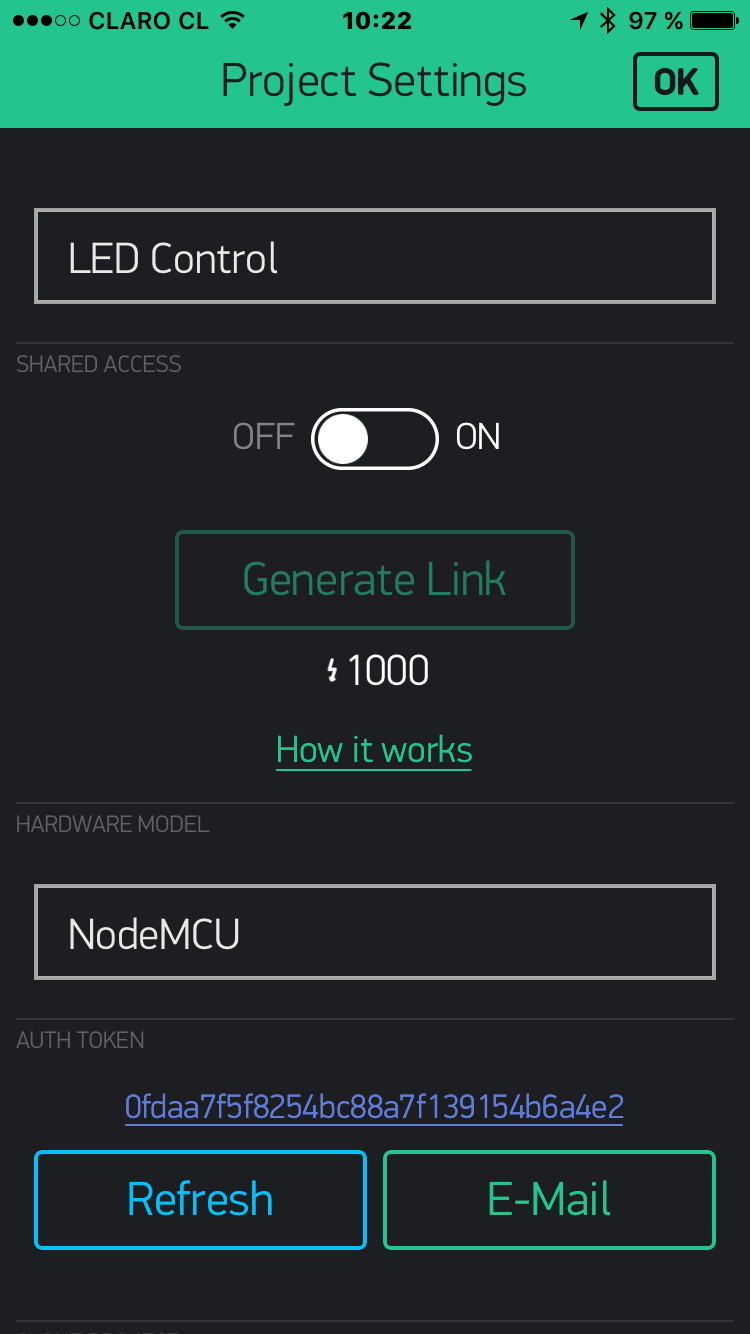
- Give a name for your project (For example "LED Control")
- Select the appropriated Hardware Model: "NodeMCU""
- Take note from Authorization Token (you can e-mail it to you to ease copy&past on your code)
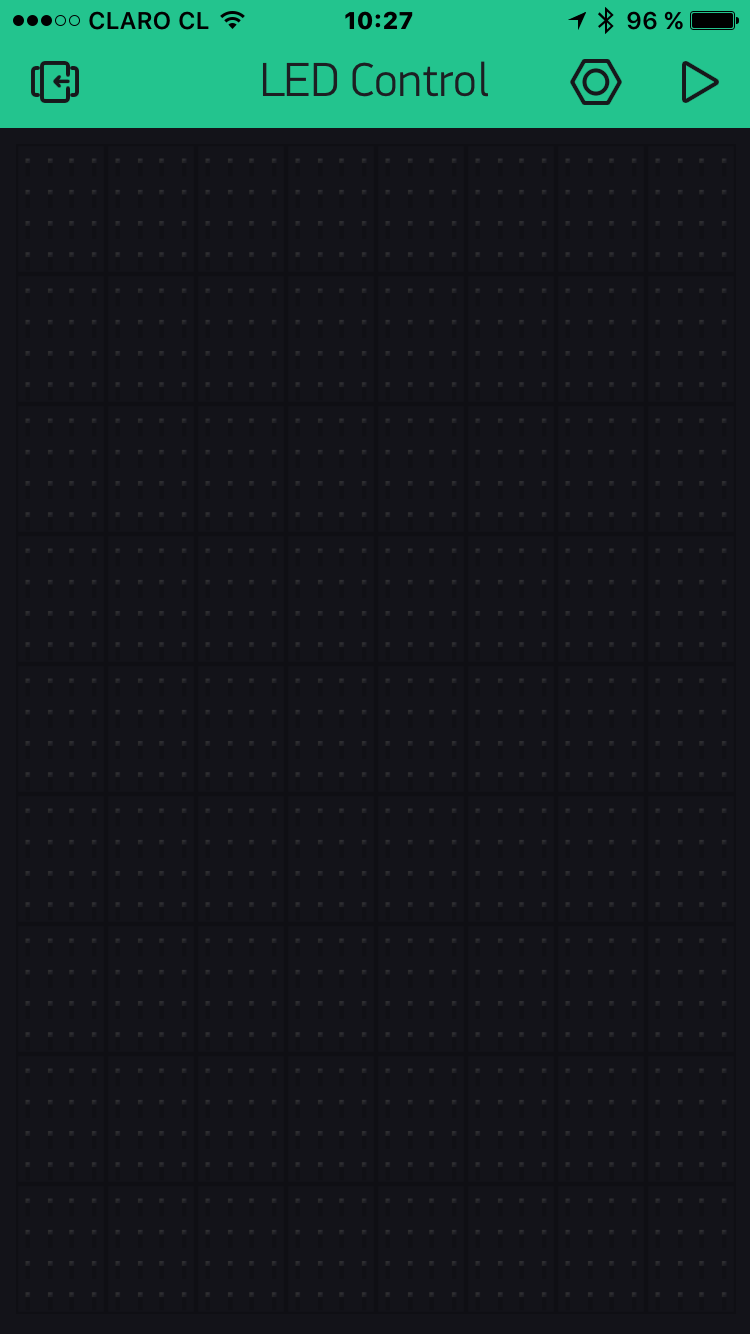
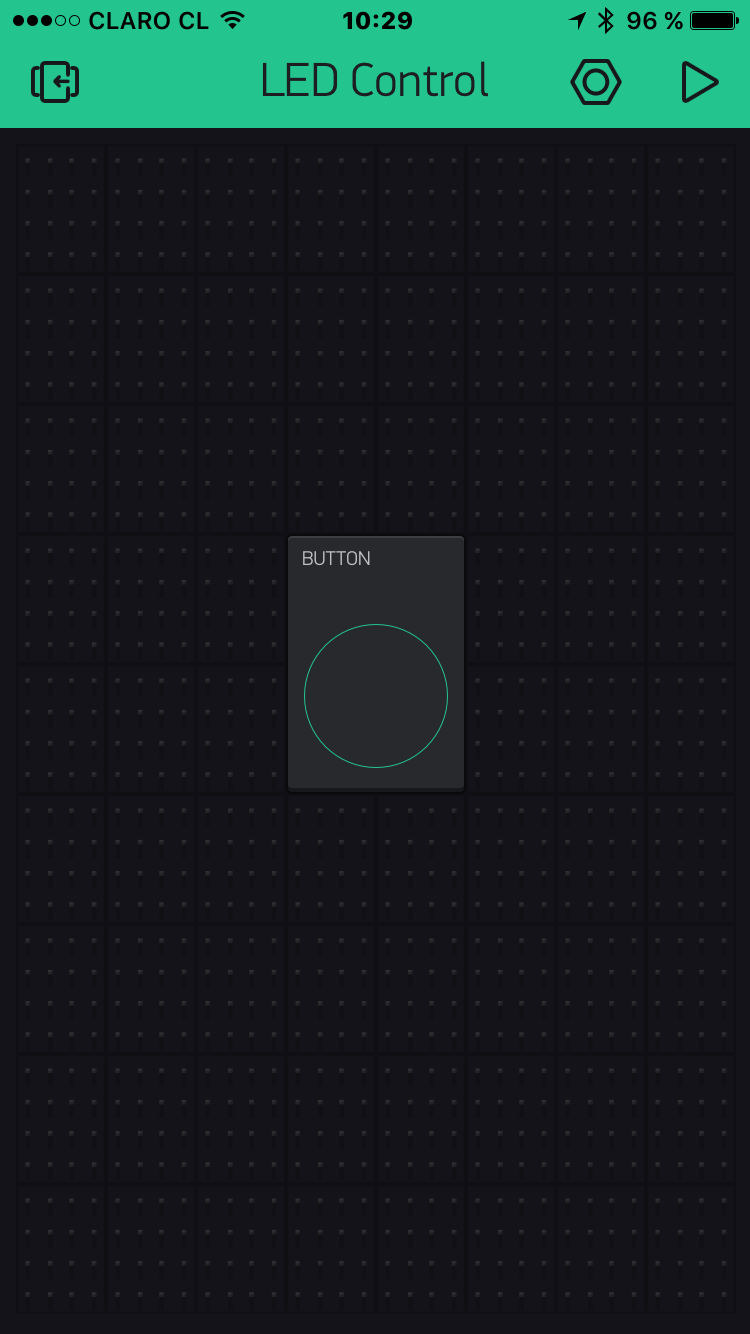
- Press "OK". A Blank screen with dots will appear.
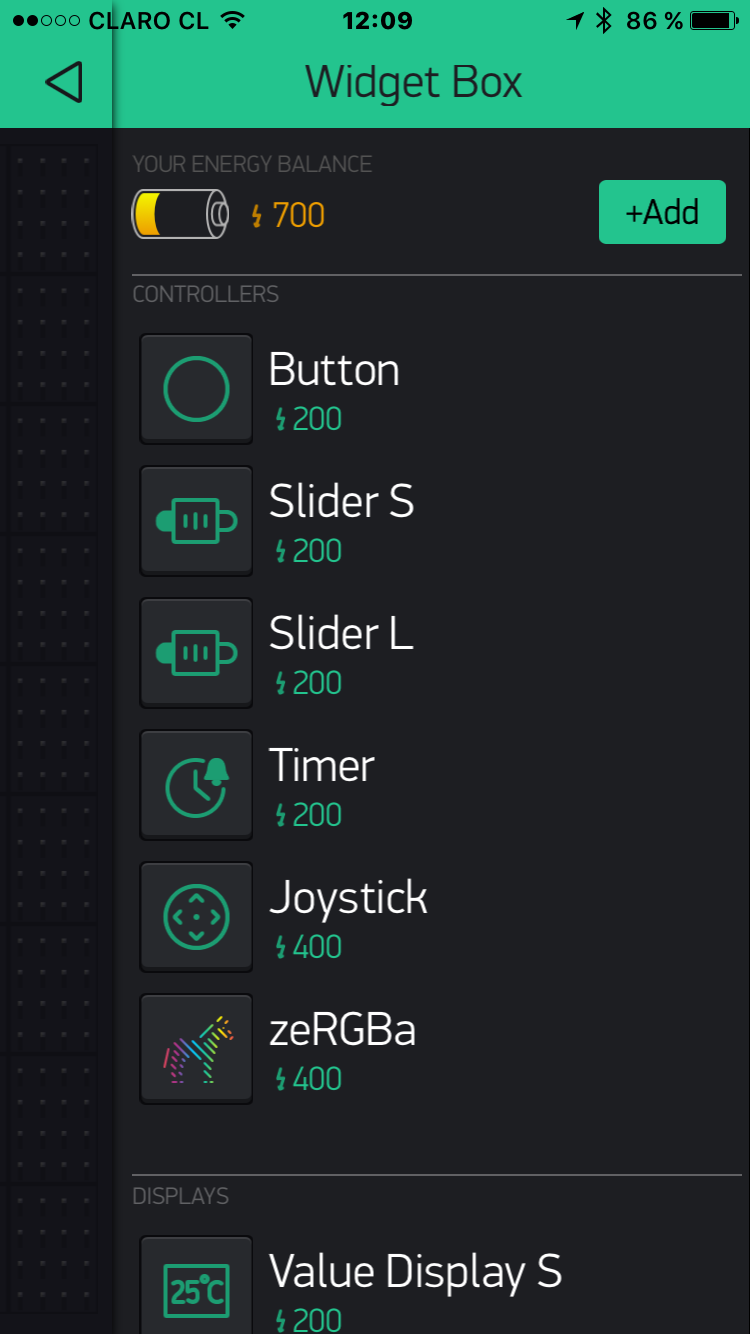
- Tap the Screen to open the "Widget Box"
- Add Button widget. You can hold and drag it to reposition.
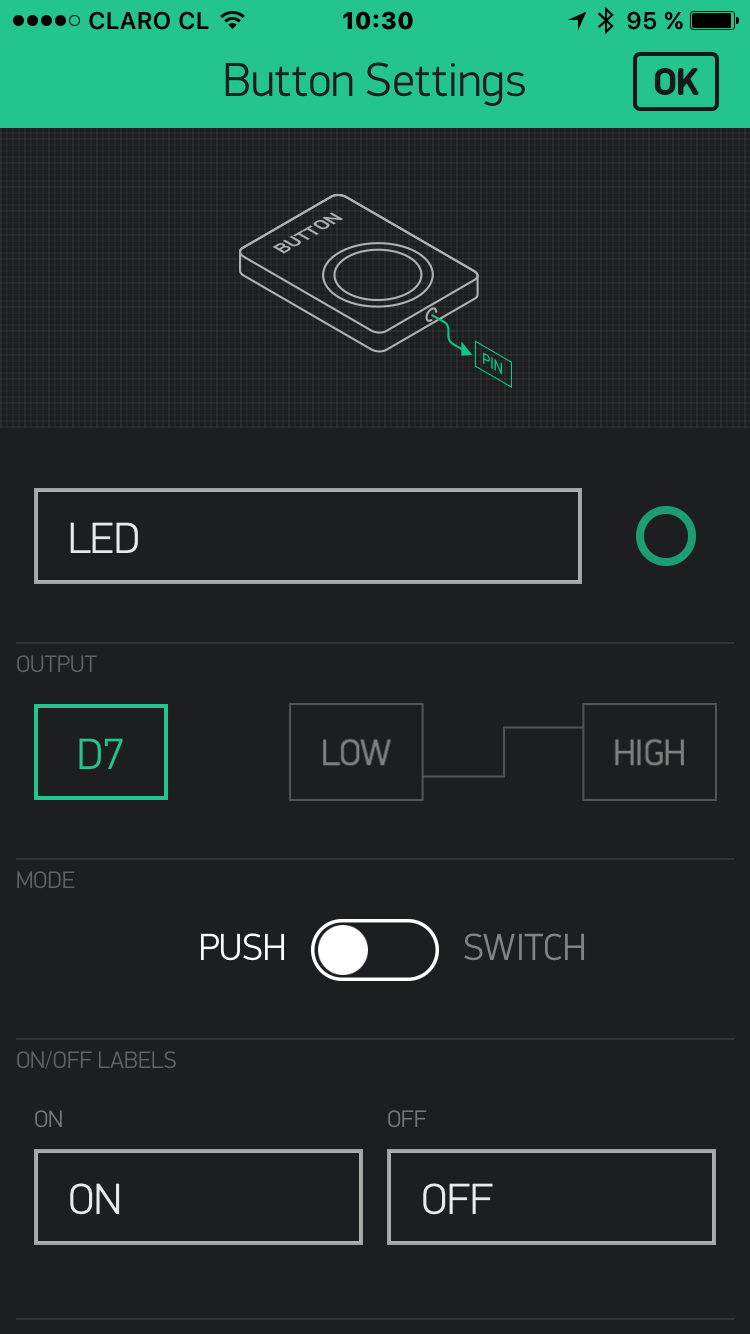
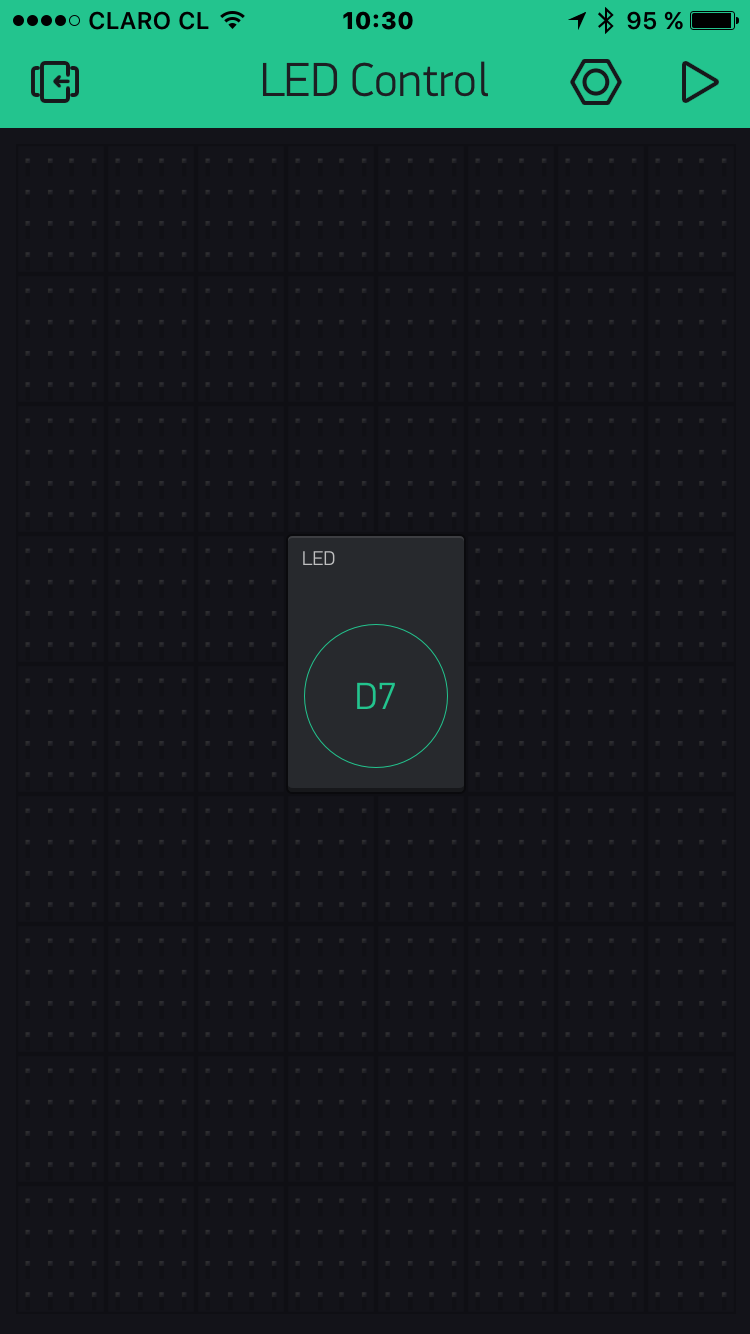
- Tap once to get to Widget Settings. The main thing you need to set is PIN number you want to control (e.g. if your LED is connected to pin 7 – choose pin D7). It is good also to name it: "LED". Press OK
Return to your sketch and update it with the authorization code that you get at the app: char auth[] = "YourAuthToken";
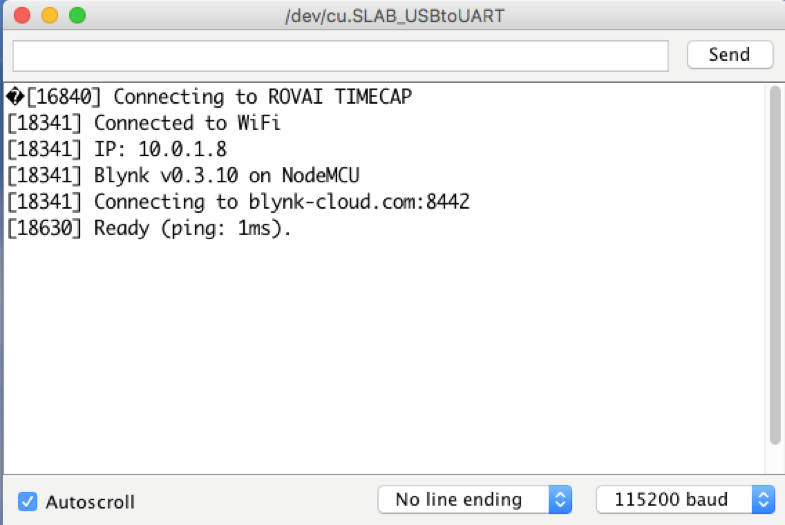
Once the code is upload to your ESP12-E, the Serial Monitor should present something similar to mine above. Now, run your Blynk project (use the "play" button at your app) and that's it! You are flying!!!!! ;-)
Runing Our Weather Station on Blynk
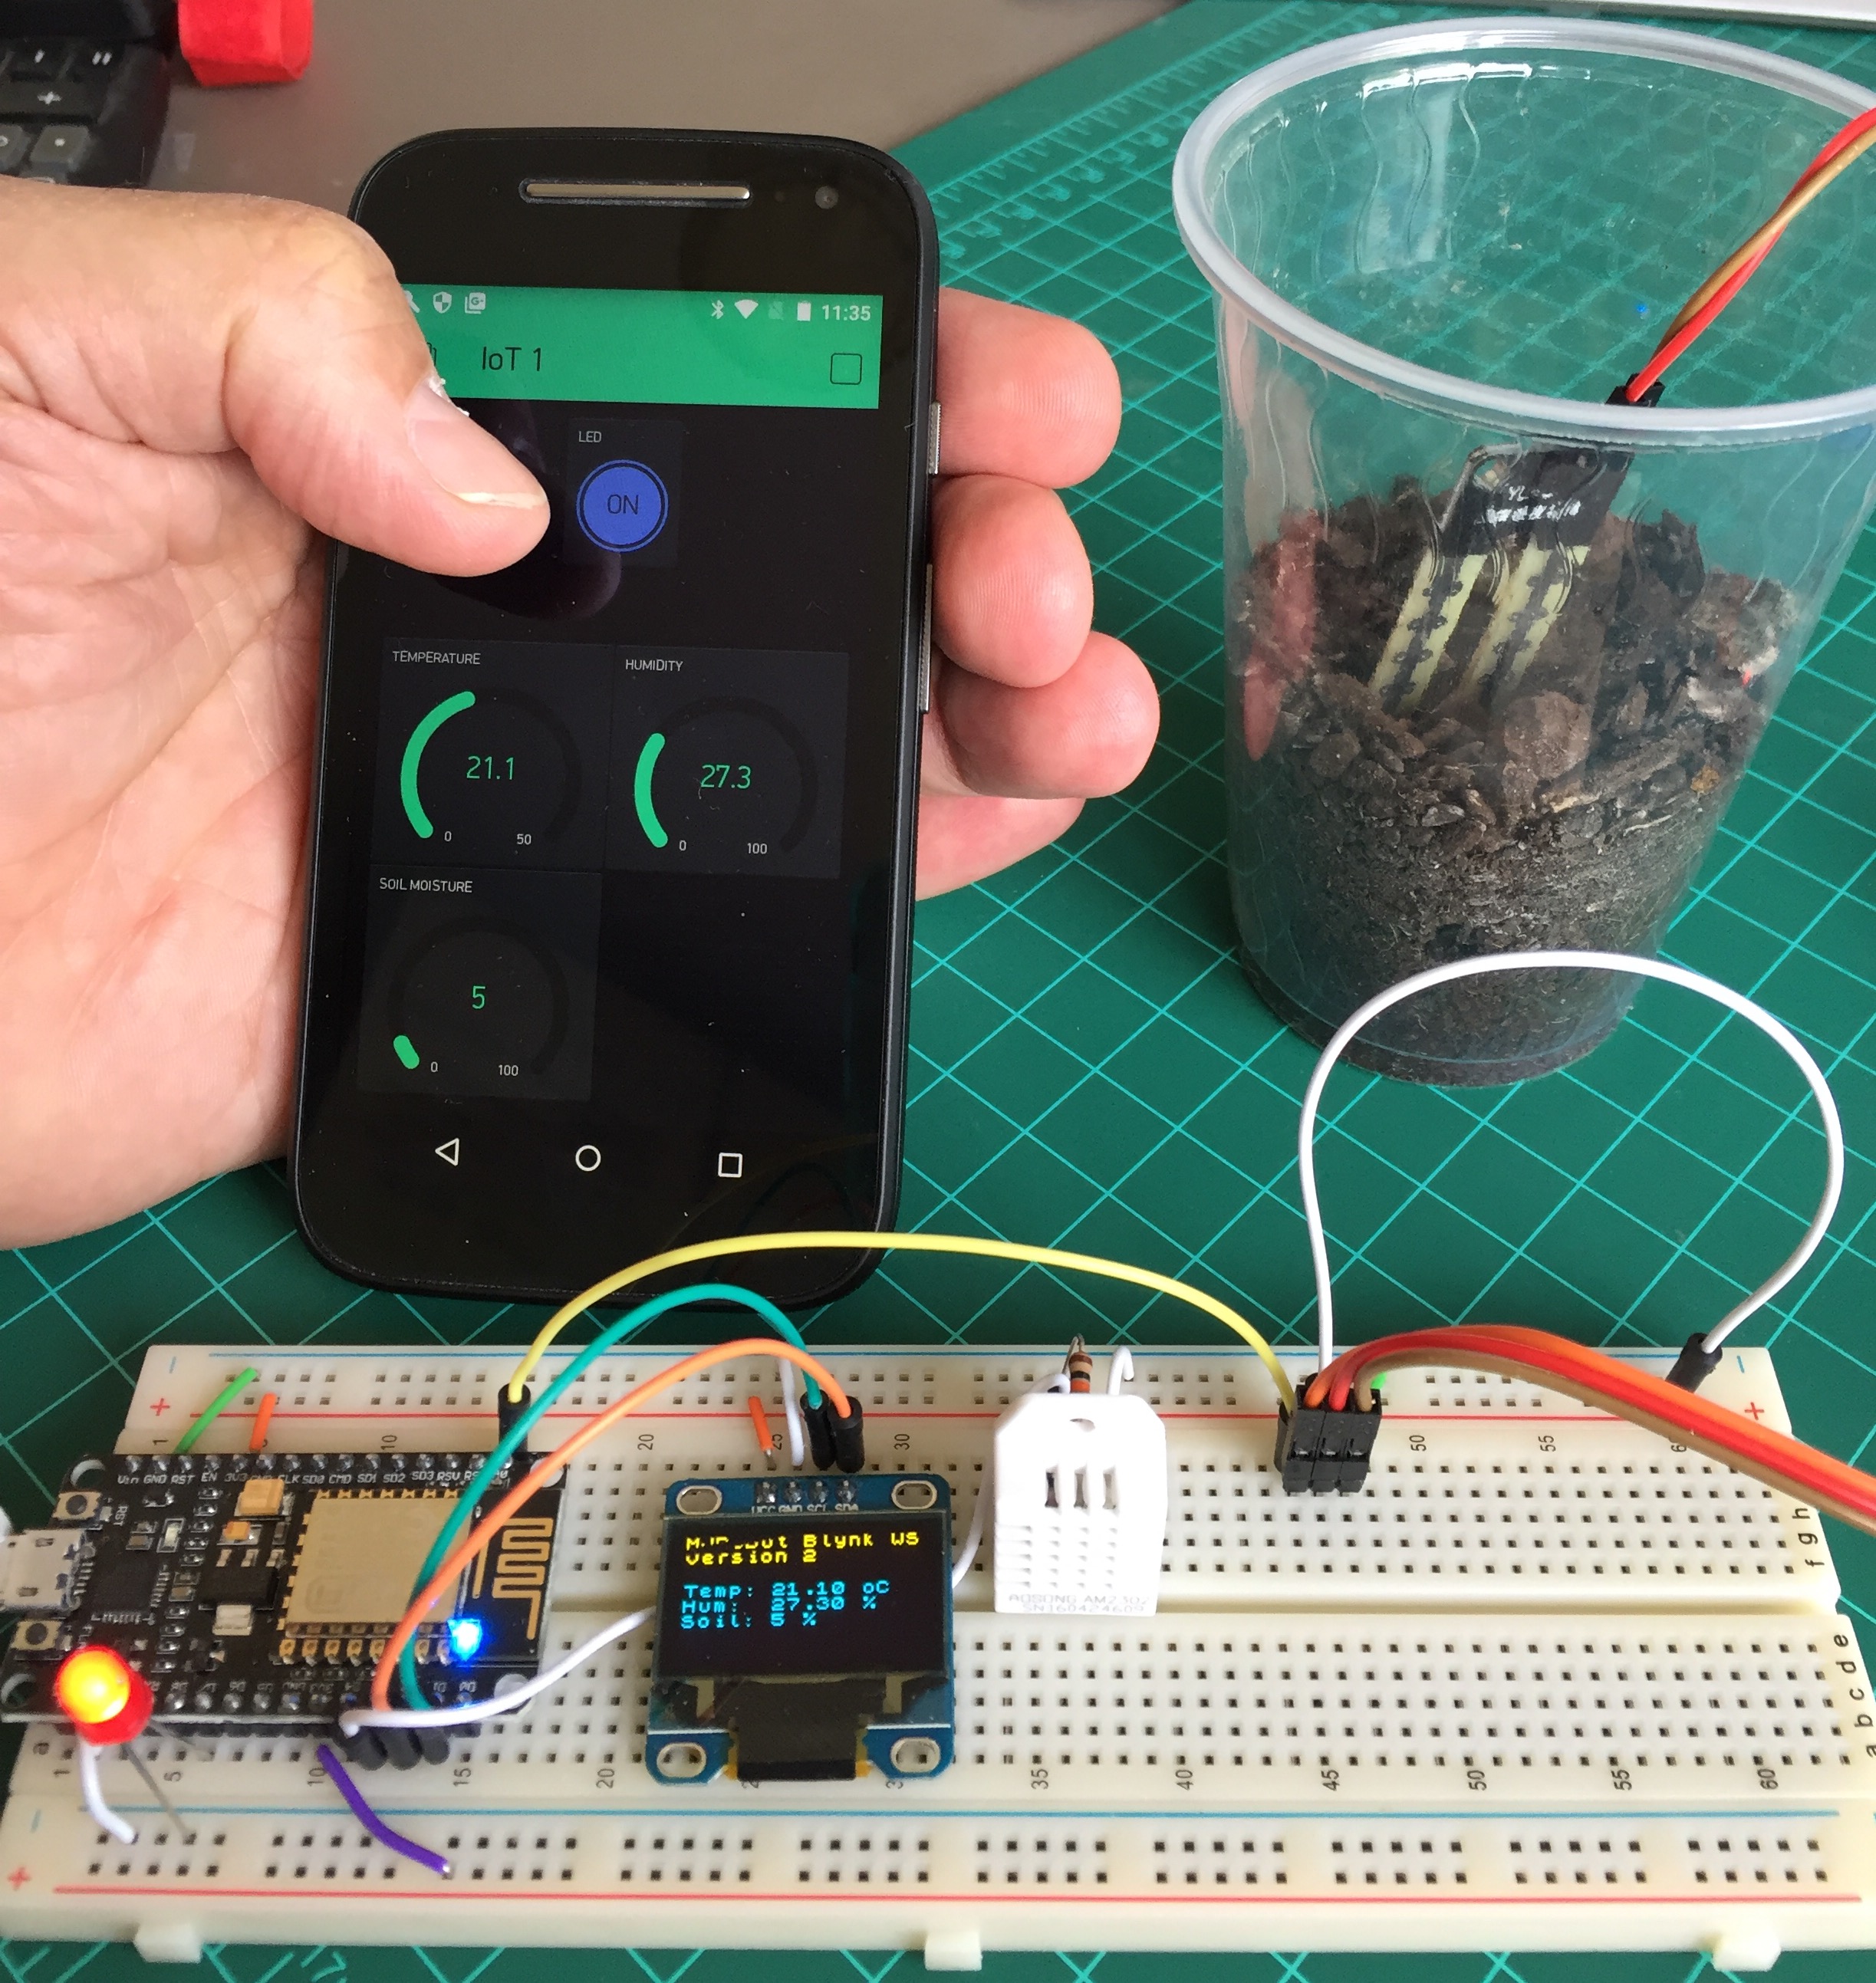
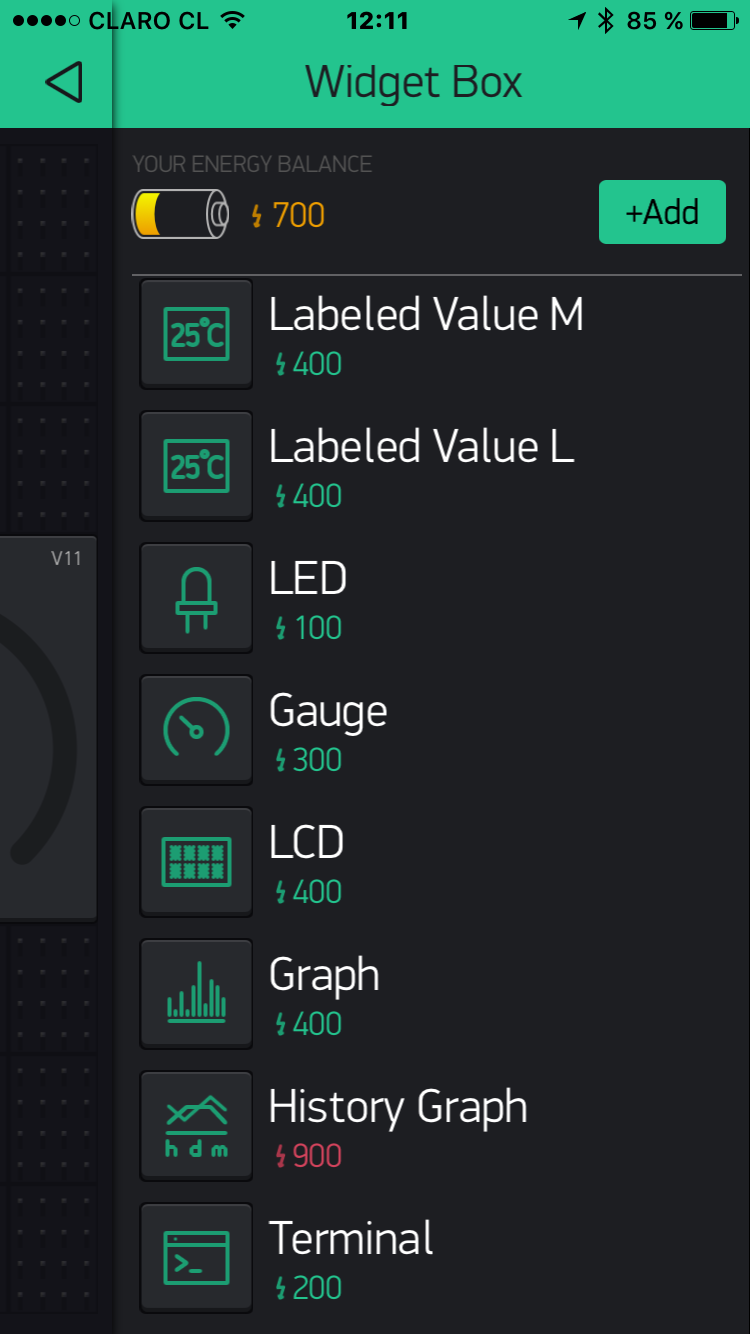
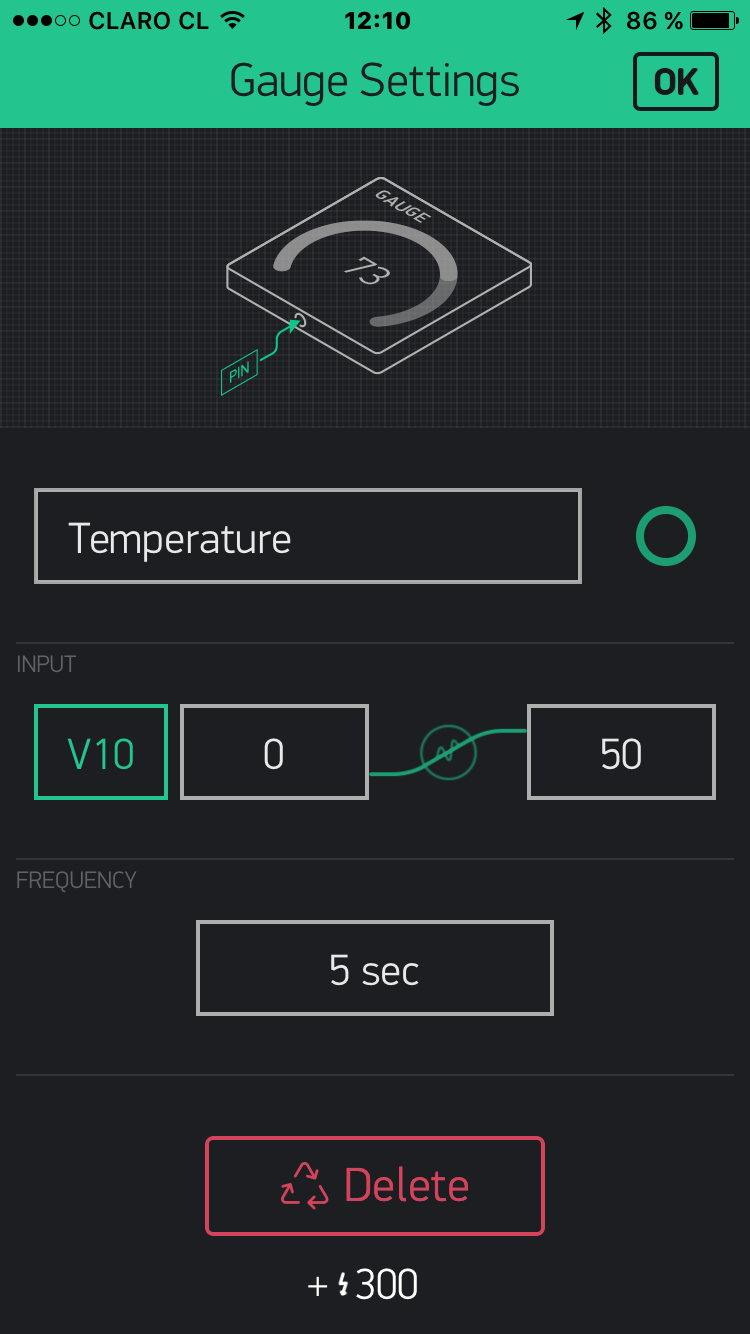
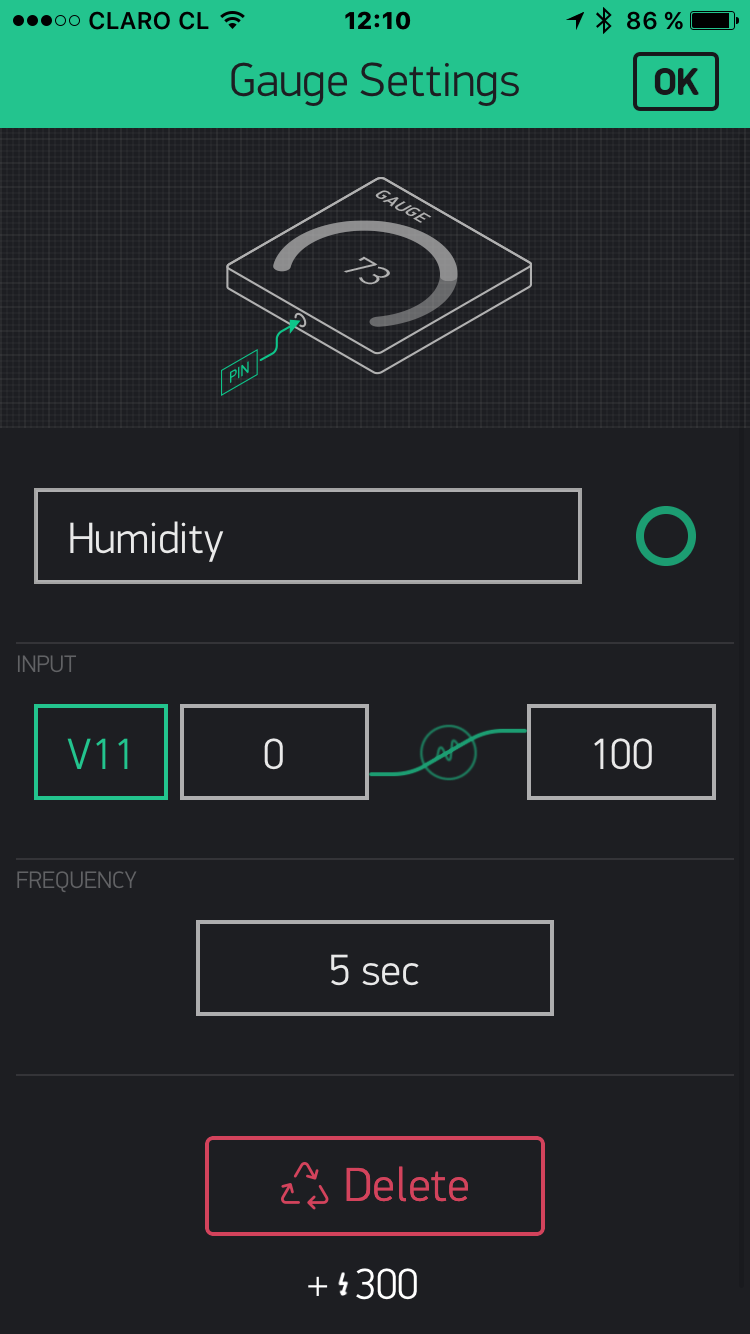
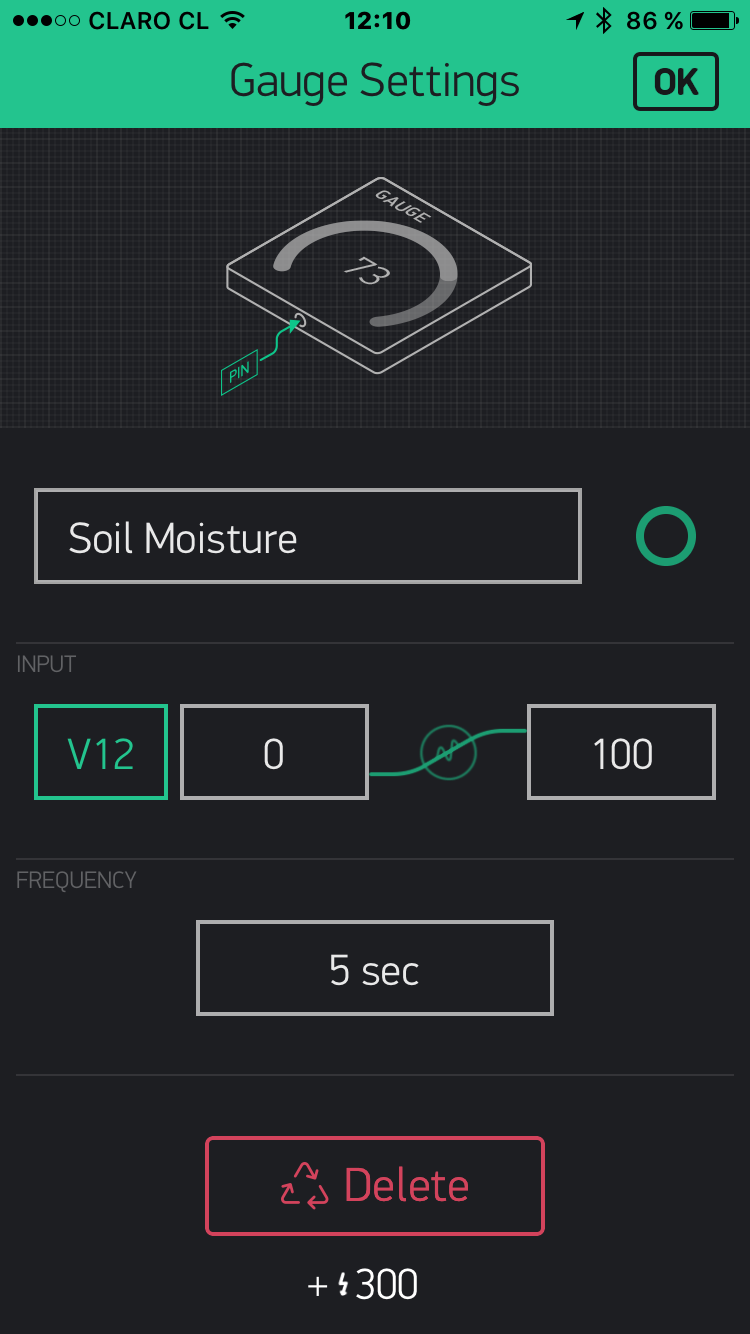
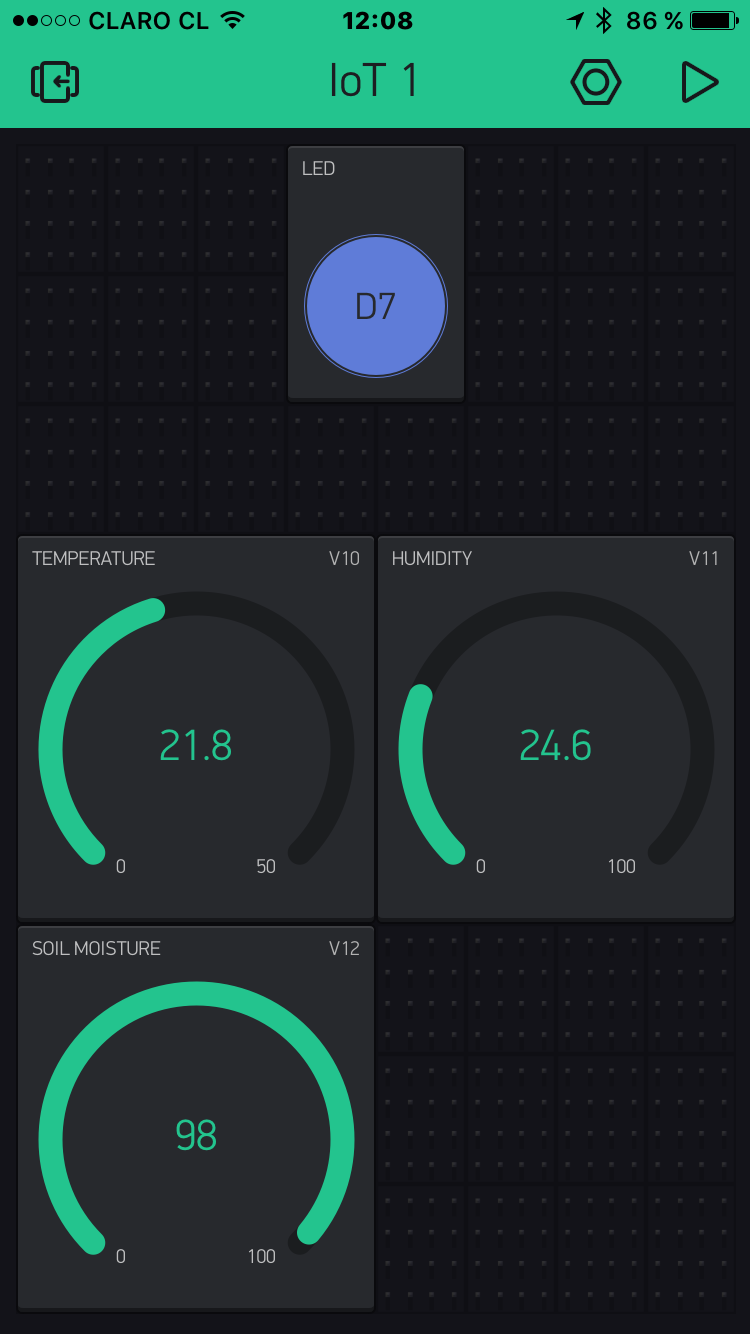
We can also send the data that we are collecting from sensors to Blynk same we did to ThinkSpeak.
Let's create a new Blink Project at our app (or update the one already created):
- Tap the screen to add new 3 Widgets. In our case "Gauge"
- For each one of them, let's define: name, input type, range and frequency to update the values.
For our sensors, that will be we will define the following "Virtual Ports"
- V10: Temperature, range 0-50oC, 5s of pooling frequency
- V11: Humidity, range 0-100%, 5 s
- V12: Soil Moisture, range 0-100%, 5 s
On our ESP12-E code we must enter the above values. We will start from the previous simple code and add the new sensors and timer. The bellow line of code included on setup(), same we saw with thinkspeak version, will force the program to run the function sendUptime() each 5 seconds.
timer.setInterval(5000L, sendUptime);
bellow you can see the sendUptime function:
/***************************************************
 * Send DHT data to Blynk
 **************************************************/
void sendUptime()
{
  // You can send any value at any time.
  // Please don't send more that 10 values per second.
  Blynk.virtualWrite(10, temp); //virtual pin V10
  Blynk.virtualWrite(11, hum); // virtual pin V11
  Blynk.virtualWrite(12, soilMoister); // virtual pin V12
}
and Voilá! the program your Blynk app is receiving updated info regrading your sensors and you can also control your LED from internet.
Bellow the complete code for our Blynk Weather Station Control app:
Downloads
Running Blynk and ThinkSpeak Simustanealy
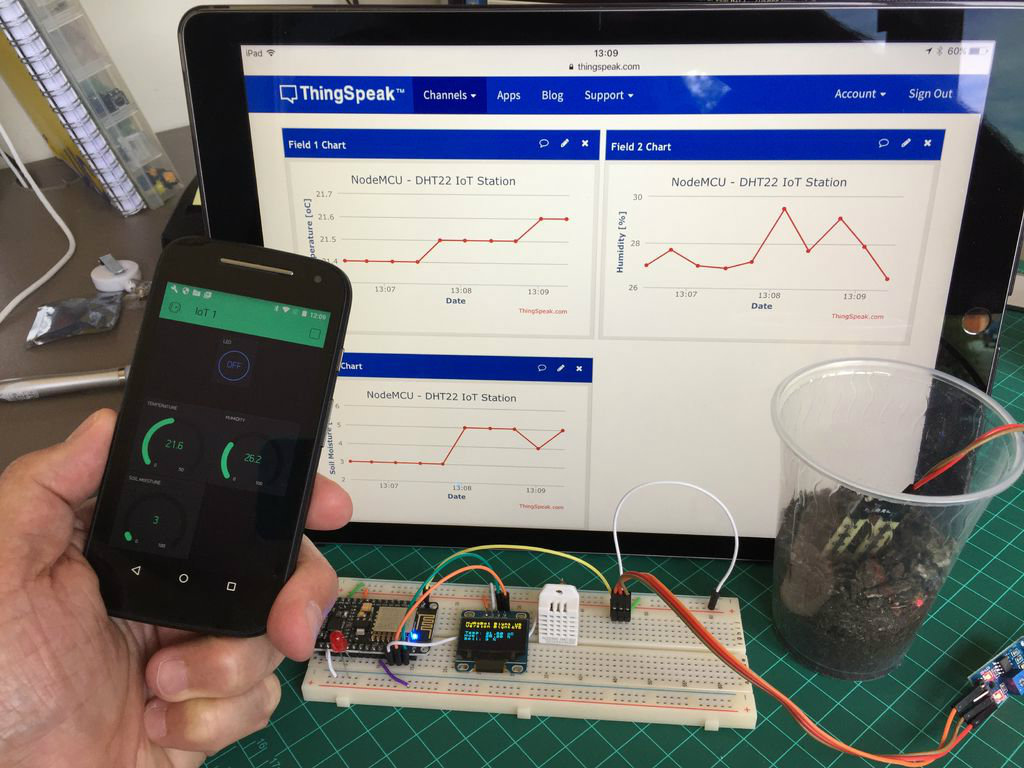
Of course we can have our data on both sites:
- Blink app (that it is great for control and mobility) and
- ThinkSpeak that is very good for historical storage and data analysis.
The bellow file shows the complete code :
Conclusion

As always, I hope this project can help others find their way in the exciting world of electronics and IoT!
For more projects, please visit my blog: MJRoBot.org
Saludos from the south of the world!
See you at my next instructable!
Thank you
Marcelo