From a Snapshot to a Great Photo : Stage One
by markuss5 in Circuits > Cameras
3351 Views, 8 Favorites, 0 Comments
From a Snapshot to a Great Photo : Stage One
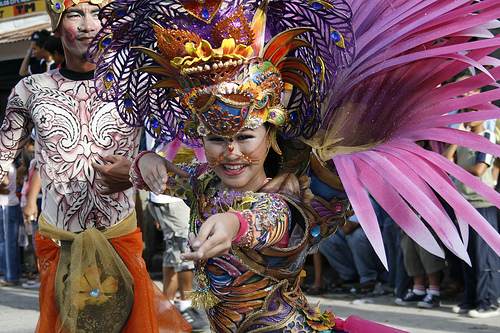
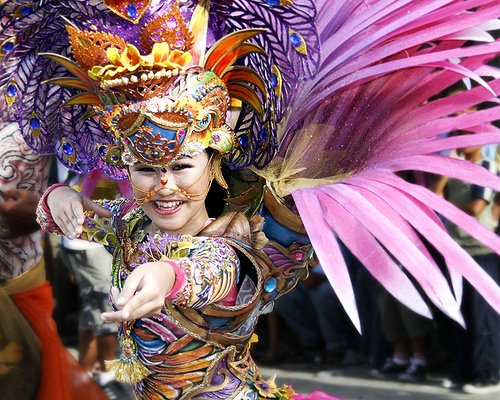
Taking pictures of people and places during street dancing festivals can be very colorful and fun.
We all get very excited clicking here and there, imagining how wonderful the costumes would come out in our pictures, how proud we would be of our prints, how exotic the dancers would look.
All the excitement and hopes soon fade away as soon as we get the prints- unfortunately. This is because we tend to get so caught up in the moment that
in most cases, all we have are snapshots.
So how do you make your snaphots into a great photo?
To learn more, go to the next page...
Visual Playground
File Downloads and Photoshop Shortcut Keys.
Before anything else;
Some of the tools that I have used in this tutorial:
ScreenPrint32 - I used it for screen printing. You can download free for unlimited use on their website.
Rule of Thirds - An action script from PanosFX. Download file and unzip to a folder and rename it as Photoshop Action Script so you can locate it easily for later use. (Check my tutorial on the "Rule of Third" here using this script.
Photoshop shortcut keys:
Ctrl+Alt+Shift+E - Merge visible layers into a separate layer and place it on top of the layer pallete.
[]- Reduce or Maximize brush diameter.
Spacebar - Panning.
B - Brush
Ctrl+Shift+I - Inverse selection.
X - Foreground and background color toggle.
Analysis
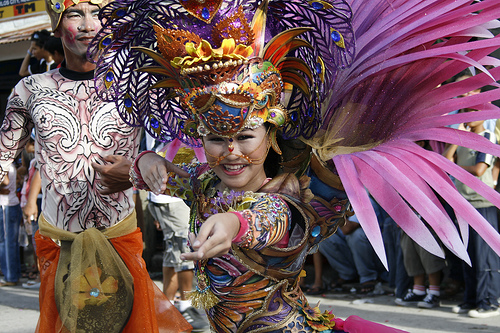
This is the original photo I took on the "Pintaflores" street dancing festival last November in San Carlos City Negros, Philippines. I really like this photo, a beautiful dancer with a great costume, an appropriate material for this tutorial.
Now let us take a moment to identify on how to improve this photo.
Exposure - Is a little bit underexposed on the subject's part. If I hadn't been too lazy, I could have snagged the shot. I was in a sort of dilemma at that time if I should bring my external flash. I opted for the beer instead (which is the right thing to do) so I can take pictures with a single hand.:)
Composition - Too centered for my taste and the guy on the left did not help with the overall balance.
Background - Very busy. I could have blurred the background with a shallower DoF but at that time it was blurred enough for me!hic....
The remaining enhancements will be for the next stage of this tutorial just so you'll come back for more.:)
Now let's roll out our sleeves and go to work!
Duplicate Background
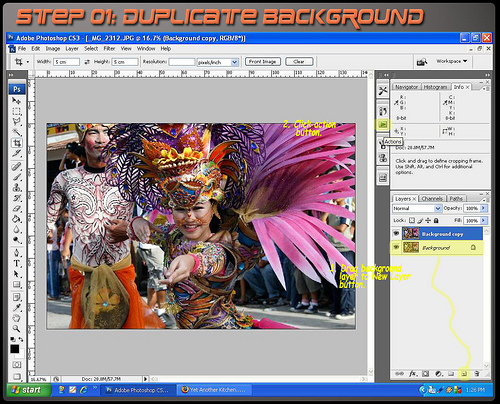
You can download a copy by clicking the image above for use in this tutorial only. Open your Photoshop and remember to duplicate the background by dragging the layer to "Create a new layer" button below the layer pallet or you can press/hold Ctrl+J keys.
Loading Action Script
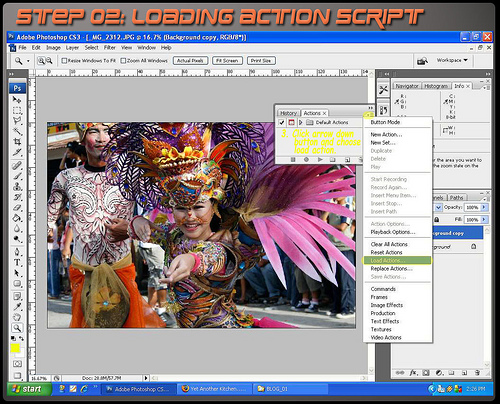
Locate the file "Rule of Thirds Cropping" where you unzipped the action script by pressing the "Load Action" option.
Running Action Script
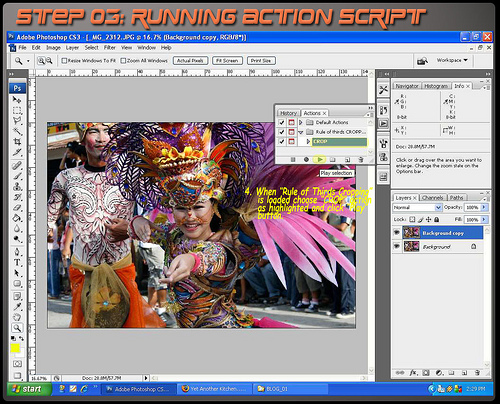
When loaded, highlight the script and press "Play Selection" and wait for the script to run completely until a yellow grid appears.
Rule of Thirds
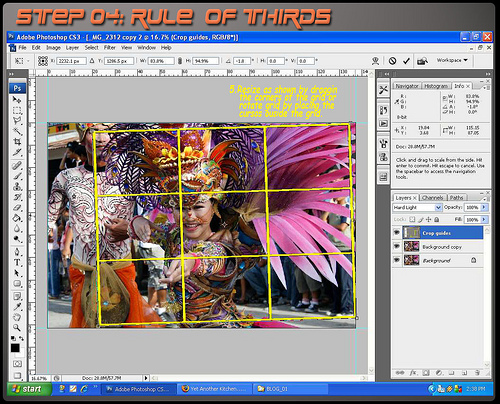
Rotate grid by click/drag mouse cursor just outside the yellow rectangle and resize by dragging transform toggles on corners and middle sections of the grid. (You can retain the image size ration by press/hold the "Shift" key at the same time.)
When done, read and follow the instructions until the action script is finished.
When done, read and follow the instructions until the action script is finished.
Applying Levels
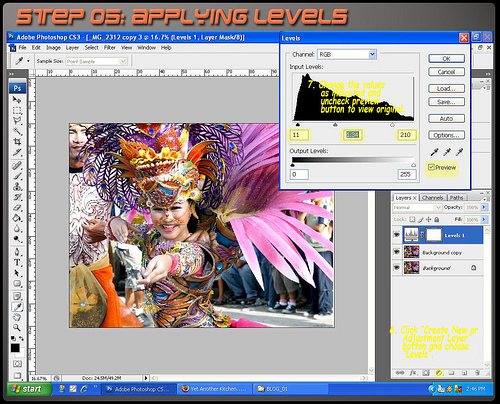
Adjust "Level" values as indicated focusing on the background. Check/Uncheck the preview check box to compare the effect. The purpose of this step is to minimize the effect of the background.
Quick Mask
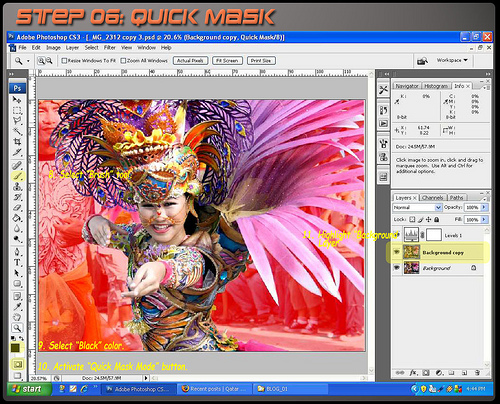
Carefully mask the background using brush in "Quick Mask Mode"and make sure that the foreground color is black.
Do not worry if you go beyond the edges. Just press "X" key to change the foreground to white and brush the excess to erase the mask. This should be a challenge on your masking skills specially on the headress part.
Do not worry if you go beyond the edges. Just press "X" key to change the foreground to white and brush the excess to erase the mask. This should be a challenge on your masking skills specially on the headress part.
Applying Layer Mask
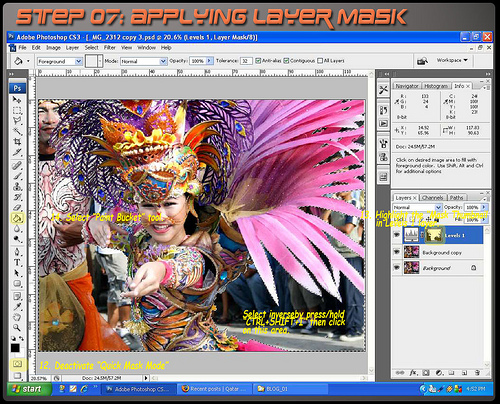
Deactivate "Quick Mask Mode" by clicking the button once. Automatically it will change into a selection. It is a good idea to save the selection by clicking "Select" tab and pick "Save Selection" option. Apply layer mask as shown below.
Gaussian Blur
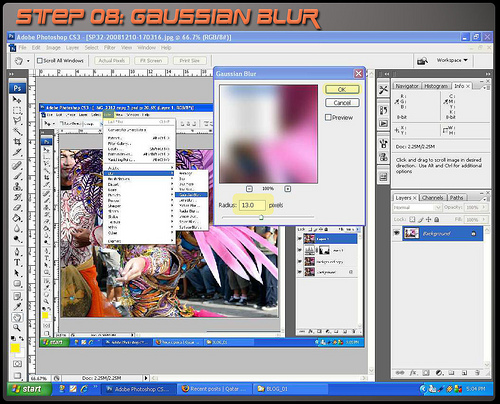
Merge layers by press/hold "Ctrl+Alt+Shit+E" into a separate layer. Then apply gaussian blur to further diminish the background making the subject stand out.
Layer Mask Selection
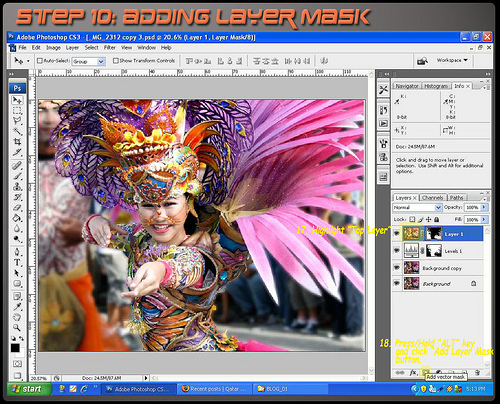

To isolate the effect only on the background, we will apply a layer mask. But first, right click on the "Levels" layer mask thumbnail and select "Add layer mask to selection", highlight the topmost layer and while pressing the "Shit" key, click "Add Vector Mask" at the bottom of the layers pallette.
Adjusting Layer Opacity
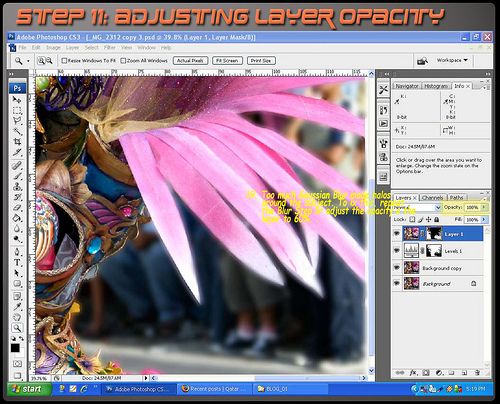
Too much blurring will produce halos at the edges. To fix that we will reduce the opacity of thelayer to minimize the blur effect.
Merge Layers & Levels
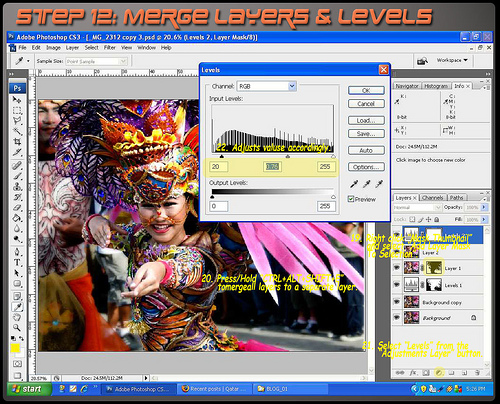
Merge layers, then darken the image by using "Levels" and apply a mask to restrict the effectonly on the background.
Adjusting Curves
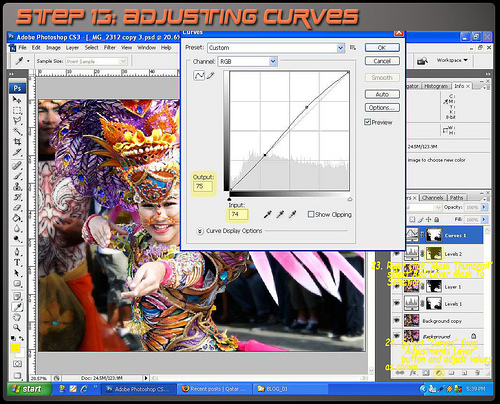
Apply "Curves" to enhance the contrast as shown.
Sharpening With High Pass Filter
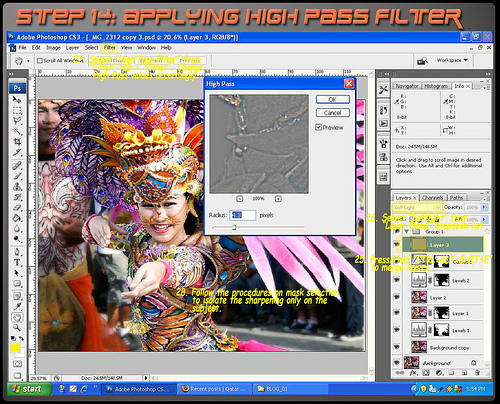
There are many ways to sharpen an image. But for this tutorial, we will use the "High Pass" sharpening filter.
Cropping
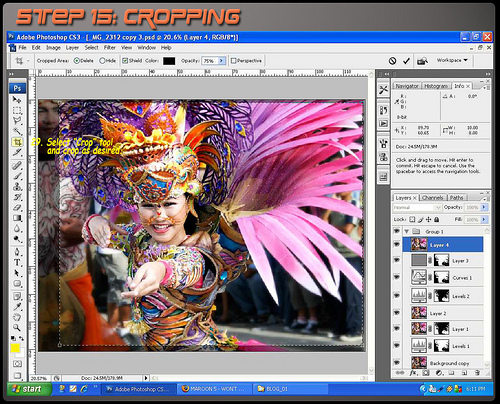
Finally, crop the image as desired. In my case, I prefer the 8 x 10 ratio.
Result
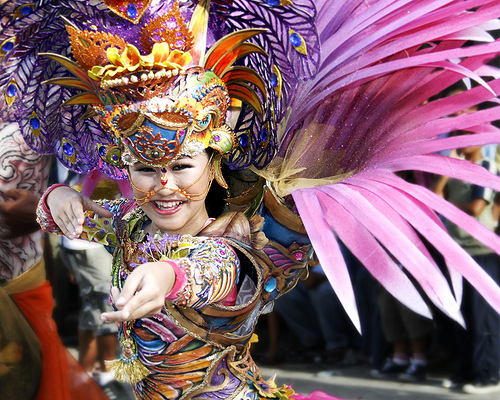
And voila! We are done.
For more Photoshop techniques visit Visual Playground
Stay tuned for the Stage Two of this tutorial. Ciao...
For more Photoshop techniques visit Visual Playground
Stay tuned for the Stage Two of this tutorial. Ciao...