From 3D Printing to Electroforming - Here's My Unique Wings Pendants
by CuForming in Craft > Jewelry
877 Views, 17 Favorites, 0 Comments
From 3D Printing to Electroforming - Here's My Unique Wings Pendants


.JPG)
.JPG)

.JPG)
.JPG)
How to Make Magical 3D Printed Electroformed Wing Pendants!
Hey everyone! 🌟
Today, we're going on a super fun and creative adventure. We're going to make magical pendants with 3D printed wings of butterflies, fairies, demons, and angels. This project combines the wonders of 3D printing with the process of electroforming to turn simple ideas into jewelry pieces.
If you love getting creative and adding a bit of sparkle to your crations, you're in the right place. I'll take you through each step, from designing and printing to assembling and electroforming.

Grab your supplies and let's get started on this magical journey together! 🦋✨
Supplies
Supplies and Materials
Design and 3D Printing
- My pre-made designs https://website.beacons.ai/cuforming/3d-printables-shop
- 3D printer https://amzn.to/45dxFg5 | https://ebay.to/3WVt5ko
- Resin https://amzn.to/3VeiGif | https://ebay.to/3RWJcLZ
- UV Lamp https://amzn.to/3wNMJ7e | https://ebay.to/4bR9R3E
Smoothing and Preparation
- Rubber bit for rotary tool https://amzn.to/4bQb0It | https://ebay.to/48P3ZGe
- Rotary tool https://amzn.to/3VgjRht | https://ebay.to/44B9mqs
Assembly
- Cabochons https://amzn.to/3wTjZdd | https://amzn.to/3wT9GWD | https://ebay.to/3XeBNKP
- Copper tape https://amzn.to/3VevSni | https://ebay.to/46GuMng
- Copper wire https://amzn.to/3wWvVLa | https://ebay.to/3JiRCIb
- Decorative craft scissors https://amzn.to/3VgSiU3 | https://ebay.to/4bPaevq
- Agate knife https://amzn.to/3VgkgAv | https://ebay.to/4bKlvNO
- CA glue https://amzn.to/3wDK3sU | https://ebay.to/3wOcowj
- UV resin https://amzn.to/3wDKeEA | https://ebay.to/3JPvi79
- Masking tape https://amzn.to/4bQbE8R | https://ebay.to/4av8aaY
Filling and Painting
- Relief paint https://amzn.to/4bSSeAh | https://ebay.to/3haxA4u
- Conductive paint https://website.beacons.ai/cuforming/tutorials-shop
- Brushes https://amzn.to/4dSmSM5 | https://ebay.to/3PgEXJe
Protection and Electroforming
- Nail polish https://amzn.to/44WhMdv | https://ebay.to/3ZPYVhS
- Liquid latex https://amzn.to/3WSJ0zJ | https://ebay.to/47RlaYf
- Electroforming setup https://kit.co/cuforming/electroforming-advanced-kit
Patina and Finishing
- Electropatina solution https://website.beacons.ai/cuforming/tutorials-shop
- Beaker https://amzn.to/4bzlPPq | https://ebay.to/3W9uDov
- Thermometer https://amzn.to/3WQLjn3 | https://ebay.to/3LSboM1
- Liver of sulfur https://amzn.to/4aIKvUI | https://ebay.to/3BOoR1i
- Acetone https://amzn.to/3UULsTJ | https://ebay.to/3UGNC7W
- Bristle brush wheel https://amzn.to/44ZayFM | https://ebay.to/3WX8bkO
Safety Supplies
- Protective gloves https://amzn.to/3KdcD7z | https://ebay.to/3Q7Ka6C
- Safety goggles https://amzn.to/4aCVyyD | https://ebay.to/44U07mV
- Respiratory mask https://amzn.to/4azAsAX | https://ebay.to/3AJtJoy
That's everything you'll need to create your own 3D printed electroformed wing pendants! Have fun crafting ! ✨

Step 1: Designing the Wings
First things first, we need to design our wings. I used Blender, which is a cool software for creating 3D models. If you're new to Blender, don't worry—it took me months to learn, but it's totally worth it. If you want to skip this step, you can buy my ready-made designs from my shop!


Step 2: 3D Printing the Wings
Now that we have our designs, it's time to print them. I'm using a resin 3D printer and Anycubic's water-washable resin. This resin is great because you can wash it with just water, which means no smelly isopropyl alcohol! After printing, I cure the wings in the sun because it's free and we have plenty of sunshine in my region. I only use a UV lamp on cloudy days.


Step 3: Smoothing the Wings
Next, we need to make our wings smooth and silky. I use a rubber bit on a rotary tool to remove any support marks. Make sure to wear a mask during this step—keeping healthy is super important! When the wings feel nice and smooth, we're ready to move on.


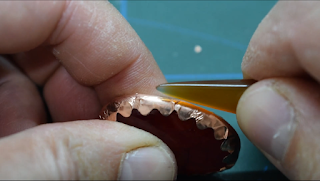
Step 4: Assembling the Parts
Now comes the fun part—assembling our pendants! I like to arrange the wings and cabochons to make each piece unique. To add an extra touch, I use copper tape to create bezels around the stones. Decorative craft scissors help make fancy edges, and an agate knife helps the tape stick tightly.

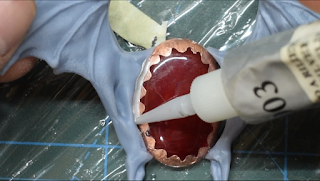
With everything in place, it's time to glue our pieces together. I use CA glue to join the parts, but it's a bit messy. Don't worry if some glue spills—hardened glue can be cleaned off later. For attaching the bails (the parts that let you hang the pendant), I switch to UV resin for extra strength.


Step 5: Filling the Gaps
To fill any hollow or concave spots, I use relief paint. This might need more than one coat, so be patient. Once it's dry, our pendants are ready for the next step.

Step 6: Applying Conductive Paint
Now, we need to make our pendants conductive for electroforming. I use my graphite conductive paint formula and a brush to spread it evenly. A large brush helps avoid lumps, and a small one is great for details. Make sure to cover every spot with a second coat!


Step 7: Protecting the Stones
Before electroforming, we need to protect our stones. Nail polish works well for this, especially on smooth surfaces. I carefully apply it with a toothpick to keep the edges neat.


Step 8: Electroforming Time!
Finally, it's time to electroform our pendants. I measure the surface area to calculate the right current. One method is to trace the silhouette on paper, draw squares and sum up to get the total area. Alternatively, I use Blender for precise measurements. Each run takes about two days—set the current low for the first day and a bit higher for the second one.


Step 9: Adding Patina
After electroforming, it's time to add some color with patina. I use electropatina for bright, durable colors. For dark colors, I use liver of sulfur. This step makes our pendants look even more magical!


Step 10: Final Touches
The last step is to clean up and add the final touches. I remove the nail polish protection and any glue residue with a bit of acetone. A bristle brush wheel helps highlight the ridges, removing the black liver of sulfur patina and keep the copper shiny.


Conclusion
And there you have it—a stunning 3D printed electroformed wing pendant! This project was an amazing journey from virtual sketches to real-life treasures. I had so much fun, and I hope you did too. Remember, with a bit of creativity and some science, you can make anything sparkle and shine!
If you want to see the entire process in action, make sure to check out the related video on my YouTube channel. You'll get to see each step in detail and maybe pick up a few extra tips and tricks along the way. Don't forget to like, subscribe, and hit the bell so you don't miss out on future projects.
Thanks for joining me on this adventure! Always be creative, and I'll see you next time!
Happy crafting by CuForming! 😊✨