Face Following Sunflower
by CroissantPoisson in Circuits > Electronics
1149 Views, 7 Favorites, 0 Comments
Face Following Sunflower


Inspired by the hit song "You Are My Sunshine" sung by Christina Perri, the design we will create is a sunflower that follows your face, symbolizing that you are the sunshine. The design also draws inspiration from Flowey from the game Undertale. Flowely, a smiley flower who introduces you to the game and then quickly turns to attack you, proves to be a menacing threat for the rest of the playthrough. Therefore, to match the character of Flowey, the design is given an uncanny vibe; it has eyes that glow red and plays a childish lullaby when it sees someone, creating an unsettling feeling for the person deemed to be the flower's sunshine.
This project heavily utilizes AI in both its function and the design process. There is a face recognition AI that gives directions for how the flower should rotate, the song played by the flower is AI generated, and AI tools are used to create the 3D model of the flower. While this may sound complicated, the creation of this flower only requires minimal 3D modeling and programming skills because AI will do most of the heavy lifting. This instructable will guide you on using AI to create AI and much more! The final product can be used as a fun way to scare friends and family, and it also functions as a face-following camera for your online video meetings.
Supplies
Materials
Webcam
3D Printer + Filament
Servo Motors (x2) + Servo Attachments
Jumper Wires (Male to Male and Male to Female)
Resistors (x2 220 Ohms)
LEDs (4 yellow, 1 red)
Breadboard
Arduino (UNO)
USB A to USB B 2.0 Adapter
Battery Cases + Four 1.5V Batteries
Adhesive (Hot Glue or Strong Tape)
Software
Fusion 360 + Project Salvador plug-in (3D Modeling + AI)
Cura (Slicer)
Python (Code)
Arduino IDE (Code)
Chat GPT (AI)
Suno (AI)
Tinkercad (Circuit Design)
Modeling the Flower and Pot


We will use Fusion 360 to model the flower due to its ease of access and high-end functions. To incorporate AI into the 3D modeling process, we will download a plug-in called Project Salvador, which allows users to enter a prompt and generate an image to use as a canvas Project Salvador can create almost any image in any style, from pandas wearing dinosaurs costumes in the style of Vincent van Gogh to a Nyan Cat with a pancake instead of a pop tart. Then, Project Salvador takes these wild images, or canvases in the case of Fusion 360, and generates a sketch from them. Images in the style of clipart work best for sketches. Asking Project Salvador for photorealistic images tends to create convoluted sketches that are not useable — unless you’re looking to 3D model abstract art. From there, we will base a flower model on the sketch created by Project Salvador, making small changes to ensure the flower has the requisite features to incorporate the LEDs, servos, and camera to enable it to follow one’s face.
First, we will have to install Project Salvador. To do this, head to the Fusion 360 plug-in store, which can be found at Project Salvador | Fusion | Autodesk App Store. Project Salvador is free for all users. To create our (totally) friendly and harmless sunflower, we used Project Salvador’s generate canvas feature and inputted the prompt “smiling sunflower with leaves and stem clipart simple”. Project Salvador also gives you the option to enhance your prompt, where AI is used to rewrite the original prompt in a more detailed manner. Afterward, you can select Generate Image, and then Project Salvador uses the prompt to create a custom image for the canvas. If the image isn’t to your liking, you can click Generate Image again to create a new image. Remember, each image generated by Project Salvador is unique, so continue to experiment with your prompt and settings until you find an image you like!

After selecting OK, the image is automatically uploaded as a canvas. Then, you can resize the canvas by double-clicking the image under the canvas tab and selecting calibrate. Afterward, select two points and the distance away from them. Here, we will calibrate the canvas based on the width of the stem, which we want to be strong enough to support the flower’s head. Another important factor when resizing the canvas is the size of your printbed. By setting the width of the stem to 14 mm, the width of the sunflower was about 60 mm, which meant that the flower had to be split into multiple parts. It was too big to fit on the print bed.

Next, use Project Salvador’s generate sketch feature and select the canvas. Within a minute, project Salvador creates a sketch of the outline of the entire canvas. Additionally, we will edit the base of the sunflower’s stem to be a flat surface since we will attach the servo base to the sunflower here.

Once the outline of the flower is extruded, select the remaining profiles and extrude those features to 17 mm. Afterward, create a base with a radius of 36mm at the bottom of the flower for the bottom servo to attach to. Cut the shape of the servo attachment to the base for an easier attachment later on.
We will now create a dovetail joint. This allows us to print the flower in multiple parts and easily connected it later. With the sunflower facing you, select the front of the stem as the plane for a new sketch. At the base where the flower base and the stem meet, create a trapezoid with the taper facing downward. Remove the bottom line and connect the bottom left point of the trapezoid to the bottom left point of the stem. Repeat with the right side. Apply a 1 mm fillet on all the corners and offset the profile by 1 mm upward (this tolerance may vary based on the quality of your 3D printer). Connect the lines at the left and right end, creating a closed profile.
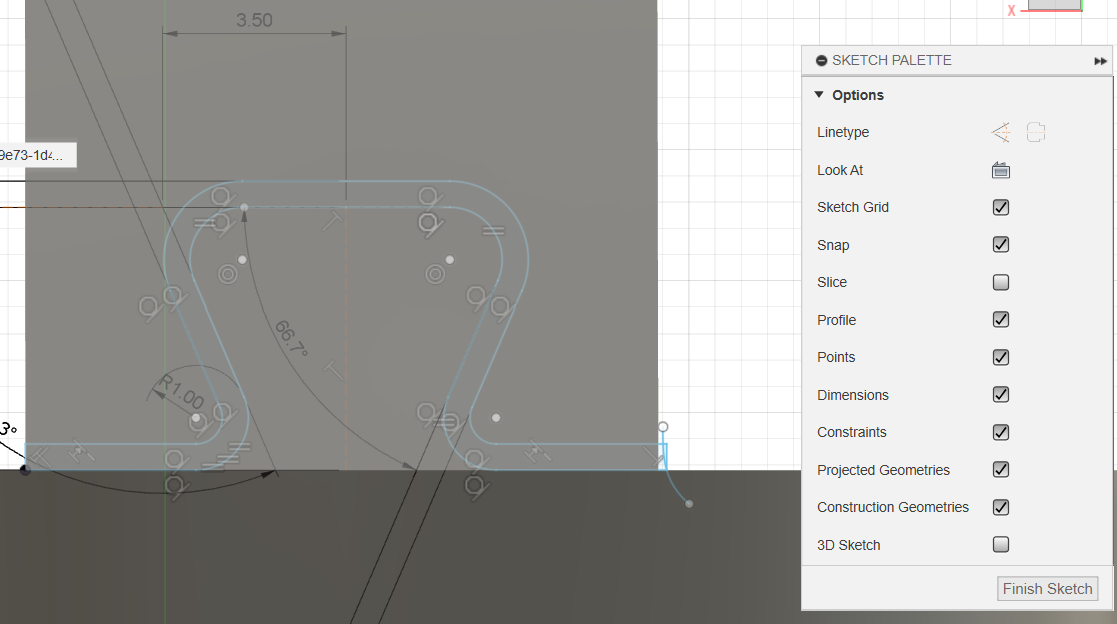
Extrude the created profile through the stem to create the dovetail joint.
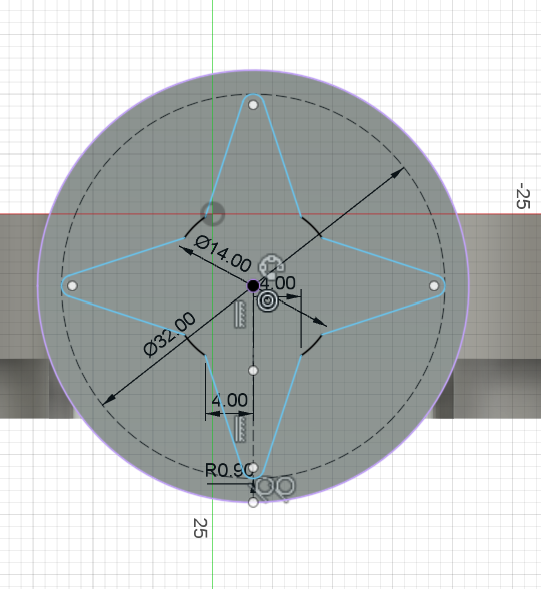
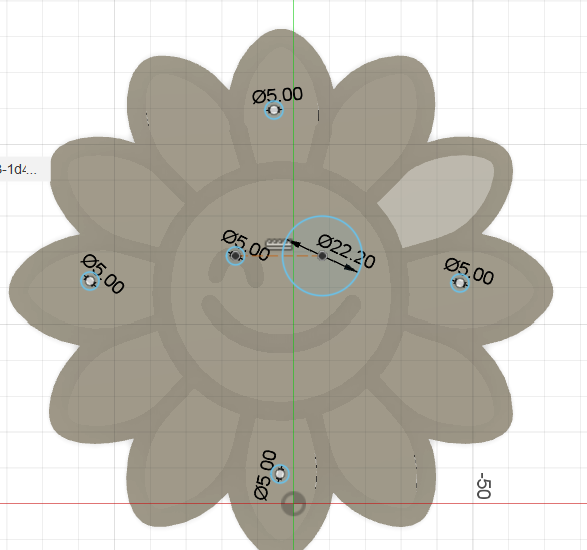
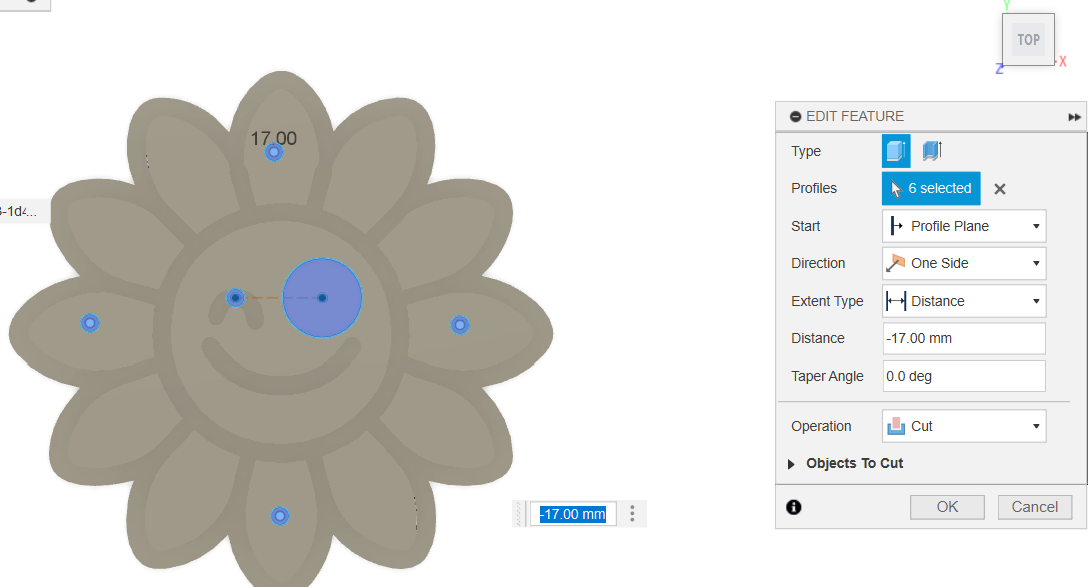
We will now add holes for cameras and LEDs. Create a sketch on the plane of the flower’s face. Using the center diameter circle, create five circles — five 5 mm diameter holes for the LEDS and one 22 mm diameter hole for the camera. Four LED holes will be on the petals, one each on the center of the sunflower’s north, east south, and west petal if imagining the sunflower as a compass rose. The final LED hole is centered on the sunflower’s right eye, which is on your left-hand side if the flower is facing you. The camera hole is centered on the flower’s left eye.
Selecting all six of the holes, extrude them through the entirety of the sunflower.
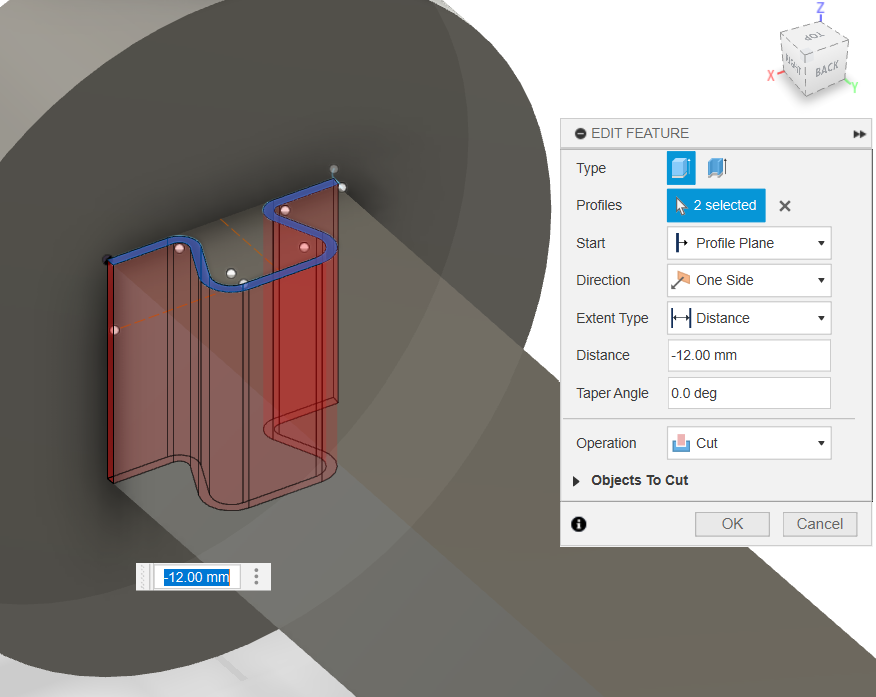
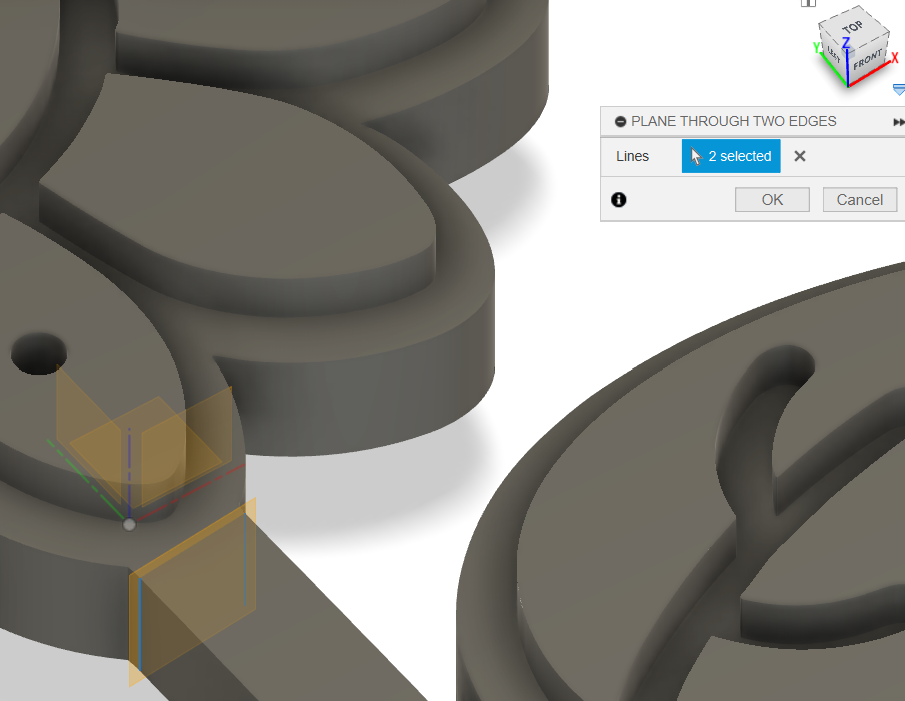
To ensure our sunflower head can move around freely and track the user’s face, we have to separate it from its earthly tethers (the stem in this scenario). Under the offset plane option, open the plane creation menu and select plane through two edges. Select two vertical lines on either side of the stem where the head of the flower meets the stalk. This creates a plane separating the sunflower’s head and stem.
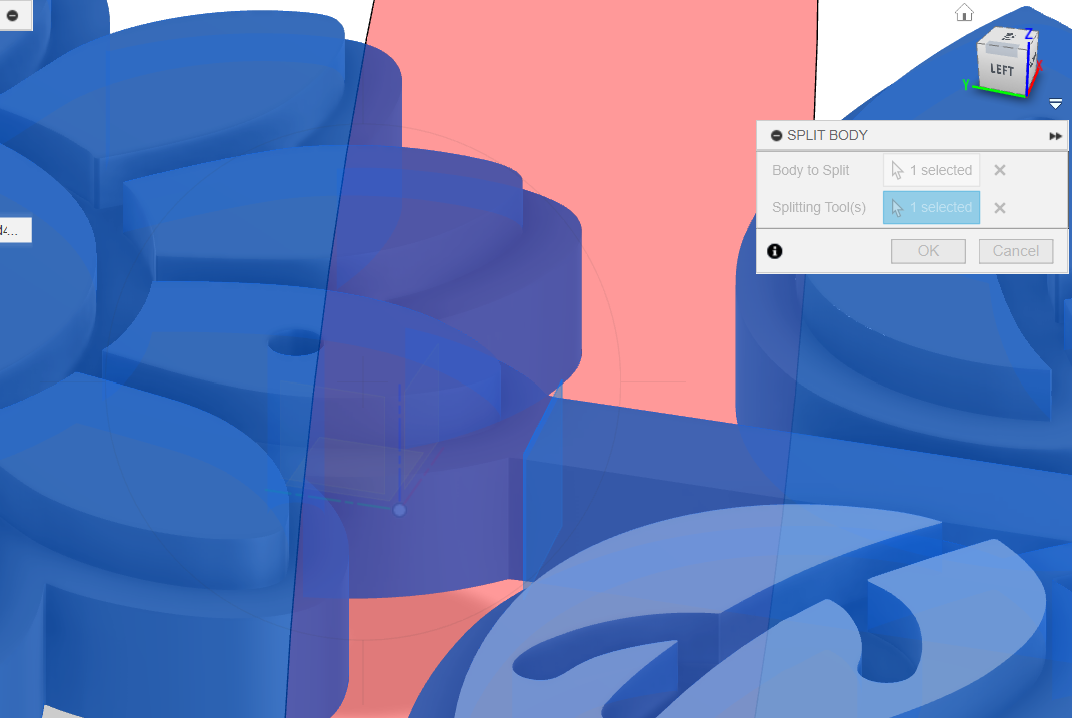
Using the plane, select the split body under the modify tab, choosing the sunflower as the body and the plane as the splitting tool. This effectively cleaves the sunflower into two easy parts that easily fit onto the print bed.
Congratulations! You have modeled your very own flower, ready to scare your friends and family at night!
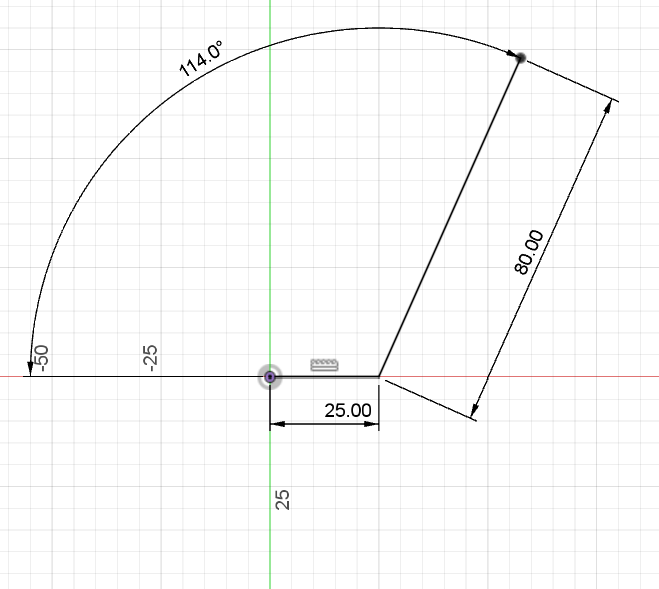
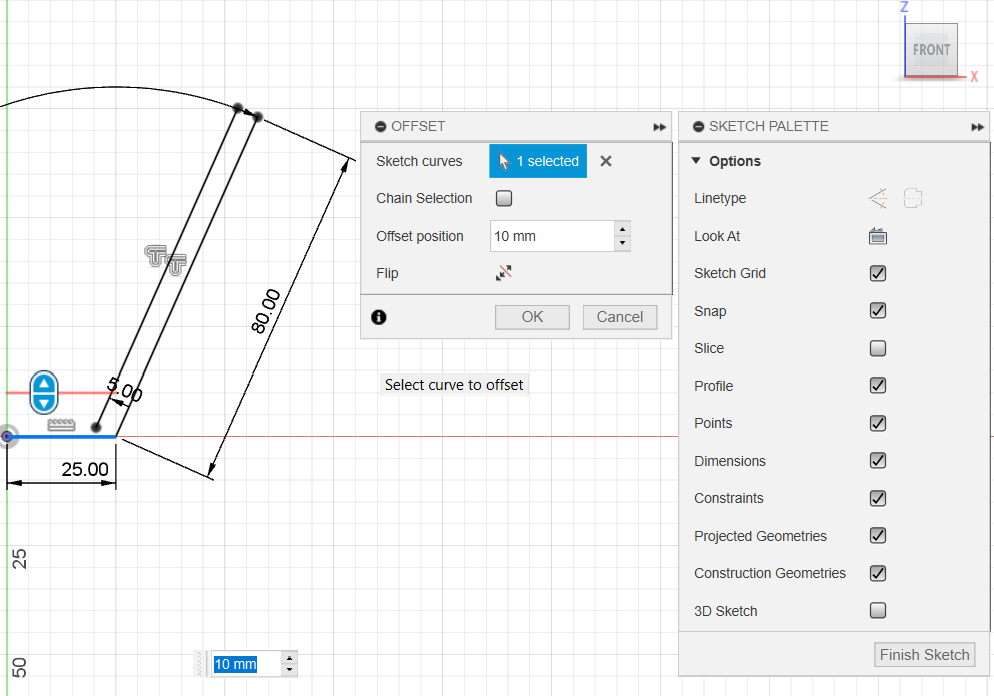
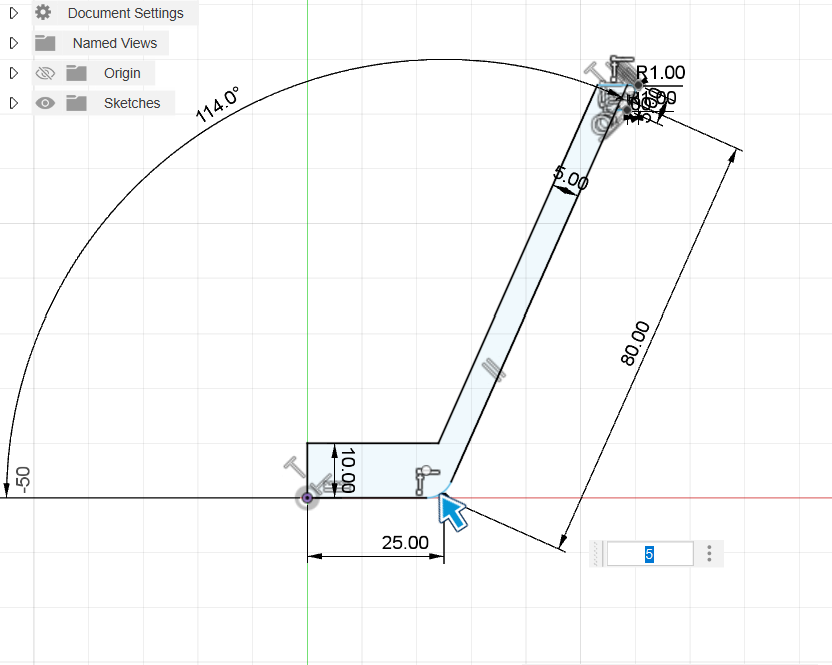
Now it is time to model the pot the flow will reside in. Select the xy plane as the plane of a new sketch, this will be the plane for the flower pot sketch. Create a horizontal line 25 mm in length from the origin, then create a line 80 mm in length and 114 degrees apart from the previous line.
Offset the angled line 5 mm upward and the horizontal line 10 mm upward. This is only possible if chain selection is turned off.
Using the trim tool, which is accessed through the “T” keyboard shortcut, remove the intersecting line segments.
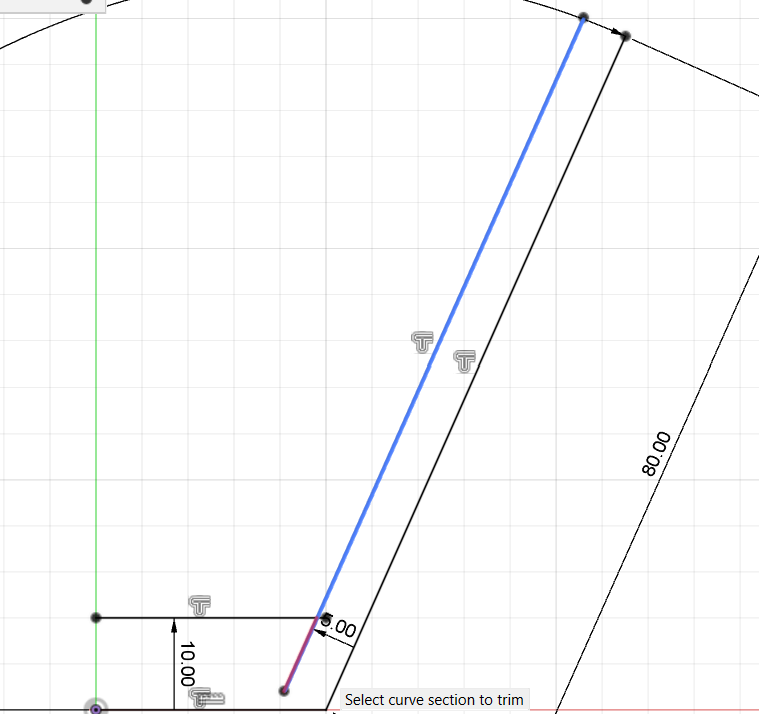
Connect the two segments by placing a vertical line connecting their leftmost points and an angled and horizontal line connecting their top right points at a 66-degree angle.
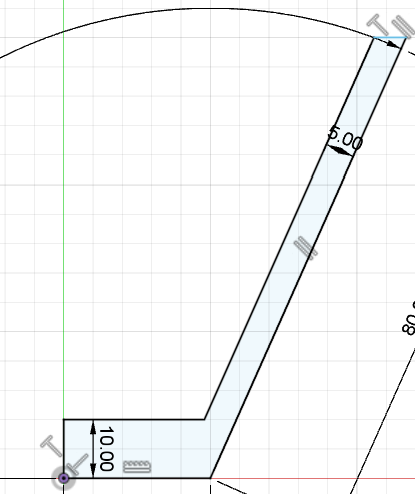
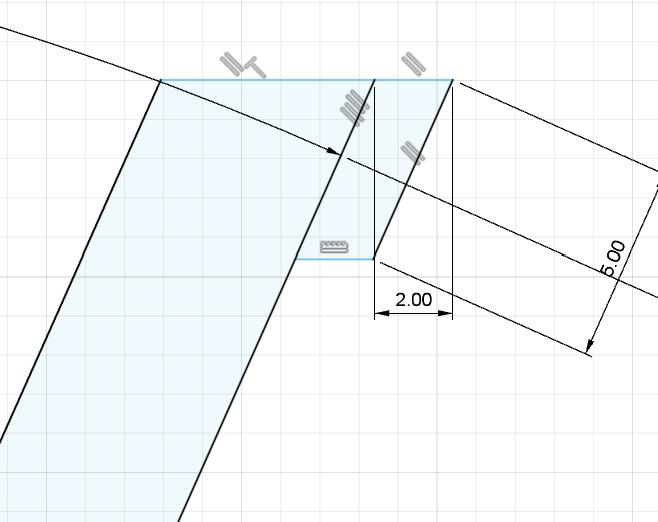
From the top-right point of the shape, create a horizontal line 2 mm in length. Then create a line parallel to the angled line and 5 mm in length. Close the shape by connecting the walls of the pot with the angled line.
Add fillets accordingly to the edges of the plant pot profile.
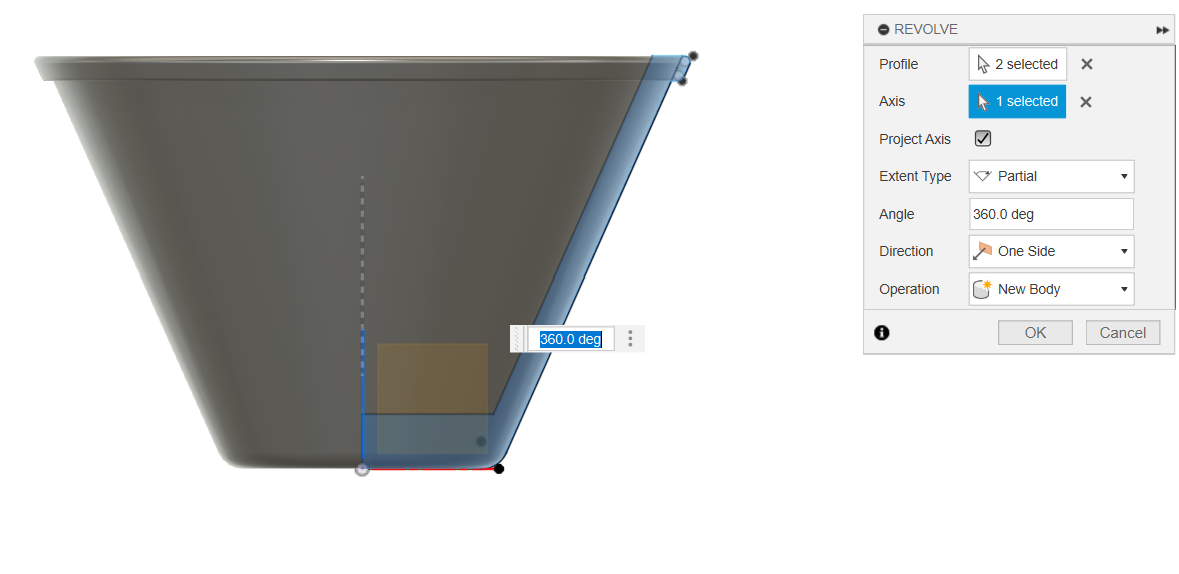
Exit sketch mode and use the revolve tool by selecting both of the profiles and the y-axis.
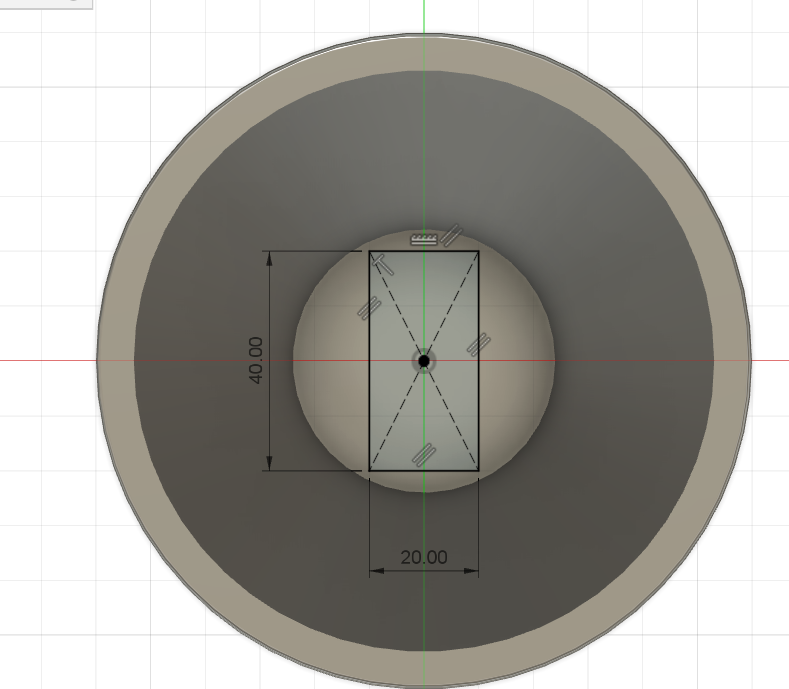
Create a sketch of a 20 mm by 40 mm rectangle centered on the y-axis on the inner bottom of the pot.
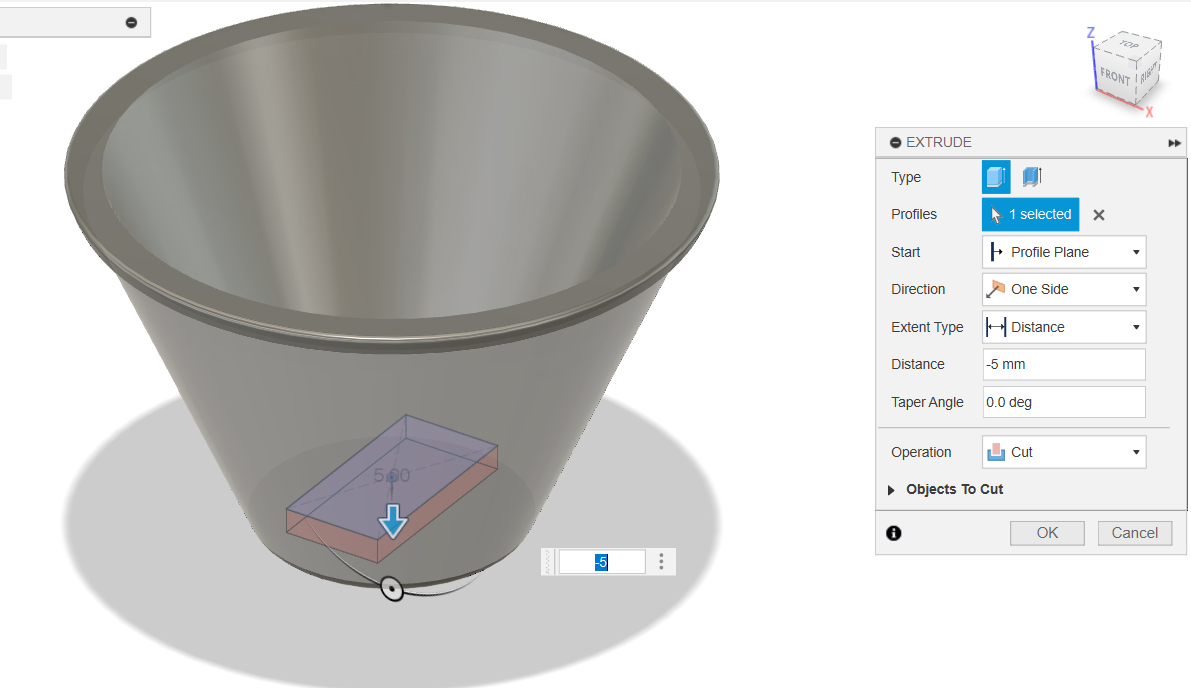
Extrude the rectangle 5 mm into the pot.
Now that the 3D models are complete, slice them using Cura or another slicer and send them off for 3D printing. We printed in white filament as that is typically the color of Flowey's sprite when we interact with him in game.
Assembly and Wiring


Now that we have modeled and printed the flower, we have all the parts required for this flower, so it is time to put them all together. First, we use hot glue or strong tape to connect certain parts. There is a dovetail joint between the base of the flower and the stem, but we will still use hot glue in between these parts so that they stay together.

We will also glue the camera onto the flower head. Following this, stick the servo attachments to the webcam and the base of the flower. It does not matter what attachment you use. These allow the servos to directly turn these parts. The servo connected to the camera will turn the flower head up and down and the servo connected to the base of the flower turns left and right.

Now, put one of the servos into the slot in the pot with the wire coming out of the bottom opening of the pot. Then, put the base and stem of the flower on top of that servo. Finally, place the second servo on the top of the stem and attach the webcam and flower head.

Now that the flower is put together, it is time for the wiring. It is important to have a wiring diagram as things often get messy with a lot of jumper wires around. Tinkercad is a free program where you can easily create wiring schematics.

This is the wiring diagram for the flower. It may look complicated, so let's get through this one component at a time. Starting at the right, there are four batteries. These batteries are in series because the red positive terminal of one battery is connected to the black negative terminal of the next battery. The remaining terminals are the positive and negative terminals of the equivalent battery. Since there are four 1.5 V batteries in series, the equivalent battery is a 6V battery, the sum of its parts.
Next, are the four yellow LEDs on top of the breadboard. LEDs have a positive and negative end. Two legs extrude out from an LED, and the longer one is positive while the shorter one is negative. Since all of these LEDs will light up at the same time, we can connect the positive inputs to the same row of the breadboard. The negative output side, which is the shorter leg, will be connected to the ground bus line at the top of the breadboard. Then the breadboard row connected to all of the positive yellow LED legs will be connected to pin 2 of the Arduino with a jumper wire and resistor. It is essential to use resistors so that LEDs will not burn out. The red LED wiring follows the same logic, but it has to light up at a different time than the yellow LEDs, so it is connected to pin 3.
The servos are at the bottom of the diagram. They have three wire connections: ground (brown), power (red), and signal (orange). Connect the ground and power to their respective bus lines and then connect the signal wire of the servo in the pot to pin 8 and connect the servo on top of the stem to pin 9.
Finally, connect the ground of the Arduino to the ground bus line. This creates a complete circuit path. We cannot use the 5V output of the Arduino because it does not output enough power for 2 servos. Therefore, we are using 4 batteries as the power supply instead.

This is the physical wiring that I ended up with. It is an equivalent circuit to the one shown above in the diagram. Jumper wires are very convenient to use, but they are very messy. The breadboard fits nicely at the back of the pot. To get the LEDs attached to the flower, first place stick the legs through the front face of the flower. Then, attach the female ends of the jumper wires to the legs. The jumper wires will prevent the LEDs from falling out.
Music


"You Are My Sunshine" sung by Christina Perri is a wonderful song, and we are going to make an uncanny lullaby inspired by it. We will use AI for this entire process.
First, we will generate lyrics for the song using Chat GPT. We will ask Chat GPT to write lyrics for a subtly uncanny lullaby based on the phrase "You Are My Sunshine" as the first line.

You can ask Chat GPT to regenerate the lyrics until you find something that fits perfectly with you. If you want specific things to be added to the song, point it out in your prompt and Chat GPT will follow.
Next, we will use Suno to generate the song using these lyrics. Suno can make any type of song with custom lyrics based on the prompts you put in, and you can create several free songs every day. Click Create on the sidebar, turn on custom mode, and copy and paste the lyrics from Chat GPT. Remove the (Verse 1), and (Chorus) texts from the lyrics. Then, type in the style of music and click generate. Suno will generate two versions of the song.

Click the three dots on the bottom bar next to the song title and download the song. We will have the flower play this song later.
Downloads
Programming

In the era of AI, where anything can be computer generated, the most important skill is not the ability to create something, but instead how well it can be described. A program is simply a function. A certain input will cause a certain output. Programming is how this function is defined, and it is a difficult skill that takes hundreds if not thousands of hours to master.
However, with AI, all you have to do is define what inputs will cause what outputs, and the AI can fill in the programming steps for you. It is still important to have basic programming knowledge to understand the code. Luckily, Chat GPT gives helpful comments that define the purpose of each line.
AI is not perfect, so programming mistakes are not a rare occurrence. Despite this, feeding in the error to the AI will often allow the AI to fix the mistake and generate a new code that works. In this project, we will Chat GPT to write the code for us. To do this, we need to specify what we want to code to do, so let's make a list of criteria:
- Uses Arduino IDE and Python
- Has AI Face Tracking
- Moves servo so that it turns left if the face is on the right of the webcam view, right if the face is on the left, up if the face is on the bottom, and down if the face is on the top
- When no face is detected, yellow LEDs are on and red LEDs are off
- After a face is detected for 2 seconds, turn off yellow LEDs, turn on red LED, and start playing music from a file.
Now, ask Chat GPT to write the code with these criteria. It will give you the code alongside information such as materials and libraries needed.

These images give an example of Chat GPT's response. It may differ for you based on how you typed in the criteria. Only part of it is shown, as displaying the full response will take up too much space. The files for the code are included below, but it is recommended that you try using Chat GPT to get it for yourself.
Integrating the Code


First, install all the libraries required for Chat GPT's code and change the connection pins in the code to the ones that we previously connected. Chat GPT may have provided detailed instructions on how to set up the code in its response. If not, you can simply ask Chat GPT to do so, and it will.

Put the code from the previous step into their respective code engines. There may be some changes that you have to make right away. For example, if your computer already has an integrated webcam, then the camera feed will be cv2.VideoCapture(1) instead of cv2.VideoCapture(0) given by Chat GPT. Even with the same prompt, Chat GPT may generate different codes for different people.

Finally, connect the Arduino and webcam to your laptop, upload the Arduino code, and then run the Python code. If your flower is not working properly, describe the problem to Chat GPT, and it will provide a new code to fix the mistake. One issue I came across was that the flower would not move unless I was at the edge of the webcam view. I put this issue into Chat GPT, and it edited to code so that the flower would move until the face was in a small range within the middle of the screen.
Beyond the Flower

Although our project of creating a semi-sentient plastic sunflower is already amazing, there is much we can do with the skills we learned to create something even greater. The prompt we used for Project Salvador was not very precise, but the AI was able to create a great sketch. We wanted to make a sunflower for this project, but quite literally anything could have been created. The design could have easily looked like a dinosaur if we desired it.
The face-tracking technology we used on the sunflower creates potential for future ideas. It can be incorporated into something like a peashooter from Plants vs Zombies. Instead of glowing red and playing music, it would shoot peas instead. There are so many designs that what we learned can be incorporated into, and there are boundless possiblities to what one can make with AI.