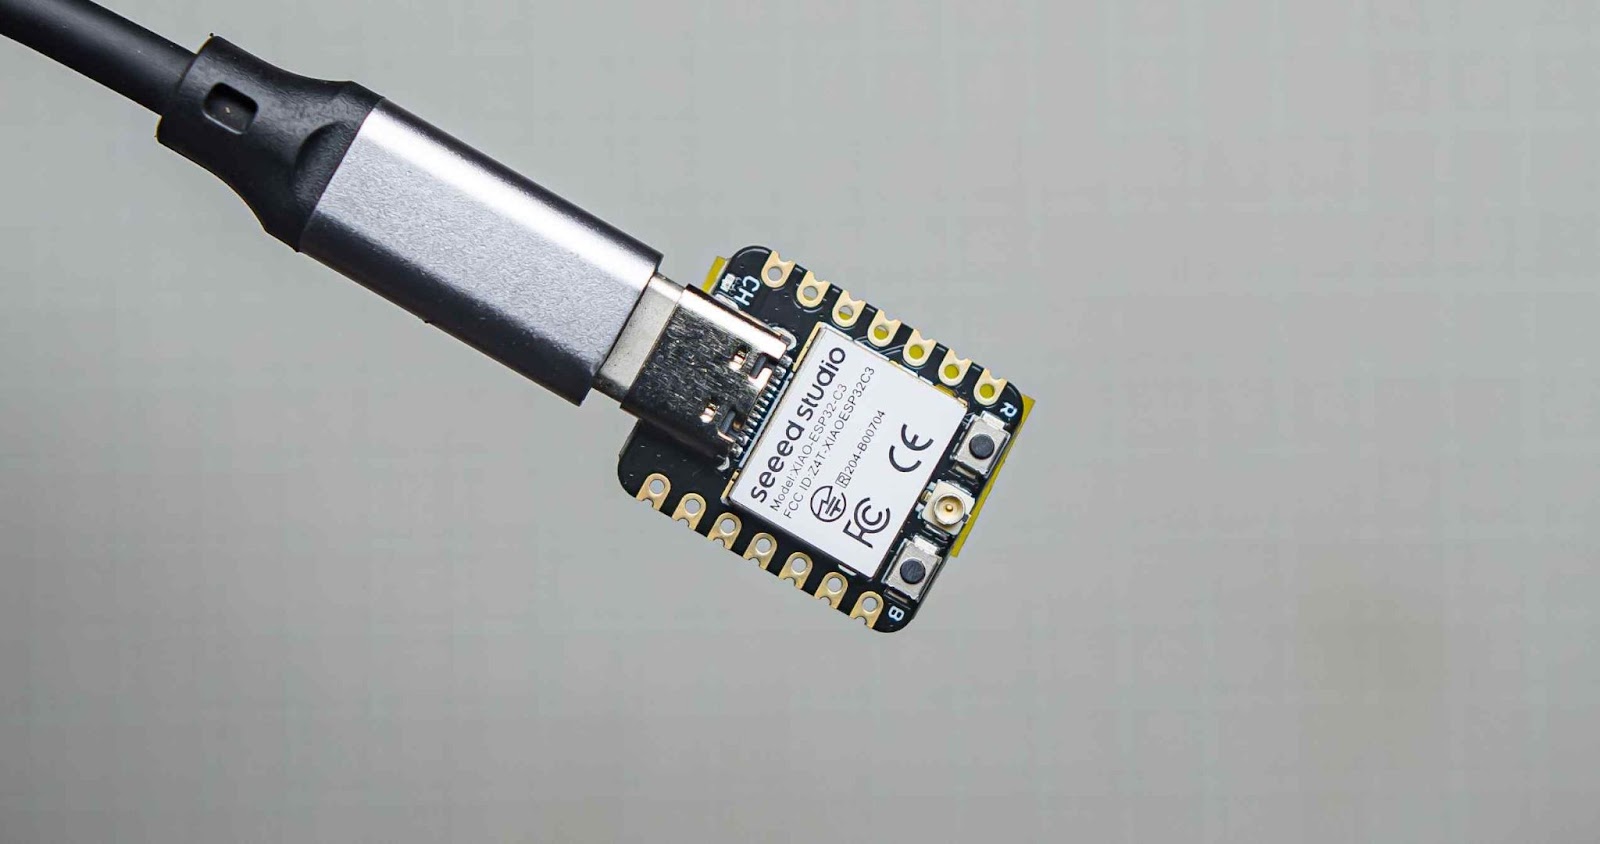
I always like to upload the code to the microcontroller before assembly. I am using Arduino IDE for flashing the code. follow these tutorials for setting up IDE for Seeed Studio XIAO ESP32C3 and learn more about this board
We need an internal connection to get time data from NTP servers. so we need to connect this clock to your wifi network. you can enter your wifi credentials on 46,47 lines
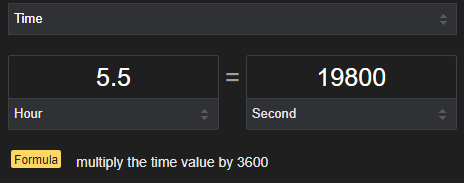
The time zone is configured using your GMT offset in seconds. My GMT offset is GMT +5:30, now we need to convert it into seconds which is 19800sec. Just google it for easy conversion
#include <WiFi.h>
#include <SPI.h>
#include <NTPClient.h>
#include <WiFiUdp.h>
#include <Adafruit_GFX.h>
#include <Adafruit_SSD1306.h>
#include <Fonts/Org_01.h>
#define SCREEN_WIDTH 128 // OLED display width, in pixels
#define SCREEN_HEIGHT 64 // OLED display height, in pixels
// WiFi credentials
const char* ssid = "NG(3110)"; // your WiFi SSID
const char* password = "80898089"; // your WiFi password
// OLED display SPI pins
#define OLED_MOSI D10
#define OLED_CLK D8
#define OLED_DC D6
#define OLED_CS D7
#define OLED_RESET D5
Adafruit_SSD1306 display(SCREEN_WIDTH, SCREEN_HEIGHT,
OLED_MOSI, OLED_CLK, OLED_DC, OLED_RESET, OLED_CS);
// NTP client to get time
WiFiUDP ntpUDP;
NTPClient timeClient(ntpUDP, "pool.ntp.org", 19800, 0); // 19800 = IST offset (UTC+5:30)
static const unsigned char PROGMEM image_Layer_25_bits[] = {0x01,0x0e,0x07,0x03,0x81,0xc0,0xe0,0x70,0x38,0x1c,0x0e,0x07,0x03,0x81
,0xc2,0x00,0x03,0x1f,0x0f,0x87,0xc3,0xe1,0xf0,0xf8,0x7c,0x3e,0x11,0x08,0x84,0x42,0x23,0x00,0x07,0x3f,0x9f,0xcf,0xe7,0xf3,0xf9,0xfc
,0xfe,0x7f,0x20,0x90,0x48,0x24,0x13,0x80,0x0f,0x3f,0x9f,0xcf,0xe7,0xf3,0xf9,0xfc,0xfe,0x7f,0x20,0x90,0x48,0x24,0x13,0xc0,0x07,0x3f
,0x9f,0xcf,0xe7,0xf3,0xf9,0xfc,0xfe,0x7f,0x20,0x90,0x48,0x24,0x13,0x80,0x03,0x1f,0x0f,0x87,0xc3,0xe1,0xf0,0xf8,0x7c,0x3e,0x11,0x08
,0x84,0x42,0x23,0x00,0x01,0x0e,0x07,0x03,0x81,0xc0,0xe0,0x70,0x38,0x1c,0x0e,0x07,0x03,0x81,0xc2,0x00,0x00,0x00,0x00,0x00,0x00,0x00
,0x00,0x00,0x00,0x00,0x00,0x00,0x00,0x00,0x00,0x00,0x00,0x00,0x00,0x00,0x00,0x00,0x00,0x00,0x00,0x00,0x00,0x00,0x00,0x00,0x00,0x00
,0x00,0x00,0x00,0x00,0x00,0x00,0x00,0x00,0x00,0x00,0x00,0x00,0x00,0x00,0x00,0x00,0x00,0x00,0x00,0x00,0x00,0x00,0x00,0x00,0x00,0x00
,0x00,0x00,0x00,0x00,0x00,0x00,0x00,0x00,0x00,0x00,0x00,0x00,0x00,0x00,0x00,0x00,0x00,0x00,0x00,0x00,0x00,0x00,0x00,0x00,0x00,0x00
,0x00,0x00,0x00,0x00,0x00,0x00,0x00,0x00,0x00,0x00,0x00,0x00,0x00,0x00,0x00,0x00,0x00,0x00,0x00,0x00,0x00,0x00,0x00,0x00,0x00,0x00
,0x00,0x00,0x00,0x00,0x00,0x00,0x00,0x00,0x00,0x00,0x00,0x00,0x00,0x00,0x00,0x00,0x00,0x00,0x00,0x00,0x00,0x00,0x00,0x00,0x00,0x00
,0x00,0x00,0x00,0x00,0x00,0x00,0x00,0x00,0x00,0x00,0x00,0x00,0x00,0x00,0x00,0x00,0x00,0x00,0x00,0x00,0x00,0x00,0x00,0x00,0x00,0x00
,0x00,0x00,0x00,0x00,0x00,0x00,0x00,0x00,0x00,0x00,0x00,0x00,0x00,0x00,0x00,0x00,0x00,0x00,0x00,0x00,0x00,0x00,0x00,0x00,0x00,0x00
,0x00,0x00,0x00,0x00,0x00,0x00,0x00,0x00,0x00,0x00,0x00,0x00,0x00,0x00,0x00,0x00,0x00,0x00,0x00,0x00,0x00,0x00,0x00,0x00,0x00,0x00
,0x00,0x00,0x00,0x00,0x00,0x00,0x00,0x00,0x00,0x00,0x00,0x00,0x00,0x00,0x00,0x00,0x00,0x00,0x00,0x00,0x00,0x00,0x00,0x00,0x00,0x00
,0x00,0x00,0x00,0x00,0x00,0x00,0x00,0x00,0x00,0x00,0x00,0x00,0x00,0x00,0x00,0x00,0x00,0x00,0x00,0x00,0x00,0x00,0x00,0x00,0x00,0x00
,0x00,0x00,0x00,0x00,0x00,0x00,0x00,0x00,0x00,0x00,0x00,0x00,0x00,0x00,0x00,0x00,0x00,0x00,0x00,0x00,0x00,0x00,0x00,0x00,0x00,0x00
,0x00,0x00,0x00,0x00,0x00,0x00,0x00,0x00,0x00,0x00,0x00,0x00,0x00,0x00,0x00,0x00,0x00,0x00,0x00,0x00,0x00,0x00,0x00,0x00,0x00,0x00
,0x00,0x00,0x00,0x00,0x00,0x00,0x00,0x00,0x00,0x00,0x00,0x00,0x00,0x00,0x00,0x00,0x00,0x00,0x00,0x00,0x00,0x00,0x00,0x00,0x00,0x00
,0x00,0x00,0x00,0x00,0x00,0x00,0x00,0x00,0x00,0x00,0x00,0x00,0x00,0x00,0x00,0x00,0x00,0x00,0x00,0x00,0x00,0x00,0x00,0x00,0x00,0x00
,0x00,0x00,0x00,0x00,0x00,0x00,0x00,0x00,0x00,0x00,0x00,0x00,0x00,0x00,0x00,0x00,0x00,0x00,0x00,0x00,0x00,0x00,0x00,0x00,0x00,0x00
,0x00,0x00,0x00,0x00,0x00,0x00,0x00,0x00,0x00,0x00,0x00,0x00,0x00,0x00,0x00,0x00,0x00,0x00,0x00,0x00,0x00,0x00,0x00,0x00,0x00,0x00
,0x00,0x00,0x00,0x00,0x00,0x00,0x00,0x00,0x00,0x00,0x00,0x00,0x00,0x00,0x00,0x00,0x00,0x00,0x00,0x00,0x00,0x00,0x00,0x00,0x00,0x00
,0x00,0x00,0x00,0x00,0x00,0x00,0x00,0x00,0x00,0x00,0x00,0x00,0x00,0x00,0x00,0x00,0x00,0x00,0x00,0x00,0x00,0x00,0x00,0x00,0x00,0x00
,0x00,0x00,0x00,0x00,0x00,0x00,0x00,0x00,0x00,0x00,0x00,0x00,0x00,0x00,0x00,0x00,0x00,0x00,0x00,0x00,0x00,0x00,0x00,0x00,0x00,0x00
,0x00,0x00,0x00,0x00,0x00,0x00,0x00,0x00,0x00,0x00,0x00,0x00,0x00,0x00,0x00,0x00,0x00,0x00,0x00,0x00,0x00,0x00,0x00,0x00,0x00,0x00
,0x00,0x00,0x00,0x00,0x00,0x00,0x00,0x00,0x00,0x00,0x00,0x00,0x00,0x00,0x00,0x00,0x00,0x00,0x3e,0x00,0x00,0x00,0x00,0x00,0x00,0x00
,0x00,0x00,0x00,0x00,0x00,0x00,0x01,0xf0,0x41,0x00,0x00,0x00,0x00,0x00,0x01,0x00,0x01,0x00,0x00,0x00,0x00,0x00,0x02,0x08,0x9c,0x80
,0x00,0x00,0x00,0x00,0x03,0x00,0x01,0x80,0x00,0x00,0x00,0x00,0x04,0xe4,0xbe,0x80,0x7f,0xff,0xff,0xff,0xf7,0x00,0x01,0xdf,0xff,0xff
,0xff,0xfc,0x05,0xf4,0xbe,0x80,0x80,0x00,0x00,0x00,0x03,0x00,0x01,0x80,0x00,0x00,0x00,0x02,0x05,0xf4,0xbe,0x81,0x00,0x00,0x00,0x00
,0x01,0x00,0x01,0x00,0x00,0x00,0x00,0x01,0x05,0xf4,0x9c,0x82,0x00,0x00,0x00,0x00,0x00,0x00,0x00,0x00,0x00,0x00,0x00,0x00,0x84,0xe4
,0x41,0x04,0x00,0x00,0x00,0x00,0x00,0x00,0x00,0x00,0x00,0x00,0x00,0x00,0x42,0x08,0x3e,0x08,0x00,0x00,0x00,0x00,0x00,0x00,0x00,0x00
,0x00,0x00,0x00,0x00,0x21,0xf0,0x00,0x10,0x00,0x00,0x00,0x00,0x00,0x00,0x00,0x00,0x00,0x00,0x00,0x00,0x10,0x00,0x00,0x20,0x00,0x00
,0x00,0x00,0x00,0x00,0x00,0x00,0x00,0x00,0x00,0x00,0x08,0x00,0x00,0x20,0x00,0x00,0x00,0x00,0x00,0x00,0x00,0x00,0x00,0x00,0x00,0x00
,0x08,0x00,0x00,0x20,0x00,0x00,0x00,0x00,0x00,0x00,0x00,0x00,0x00,0x00,0x00,0x00,0x08,0x00,0x00,0x20,0x00,0x00,0x00,0x00,0x00,0x00
,0x00,0x00,0x00,0x00,0x00,0x00,0x08,0x00,0x00,0x20,0x00,0x00,0x00,0x00,0x00,0x00,0x00,0x00,0x00,0x00,0x00,0x00,0x08,0x00,0x00,0x20
,0x00,0x00,0x00,0x00,0x00,0x00,0x00,0x00,0x00,0x00,0x00,0x00,0x08,0x00,0x00,0x20,0x00,0x00,0x00,0x00,0x00,0x00,0x00,0x00,0x00,0x00
,0x00,0x00,0x08,0x00,0x00,0x20,0x00,0x00,0x00,0x00,0x00,0x00,0x00,0x00,0x00,0x00,0x00,0x00,0x08,0x00,0x00,0x20,0x00,0x00,0x00,0x00
,0x00,0x00,0x00,0x00,0x00,0x00,0x00,0x00,0x08,0x00,0x00,0x20,0x00,0x00,0x00,0x00,0x00,0x00,0x00,0x00,0x00,0x00,0x00,0x00,0x08,0x00
,0x00,0x20,0x00,0x00,0x00,0x00,0x00,0x00,0x00,0x00,0x00,0x00,0x00,0x00,0x08,0x00};
void setup() {
Serial.begin(115200);
// Initialize OLED display
if(!display.begin(SSD1306_SWITCHCAPVCC)) {
Serial.println(F("SSD1306 allocation failed"));
for(;;);
}
// Connect to Wi-Fi
WiFi.begin(ssid, password);
while (WiFi.status() != WL_CONNECTED) {
delay(1000);
Serial.println("Connecting to WiFi...");
}
Serial.println("Connected to WiFi");
// Initialize time client
timeClient.begin();
}
void loop() {
// Update time from NTP server
timeClient.update();
unsigned long epochTime = timeClient.getEpochTime();
time_t rawTime = epochTime;
struct tm *ptm = gmtime(&rawTime);
int monthDay = ptm->tm_mday;
int currentMonth = ptm->tm_mon + 1;
int currentYear = ptm->tm_year + 1900;
int currentHour = ptm->tm_hour;
int currentMinute = ptm->tm_min;
// Convert time to 12-hour format
String period = "AM";
if (currentHour >= 12) {
period = "PM";
if (currentHour > 12) {
currentHour -= 12;
}
} else if (currentHour == 0) {
currentHour = 12;
}
// Make strings for time and date
char timeStr[6];
snprintf(timeStr, sizeof(timeStr), "%02d:%02d", currentHour, currentMinute);
char dateStr[11];
snprintf(dateStr, sizeof(dateStr), "%02d.%02d.%04d", monthDay, currentMonth, currentYear);
// Display data on OLED
display.clearDisplay();
display.setTextColor(SSD1306_WHITE);
// Time (centered X)
display.setFont(&Org_01);
display.setTextSize(5);
int16_t x1, y1;
uint16_t w, h;
display.getTextBounds(timeStr, 0, 0, &x1, &y1, &w, &h);
int timeX = (SCREEN_WIDTH - w) / 2;
display.setCursor(timeX, 35);
display.print(timeStr);
// AM/PM (don’t move)
display.setTextSize(1);
display.setCursor(59, 48);
display.print(period);
// Date (centered X)
display.setTextSize(2);
display.getTextBounds(dateStr, 0, 0, &x1, &y1, &w, &h);
int dateX = (SCREEN_WIDTH - w) / 2;
display.setCursor(dateX, 60);
display.print(dateStr);
// Bitmap
display.drawBitmap(1, 2, image_Layer_25_bits, 126, 62, 1);
display.display();
delay(1000);
}