Extra Pieces for Board Games
by prichards01 in Workshop > 3D Printing
585 Views, 6 Favorites, 0 Comments
Extra Pieces for Board Games

Hello! My name is Portia Richards and I am in 9th grade at Fairview High School.
Have you ever had a board game where just one piece was missing? Have you felt the frustration of using a bottle cap or coin in its place? Just about everyone can answer yes to both of those questions.
While playing board games with my family, there are two game pieces I always seem to lose. These are a chess pawn and a Monopoly hotel.
That is why I decided to make these two pieces, and they each use different crucial tools in Fusion 360.
The Pawn focuses on the Revolve Tool, and the Hotel focuses on the Extrude Tool.
Supplies

All you need is Fusion 360, access to a 3D printer, and some patience!
Chess Pawn: Starting

.png)
- First, we will start with the simplest one, the Chess Pawn! Before you begin, save your new file by clicking the "save" button in the top left corner of your screen.
- You can title the file "Chess Pawn"
Chess Pawn: Get Your Refrence Image

You will need a reference image to execute this Chess Pawn successfully.
- Simply Google "Chess Pawn", find an image, and right-click on the image to select "Save image as...".
- Make sure your reference image is a JPEG file or else Fusion 360 will not allow you to upload it.
Chess Pawn: Insert Refrence Image

.png)
.png)
.png)
Now, go into Fusion 360 and select the "Insert" button followed by "Canvas".
- Select "Insert from my computer" and select your reference image.
- Make sure you then select the "z" plane. It will then prompt you with several options. Press and hold the curved gray line to stretch your image, which you should do without worrying about the size.
- Click "Ok" when you finished stretching the image
Chess Pawn: Adjsting Image
.png)
.png)
.png)
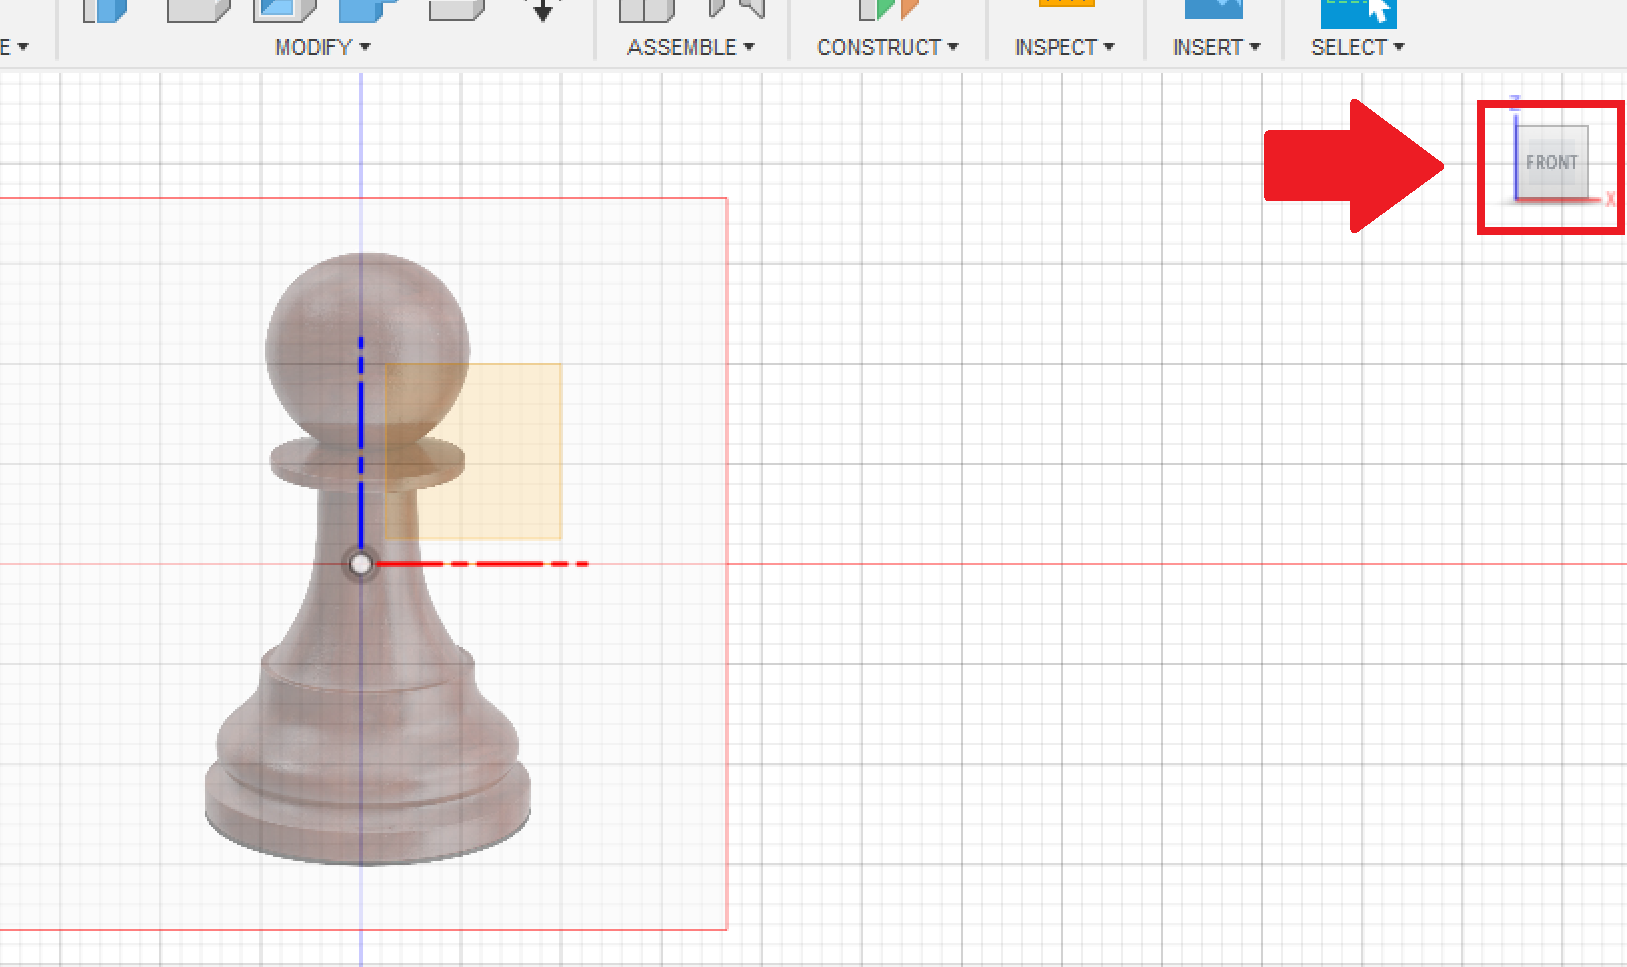
Now, you will adjust the image until the bottom is on the "x" axis.
- First, using the cube on the upper left, select the face titled "Front". Now, you will get a head-on view of your reference image.
- From the left, select the drop-down menu from the "Canvases" arrow.
- Right-click on the file for the image and select "Edit Canvas"
- Select the gray box and drag the image until the rough bottom of the Pawn (Not the whole image) is touching the "x" axis.
Chess Pawn: Start Your 2D Drawing

.png)
.png)
Now, you will start sketching your 2D image which will soon turn into a 3D model with the help of the Revolve Tool
- Click the eye on the "Origin" square on the left-hand side. This will allow the origin planes to be viewable.
- Select the front origin plane and right click followed by "Create Sketch"
- Select the "Line Tool" on the top left of your toolbar, and draw a line from the approximate bottom of the pawn to the approximate top
- To avoid drawing a second line, select the green check mark after drawing your first line.
Chess Pawn: Finishing Your 2D Sketch
.png)
.png)
.png)
Now that you have drawn the center line, you will now draw the curved line of half your image, connecting the top of your line to the bottom.
- Start by selecting the "Fit Point Spline" Tool on the top left of your toolbar.
- Starting at the bottom of the line, work your way up along the curvature of the image, placing a dot whenever the curve changes. Select the green check.
- Once finished, you can click and drag any of the points you made to align it more perfectly with the reference image.
- Once complete, hit "Finish Sketch"
Chess Piece: FINAL STEP
.png)
.png)
.png)
Yay! You are almost complete with your pawn! All you need to do is finish up using the "Revolve" Tool.
- First, select the "Revolve" tool in the upper right-hand corner. Make sure it's the blue one, not the orange.
- It will then ask you to select a profile and an axis. For profile, select the half-shape you just created. For the axis, select the vertical line cutting the reference image in half.
- Then click "Ok"
- You have completed the pawn! Click on the eyes next to "Canvases" and "Origin" to leave just the pawn in the center of your screen!
Monopoly Hotel: Making Your Rectangle
.png)
.png)
.png)
.png)
Now, it's time to make the Hotel!
- Just like with the Chess Pawn, start by saving your file. Title this one, "Monopoly Hotel"
- Locate the cube on the top right, select the face labeled "Top", then select the "New Sketch" button and click the square
- Then, start by using the line tool to create a rectangle. Starting at the origin, make a line directly vertical from the origin and make that line 12 mm long. Then, go directly horizontally from that point and make another line of 8 mm. You may have to zoom in with your mouse. Once you finish both lines, click the green check mark
- Then, tap the letter "r" on your keyboard to make a rectangle
- Connect the last point to the origin to finish the rectangle
Monopoly Hotel: Offset Edges
.png)
.png)
Now, you will build the wall thickness using the "Offset" tool.
- Start by holding the "Shift" button on your keyboard while clicking on each of the four sides of your rectangle
- Select the "Offset" tool in the toolbar
- Type in -0.5 millimeters as the offset. This will create a wall thickness accurate to an actual Monopoly Hotel
- Select "Ok" and then, "Finish Sketch"
Monopoly Hotel: Extrude Walls
.png)
.png)
Now, you will extrude the walls to create a hollow box,
- Select the "Extrude" tool in the toolbar
- Select the thin rectangle and extrude exactly 7 mm high
- Select "Ok"
Monopoly Hotel: Adding Triangular Walls (1)
.png)
.png)
.png)
Now that we have our box, we now need to add triangles on the short sides to help build the ceiling. THIS IS THE HARDEST STEP!
- Start by orienting the box by clicking the cube in the corner and selecting "Front"
- Create a new sketch using the button on the top left and select the face of the box
- Select the "Line" tool
- Hover your mouse above the top edge of the rectangle until a small triangle appears, indicating the midpoint.
- Click the midpoint and create a vertical line 2.5 mm tall.
- Next, click to place the line
- Select the line tool and form another line connecting the top left corner of the rectangle to the top of the line you're just created. To do this, click on the first point and then the second. The line will form between the two.
- After the right triangle is formed, copy the same on the other side.
Monopoly Hotel: Adding Triangular Walls (2)
.png)
.png)
.png)
.png)
Now that you have the sketch, let's make it 3D!
- You will start by selecting the "Trim" tool in your toolbar. Select the line in the middle, cropping it out. (It was only a reference line)
- Select "Finish Sketch", and then the small house button right next to the small cube in the upper-right. This will return you to "Home View"
- Now, we will extrude the sketch to match up with our walls. Click "Extrude" and select the triangle
- In the box that appears change the "Distance" box to "To Object". Then click the backside of the wall. This will allow the triangle to extrude perfectly to the back of the rectangular wall.
- Click "Ok"
- Repeat the entirety of Steps 11 and 12 on the other short face.
Monopoly Hotel: Building the Roof (1)
.png)
.png)
Now that we have our walls, let's make the roof! NOTE: This step may require a couple of tries to fully understand, but just look at the images and follow the instructions closely.
- To start let's create a new sketch on one of the short faces. (The ones with the triangles)
- Hold "Shift" and click on the two slanted tops of the triangle followed by the "Offset" button
- Offset by 0.3 mm and click the "Enter" key on your keyboard.
Monopoly Hotel: Building the Roof (2)
.png)
.png)
.png)
.png)
Now, you will make the roof overhang slightly to match the real Monopoly Hotel!
- First, use the "Line" tool to draw a horizontal line extending past the rectangle passing through the top two corners of the rectangular part of the wall (see image for reference)
- From the "Modify" drop-down menu, select "Extend"
- Click on the two slanted parts of the triangle. The slanted lines will then touch the horizontal line you just drew
- Use the "Trim" tool to cut off any excess horizontal line protruding from the triangle.
Monopoly Hotel: Building the Roof (3)
.png)
.png)
.png)
The final step of making the roof!
- Now, the next step is extruding the roof. First, however, you must make the roof a "closed shape" in order to be able to extrude. Simply do this by selecting the "Line" tool and drawing two lines from the two corners of the gray triangle to the top of the gray triangle (Not the shaded blue triangle)
- Select "Finish Sketch"
- Click on the "Extrude" tool and select the roof you just made (REMEMBER: Do not select the gray triangle. Only select the shaded light blue edge)
- Extrude -12.2 mm and select "Okay"
- Now, only one side of our roof is overhanging, so we have to extrude the same wall again in the other direction so it has some overhang. Extrude the same shaded light blue edge 0.2 mm
- Select "Ok"
Monopoly Hotel: Adding the "windows" (1)
.png)
.png)
.png)
.png)
Now, you could be finished and ignore this last step. However, if you would like some extra detail, follow this step
- First, select one of the long faces of your model and click "r" on your keyboard to draw a rectangle. Make the dimensions 1.2 mm wide and 10 mm long. To switch between choosing your length and your width, click the "Tab" button on your keyboard.
- Select the "Sketch Dimension" tool in your toolbar
- Select the top of your rectangle, followed by the bottom edge of the roof. Drag your mouse to the left, click, and then type 0.01 mm as the distance. This will move your rectangle to the edge of the roof. Click the "Enter" key
- Repeat Step 3 on the left vertical edge of the rectangle. This distance will be 1.5 mm
- Select "Finish Sketch"
Monopoly Hotel: Adding the "Windows"(2)
.png)
.png)
.png)
.png)
Now that you've drawn the windows, you will now extrude them slightly and then pattern them.
- Select the "Extrude" tool and select the newly-completed rectangle. Extrude it by 0.1 mm and select "Ok"
- Now, it's time to pattern the rectangle! Select the "Rectangular Pattern" tool and select your rectangle.
- Make sure to select "Bodies" from the "object type" drop-down menu. Under "Axes" select the bottom edge of your house to make the pattern stretch to the desired direction.
- Drag the blue arrow and make the pattern distribution 7.9 mm
- Repeat all the "widows" steps on the opposite side