Encrypted Note Storage
by Northstrix in Circuits > Microcontrollers
1606 Views, 6 Favorites, 0 Comments
Encrypted Note Storage
Encrypted note storage is a fusion of the microcontroller that performs the encryption/decryption of notes and stores the keys and the external database that stores the ciphertexts.
Your notes are indecipherable without the microcontroller.
Before you continue reading this tutorial, beware that if you lose the device and the firmware that you uploaded into it, you will lose the ability to decipher your notes!
*UPDATED: Newer and better version of this device is available here https://www.instructables.com/Encrypted-Note-Storage-V30/
Supplies
- ESP8266 x1
- D-SUB port x1
- VGA monitor x1
- VGA cable x1
- 330 - 470 ohm resistor x1
Encryption Algorithm
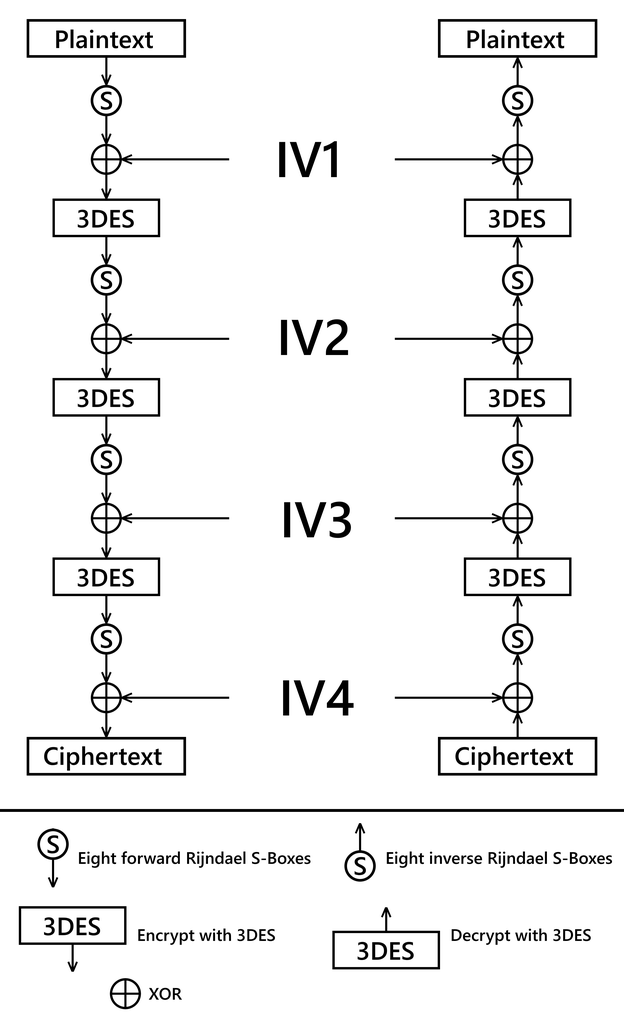
I decided to use M9DES to encrypt/decrypt passwords. Four IVs are randomly generated for every 8 characters of the plaintext.
Structure of the Block

The first sixty-four characters are the encrypted IVs. The last sixteen characters are the encrypted characters of the plaintext.
Install the Drivers and Configure Arduino IDE *optional
If you've never flashed ESP8266 before, you'll need to configure Arduino IDE and install drivers to upload the firmware to the boards. You can find drivers here:
CH340 driver:https://sparks.gogo.co.nz/ch340.html
CP210x driver:https://www.silabs.com/developers/usb-to-uart-brid...
In case you don't have Arduino IDE, you can download it here:
https://www.arduino.cc/en/software/
Configuring IDE isn't a part of this tutorial, you can read about it here:
Download the Code From GitHub
The code includes the firmware for ESP8266, a pre-compiled open-source program to store the encrypted notes, and the source code of this program.
You can download the code here https://github.com/Northstrix/Fuzzy-invention
Download and Install the Libraries
DES_Library:https://github.com/fcgdam/DES_Library
ESP8266TrueRandom:https://github.com/marvinroger/ESP8266TrueRandom
ESPVGAX Library:https://github.com/smaffer/espvgax
You can unpack the content of the archive into the folder: ...\Arduino\libraries. Or open the Arduino IDE, click to the Sketch -> Include Library -> Add .ZIP Library... and select every archive with libraries.
Generate the Keys
You can do it by any means possible.
I can only suggest a program to do so https://defuse.ca/passgen.htm
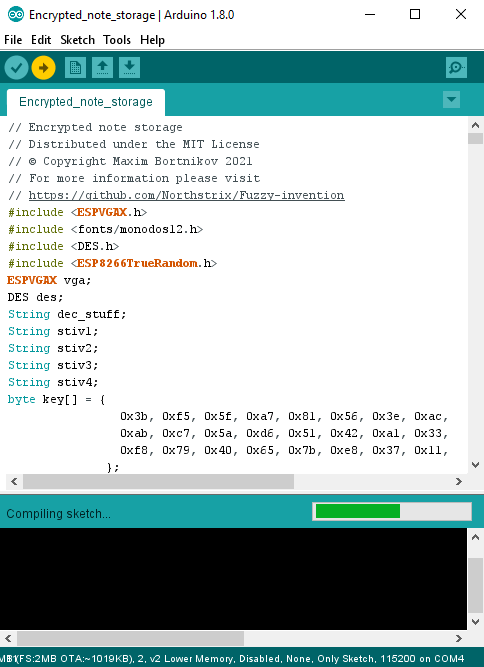
Modify the Firmware
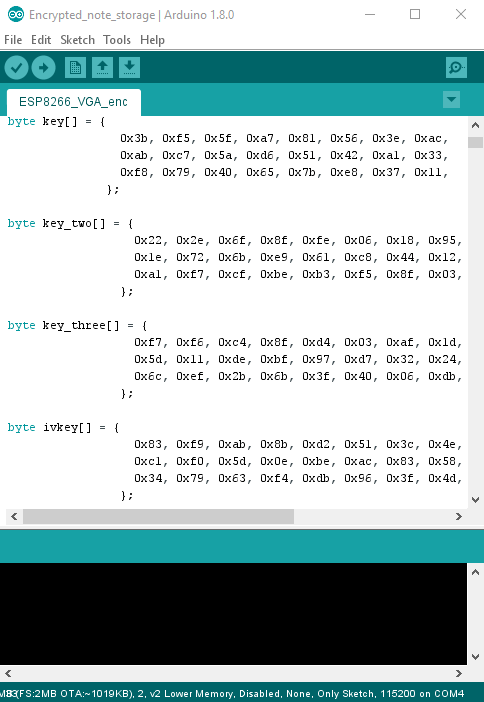
Open the file Encrypted_note_storage.ino and replace the existing keys with those you've generated.
Flash the ESP
Upload the modified firmware from the folder Encrypted_note_storage into the ESP8266.
Connect the D-SUB Port to the ESP
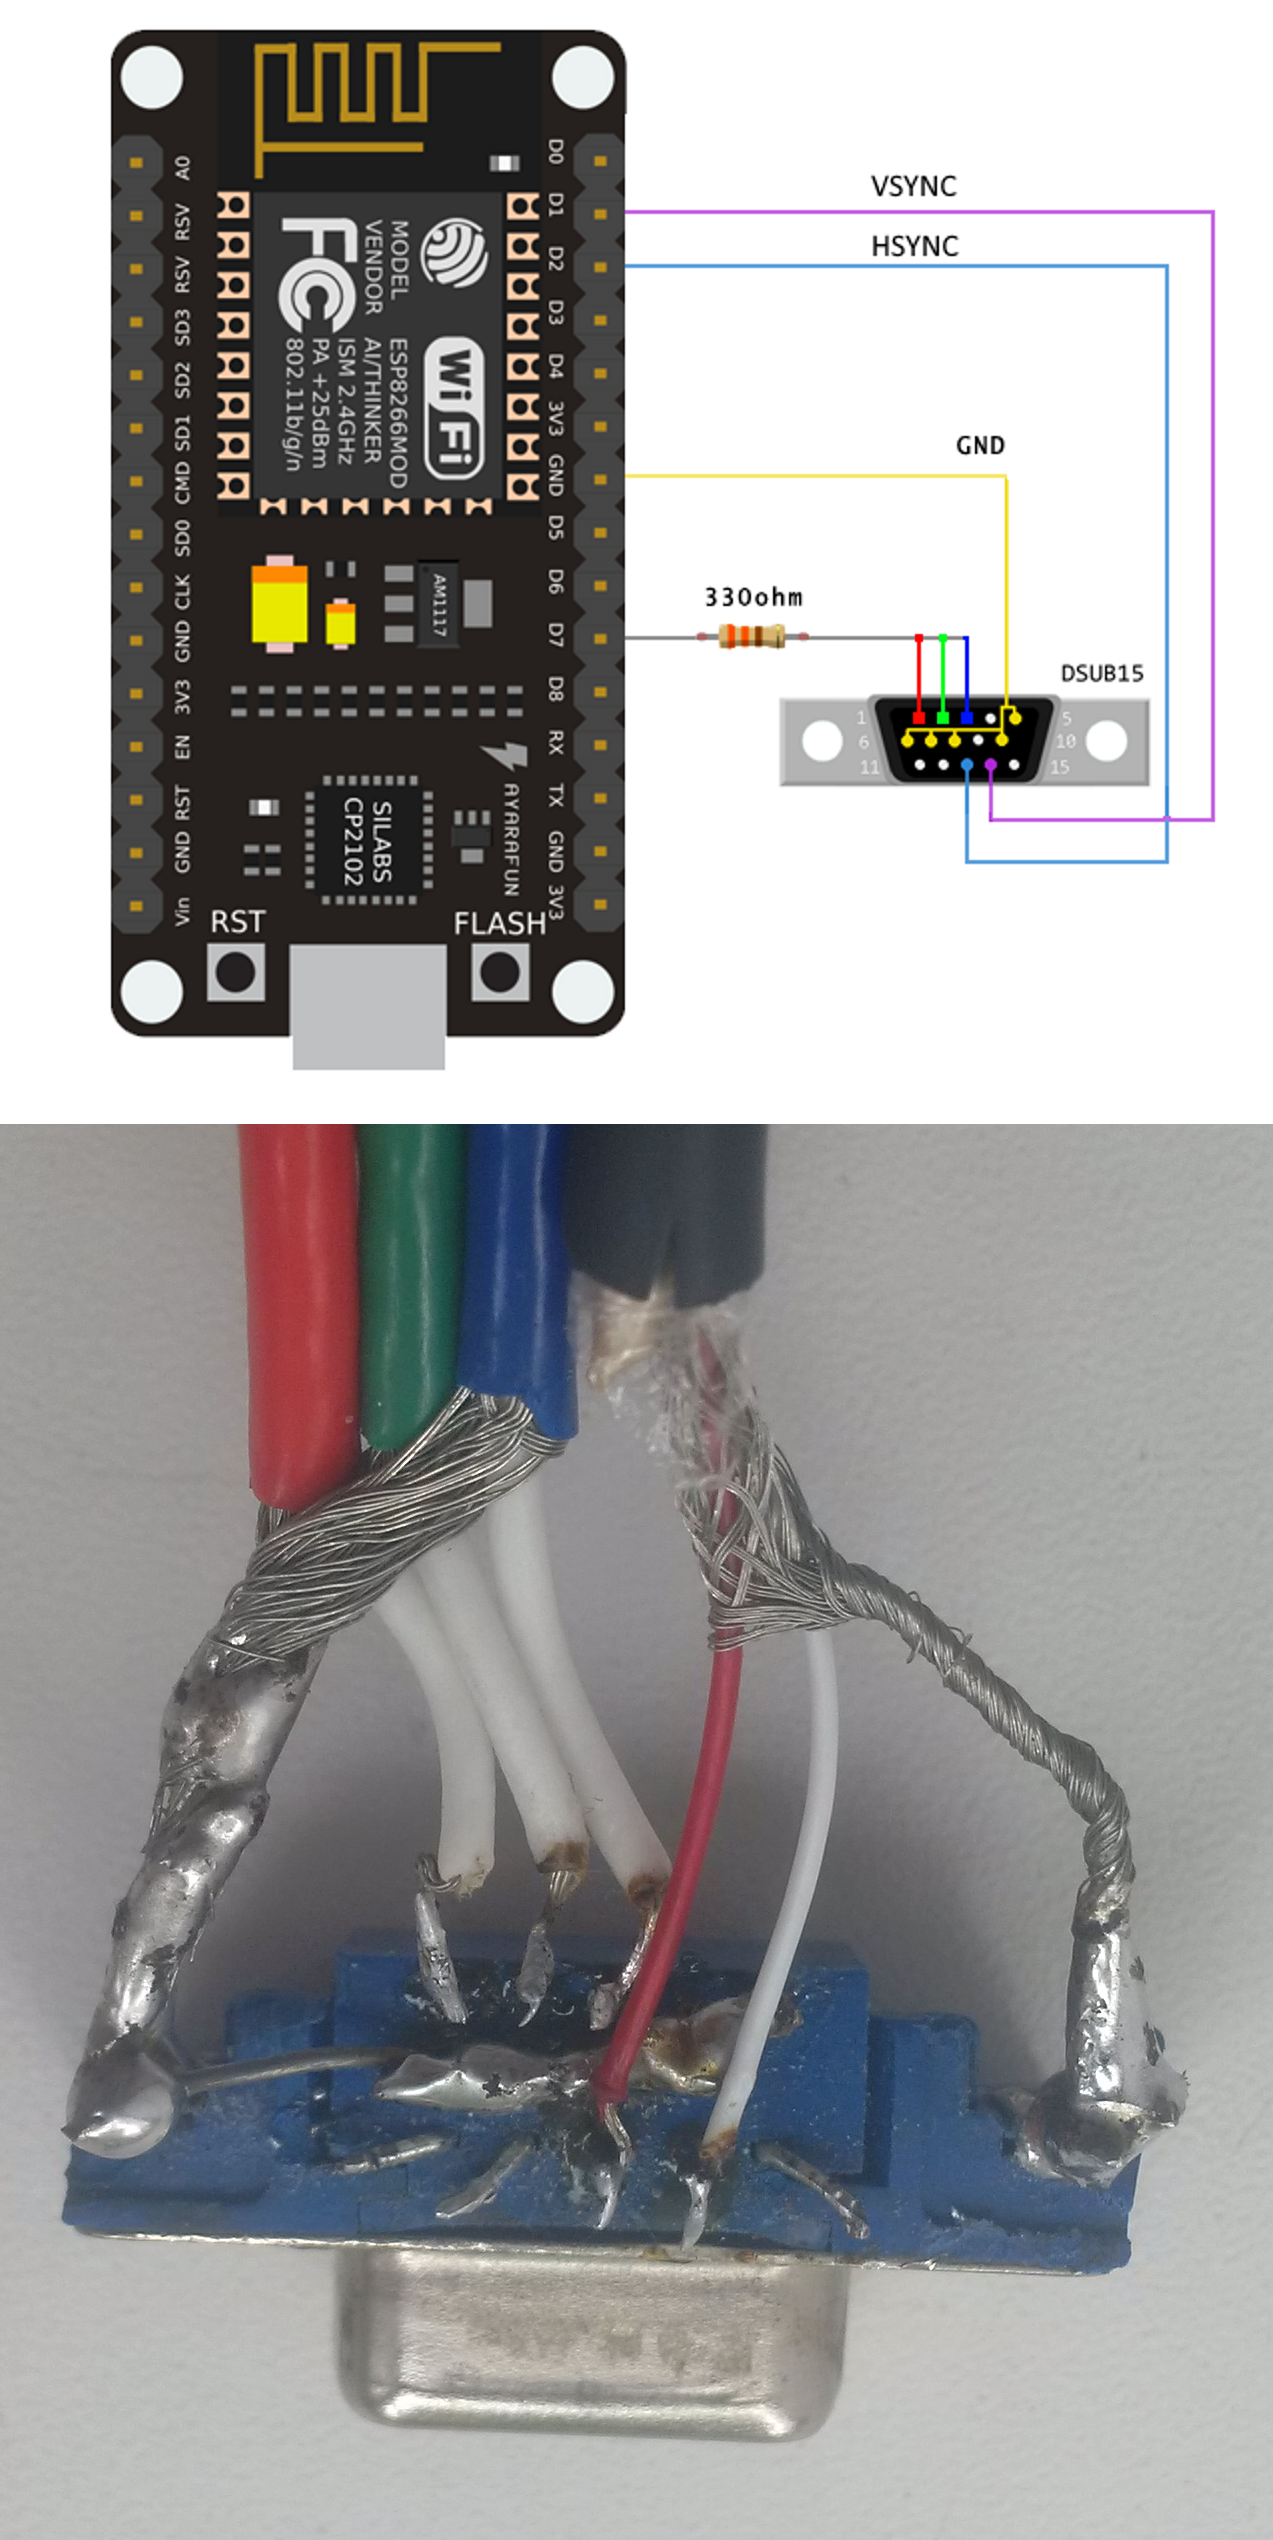
Follow the connections on the diagram. You can use any resistor with a value from 330 to 470 ohm.
Encrypt the Note
To encrypt the note:
1) Connect the USB cable to the ESP;
2) Open the Serial Monitor;
3) Set the baud rate to 115200;
4) Enter 1;
5) Press Send;
6) Enter the note that you want to encrypt;
7) Press Send.
After the note was encrypted, ESP will throw an exception and reboot.
The memory of the microcontroller is limited. Decrypting notes longer than 500 characters doesn't always work. I wasn't able to decrypt a note longer than 561 characters. Take it into account.
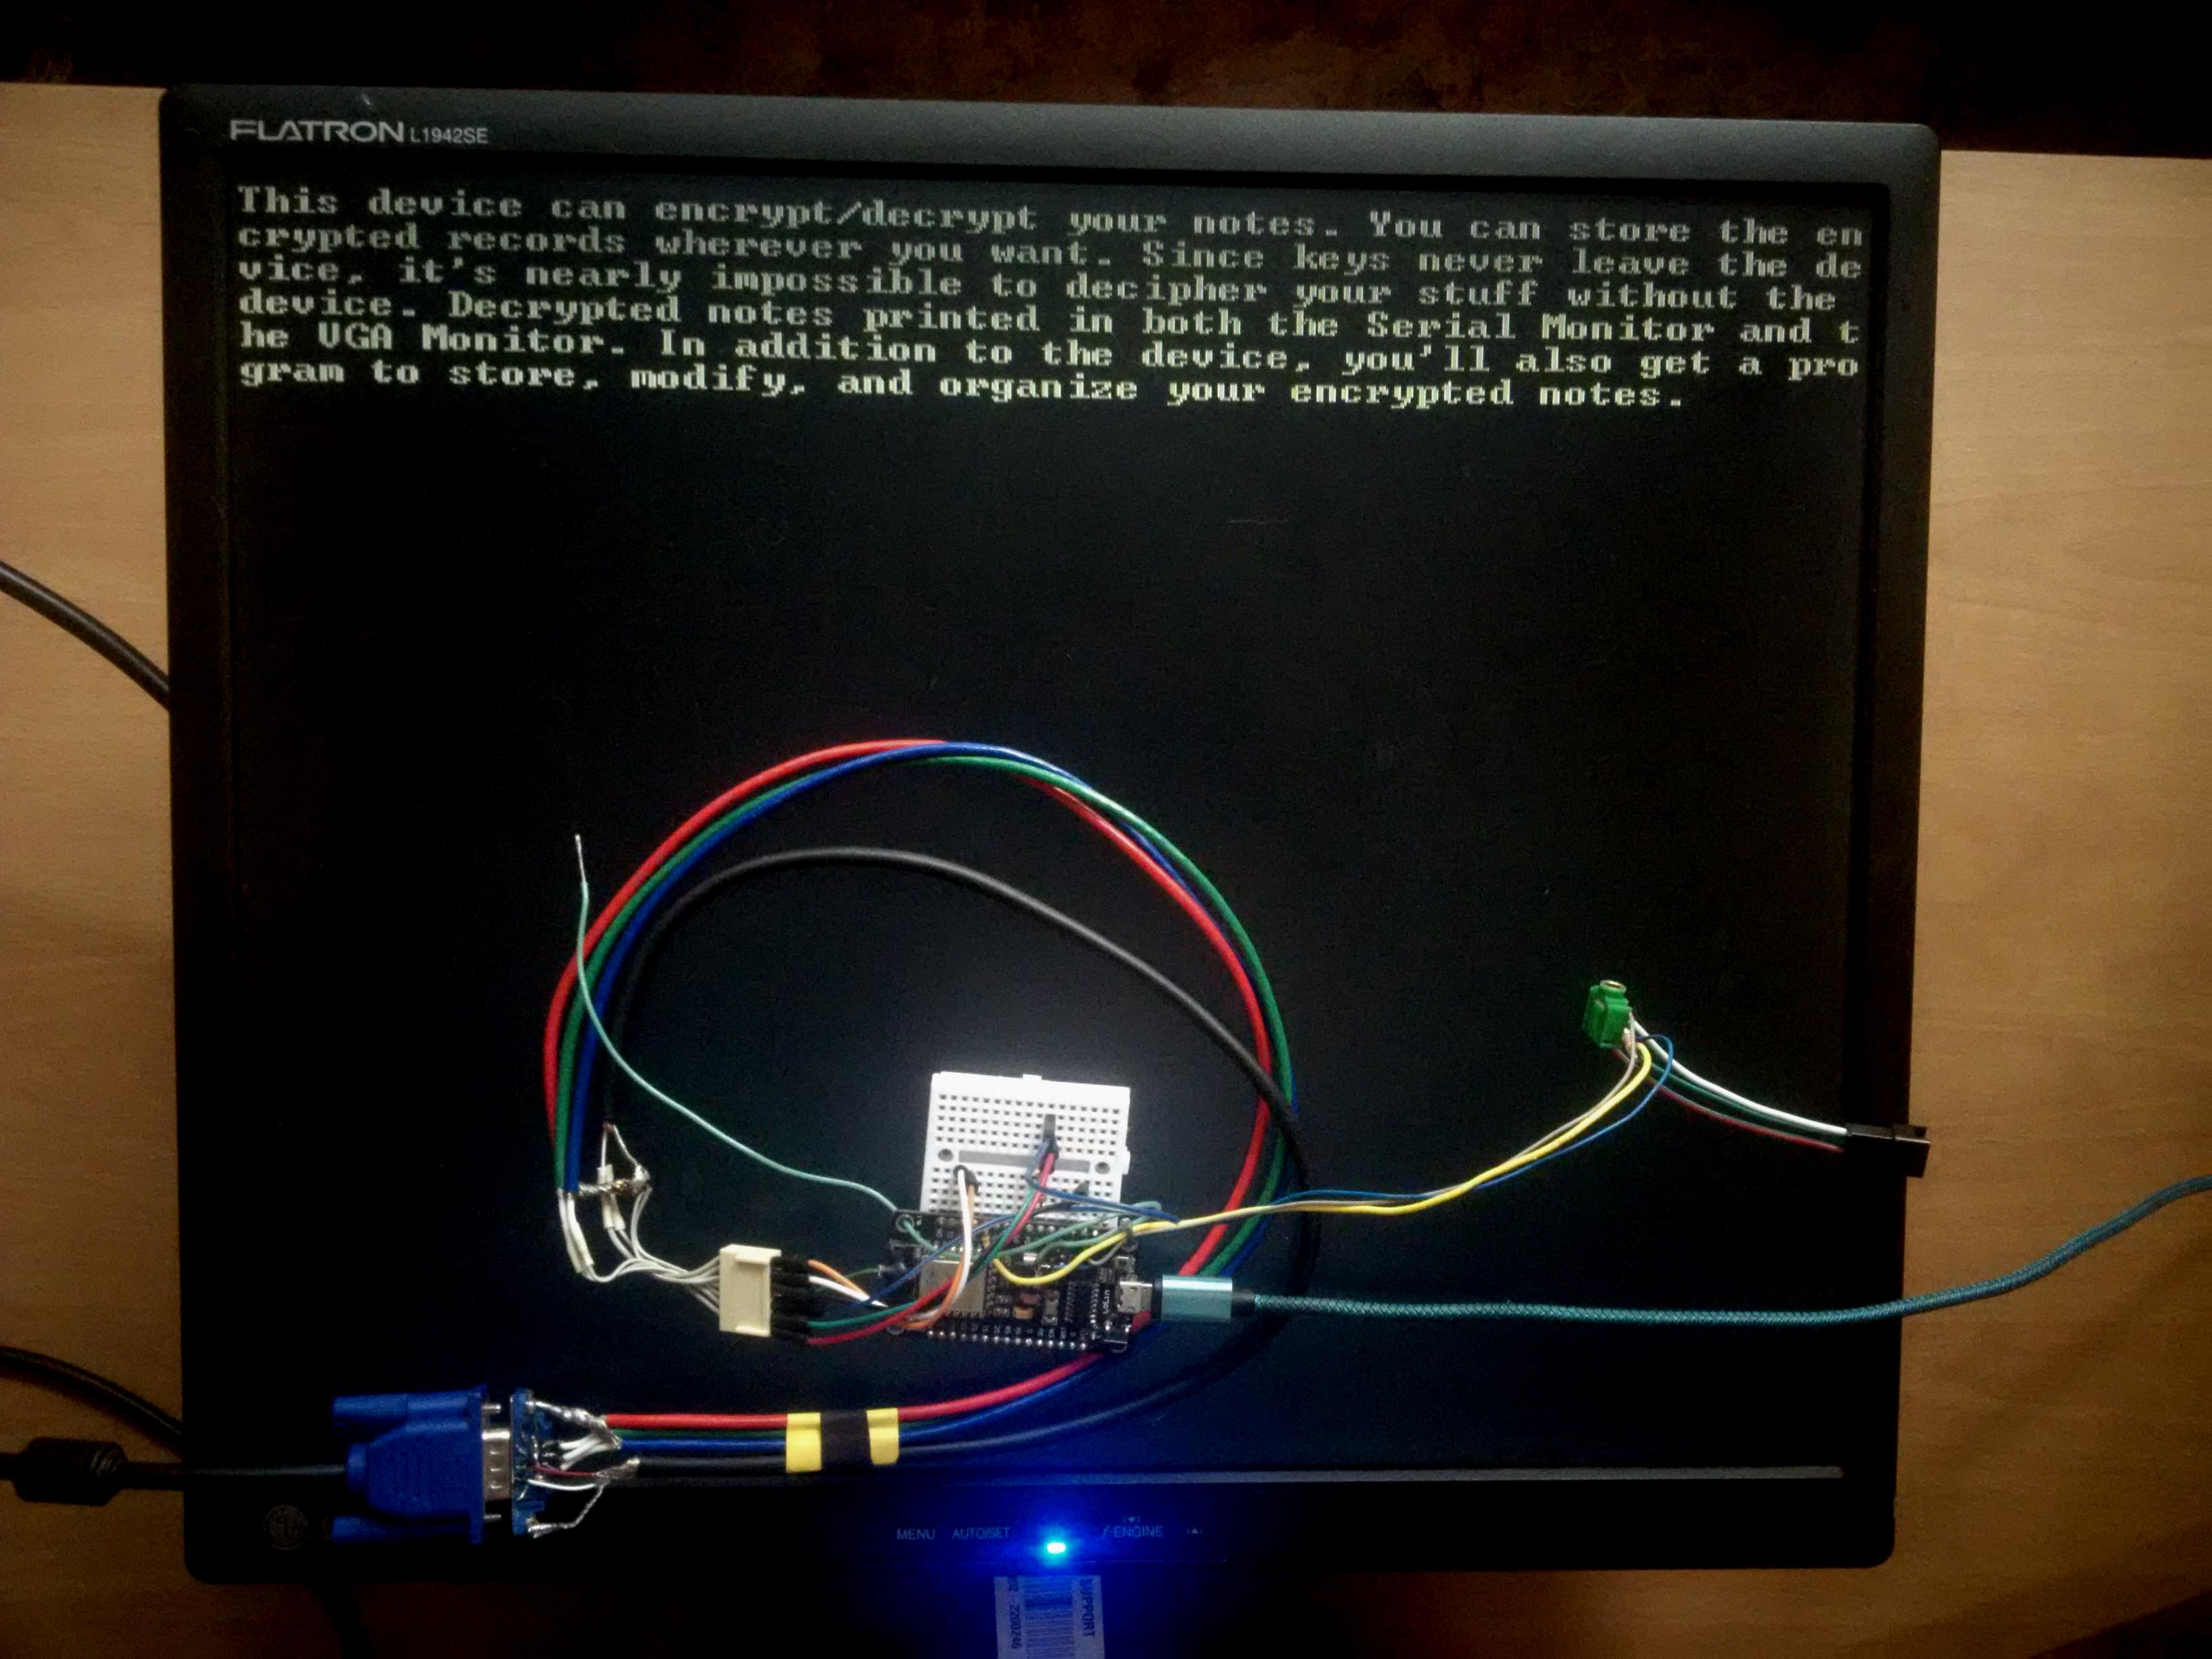
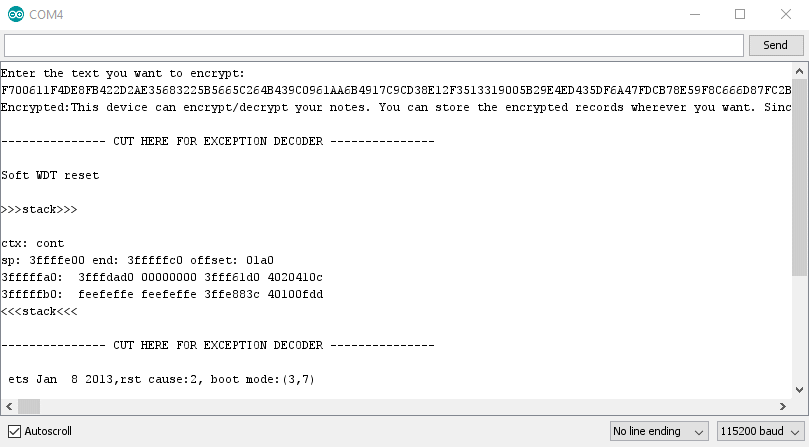
I encrypted this plaintext:
This device can encrypt/decrypt your notes. You can store the encrypted records wherever you want. Since keys never leave the device, it's nearly impossible to decipher your stuff without the device. Decrypted notes printed in both the Serial Monitor and the VGA Monitor. In addition to the device, you'll also get a program to store, modify, and organize your encrypted notes.
And obtained this ciphertext:
F700611F4DE8FB422D2AE35683225B5665C264B439C0961AA6B4917C9CD38E12F3513319005B29E4ED435DF6A47FDCB78E59F8C666D87FC2BB3986A7BE6D329EE5356F442DF4A0A0ECB2069D543014016298E33CB0EC964106F4F562300B17B305343BA9FB17B227E17DE48BFBE6C67063D8B0AD4A3C74AC66A118FC50D4A731FD9A0F2F212510C151B604419C2BB7E28C21BEF527F095597FF60DBCD4CB353901C4633C54C70523C5CDF517ABE09A97F1322BD9F884783D339F55E2F596FE72398F1675E1602685BD8675A6AB3881CFBF7743715471DA77E2349D15B2B77D93CF796F0DB38CA83107493789F5127D6BFDEABA59AA534E72FBDF44C6F8783C59C7440428B8863908AF886A0EEF4294EC210AEA293DE6750DA173032DE1952A3633E01267D9DA5FD280DF513F8908723406AA58F6F31A1A8449FF259998A953BC55C02AE27FB0B8619637DF7291E063DF0AEE43DEDDCCCFE6DA6562320FB95637714CC053702052650BF315F1ED95266BA5AA374C361AAD3E28F5962DCF75F8944A15E4890CB5D052CF297777F7849BE57D7470BE63EBEE988A12C8DE2A7E56D8D7FEE99AA8084476EE8B4F77F9CA90DBB7912003FF9145FBB6DA8181C058E12914E15710E7A6ECF6D741983390E96F53D3C1B0ED63D997BEDA167A752A276759BDC9E9E69F337399D3EAEA7120965CEB5E395CF51D0F36EAE59FD5F4E0B44350091D6C2FD49E5A0639BFFCC244A3F73919162194DA4DBE9A0609B8B4E8484E623448DDF0DECE485EFA33308D8384D34269510F7DCDAF66F7BD20B44266B92A04C5F617962B2FC3303034EA151C9C940EBEAD15FA3C6D1AD94108C96C9E820347334EA11E9C79D08D5979AED33363D950661104D1004841E78D59D5C755EBBB2D89026C7BD19BCCB619BA9359252C86665CF639DFF1F22CD02CFBDC449DFCD8F37FCE5AD5DABE3278215095A33DD6ECB0EF5CF17B9299A1799130B280CD57C0F4C8C28DA7DABD784CA4EED85926134A8CA155F36D95DFF9A54656E1ADF70AEACFE526DEC6DEE9042401348F190E5F14C2D1B3CF338E41E10FA187252D655D1B1E7D594AB5A479D4EAEA1E244C6374581DC16D6680886E3055FF971D650F077FDF3667DD60BD1226434770B04241EF00B8FC488935E482BDEC5711F622CE6186A13C1EC3CBCCF8B1DCCC58D5A316194D8FB894FD55F1E5DEA557ACCB8F3FA2B957642E1F250BAF2FEC846E6D07225A729C2FC44B55C84BB1D0CB9A3B6D9E83BA210EAE4BF2891DE36F7E91CD503A30751004A60E208AC88009D6C959D5BC070170A75BE0B52AC04268524DA6CBB728457FA9648BAB922E063BF0BF8CC9A156560EA628118219072BA1B14B42FBD97B6A0B07EA2107C93A9CCD54550D277381829A378D7A41C3F9EA2569420767B6DC91FB72155BE21052432AC5642B50BD5012AF1CC45C0F26B1E35C2907FD250DB3B0CFEEAD8E9833E7DBC21996708372E87029375A9EFA656141B6A7344BFC59FAD17B0257F2859125A46CA747F3381B8387691444E194379928EF211A9528F62F419C89B5E13F7E48A2283D80C6DE3F3C18D1126443F604936836CC88F79CCB926871EEA98CCD15255D859D6C23CB5AFB84989635B88AE8496B16FE09F15449C8589A5986F547C8FB642C2D7D32FB2D386A2F75A39EF4D11B8AE47CBA2BD55718D08F97FD168973C6B16CBCBB29038A000F9D95FFC8604F1AB94C61146B6C7ECDCCC0F3D3C42BC77ADF812D06A9DB3B1FECFC20A4A4AB9C16B48657B412377870DCD1187EC796D4AB3FC4B666DB276403D8573D9B1E9590C937D67F81CB77FB587512EF245C3470AAD6A4A234061CC2AF7955E1705B72F5F679F404C906F8606F530F4CD255B1BC9AD72251EE584FD17D6ECDAE7BE5B392446B81FCD8C533A7077ED3A766DEA2D1D3208C9E6DD6914481B14CD7CC9F181B1043A61CF6C029E49619B152A1B061118CDDCE0C17F947280F5BC7C1C521B1656C1596787830A6B11041A96DFAFB6525482130B467C80BC23CCC65047467FF1994D96877F095D33A237112D465A83BEEF6DB80658337C3084A4316DC0DBDCBF9B1C5A19E1203A1FCB6686A6EB9ADEFD2BBBBF7AF84D892779961CA5C7F6A17B58AD14EA454F318936405F3184061BD6B97056FCADE24D1040B69353C7A7D41405B3C341723885F4C8F5E8BBDC460FC63600BFE426D0D1217372292C9EA74014795FF2C50A37AC16BDEA4BFAAE4D48640F86F6F4BF8F340FC52DA371DAC4840653CFD9B2A0B13FD7334D382FA94371420C80F5D8991FD82F281E5B9316A7BC5BE1C216A45EDB8834C6C59274E14C62F99F649BED60B50F5C1990AE9D1A09BE039BDE7A33D571AA8B04183B7511D5FC5468C6408985262616EA39872879230E4472408B0C886F104B5FFDDCCAB803CB171C675C578A3DBDA9F745A33B4600B81352DA5A006A37E5377965C90166EA1F9E1DE1DE23B8F8FA814748F8E82C11DC47057513D186E9FDCA9B8167665CF2CBDE685CC2D55C5C2D7A4EB7129A0B6FA086B37873A361CFCD66F8F0F24BD73E98A8B3BEFD487304CE3B183641D7207CC8641D50F6F30B2180874F5CAC239B56E69D757A42F519A5D0A5FDB0625CAAB62EB289C8313B9BE2F76A05340DE05F6FA533BA88AB8D42304AA7BDE2EFF367538EF57272D0481DA4DC9FC09FD11FC5B233B9D7DE9AAC3D6B52E6B50378A
Save the Encrypted Note
You can write it down on paper, put it in the text document, or put it into the database.
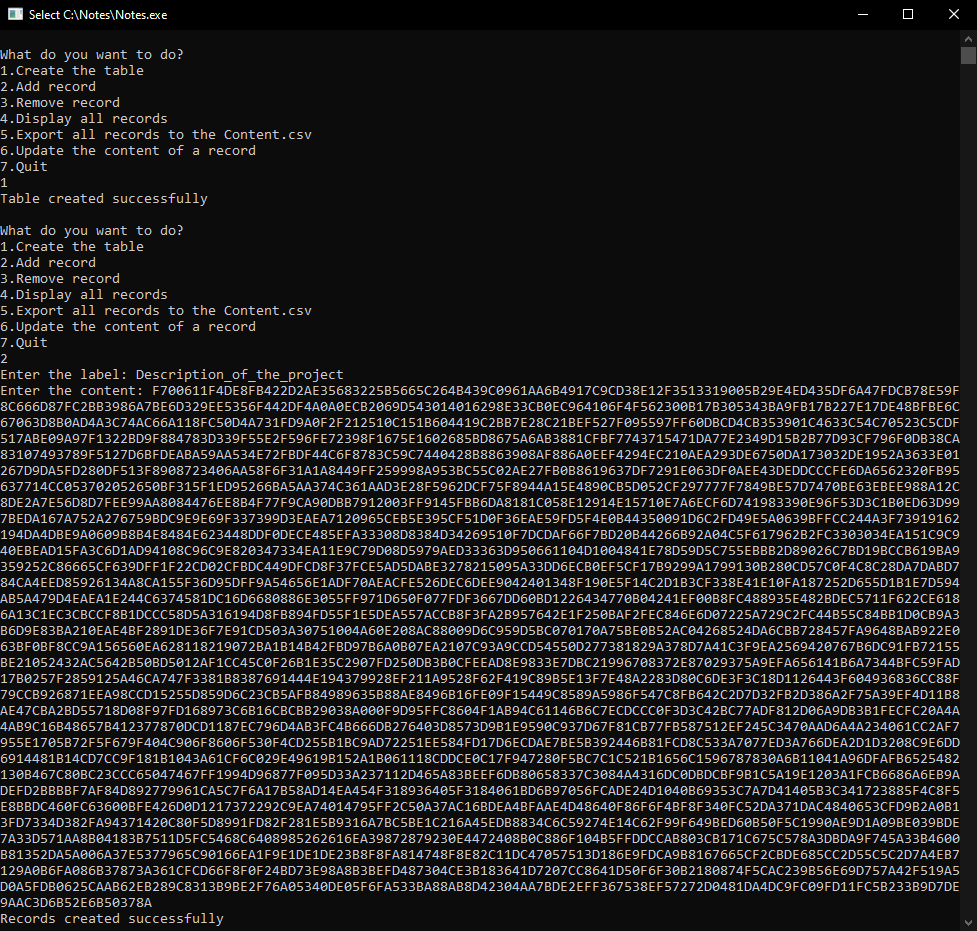
To put the encrypted record in the database:
1) Launch Notes.exe;
2) If you're launching the program for the first time, Enter 1 and then press Enter;
3) Enter 2 and then press Enter;
4) Enter the label. Make sure that there are no spaces in the name of the label;
5) Press Enter;
6) Paste the encrypted note into the program window;
7) Press Enter.
If the plaintext length is longer than 408 characters, store the ciphertext somewhere else because the database will truncate it. Let me explain why. The algorithm only encrypts blocks of 8 characters and produces 80 characters ciphertext. 80/8 = 10. If the plaintext length isn't divisible by 8, then padding is applied. Technically, the output is ten times longer than the input. 408x10 = 4080. The maximum length of the record that can be stored in the database is 4095 characters. Add another character, and you will get one more block. 416x10 = 4160. 4160> 4095. Therefore it must be truncated to 4095 characters.
Export the Encrypted Data to the .csv File
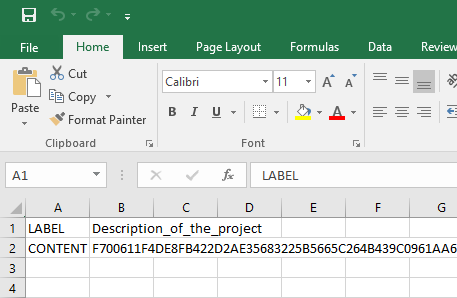
To export the encrypted records to the .csv file:
1) Launch Notes.exe (if it weren't already launched);
2) Enter 5;
3) Press Enter.
Decrypt the Note

To decrypt the record:
1) Connect the USB cable to the ESP;
2) Open the Serial Monitor;
3) Make sure that the baud rate is set to 115200;
4) Enter 2;
5) Press Send;
6) Paste the ciphertext to the Serial Monitor;
7) Press Enter;
8) Wait for a couple of seconds (Waiting time depends on the ciphertext length).
Final Thoughts
Even though this device is doing a good job at encrypting your notes, nothing can give you a 100% guarantee that your stuff will not get into the attacker's hands.
The computer on which you're encrypting the notes can have a keylogger on it, or an attacker can give you a "random-number generator" with a backdoor in it. Just beware that there are indirect ways to get access to your stuff without hacking the device itself. In the most naïve case, an attacker can stand behind your back while you're typing your notes.
If you like this tutorial, please share it.
Thank you for reading this tutorial.