Emotion Shirt Using a Linkit One
by ehudwill in Circuits > LEDs
1606 Views, 10 Favorites, 0 Comments
Emotion Shirt Using a Linkit One

My family loves the movie Inside Out. So I thought it would be great if I made a shirt that would show emotions. I decided the Linkit One would be perfect for this as it would give you wireless access to the controls
Tools/Materials
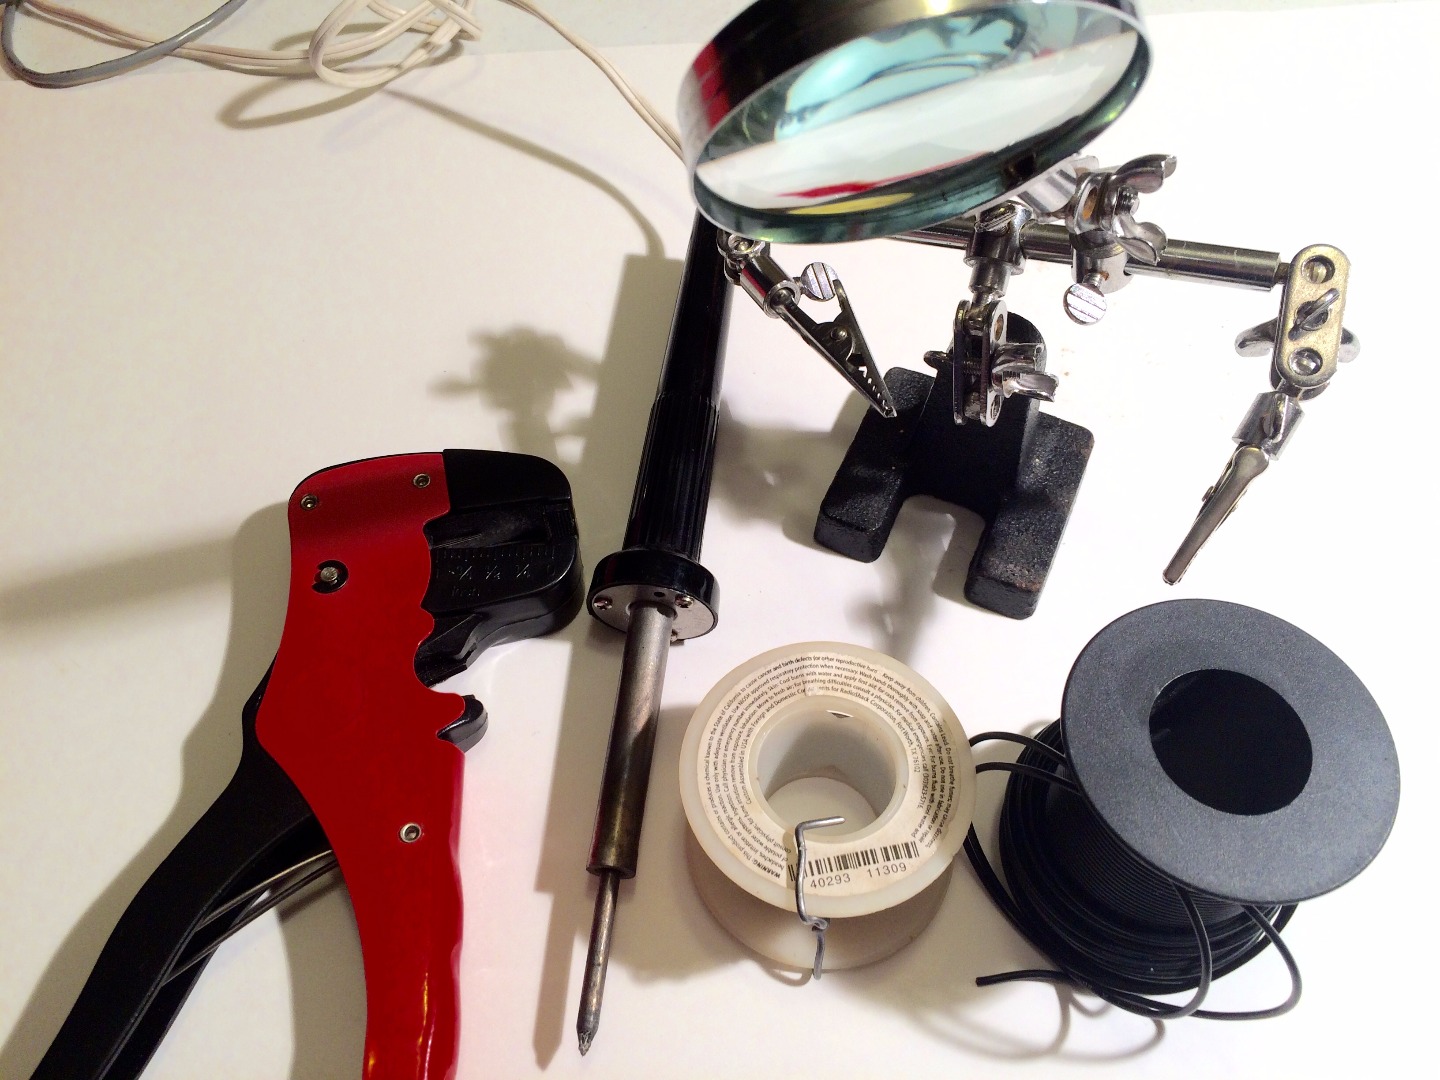


Tools
- Computer
- USB cable
- Soldering Iron
- Wire Cutters
- Needle
- Scissors
- Wire Strippers
- Helping Hands
Materials
- Linkit One
- Battery for Linkit One
- Wifi Cable for Linkit One
- 3 - RGB LED (common anode)
- 1 - Circular Circuit Board
- 1- Breadboard
- 1- Wires (Most of my wires were scavenged from old computers)
- Solder
- 1- Shirt
- Thread
- Extra Fabric
- Super Glue
- 1 - Half a small plastic sphere about the size of the circular circuit board (I got mine from a quarter machine)
- Poly-fil
- Two Part Putty Epoxy (Water Weld)
Code

This code is designed to light up certain colors of the RGB LED. It is set up in such a way that you can activate the color that corresponds with the colors of the emotions in Inside Out.
<p>//#include <b64.h><br>#include <httpclient.h>
#include <ltask.h>
#include <lwifi.h>
#include <lwificlient.h>
#include <ldatetime.h>
#define WIFI_AP ""
#define WIFI_PASSWORD ""
#define WIFI_AUTH LWIFI_WPA  // choose from LWIFI_OPEN, LWIFI_WPA, or LWIFI_WEP.
#define per 50
#define per1 3
#define DEVICEID "" // Input your deviceId
#define DEVICEKEY "" // Input your deviceKey
#define SITE_URL "api.mediatek.com"</ldatetime.h></lwificlient.h></lwifi.h></ltask.h></httpclient.h></b64.h></p><p>LWiFiClient c;
unsigned int rtc;
unsigned int lrtc;
unsigned int rtc1;
unsigned int lrtc1;
char port[4]={0};
char connection_info[21]={0};
char ip[21]={0};
int portnum;
int val = 0;
String tcpdata = String(DEVICEID) + "," + String(DEVICEKEY) + ",0";
String upload_led;
String tcpcmd_ledJoy_on = "LED_ControlJoy,1";
String tcpcmd_ledJoy_off = "LED_ControlJoy,0";</p><p>String tcpcmd_ledAnger_on = "LED_ControlAnger,1";
String tcpcmd_ledAnger_off = "LED_ControlAnger,0";</p><p>String tcpcmd_ledDisgust_on = "LED_ControlDisgust,1";
String tcpcmd_ledDisgust_off = "LED_ControlDisgust,0";</p><p>String tcpcmd_ledFear_on = "LED_ControlFear,1";
String tcpcmd_ledFear_off = "LED_ControlFear,0";</p><p>String tcpcmd_ledSad_on = "LED_ControlSad,1";
String tcpcmd_ledSad_off = "LED_ControlSad,0";</p><p>LWiFiClient c2;
HttpClient http(c2);</p><p>void setup()
{

  LTask.begin();
  LWiFi.begin();
  Serial.begin(115200);
  /*while(!Serial) delay(1000); /* comment out this line when Serial is not present, ie. run this demo without connect to PC */</p><p>  Serial.println("Connecting to AP");
  while (0 == LWiFi.connect(WIFI_AP, LWiFiLoginInfo(WIFI_AUTH, WIFI_PASSWORD)))
  {
    delay(1000);
  }

  Serial.println("calling connection");</p><p>  while (!c2.connect(SITE_URL, 80))
  {
    Serial.println("Re-Connecting to WebSite");
    delay(1000);
  }
  delay(100);</p><p>  pinMode(13, OUTPUT);
  pinMode(12, OUTPUT);
  pinMode(11, OUTPUT);
  pinMode(10, OUTPUT);
  pinMode(9, OUTPUT);
  pinMode(8, OUTPUT);
  pinMode(7, OUTPUT);
  pinMode(6, OUTPUT);
  pinMode(5, OUTPUT);
  pinMode(4, OUTPUT);
  pinMode(3, OUTPUT);
  pinMode(2, OUTPUT);
  getconnectInfo();
  connectTCP();
}</p><p>void getconnectInfo(){
  //calling RESTful API to get TCP socket connection
  c2.print("GET /mcs/v2/devices/");
  c2.print(DEVICEID);
  c2.println("/connections.csv HTTP/1.1");
  c2.print("Host: ");
  c2.println(SITE_URL);
  c2.print("deviceKey: ");
  c2.println(DEVICEKEY);
  c2.println("Connection: close");
  c2.println();

  delay(500);</p><p>  int errorcount = 0;
  while (!c2.available())
  {
    Serial.println("waiting HTTP response: ");
    Serial.println(errorcount);
    errorcount += 1;
    if (errorcount > 10) {
      c2.stop();
      return;
    }
    delay(100);
  }
  int err = http.skipResponseHeaders();</p><p>  int bodyLen = http.contentLength();
  Serial.print("Content length is: ");
  Serial.println(bodyLen);
  Serial.println();
  char c;
  int ipcount = 0;
  int count = 0;
  int separater = 0;
  while (c2)
  {
    int v = c2.read();
    if (v != -1)
    {
      c = v;
      Serial.print(c);
      connection_info[ipcount]=c;
      if(c==',')
      separater=ipcount;
      ipcount++;
    }
    else
    {
      Serial.println("no more content, disconnect");
      c2.stop();</p><p>    }

  }
  Serial.print("The connection info: ");
  Serial.println(connection_info);
  int i;
  for(i=0;i<separater;i++)  ="" {=""  ip[i]="connection_info[i];" }="" int="" j="0;" separater++;="" for(i="separater;i<21" &&="" j<5;i++)=""  port[j]="connection_info[i];"  j++;="" serial.println("the="" tcp="" socket="" connection="" instructions:");="" serial.print("ip:="" ");="" serial.println(ip);="" serial.print("port:="" serial.println(port);="" portnum="atoi" (port);="" serial.println(portnum);<="" p=""></separater;i++)></p><p>} //getconnectInfo</p><p>void uploadstatus(){
  //calling RESTful API to upload datapoint to MCS to report LED status
  Serial.println("calling connection");
  LWiFiClient c2;  </p><p>  while (!c2.connect(SITE_URL, 80))
  {
    Serial.println("Re-Connecting to WebSite");
    delay(1000);
  }
  delay(100);
  if(digitalRead(13)==1)
  upload_led = "LED_Display,,1";
  else
  upload_led = "LED_Display,,0";
  int thislength = upload_led.length();
  HttpClient http(c2);
  c2.print("POST /mcs/v2/devices/");
  c2.print(DEVICEID);
  c2.println("/datapoints.csv HTTP/1.1");
  c2.print("Host: ");
  c2.println(SITE_URL);
  c2.print("deviceKey: ");
  c2.println(DEVICEKEY);
  c2.print("Content-Length: ");
  c2.println(thislength);
  c2.println("Content-Type: text/csv");
  c2.println("Connection: close");
  c2.println();
  c2.println(upload_led);

  delay(500);</p><p>  int errorcount = 0;
  while (!c2.available())
  {
    Serial.print("waiting HTTP response: ");
    Serial.println(errorcount);
    errorcount += 1;
    if (errorcount > 10) {
      c2.stop();
      return;
    }
    delay(100);
  }
  int err = http.skipResponseHeaders();</p><p>  int bodyLen = http.contentLength();
  Serial.print("Content length is: ");
  Serial.println(bodyLen);
  Serial.println();
  while (c2)
  {
    int v = c2.read();
    if (v != -1)
    {
      Serial.print(char(v));
    }
    else
    {
      Serial.println("no more content, disconnect");
      c2.stop();</p><p>    }

  }
}</p><p>void connectTCP(){
  //establish TCP connection with TCP Server with designate IP and Port
  c.stop();
  Serial.println("Connecting to TCP");
  Serial.println(ip);
  Serial.println(portnum);
  while (0 == c.connect(ip, portnum))
  {
    Serial.println("Re-Connecting to TCP");
    delay(1000);
  }
  Serial.println("send TCP connect");
  c.println(tcpdata);
  c.println();
  Serial.println("waiting TCP response:");
} //connectTCP</p><p>void heartBeat(){
  Serial.println("send TCP heartBeat");
  c.println(tcpdata);
  c.println();

} //heartBeat</p><p>void loop()
//Red led
{
  //Check for TCP socket command from MCS Server
  String tcpcmd="";
  while (c.available())
   {
      int v = c.read();
      if (v != -1)
      {
        Serial.print((char)v);
        tcpcmd += (char)v;
        if (tcpcmd.substring(40).equals(tcpcmd_ledAnger_on)){
          digitalWrite(4, HIGH);
          digitalWrite(3, HIGH);
          digitalWrite(2, HIGH);
          Serial.print("Switch LED ON ");
          tcpcmd="";
        }
        else if(tcpcmd.substring(40).equals(tcpcmd_ledAnger_off)){
          digitalWrite(4, LOW);
          digitalWrite(3, LOW);
          digitalWrite(2, LOW);
          Serial.print("Switch LED OFF");
          tcpcmd="";
        }
        else if(tcpcmd.substring(40).equals(tcpcmd_ledJoy_on)){
          digitalWrite(4, HIGH);
          digitalWrite(3, HIGH);
          digitalWrite(2, HIGH);
          digitalWrite(10, HIGH);
          digitalWrite(9, HIGH);
          digitalWrite(8, HIGH);
          digitalWrite(7, HIGH);
          digitalWrite(6, HIGH);
          digitalWrite(5, HIGH);
          Serial.print("Switch LED ON ");
          tcpcmd="";
        }
        else if(tcpcmd.substring(40).equals(tcpcmd_ledJoy_off)){
          digitalWrite(4, LOW);
          digitalWrite(3, LOW);
          digitalWrite(2, LOW);
          digitalWrite(10, LOW);
          digitalWrite(9, LOW);
          digitalWrite(8, LOW);
          digitalWrite(7, LOW);
          digitalWrite(6, LOW);
          digitalWrite(5, LOW);
          Serial.print("Switch LED OFF");
          tcpcmd="";
        }
        else if(tcpcmd.substring(40).equals(tcpcmd_ledDisgust_on)){
          digitalWrite(10, HIGH);
          digitalWrite(9, HIGH);
          digitalWrite(8, HIGH);
          Serial.print("Switch LED ON ");
          tcpcmd="";
        }
        else if(tcpcmd.substring(40).equals(tcpcmd_ledDisgust_off)){
          digitalWrite(10, LOW);
          digitalWrite(9, LOW);
          digitalWrite(8, LOW);
          Serial.print("Switch LED OFF");
          tcpcmd="";
        }

        else if(tcpcmd.substring(40).equals(tcpcmd_ledFear_on)){
          digitalWrite(4, HIGH);
          digitalWrite(3, HIGH);
          digitalWrite(2, HIGH);
          digitalWrite(7, HIGH);
          digitalWrite(6, HIGH);
          digitalWrite(5, HIGH);
          Serial.print("Switch LED ON");
          tcpcmd="";
        }

        else if(tcpcmd.substring(40).equals(tcpcmd_ledFear_off)){
          digitalWrite(4, LOW);
          digitalWrite(3, LOW);
          digitalWrite(2, LOW);
          digitalWrite(7, LOW);
          digitalWrite(6, LOW);
          digitalWrite(5, LOW);
          Serial.print("Switch LED OFF");
          tcpcmd="";
        }</p><p>
        else if(tcpcmd.substring(40).equals(tcpcmd_ledSad_on)){
          digitalWrite(7, HIGH);
          digitalWrite(6, HIGH);
          digitalWrite(5, HIGH);
          Serial.print("Switch LED ON");
          tcpcmd="";
        }

        else if(tcpcmd.substring(40).equals(tcpcmd_ledSad_off)){
          digitalWrite(7, LOW);
          digitalWrite(6, LOW);
          digitalWrite(5, LOW);
          Serial.print("Switch LED OFF");
          tcpcmd="";
        }
      }
   }</p><p>  LDateTime.getRtc(&rtc);
  if ((rtc - lrtc) >= per) {
    heartBeat();
    lrtc = rtc;
  }
  //Check for report datapoint status interval
  LDateTime.getRtc(&rtc1);
  if ((rtc1 - lrtc1) >= per1) {
    uploadstatus();
    lrtc1 = rtc1;
  }

}</p>
Downloads
Testing
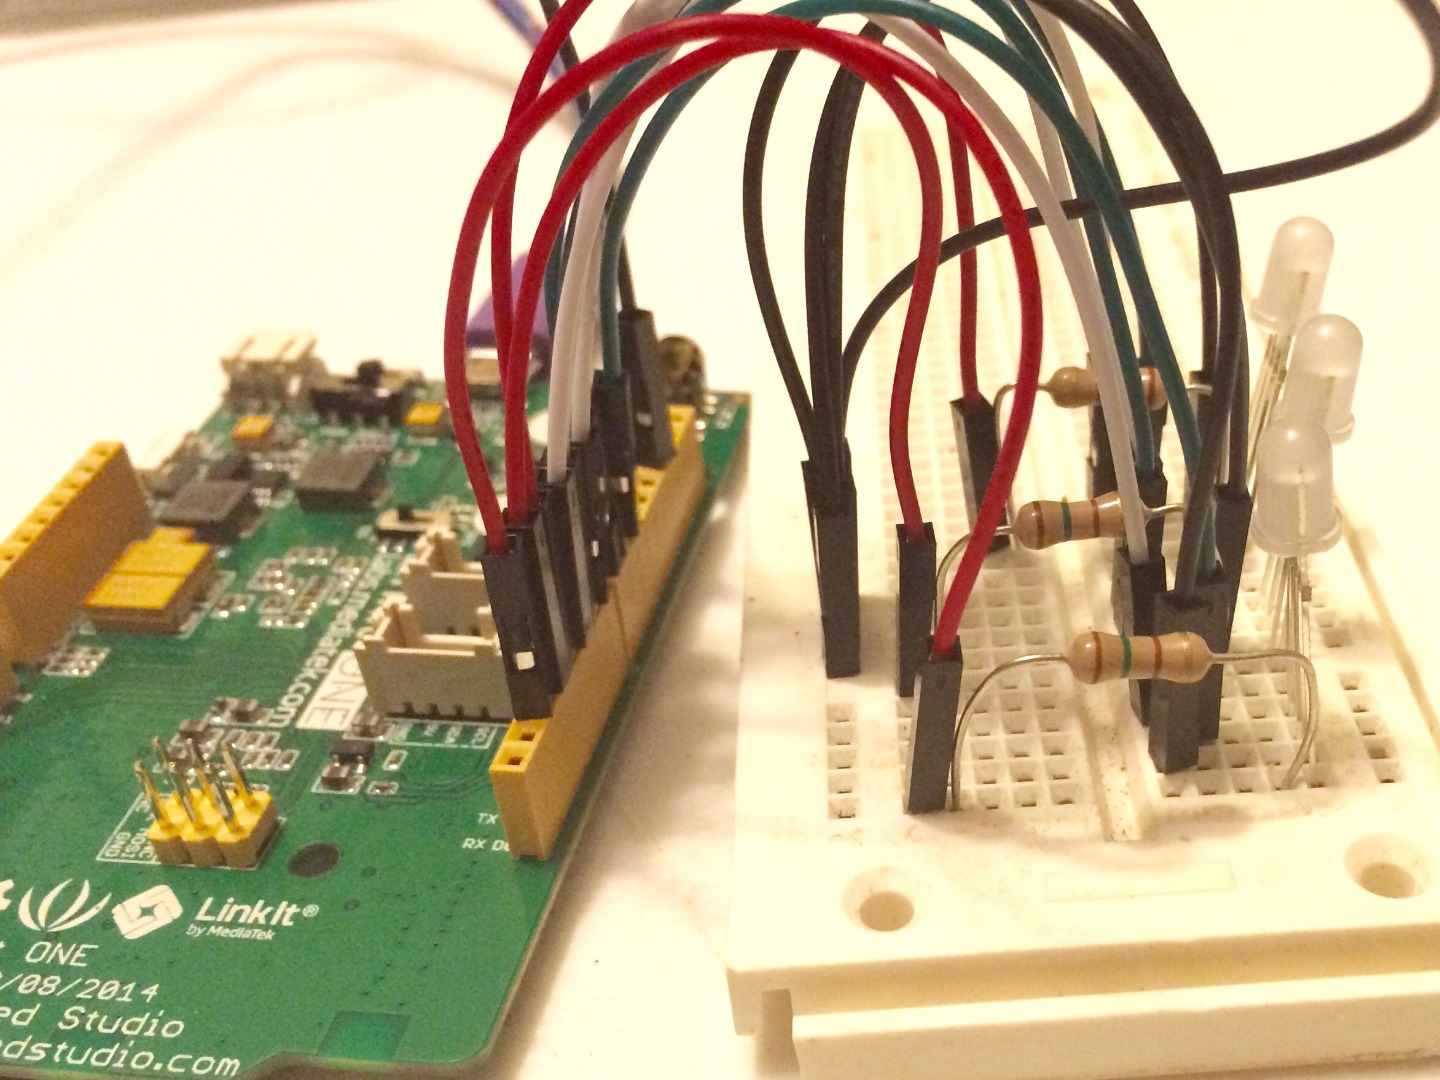


After working out my code I needed to test it. I set up three LEDs on my breadboard and wired them to the Linkit One. I wired the red leads of the three LEDs into digital pins 2, 3, and 4. I wired the blue leads of the three LEDs into digital pins 5, 6, and 7. I wired the green leads of the three LEDs into digital pins 8, 9, and 10. Then I wired in the ground from the LEDs to the ground of the board.
Making the Light


I bent the ground lead on the RGB LEDs out. I placed the three LEDs in the circle so that the ground leads are near each other. I soldered these three together with the wire for the ground. I trimmed the leads of the LEDs as I soldered wires to them. I soldered the wires to the other leads of the LEDs. I used the left over leads that I cut and soldered them to the other end of the wire to help them fit into the ports of the Linkit One. I used heat shrink tubing to keep the wires together and to protect from shorts. Then I put the wires in the Linkit One in the same pins as I did for the testing step. I used water weld to hold the wires in place. Then I put a small amount of Poly-fil around the LEDs. This helps diffuse the light. Then I put half a small plastic sphere from a cheap plastic toy over the Poly-fil and lights. This gives it a nice rounded look and helps it resemble the memories from the movie Inside Out. I used super glue to hold the plastic onto the lights.
Making the Shirt


I selected a shirt with a pocket to hide the cut I made for the wiring of the light. I cut a small hole behind the fabric of the pocket where the light would fit through. Then I cut a square of fabric that would act as a pocket inside the shirt for the Linkit One. I folded the edges of the fabric over and used a simple stitch to attach it to the bottom of the shirt on the same side as the light.
Putting It All Together

I put the light in the pocket and then connected it to Linkit One. I made sure the battery and wifi antenna were connected. I switched the Linkit One to battery.