Electronic Dice Arduino Project
.jpg)
The reason why I made this project is because first of all I did'nt have anything else to do and second of all since the beginning of this semester I made a goal to make something which at least includes something like a dice. I really liked this project, because the dice with the leds look so good i my opinion. This arduino project is easy on making in arduino and honetly I didn'nt need to see on screen while making it on arduino, becaue of how easy it was. But here is where it gets harder the code. So the code is actually way harder than I thought. It included so many random stuff that we never covered and because I had tried many others and many others and unfortunately the were fake.They turned out to be not real I wasted time on that and now I was running out of time sand I used that code and there were sdo many mistakes and some of them I fixed on my own, but because of some other ones my thing did'nt work.In my opinion it could work if the code worked.
Supplies

This project included breadboard, resistors 220 ohms , leds, arduino and jumper wires.
Gather Materials
.jpg)
Gather Materials
- Arduino
- 7 LEDs
- 7 resistors (220 ohms)
- 1 push button
- Breadboard
- Jumper wires
Set Up the Circuit
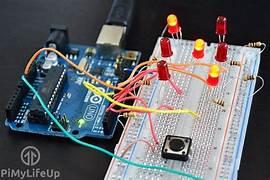.jpg)
Place the 7 LEDs on the breadboard in a pattern resembling a dice face.
Connect one leg of each LED to the Arduino's digital pins (e.g., 2, 3, 4, 5, 6, 7, 8).
Attach the other leg of each LED to a 220-ohm resistor, then to the ground (GND).
Connect a push button to a digital pin e .g. pin 9 and the ground.
Write the Code
.jpg)
Now i agree that I kinda got the code from somewhere else because I was runnng out of time, but actually tehre were so mistakes in it, so almost half of the code I had to erase and make it again aad now the code looks like this.
int button = 2;
int bottomLeft = 3;
int middleLeft = 4;
int upperLeft = 5;
int middle = 6;
int bottomRight = 7;
int middleRight = 8;
int upperRight = 9;
int state = 0;
long randNumber;
//Initial setup
void setup(){
pinMode (bottomLeft, OUTPUT) ;
pinMode (middleLeft, OUTPUT) ;
pinMode (upperLeft, OUTPUT);
pinMode (middle, OUTPUT) ;
pinMode (bottomRight, OUTPUT) ;
pinMode (middleRight, OUTPUT) ;
pinMode (upperRight, OUTPUT) ;
pinMode (button, INPUT) ;
Serial.begin (9600);
randomSeed (analogRead (0)) ;
}
void 1oop() {
if(digitalRead(button) == HIGH && state == 0){
state = 1;
int randNumber = random (1, 7);
delay (100) ;
Serial.println (randNumber) ;
setNumber(randomNumber);
if (randNumber == 6) (
six();
}
if (randNumber = 5) [
five ();
}
if (randNumber == 4) (
four ();
}
if (randNumber == 3)[
three () ;
}
if (randNumber == 2) [
two();
}
if (randNumber == 1)(
one () ;
}
delay(5000);
checkAll();
State = 0;
}
void six (){
digitalWrite (bottomLeft, HIGH);
digitalWrite (middleleft, HIGH);
digitalWrite (upperleft, HIGH):
digitalWrite (bottomRight, HIGH) :
digitalWrite (middleRight, HIGH):
digitalWrite (upperRight, HIGH);
}
void five (){
digitalWrite (upperieft, HIGH);
digitalWrite (bottomleft, HIGH):
digitalWrite (middle, HIGH):
digitalWrite (upperRicht, HIGH):
digitalWrite (bottomRight, HIGH):
}
void four(){
digitalWrite (upperteft, HIGH):
digitalWrite (bottomleft, HIGH):
digitalWrite upperRight. HIGH):
digitalWrite (bottomRight, HIGH);
}
void three(){
digitalWrite (upperleft, HIGH):
digitalWrite(middle. HIGH):
digitalWrite(bottomRight. HIGH):
}
void two(){
digitalWrite(bottomRight. HIGH):
digitalWrite (upperleft, HIGH):
}
void one (){
digitalWrite(middle, HIGH):
}
void clearAll(){
digitalWrite (bottomleft, LOW):
digitalWrite middleLeft, LOW);
digitalWrite (upperleft, LOW) :
digitalWrite(middle, LOW):
digitalWrite (bottomRight, LOW):
digitalWrite (middleRight. LOW);
digitalWrite ((Right, LOW):
Upload the Code
.jpg)
Connect your Arduino to your computer via USB.
Open the Arduino IDE, paste the code, and upload it to the board.
Test Your Dice
.jpg)
Press the button to roll the dice.Observe the LEDs light up in patterns representing numbers 1 to 6.