Eco-Friendly, Modular Timber Bricks Made Out of Recycled Pine Timber for an Environmentally Friendly Future
by JasC13 in Workshop > Woodworking
1314 Views, 12 Favorites, 0 Comments
Eco-Friendly, Modular Timber Bricks Made Out of Recycled Pine Timber for an Environmentally Friendly Future


The timber brick (T-Brick) system is a quick and simple way to build a safe, watertight, insulated and fire resistant building. It is a modular, reusable building product which is easy to use and requires minimal site machinery and labor.
A survey conducted for this revealed that over 50% of people believed that concrete was a good building product for the environment. However, concrete manufacturing is a large producer of carbon dioxide contributing 4-8% of the world’s greenhouse gas emissions. Concrete also uses 10% of the worlds’ water supply.
However, timber grown in sustainable forests is an environmentally friendly building material. Timber is a natural carbon storing material, meaning that timber in its life cycle as a tree will absorb and capture carbon dioxide through photosynthesis.
There are existing building products that use timber, such as CLT (cross laminated timber). CLT is heavy, bulky and produces a lot of wastage. T-Bricks take the idea of CLT and reduce its size and weight into an easy to use brick so it is a more versatile building material.
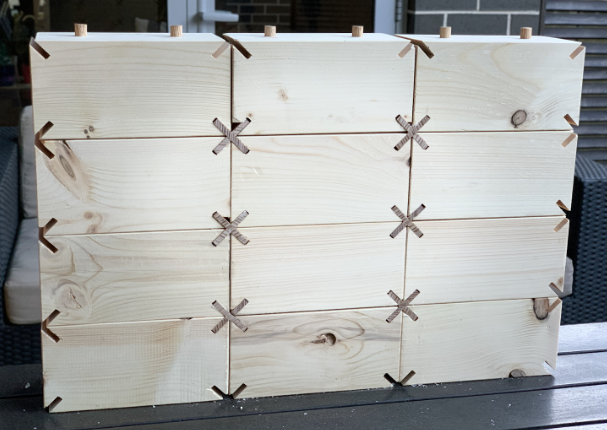
In developing the T-Brick prototype, many types of joint options were drawn up on Fusion, and explored for strength, durability and ease of manufacture. The cross joint option for the T-Brick prototype is the joint that was found to be the most secure and easy to use. It can’t be pulled apart from the sides and also creates the least waste. These joints also make sure that the T-Bricks are easy to assemble and use for all people.
T-Bricks can be used to build structures efficiently and cost-effectively whilst reducing carbon dioxide in the environment. T-Bricks will also be pleasing for designers and an economical do-it-yourself solution. T-Bricks will be able to be used in regional areas where existing solutions like CLT are difficult and expensive due to the costs of transport and heavy lifting equipment required on site.
Supplies

- Recycled pine timber (which was originally a packaging crate)
- Machinery (Thicknesser machine, Table Saw, Drop Saw, Drill Press, Handheld drill)
- Timber Dowles
- Hand sander and machine sander
Cutting the Timber

The T-Brick prototypes were constructed out of recycled pine timber. The pine was originally a packaging crate. The pine timber was passed through the Timber Thicknesser machine first to shave down the solid timber to the correct thickness (100mm x 100mm). The Thicknesser is connected to a dust extractor which is designed to cope with the quantity of waste sawdust being produced. It makes sure that the wood is clean and ready to be cut
Using the Drop Saw

The Timber length was then cut with a Drop Saw. A Drop Saw is used to make accurate crosscuts and mitres in a workpiece by using a large mounted circular saw blade down onto a board at a selected angle. A Drop Saw was used to cut the beam of timber into smaller 200mm blocks. The bricks did not have joints yet.
Cutting the Cross Joint

The 200mm timber blocks were then processed on the Table Saw. The Table Saw was used for cutting the cross joint into the corners of each brick. The Table Saw was set at the correct 45 degree angle and depth by an experienced Cabinetmaker. Each brick had to be cut 12 times (3 cuts on each of the 4 corners).
Drilling Dowel Holes

After making the cross cuts in the bricks, the holes for the dowels were drilled using a Drill Press. The Drill Press is a machine which is a fixed drill and uses a special type of drill bit. The position of each hole had to be exactly the same on each T-Brick to ensure that they positioned together exactly. This required a precise set up of the Drill Press.
Sanding the Bricks

The next step was to sand down all the sides, edges and faces of the T-Bricks to make sure that they were all smooth and nice to touch instead of having rough surfaces. The T-Bricks were sanded manually with sanding paper and a handheld sander. The edges of the cross were also sanded to try and prevent the chipping of the brick and the cross holes.
Inserting Dowels

Dowels were cut down to size and then inserted into the drilled holes. The dowels were created out of a broom handle that wasn’t being used. This was so that the dowles were the correct diameter size in scale (1:2).
Making the Cross Dovetail Pieces


The cross joint was constructed by using interlocking cross pieces. A jig was set up to cut the pieces on the table saw. The thickness of the cross joint was tested in the joint for tight fit. This process took a long time for each piece. As a prototype we found that a jig would need to be used to manufacture these pieces efficiently.
Once cut, the two pieces are joined together to create a cross that fits into the holes between the bricks. The cross piece ensures that the T-Bricks are not able to be pulled or forced apart.
Connecting the Wall


The final constructed T-Brick wall was completed by inserting the cross dovetail joint pieces. These were knocked into place using a hammer. As they were inserted, they locked in the bricks top to bottom as well as side to side.