Ebike to Solar Bike Conversion (50w Milkcrate Method)
by doctorclockwork42 in Workshop > Electric Vehicles
1539 Views, 16 Favorites, 0 Comments
Ebike to Solar Bike Conversion (50w Milkcrate Method)

Want to Convert an Ebike to Run on Solar Energy but not sure where to start? I was in the same place once and wrote a guide.
Here's the Youtube playlist of me figuring all this out: https://www.youtube.com/watch?v=jYcOVq62N50&list=PLwGrHEqASn27YINRIL0njr4_XnYqxUbm2
And Here's the Google Doc if you want to comment and leave a suggestion (or help please): https://docs.google.com/document/d/11KIzcut1K6K_E2t0LbvgSbFuEbDXuiRDH8tEb8u1yUo/edit?usp=sharing
Supplies
Parts List
- Solar Charge Controller, Boost MPPT 24-85v adjustable (yes there are better ones on the market but I like having things be programmable and all the grin technology stuff was sold out): https://www.amazon.com/Controller-Adjustable-Waterproof-Regulator-Protections/dp/B0B5HPPZDP/ref=rvi_sccl_3/146-5814340-8326663?pd_rd_w=zMxgf&content-id=amzn1.sym.f5690a4d-f2bb-45d9-9d1b-736fee412437&pf_rd_p=f5690a4d-f2bb-45d9-9d1b-736fee412437&pf_rd_r=ZXJ4K79TAZQTRQGMD0PM&pd_rd_wg=Br8Wg&pd_rd_r=a79ef1e3-06ed-4fd7-98ff-cea2e68f5b71&pd_rd_i=B0B5HPPZDP&th=1
- Solar connector Pins, you can directly wire them in but I like having things modular: https://www.amazon.com/Dawnice-Connectors-Female-Waterproof-Connector/dp/B0CF5CN8MQ/ref=sr_1_12_sspa?keywords=Solar+Panel+Connectors&qid=1703880501&sr=8-12-spons&sp_csd=d2lkZ2V0TmFtZT1zcF9tdGY&psc=1
- Solar Panels, using x1 50 watt Sunpower flexible solar panels: https://www.amazon.com/SunPower%C2%AE-Flexible-Monocrystalline-Efficiency-Solar/dp/B07C34GHGV/ref=sr_1_3_pp_mod_primary_new?dib=eyJ2IjoiMSJ9.MJ6TNoZExA5zOfB-wZlxxfvm41BzW5XmJL-1vwFk4MGlhW6qDoLVHd75tOK18krJerZbqAeG2pY7uXWHCIT9C5W8QtWzNFfyYEmYOfhH-7IFUAc7ZcBpkCAWQ744CajEKWByA7zxBOxuGD3OZ5tgnxlBmo25wCIeRZ_G_r2I-ovOaxXGz9CkDbuXWaowXewLR8cXLTbydYsDSYhJwlXNsbertQvu8DRoVuq4irRs8UtoM3GZiKvd-78B_y-Vbu2sC8AXj2GcP_cVE9d41kb8imT8BeDqKnrkeeXDIUdql8c.1pp2DNymywvA8LP15iazhSne9H8HGMdrkIqkJFWOi-0&dib_tag=se&keywords=flexible+solar+panel&qid=1721958707&s=lawn-garden&sbo=RZvfv%2F%2FHxDF%2BO5021pAnSA%3D%3D&sr=1-3
- Fuses and fuse holders: https://www.amazon.com/dp/B07Q4V1M8P?ref=ppx_yo2ov_dt_b_product_details&th=1
- Wire (use whatever you have around but I recommend 10 gauge stranded wire): https://www.amazon.com/DONOKY-Gauge-AWG-Silicone-Wire/dp/B0BWHJ91DZ/ref=sr_1_4_sspa?dib=eyJ2IjoiMSJ9.6ccLNWEyXUsJEyyraRLF2UaWsoUS1YsWJviVnn7P9-qGwdCeLtDMcm1fa1Af5H_LgviOQXarrwQFOoQ4w_44LR0Ynew_K-MI5pdelUqIpWDYQM5tRO94E6uG6TPsZTHFWITbeuAqG1opw9uzBgHhekHhZXI_S72_yWPFQUSQBDjysmrbi7jju2d9SFi6gvsLZ3dpfX0JcRug45Y75I0sezkl9laBAn4JZGo4xM3JeJt8Sa_BQWglmdgDyMCc6h4RAc7sFukDYvM54NCs81M7HIjaNpgQ1Hv8eN2X8A-4uag.XICprmSrgA-DzAf6nNeScSfo4hMSLnMh4E7bdeEbtr4&dib_tag=se&keywords=10%2Bgauge%2Bstranded%2Bcopper%2Bwire&qid=1726622797&sr=8-4-spons&sp_csd=d2lkZ2V0TmFtZT1zcF9hdGY&th=1
- Male Coaxial Barrel Plug (easy to scavenge) : https://www.amazon.com/Ksmile%C2%AE-2-1x5-5mm-Adapter-Connector-Camera/dp/B015OCV5XY/ref=sr_1_6?keywords=male+barrel+plug&qid=1700101795&sr=8-6
- Heat shrink tubing: https://www.amazon.com/560PCS-Heat-Shrink-Tubing-Eventronic/dp/B072PCQ2LW/ref=sr_1_3?crid=1I7S904RS3TAI&keywords=heat%2Bshrink%2Btubing&qid=1703881131&sprefix=heat%2Bshrink%2Btubing%2Caps%2C128&sr=8-3&th=1
- Electrical Tape: https://www.amazon.com/Duck-282289-Electrical-4-Inch-Single/dp/B007JSGNVQ/ref=sr_1_3?crid=2C8AIUXOYLGUU&keywords=electrical%2Btape&qid=1703881239&s=industrial&sprefix=ele%2Cindustrial%2C135&sr=1-3&th=1
- Various Fasteners for mounting the hardware. Can use anything from zipties, hose clamps, or sheet metal screws. I went with hoseclamps because I like things being sturdy, reusable, and I figure I'll have to take the module off the bike every once in a while.
Tools
- Wire Cutters/Snippers for removing insulation
- Multimeter must be able to read DC voltage and preferably also DC amps.
- Heat Gun for heat shrink tubing
- Soldering Iron kit, for if soldering the wires to the connectors (or a good pair of crimpers)
- Drill, if screwing the solar panel to the frame
- Screwdriver, if using hose clamps.
Finding Out If Your Bike Can Be Charged While Riding It.
Step one to building a Solarbike is.
Finding out if your bike can be charged while riding it.
This is one of the most important steps in the guide and one of the ones that has the least documentation on it. The simple thing to do is to try turning on the ebike while the charger is still in it and charging. Then while the rear wheel is up (or whatever wheel that the motor is attached to) try and get the bike to operate. If it will still operate while plugged into the charger, great! If not then there are a few other options. The first is to only charge the bike whenever the bike is off. The other is to use another swappable battery, and to charge whenever the battery is low then simply swap them out whenever the batteries are low.
List of E Bike types, and notes. Please note this is based on anecdotal evidence and I am doing my best. If you have information on this topic please message me.
Rad Power Bikes - It seems that for the Radwagon, you are able to charge while the bike’s motor is working. Would recommend building a solar bike out of this.
Lectric - The Lectric XP 2.0 appears to be able to charge while the bike electronics are in operation. I have no knowledge on other Lectric models but I would guess that bikes with the same type of battery packs would work the same.
KBO - for the KBO Ranger while the charger can be plugged in while the battery is in the bike, the ebike automatically turns off when the battery is charging. In order to charge the bike while riding, you’ll have to use a 2nd battery or only charge when the bike’s electronic systems are off.
The Step Up Charge Controller Method

Methods of Getting a Solar panel's Energy into an Ebike Battery.
Step Up Charge Controller Methods
Solarpanels => Mppt Charge Controller => Ebike Battery
This is by far the simplest option and when it comes to engineering it’s best to start with KISS (keep it simple stupid). Which is always a good thing, especially when you don’t know what you're doing. One of the best benefits though is that if you can’t get an MPPT Charge controller, you can build one for cheap. An instructables user called Rusdy has designed his own battery charging module for an even cheaper option. So if you have a bit of talent with a soldering iron, I recommend going for this.. Link to Rusdy’s Project here: https://www.instructables.com/Charge-Electric-Bike-Battery-with-Solar-Panel/
Benefits
- Cheap. With only solar panels, a bit of wiring, and the mppt charge controller to pay for, a system such as this can be built for less than 100 dollars. Solar panels generally go for around 1 dollar a watt, wiring can be scavenged for free from numerous projects or scrap electronics, and the MPPT charge controller can be found online for around 50$. Then everything else can be zip tied, taped and heat shrink tubinged together. This can easily be knocked together in an afternoon.
- Lightweight.
- Simple.
- Rusdy’s DIY plan.
Downsides
- No extra power storage
- Can only be used for Ebike Battery charging or similar. “No 5v dc,12v dc, or 120v ac”
- Can be somewhat janky/ ghetto looking
- Dependent on you having some DIY Skills
Converting an Ebike (KBO Ranger) to Solar
Guide for Converting an Ebike (KBO Ranger) to Solar
This is using the Step Up Charge Controller Method.
Here’s a link to a youtube video of me doing this project by the way, it may help some people: https://www.youtube.com/watch?v=jYcOVq62N50 Solar Bike Project: Day 1, Proof of concept and figuring out how to use the solar charge controller.
A KBO ranger has a battery of 850 watt hours, it’s charged at about 150 watts at 48v (54.6v) or just under 3 amps. This means that when building a charging system for it I should charge it at under 150 watts.
The way the KBO 3 amp charger works is by turning green when the charge is either unplugged or the battery is fully charged. And the charger light turns red when the battery is currently charging. I suspect that the charger is meant to always be green, and only turns red when current is flowing through it and is “performing work.” The charging plug appears to be a regular male coaxial plug with the positive 54.6v line going into the center and the exterior being grounded. Since male coaxial plugs are so common in electronics, I recommend looking around your junk drawer or workshop area, since it’s very likely you’ll have one lying around that once went to a now broken bit of electronics.
Picture Below taken from the bottom of a KBO 3 amp charger.
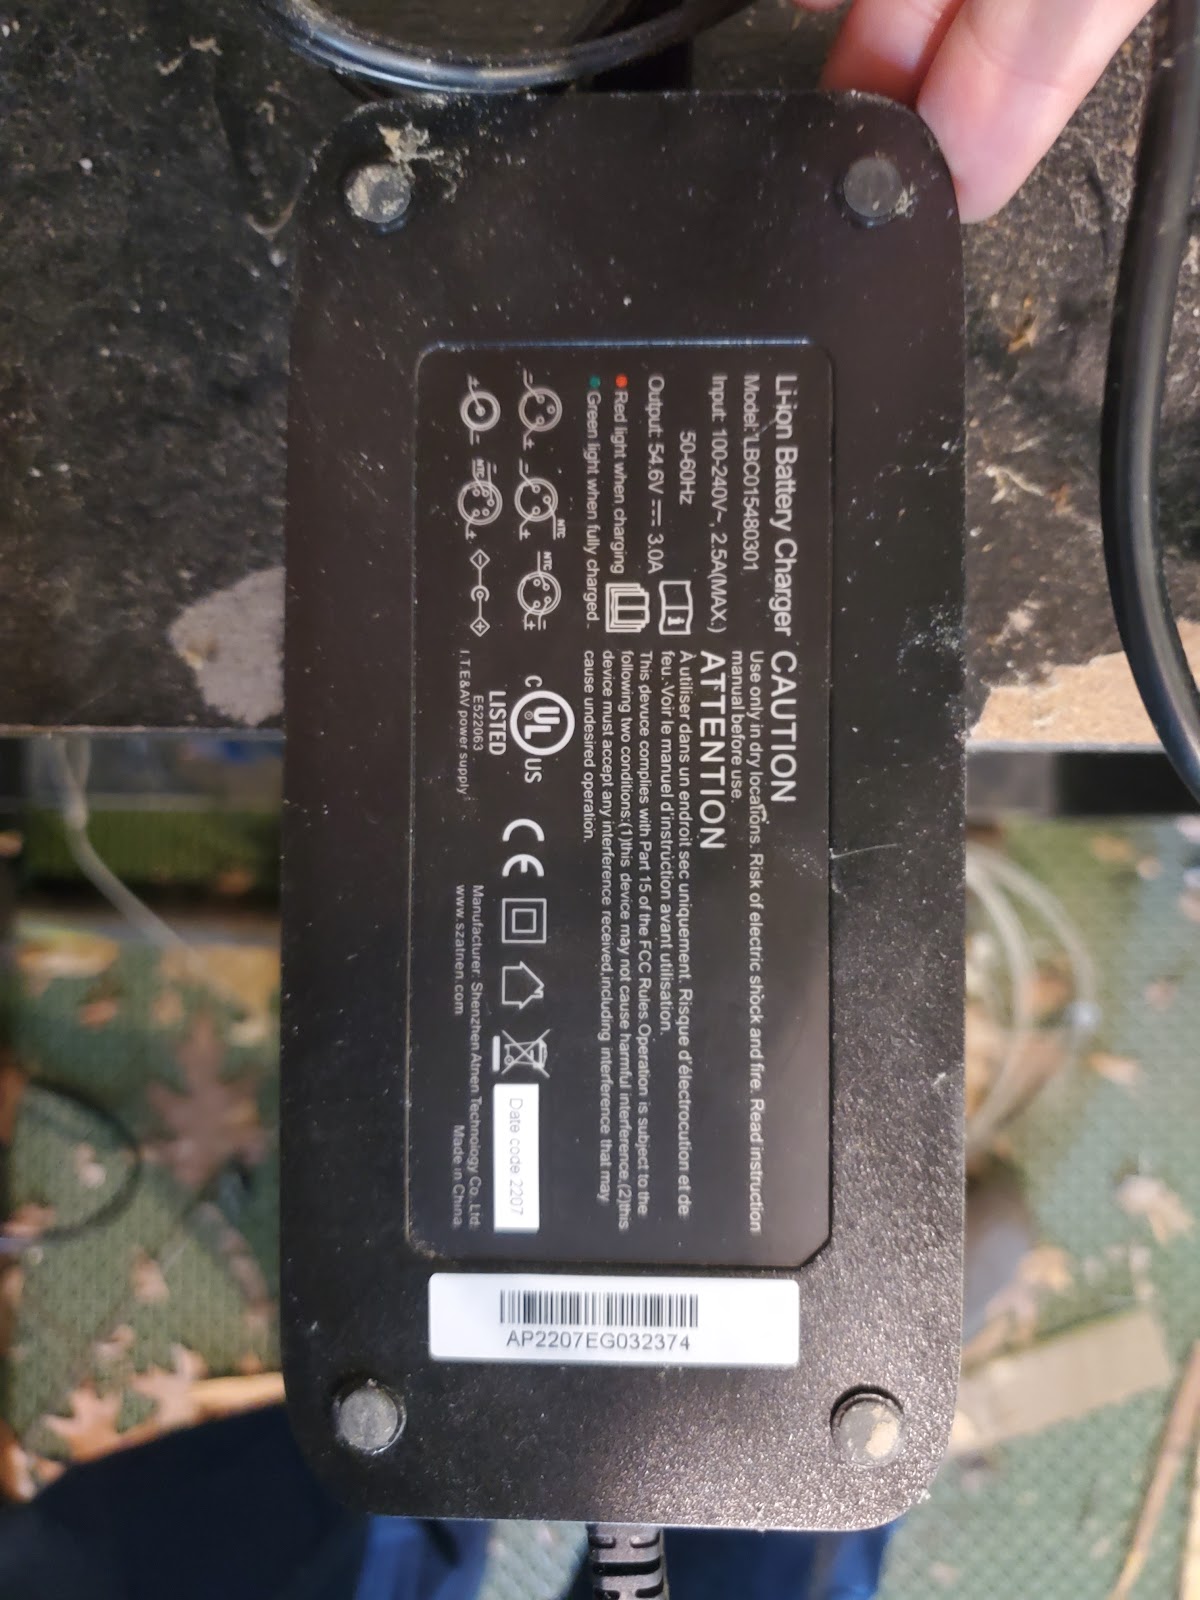
Picture Below of a male coaxial plug Picture taken from KBO 3 amp charger.

Please note that the three main takeaways we need from the charging system is the voltage (54.6v) amperage (3 amps) and the symbol that shows on which side the barrel connector is connected to positive voltage and negative voltage.

Per the picture of our connector the center of the KBO ranger’s barrel type connector is positive and the exterior is negative. Go ahead and confirm this with your Multimeter
Now for Figuring out how to charge this bike
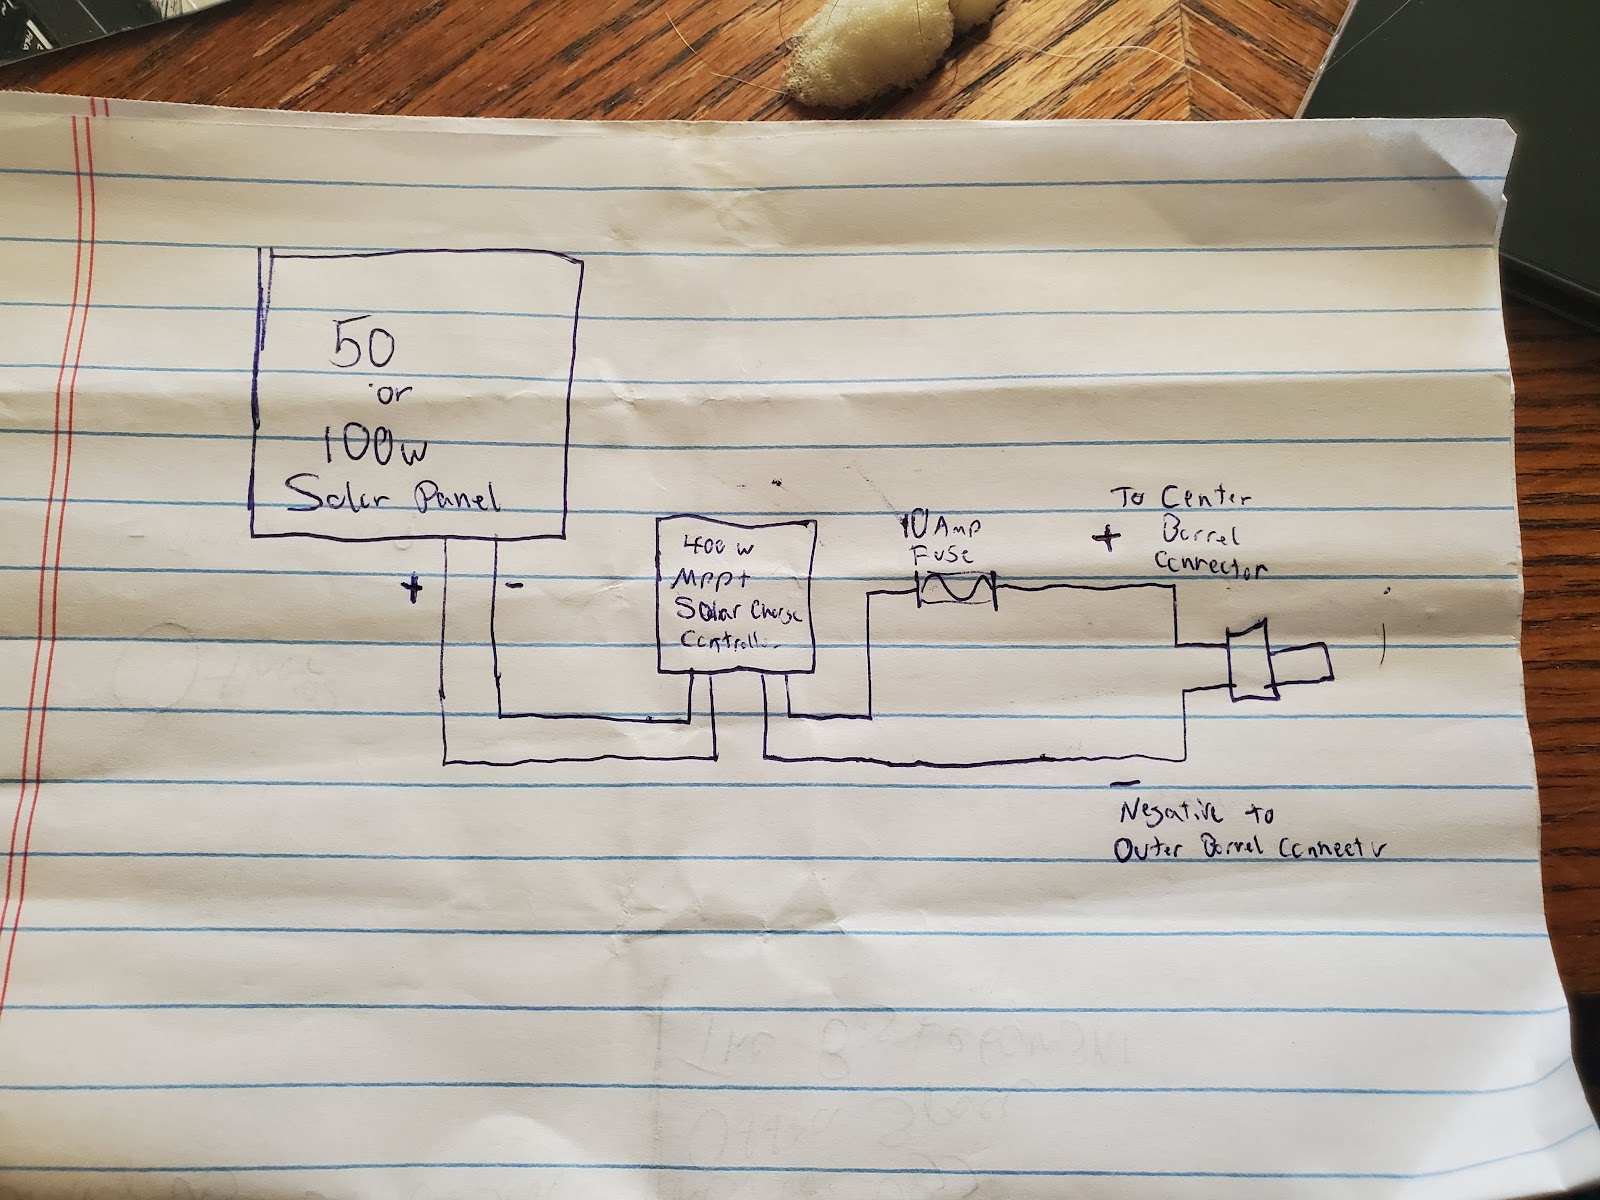
My plan is to use 1 or 2 50 watt solar panels and run them through a mppt boost charge controller up to 54.6 volts. Then feed it directly into the bike through a barrel connector. These panels look like they provide around 20v each too depending on shade and orientation. For the charge controller we’ll be using (the 400w elejoy) we’ll need to maintain an input voltage of at least 18v, so keep this in mind when selecting panels. If your panel is below that voltage, try to see about getting another identical (or incredibly similar) panel and place it in series. Provided they both receive sunlight, the charge controller should be able to accept this.
Wiring up an incredibly simple system.
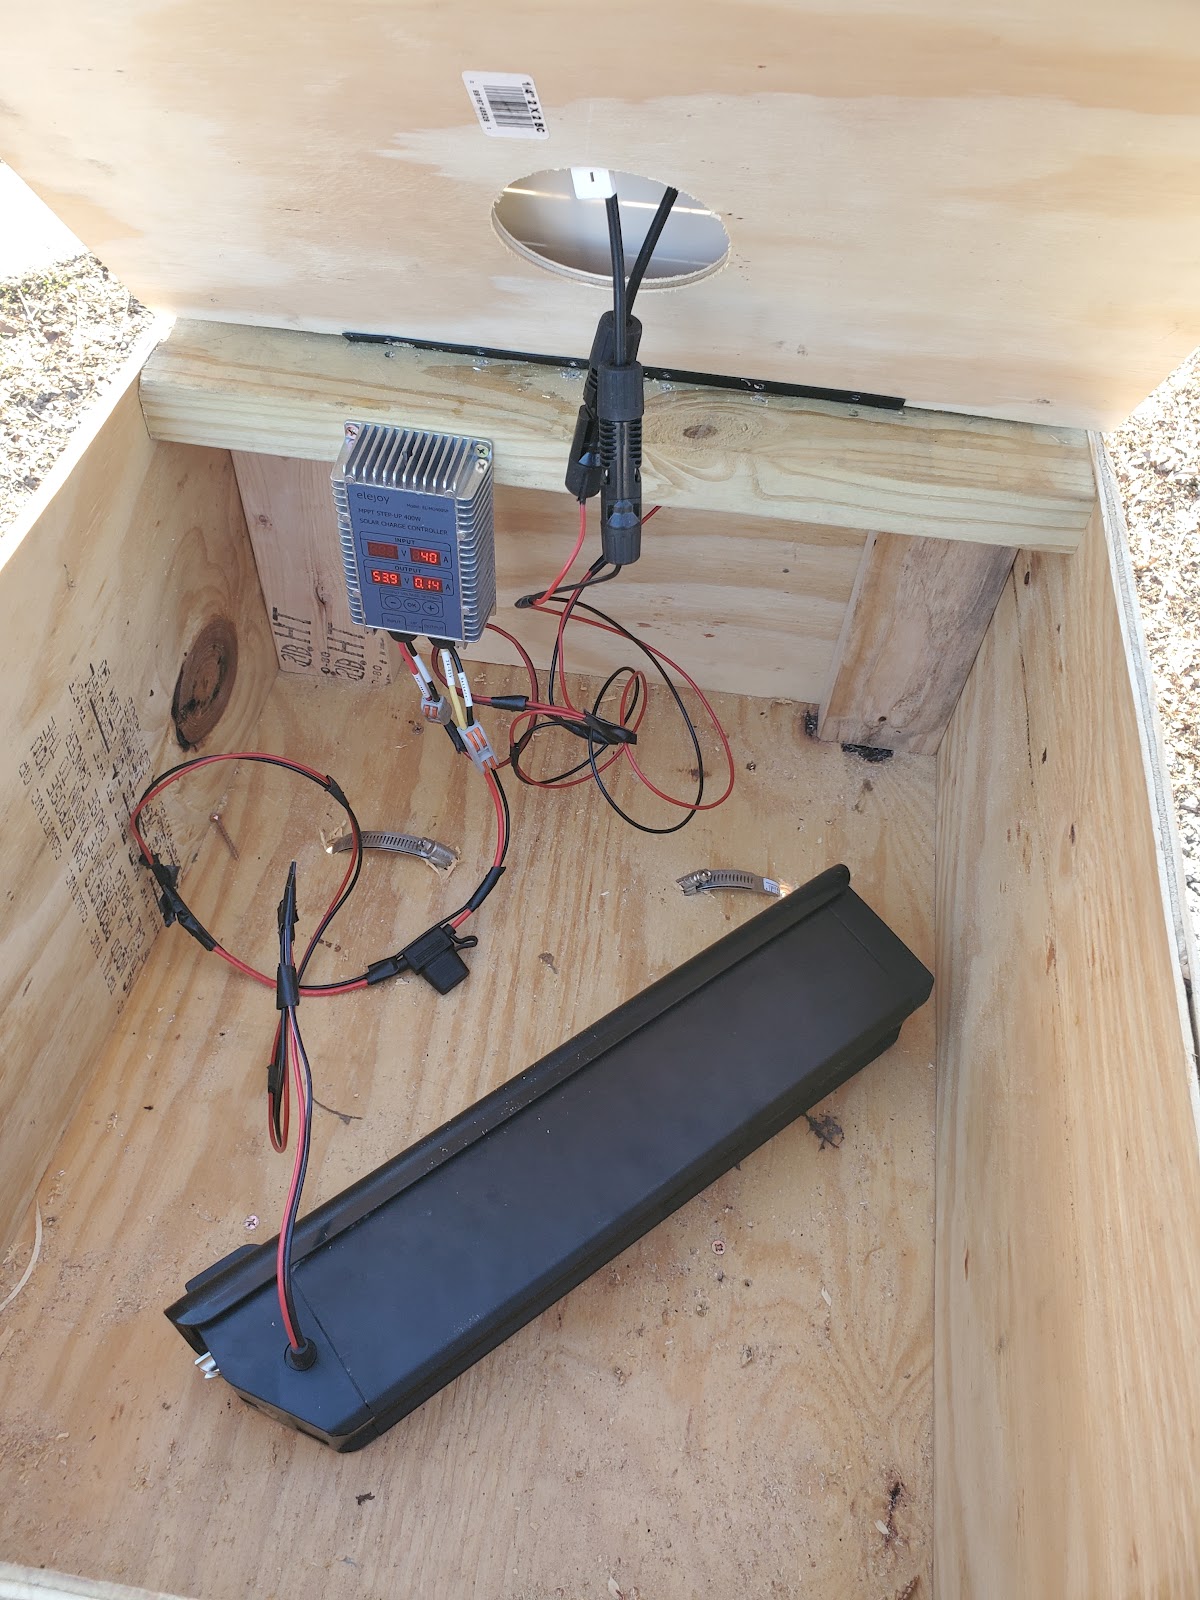
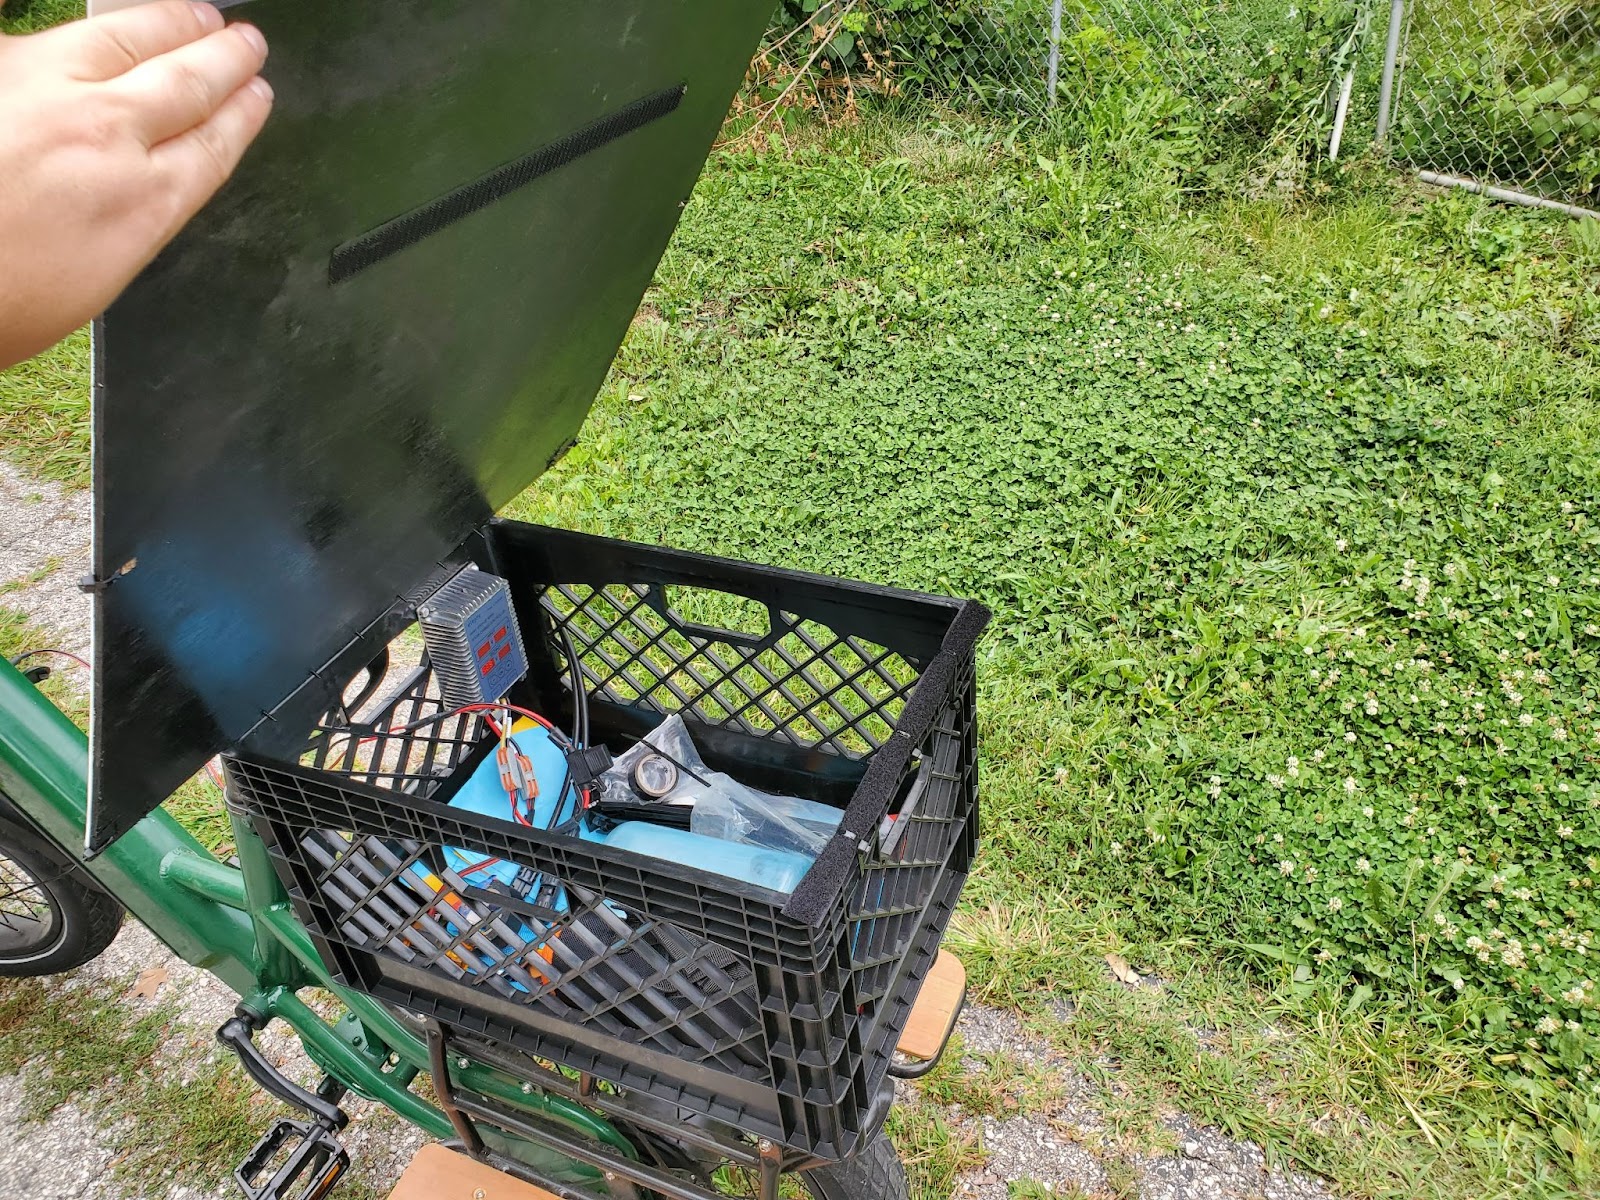
Picture of the system crudely wired and taped together.
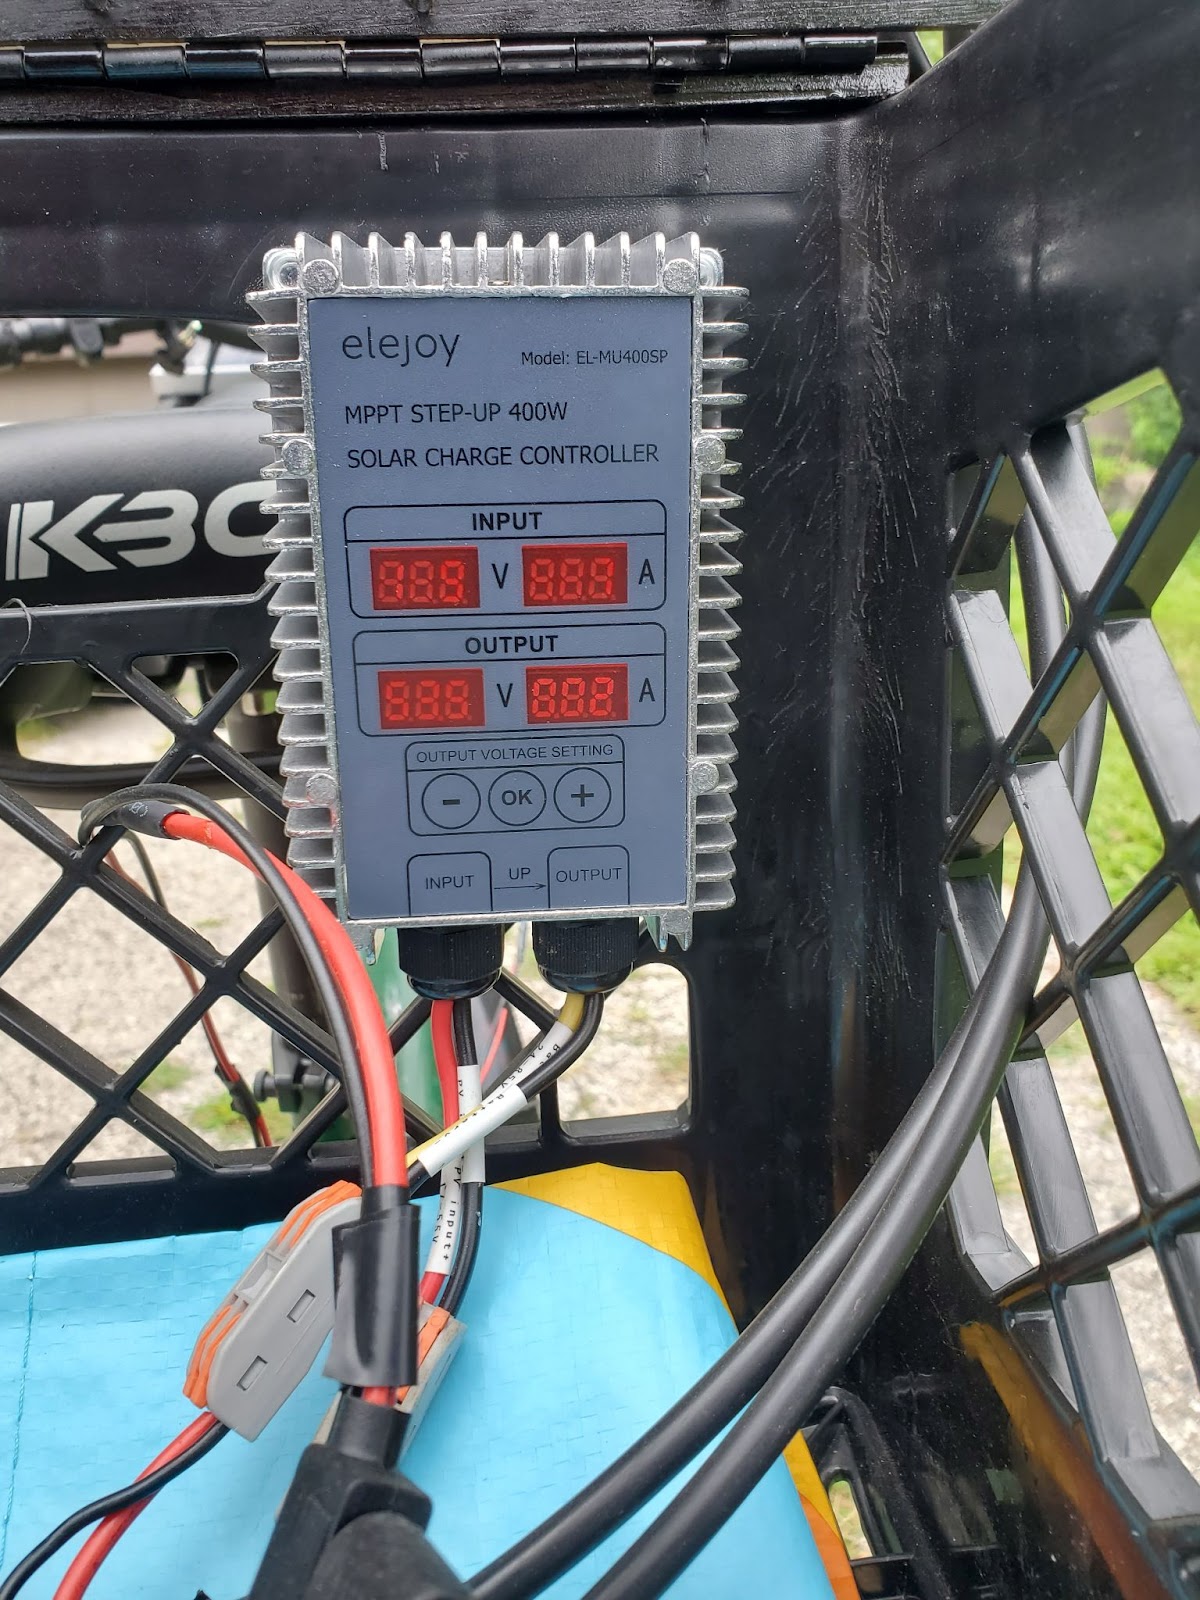
Once everything is connected together, bring the solar panel out to the sunlight and confirm that the charge controller lights up. Provided it lights up it should say something around 20v for our panel and not much in the way of current. This is all fine, the important thing to do is to now program the charge controller. To do this simply move to voltage on the bottom screen using the arrow keys to our desired voltage (in our case 54.6v) then press ok. After this go ahead and take your multimeter and confirm it’s applying positive voltage to the center pin (please note that this may look like around half the voltage you would expect, that normal). Once you confirm voltage is where it needs to be on your connector go ahead and plug it in to the ebike battery. Provided everything has gone well It should now display that it is outputting somewhere around a few volts under 54.6 (this will vary depending on how depleted of a charge your battery has) and somewhere under 1 amp of current maybe.
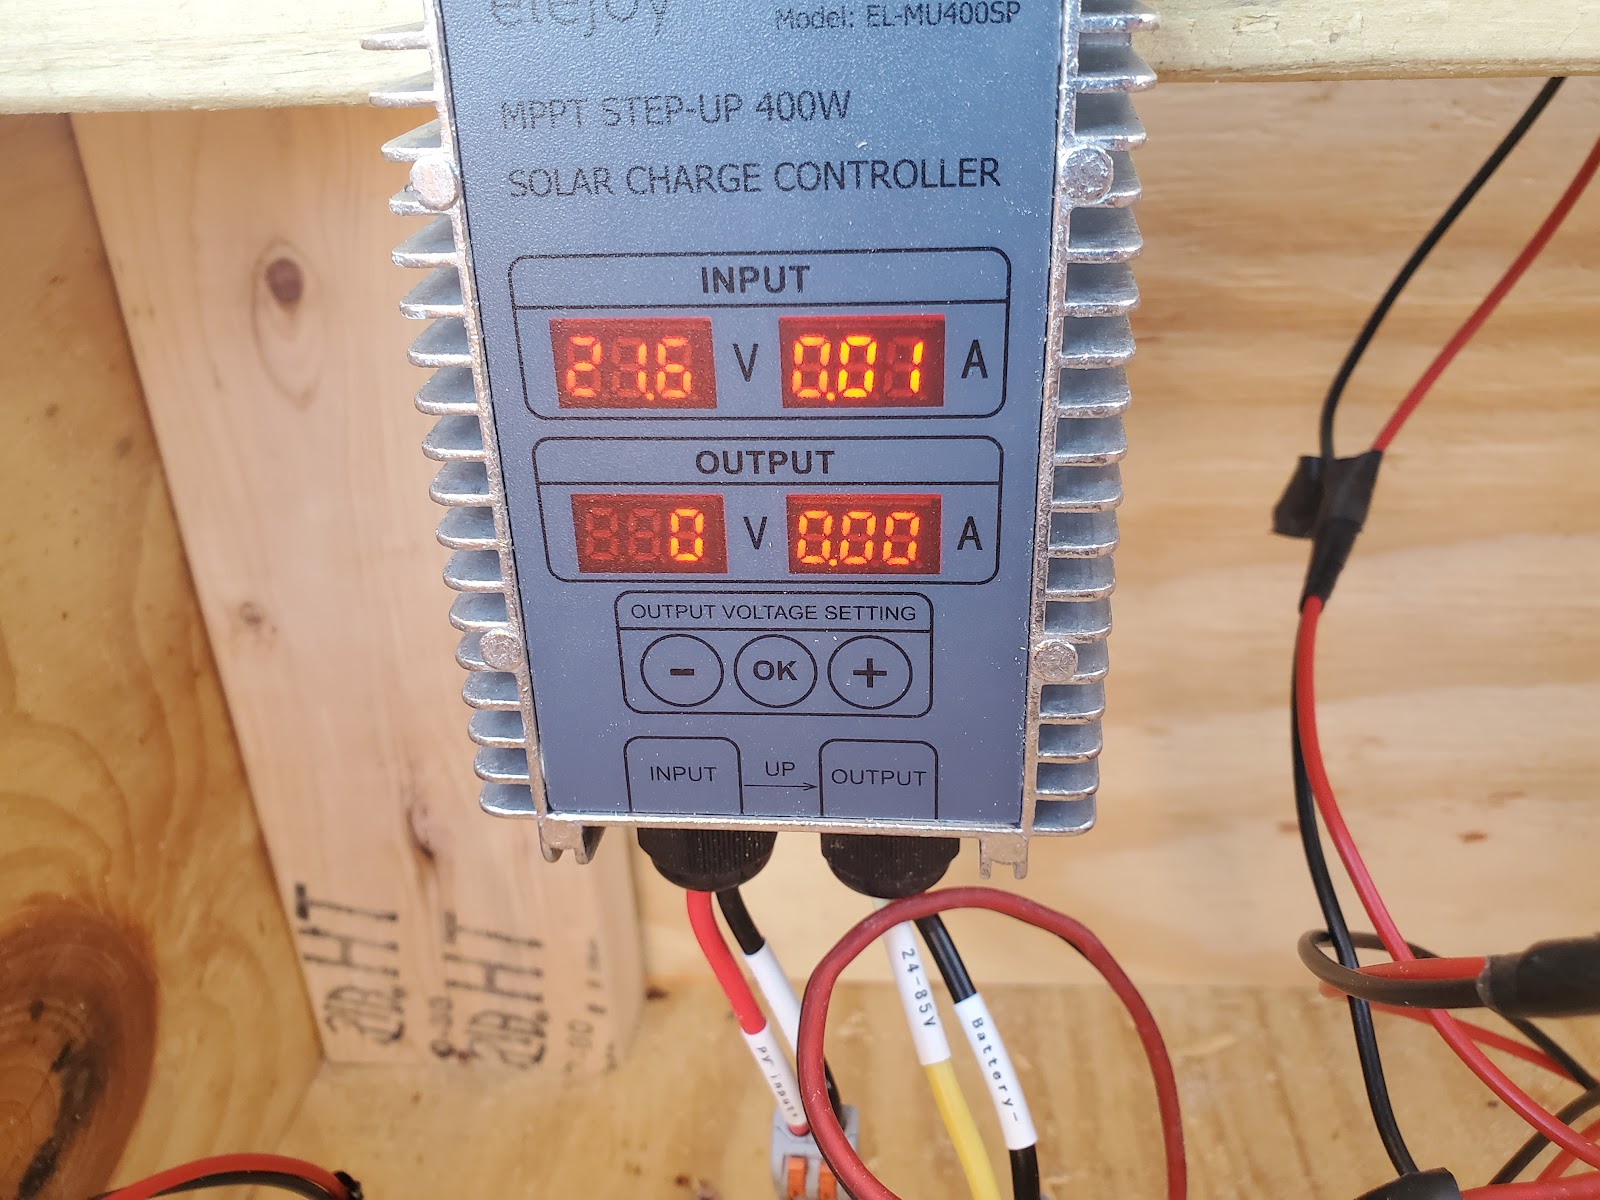
Picture of Charge Controller not hooked up to battery.

Picture of Charge Controller hooked up to battery. (Please note it was late in December when this picture took place on a grayish day).
As the solar panel charges the battery the output voltage will increase until it reaches 54.6 which was programmed in previously. At this voltage the battery will be considered fully charged.
Please let me know if anyone has any questions on how this system works. I plan on building more types of systems like this and will post the end results.
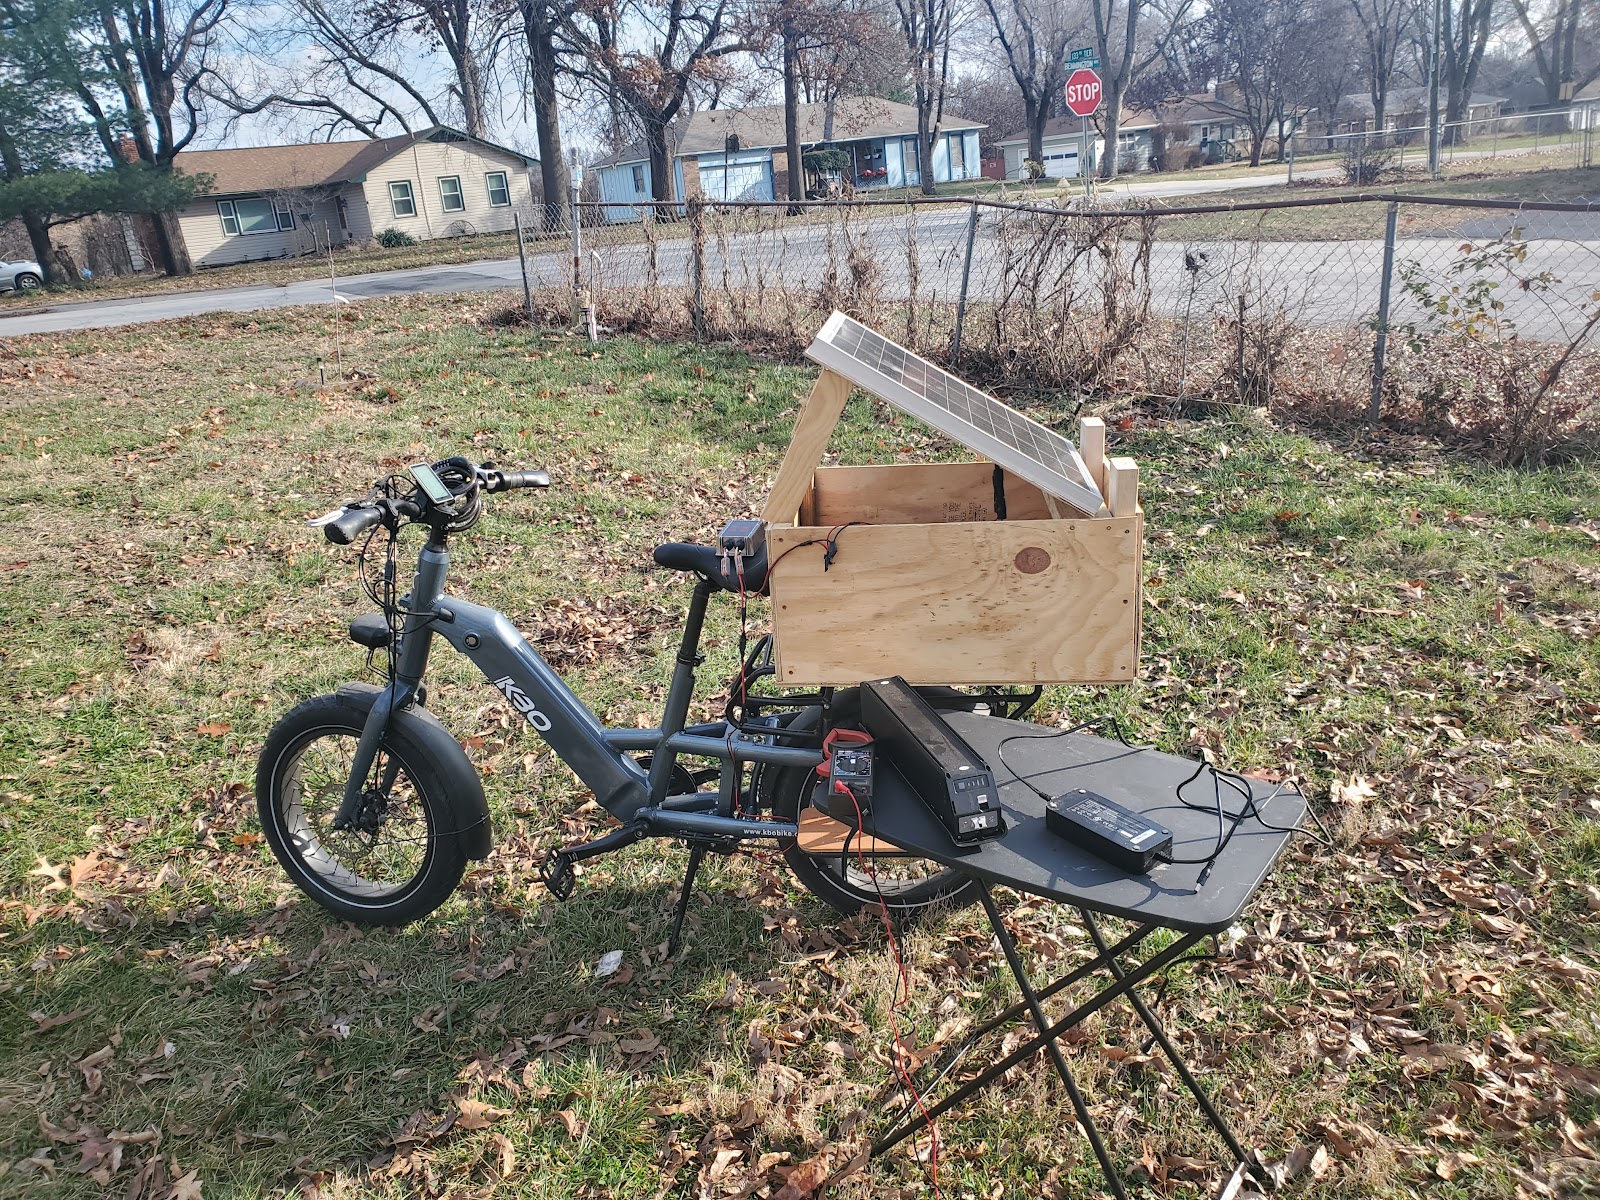
Picture of Bike completed with Solar Box on the top for storage. You do not need a box, it is topheavy and while nice for transporting cargo, it is somewhat janky. A good milk crate and some zipties will work perfectly fine, just make sure all electrically connected devices cannot get wet otherwise we find out the hard way if that fuse is good.
Updated Version of Same Design. Do This Instead!
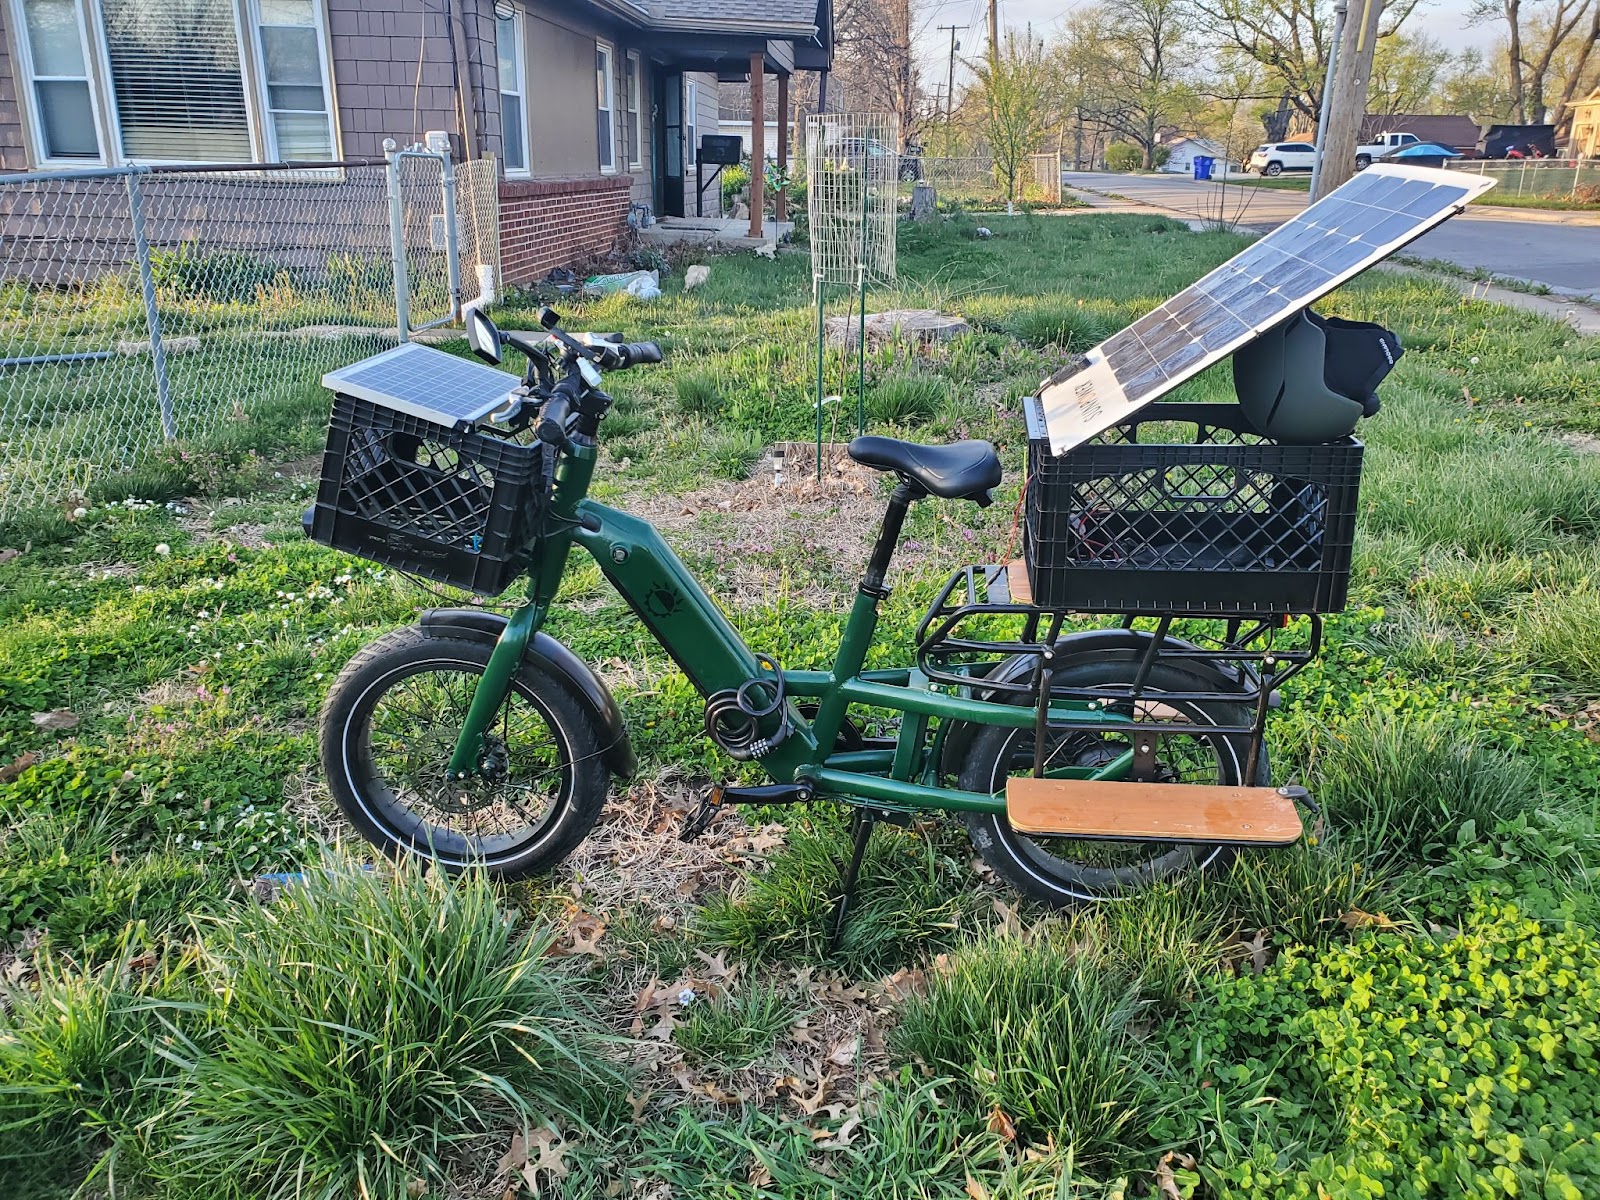
I wound up using an 24 quart milk crate instead of a scrap wood box. I also replaced the 50 watt Renogy panel with a 50 watt flexible solar panel zip tied to a piece of hobby plywood. This was attached to the milkcrate with the piano hinge from the plywood box, then to reduce it clanging with every bump in the road, I added a layer of velcro where there wound normally be a lock on the hinged lid. This kept it shut, lightweight and reduced jank massively. The milkcrate is kept attached to the bike frame using hose clamps so I can take the whole structure off just messing with a screwdriver for five minutes.
I want to emphasize that the best thing to do when building this is to go as lightweight as possible, especially when having to have the weight be high up. Heavier objects higher up on a bike increase the wobbleyness of the build, so even though the original plywood box wasn’t that heavy, it makes the bike too unstable especially when having to maneuver city streets at 20mph. Go lightweight as much as possible, trust me.
Troubleshooting
Also Side note when using this method. Occasionally the MPPT Charge controller won't read the bike batter voltage when the battery level is low, say for example when the bike depleted after a long discharge. What seems to happen is that the mppt step up charge controller detects if the battery voltage is to low or to high compared to where it will begin outputting current.
If the rear MPPT charge controller is set too high above the battery voltage it will read 0 and 0 on the output. This can be fixed by changing the output to be a few volts lower say 2-3 v at a time.
If the Rear MPPT charge controller is set too low compared to the battery voltage it will read (whatever voltage it was set too) and 0.01amps. This can be fixed by adjusting the voltage to be slightly higher.
Ideally what should happen is the MPPT charge controller should be set to around 2-3 volts higher than what the battery voltage is. Then once set the screen on the battery will change. Say is my battery is half depleted the battery voltage would be around 49.5V. I then change the MPPT charge controller to read 52v and hit enter. The screen will then flash and the output will then read something like 49.5v or 49.6v and .7 amps. Remember if no amps are flowing into the bike battery it's not doing any work!
And Remember DO NOT SET IT ABOVE THE MAX BATTERY VOLTAGE!