ESP8266 NodeMCU Access Point (AP) for Web Server With DT11 Temperature Sensor and Printing Temperature & Humidity in Browser
by Utsource in Circuits > Arduino
8798 Views, 4 Favorites, 0 Comments
ESP8266 NodeMCU Access Point (AP) for Web Server With DT11 Temperature Sensor and Printing Temperature & Humidity in Browser
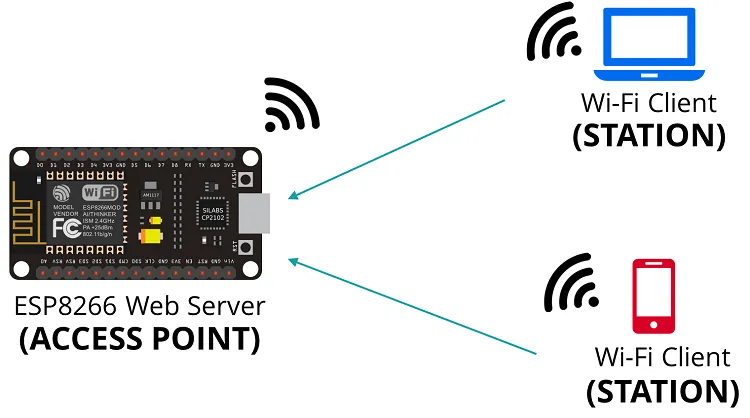
So basically we have two issue here :
1- we need a wifi connection to host the webserver (router)
2- every time if wifi connection needs to changed we need to input credentials and reupload the code.
So to avoid all this problem what we can do is instead of giving a wifi access we can make the ESP8266 to create a wifi connection of its own so if we connect to that wifi connection we can access the webserver of ESP8266.
So basically we will be hosting a webserver with ESP8266 with access point.
So in this instructables we will be creating a webserver using Access Point with ESP8266 and we will connect a DHT11 sensor and print temperature and humidity on the webserver page.
Things You Need
.jpg)
.jpg)
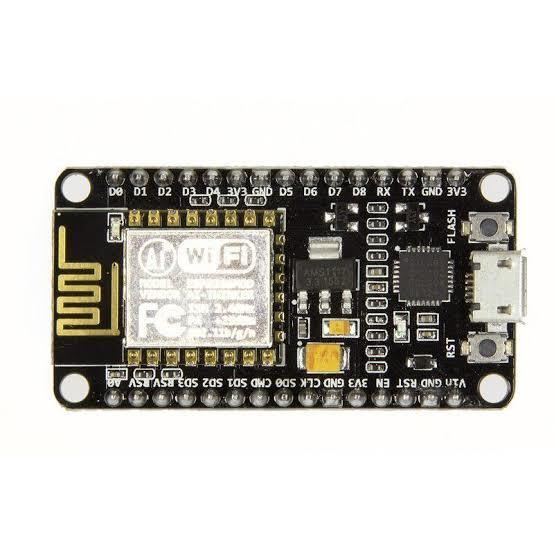
1x ESP 8266 Nodemcu :
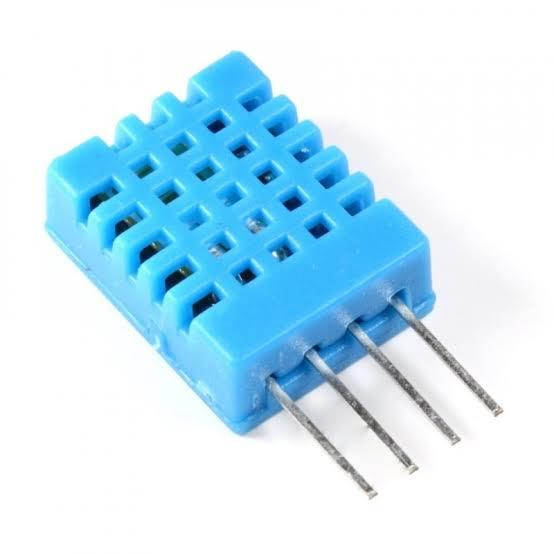
1x DHT11 :
1x breadboard :. :
Few jumpers :
Get the DHT11 Libraries
.png)
.png)
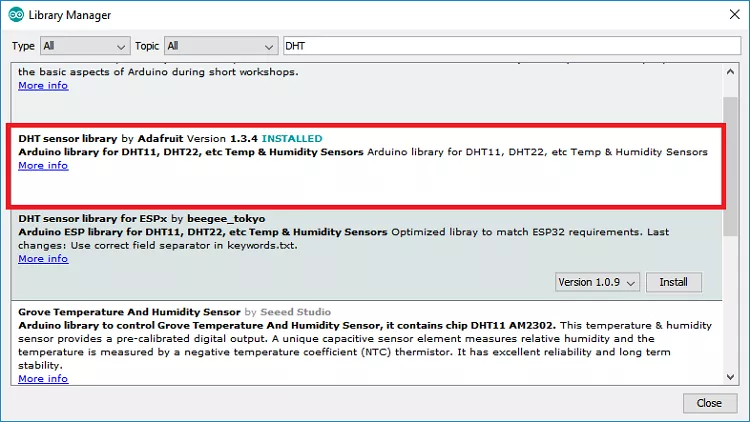
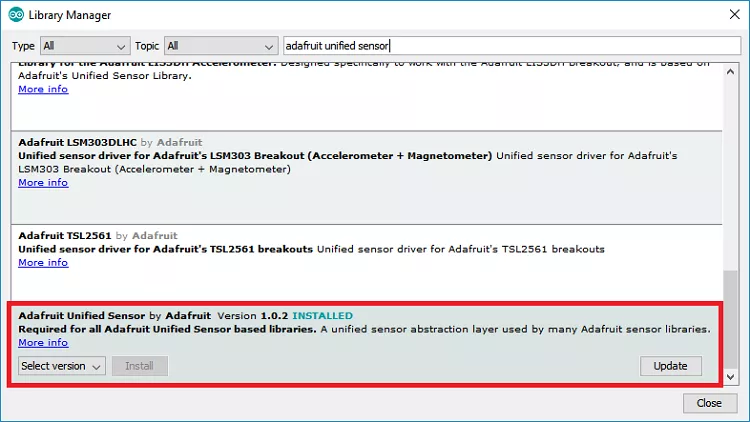
Search for “DHT” on the Search box and install the DHT library from Adafruit.
After installing the DHT library from Adafruit, type “Adafruit Unified Sensor” in the search box. Scroll all the way down to find the library and install it.
After installing the libraries, restart your Arduino IDE.
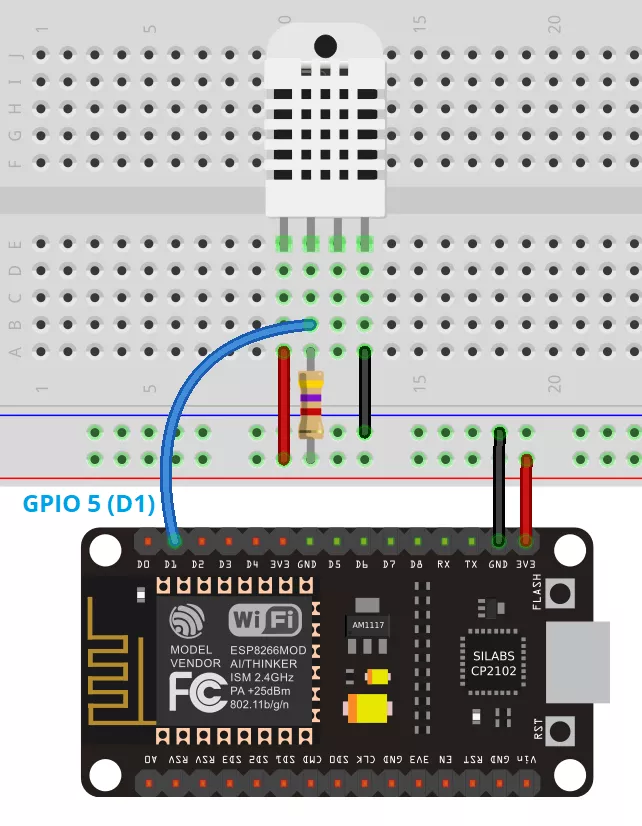
Connections
.png)
Access Point Code
.jpg)
From my previous instructables i am gonna modify the webserver code of this instructables :
https://www.instructables.com/id/ESP8266-Nodemcu-T...
And turn it into access point webserver code.
Please copy the code provided below :
#include "Arduino.h"
#include "ESP8266WiFi.h"
#include "Hash.h"
#include "ESPAsyncTCP.h"
#include "ESPAsyncWebServer.h"
#include "Adafruit_Sensor.h"
#include "DHT.h"
const char* ssid = "ESP8266";
const char* password = "password";
#define DHTPIN 5 // Digital pin connected to the DHT sensor
// Uncomment the type of sensor in use:
//#define DHTTYPE DHT11 // DHT 11
#define DHTTYPE DHT22 // DHT 22 (AM2302)
//#define DHTTYPE DHT21 // DHT 21 (AM2301)
DHT dht(DHTPIN, DHTTYPE);
// current temperature & humidity, updated in loop()
float t = 0.0;
float h = 0.0;
// Create AsyncWebServer object on port 80
AsyncWebServer server(80);
// Generally, you should use "unsigned long" for variables that hold time
// The value will quickly become too large for an int to store
unsigned long previousMillis = 0; // will store last time DHT was updated
// Updates DHT readings every 10 seconds
const long interval = 10000;
const char index_html[] PROGMEM = R"rawliteral(
ESP8266 DHT Server
Temperature
%TEMPERATURE%
°C
Humidity
%HUMIDITY%
%
)rawliteral";
// Replaces placeholder with DHT values
String processor(const String& var){
//Serial.println(var);
if(var == "TEMPERATURE"){
return String(t);
}
else if(var == "HUMIDITY"){
return String(h);
}
return String();
}
void setup(){
// Serial port for debugging purposes
Serial.begin(115200);
dht.begin();
Serial.print("Setting AP (Access Point)…");
// Remove the password parameter, if you want the AP (Access Point) to be open
WiFi.softAP(ssid, password);
IPAddress IP = WiFi.softAPIP();
Serial.print("AP IP address: ");
Serial.println(IP);
// Print ESP8266 Local IP Address
Serial.println(WiFi.localIP());
// Route for root / web page
server.on("/", HTTP_GET, [](AsyncWebServerRequest *request){
request->send_P(200, "text/html", index_html, processor);
});
server.on("/temperature", HTTP_GET, [](AsyncWebServerRequest *request){
request->send_P(200, "text/plain", String(t).c_str());
});
server.on("/humidity", HTTP_GET, [](AsyncWebServerRequest *request){
request->send_P(200, "text/plain", String(h).c_str());
});
// Start server
server.begin();
}
void loop(){
unsigned long currentMillis = millis();
if (currentMillis - previousMillis >= interval) {
// save the last time you updated the DHT values
previousMillis = currentMillis;
// Read temperature as Celsius (the default)
float newT = dht.readTemperature();
// Read temperature as Fahrenheit (isFahrenheit = true)
//float newT = dht.readTemperature(true);
// if temperature read failed, don't change t value
if (isnan(newT)) {
Serial.println("Failed to read from DHT sensor!");
}
else {
t = newT;
Serial.println(t);
}
// Read Humidity
float newH = dht.readHumidity();
// if humidity read failed, don't change h value
if (isnan(newH)) {
Serial.println("Failed to read from DHT sensor!");
}
else {
h = newH;
Serial.println(h);
}
}
}
Before you upload the code make sure you put following things :
const char* ssid = "ESP8266"; // whatever ssid of wifi you want
const char* password = "password"; //pass to connect to above ssid
Set The ESP8266 as an Access Point :
To set esp8266 as an access point we will be using softAP command as shown below ; to create a access point.
WiFi.softAP(ssid, password);
There are also other optional parameters you can pass to the softAP() method. Here’s all the parameters:
If youbopen the serial monitor you can see the IP of access point. Which is done by following part of the code .
IPAddress IP = WiFi.softAPIP();
Serial.print("AP IP address: ");
Serial.println(IP);
By default Ip address is : 192.168.4.1
Final Step : Testing
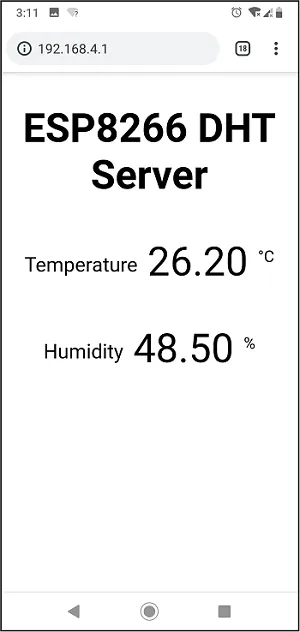
After connecting just open the IP in your browser which we got from the serial monitor (http://192.168.4.1.) and you will able to seeth temperature & humidity in your browser as mine.
And we didn't use any wifi network to get this done so thats how access point of esp8266 work.