ESP-NOW: Instant Wireless Communication for ESP32
by educ8s in Circuits > Wireless
3880 Views, 20 Favorites, 0 Comments
ESP-NOW: Instant Wireless Communication for ESP32

)
.jpg)
.jpg)
Forget NRF, Bluetooth, 433MHz modules—even Wi-Fi! There’s a better way to do wireless. I'm Nick from educ8s.tv, and today, I'm showing you ESP-NOW—a game-changing protocol built right into the ESP32 that lets your devices talk instantly, reliably, and without the headaches of traditional wireless setups.
We’ll use it to build a wireless weather station, streaming real-time sensor data between ESP32s and displaying it on a big screen, and we will do that in less than 10 minutes. Are you ready to upgrade your wireless game? Let's get started!
Supplies
.jpg)
ESP-NOW: a Quick Overview
.jpg)
Did you know that this little ESP32 board... already has everything we need to send data wirelessly to another device without the use of Wifi? That's right! Without any extra modules, antennas, or anything else! It's all built right in! And that's thanks to something called ESP-NOW.
ESP-NOW is a lightweight, connectionless wireless protocol developed by Espressif, the makers of the ESP32. Unlike Wi-Fi or Bluetooth, which require handshaking, authentication, and complex setup processes, ESP-NOW allows devices to communicate instantly and directly with each other. Think of it like a walkie-talkie system for ESP32s—one device sends data, and another receives it without needing an internet connection, a router, or even prior pairing. This makes it fast, efficient, and incredibly easy to use for IoT projects, sensor networks, and real-time data sharing.
One of the biggest advantages of ESP-NOW is its low power consumption. Because it doesn't rely on constant network connections or background communication overhead, it’s perfect for battery-powered applications like remote sensors, weather stations, and smart home devices. It also supports one-to-one, one-to-many, and even many-to-many communication, meaning you can set up a network of ESP devices that exchange data easily. And despite its simplicity, ESP-NOW can encrypt data for security, making it a powerful yet lightweight alternative to traditional wireless options.
Okay, great! Now that you know what ESP-NOW is all about, let's get practical. In this Instructable, we're going to demonstrate the absolute easiest way to get started with ESP-NOW. We're going to set up one ESP32 to send out a message... but not to any specific device!
Instead of targeting a specific address, we'll use something called broadcasting. This means our sending ESP32 will shout out its message to anyone who's listening on the ESP-NOW channel.
And the cool thing is... any ESP32 device nearby can pick up this message! No need to pre-program addresses, no complicated pairing lists. Just send data out into the wireless ether, and any ESP32 that's ready to listen can receive it.
This is perfect for simple data broadcasting, like our weather station where we want to send sensor readings out for any display unit to pick up.
Keep in mind that ESP-NOW is actually a very advanced protocol with many features, but today we're just taking our first steps, and I'll be preparing more advanced videos to explore its full potential in the future.
Setting Up Your First ESP-NOW Project
.jpg)
Before we dive into the project, I want to thank today’s sponsor, PCBWay! If you’re building complex projects on a breadboard, you know that breadboard prototypes can only take you so far. That’s where PCBWay comes in. They’re a one-stop shop for all your PCB needs, offering high-quality circuit boards starting at just $5 for 10 pieces, with professional-grade manufacturing that ensures your projects work reliably every time.
![]()
What I especially love about PCBWay is their incredibly fast turnaround – they can manufacture and ship your boards in as little as 24 hours. And it’s not just PCBs – they offer full assembly services using advanced automated systems, so they can handle everything from simple boards to complex projects. Their online platform makes it super easy to upload your designs, get instant quotes, and track your order from production to delivery.
Get $5 off your first order by using this link.
Now, let’s get back to our project!
To make using ESP-NOW incredibly simple, I have created a special ESPNowEasy class! This class is provided as two simple files – an ESPNowEasy.h file and an ESPNowEasy.cpp file. You just need to include these two files in your Arduino project, and you'll have all the magic of this class at your fingertips!
Before we can use this class in our Arduino code, we need to import its header file. Just like with any Arduino library, you do this at the very top of your sketch with an #include statement.
Simply add this line: #include <ESPNowEasy.h> This makes all the features of the ESPNowEasy class available in your code.
Now, before we create our "ESP-NOW helper" object, we first need to tell the ESPNowEasy class what kind of data it will be sending. Remember, we said we'd send a number and a message in our basic example? To define this data, we create a custom data structure. Think of it as designing a special "box" to hold our specific data.
It looks like this: struct Message { ... }; Inside this struct, we define the pieces of data our "box" will hold. For our example, we want to send:
- An integer - we'll call it counter.
- And a message - a text string, "Hello World!", stored in a char array called text.
Once we have defined this message structure – telling ESPNowEasy what kind of data to expect – then we can create our ESPNowEasy object, our "ESP-NOW helper." And when we create this object, we need to tell it which message structure to use.
We do that with this line:
ESPNowEasy<Message> espNow;
See? Just one line, and we now have our espNow object, specifically designed to handle our message data type, ready to make wireless communication super easy!
Full code of the projects here: https://github.com/educ8s/ESP32-ESPNOW-Examples
Transmitter Code: Sending a Counter and Text
.jpg)
Now, let’s send a message. To begin, we need to initialize the ESP-NOW protocol. With our ESPNowEasy class, this is incredibly simple – just use this line:
espNow.begin();
Next, let's prepare our first data package. We'll set our counter to 0 and the text message to "Hello World!". Once our dataToSend structure is filled with this information, sending it wirelessly is just as easy:
And that's all there is to it! Believe it or not, with the ESPNowEasy library, sending data is truly this simple – just a few lines of code. To make our example a bit more dynamic, let's move the data sending and counter incrementing into the loop() function. This way, we can increase the counter after each message is sent, ensuring we transmit a different value every time. Finally, adding a short delay of one second between each send will make it easier to observe the data transmission.
Here's the complete transmitter code:
Receiver Code: Displaying the Received Data
.jpg)
Now, let’s create the receiver sketch. The receiver code is just as simple as the sender! In fact, it shares a lot of similarities.
First, just like the sender, the receiver needs to understand the structure of the messages it's going to receive. This means we need to define the exact same Message struct in our receiver code!
Next, just like in the sender, we create our ESPNowEasy object, specifically designed to handle our message data type, with this line: ESPNowEasy<Message> espNow;
Now, in the setup() function, the first crucial step is to initialize the ESP-NOW protocol itself using espNow.begin();. Then, we configure the receiver to listen for incoming messages by calling the onReceive() method and telling it to use our onMessageReceived function as the handler.
Think of this function as a dedicated little worker inside your receiver ESP32. Its only job is to wait patiently for ESP-NOW messages to arrive wirelessly. And when a message does come in, this function automatically springs into action!
This type of function is often called a "callback function". It's not a function that we call directly in our main loop(). Instead, we register it with this line of code: espNow.onReceive(onMessageReceived);. After that registration, the ESPNowEasy library takes over and automatically calls the onMessageReceived function for us whenever a new message arrives. Inside the onMessageReceived function, the magic variable is receivedMessage.
Notice that receivedMessage is of type Message&. This means it's a reference to a Message structure. When ESPNowEasy calls onMessageReceived, it automatically fills this receivedMessage structure with the data from the wirelessly received message!
So, inside onMessageReceived, we can directly access the data from the incoming message using receivedMessage.counter and receivedMessage.text. We can then do whatever we want with this received data – in our example, we simply print it to the Serial Monitor. But in a real project, you might use this data to update a display, control motors, trigger actions, or anything else you can imagine!
Here's the complete receiver code:
Testing the Basic ESP-NOW Communication
.jpg)
We're almost there! Now it's time to put our code to the test.
First, make sure you've uploaded the transmitter code to one ESP32 board and the receiver code to another.
Open the Serial Monitor in the Arduino IDE for the receiver ESP32. Set the baud rate to 115200, matching the Serial.begin() call in your code.
As soon as both ESP32 boards are powered on, you should start seeing the messages appear in the Serial Monitor of the receiver. The output should look something like this:
You'll notice the counter value increasing with each received message, demonstrating that the data is being transmitted and received successfully.
To really show you how versatile ESP-NOW is, I'm even going to use a different ESP32 model for the receiver – this time, an ESP32-S3 board! And look at this – it works perfectly! Over on the Serial Monitor, we can see the messages arriving wirelessly! This shows that ESP-NOW broadcasting is compatible with a wide range of ESP32 boards.
If you don't see any output, double-check the following:
- Wiring: Ensure both ESP32 boards are properly connected to power.
- Baud Rate: Make sure the Serial Monitor's baud rate is 115200.
- Code Upload: Verify that the correct code is uploaded to each ESP32.
- Proximity: Ensure the ESP32 boards are within a reasonable distance of each other.
Once you see the messages in the Serial Monitor, you've successfully established basic wireless communication between two ESP32 boards using ESP-NOW and the ESPNowEasy class!
You can find the full code here: https://github.com/educ8s/ESP32-ESPNOW-Examples
Building the Wireless Weather Station: Transmitter
.jpg)
.jpg)

Now that we have a solid foundation with our basic ESP-NOW communication, let's move on to our wireless weather station project. We'll start by modifying the transmitter code to send real-world sensor data from a BME280 sensor.
The main adjustment, as you might expect, is modifying our data structure to match the sensor readings. Let's take a look at the WeatherData structure for our weather station. You'll see we've essentially redesigned our "data box" to specifically hold temperature, humidity, and pressure values.
Here's the new WeatherData structure:
Instead of using the direct Adafruit BME280 library calls, we're now utilizing a separate sensor.h file and a Sensor class to encapsulate the sensor interactions. This makes the main code cleaner and more organized.
Here's the updated transmitter code:
Explanation of Changes:
- #include "sensor.h": Includes the custom sensor handling code.
- Sensor sensor(true);: Creates a Sensor object, initializing it to use the metric system.
- sensor.begin(): Initializes the BME280 sensor through the Sensor class.
- sensor.getTemperature(), sensor.getHumidity(), sensor.getPressure(): Retrieves sensor data using the Sensor class's methods.
- Error Handling: Added checks for espNow.begin() and sensor.begin() to ensure proper initialization.
- 2000 ms Delay: The delay has been changed to 2000ms.
Wiring Instructions:
Please refer to the attached wiring diagram for detailed instructions on connecting the BME280 sensor to your ESP32. Ensure that the sensor's VCC, GND, SDA, and SCL pins are connected correctly.
Now, upload this code to your transmitter ESP32. You'll start seeing the sensor data being sent wirelessly!
Building the Wireless Weather Station: Receiver

.jpg)
Now, let's turn our attention to the receiver side of our weather station. We'll modify the receiver code to display the incoming weather data on an ILI9341 display.
First, we need to include the necessary libraries and define our WeatherData structure, just like in the transmitter code. We'll also include a custom Display.h file to handle the display interactions.
The key changes in the receiver code are:
- Including the Display.h file: This allows us to interact with the ILI9341 display.
- Creating a Display object: This object will manage the display.
- Defining the onWeatherDataReceived callback function: This function is crucial for handling incoming weather data. Here's the function:
This function is triggered automatically when the ESP32 receives weather data from the transmitter. It first prints the received data to the Serial Monitor for debugging and verification. Then, it calls the display.update() function, passing the received data, to update the ILI9341 display.
- Initializing the display in the setup() function: We call display.begin() to set up the display.
Essentially, we're adding code to receive the weather data and then send it to the ILI9341 display for visualization.
Uploading the Code:
- Connect your receiver ESP32 to your computer using a USB cable.
- Open the Arduino IDE and select the correct board and port.
- Ensure that the Display.h and Display.cpp files are correctly placed in your Arduino project folder, or included as tabs within the IDE.
- Verify the code and then click the "Upload" button.
Wiring Instructions:
Please refer to the attached wiring diagram for detailed instructions on connecting the ILI9341 display to your ESP32. Ensure that the display's VCC, GND, SDA, SCL, and other necessary pins are connected correctly.
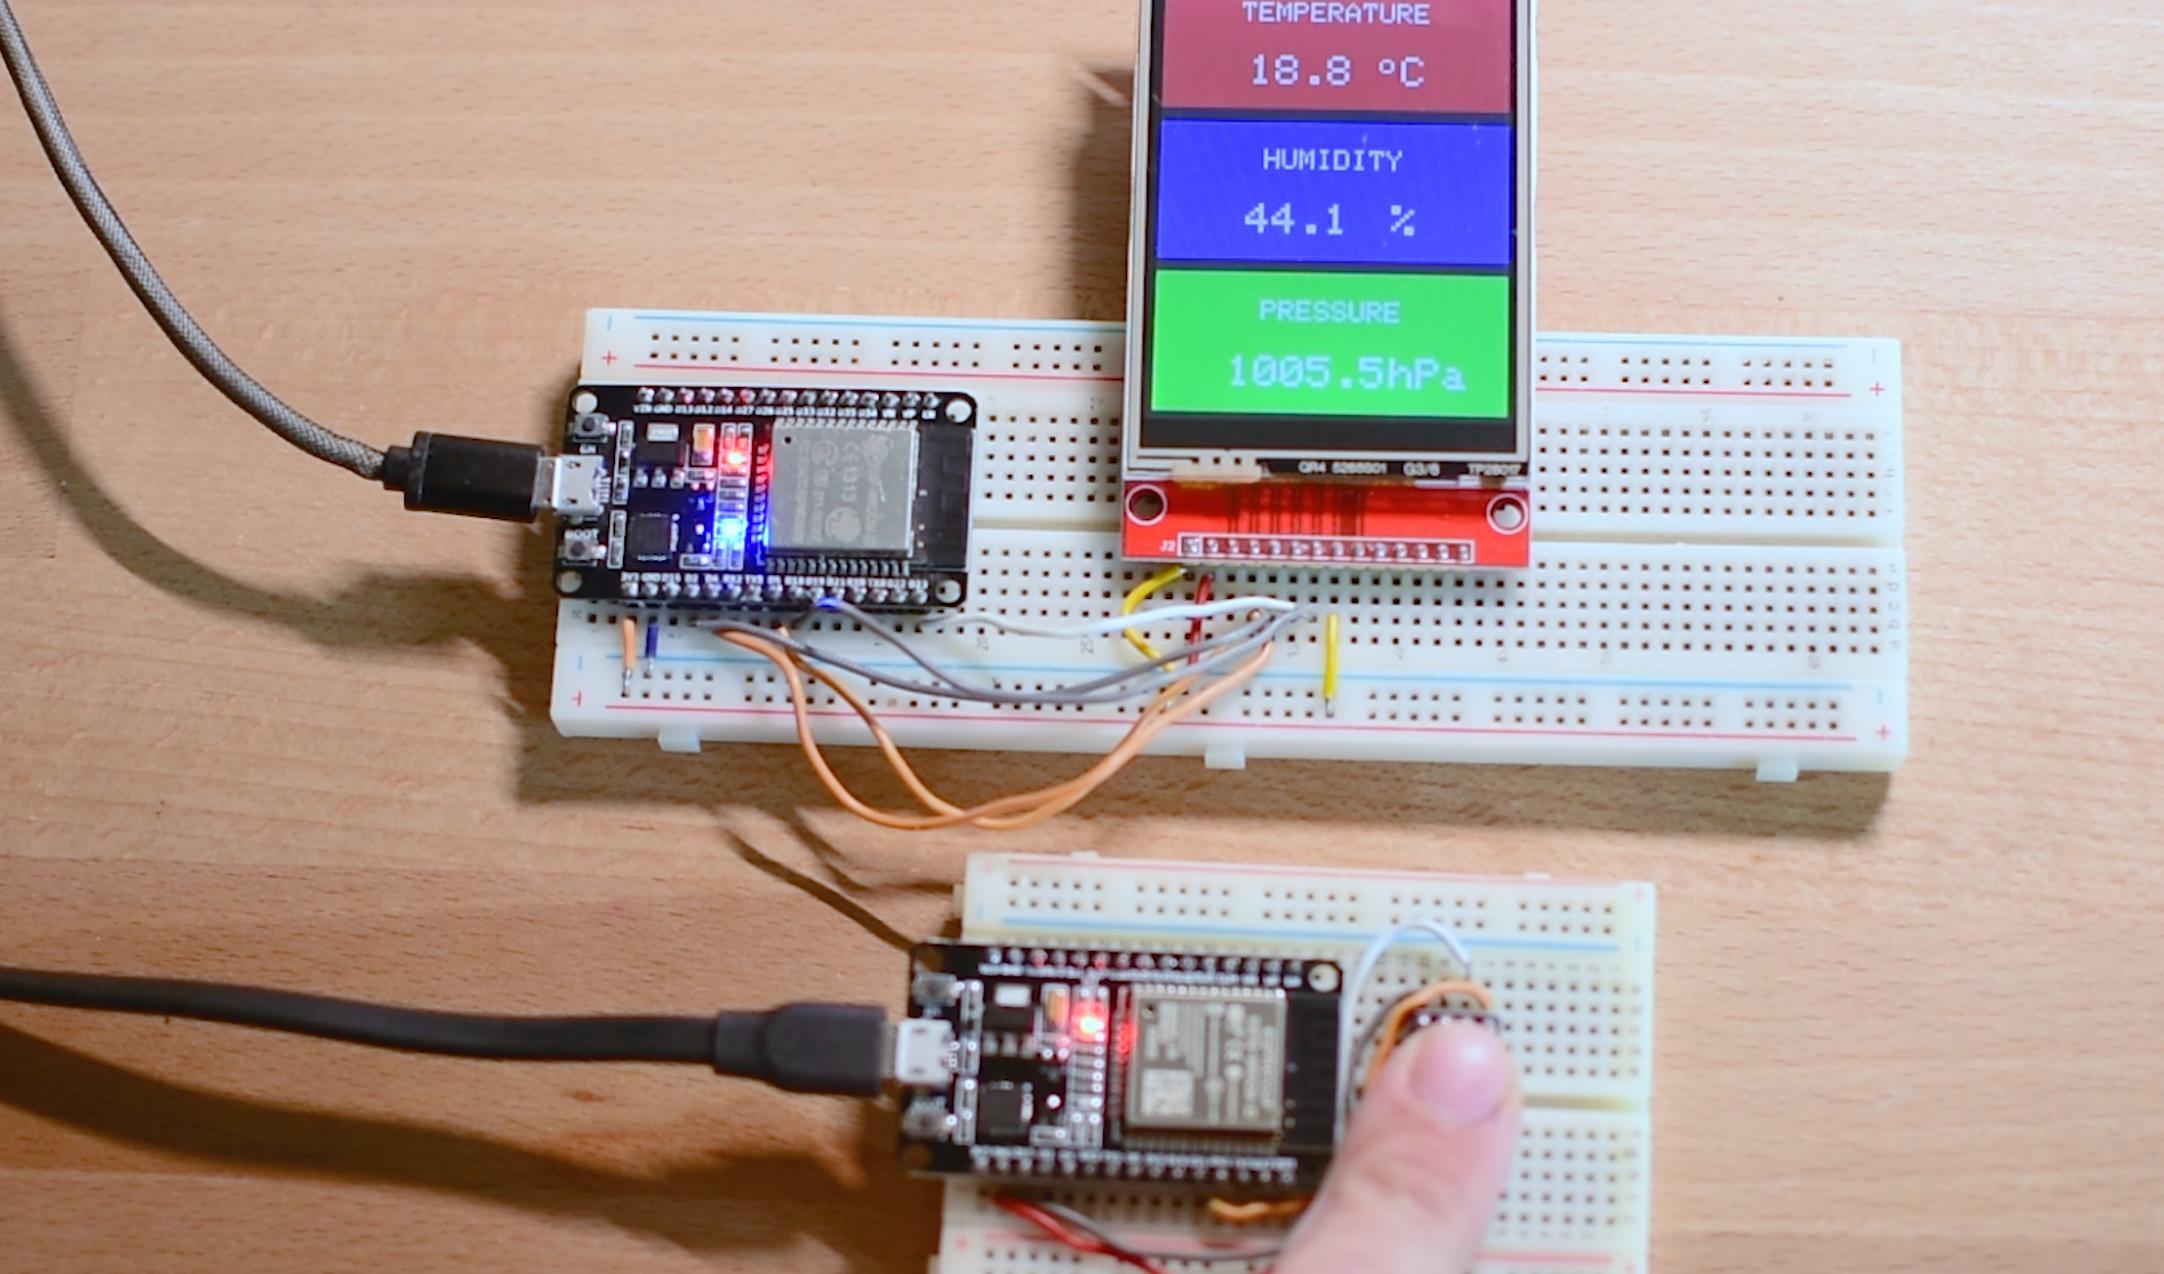
Now, once the code is uploaded to your receiver ESP32, and the transmitter is running, you'll see the weather data displayed on the ILI9341 screen as it's received from the transmitter. The serial monitor will also display the data.
Range and Reliability of ESP-NOW
.jpg)
.jpg)
Now that our wireless weather station is up and running, let's talk about the range and reliability of ESP-NOW.
In my testing, ESP-NOW has been surprisingly robust. I've been able to walk all around my house with these ESP32s, and the weather data keeps streaming perfectly – without losing a single data packet! Honestly, for this kind of local, in-home wireless communication, I've found ESP-NOW to be far more reliable than any Bluetooth, 433MHz, or NRF module setup I've ever used. It just works, and it works consistently.
And what's even more exciting is that ESP-NOW is capable of even greater range – up to 400m - and that's something I'll be exploring in detail in another video soon, so stay tuned!
This reliability makes ESP-NOW ideal for sensor networks, smart home applications, and any project where consistent data transmission is crucial. While factors like obstacles, interference, and antenna placement can affect range, ESP-NOW provides a strong and dependable wireless solution for ESP32 projects.
Conclusion
And there you have it! We've successfully built a wireless weather station using ESP-NOW, demonstrating how easy and reliable this protocol is for ESP32 communication.
We've learned how to:
- Set up basic ESP-NOW communication to send and receive data.
- Create a custom data structure for our weather data.
- Use the ESPNowEasy library to simplify the process.
- Integrate a BME280 sensor to capture real-time environmental data.
- Display that data on an ILI9341 screen.
ESP-NOW offers a powerful and efficient way to create wireless projects without the complexities of traditional Wi-Fi or Bluetooth setups. Its low power consumption and reliable communication make it perfect for a wide range of applications.
I encourage you to try this project yourself and explore the possibilities of ESP-NOW. You can find the complete code and wiring schematics, including the example codes used in this instructable, here:
https://github.com/educ8s/ESP32-ESPNOW-Examples
If you found this introduction to ESP-NOW and the ESPNowEasy class helpful and easy to follow, please give this Instructable a like! It really helps more people discover this simple and powerful wireless technique for their ESP32 projects.
Stay tuned for future videos where we'll delve deeper into ESP-NOW's capabilities, including exploring its long-range potential and advanced features.
Thank you for following along, and happy making!