E-Bike Battery

Good evening fellow builders! Have you ever wanted to build an electric vehicle or power bank? Well, as you may or may not know, electric vehicles require a power source to run off of (in our case a battery). I will be building an electric bike to help ease my commute and get rid of that pesky walking! The main part to every e-bike is the battery. As a poor college student I wanted to be able to build one for as cheap as possible. In this Instructable I will be showing you how to build your very own battery. And yes, you could go buy a pre-made battery that will probably work well but that's not what us builders are about (we're here for the thrill of the build). Building your own battery pack can be cheaper, more well built than pre-maid packs, and a lot of fun! I can definitely say I've learned a lot over the course of this build and I'm very excited to share what I learned along the way.
Some of the main things you will need:
1. Battery cells - I used 18650 Lithium Ion cells because they are very common and most people use this type of battery. The cells I used are no-name Chinese cells.
2. A multi meter - This is one of the most important things to have. You will use a multi meter throughout the whole build.
3. Gloves
4. Pliers and flat head screw driver - If you are taking apart an older pack
5. Electrical Tape
6. Vruzend Caps - Awesome product that makes battery building easier.
7. BMS
8. Shrink wrap
9. Wire strippers
10. Battery charger and discharger - Can be bought as a single unit or buy separate
11. 5.5mm socket and ratchet
12. Soldering equipment
13. Silicon wire for the BMS (gauge depends on the size of battery)
14. 1/8 inch crafting foam
15. Hot glue
How Do I Know How Big to Make My Pack?

This will be a long section but stick with me. I will be explaining how I came up with battery size (how many volts and amps I wanted it to be) and how I planned out my whole build.
**Disclaimer** - I advise against building a battery if unfamiliar with simple battery and electrical concepts.
The picture is just to show the difference between series and parallel.
The first step in knowing how to size out your battery is knowing how big you want it to be. This is mainly determined by your motor/controller and how much it pulls. I bought a full ebike motor kit on amazon that was rated for about 3000 watts. This is on the bigger end of motor sizes, but that also means faster and having more torque. The easy equation to go by is:
Watts = voltage * amperage
3000W = 60V * 50A
My kit was rated for 60V and 50A (This is normally supplied to you in the specs of the motor). This makes the first part of the build very easy. When you buy 18650 cells they have both a voltage and amp hour rating. Voltage is the charge of the cell and amp hours are basically the amount of amps that the battery can supply in one hour (easier terms is how long the battery lasts). The cells that I bought have a nominal voltage of 3.7 and 2.5 Ah rating. This is how you get the amount of cells you need in series.
Controller voltage rating / cell voltage = number of cells in series
60V / 3.7V = 16.2 or 16
Keep in mind that this is just the nominal voltage. Your battery cells will reach ~4.2V max and ~3.3V min. Motor controllers can handle the slight variation in voltage so this won't be an issue. Now we have what we call a 16S battery, or 16 in series. After determining the amount of cells you need in series you can figure out the parallel cells. This is where you want to note how much amperage your controller pulls and build based on that. The 50A that my controller is a peak value. This means that it only really hits that current if I have the throttle wide open.
The battery size (Ah) should theoretically take into account how big your battery is but its all in personal opinion. The bigger the pack is then the longer it will last. In my case I could go with a 16S1P (just a single line of cells in series) or something more reasonable like 16S8P. Having a bigger battery has its pros and cons.
Pros: Easier on the cells, lasts longer per charge, Cells have a longer life
Cons: $$ money, battery pack gets big and heavy
I personally wanted to make my battery as big as possible so I wouldn't have to charge my batteries as much. My original plan was to make a 50Ah pack, but after testing all the cells I realized I wouldn't have enough to make a pack that big. I ended up settling with a 35Ah pack since I didn't have much space and only had so many cells to work with. Everyone's situation is different so you will need to decide how big you want your pack to be. I always advise overbuilding your battery unless you are concerned about space or money.
Cell Amp hour rating * number of cells in parallel = total Amp hour rating of battery
2.5Ah * 12 = 30Ah
This gives us the final geometry of our battery pack--> 16S12P
This is where you want to do the most research. There is a lot of good material online that will help lead you in the right direction if this was confusing.
Find Some Used Cells


We will be using standard 18650 li-ion cells. They are widely used in the electric vehicle community and have adequate specifications (lightweight, high voltage capacities, and they don't discharge super fast).
Batteries are usually the most expensive part of electric vehicle builds. You need to know where to buy them and how to make sure they are good quality cells. Sites like Ebay and Ali-express are filled with battery cells so that may be a good place to start looking. When searching for cells you have a wide selection of brands to choose from and it can be overwhelming if you don't know what you are looking for.
New cells:
Buying new usually ensures that all the cells work as they should right out of the box. Big name brands like Samsung or LG have some of the highest quality ones out there but they are also the most expensive. Samsung cells are typically made better so they will almost always work right away. If you are looking for a slightly cheaper option then you can find a vast market of Chinese "no-name" cells. This is what you will usually find on eBay when just typing in "18650 cells". These cells can still be very good and many people use them with success. In my opinion these cells are just as good as the name brand as long as you test them all before hand. The quality is slightly worse due to their geometry but still worthy of a build.
*Note: I always test my batteries no matter the brand or if they are new or old. Its a few extra steps but its worth it in the end. You never know if a cell is genuinely good or not.
Used cells:
Buying used cells is a budget route but it's one of the most practical ways in my opinion. One of the most well known ways to get used cells are to find old laptop or remote control car batteries. You can find them everywhere on eBay for low prices. Dell laptop packs usually consist of ~6 cells. You can buy a bunch of those and make a very decent pack out of it. Another good way to find cells is going places that recycle batteries. A couple places you may want to try are Lowes or Home Depot (they have old drill batteries). The last good way I know of finding cells is knowing people that build batteries or have battery packs left over from previous builds. This could be online forums or electric vehicle organizations at a school. I have friends that built their own electric bikes and they had some old packs that they were not using. My friend was generous enough to sell me some of the packs that either didn't work or the BMS shorted out. This was a great opportunity for me to get a large amount of cells for very cheap. Some of the downsides to buying used packs are not knowing how old the cells are, if the cells are still good, and the amount of time it takes to test and assemble. You have to take apart each pack into individual cells, test them, and build the pack which can be very time consuming.
*Note: Buying used cells is more work but you end up learning a lot. It was very interesting to see what goes into building a DIY battery pack.
Disassemble the Pack Into Individual Cells


Here is the first real physical work that goes into building your own battery. Since I bought used battery packs, I needed to take them down to the bare cells.
Step one:
Put on Gloves! Although the chances of getting shocked is slim, you want to be careful. Plus, it has the chance to spark.
Step two:
This second step is to take off the outside shrink wrap or covering off the battery (see pic 1). You will want to be careful with your knife to not cut the batteries or battery skin. You could potentially puncture the cell or cause sparks if you short out the circuit.
Step three:
The Third step is to remove the old Battery Management System (BMS). The BMS is actually what saved these battery packs. Without running a BMS, a battery pack is subjected to random voltage and current spikes. This can kill a battery pack very easily. In my case the BMS blew out and saved the cells from damage. To remove the BMS you want to clip the all wires as close to the solder points on the battery as possible (not near the BMS). If you leave a long exposed wire then it has the possibility to accidentally hit other cells and cause sparks and shorts. I pulled each wire back and held it in my hand until all wires were cut to minimize the chance of the wires touching anything.
Step four:
Battery packs are usually spot welded together with nickle strips. These strips have to be removed to get the cells out of the pack. It is very easy to accidentally short out the cells with either pliers or the nickle strip when pulling it up.
You will want to pull up each row one at a time. Start on one end and begin pulling up the nickle strips with small pliers or clippers. The spot wells are very small and should pull off with ease. DO NOT pull straight up on the cells! this will put a hole in the cell and render it useless. Pull up at an angle (you may have to wiggle it to loosen it). You will have to take this cell by cell so take your time.
Step five:
Once all your nickle strips are removed then you just need to pull the cells out of the black holding bracket. These are normally pressed on the batteries so it may take some force. I took my pliers and broke off the ones that were pressed on too tight. You can either toss these or keep them to build your pack later. We will be using the Vruzend system so these are not needed.
And your done! you should have a ton of individual cells ready for testing.
Charge Up All the Cells


When you have all your individual cells, you want to take your multi meter and test all the cells. When doing this, you are just looking for the "odd one out" cells. They should have a specific voltage depending on how long they have been sitting. The 18650 cells can get down to ~3V if they have been sitting for a very long time. Some of the cells i tested did not have a voltage at all or they were discharging as I was testing it. Those cells are garbage and you will want to set them off to the side to dispose of later. As long as it had a voltage over 3V then I kept it to test.
I bought a 6 cell charger off amazon here (only a charger) but you can buy a all-in-one charger/tester here (charges and tests capacities). I bought this one in particular because of the capacity it can charge at once. I have a lot of cells and don't want to wait forever. Charging all these cells took a couple weeks. It was a matter of just putting some in and waiting for them to get to 4.2V. This charger automatically cut off when it hit that voltage so I did not have to worry about overcharging. Fortunately, Most of my cells were very close to their max voltage so they did not need to sit on the charger for too long. I only charged my cells while I was close by so I could keep an eye on them (studying, watching tv, cooking).
*Note: Do not leave the cells on the charger unattended when you leave. Some cells may be bad and can get very hot. I had some get so hot that I couldn't touch them. Keep and eye on them and feel them to make sure they are charging smoothly. If they do get hot then toss them aside for disposal.
Take your time, charge up all the cells, and set them off to the side in a cool place will little moisture.
My Extra Testing Step (it Actually Helped in the End)

This step might be unnecessary but I did it anyway. I actually found it to be beneficial when discharging the cells.
After charging up all the cells I let them sit for a month or two. I wasn't in a rush to build the pack and decided to see what would happen. After about two months, I came back to test the cells with the multi meter. This is where I noticed a large variation in some of the cells. I tested every single cell with the multi-meter again and separated them into 3 piles. One pile was 3.6V and above, the next was between 3.3-3.5V and the rest were close to zero or they were discharging while checking the voltage (put those in the bad pile).
After doing this step you need to recharge all the cells and keep them in their respective piles.
Fast Forward to the next step :
When discharging the two piles, some of the lower voltage cells discharged in a significantly faster time. I might not have noticed the discharging times if I did not separate them into these piles. I did not keep the cells with the fast discharging time. I had more than enough so I didn't want to take the risk. I only chose cells with consist capacities and testing times.
Test All the Cells by Discharging


This is the main step to ensuring you have a well built battery pack. Discharging the cells using a tester gives you the capacity. The cells I have are rated at 2500 mAh so I wanted to make sure its close to or above that value. I bought an 18650 tester on amazon here. The reason I had two units to charge and test the capacities because of how many cells I had. Having them separate gave me the ability to charge and discharge cells at the same time. It made time go by quicker but it is not necessary.
I made myself a little assembly line to make things easier. I took the batteries from the pile, put them on the charger to ensure they were fully charged, moved them to the tester to discharge them, and then put them into a done pile.
How to use the Tester I bought (most of them should be the same):
Insert the cells one by one into the tester and make sure they are making a good connection. When you first plug them in you should see the voltage pop up (make sure its near 4.2V). For my particular model tester I have to hit the "slot" button until all the slots are blinking to change the input function. Then you need to change the function of the tester so it will discharge the cells and report the capacities. To do this you hit the mode button until it says "charge" and "test". Then, while all the slots are still blinking, you hit the current button until it says 1000 mAh. After that the blinking should stop and it will begin to discharge at 1 amp per hour. The number should fluctuate a little but only between 990 and 1010 mAh. If it is outside that range then I would keep a close eye on it.
Discharging the cells will take awhile. Each of my cells took about 4 hours and 30 minutes apiece. This is where separating the batteries in the last step helped out. After I did all the batteries I suspected to be good then I moved on to the questionable ones. To keep the consistency, I did not use the ones that took less than 4 hours. Before you take the cells out of the tester you need to hit the display button until it shows the capacity (in mAh). Write the capacity on the side of the cell with a sharpie to keep track of it. My cells ranged from 2600-2800+ with the majority being in the 2700's. Since my cells are rated for 2500 mAh then all these are good to keep. If you choose ones with a capacity lower than the rating then the battery is starting to die.I wouldn't advise using it since it means the battery may not last for much longer.
After you are done discharging the cells then set them off to the side. Repeat until all the cells are done.
Figure Out How You Want to Connect the Cells (Vruzend Is the Way to Go)


The majority of battery packs are built with cell holders/bracket or glued together, and then spot welded with nickel strips to make the connections. I will not go through this method since I did not use it but I will explain why. This method has its pros and cons.
Pros: Gives you the smallest pack possible since there is little to no space between the cells. The strips carry the current well and keep the pack thin. The spot welds hold the pack together well without falling off.
Cons: Hot glue tears up the cell skins and make them not reusable. Spot welders are expensive and unless you already have one then its inconvenient to buy. Its a lot of parts to buy (holders, nickel, welder, glue). When spot welding the packs you risk overheating the cells or blowing a hole in it if you're not careful. Spot welding can be tricky to get right and if you make a mistake then its a lot of trouble to get them off.
This was my original plan until someone told me about Vruzend. This is a company that supplies battery components if you are planning to do a DIY build. One of the main things they supply are battery kits and they are absolutely amazing! The kit includes caps, bus bars, nuts, cable ties, and wire clamps. They have two options for the kits. You have the choice to pick between the V1.5 kit and the V2.0 kit. The V1.5 is for smaller builds that don't have high current ratings. I went with the V2.0 since my battery is so big and they are meant to handle the extra power. Its basically a beefier version of the V1.5.
A little about the kit:
The caps are the main part of this kit. These fit tightly over the top of the battery and hold themselves in place by resistance (Note: if you tear off the skin then it will not fit on very well).The caps also have a piece of metal that goes through the middle. One side touches the battery cell and the other side is a threaded post. The caps fit together like puzzle pieces so you can build the shape of any configuration you want. Then the bus bars are connected between each cell in place of nickel strips. The kit also supplies nuts that are used to hold down the bus bars. This is a super easy process that does not require spot welding. If you can put Legos together then you can use this kit. It literally so easy. One big added benefit of the kit is the space it provides between each cell. It gives the cells enough room to breath and get some air flow.
I am so happy I got to try out this kit. It fit together really nice and works great. They have released an amazing product that I hope more people can end up using in their own builds.
Note: I do advise buying more than you need in case you accidentally break a few of the caps. They are still plastic and have the potential to crack if you don't use care.
Design Your Future Battery


While you are waiting for your cells to get done testing you can move on to designing the battery. This refers to both the outside shape and how you will run all the connections.
Outside:
Since I am building this for an electric bike, I need a battery that will fit my frame. You can pretty much make whatever shape you would like but a simple rectangle or square is the easiest to work with. Unfortunately, I have so many cells that a simple rectangle will not fit on my bike without serious frame modification. I am designing my battery off the frame of a Mongoose Hitch bike. The frame of the bike is very small so it was a challenge to work around. Since I will be making a 16S12P pack, there is no possible way to fit that many cells into a single pack. So I decided to build two 16S6P packs and run them in parallel. This will essentially work the same way as a single pack except you will have to splice wires and run them to the controller separately. I generated the shape of my batteries by connecting the caps together and finding something that fit well. I went through so many different designs before I finally found one I was happy with.
One of the main issues I was faced with was weight. I knew the batteries were heavy so I wanted to keep them as low on the bike as possible to keep a low center of gravity. I also didn't want the controller to be sitting on the outside of the battery box. My final design was able to fit both batteries, controller, and all the wiring. These designs also keep the weight lower on the bike. It will make the bike a little wider than I would have liked but it will be worth it to have a clean look without wires all over the place.
Connections:
You always want to plan your connections prior to putting your pack together. I started by knowing where I wanted my positive and negative sides to be (they will be on opposite sides of the pack). Then I Just alternated the connections on each side. If this is your first battery then I would draw the connections out on paper first to make sure you short anything out.
When you are using old cells you want to make sure that the capacities are balanced to maximize the life of the battery. Each parallel row should consist of cells with equal capacities. To do this you can manually figure out what cells to put where but that's the hard way. My friend showed me a super easy program that does it for you! Go check out 'Repackr' and use that instead of computing the capacities. It is incredibly easy to use and makes your job quick. You just type the capacities in the program with a comma separating each one, then put how many you want in series and in parallel. If you input more cells than your pack calls for then it will only use the highest capacities (it will filter out all the low capacities). This can be a time consuming process if you are making a large pack and doing it by yourself. I recommend getting a friend to help you on this step. One person can call out the number and the other person inputs it. Once you enter it then it will list all the groups that you need to create. Then you can put the cells into grouped piles and get ready to assemble it.
Find a Good Quality BMS (battery Management System)


The battery management system, or bms, is the brain of the battery. This thing has a few different tasks. Fist thing is that it balances the cells during charging. It does this by monitoring the series groups with balance wires and applying the juice accordingly. The second task it does is protect the battery for voltage and amperage spikes. A spike could cause the catastrophic failure of the battery (fire or destroy the cells).
When sourcing out a BMS you want to make sure it is high quality and works as intended. I DO NOT recommend the cheap ones on ebay. You don't want to cheap out on this part. I spent a lot of money on my cells and didn't want to lose it because I bought a bad/cheap bms.
Note: This might just be a personal opinion. Those cheap BMS's might work. I personally think you are gambling with it being a good bms or not. I have read mixed reviews on them and didn't want to take my chance.
My advice is not to buy the $10 BMS and spend the extra $40 to get a mid range one and the least. The price can range from $10 all the way to a couple hundred. I heard good things from the company 'Supower' at so I decided to go with them (you can buy a lot of other battery components there). When I opened their product, it was well packaged and the quality felt really good.
When searching for a BMS it can be overwhelming looking at all the different voltage and amp ratings. This is actually very easy. First you want to make sure it can handle the amount of cells you have in series (16S). Then, you want want to match the voltage of the pack you are making (60V). Finally you want to know how many amps you are planning to pull (in my case its 60A). You want to make sure you have a slightly higher amp rating so it gives the battery room to open up. You don't want the BMS to blow every time it hits 60A. Since I am building two batteries, I went with 2 60V35A BMS's.
Assemble Your Battery


Assembling the battery is like putting together lego pieces. It is extremely easy with the Vruzend kit. I briefly touched on it in a previous step but I will go into slightly more detail here.
Some of my battery skins were torn due to the previous battery pack. An ideal route would be to buy more shrink wrap and recover the batteries. Mine were not torn badly so I decided to pull and smooth out the skin. You just want to make sure its not bunched up in any areas (if it is then the fit will be too tight and you might break the caps). One of the pictures is an example of what some of my cells looked like with bunched up skins.
Once all the skins are good to go then you can start putting on the caps. When doing the caps, you want to take it one row at a time. The first step is to connect the caps together without the batteries inserted. Note: it uses a dove tail design to hold each cap together. For the top caps, the dove tails should be facing up and to the right. The bottoms ones will have the caps facing down and to the left. As you start to assemble the pack you will notice that there is only one way for them to go together. The easiest way to do this is go ahead and assemble a row of bottom and top caps, set the bottom row on the table, lightly push the cells into the caps, and then push the top caps on. This may take a couple tries if it is your first time doing it. Note: The orange caps represent the positive end and the black is the negative. Once you have the caps lightly pressed on then you need to clamp it somehow. You can use two pieces of wood on either side and use a wood clamp to press the two together, or you can get a piece of wood and press down on top of the caps with your body weight. I did it the second way and it worked perfectly. As you assembling each row then you need to go ahead and start connecting the cells into your configuration. Line up the rows and caps. The dove tails will slide into the slots (sometimes it takes some force so have a piece of wood on hand to give it some gentle "persuasion"). I highly recommend taking a look at some YouTube videos of the Vruzend caps being installed. This is definitely a system you will want to see in action to get a good idea of how to install it.
Once all the caps are on and the battery is in configuration then your done with assembly!
*Note: Make sure all the dove tails are locked in and none of the caps are broken.
*Note: After you assemble each row then you can check the connections with the multi meter just to make sure its working as it should. This is an extra step but could help with further issues if a cap is broken.
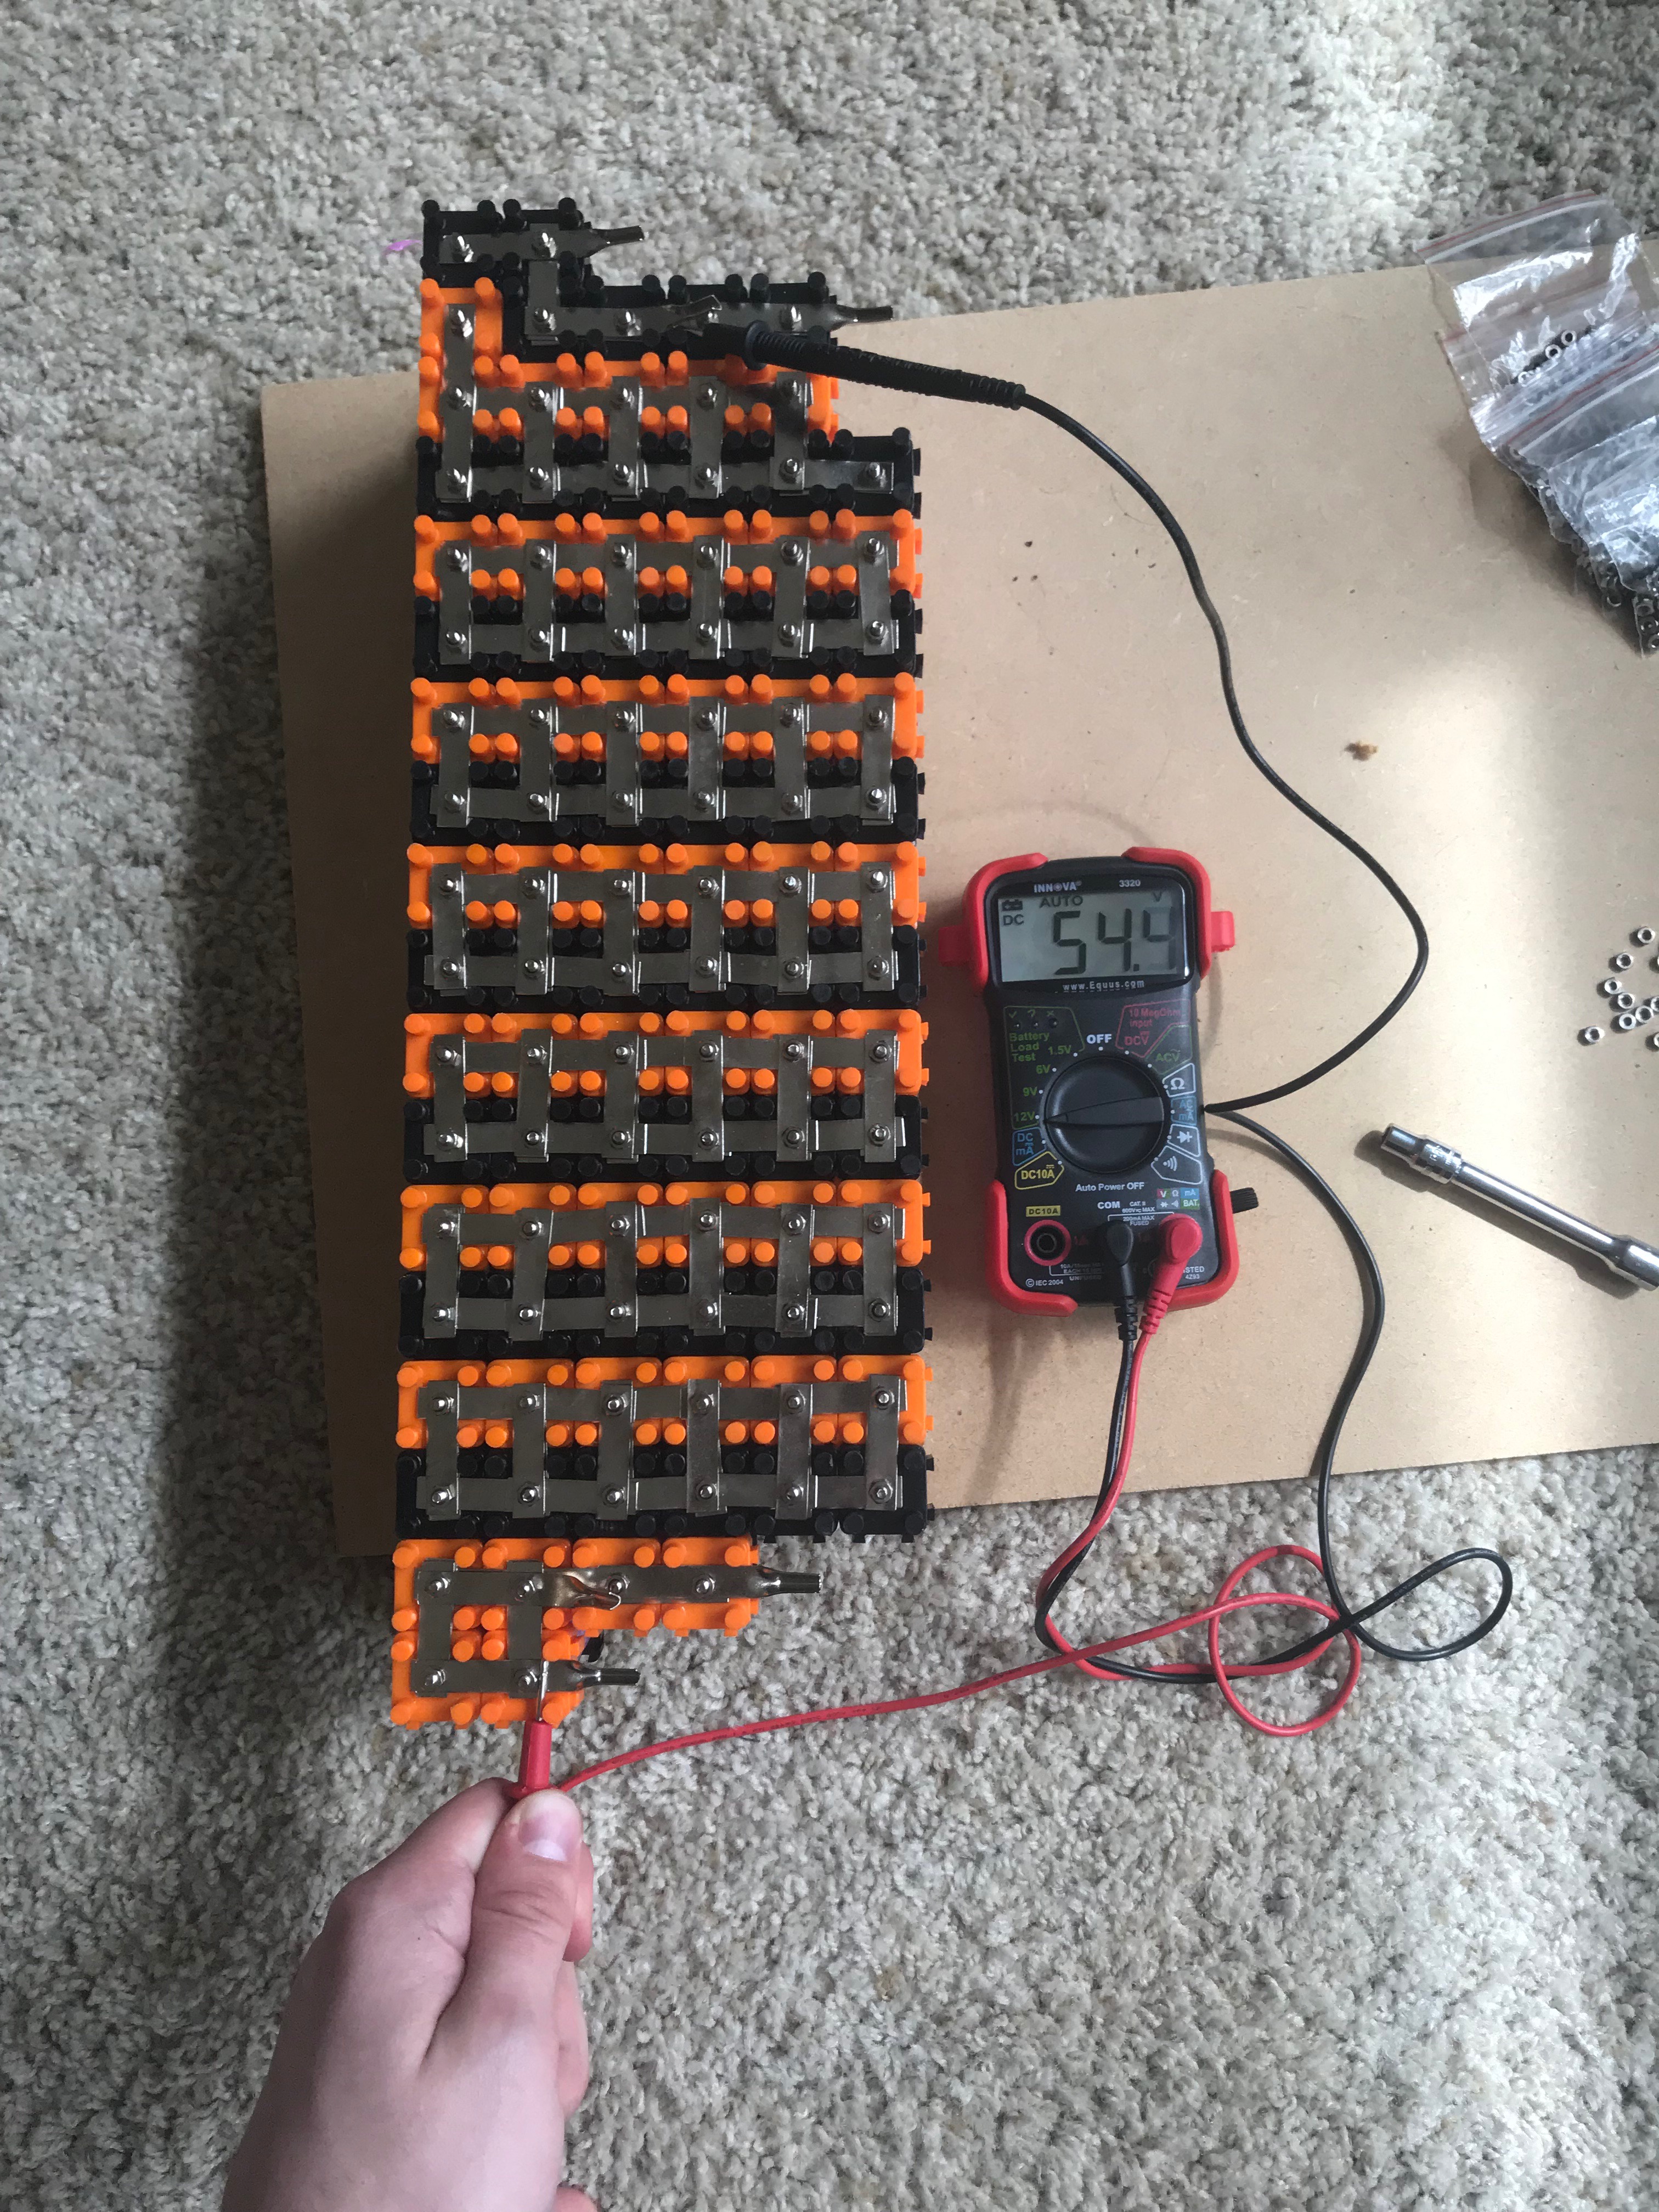
Test All Connections


This is a simple step but its very important.
Once your battery is in its configuration then you need to test all the connections with the multi-meter. This can be very time consuming if you have a big battery pack but its imperative that it be done now before you put the bus bars on. Basically test each cell and make sure that is has a voltage running through it. If it doesn't then you need to try to push the cap down further or replace the cap all together. It is also a good time to check all the threaded ends of the caps. Make sure they are not loose or cracked. I had a few that had broken contacts on the inside and ended up having to change them out while I was adding the bus bars (It was really frustrating to do it with the bus bars attached). If it is broken then change it out with one of the extra caps. Once you've tested all of your connections then your ready to move onto the next step!
Wire Up the Connections and Add the BMS


The next step is to start making all the connections between each cell and add your battery management system. When attaching the bus bars be very cautious of where you put each bar so you don't short anything out. If you do short the connections then quickly remove the bar with gloves and be careful because it might be hot. You shouldn't have an issue if you follow your drawing well. I did one side of the battery at a time. All the bus bars were added first and the nuts were tightened down on top. Do NOT over tighten the nuts but they should be snug. The kit also came with wire clamps that should be placed at the positive and negative ends of the pack (add as many as you can to distribute the load). The wire clamps are able to hold the wires with a little bit of solder.
If you have extra bus bars then I recommend doubling up on the series connections so they can handle the current better. I doubled up on all of my series connections so the battery isn't as stressed (ask for extra bus bars from Vruzend). This step is very simple as long as you pay close attention. The last step is attaching the BMS.
The BMS should come with a wiring diagram (see pic) that shows you how to wire up the positive/negative ends and balance wires. I suggested silicone wire in the materials because of its flexibility. I had some leftover 10 gauge wires from the old packs I took apart so I just used that. On the positive and negative ends of my battery I had 3 wire clamps that I need to solder to the wire. To do this I took three wires, soldered them to the clamps and spliced them together with a large wire. This is all you need to do with the positive end and it will go straight to the controller. You will treat the negative side the same way except instead of going to the controller it will go to the B- side of the Bms. Be careful when soldering to the BMS. It has small terminals and you don't want to glob solder all over the place. Then you will connect a single wire (same size) to the P- terminal of the BMS. From there it will go to the controller. Once you have the wires connected then you can hot glue the BMS to a piece of foam board and then hot glue the foam to the side of battery pack. The last step is to connect the balancing wires. You take each wire, cut the wire to a desired length, strip the wire sleeve off, and form the wire into a hook. Then you undo the nut of one of the caps in each parallel groups and wrap the wire around the post.Tighten the nut back down and hot glue the end of the wire to reduce fatigue. You can also hot glue the wires in other areas as needed to keep the wires uniform and contained. This is were you want to follow the wiring diagram very closely to make sure you hook up the right wire with right parallel group. If you make the wrong connection then it will burn out the BMS.
*Note: I attached a XT60 connector before the controller to make it easy to disconnect for charging. This is a good point to think ahead and figure out your charging situation. I will use Luna Cycles 60V 5A charger and it uses an XT60 connection. You can use any charger you want as long as it matches the voltage.
Make a Covering


At this point your battery is essentially done. You could easily put it in a case, hook it up and be done with it. But you don't really want all those connections exposed and vulnerable to the environment do you?
The final step is to add a protective covering to the outside to protect the battery from moisture and damage. There are a lot of different methods to covering the outside. I've seen people use shrink wrap, car wrap, duct tape, plastic, or even electrical tape. All of these methods work but some work better than others.
The first step is to get some 1/8 crafting foam that you can find at your local craft store. You can cut these to the shape of your battery and try to put enough to cover the entire thing. I was planning to use shrink wrap but I would have needed 500mm diameter sections and it was expensive. I was also impatient and didn't want to wait for it to be mailed from China. Instead I plan to use car wrap. If you go to a car wrap shop in your area then you can ask if they have any scraps you can buy off of them or buy it online.
Step 1:
Hot glue your foam pads to the pack (you dont need much)
Wrap the battery with electrical tape as extra strength to hold it together.
Step 2:
Cut your wrap in two strips. You want to wrap the battery in a + shape. One goes horizontally and the other goes vertically.
Make sure your your positive and negative wires are leading outside the corner of the wrap so you can connect them to the controller later.
Step 3:
Take the backing of the wrap and lay it smooth side down (sticky side up). Place the battery in the middle and fold it up like a present. Use a heat gun on the corners as it will make the wrap pliable to contour to the shape of the battery. Make sure your wires are repeat doing it both horizontally and vertically. Heat areas as needed and work the wrap into place.
I will be leaving my battery with only the foam on the outside until I get my bike fully up and running. I want to anticipate any issues that I may run across.
Note: If you've never wrapped anything before then this might take some practice. I recommend watching YouTube videos of people wrapping stuff so you can get an idea.
Put in on the Bike and Have Fun!
And you're done! That's it!
All you need to do now is make your battery still has voltage and put it on the electric bike. Don't forget to charge it back up before you try to ride.
This project was done for my school. I am part of the Invention Studio and the Georgia Institute of Technology. This is a student run maker space where students can bring there projects into reality. People are able to bring in their ideas and actually make a physical prototype. This guide will hopefully be used to guide other students around my campus to build their own batteries. You can find more information about the Invention Studio on our website here.
I definitely recommend doing more research before you start building. There are a lot of great YouTube videos of people putting battery packs together and it will be a great visual representation of what I'm doing here.
I really enjoyed this project and would love to do another pack in the future. It was a honor to share my experience with everyone and hopefully this will either inspire you to build your own battery or help guide you through the process.
Please check out Vruzend for your battery components and kits. Also check out Supower for some of their stuff as well.