Dynamic Values in a MS Window Using PyQt
by RB-roboBASics in Design > Software
1994 Views, 4 Favorites, 0 Comments
Dynamic Values in a MS Window Using PyQt

This instructable describes the use of dynamic variables in a PyQt window.
Qt enables building interactive, connected (Ms/Linux/Android/IoS) windows. PyQt enables building such in Python. The main loop of a PyQt scripts consists of the window methods, using the predefined window-variables. Updating these window-variables is possible, but not a good idea if extensive processing is needed. For the ISS-tracker window in the first video capture, threading is used to make a PyQt window work with “outside” variables. Surely there are other (and better methods) , but this one works fine and its structure ‘suits my logic’.
For both examples the window layout was created with Qt Designer. So, please disregard the amount of code lines in both scripts. Formatting a window lay-out for a lot of fields, requires declarative code like the position on the screen, the size, how it should react on max/minimizing the window, color, style, content, connected action, etc. Fortunately Qt Designer generates all these lines of code based upon your graphical layout. Unfortunately as a result of that, you’ll end up with a lot of lines in your main loop.
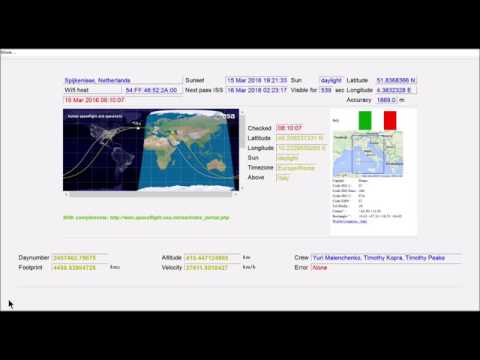
Since I wanted to get familiar with PyQt, I’ve build the ISS-tracker window using a lot of variables and different kind of fields. For those who are interested, I’ll elaborate a bit more later on.
The second video capture shows a very small and simple script to visualize the threading approach. The python script used can be found at: Bitbucket
The script simulates the throwing of a dice and processes the outcome of the throws.
The script uses two threads: one thread for maintaining the display of the window ( PyQt requires that this will be the main loop of the script ) and another thread for processing and periodically trigger the window-thread. For exchanging values, both threads have to be pointed towards the same variables in memory. In even more simple words: one thread processes some data, places the results at a special location, ‘rings the doorbell’ at the main loop to tell it’s ready and points out where the new delivery has been placed.
So, let’s see how that looks like in Python:
The script starts with the usual import of libraries needed: ‘QtCore’ for creating threads, ‘QtGui’ for processing the window visuals, ‘datetime’ and ‘time’ so we won’t forget about it.
The next two 'try' statements are needed for the make-up of the fields on the screen. Don’t mind these: Qt Designer generates these lines as soon as you start using rich-text descriptors. (e.g. for displaying another font, color, size, bold/italic, etc of any field in the window, one has to define a rich-text (i.e. HTML) descriptor.)
Then just a few global variables: ‘throw number’ and ‘total of all throws’ The essential variable is the memory shared between both threads, which I named the ‘linking storage’ (old habits ….) .
The linking storage here is a string where all variables have to be put into by the processing- thread and where those can be read from by the window-thread.
Another one of my old habits is a favor for using strings. I learned how this can save a lot of time while debugging scripts. (And: Qt prefers strings for display.)
The threaded (processing) method generates a random value (don’t mind the manipulating; I just tried to force as much volatility as possible in the screen), calculates some other values and puts them into the ‘LinkingStorage’ String.
The ‘trigger’ class ‘rings the bell’ at the main loop. It’s called by Qthread and creates and emits a signal every tenth of a second.
The next class consist in majority of the screen layout definitions to be used by the main loop. Although not such an extensive method as in the ISS tracker script, it’s still a substantial part of the script. The ‘setupUI’ method contains the declarations for the fields to be shown: object type, position in the window, font, relationship to other fields, etc. This method is generated by Qt Designer. The method holds two commands. One to apply the field formats (‘retranslateUi’) and one to set up the processing thread (‘setupTrigger’). The latter is added to the generated code. The ‘setupTrigger’ method starts the processing thread and defines the method to be executed when a signal is emitted by the processing thread (i.e. ‘refreshWindow’).
The ‘refreshWindow’ method splits the ‘LinkingStorage’ string, filled by the processing-thread and redefines the window fields adding the new content. Minor processing, like obtaining the current time, can be part of the same method. As said: major processing, should be executed in the processing thread.
The main loop speaks for itself: construct a window and show it on the screen.
In my opinion this is the most simple way to add dynamic data to a window.
Building the ISS tracker screen
The complete source for this application can be found at: Bitbucket
Although much bigger in size, handling the window and its variables is done in same way:
- Declaration of the window in the class ‘Ui_mainwindow’
- Declaration of the processing-thread in the class ‘trigger’. The timer for emitting the signal to the window-thread is set to 3 seconds. Together with the overall processing time of 2 seconds, this results in a refresh of the window every 5 seconds. Although I think it could be fastened to an overall 2 seconds, one should realize that the data gathering for the dynamic fields is done by API calls. If you want to use the tracker for a constant display, be aware that at a refresh rate of 2 seconds the script will generate 43,200 calls in 24 hours. In my opinion that’s far beyond ‘fair usage’ for free API’s
- Data passed through the ‘LinkedStorage’ string
The data handling is split into gathering of the static data (only gathered once and shown constantly) and the gathering of dynamic data (local and ISS).
The use of several API’s to obtain all the data, has been described in a former instructable about the Raspberry Pi SenseHat: