Drawing With Candy Melts
by creativesocialworker in Cooking > Candy
38135 Views, 52 Favorites, 0 Comments
Drawing With Candy Melts


This is a great technique for making intricate chocolate candy pieces that I discovered by accident year ago. It is surprisingly simple but can be time consuming if you are new at it. It is pretty much just like tracing/coloring but with melted chocolate. I use these as cake toppers or make them into creative candy bars.
Supplies

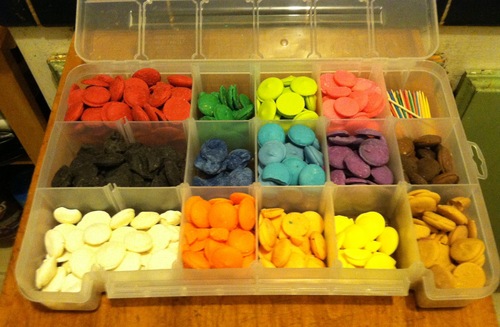
All you need are colored merckens candy melts (used for chocolate molds/lolipops). You can buy them online, from Michaels Crafts or other baking/chocolate stores. You can use regular chocolate for this but it is harder to work with and has a lower melting point.
You will also need something to draw with (Tooth picks, small paint brush, needle tip squeeze bottle, piping bag, etc.)
Other supplies are a clipboard, tape, a printer, and paper
You will also need something to draw with (Tooth picks, small paint brush, needle tip squeeze bottle, piping bag, etc.)
Other supplies are a clipboard, tape, a printer, and paper
Select and Print an Image

First print out the picture that you want to replicate on regular computer paper. It is easier to do this with a color image.
Simple pics/drawings work best. I sometimes add “coloring page” or “clip art” into my google image searches.
Before you print it, it is important to flip the image so it is backwards (click flip horizontally).
Tape the paper to a clipboard on all sides so the paper cannot curl.
Simple pics/drawings work best. I sometimes add “coloring page” or “clip art” into my google image searches.
Before you print it, it is important to flip the image so it is backwards (click flip horizontally).
Tape the paper to a clipboard on all sides so the paper cannot curl.
Melting Options

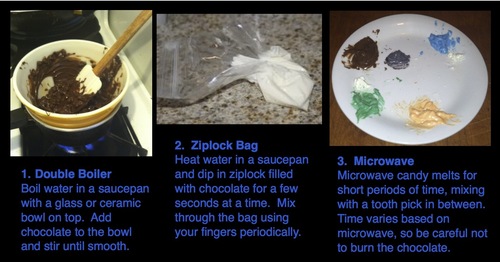
Ziplock in Hot Water: I usually put the melts in a zip lock bag while I heat water in a pan on the stove. I then dip the bottom of the bag in the water and play with it in my hand until it is liquid. If you do it that way then you have to be careful not to let any water get in the bag or the chocolate with cease up.
Microwave: The defrost-setting works best for this. If it is a small amount of candy melts, heat them at 20-second intervals and stir in between so they don’t burn.
Double-Boiler: You can also heat a pan of water on the stove and put a glass bowl containing the candy melts on top of it.
Microwave: The defrost-setting works best for this. If it is a small amount of candy melts, heat them at 20-second intervals and stir in between so they don’t burn.
Double-Boiler: You can also heat a pan of water on the stove and put a glass bowl containing the candy melts on top of it.
Outlining

Start by melting black candy melts.
Then take a tooth pick, dip the tip in the melted chocolate and outline the image directly on what you printed. Spend a good amount of time getting the tracing right. Cover the lines exactly and use the other end of the tooth pick to scrape away anything that went over the line.
Put the clipboard in the fridge (not freezer) while you complete the next step to let the chocolate harden so it wont smear.
Filling in Color

Then melt the different colored melts and paint it over the all the parts of the image that are that same color. You can use a small paint brush or, if you melted the chocolate in the ziplock, cut off the corner of the bag and squeeze out the chocolate then smooth it out with a toothpick.
It will look like you are coving up all the detail but you aren’t. The part that is face down, touching the paper, is the top. If there is a lot of detail then put the clipboard in the fridge between colors that are close together.
It will look like you are coving up all the detail but you aren’t. The part that is face down, touching the paper, is the top. If there is a lot of detail then put the clipboard in the fridge between colors that are close together.
Add the Final Layer of Chocolate

After you finish, melt white candy melts (or another light color) and put a thick layer over everything. If it is too thin then the piece will crack. If you are putting this on top of a cake then putting a very thick layer with make it difficult to cut.
Put the clipboard in the fridge until the piece hardens. The colder the chocolate is the easier it comes off. Make sure the chocolate has completely hardened if you want to put it in the freezer.
Put the clipboard in the fridge until the piece hardens. The colder the chocolate is the easier it comes off. Make sure the chocolate has completely hardened if you want to put it in the freezer.
Removing
The paper absorbs the oils from the chocolate so there is no greasing/special paper necessary. Remove the paper form the clipboard, flip it over and pull the paper off slowly from all sides.
Storing and Finished Product

You can store the finished pieces in either the fridge or freezer. They keep for a long time. I’ve left pieces in the freezer for months with no issues.
This makes a great cake topper and is fine to be stored at room temp when on a cake. If you used regular chocolate on the back of the piece it may sink into the cake a little. I crack the hard chocolate with the tip of a knife before cutting it so that the cake doesnt get smashed. You could also remove the whole piece before serving. This is made easier if you let you cake's frosting set up in the fridge before putting on the chocolate piece.
Add a thick layer of chocolate to the back to make intricate candy bars.
Store your leftover candy melts in an airtight bag or they will be hard to work with the next time. I stick my organizer in a vacuum bag.