Digilent FPGA Projects With Tcl Scripts
by NAEastland in Design > Software
3376 Views, 5 Favorites, 0 Comments
Digilent FPGA Projects With Tcl Scripts

FPGA projects written in either VHDL or Verilog can easily be adapted to run in Vivado using tcl (tickle!) scripts. While most users are familiar with the standard graphical user interface (GUI) method of working in Vivado, the program operates in the background using the tcl scripting language. The purpose of this Instructable is to show you how to convert a simple existing FPGA design in the format utilized by Digilent on their GitHub account, allowing you to benefit from the advantages afforded by using GitHub (version control, ease of access & contribution).
If you are not familiar with the usage of the tcl scripts with Digilent projects, check out this Instructable for a brief tutorial.
The Create_project Script

A template for the tcl script used in Digilent's projects that you can use to convert your existing project can be found below within the zip file (once you have unzipped and edited the create_project file, you will use the folder in the next step).
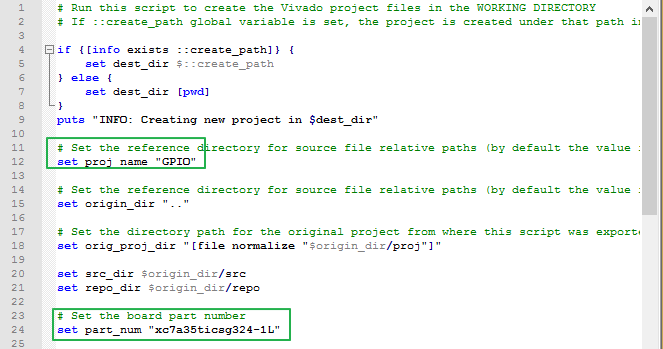
Using a text editor of your choosing to open the create_project.tcl file within the proj folder, you will need to edit two fields shown in the image above. In the line 'set proj name' just enter the name of your project in quotes ("ProjectName"), which just determines the name given to the file when the script is executed. The second line to be modified is 'set part_num' and requires you to enter the part number of the specific FPGA you are targeting.
This is most easily obtained from the existing project in the 'Project Settings' option under the 'Tools' drop down in Vivado, in the field called 'Project device'.
Downloads
The Folder Structure

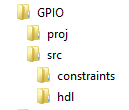
Once you have the create_project file set up you will need to create the folder structure that the new project will reside in. An example of this structure is provided in the first image above.
The top folder should be the name of the project and will contain two subfolders, one named 'proj' and the other named 'src'. You can simply move the whole 'proj' folder from the previous step into the top level folder. None of the other files within the 'proj' folder will require modification.
Within the 'src' folder you will need to make a folder named 'constraints', 'hdl', and 'ip'. The contents of each are outlined below:
- constraints - Copy in the .xdc file from your existing project into this folder.
- hdl - Copy all your verilog or VHDL source files into this folder.
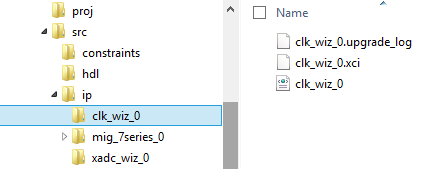
- ip - If your project uses any IP cores, you will need to create an individual folder of matching name for each core within the 'ip' folder. Find and copy in the .xci or .xco files for each IP core from the existing project into its corresponding folder you just created.
Run Your Project

The image above provides an example of what your file structure will look like once you have created folders for IP cores (if your project has any). Once you have created all the necessary folders and copied over all the source files you need, you can open up Vivado and run your newly converted project.