Digicylumi_Clock

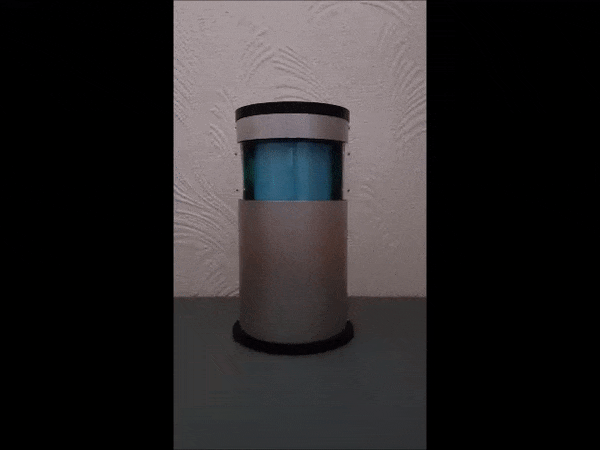
This clock is a variation of the Lumiclock and Analumi_clock combined to make a cylinder clock with a digital display.
Using UV LED's to energise a luminescent film on a rotating cylinder to display the time as dot matrix digits.
The entire mechanism is housed in an Aluminium tube with 3d printed end caps.
As with the previous versions this is controlled by a Microbit, RTC and Servo Driver.
Size of the clock is 100(W) x 100(D) x 200(H) mm
Supplies


Microbit V2
Compact All in One Robotics Board
DS3231 RTC
Resistor 2k2 - Qty 2
Resistor 10k - Qty 2
Resistors 220R - Qty 8
Capacitor 100nF MLC - Qty 3
74HC541 Octal Buffer IC
UV LED's 5mm - Qty 8
Battery CR1220
3d Printer
Filament (SUNLU PLA+ Black)
20pin DIL IC socket
Ball magnets 3mm - Qty 1
Stainless steel tubes 300mm(L) X 6mm(Dia.) - Qty 3
Pin Header right angle 22 pins
Pin header straight 10 pins - Qty 2
3 pin PCB terminal block 2.54mm
21 AWG tinned copper wire
Jumper leads ~185mm P/S - Qty 3
Jumper leads ~185mm S/S - Qty 30
Push Button SPST - Qty 2
Multistrand wire
Hex Standoffs M3 x 10mm - Qty 18
M2 x 8mm Countersink Bolts - Qty 4
M2 x 5mm Self tapping screws - Qty 2
M2 x 6mm Countersunk Bolts - Qty 4
M2 x 10mm Threaded standoffs - Qty 4
M3 x 5mm Bolts - Qty 2
M3 x 6mm Panhead Bolts - Qty 4
M3 X 8mm Countersunk Bolts - Qty 10
M3 x 10mm Threaded standoffs - Qty 2
M3 x 10mm Bolts - Qty 4
M3 x 12mm Plastic Bolts - Qty 4
M3 x 20mm Threaded Standoffs - Qty 2
M3 Nuts - Qty 8
M3 Plastic Nuts - Qty 8
May prove more cost effective to buy a range of values rather than individual values unless you already have them available. Some components may also have a MOL greater than the quantity specified in the component list.
No affiliation to any of the suppliers used in this project, feel free to use your preferred suppliers and substitute the elements were appropriate to your own preference or subject to supply.
Links valid at the time of publication.
0.5mm drill bit
2mm drill bit
3mm drill bit
4mm drill bit
6mm drill bit
6.5mm drill bit
Countersink drill bit
Drill
Saw
Soft Jaw Clamps
Ruler
Combination Square
Allen Keys
Pliers
Soldering Iron
Solder
Sanding paper
Needle files
Double sided tape
Clear tape
Masking Tape
Glue
Scissors
Mallet
Hot Air Gun
Wire Wool
Know your tools and follow the recommended operational procedures and be sure to wear the appropriate PPE.
Design


The main supporting elements were designed in BlocksCAD and 3D printed.
The elements consist of the following:
1: Lid (Holds control buttons).
2: Base (Holds the USB socket, RTC, Motor board and supporting rods).
3: Support platform (Holds the motor, LED support, Hall sensor and supporting rods).
4: LED arm. (Holds 8 x 3mm LED's).
5: Display cylinder (2 x End caps).
6: Motor Driver Support.
7: Motor spindle washer.
8: LED driver board support.
Alternative display option.
A: Luminous display (The 3D printed version could be substituted for Luminous film)
B: Display light blocker. (Sits behind the luminous filament to exclude any light from the back)
As the 3D printed display and blocker are rigid this negates the requirement for the 4 perimeter display support tubes and only the centre tube need be used.
Holes for bolts of items to be attached or supported are pre-designed into the elements, precluding the requirement for drilling, unless the parts are substituted or dimensions of the parts change.
However, some post processing may be required to remove aberrations, smooth surfaces and adjust holes sizes.
Character Format

Each character to be displayed is stored as an array element in a string of five, 2 character decimal numbers, one number per column.
When converted to binary the character is formed in a 5 x 5 matrix
Each array element from 0 to 9 corresponds to the numbers 0 to 9
0 = "1417211714" ... 9 = "0221130502"
Taking the "0" character for example.
Each number is formed of 5 columns of 5 digit binary with LSB at the top of the column and MSB at the bottom of the column. The sum of the weighting were the value in the colunm is one gives us our decimal column number.
Resulting in 5 decimal values per number.
.....c1 c2 c3 c4 c5 .......weighting
lsb .0.. 1 ..1 ..1 ..0 .....: 1
... ....1 ..0 ..0 ..0 ..1 .....: 2
.... ...1 ..0 ..1 ..0 ..1......: 4
..... ..1 ..0 ..0 ..0 ..1..... : 8
msb 0 ..1 ..1 ..1 ..0 ....: 16
dec 14 17 21 17 14
Reading back the time for example "12:45"
Separating the digits and ignoring the ":", gives us "1", "2", "4" and "5"
We identify the array element for the required number based on the number itself.
Array index 1 gives us the 5 digits [1818311616] for the number 1 which is converted in to a 5 x 5 matrix as described previously.
Once converted to binary each column digit is assigned to an LED, energising the film when the binary digit is one.
Coding

The coding was carried out using Makecode for MicroBit.
The delay between time updates is controlled by the value of the passing parameter in the long_dly procedure.
This is set to update the display once every 60 seconds but can be adjusted subject to material image retention time.
The main part of the process is in controlling the stepper motor position synchronised to the dot matrix code making up each number to be correctly positioned around the cyclinder.
Part of the process is defining a known reference start point.
In this case the reference is at the back of the (12 o'clock position), at this fixed position is situated the Hall effect sensor.
The Hall effect sensor detects the presence of the magnet attached to the rotating cylinder base which is attached to the stepper motor.
The first part is to home the Display to a known start position, this process is carried out in the homing procedure.
"homing", by rotating the Display until the magnet is detected by the Hall effect switch at which point the motor is stopped.
The output of the Hall effect switch is connected to P0 which is configured as a digital input.
A while loop checks if the digital pin=0 meaning the magnet is aligned with the sensor. Therefore, Home = True
If the digital pin=1 the loop continues, however to prevent an endless loop a 60 second time out is assigned.
If the timeout is reached, Home = False.
Whilst in the while loop and checking the status of the sensor the motor is being turned.
In order to rotate the motor we apply a step pattern, the 8 step pattern is held in beat_list.
Calculate Steps.
360/step angle * gear ratio = 360/5.625*64 = 4096step/rev = 0.088deg/step
Using an 8 beat pattern = 4096/8 = 512step/rev = 0.703deg/step
512/360 = 1.4222 steps/deg small enough step for our needs.
360/60 minutes = 6deg/min based on an analogue clock display.
However, the cylinder clocks forward facing display is only maximally visible at 180 degrees.
But in order to optimise forward viewing the characters will occupy a smaller angle.
Steps/Column = int((increment*6)*1.4222)
Degrees = Steps/1.4222
The steps returned can be positive (anticlockwise rotation) or negative (clockwise rotation).
Each number to be displayed is made up of a 5r x 5c matrix separated by a space therefore 5r x 6c
Where: r = row and c= column.
Thus for all four numbers to be displayed = 6 columns x 4 characters = 24 columns which equate to ~143 degrees.
This is better but the first and forth characters or not totally visible from the front.
By changing the Steps/Column calculation to int((increment*5)*1.4222) we can display the time within a ~120 degree angle.
The basic process is
Home the Display.
Flash the Display with up to 5 LED's for 0.5 second.
Repeat 4 times.
//This prints a number.
Rotate the Display to create a space.
Repeat the 3 previous steps 3 more times.
//All four number are now printed.
Rotate the display to the viewing position.
Wait 60 seconds and repeat the process.
Downloads
Schematic

The schematic shows how the different elements are connected.
The Microbit plugs directly into the robotics board.
The RTC uses pins 19 & 20 and 3V and 0V. A backup battery is required to retain the time if power is removed.
The stepper motor used comes complete with a ULN2003 driver board (with visual driver bit indication), and is connected to pins 13, 14, 15, 16, 5V and 0V. This rotates the Display cylinder in front of the UVA LED's.
The Hall sensor using pins 0, 0V & 3V and is used to reference the home position for the Display cylinder.
LED driver which is connected to 0V, 5V, Servo outputs 1 to 8, Microbit pin 8 and the 8 UVA LED's to create the digits.
The majority of connections are made using jumpers to interconnect the various boards.
However, some soldering is required to build the LED driver and mount the LED's and Hall sensor.
Main Frame Tubes


The main frame support tubes are made of 6mm diameter stainless steel.
Cut 4 tubes of 110 mm in length.
Deburr the inner and outer edges with a combination of rounded and flat needle files.
8 x M3 x 10mm hexagon spacers will be required, 2 per tube to be fitted into the open ends.
With a flat file, sanding paper or grinder, create a taper on one end of each of the spacers.
The taper should allow the spacer to be pressed into the open end of the tube a little way without falling out.
Hand fit a spacer into each end of a tube.
With the tube and spacer combination in a vertical position sit the lower spacer on a hard flat surface (Anvil, Vice or similar), and tap the upper spacer with a Mallet/Hammer knocking the spacers into the rod.
Ensure the spacers remain vertical to prevent undue deformation of the tubes.
Rotating the tubes to tap the other end may be required if one spacer is still partially visible.
Display Tubes


The display support tubes are made of 6mm diameter stainless steel.
Cut 4 tubes of 46mm and one of 32mm in length.
Deburr the inner and outer edges with a combination of rounded and flat needle files.
10 x M3 x 10mm hexagon spacers will be required, 2 per tube to be fitted into the open ends.
With a flat file, sanding paper or grinder, create a taper on one end of each of the spacers.
The taper should allow the spacer to be pressed into the open end of the tube a little way without falling out.
Hand fit a spacer into each end of a tube.
With the tube and spacer combination in a vertical position sit the lower spacer on a hard flat surface (Anvil, Vice or similar), and tap the upper spacer with a Mallet/Hammer knocking the spacers into the rod.
Ensure the spacers remain vertical to prevent undue deformation of the tubes.
Rotating the tubes to tap the other end may be required if one spacer is still partially visible.
Clock Display


The clock display consists of two identical 3D printed end caps.
This is held in place by the 5 display tubes previously made.
Push each of the 46mm tubes into the holes at 90 degree intervals and secure in place with 4 x M3 x 8mm pan head screws.
Push the 32mm tube into the centre hole.
Cut a strip of Luminous film 226mm x 50mm and a matching length of stiff paper/ card.
Stick the film to the paper with double sided tape or glue.
Form a cylinder and stick the short ends together with clear tape front and back.
Slide the cylinder over the tubes and sit the cylinder into the groove.
Place the free end cap over the tubes and align the film with the groove on the upper cap.
Press the two end caps together making sure the film remains in the grooves.
Secure in place with 4 x M3 x 8mm pan head screws.
Widen one of the 4 holes in the end cap with a 3.5mm drill bit to accomodate the 3mm ball magnet.
Glue in place such that the ball is just visible above the surface.
Mark the corresponding hole on the other cap with coloured paint this helps to identify the location of the magnet in relation to the sensor for set up and troubleshooting.
Alternative display medium.
Instead of a luminous film a 3D printed cylinder from luminous filament can be made in adddition to a 3D printed backing shield using dark opaque filament.
These simply replace the film and use only the central support tube.
However, definition of the dots and duration of the glow were not as good as the Luminous film.
Only a selection of films and a filament were evaluated for suitablity.
It's possible that a filament or paint on a par with the Luminous film exists and if so could be used instead, but that's for another time.
LED Arm


The LED arm fits into a slot in the support platform and is held in place with 2 x M2.5 x 20mm screws.
Check that the holes for the pin header location are clear and if necessary open up with a 0.5mm drill bit
Fit 8 x 3mm UV LED's into the holes in the arm from the back (the back is identified by a ledge on the inner rim of each hole), all orientated the same way.
Feed a length of (21 AWG), tinned copper wire through one of the outermost holes were the dual pin header will be fitted.
This should run the full length of the arm with 1cm excess at each end.
Insert an M2 x 5mm self tapping screw into the small hole at the top of the arm, loop the end of the wire around the screw and tighten.
Feed flexible (30 AWG), single strand wire for each LED, through a hole were the dual pin header will be fitted leave 1cm excess on both ends, strip the insulation and fix one end to the +Ve lead.
Repeat for all LED's and trim the LED leads.
Solder the free ends to the central 8 pins of a dual pin header and the common -Ve lead to one of the outermost pins.
With a soldering iron press the 3 free outer most pins into the small holes, to hold the header in place. Secure with epoxy putty if necessary.
Support Platform


The support platform holds the motor, hall sensor and the LED support.
The support platform is orientated horizontally with the edge flange pointing down.
Hall sensor
The Hall effect sensor is omnipolar, meaning it will respond to either magnetic polarity.
Identify one of the two locations which is unobstructed by the motor, using one of the two slots at the chosen location to insert the sensor leads.
Take the PCB terminal block and solder a 0.1uF capacitor between the terminals designated as V+ and 0V to suit the sensor terminals, solder 3 x ~185mm P/S (pin/socket), terminated leads to the PCB terminals.
Glue the PCB terminal to the underside of the support platform such that the screw terminals align with the sensor leads.
Take the Hall sensor and bend the leads down at a right angle to the body (ensure the Hall sensor is correctly orientated such that the sense element faces upwards).
Trim the sensor leads such that the sensor sits flat to the platform with its leads inserted into the screw terminals and tighten the screws to hold the sensor in place.
When powered and in the abscence of a magnetic field the output is High when a magnetic field is detected the output goes Low.
The sensor is connected to the following pins: Vcc to 3V, 0V to Gnd and Output to P0.
Note: Connecting the sensor Vcc to the Servo Vcc can cause the sensor to malfunction as the Servo Vcc can be inexcess of this sensors maximum voltage, this being 5.5V.
Motor
The motor is fitted beneath the platform with the axle protuding up through the centre hole.
Attach the motor to the platform with 2 x M3 x 8mm screws and 2 x M3 x 20mm hexagonal spacers at the locations identified by M1 and M2.
Ensure the motor axle is central to the hole.
Over the axle of the motor fit the spacer washer, this is to prevent the display cylinder sitting too low to the platform surface and catching on the Hall sensor.
LED arm
Feed the bottom of the LED arm through the hole in the support platform and secure with screws, ensure the LED faces are pointing towards the centre of the support platform.
The support platform is held in place with 4 X 8mm pan or cheese head screws at locations T1 to T4 which align with the tops of the tubes.
Motor Driver


The motor driver circuit is mounted to a 3D printed base with 4 x M3 x 12mm plastic screws.
This is then mounted behind the motor on the 2 X M3 standoffs with 2 x M3 x 8mm pan head bolts.
The motor leads plug into this board.
Using 4 x ~185mm S/S (socket/socket), leads these are connected between pins in1 to in4 and pins 13 to 16 on the Microbit.
Power for the motor is taken directly from the input supply.
Base Assembly


The tubes are attached at the locations identifed on the base and support platform at T1 to T4.
These are held in place with 8 x 8mm countersunk bolts.
As the base will be face down and on a flat surface and in order not to mark the surface and ensure stability the holes will be required to be counter sunk. This can be accomplished with a countersink drill bit or alternatively heat applied to the head of the screw with a soldering iron ensuring not to exceed the glass transition temperature (Tg), to enable deformation without liquification. Tg for PLA is 55-65C (subject to material variances). You want the plastic to be pliable to allow the head to press in and still be able to turn and remove it.
If using a soldering iron to heat the screw head.
Drill a 4mm hole in a small piece of wood that sits flat inside the perimeter of the base when turned upside down, allowing the base to sit flat.
Align the hole in the wood with the required hole in the base and fit the screw.
Apply the heat, when the screw head starts to move down, quicky remove the heat and apply a flat piece of wood that overlaps the screw head and press down this will keep the screw head horizontal and stop it popping out of the hole whilst it cools. This process may need to be repeated until the screw head is level or just below the level of the base.
If the ridge develops around the perimeter of the screw head this can be filed or sanded flat.
Complete the selected process on all holes for the main frame tubes.
Screw all 4 tubes in place to the base.
Fit 2 x M3 x 10mm standoffs and secure with 2 x M3 x 8mm bolts these are for the robotics board.
Fit 2 x M2 x 10mm standoffs and secure with 2 x M2 x 8mm bolts these are for the RTC board.
Fit 2 x M2 x 8mm standoffs and secure with 2 x M2 x 8mm bolts these are for the USB board.
The robotics board sits in the middle of the base this is orientated such that the Microbit faces the back of the clock.
The RTC sits on the base at the front of the clock between two tubes and below the LED driver. It is secured in place by M2 standoffs and M2 bolts. Power is taken from the servo headers Vcc to Vcc, Gnd to Gnd, SCL to P19, SDA to P20.
The LED driver on the support frame slides onto the 2 tubes nearest the RTC. With power taken from the servo headers.
The USB socket sits at the back of the clock between two tubes and is connect to the supply input of the robotics board with two wires.
Make all the connections as per the schematic.
LED Driver


The UV LED's are not driven directly by the microcontroller.
We will make use of the robotics board which has 16 servo outputs although only 8 will be made use of, this will allow control of each LED with PWM. Although, it will only be required to switch them fully on or off individually.
Due to low drive capability a buffer IC (Non Inverting Octal Buffer with TriState output), 74HC541 rated up to 7.8mA per output is used to drive the LED's from a 5V supply.
Having made a number of clock projects with the same LED driver, I decided to create a PCB.
Straight pin headers are used to make the connections for inputs, outputs and power.
All components are soldered to the board with the exception of the IC which is fitted in a socket.
Vcc on the buffer board goes to Vcc on the servo board.
With one decoupling capacitor on the supply and a pull up resistor to pin 19. When this pin (19), is low the outputs follow the inputs and when high the outputs are high impedance and disabled. This pin is driven by the microcontroller on P8
Inputs to the buffer are taken from servo outputs 1 to 8 with 0V connected to the servo GND pins.
Outputs from the buffer go to the LED's with LED1 at the top of the arm via output 1.
The PCB is fitted to a 3D printed support frame by 4 holes which is fitted to one pair of the support tubes.
The PCB is fitted to the frame with 4 x M3 x 12mm bolts then secured to the tubes with 2 x M3 x 6mm bolts.
Secure the support platform to the base with 4 x M3 x 8mm bolts.
Container


The container is made from a tube of Aluminium (a scrap piece awaiting a project), with dimensions of 100(W) x 185(H) x 2(T) mm.
This was not painted but simply rubbed with wire wool to remove surface scuffs and ctreate a uniform finish.
Into the container is cut a slot 49(H) x 152(radial W) mm this is to enable the clock display to be viewed.
The bottom of the slot starts 115 mm up from the bottom of the tube.
Masking tape was applied to the surface and the cutting lines applied to this.
The two cuts along the width were performed with a hacksaw.
Whilst the shorter cuts were carried out with a miniature grinding wheel.
Do not discard the piece cut out to make the window as this will be used in a later process.
Measure 5 mm along the short edge from the cutout corner and 5 mm horizontally from this point at the short edge and drill a 2 mm hole. Perform this at all 4 corners.
Cut two pieces of thin metal strips (brass or tin), with dimensions 20(W) x 49(H) mm, drill a 2 mm hole at the intersection of 5mm horizontally and 5mm vertically in each corner.
The metal strip will be used to attach transparent protective window to the container.
A 22 mm diameter hole was drilled 32 mm up from the bottom in the back to enable the Microbit display to be viewed.
Additionally, a 10 mm diameter hole was drilled 8 mm up from the bottom in the back for the USB plug.
Drill 2 x 1.5 mm holes, 2.5 mm down from the top edge at the horizontal centre on the left and right, repeat for the bottom edge. These will be used to secure the top and bottom.
Display Window


To prevent contact of the display cylinder that may stop its movement or marr the display film whilst minimising the ingress of dust etc.
The display window is made from a strip of clear Acrylic 49(H) x 152(W) x 3(T) mm that will be bent on a curve.
The template curve will be the offcut from creating the window cutout.
The process will involve heating the Acrylic with a hot air gun and holding with soft jaw clamps.
Soft jaw clamps being used so as not to damage the surface due to localised heat and pressure.
Be sure to check the jaws beforehand under the appropriate conditions to ensure they do not melt.
Clamp one end of the Acrylic to the Aluminium template applying the heat uniformally across the Acrylic and apply down ward pressure to the free end. Don't let the heat remain static on one spot for too long or you risk damaging the surface.
You may want to experiment with the specific material being used to determine the glass transition (Tg), temperature and workable range unless you have a datasheet. A typical range is 140 -180 centigrade.
Once the Acrylic can be bent around the template, clamp the previously free end.
Allow the Acrylic to cool down then remove the clamps.
Measure 5 mm along the short edge from the cutout corner and 5 mm horizontally from this point at the short edge and drill a 2 mm hole. Perform this at all 4 corners.
Attach the metal strips previously made, one to each end of the window with 2 x M2 x 5mm bolts.and fix it to the container with 2 x M2 x 5mm bolts.
The Lid


The lid completes the encapsulation process helping to protect the contents and supporting the time setting switches.
3 x 6mm holes are pre-formed into the lid, to accomodate 2 x push to make/release to break switches used to set the hours and the minutes and one SPDT switch to enable the SET mode.
The holes are set at a angle to hold the switches away from the rotating cylinder.
A cable retainer is included to prevent the cable sagging and rubbing on the display cylinder.
Attach ~150 mm multistrand wires (2 per switch), terminated with sockets to fit the terminal pins fitted to the robotics board.
Drill a 6.5mm hole in the support platform close to the edge and near the LED arm to enable the wires to be threaded down to the motor board.
Buttons:
Hours - Button A connected between P5 and Gnd. Internal pull up enabled by default.
Minutes - Button B connected between P11 and Gnd. Internal pull up enabled by default.
Set - Switch connected between P1 and Gnd. Internal pull up is enabled in the code.
Fitting the Display


The display is a push fit onto the motor axle.
Ensure the end with the ball magnet is placed facing the support platform.
Direct alignment with the magnet and the sensor is not essential at this stage as part of the process is auto alignment between the magnet and the sensor during time setting.
If during the homing process the display rotates and does not stop when the magnet aligns with the sensor a cross will be displayed on the Microbit and the motor will stop.
The marking dot on the top coincident with the ball magnet gives a visual indication of the magnets position.
If a fault occurs investigate the following:
Check the sensor is wired and orientated correctly.
Check that the sensor is not faulty by powering separately and monitoring the output with a DVM when a magnet is both absent and present.
Ensure the magnet passes over the centre of the sensor.
Encapsulation

With the base and support platform fitted together.
Feed the long wires from the switches down through the Aluminium cylinder, ensure the cylinder is the correct way up with the window uppermost.
Push the 6 wires through the 6.5mm hole in the support platform and attached to the pins P1, P5, P11 and Gnd on the Robotics board.
Fit the lid, ensuring the wires from the switches do not foul the display cylinder and attach with 2 x M2 x 8mm self tapping screws.
Insert the USB plug into the back of the clock and plug into a suitable adapter.
Operation


Setting the clock.
Before setting the clock ensure that the RTC has a battery fitted to retain the time when/if power is removed.
The default time format is 24 hour mode.
Move the switch to the set time position a plus (+) symbol will be shown on the display.
Press Button A for Hours. (0 to 23)
Press Button B for Minutes. (0 to 59)
Press Buttons A & B together to set the time, the entered time values will be displayed.
Move the switch from the set position.
At switch on or after setting.
If the clock has been previously set, it will auto home unless it is in the home position already.
Homing will be indicated on the Microbit display with a circle containing a upright bar.
The time will be displayed on the Microbit.
The dial homes, then illuminates the LED's, 4 x (5 x 5), dot matrix characters are displayed indicating the time.
If the Microbit displays a "X" this indicates a homing error related to the Display disc not moving or sensor fault.
Finally
Thanks for getting this far and hope you found this of interest.