Detect Motion and Destroy Target! Autonomous DIY Project
by MertArduino in Circuits > Microcontrollers
3341 Views, 35 Favorites, 0 Comments
Detect Motion and Destroy Target! Autonomous DIY Project

Detect Motion and Destroy Target!
In this video I show you how to build a DIY motion tracking project with a Raspberry Pi 3. The project is autonomous so it moves and fires the gun when it detects motion. I used laser module for this project, but you can easily change modify this build to use a Nerf instead.
This project allows you to detect and track a person with OpenCV and then trigger a device (such as a laser or gun).
Video Tutorial - Step by Step

Hardware Components
You can reach the hardware used in the project from the links below:
Pi V2 Official Camera or Webcam PC Camera
Laser Module 5V or Nerf Gun
MDF Sheet
Spray Paint
Circuit Diagram
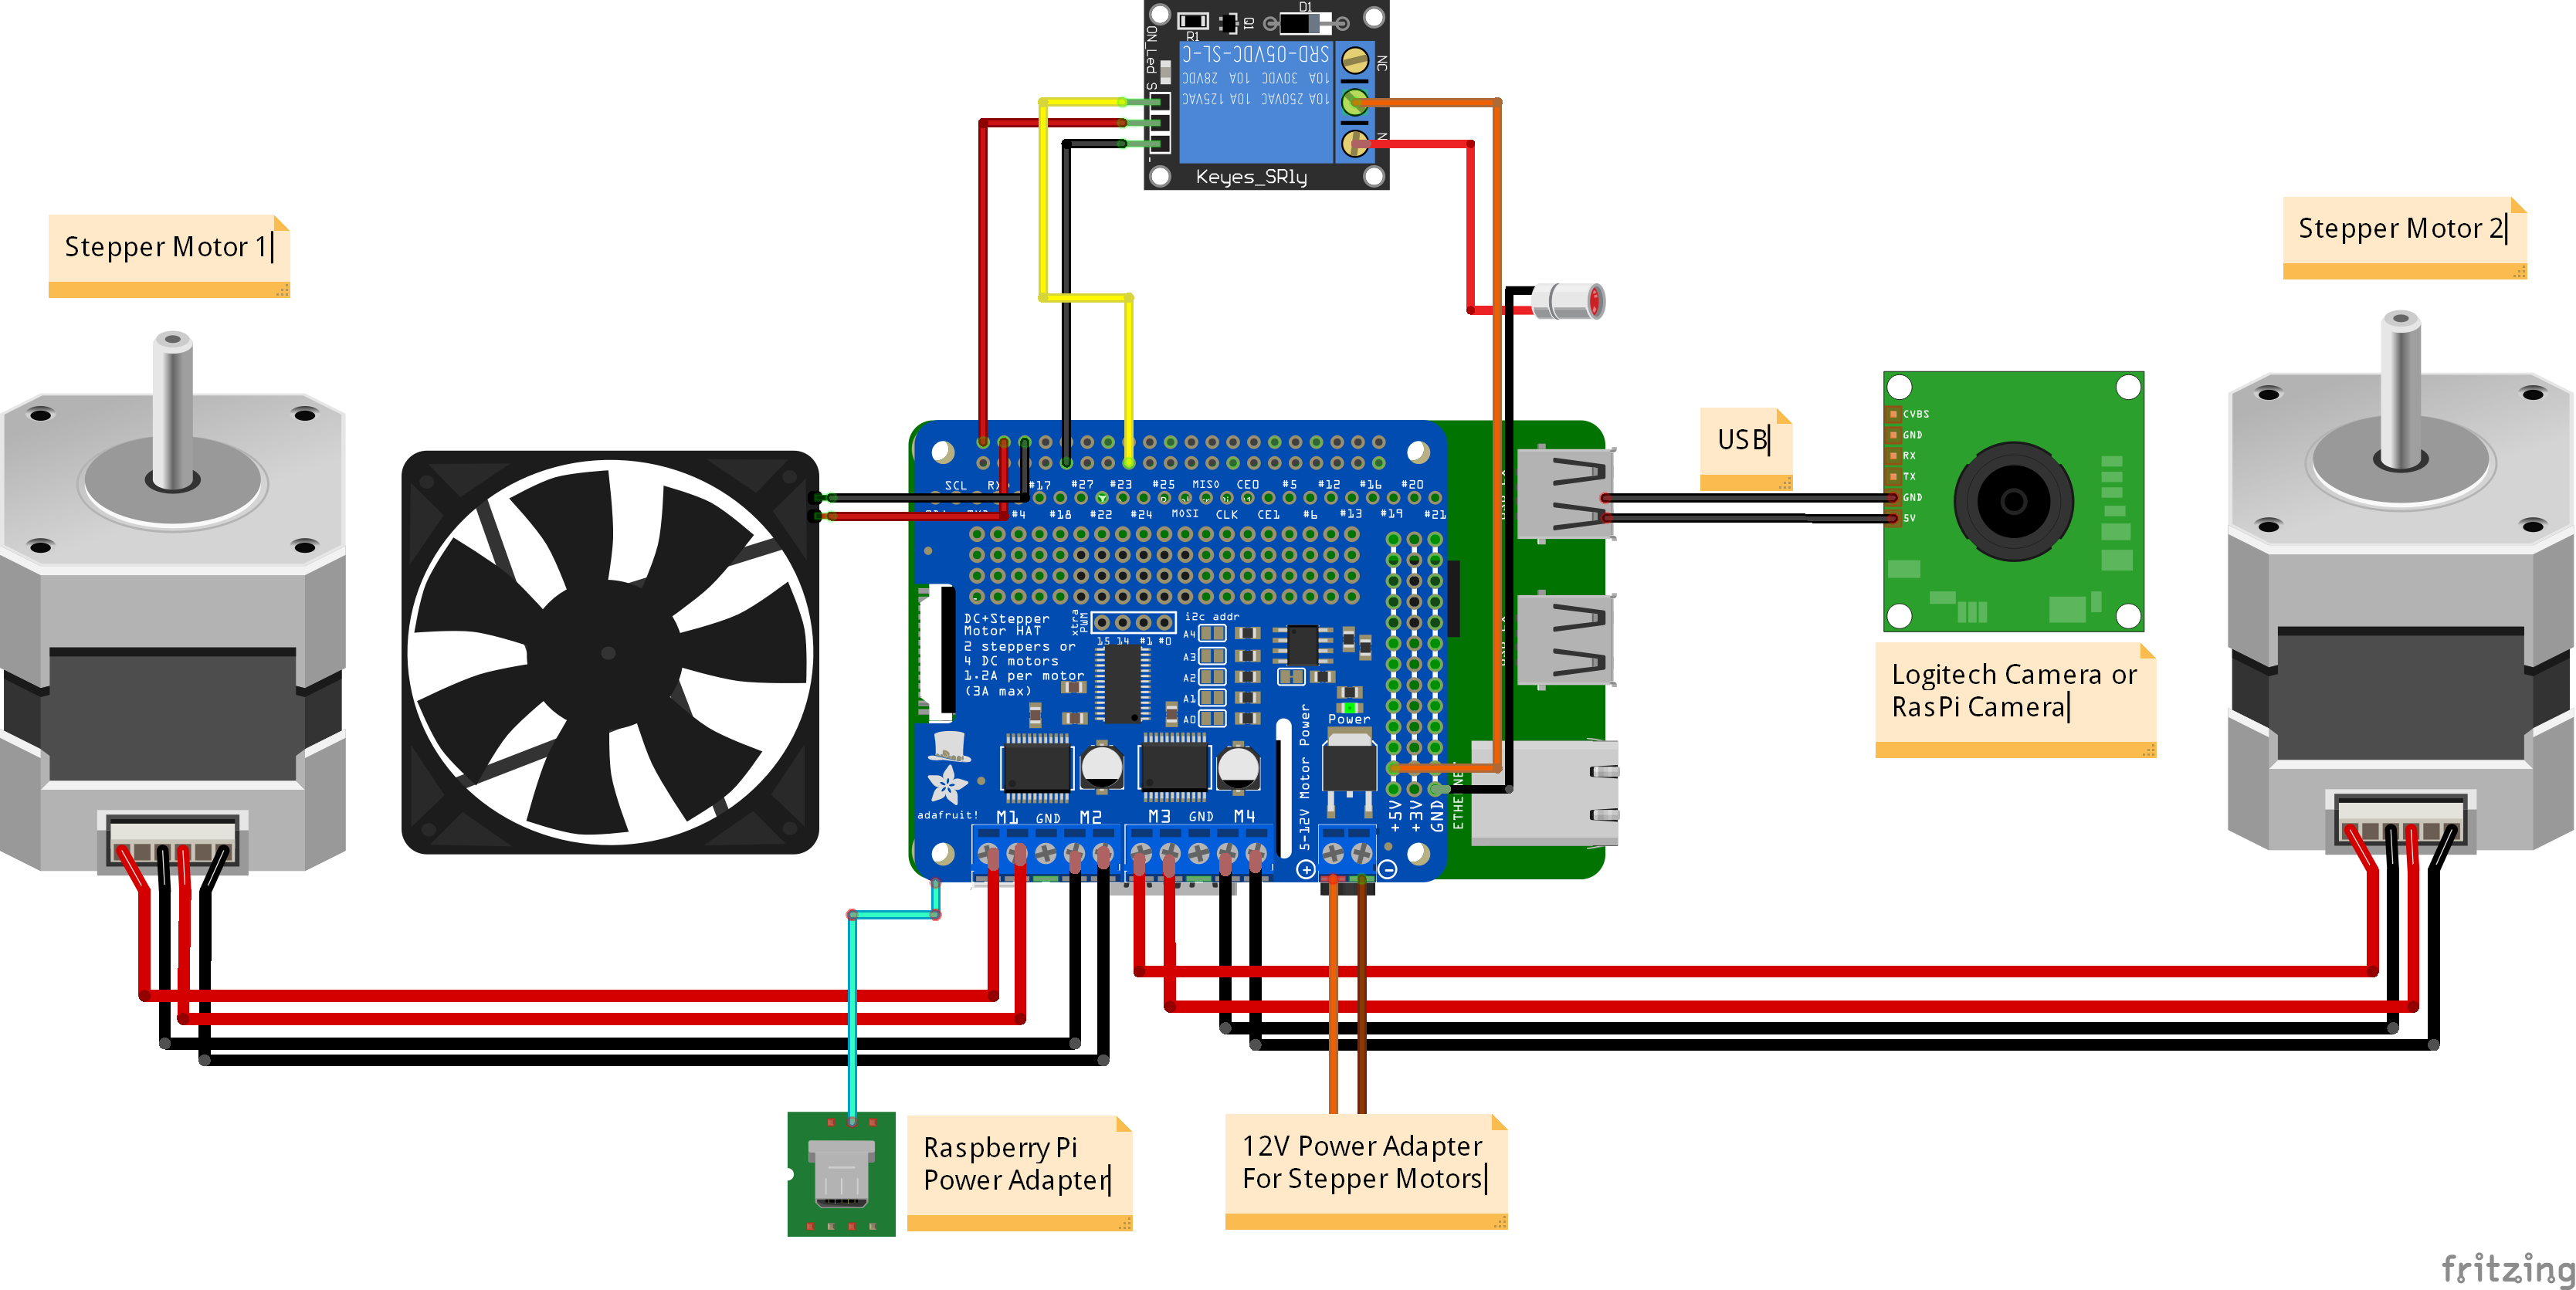
You can complete your connections according to the circuit above. GPIO22 pin is used for relay control within the code.
RELAY_PIN = 22
Install Guide - OpenCV and Pip

1. Make sure pip is installed
sudo apt-get install python pip
https://www.pyimagesearch.com/2018/09/19/pip-install-opencv/
2. Install OpenCV 3. Follow all steps for python 3 instructions
https://www.pyimagesearch.com/2016/04/18/install-guide-raspberry-pi-3-raspbian-jessie-opencv-3/
3. Setup I2C on your Raspberry Pi
https://learn.adafruit.com/adafruits-raspberry-pi-lesson-4-gpio-setup/configuring-i2c
4. Install the Adafruit stepper motor HAT library
sudo pip install git+https://github.com/adafruit/Adafruit-Motor-HAT-Python-Library
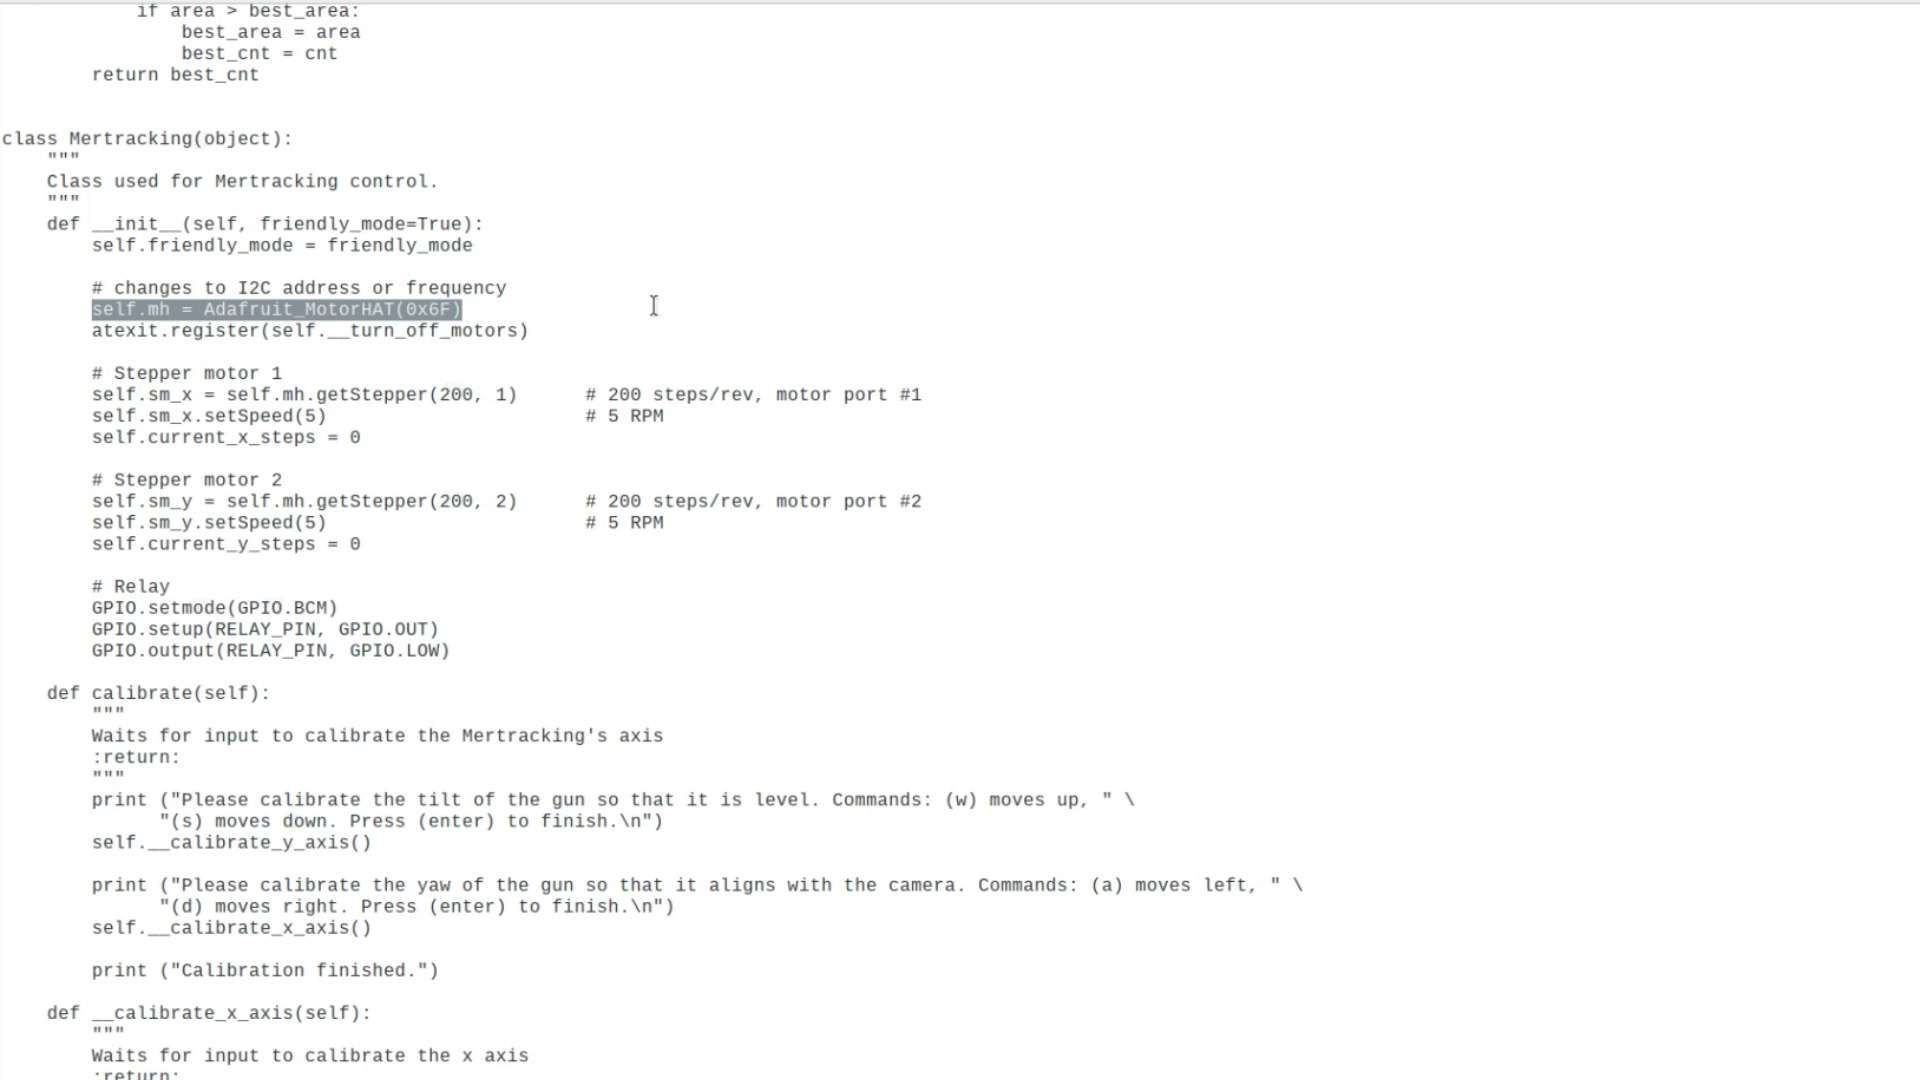
5. I2C Address
If you are using a Raspberry Pi Stepper Motor Expansion Board other than the Adafruit Stepper Motor HAT (just like in the video), then update the I2C address or frequency value with the following. (This address is only compatible with the board in the video, default value is blank for Adafruit Stepper Motor HAT)
self.mh = Adafruit_MotorHAT()
to
self.mh = Adafruit_MotorHAT(0x6F)
in the source code (mertracking.py)
for mor details: http://www.raspberrypiwiki.com/index.php/Robot_Expansion_Board
6. Make sure to create your virtual environment with the extra flag
mkvirtualenv cv --system-site-packages -p python3
7. Open Terminal and Activate your virtual environment
workon cv
8. Clone this repository
git clone git@github.com:MertArduino/RaspberryPi-Mertracking.git
9. Navigate to the directory
cd RaspberryPi-Mertracking
10. Install dependencies to your virtual environment
pip install imutils RPi.GPIO
11. Run the Code
python mertracking.py
Setting Parameters
mertracking.py has a couple parameters that you can set:
MOTOR_X_REVERSED = False
MOTOR_Y_REVERSED = False
MAX_STEPS_X = 20
MAX_STEPS_Y = 10
RELAY_PIN = 22
I2C Address or Frequency
self.mh = Adafruit_MotorHAT(0x6f)
Speed of the Stepper Motors
self.sm_x.setSpeed(5)
self.sm_y.setSpeed(5)
Steps/Rev of the Stepper Motors
self.sm_x = self.mh.getStepper(200, 1)
self.sm_y = self.mh.getStepper(200, 1)
Delay Time for the Relay Trigger
time.sleep(1)
You can change the step type with the following commands
Adafruit_MotorHAT.MICROSTEP
MICROSTEP - SINGLE - DOUBLE - INTERLEAVE
Source Code

Get the Code from GitHub - https://github.com/MertArduino/RaspberryPi-Mertracking
Clone this repository:
git clone git@github.com:MertArduino/RaspberryPi-Mertracking.git