Designing on Tinkercad/ How to Create a Pysanka of Your Own
by DariiaSS in Design > Digital Graphics
1114 Views, 1 Favorites, 0 Comments
Designing on Tinkercad/ How to Create a Pysanka of Your Own


.jpeg)
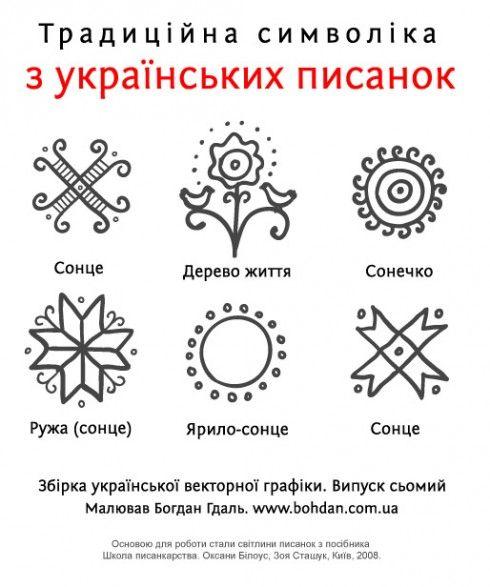
First things first, what are Pysanky?
Pysanka is a traditional Ukrainian Easter egg, with folk symbols and ornaments inscribed on it with bee wax.
To create one of your own, you'll need inspiration and for that you should gather a few references of actual Pysankas and traditional Ukrainian symbolic.
Supplies
Platform: Tinkercad
Choose Your Pysanka Design


After you've familiarized yourself with Ukrainian symbolic, you can sketch a few Pysanka designs either digitally or traditionally and pick the best one.
Write Specifications for Your Chosen Design


Your design Specifications should include all important measurements, a color palette, pieces that you're intending to make 3d should have detailed explanation about their size, color, texture and position on the final product.
Start Designing Your Pysanka on Tinkercad


Moving on to creating an actual 3d design on Tinkercad. It's better to start with one of the basic shapes from Tinkercad's library. In this case you can use the egg shape that could be found in the "Creatures & Characters" section.
Make the Sun


Next, you should choose a few main symbols that you're going to make, they will be 3d. I've chosen to make the sun first. Here's what you need to do:
- Add a hemisphere shape
- Place a star shape right below it
- Once the star and the hemisphere are combined in such a way that they make a single shape, group them. To group two or more objects you need to select the area around those shapes and press the group button at the top right.
- Change the color of the new shape into your desired one. *My recommendation is to choose white, so that when you have your physical design ready you'll have the opportunity to paint on top of it.
Make the Tear Drop and a Dot


To make a tear drop there are a few shapes you can use: a hemisphere shape, a cone shape or a paraboloid shape. I picked a hemisphere shape because it was the easiest one to edit, but all of the other ones listed work as well.
- Add a hemisphere shape to your work area
- Drag the top part of the sphere upward creating something similar to a beak from the extended part
- Adjust its width and height until it'll take on a form of a droplet
- Add a hemisphere shape once again to create a little detail
- Adjust its size. My dimensions were 4.00 x 3.00.
Make the Rim


For the rim you'll need the ring shape, you can find it in the "Basic Shapes" section. Right after you are done with that, you should:
- Place the ring shape below your egg shape
- Drag the ring up until it ends up at the height you want for it to be
- Adjust the ring's circumference by adjusting its width and size through the little selection points. The ring should fit the eggs circumference perfectly so that there won't be any gaps left between the ring and the egg shape themselves.
Make Two Symbolic Birds


- Add a half-sphere shape and shape it into an oval. You can do that by clicking on the shape and widening or elongating it via the little selection points. This shape will be our birds torso.
- After that, let's add another hemisphere for our birds head.
- Now, there are two ways to connect them (make the birds neck) either by using another shape and grouping all three of them together afterwards or connecting them using your own shape. My choice was to do the second one. For that you have to: Click on the Tinkercad's Shapes Library> Your Creation> Create Shape. Now you can draw your own shape to connect the two previous ones.
- Group the bird's body by selecting the space around it and clicking the group button at the top right.
- As for the bird's beak, you can use the "V" shape in the "Design Starters". Turn it at a 90 degree angle to the left and make it smaller according to the birds head.
- Place the beak half way inside the smaller hemisphere (the bird's head)
- Combine all the shapes together by grouping them. Select the area around your bird> Click the group button at the top right.
- To make my bird's wing I created my own shape once again.
- Place the wing on top of the bird's torso and group everything all together.
- Select your bird's shape and copy it to make an identical bird
- Mirror one of the birds via the Mirror tool at the top right corner next to the Shapes Library. Once you click the mirror tool there will be three different black arrows around your bird shape. Indicating three different directions in which your object could be mirrored. Choose either the left or the right arrow, so that one of your birds will be turned to the right and the other one to the left.
Add All Details Onto the Egg


Add all of the details onto the egg's surface by dragging them upward using a black drop cursor and then dragging them inwards once they're at the correct height.
And wallah now you have your own Pysanka design made on Tikercad!
If you have an access to a 3d printer then you can print it right away and decorate your home for Easter!