Designing Robot Wheels in Tinkercad
by ScienceOxford in Workshop > 3D Printing
3287 Views, 3 Favorites, 0 Comments
Designing Robot Wheels in Tinkercad

An important part of any robot build is choosing the correct wheels.
You need the right size, the right amount of grip and, most importantly, they need to look awesome!
If you buy wheels to fit your robot, you will only have a few options to choose from. But if you design your own, then you can do anything you like!
---
At Robocamp 2019, our summer camp for 10-13 year olds, we offered a choice of four wheels.
- Large or small?
- Gear reduction or no gear reduction?
Through testing and experimenting, attendees chose the wheels that were right for them.
We used N20 motors, in a 3D printed bracket, connected to the wheels via cogs. If you want to use this set-up, you can get the bracket and the cogs from Thingiverse, and glue your chosen cogs to your new wheels: www.thingiverse.com/thing:3820553
Alternatively, you can glue your new wheels directly onto your robot's motors, or design your own geared solution!
Choosing the Right Material for Your Wheels
What is the purpose of your robot?
- Does it need to go outside?
- Are the wheels likely to get damaged in use?
Materials have different properties, so think carefully about what might be good for your project!
Note: the wheels used during Robocamp were laser cut acrylic.
---
Listed below are some materials that we have access to in our maker space, along with some pros and cons to think about.
Laser cutter materials (quick to fabricate, choose from set thickness options):
Acrylic vs MDF
- MDF is very cheap, so great to prototype with.
- It can be painted any colour, or with a design.
- It will get damaged if it gets wet.
- Acrylic is more expensive.
- It is available in bright colours.
- It is brittle and can be snapped.
3D printer materials (slow to fabricate, can be any thickness):
PLA vs ABS
- PLA is better for the environment.
- It is easier to print with - less is likely to go wrong during the print.
- ABS can not be used with every 3D printer.
- It is bendier and less brittle.
---
There are many other materials you could laser cut or 3d print with.
Or, once you have created your design, you could print a template to cut designs into unusual materials by hand.
Do some research on different materials, and check with the owner of the laser cutter or 3D printer whether it is possible to use that material!
Designing Your Wheel Outline
If you don't already have one, create an Autodesk account to sign into Tinkercad.
If you are under 13, you will need to provide a moderator - either the email address of an adult (e.g. a parent or guardian) or a code provided by your teacher.
If you have never used Tinkercad before, we recommend that you work through their excellent tutorials: https://www.tinkercad.com/learn/designs
If you plan to laser cut your wheels, and have not designed for a laser cutter before, then please take a look at our guide to see the differences: https://www.instructables.com/id/Designing-in-Tink...
---
Step A: Drag-and-drop a cylinder shape onto your Workplane.
Step B: Set your wheel's diameter.

Step C: Set your wheel's thickness.

---
How big do you want your wheels?
- Large wheels will move faster than small wheels.
- Small wheels will have more torque (pushing power) than large wheels.
- How big are the insides of your robot, or its chassis / shell? Make sure your wheels are large enough to touch the ground!
How thick do you want your wheels?
- Thick wheels are easier to stick tires on to.
- Thick wheels are heavier than thin wheels.
- Thick wheels stick out the side of your robot more than thin wheels.
- If you are laser cutting - find out what thickness options you can choose from.
- If you are 3D printing - thicker wheels take longer to print than thin wheels.
---
Step D: Change the number of sides to the maximum amount - this will make your shape rounder.

Adding a Hole in the Middle
Step A: Drag-and-drop a cylinder hole onto your Workplane.
Step B: Set the hole's diameter.
---
If you are using Robocamp kit, it is designed to use M4 bolts. This means that hole must be big enough for a bolt 4mm in diameter.
Your hole needs to be larger than 4mm, to allow the bolt to pass through it, but not too large, or the bolt will move around too much!
We suggest a hole of 4.2mm in diameter, but depending on the material you use you may need to change it after your first prototype.
If you are glueing directly onto your motors, measure the diameter of the motor shaft as accurately as you can, and make your hole slightly larger than this.
Some motors have a D-shaped shaft instead of a circular one. You can design a D-shaped hole if you like, to help with the fit, but you will need to test and adjust the fit with a few prototype wheels to get this right.
---
Step C: Change the number of sides to the maximum amount.
Step D: Select both shapes, and use the align tool to add the hole to the exact centre of your wheel (see below). To make this easier, switch to both Top and Orthographic (flat) view!


Step E: Group the two shapes together to cut the hole out of your wheel shape.

Well done, you have a basic wheel design!
Creating a Unique Wheel Design
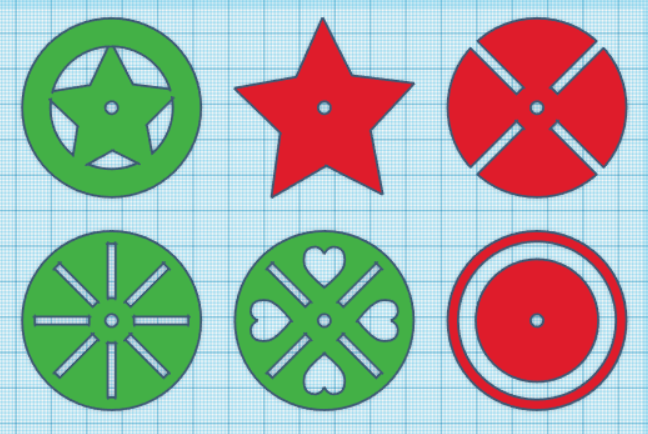
You can gain some advantages by designing some cut-outs in your wheel:
- save on material if 3d printing
- reduce weight
- make it unique
A few ideas (in green) and some examples of not-good designs (in red) are shown in the picture above!
Below, we'll walk through how to create a wheel with four star cut-outs, equally spaced around the wheel.
---
Step A: Drag-and-drop a star shape onto your Workplane, and resize it to fit within your design.
Step B: Align the star with the centre of the wheel.
Step C: Duplicate the star three times - you will now have four identical shapes in the centre of your wheel.

Step D: Drag one of the stars upwards until you are happy with its position - you can use the position markers to move it a set amount. Remember how much you moved it, so you can move the other shapes the same amount!
Step E: Click on the next star, and rotate it by 90 degrees.

Step F: Move the rotated star sideways by the same amount that you moved the first star upwards.
Step G: Repeat for the next two stars - rotate by 180 and 270 degrees, and move to their positions.
Step H: Change all of the stars into Holes (Picture #5).

Step I: Group all of the pieces together, to cut the stars out of your wheel.
Step J: Check your model! Rotate around it to make sure it looks the way you expect.
If you are having problems with your model:
- Ungroup the pieces, the rotate around the model.
- Is everything aligned to the Workplane? If not, use the align tool to put the pieces together.
You can see and remix the example wheel here: https://www.tinkercad.com/things/iiTpfbQVisG
---
When you are happy with your design, export it in the appropriate format (we use .STL for the 3D printers, and .SVG for the laser cutter) then fabricate it in your chosen material!
Attaching Your New Wheels to Your Robot
If you are using Robocamp kit, you will need the following extra bits:
- cog for each motor shaft
- cog for each wheel
- M4 nut and bolt for each wheel
Choose between a gear reduction (slower speed, higher torque), or no gear reduction.
All of the files are on Thingiverse.
Step A: glue your wheel cogs onto your new wheels and leave to dry.

Step B: push your motor cogs onto the motor shafts.

Step C: use your nut and bolt to attach the wheel to the motor bracket.

---
If you are glueing directly onto your motors, you will need:
- hot glue (easily removable and quick to set)
- OR
- super glue (not easily removable and slower to set)
Step A: push your wheel onto the motor shaft and check its placement.
Step B: hold it in position - checking that it is lined up straight - and add glue.
Step C: continue to hold in position until the glue is set.
Troubleshooting Your New Wheels
Holding your robot's wheels off the ground, test the motors.
Do they turn? If yes, awesome! Move on to the next step!
If no...
Listen to your motors when you try to drive them. Are they buzzing?
If they are not buzzing, then the motors are not turning. Check that your robot is turned on and that none of your connections have come loose.
If they are buzzing, this means they are trying to turn and there is probably something physically stopping them.
- Check that your glue hasn't jammed up the motor or its gearbox - if it has, pick off the extra glue.
- Check that the nut and bolt axle isn't too tight, stopping the wheel from turning - if so, loosen it.
Adding Tires
Now that your wheels are moving freely, you can give them tires to provide friction.
If the wheels are too slippery, they can't get enough grip on the ground to turn, meaning your robot will drive sluggishly, or not at all.
Some tire material ideas:
- rubber bands
- grippy tape
- foam tape
Experiment with a few options before committing, some will work better than others on your particular wheels.