Design and Print the Instructables Robot
by LukeK1990 in Workshop > 3D Printing
5788 Views, 66 Favorites, 0 Comments
Design and Print the Instructables Robot
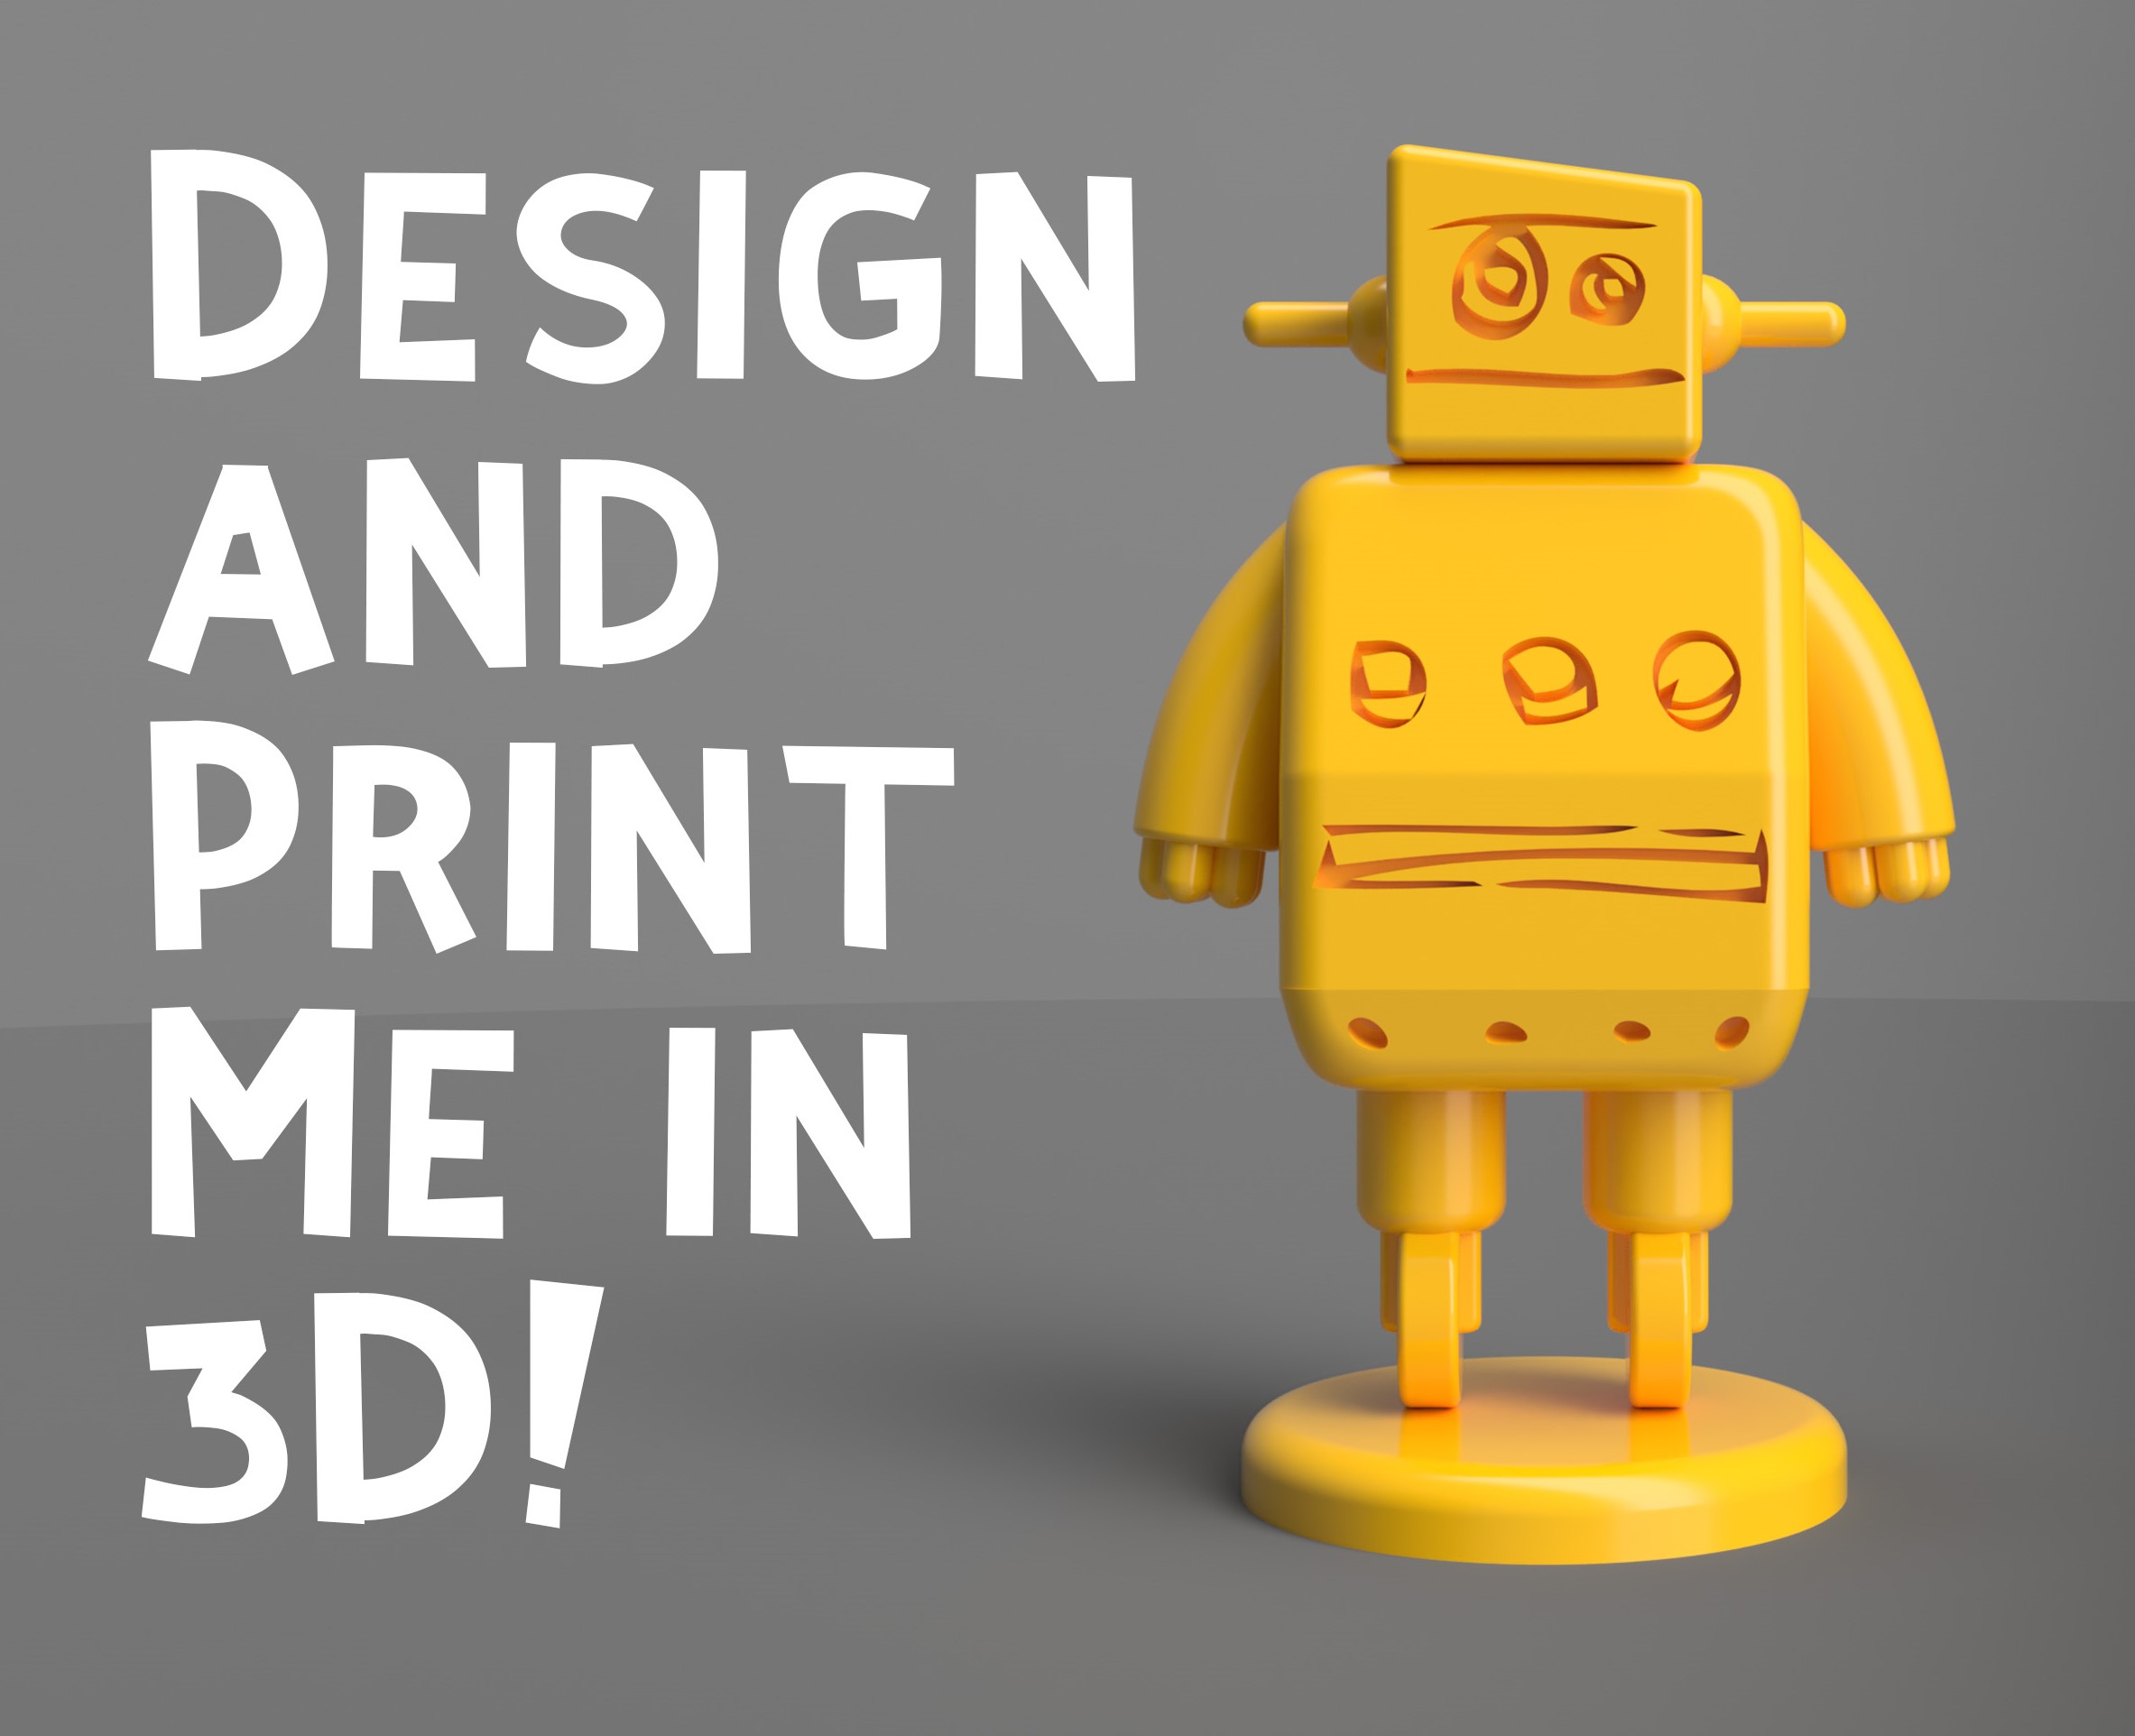
In this Instructable I will show you how to design and 3D print your very own Instructable robot using Fusion 360!
These steps are aimed at beginners who need some hands on experience using Fusion 360. More advanced users are welcome to download the completed STL files for 3D printing right away.
I will assume that you have a very basic level of experience using Fusion 360 and navigating around the workspace. If you are a complete novice then check out Phil Dollan and JON-A-TRON’s 3D Design Class for a fast track pass into the world of Fusion 360!
Before we begin, here's what you will need to complete this Instructable:
- Access to a 3D Printer
- Yellow Filament
- Fusion 360 (it’s free for hobbyists and startups & students and educators).
That's it! Let's begin..
Creating Your First Sketch
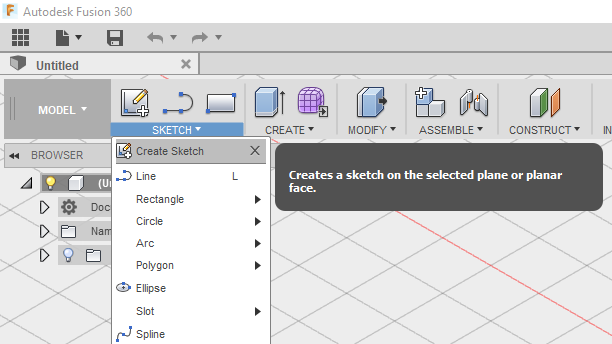
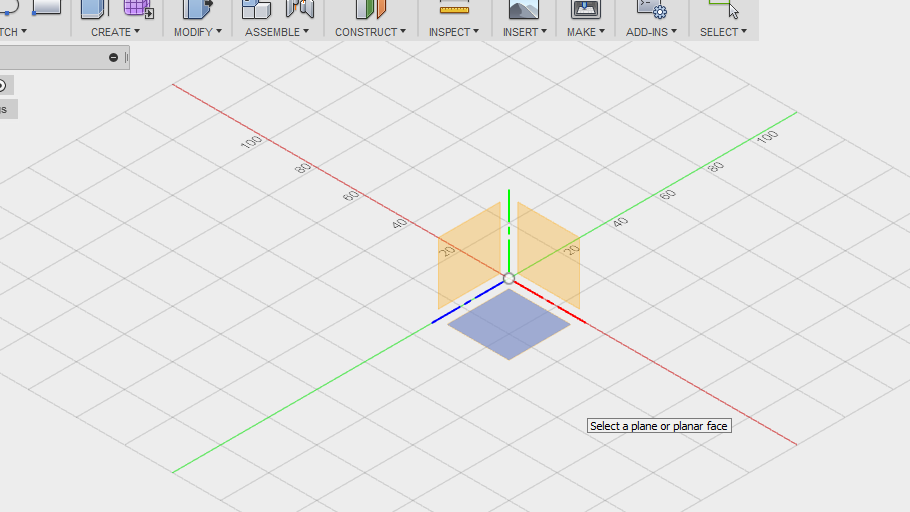
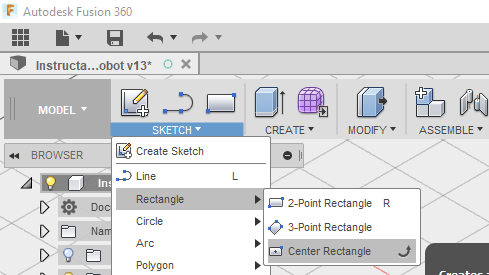
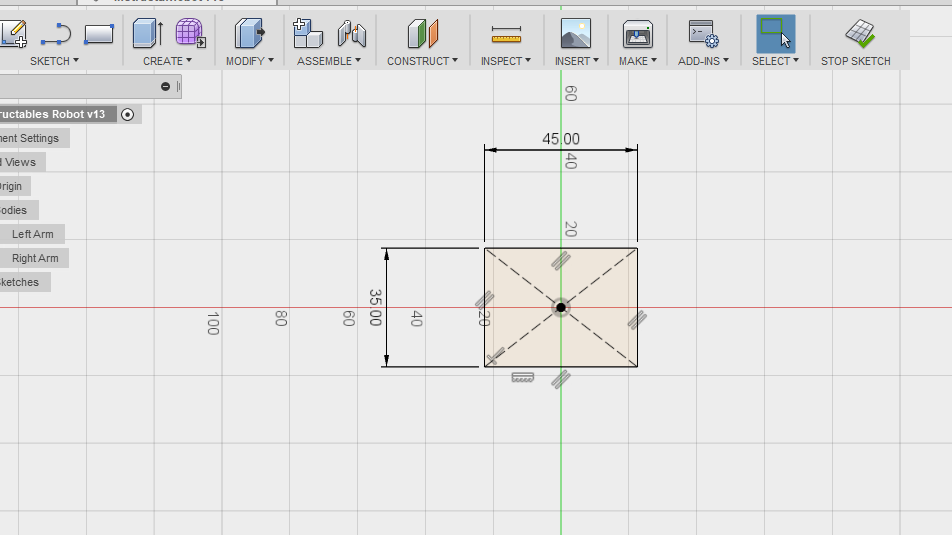
Let's begin by creating the first sketch. Go to the 'Sketch' dropdown and click 'Create Sketch'. Fusion 360 will now ask you to select a plane or face, select the ground plane. This will change the display to a birds eye view of the sketch. Draw a rectangle using the 'Center Rectangle' tool within the sketch dropdown. The rectangle should have a width of 45mm and a height of 35mm. Hopefully your sketch will look just like mine. Assuming it does, click 'Stop Sketch'.
Lofting Your First Sketch
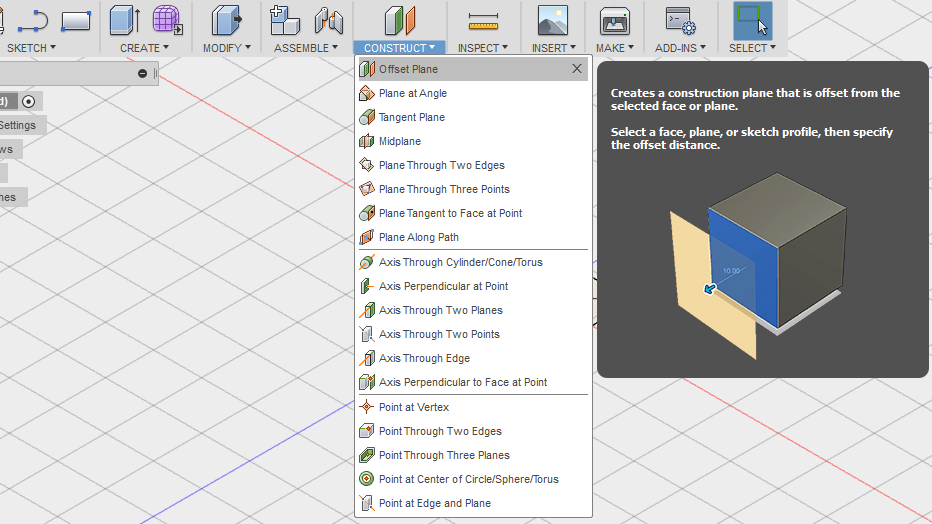
Next we want to loft the sketch to create the first part of our Instructable robot. To do this we need to create one more sketch. Do not worry if this doesn't make a lot of sense at this stage, it will become clearer as we continue.
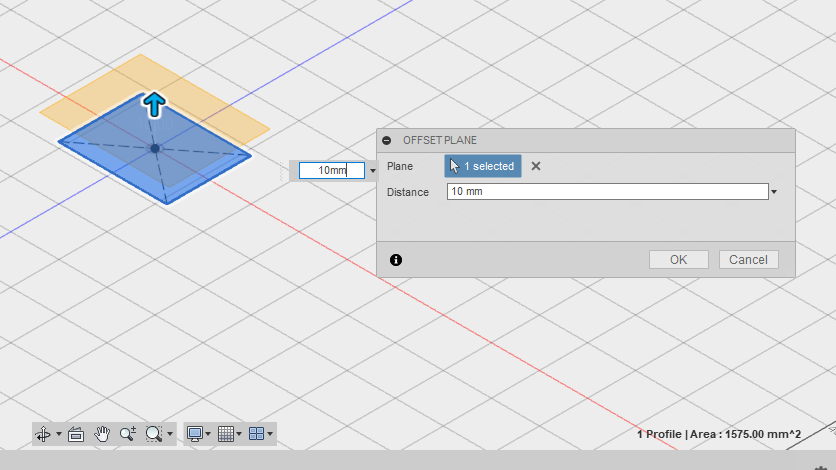
Go to the 'Construct' dropdown menu and select 'Offset Plane'. Next, click on the rectangle sketch that we just created and set an offset value of 10mm. I have atttached a screenshot of what this should look like. Assuming your screen looks just like mine you can click 'OK'.
We now have a new orange construction plane that we can use to draw a new sketch. Go to the sketch menu and select 'Create Sketch'. Once again we will be asked to select the plane or face that we want to draw the sketch onto. Select the orange construction plane that we just created.
Now, draw a rectangle using the 'Center Rectangle' tool just like we did before. This time give it a width of 50mm and a height of 40mm. Click 'Stop Sketch'.
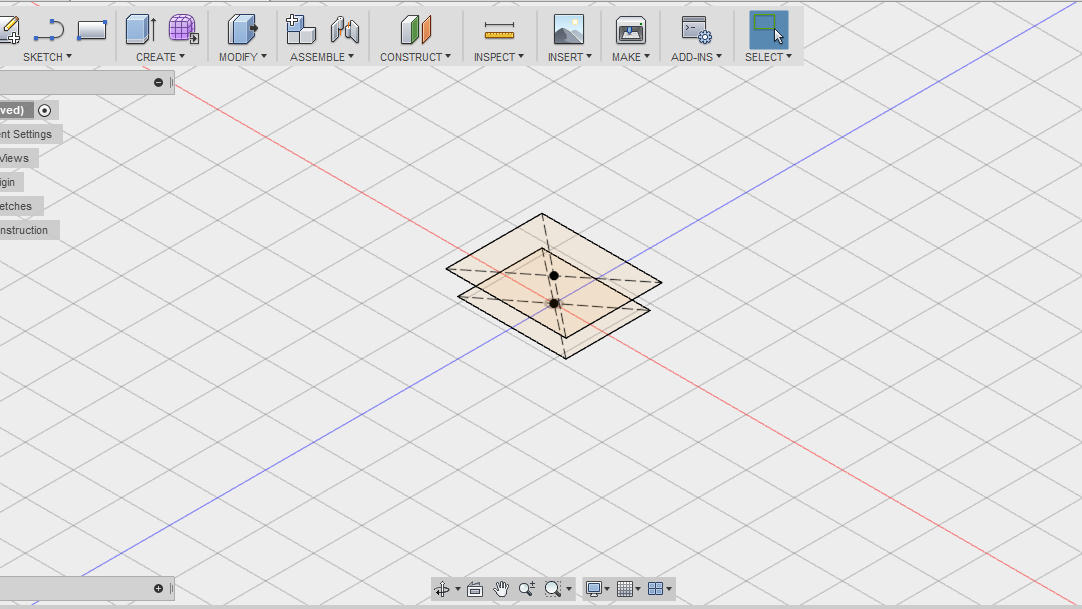
Fusion 360 will now revert back to the default view and you should see both the sketches that we created positioned 10mm apart.
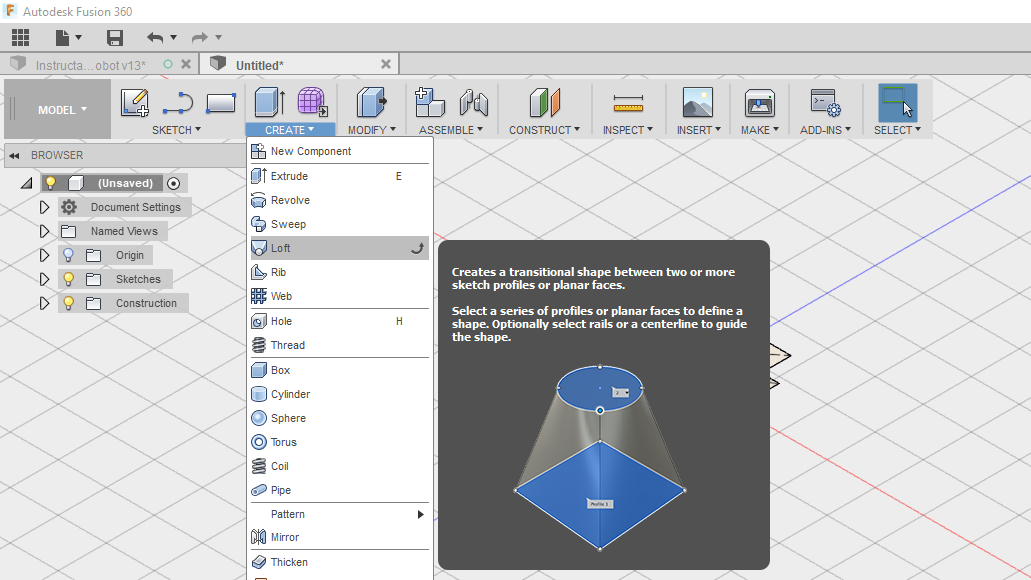
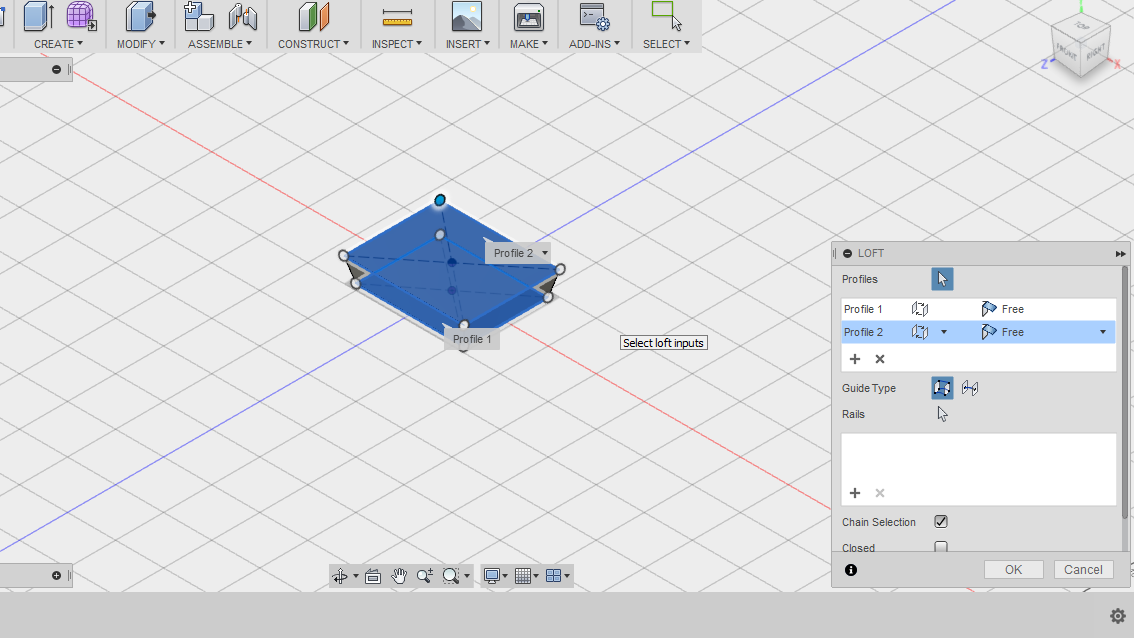
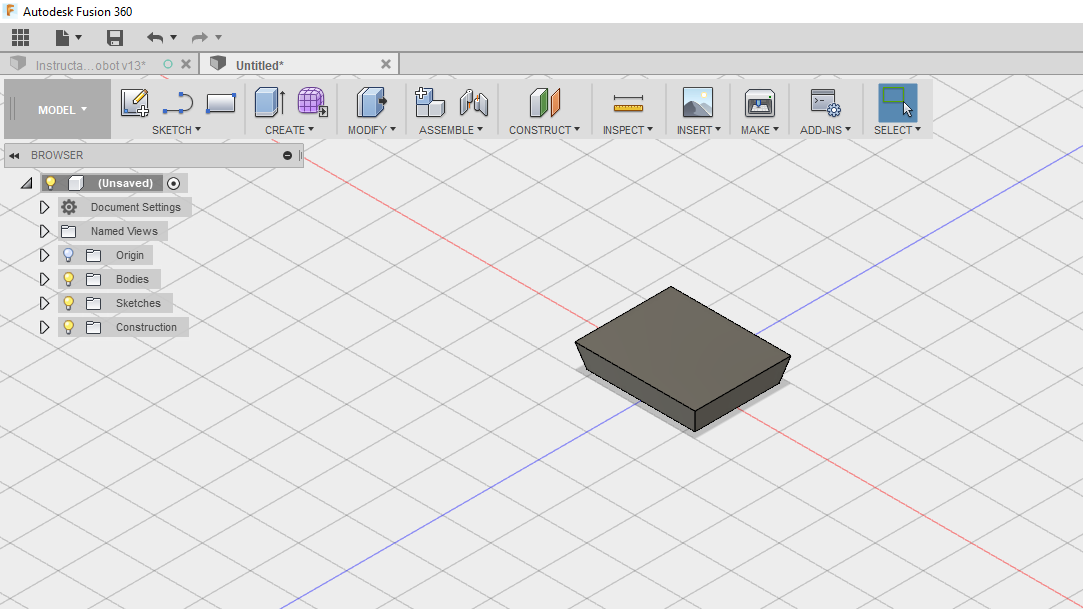
We can now create a loft between the two sketches.Go to the 'Create' dropdown menu and select 'Loft'. We will now be asked to select our loft inputs. Click on the bottom sketch, then click on the top sketch. This will loft the two sketches together to create the first 3D element of our robot. Click 'OK' and we are ready to move onto the next step.
Using the Extrude Tool
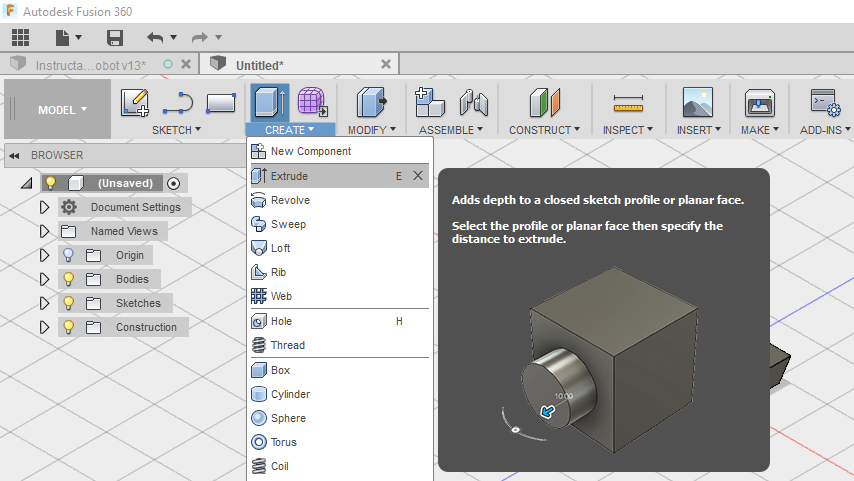
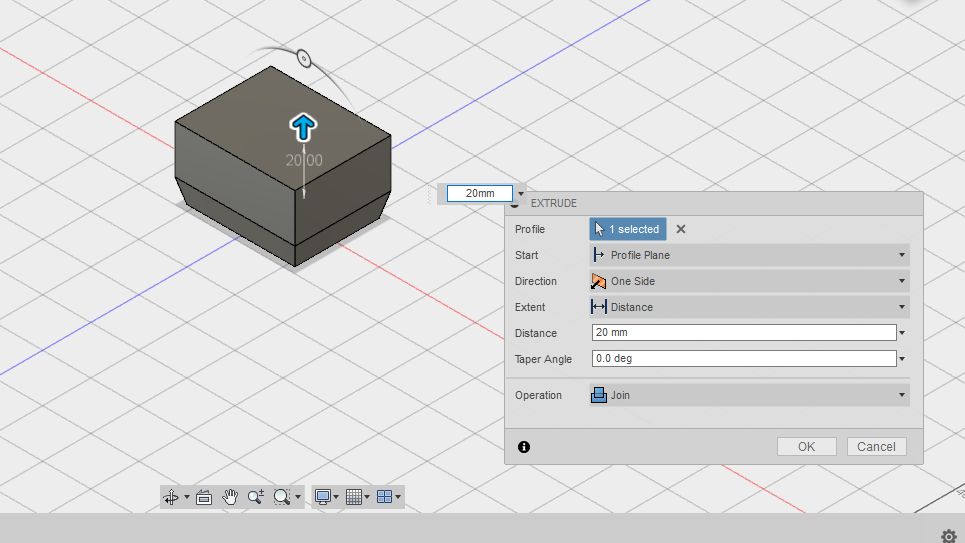
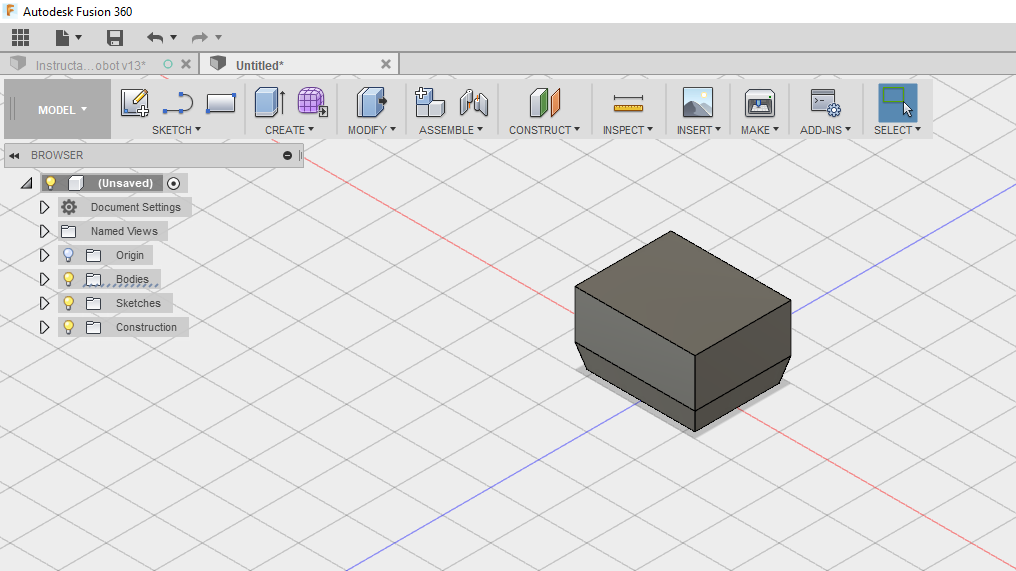
Next we need to use the extrude tool to create what essentially will be the belly of our robot.
Go to 'Create' then 'Extrude' and select the top face of our object. Extrude the face by 20mm then click 'OK'. Double check your progress so far with mine and assuming all looks good we can move onto the next step.
Completing the Main Body
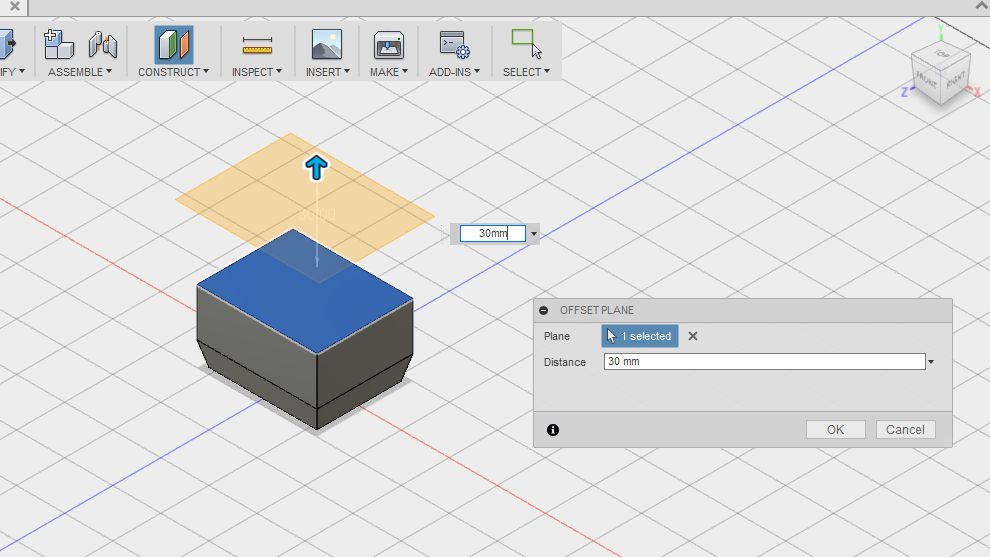
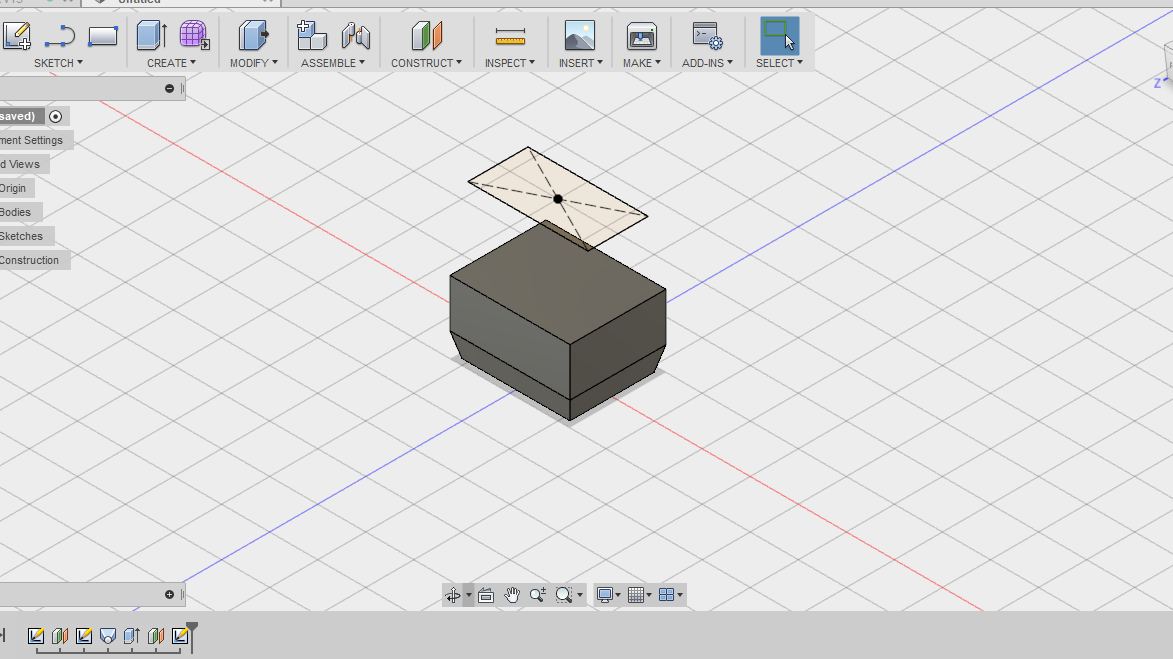
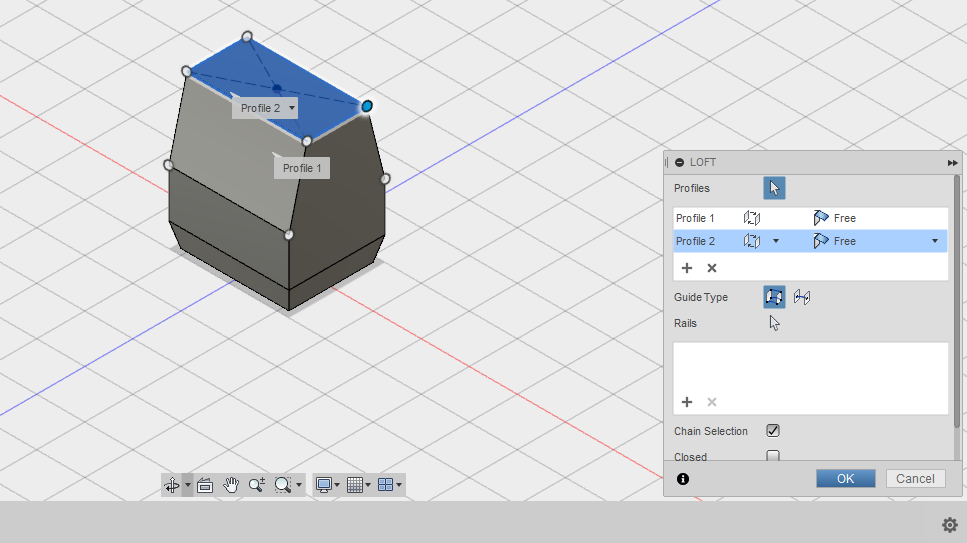
Now we are going to create another loft to produce the robots upper body. To do this start by creating a new offset plane. Select the top face and offset the plane by 30mm. Click 'OK'.
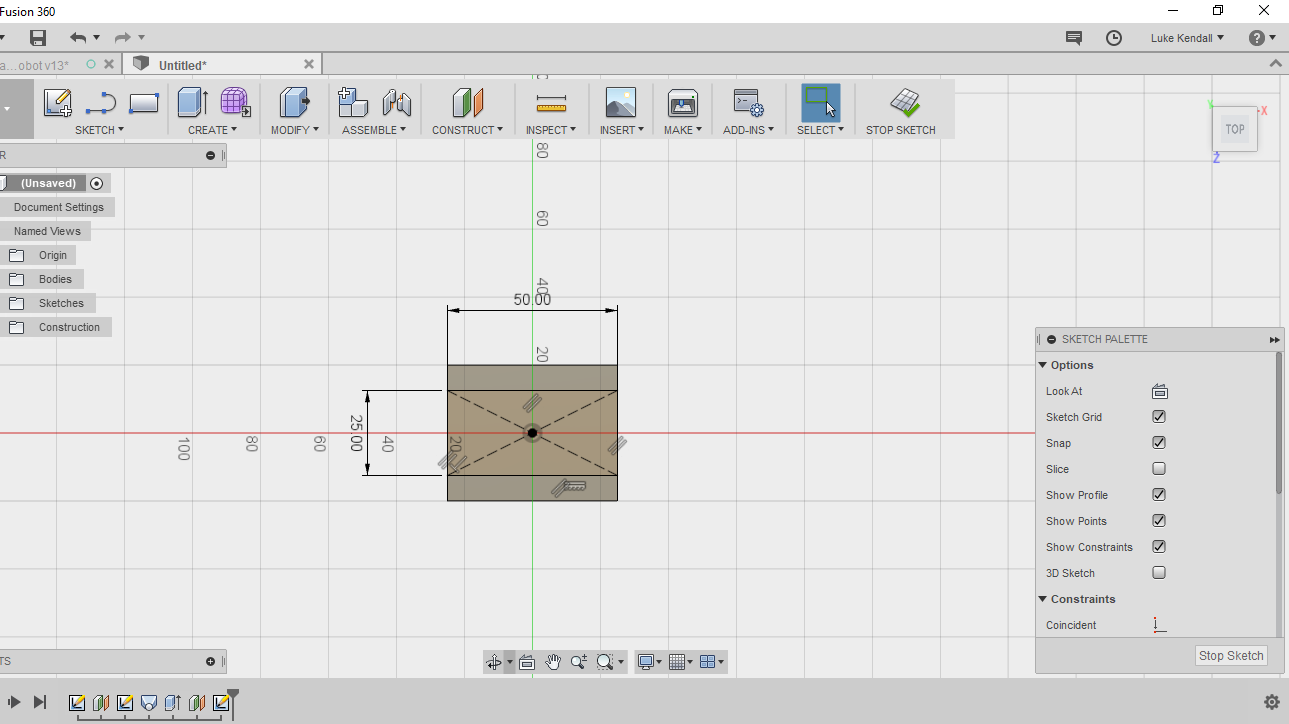
Next go to 'Sketch' then 'Create Sketch' and use the 'Center Rectangle' tool once more to create a sketch from the very center of our workspace. This time give it a width of 50mm and a height of 25mm. To finish, click 'Stop Sketch'.
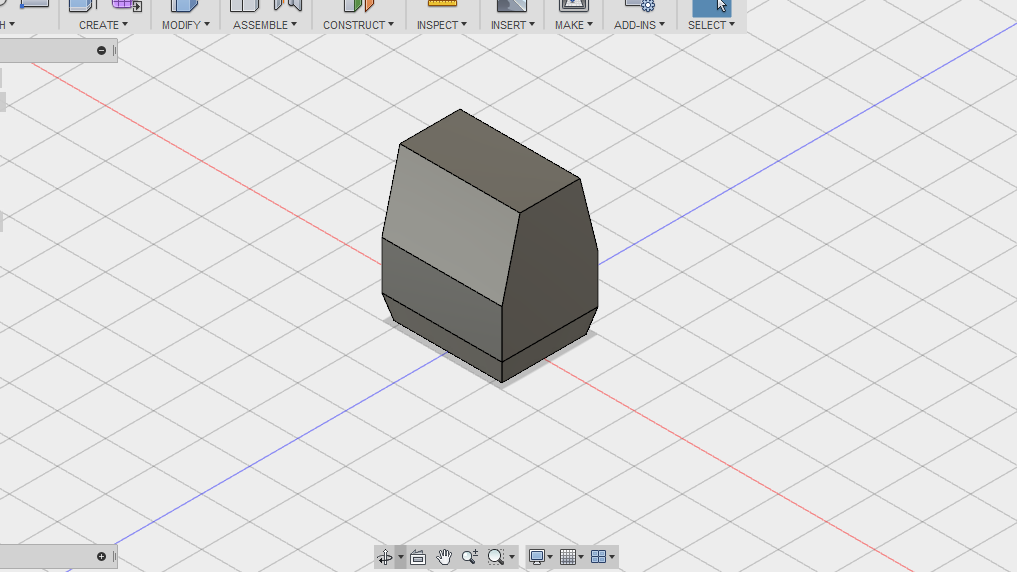
Now we can use the loft tool one last time to complete the main body of the robot. Go to 'Create' then 'Loft'. Select the top face first and then select the new sketch that we just created and click 'OK'. Check your results so far against mine before moving onto the next step.
Constructing the Head
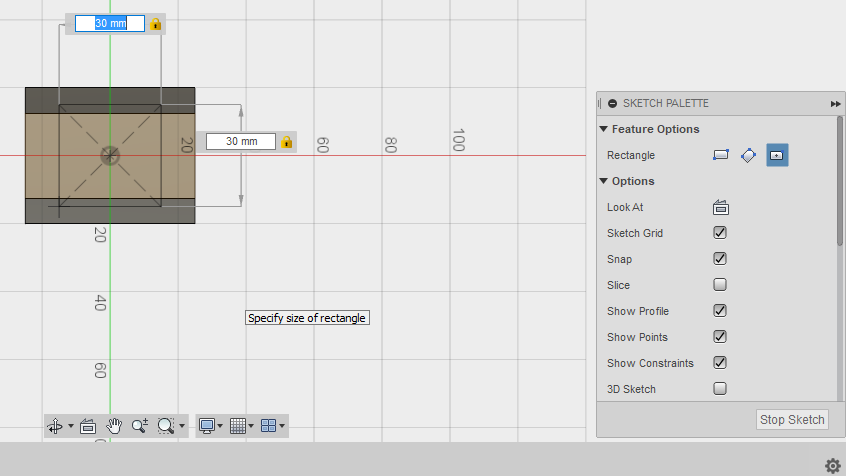
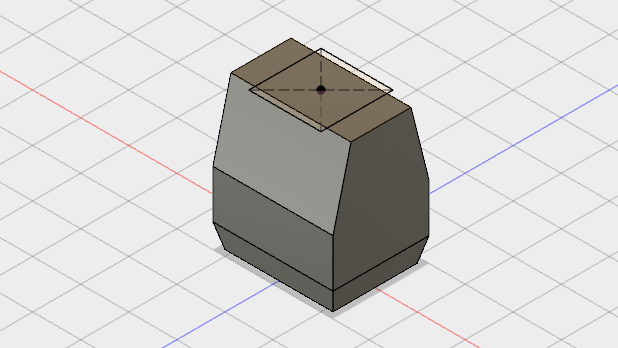
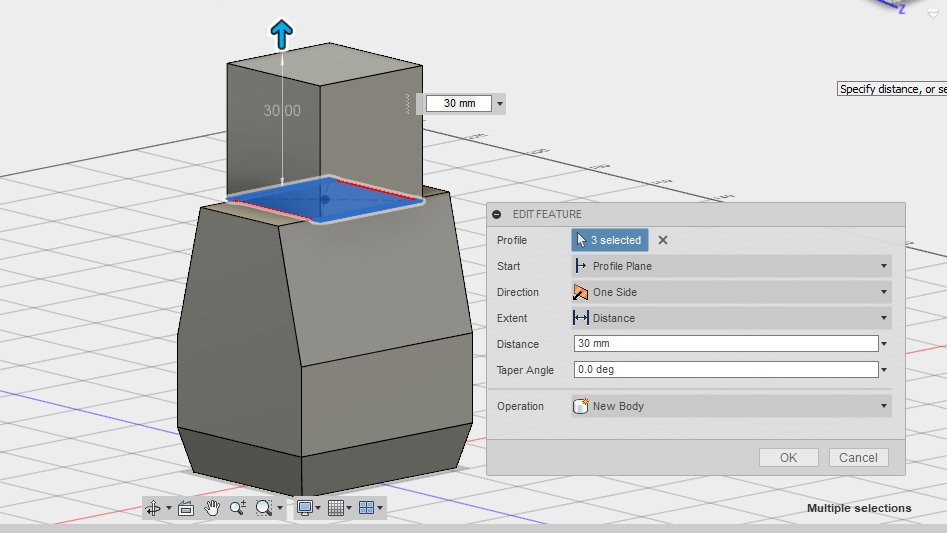
Next we will construct the head of our robot. To do this, go to 'Create Sketch' and select the top of face. Using the 'Center Rectangle' tool draw a rectangle from the midpoint with a width and height of 30mm. Click 'Stop Sketch'.
Next, go to 'Create' then 'Extrude' and select the new sketch that we just created. You will notice that the sketch is split into 3 sections due to the structures below it. You will need to select all 3 sections in order to extrude the entire sketch. Extrude the sketch by 30mm and change the operation to 'New Body'. Next, click 'OK'.
Creating the Slant
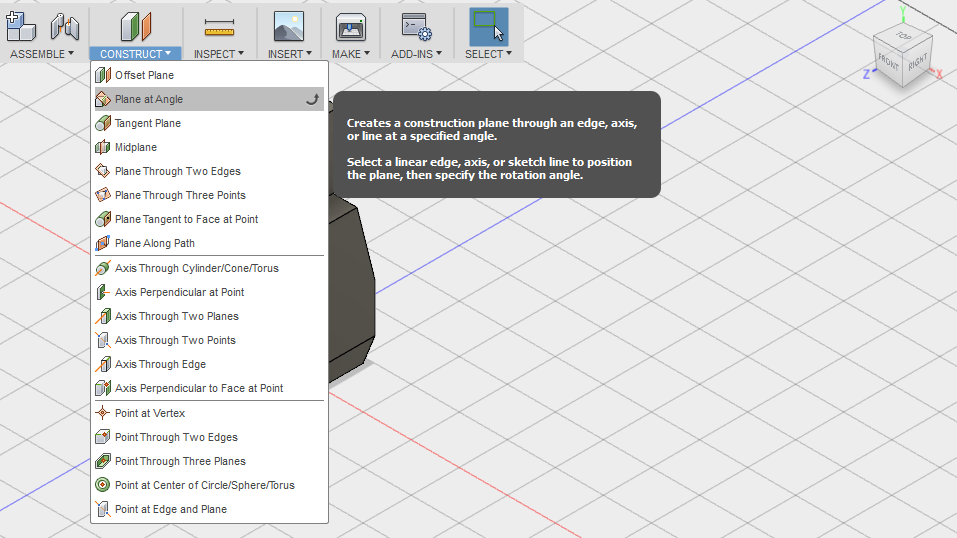
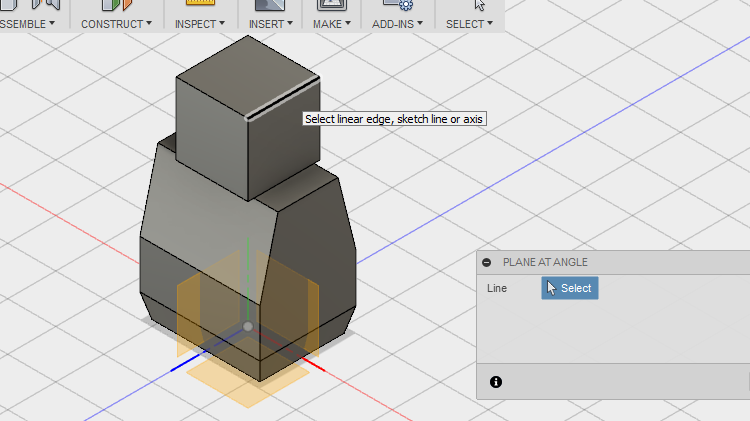
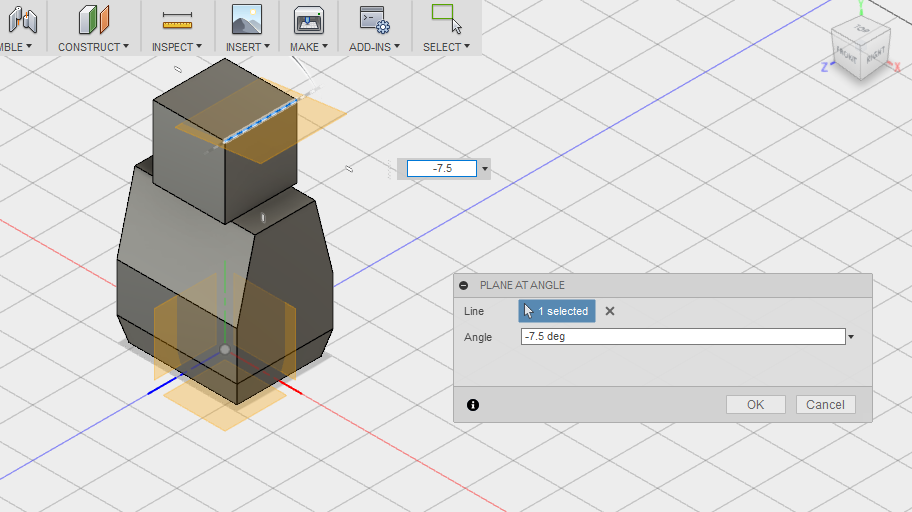
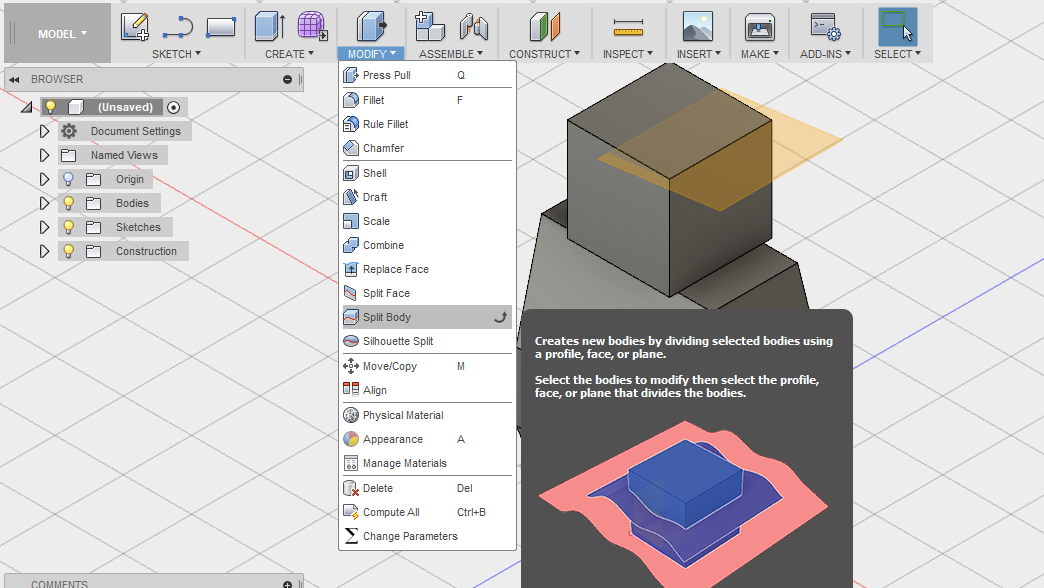
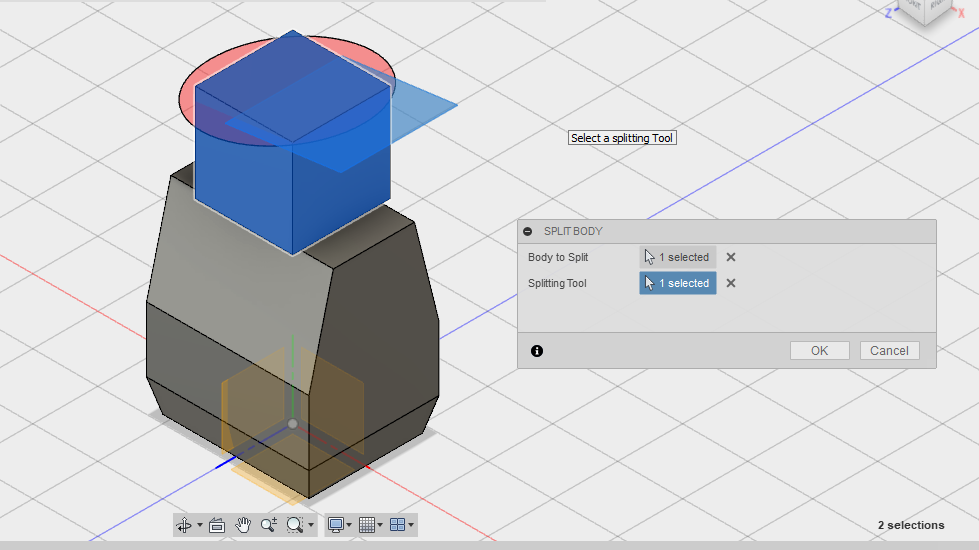
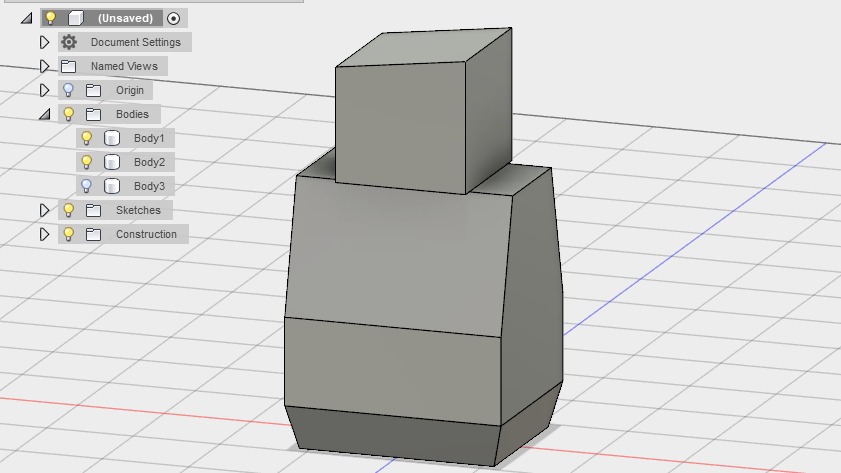
Next we need to add a slant to the top of the head to give it a sloped appearance.
To achieve this, go to 'Construct' then 'Plane at Angle'. We now need to select an edge to apply the construction plane. Select the line on the right hand side as indicated in the screenshots attached to this section. Next enter a value of -7.5 and click 'OK'.
The final step is to split the head using the split body tool. Go to 'Modify' then 'Split Body'. First we need to select the body that we wish to split. In this case we want to split the head to create the slant. Click anywhere on the robots head to select it. Next, click 'Select' which is next to the splitting tool. This will allow you to choose the plane we would like to use to split the body. Select the angled plane that we just created. This will give you a preview of split. Assuming it all looks good then click 'OK'.
Finally, go to the 'Bodies' folder on the left hand side and click the arrow to expand and reveal the contents of the folder. You will see we now have 2 bodies (the robot and the offcut that we just created). Click on the light bulb icon next to 'Body3' to hide the offcut. You should now have a robot with a slanted head.. Awesome work so far!
Creating the Arm
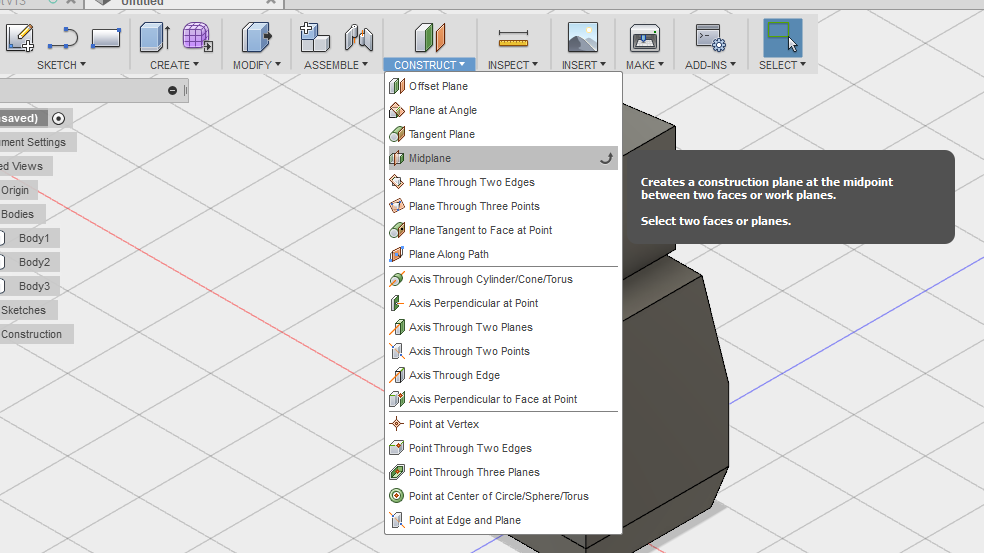
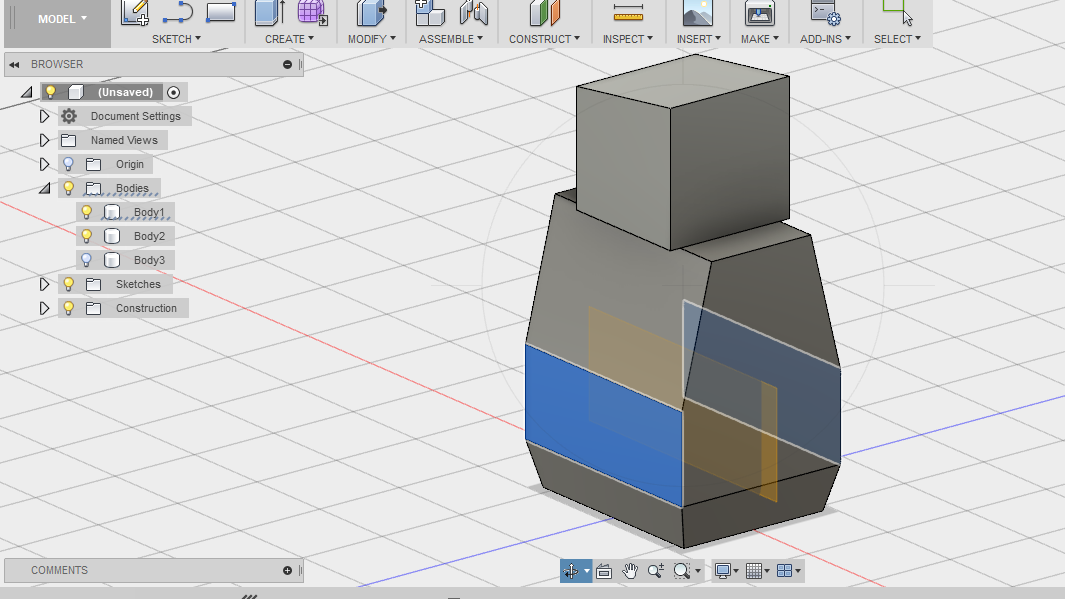
Now let's give this robot some arms.To do this go to the 'Construction' menu and select 'Midplane'. Fusion 360 now wants us to select 2 faces of the body, select the robots belly from the front and from the back. This will insert the construction pane through the center of the robot. Check the screenshots attached to make sure you are selecting the right faces.
Next go to 'Sketch' then 'Create Sketch' and select the construction plane that we just created.
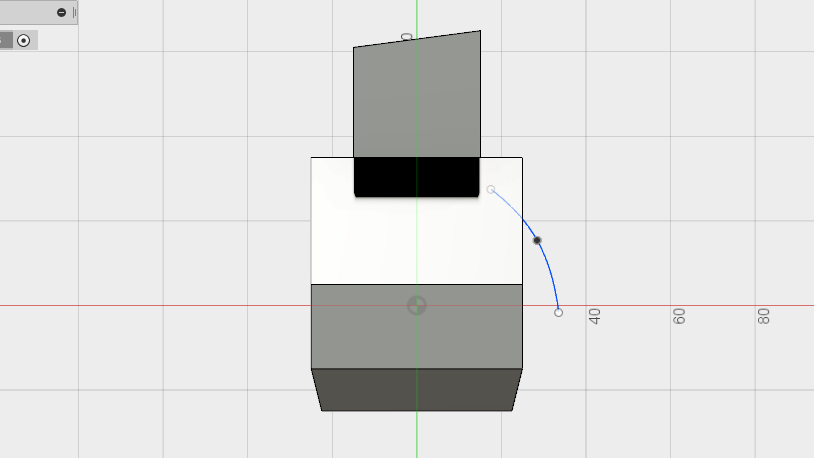
Next draw a line to represent the arm using the 'Spline' tool, something like mine in the screens attached. When you are happy with it, click 'Stop Sketch'.
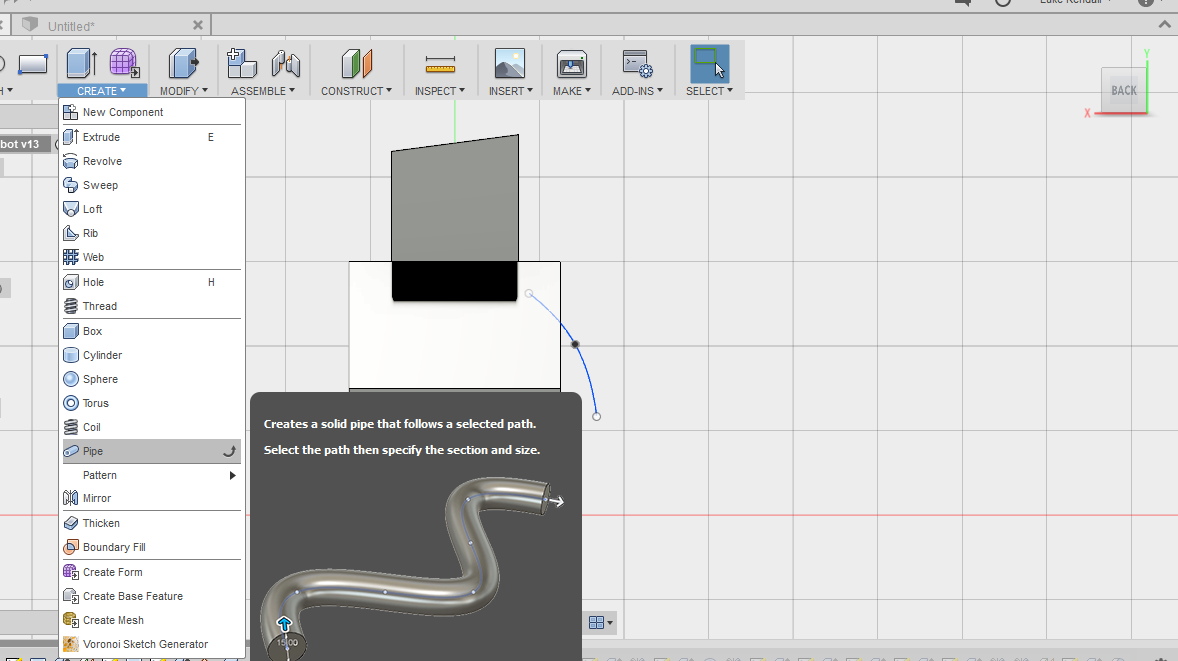
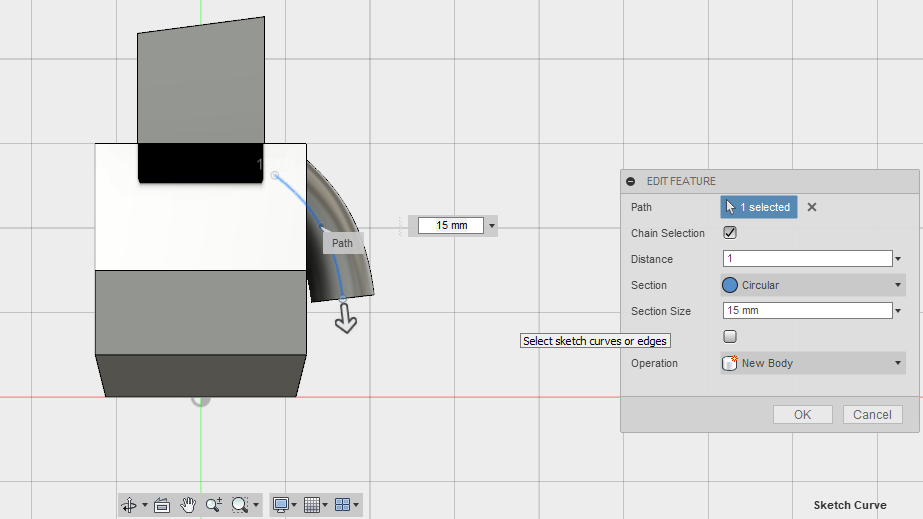
Now go to the 'Create' menu and select 'Pipe'. Fusion 360 now wants us to define the path of the pipe so select the sketched arm that we just created. Give the section size a value of 15mm and change the 'Operation' dropdown to 'New Body' then click 'OK'.
If you do not get the sketch quite right the first time do not get too frustrated, use the design history feature at the bottom of Fusion 360 to go back and make any necessary changes.
Creating Robot Fingers
Now it's time to create the hands or fingers for our robot.
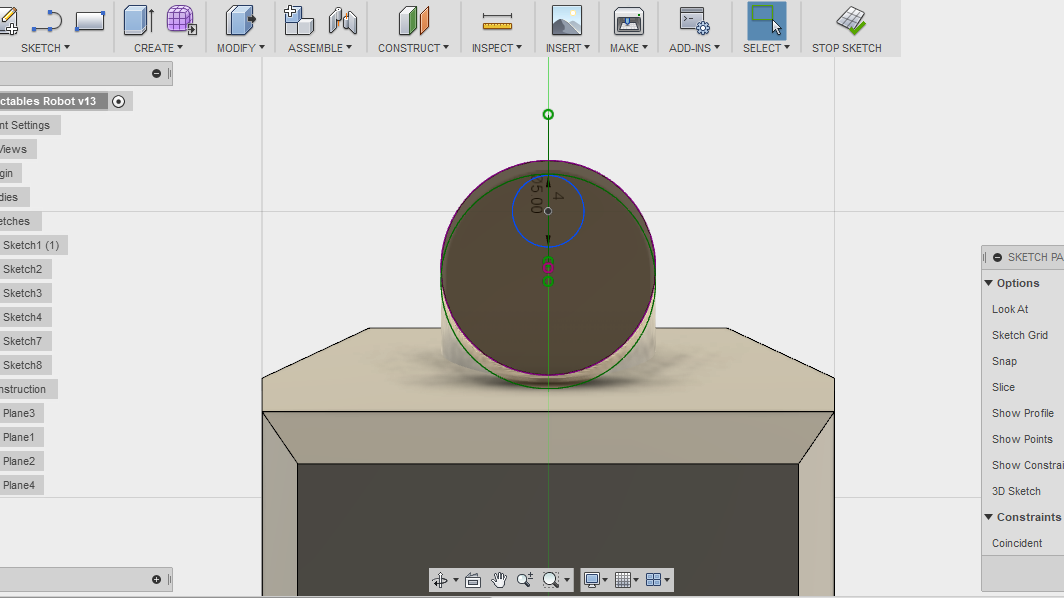
To do this go to 'Create Sketch' and select the flat face at the end of the pipe to draw our sketch onto. Create a 'Center Diameter Circle' and position it somewhere near the edge of the surface leaving a small gap. See my sketch attached to give you an idea of what this should look like. When you are happy with it, click 'Stop Sketch'.
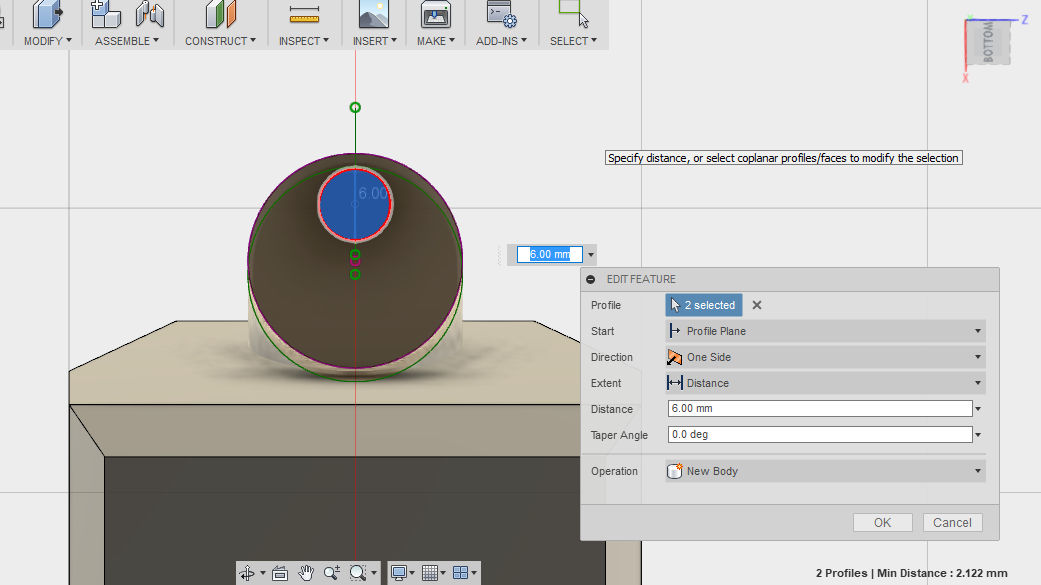
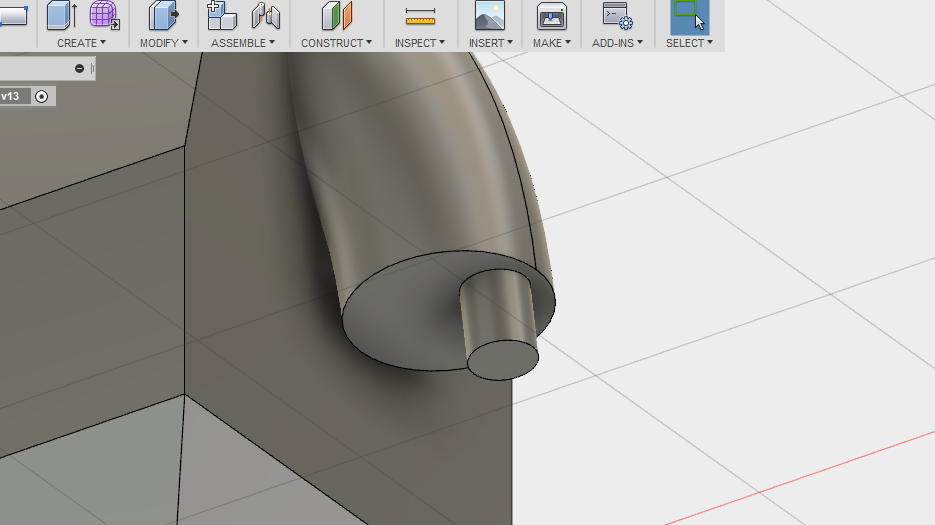
Now go to 'Create' then 'Extrude' and extrude the circle by 6mm. Change the 'Operation' to 'New Body'. Click 'OK'.
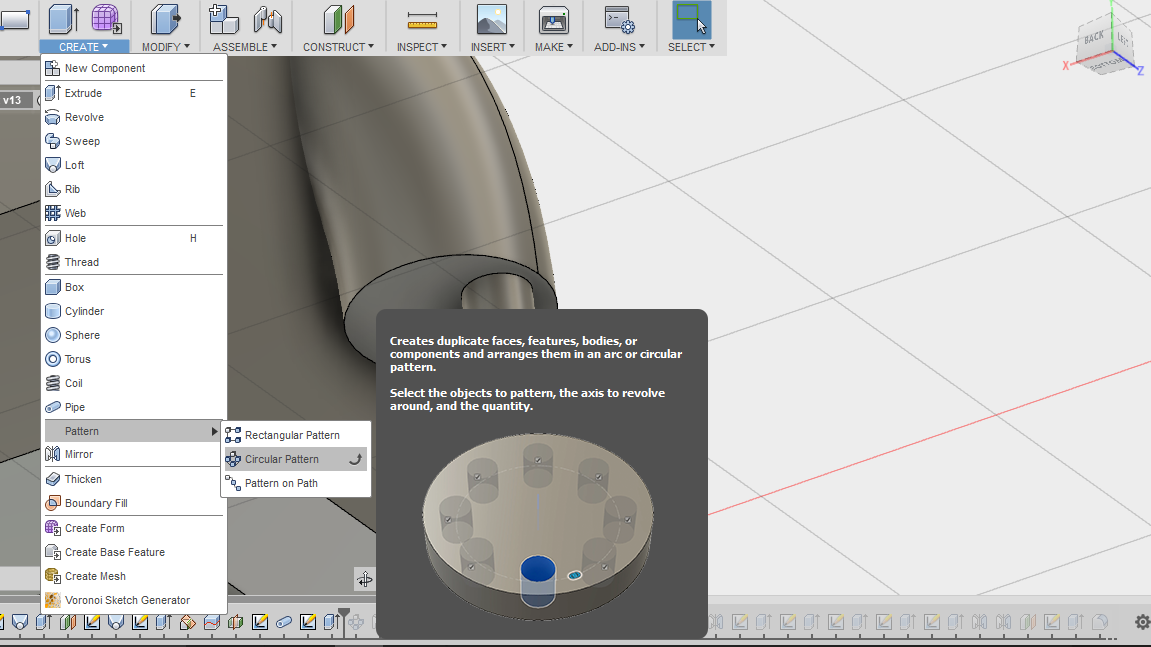
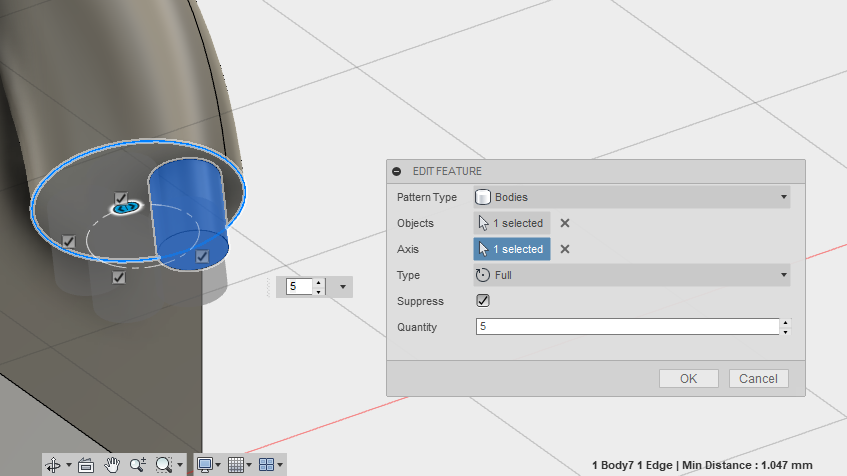
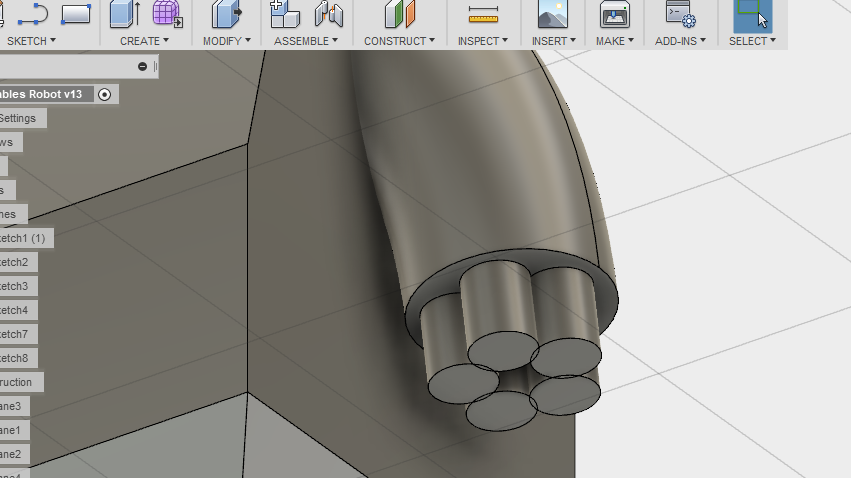
Our robot now has 1 finger! Let's give it some more. To make this easier we will use the Circular Pattern tool. To access this feature go to 'Create' then 'Pattern' then 'Circular Pattern'. Make sure the pattern type is set to 'Bodies'. Click on the finger we extruded to set it as the object we wish to duplicate. Next click on 'Select' next to 'Axis' and click on the circle around the arm to define it as the path to rotate around. Take a look at my screenshots and this should be a lot clearer. Finally change the quantity to 5 to give our robot 5 fingers and click 'OK'.
Mirroring the Arm
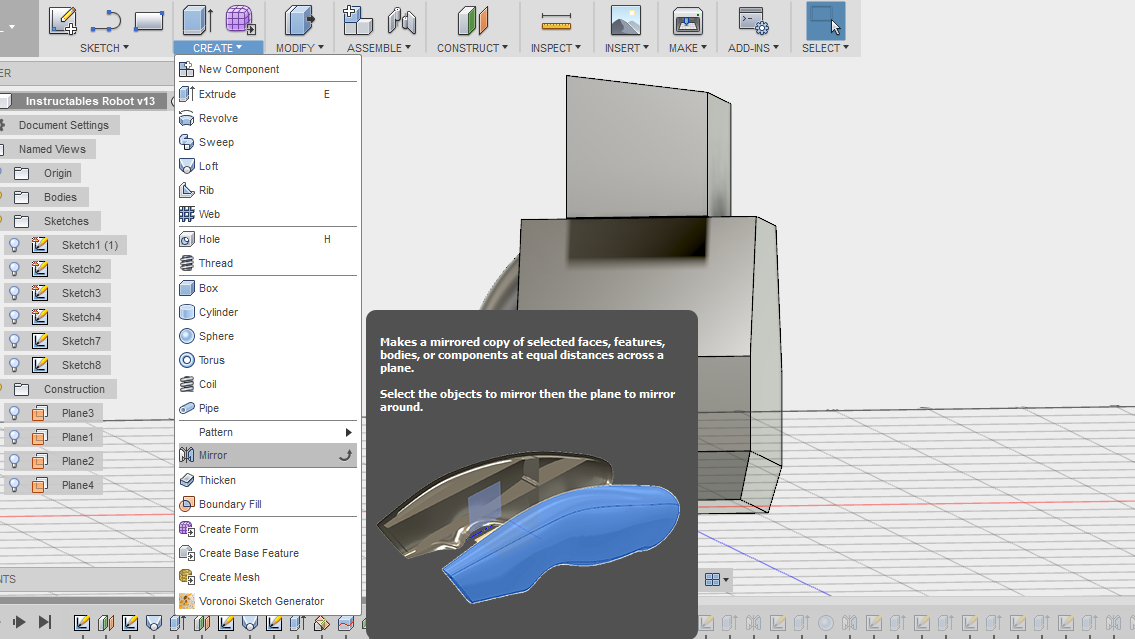
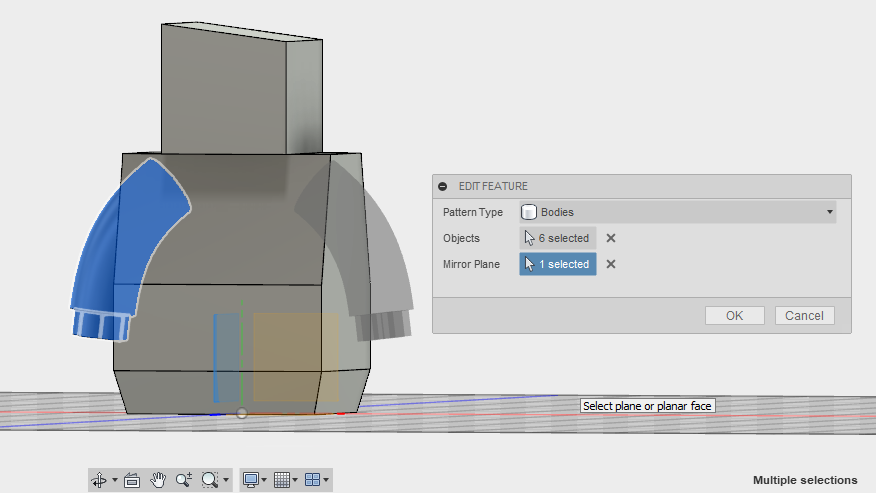
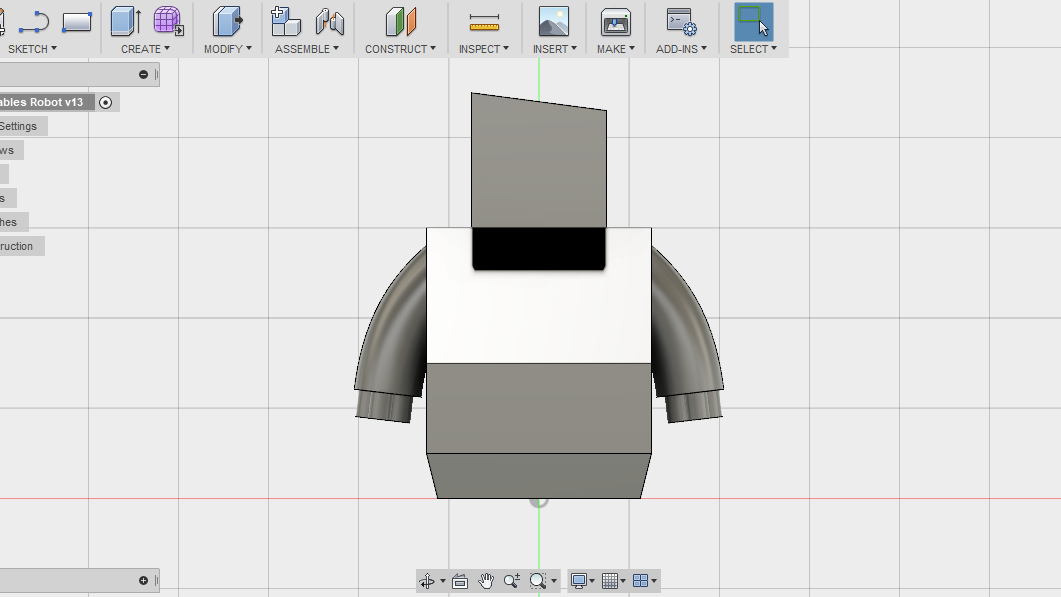
Now we need to mirror the arm onto the opposite side of the robot. With Fusion 360 this is super easy. Go to 'Create' then 'Mirror'. Click on the arm and all 5 fingers to define these as the objects that we wish to mirror.
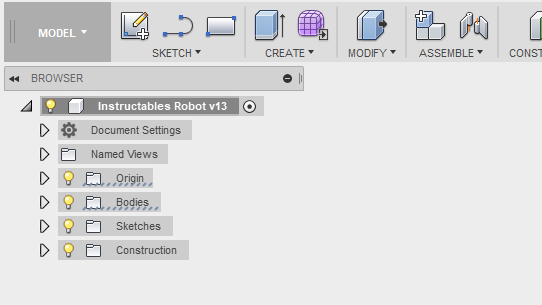
Next click 'Select' next to 'Mirror Plane'. Choose the 'YZ' construction plane as the mirror. If you cannot see this plane make sure that the 'Origin' folder on the left hand side is not hidden by toggling the light bulb. Once again take a look at my screenshots and it should all make sense!
Once you are happy with the results, click 'OK'.
Creating the Leg
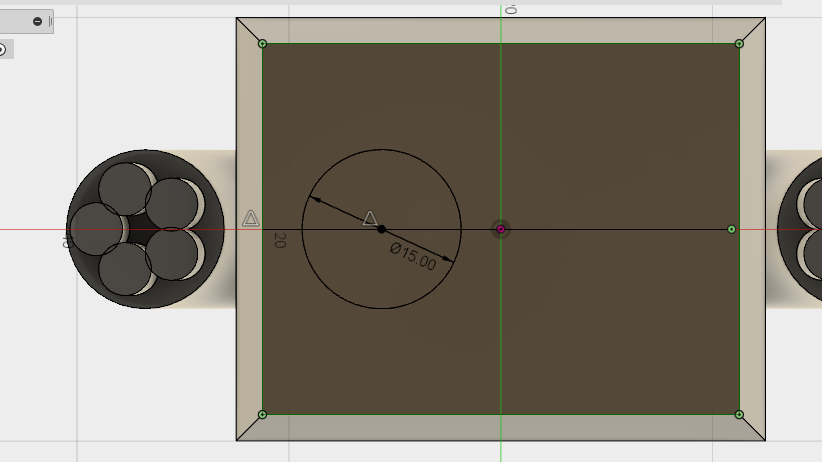
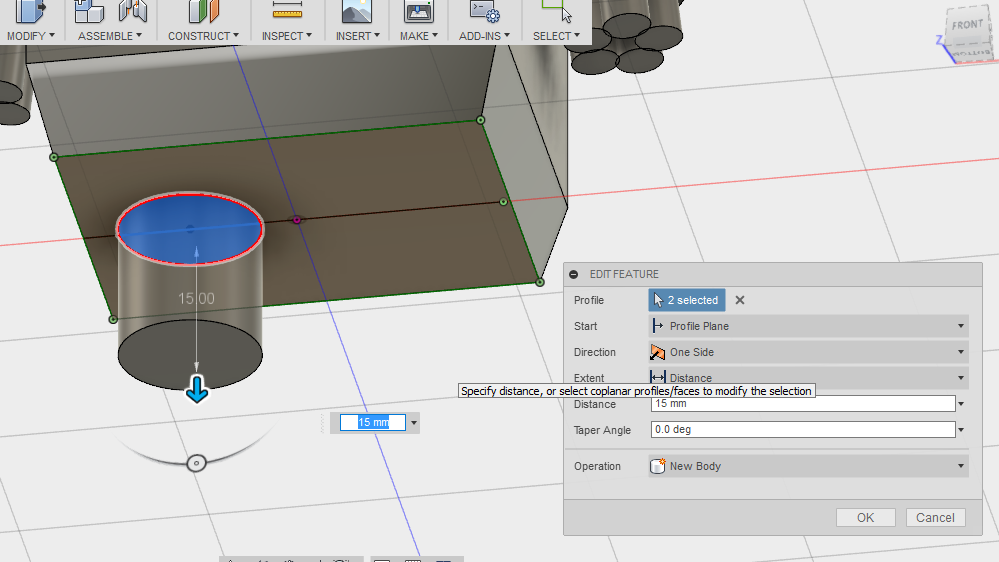
Next we need to create a new sketch for the leg. Just like we have done before, go to 'Sketch' then 'Create Sketch' and select the bottom of the body as the face that we will sketch onto. Go back to the sketch menu and select the 'Center Diameter Circle' and draw a circle where you want the leg to appear setting the diameter at 15mm. When you are done click 'Stop Sketch'.
Now go to 'Create' then 'Extrude' and extrude the sketch we just created by a distance of 15mm. Once again change the 'Operation' to 'New Body'. Click 'OK'.
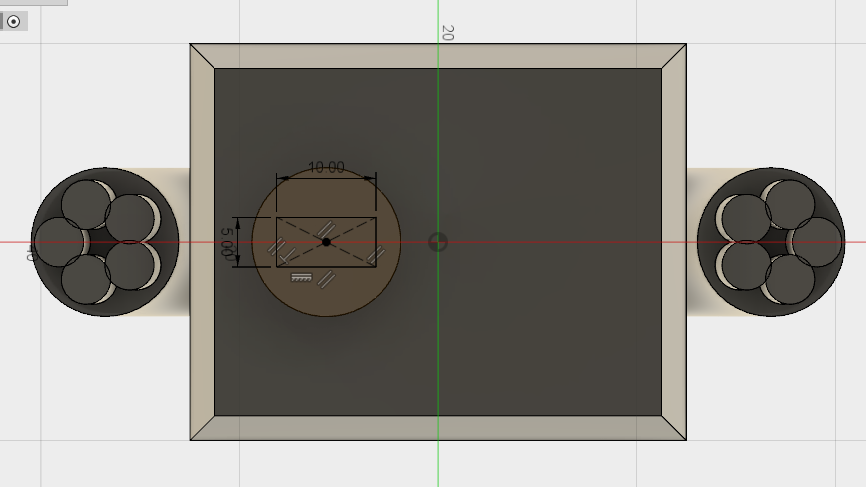
Now we need to create another sketch on the bottom of the leg that we just extruded. Go to 'Create Sketch' and select the bottom face. This time draw a 'Center Rectangle' starting at the very center of the circular leg. Give the rectangle a height of 5mm and a width of 10mm. Click 'Stop Sketch'.
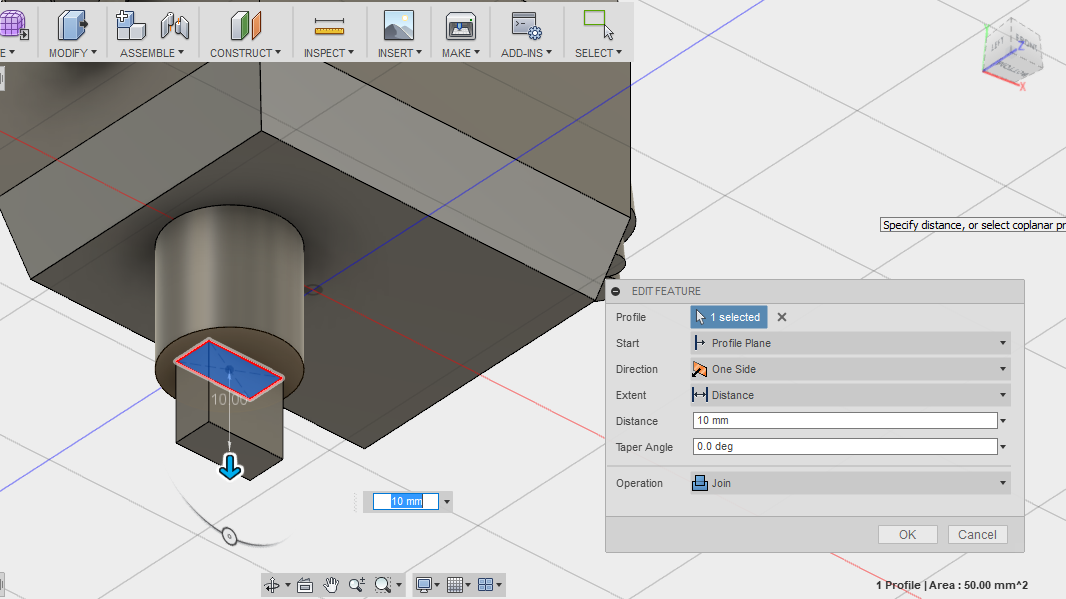
Now go back to the extrude tool and extrude this new sketch by 10mm. Click 'OK'.
Creating the Wheel & Mirroring the Leg
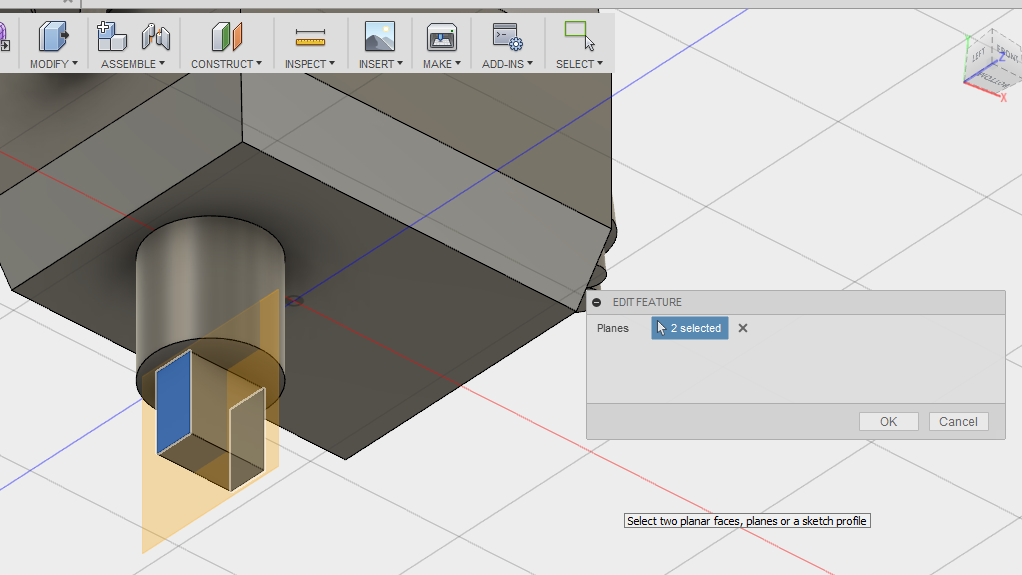
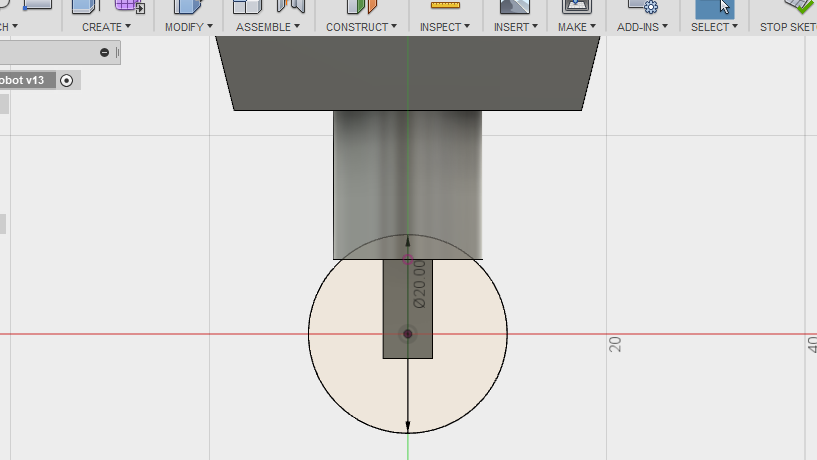
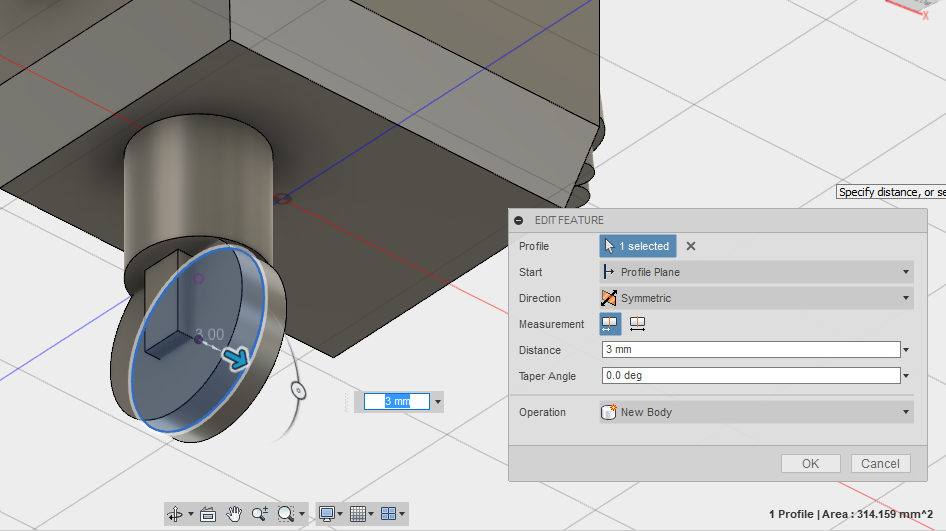
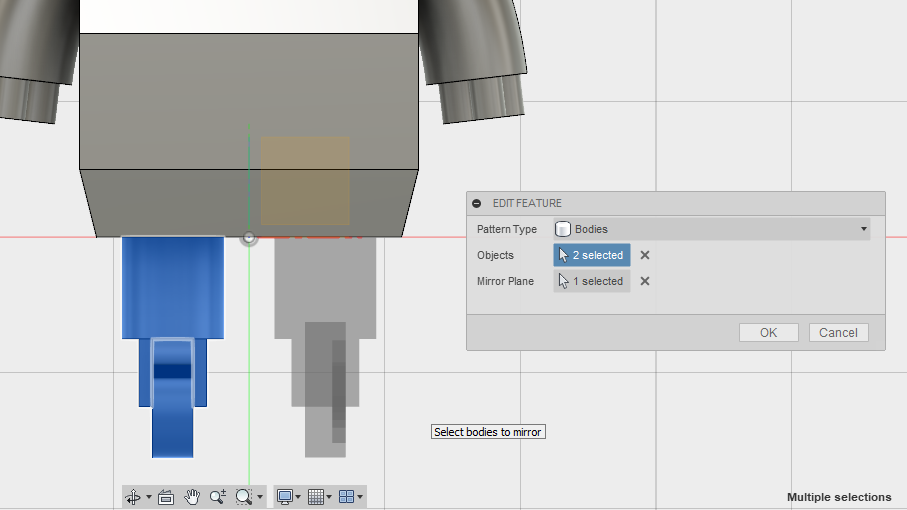
Now we need to create a wheel for our robot. To do this let's create another mid plane from the 'Construction' menu. We will use this new plane to extrude a wheel. Check the screenshots attached to this step to ensure you select the correct faces for proper construction of our plane.
Next create a new sketch using the 'Center Diameter Circle' tool onto this new plane. Position the wheel according to where you would like it to appear. Again, check my screenshots to get an idea of where this should be placed. Give the circle a diameter of 20mm. Click 'Stop Sketch'.
Now using the extrude tool, extrude that sketch by 3mm and change the 'Direction' to 'Symmetric' and the 'Operation' to 'New Body'. Click 'OK'.
Finally, using the 'Mirror' tool again from the 'Create' menu select all the bodies that make up the leg and choose the 'YZ' plane to use as a mirror. Again make sure the 'Origin' folder is not hidden. You can also temporarily hide all the bodies in your project if they are obstructing the view of the YZ plane. Just make sure to turn these back on as soon as you have selected the plane. If everything looks good click 'OK'.
Creating Robot Ears
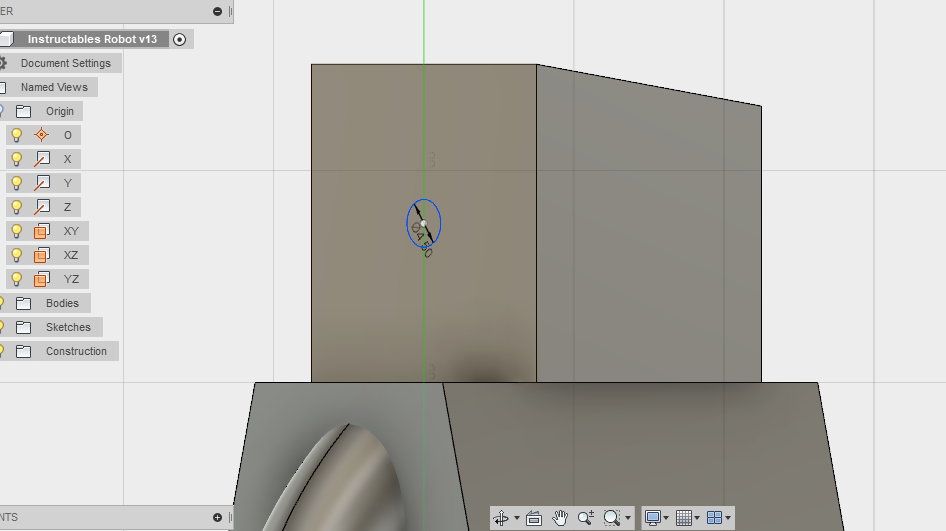
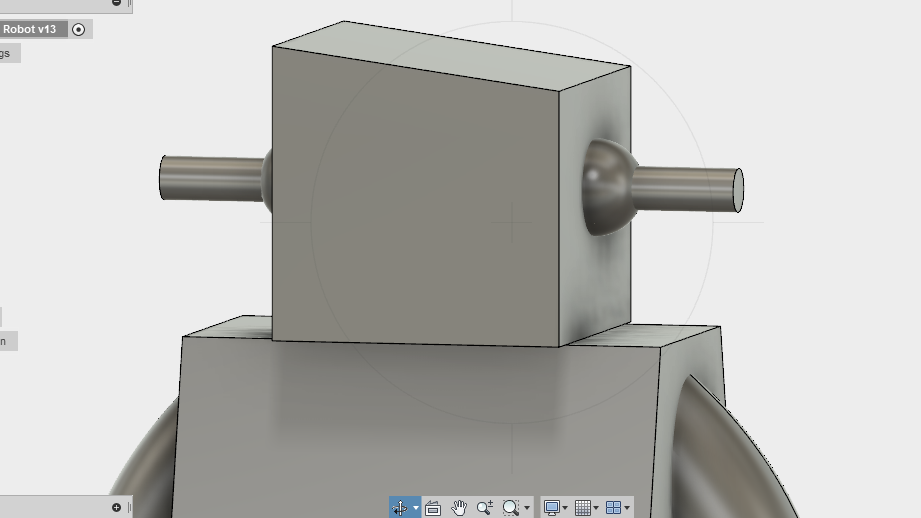
Well done if you are still with me! We are very close now so hang in there.
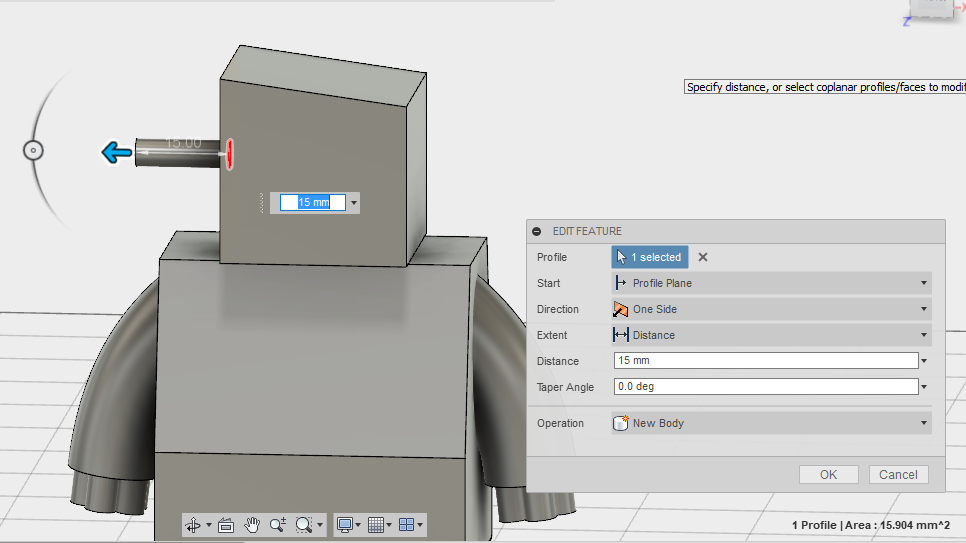
We're now going to create some cool robot ears! To do this go to 'Create Sketch' and select the face of the robots head with the largest surface area. Find the center point of the surface and draw a 'Center Diameter Circle' with a diameter of 4.5mm. Click 'Stop Sketch'.
Next, extrude this new sketch by 15mm and change the 'Operation' to 'New Body'. All other options should remain as their defaults as indicated in the screenshot attached. Click 'OK' to complete the extrude.
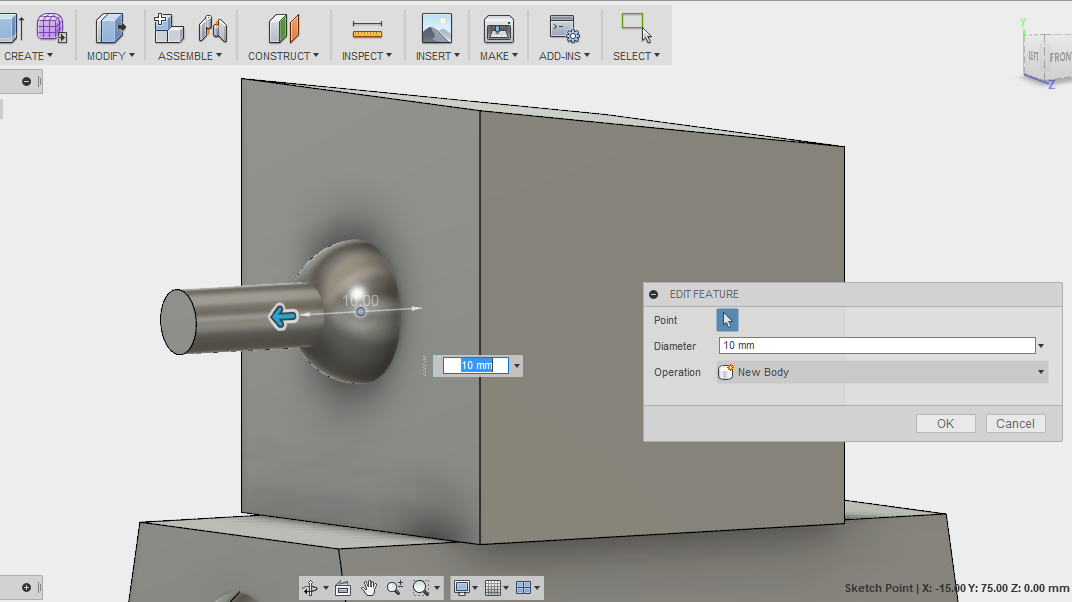
Next go to the 'Create' menu and select 'Sphere'. You will first need to select a face, select the same face as before (the left side of the head). Next we need to select a position on the model to create the sphere. Choose the center point of the circle that we just extruded. Give the sphere a diameter of 10mm and make sure the 'Operation' is set to 'New Body'. Click 'OK'.
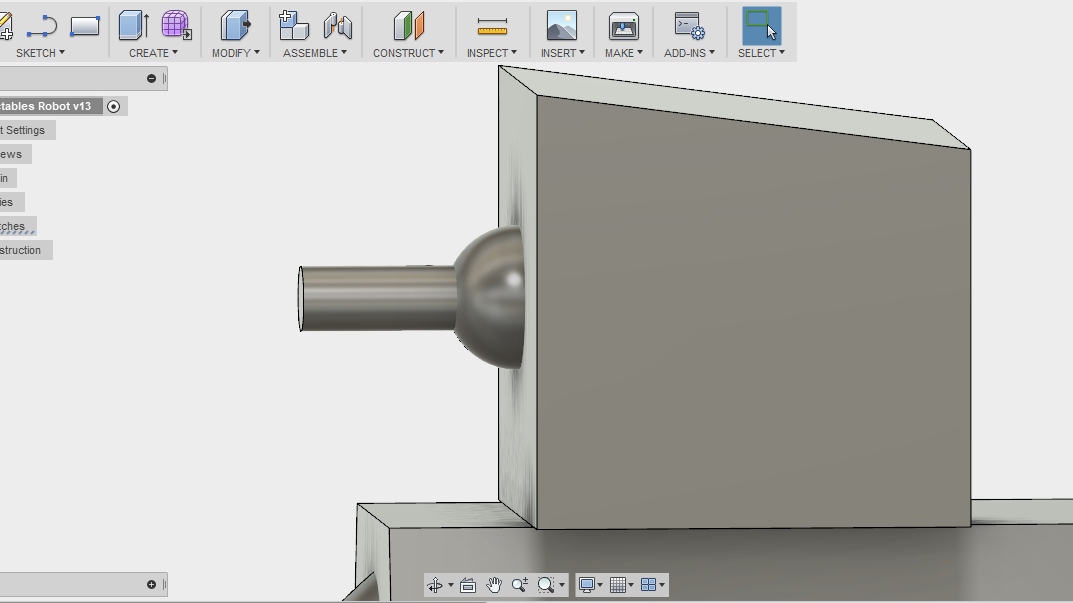
Double check your results against mine and assuming they look somewhat alike we can now mirror the bodies to the opposite side of the head.
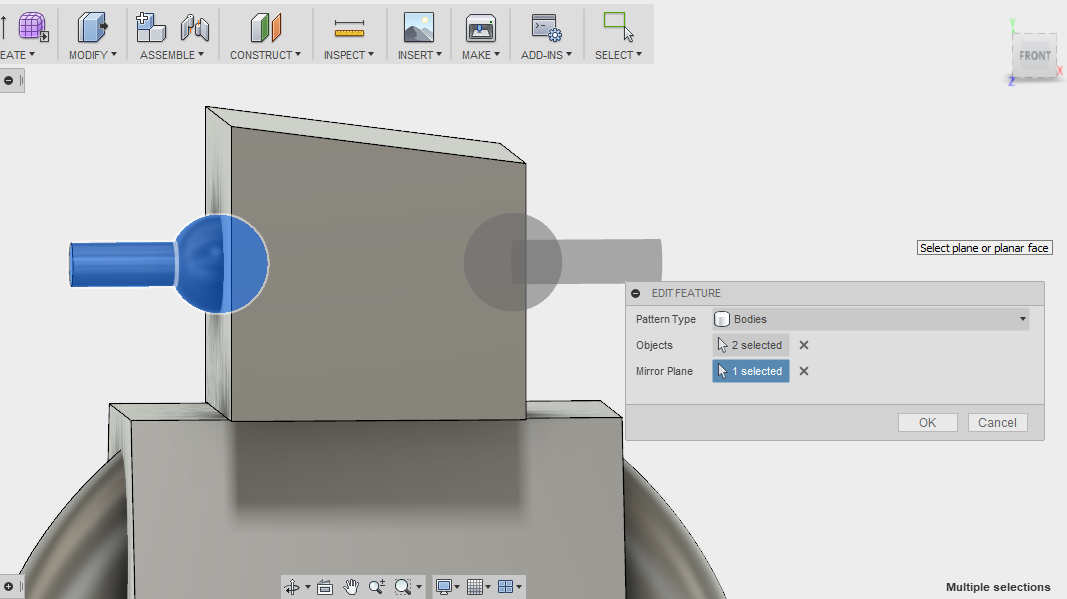
Once again using the 'Mirror' tool select all the bodies that make up the ear. Choose the 'YZ' plane again as the mirror plane. This will mirror the features that make up the ear to the other side of our model.
Adding Detail to the Design
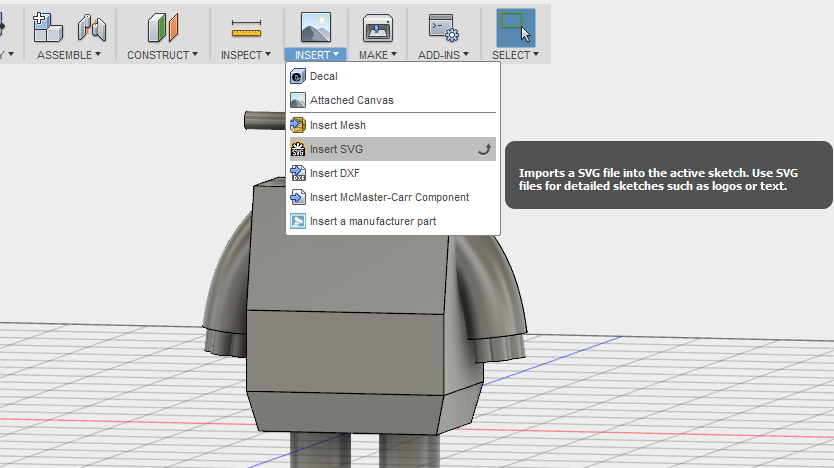
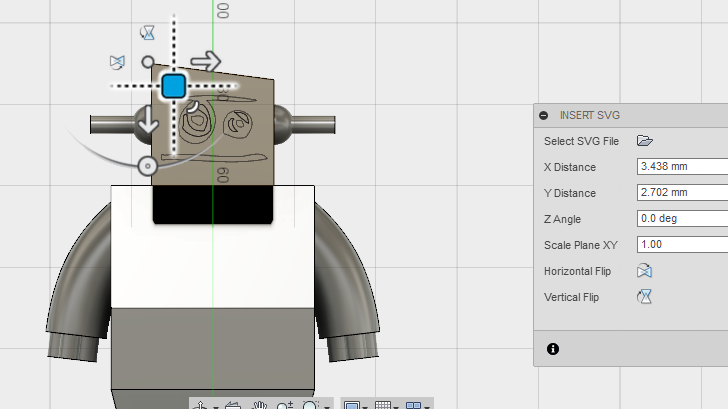
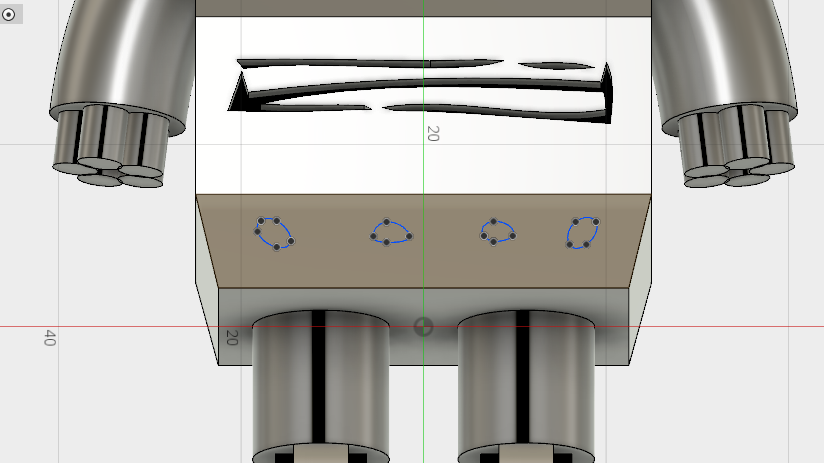
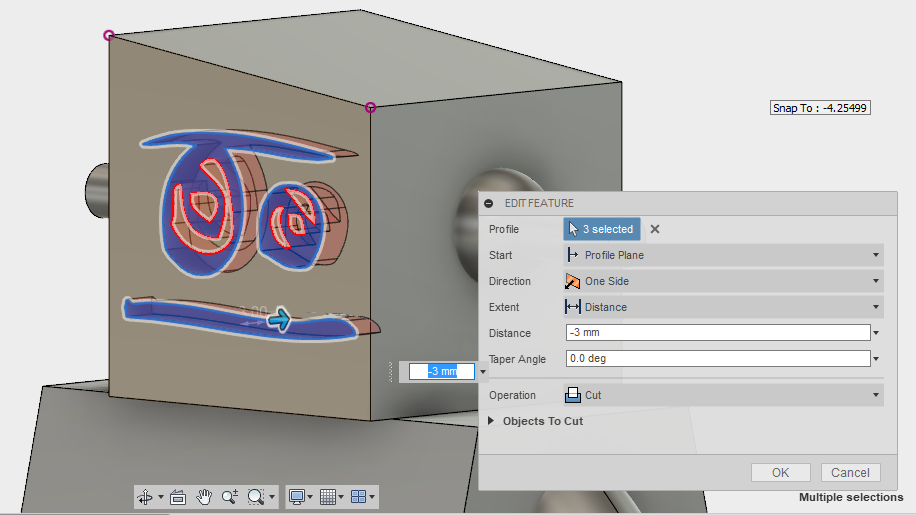
Now we have finished constructing the body of our Instructable robot we are ready to start adding some finer detail to the model.
To do this we will convert pictures of the robot into SVG files and then insert them into the sketch. We can then extrude these sketches by a negative value of -3mm to cut the detail into the design. Do not worry if you have not used SVG files before or if you have no idea what I am talking about.. It's super easy!
First, obtain an image of the Instructable's Robot then crop it down within your favorite photo editor so that we just have the face of the robot. Then repeat this for all the remaining features that you want to reproduce somewhere on your model.
Next, using an online photo to SVG converter we can convert these images into an SVG file that can be used in our sketches within Fusion 360. I have attached SVG versions of these images encase you want to save time and use mine.
Go to 'Insert' then 'SVG'. Next click the folder icon in the dialogue box and navigate to the SVG file that you want to insert into the sketch. You will then need to select the face/surface of the model where you would like to create the sketch. The SVG sketch will then be displayed on screen. Use the blue square icon to drag and drop the sketch into the correct position. You can also scale the sketch to increase or decrease the size. When you are happy with the placement of the sketch hit 'Stop Sketch'.
We now have a sketch that we can extrude by -3mm to cut the feature into the model.
Repeat this now for all the features of the model before moving onto the next step.
The holes around the bottom of the the robot (just above the legs) were created using the spline tool. Work your way around the model creating uneven circular sketches then extrude them by -3mm just like we did with the other sketches. You can also use the 'Mirror' tool if you want to duplicate the features to the opposite side of the model in half the time.
Smoothing the Edges
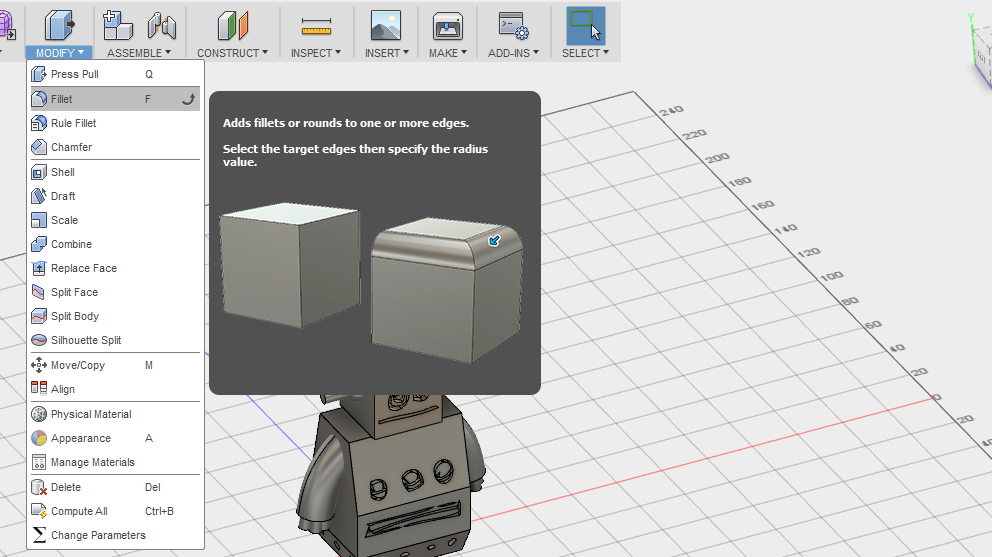
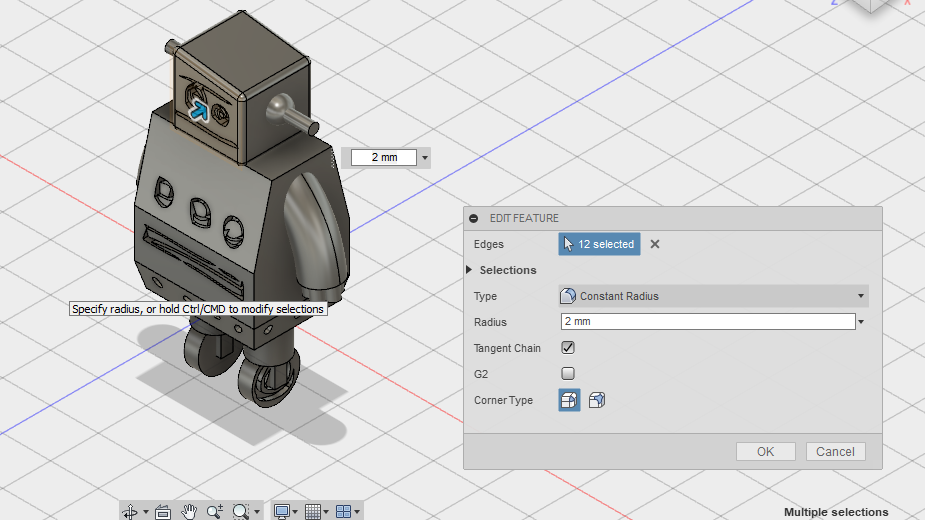
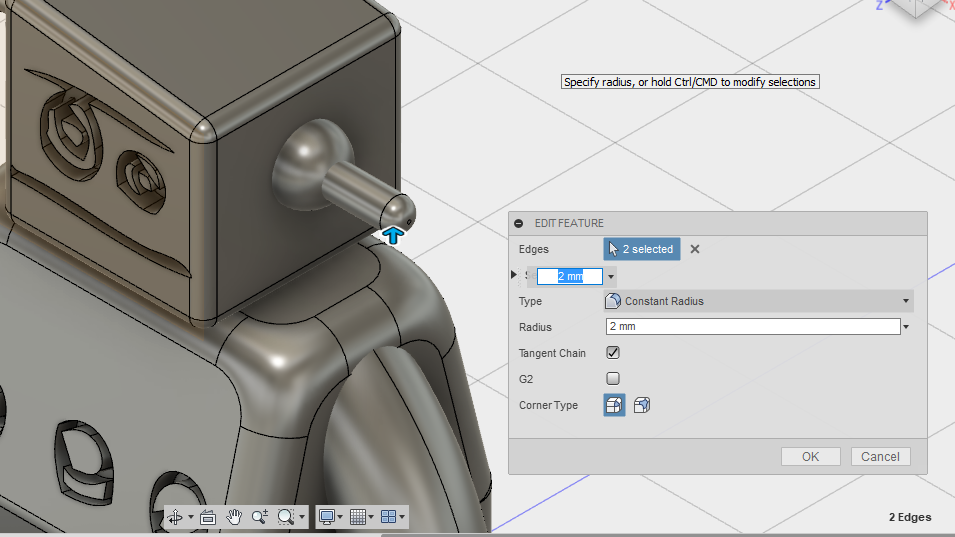
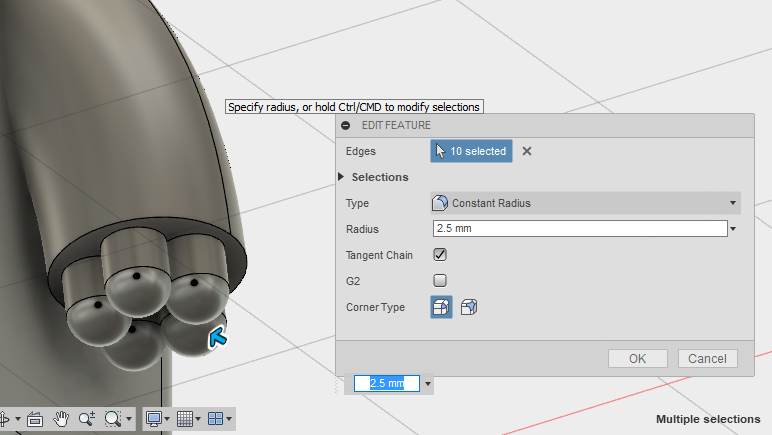
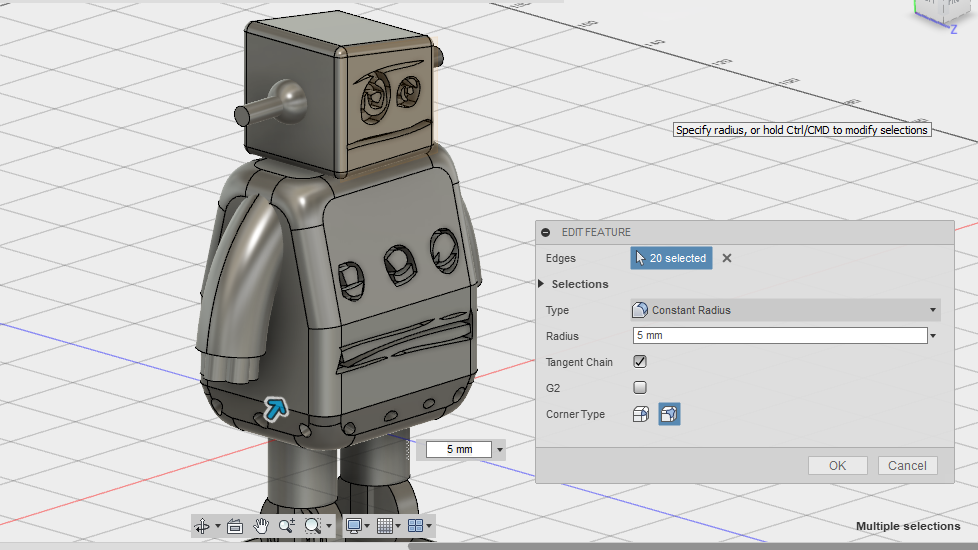
By now you should have a pretty cool 3D model of the Instructable robot however you may notice that he's looking a bit 'Square'. To smooth his edges we are going to use the 'Fillet' tool.
Go to 'Modify' then 'Fillet'. You now need to select the edges that you want to fillet. Let's start with the head of the robot. Select all the edges that make up the head, by the end you should have 12 edges selected. Set the radius to 2mm then click 'OK'.
Now work your way through all the remaining features (arms, legs & fingers etc). Adjust the fillet for each body part according to how you would like the model to look. If Fusion 360 gives you an error when you enter the radius you will need to reduce the fillet. This can be a little frustrating if you are new to the fillet tool but practice makes perfect so hang in there!
By the end of this step you should have a completed model of the Instructable robot, awesome work!
Creating a Platform for the Robot
Congratulations on creating your own Instructable Robot figurine in 3D!
Before you get too excited we're not quite finished yet. As it is the model will not balance on its two legs so we need to build a platform for the robot to stand on.
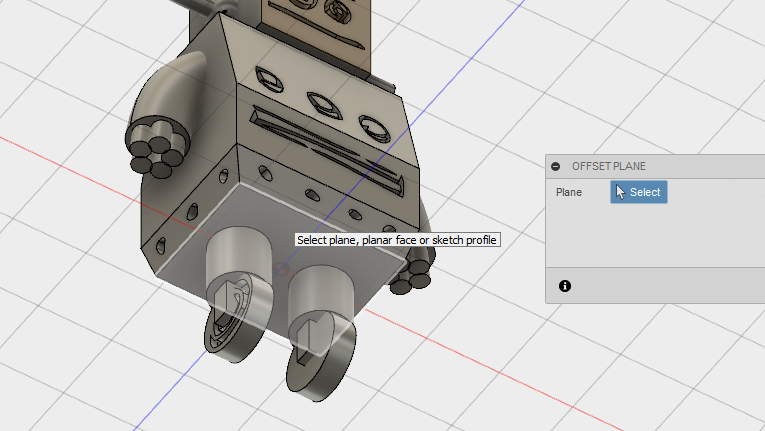
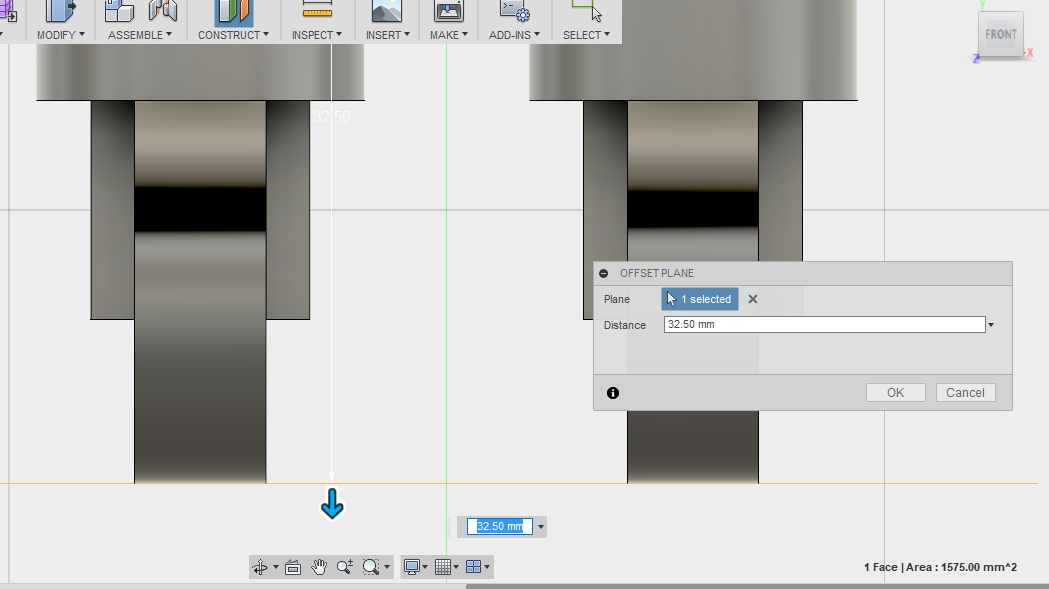
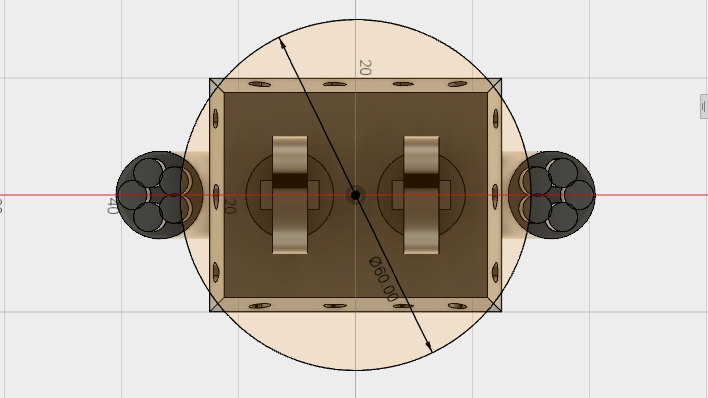
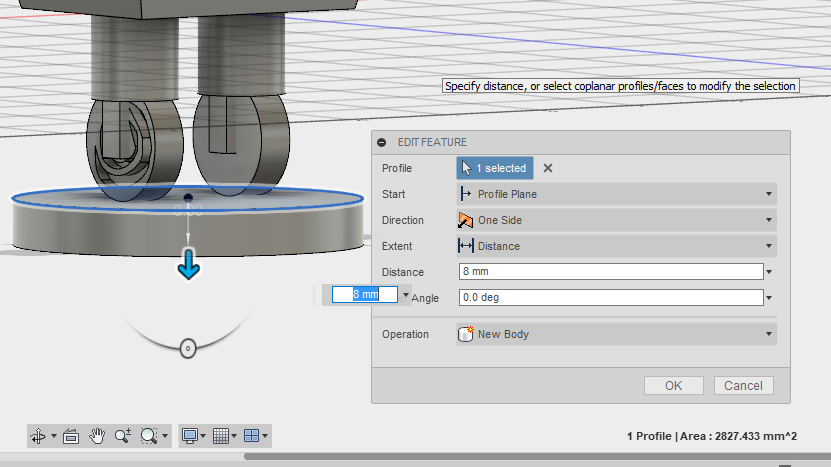
To do this, go to 'Construction' then 'Offset Plane' and select the bottom of the model as indicated in the screenshot attached. Use the blue arrow and drag the plane down until it lines up perfectly with the bottom of the wheels. Again I have attached a screenshot to show you what this looks like.
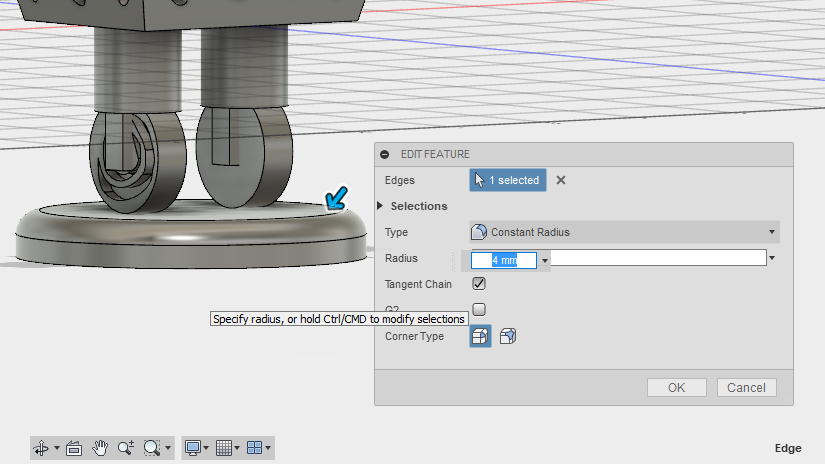
Next, create a sketch on the new plane. Use the 'Center Diameter Circle' to create a circle from the center of the model measuring 60mm. Now extrude the new sketch by 8mm to create the platform. Use the 'Fillet' tool once again to create a smoother platform. I set mine to a radius of 4mm.
Connecting the Robot to the Platform
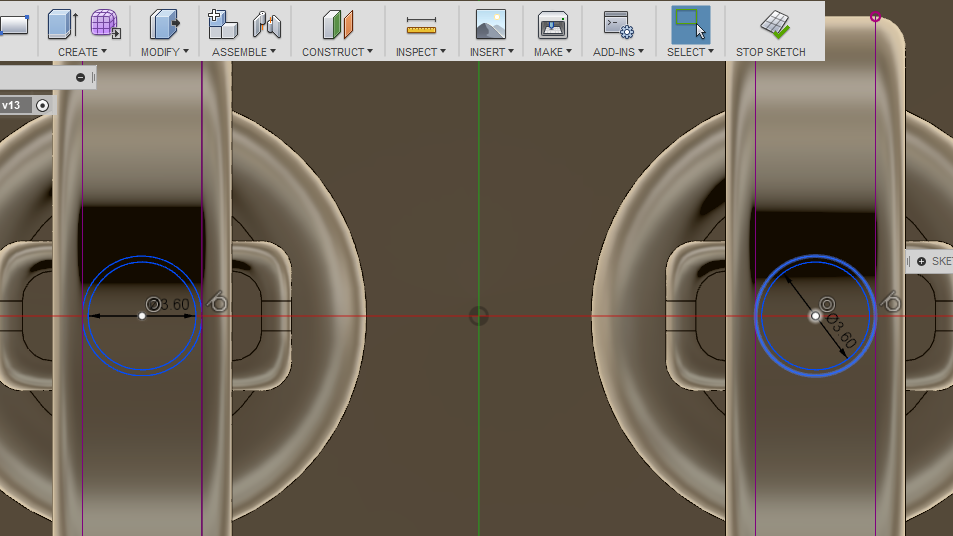
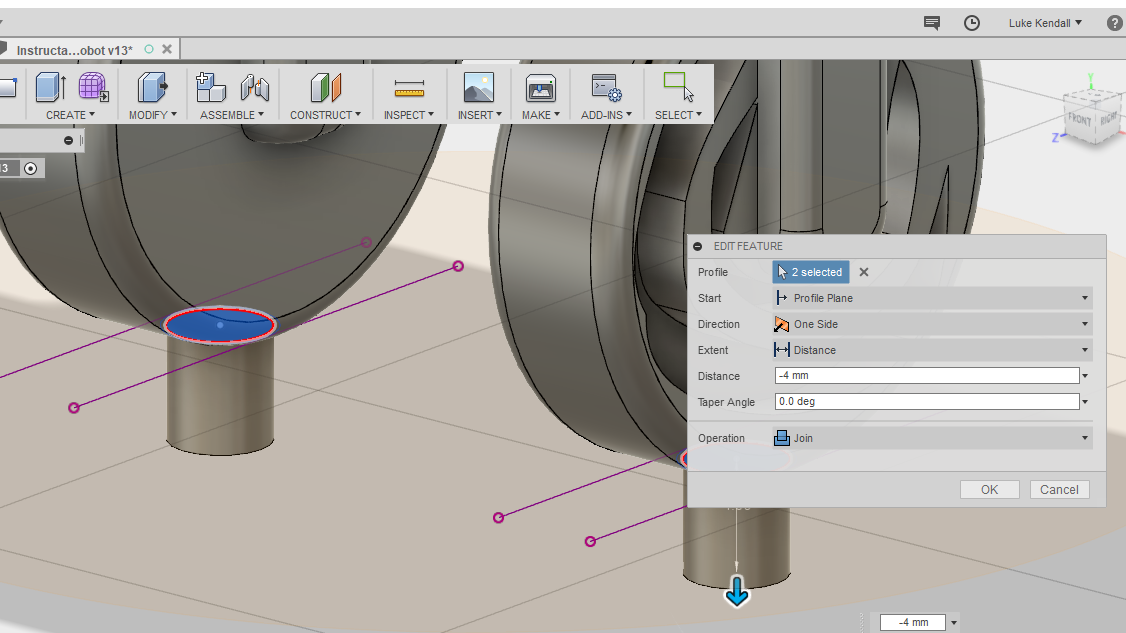
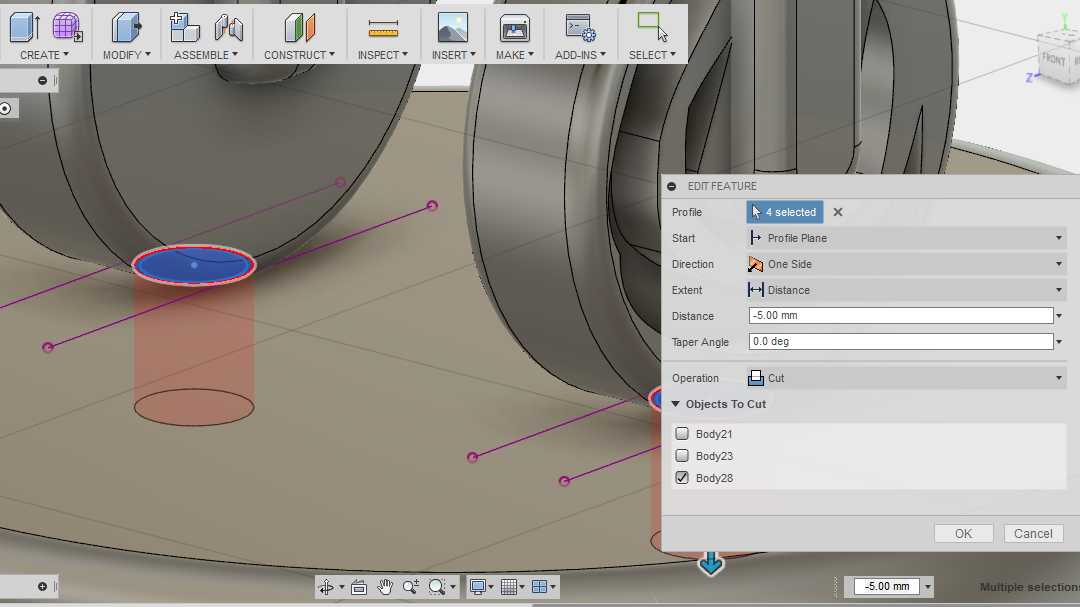
Next let's create some pegs to connect the robot to the platform. Under the 'Bodies' folder hide the platform that we just created. Create a new sketch on the latest plane that we created. If the plane is no longer visible will need to turn the visibility back on in the 'Construction' folder.
Looking at the sketch from the bottom, draw 2 circles on the bottom of EACH wheel (4 circles in total). The larger outer circle should measure 4mm and the inner circle should measure 3.6mm. Take a look at the screenshot attached to see how this should look.
Next extrude both inner circles (the 3.6mm circles) by a distance of -4mm. This will create the pegs that join our model.
Now extrude both larger circles (the 4mm circles) by -5mm and change the 'Operation' to 'Cut'. From the 'Objects to Cut' menu deselect all bodies leaving just the body of the platform ticked. This will cut holes into the platform for our pegs to slot into.
Exporting for 3D Printing
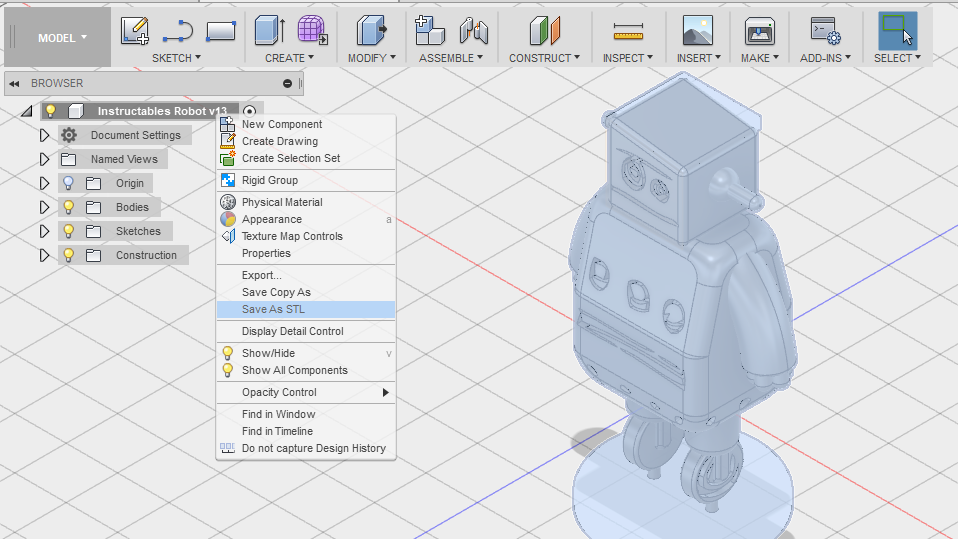
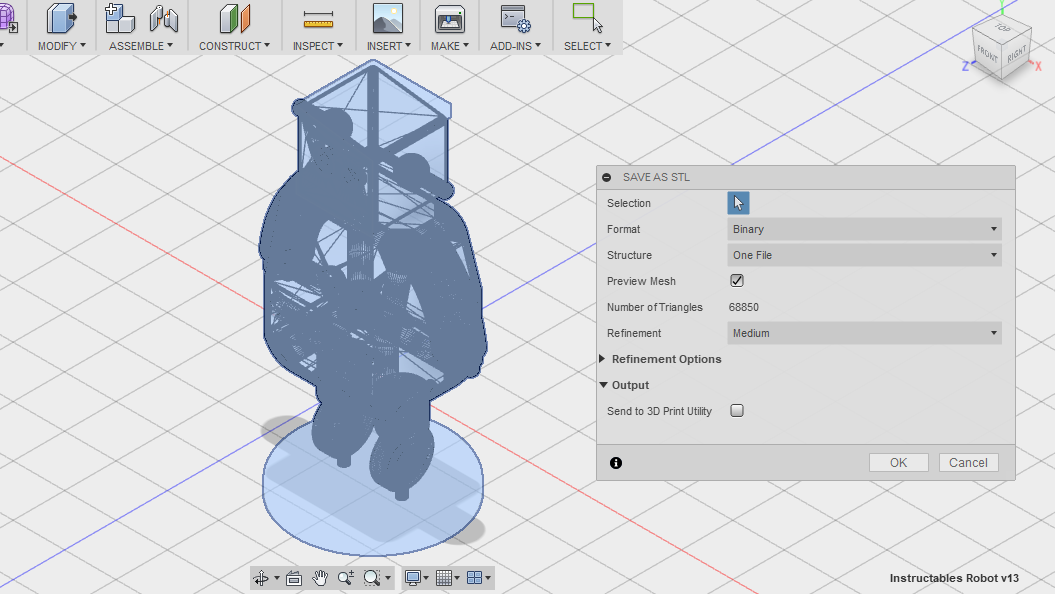
Exporting your model for 3D printing using Fusion 360 is super easy!
First we need to decide which parts of the model we want to export. In this case we want to export the entire model EXCEPT the platform. That's because the platform will be printed separately and thefore we will need a seperate 3D file for this.
Start by expanding the 'Bodies' folder, next locate the body for the platform and click on the lightbulb icon to hide it. With the platform hidden we can now export the STL file for 3D printing.
To do this simply right-click on the document title at the top left of the screen and click 'Save as STL'.
A new dialogue box will appear with some options for exporting the STL. We can leave all the settings with their defaults so click 'OK'. Fusion 360 will now allow us to save the STL file to our computer.
Now just repeat these steps for the platform.
3D Printing the Instructables Robot
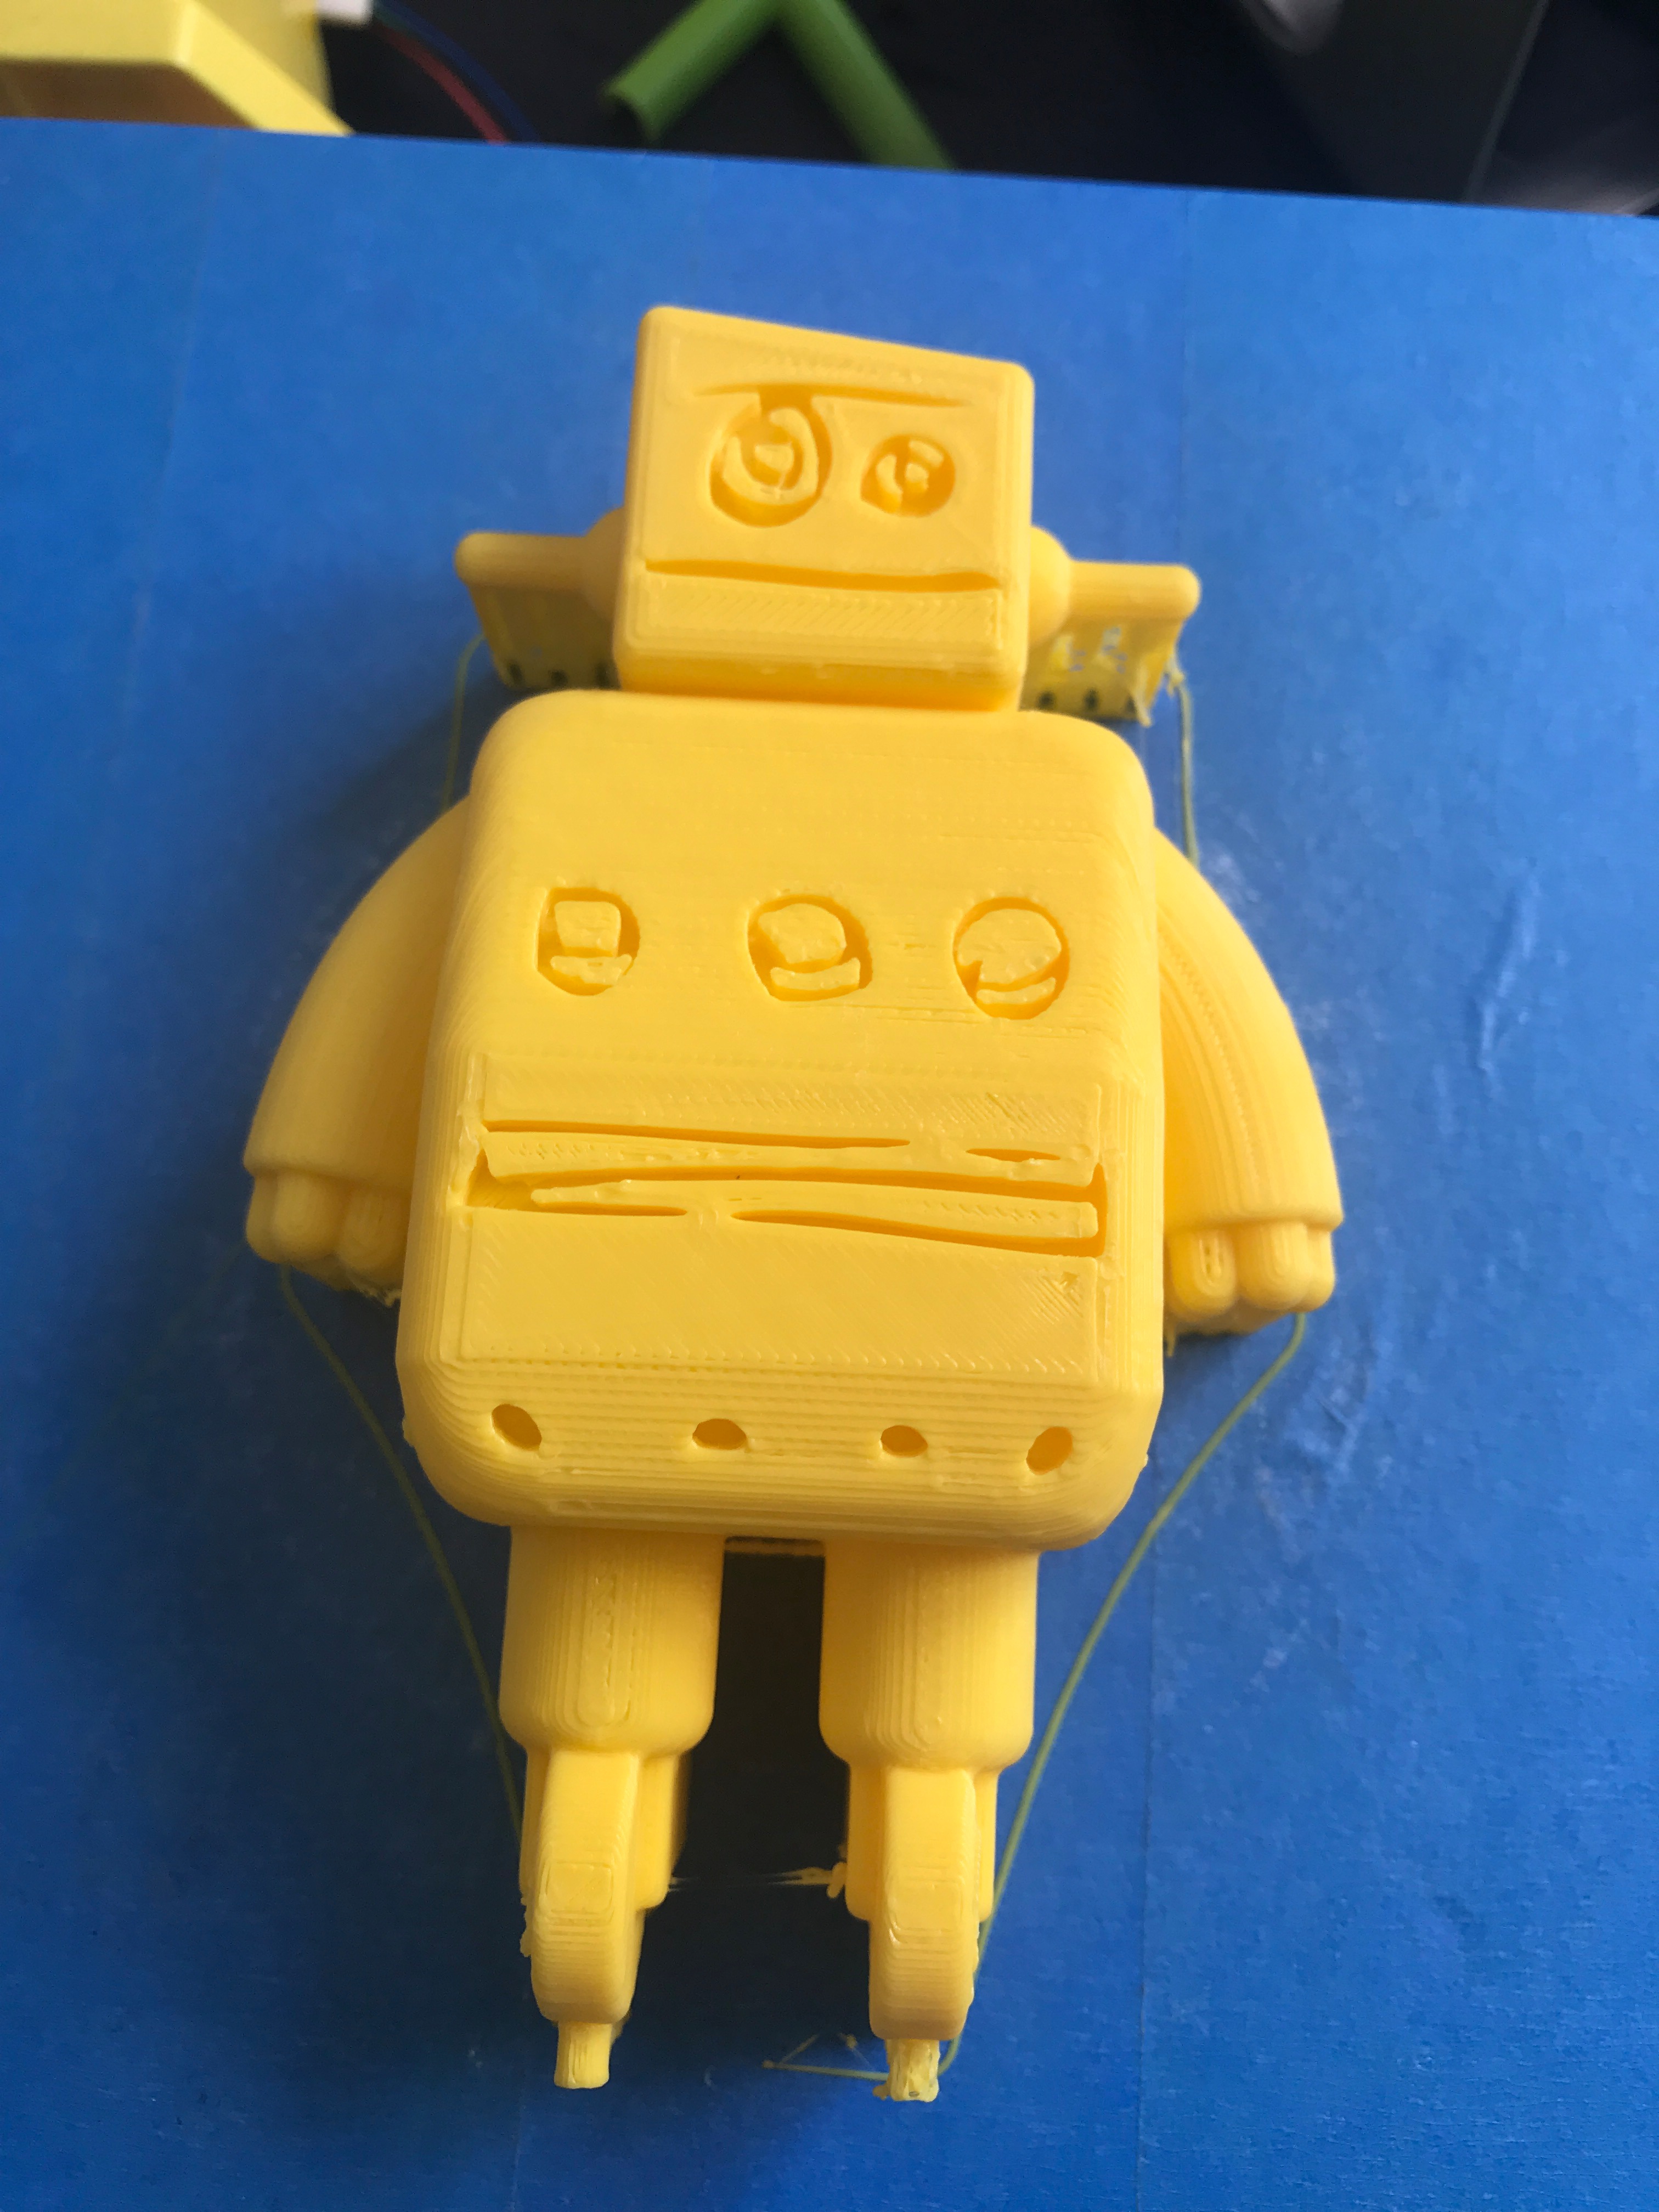
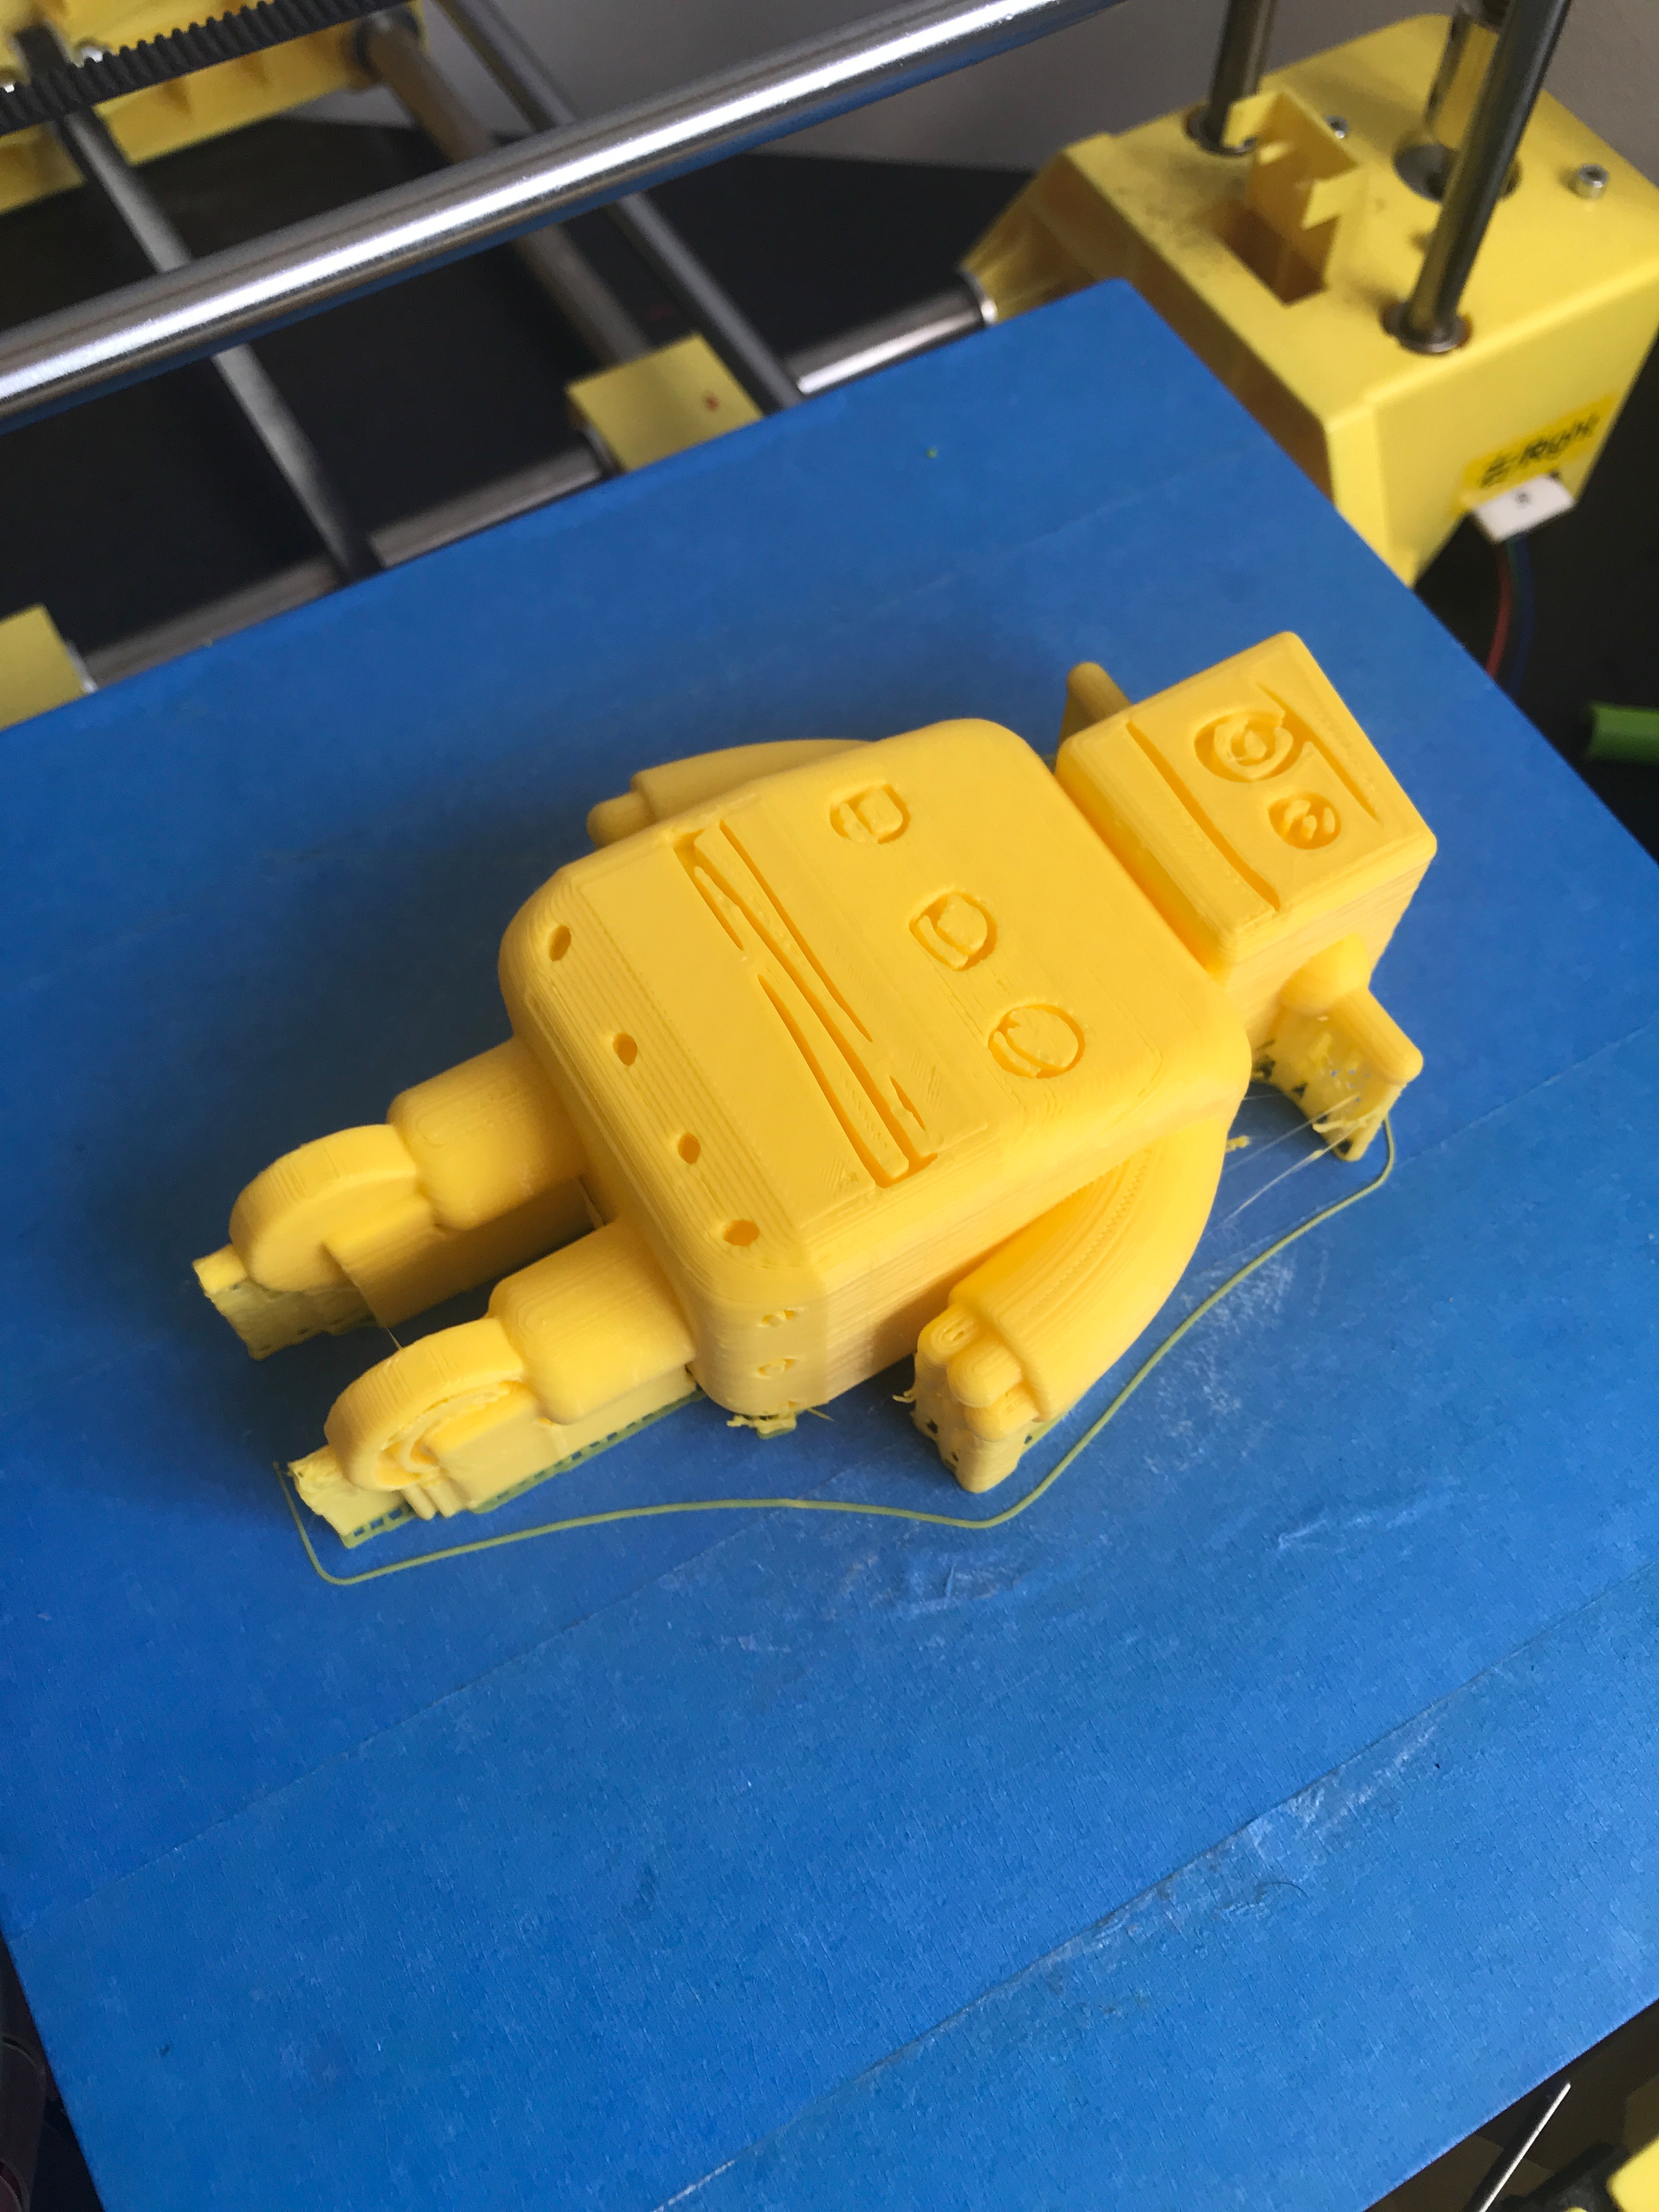
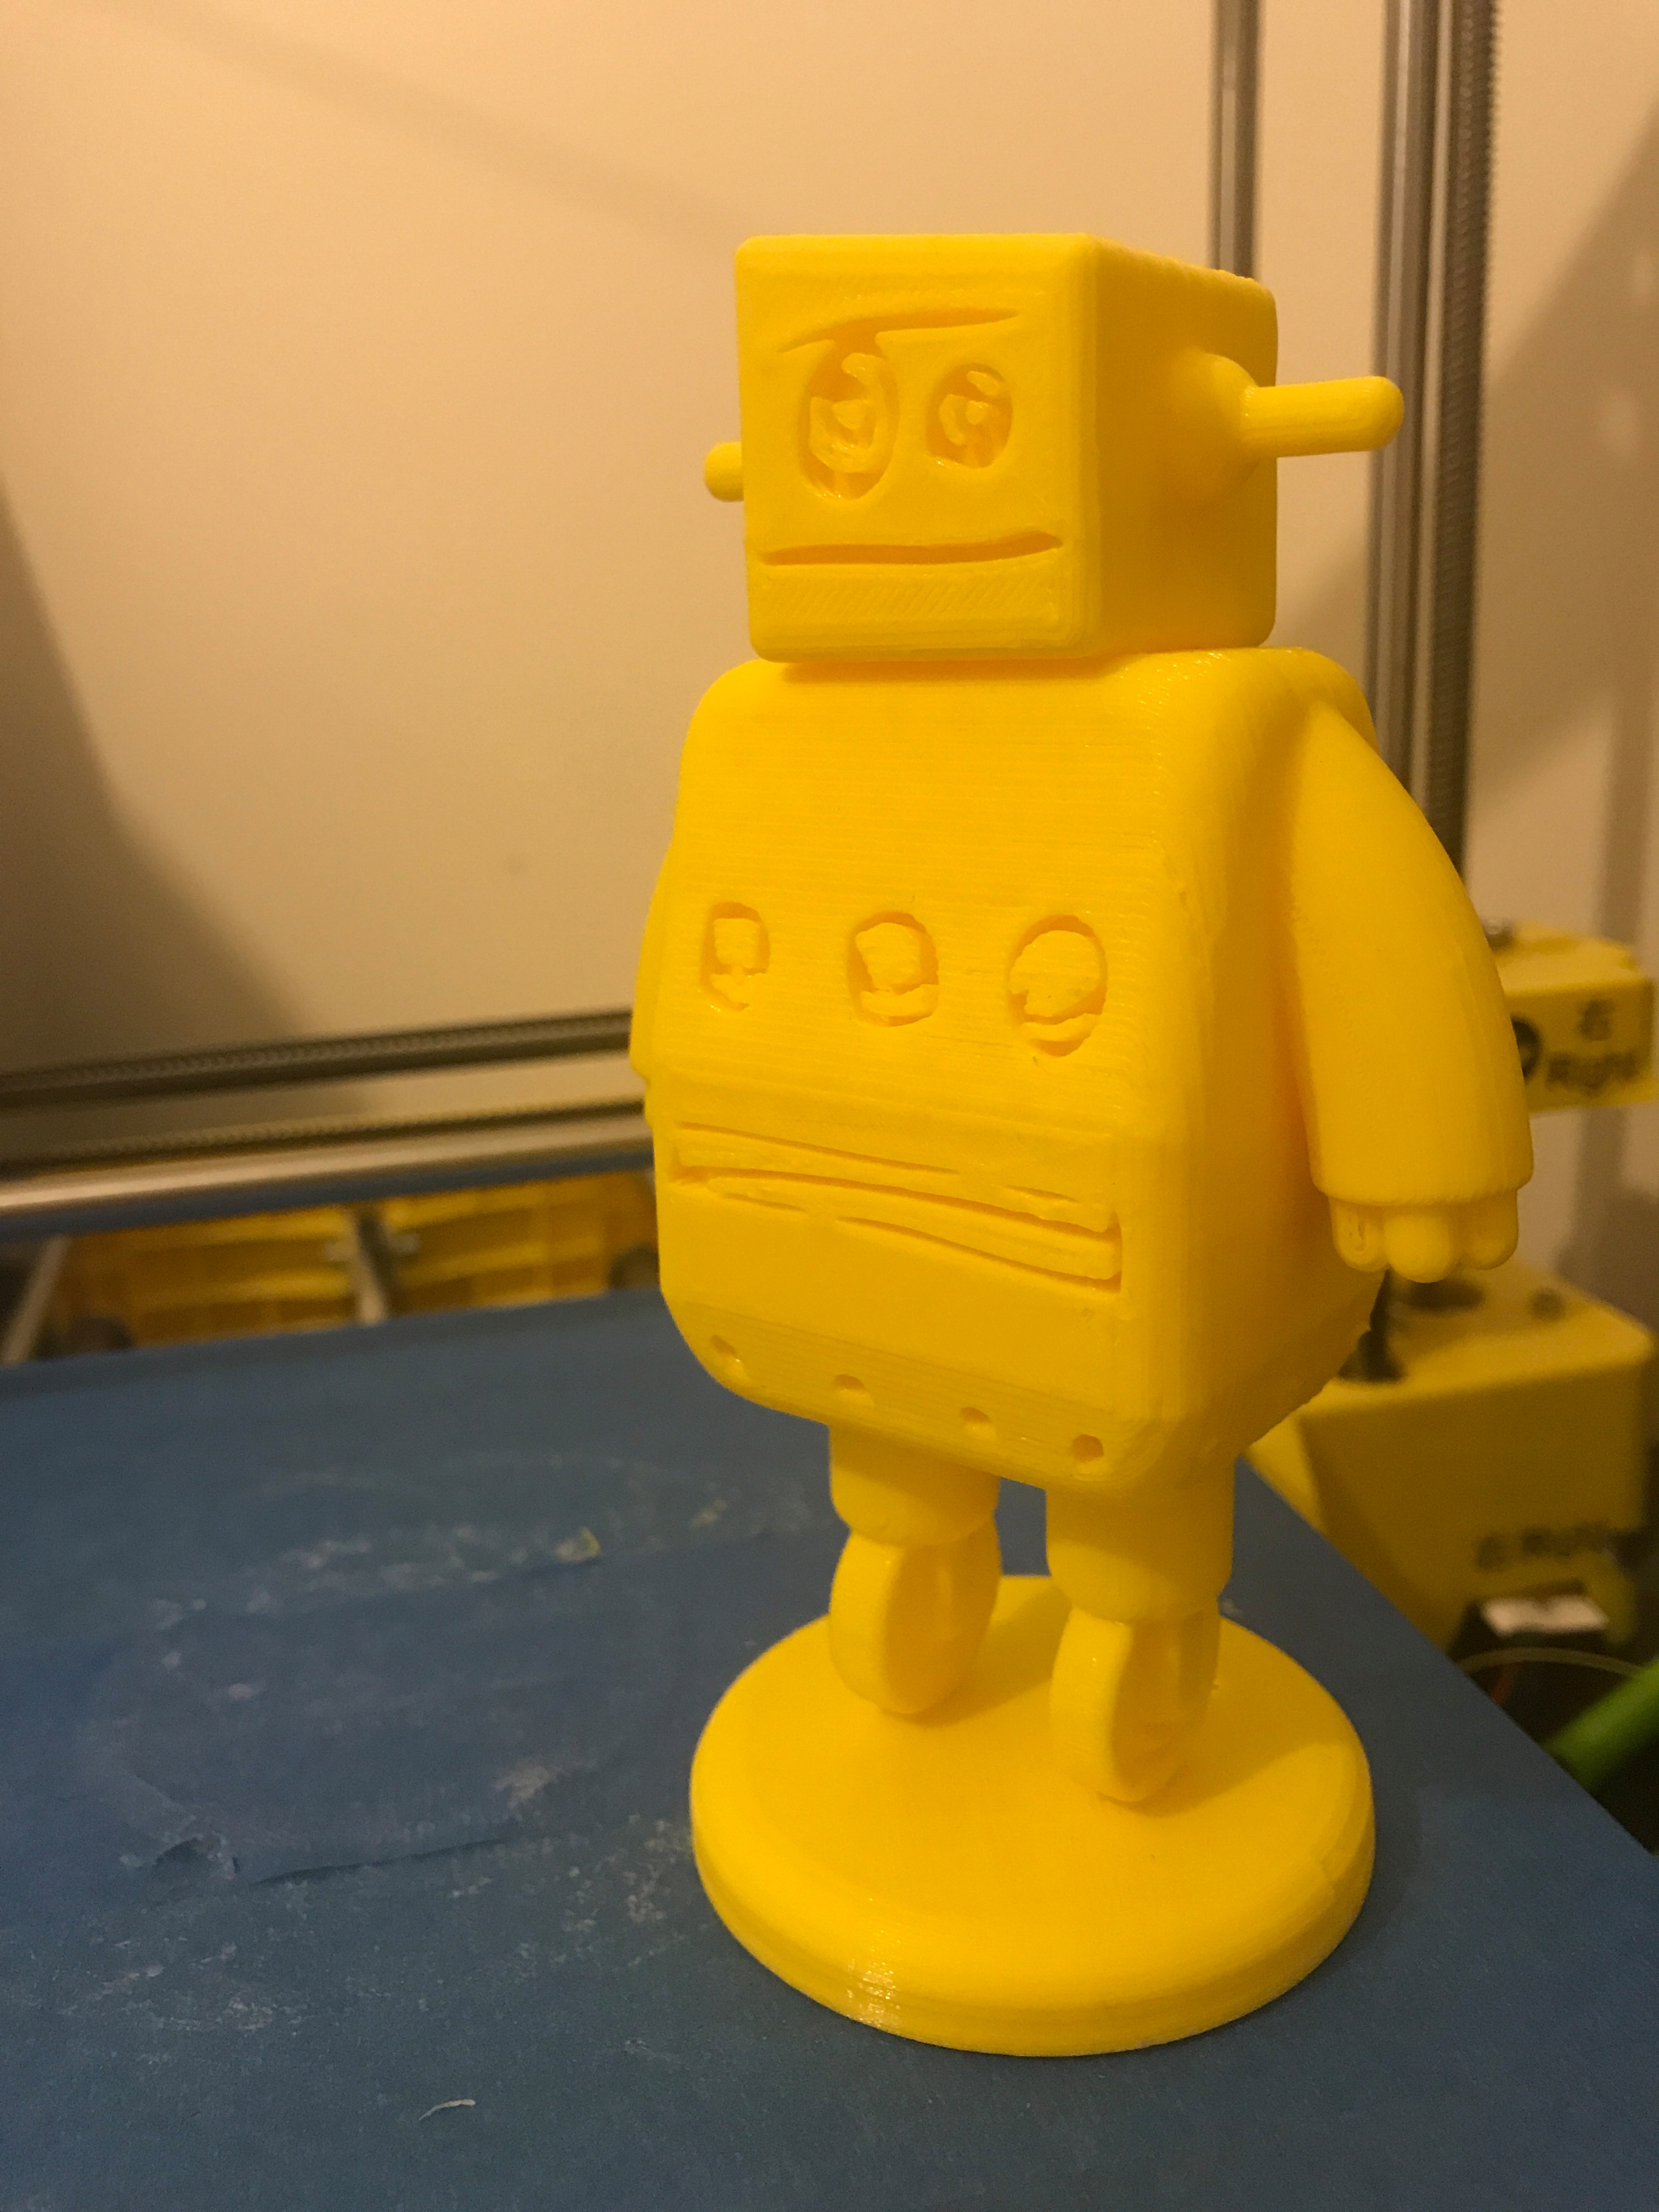
I have attached the STL files for both the model and the platform.
This is a pretty easy print, it prints nicely in PLA without any bed adhesion. Supports are essential but its up to you which way up you print the model. Since I am using a budget printer that doesn't do a great job with the initial layers above support I decided to print him on his back. This ensured the front of the robot was printed perfectly. Any imperfections are not visible.
The total print time was 5 hours and 30 minutes with the following settings:
- Layer Height: .2mm
- Infill: 20%
- Print Speed: 60mm/s
Once you have printed the robot and the base it is probably a good idea to attach the model to the base with some super glue or epoxy ad the small pegs will be brittle and delicate due to their size.
If you print this please share a photo of your finished print in the comments below!
Good luck and thank you for checking out this Instructable :)