Design a Space Satellite in Fusion 360
by Airbus Foundation in Teachers > 3D Design
11836 Views, 23 Favorites, 0 Comments
Design a Space Satellite in Fusion 360
Moon base to rover, do you copy?
Even daily communication changes when living on the moon. Without air to carry our voices, we'll have to rely on technology to communicate. We might even have to use lasers to beam a message home!
Before any rockets blast off into space, scientists need to be sure of where to send brave space explorers. One of the ways they do that is by using satellites to look at star systems and the surface of planets to determine what to focus on. Satellites stay in space for a long time, constantly sending information to earth for scientists to research. To keep satellites powered up they use large solar arrays to capture sunlight and turn it into electricity.
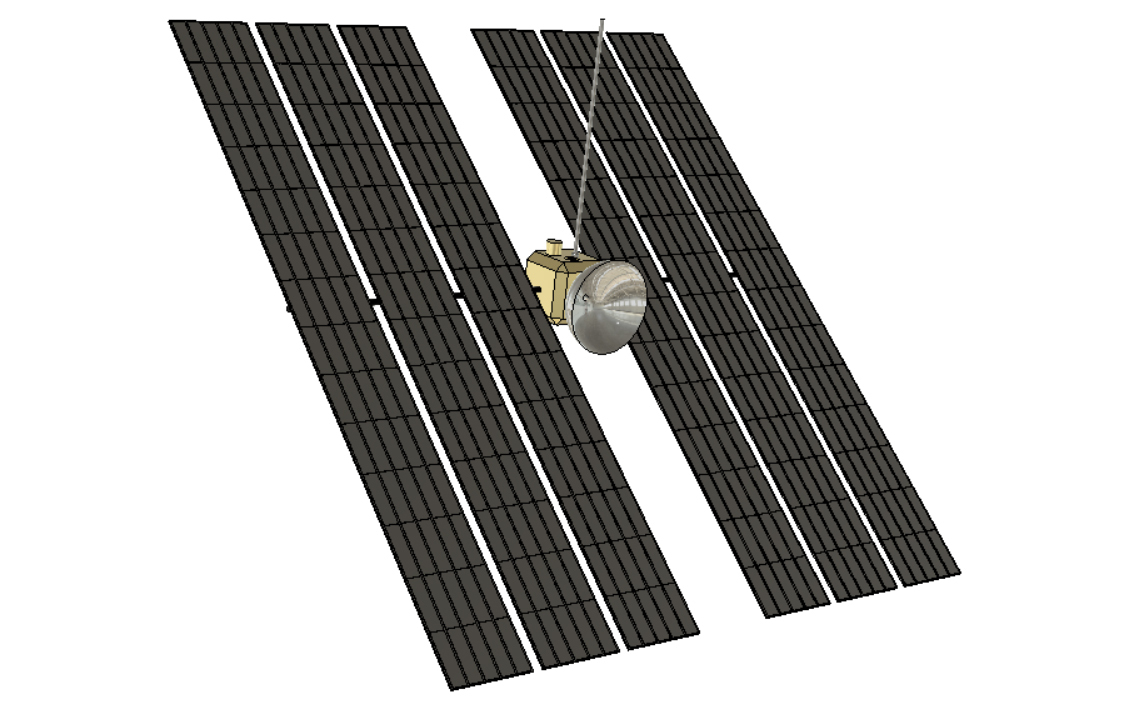
In this tutorial we'll make a solar satellite with a radio dish to transmit signals to and from earth.
Below is the satellite design we will be making together. Take a moment to interact with the model below and see it from all angles before we get started.
The moon is closer than ever with new advancements in space technology. The next breakthrough in space design could come from a designer such as yourself. Let's get making this satellite!
Satellite Body
Start by downloading Fusion 360, and making a free account.
Fusion 360 works by creating 3D models from 2D sketches on a workplane. Since Fusion 360 is parametric, you can make changes to your sketches at any time and the 3D shapes derived from those sketches automatically updates to he new values. You may find using this feature helpful if your design isn't working the way you want.
We'll use sketches in the next step, but to start we'll use a simple primitive shape.
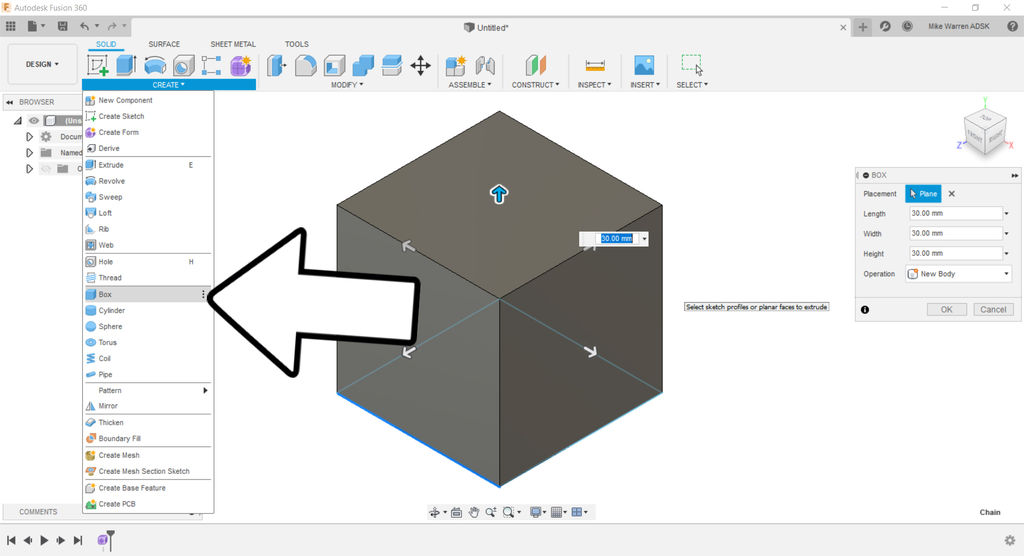
From the top toolbar find create > box, then select the bottom plane to place the box. You can use the arrows to define the box dimensions, or enter a numerical value. We want all sides equal for this box; a cube.
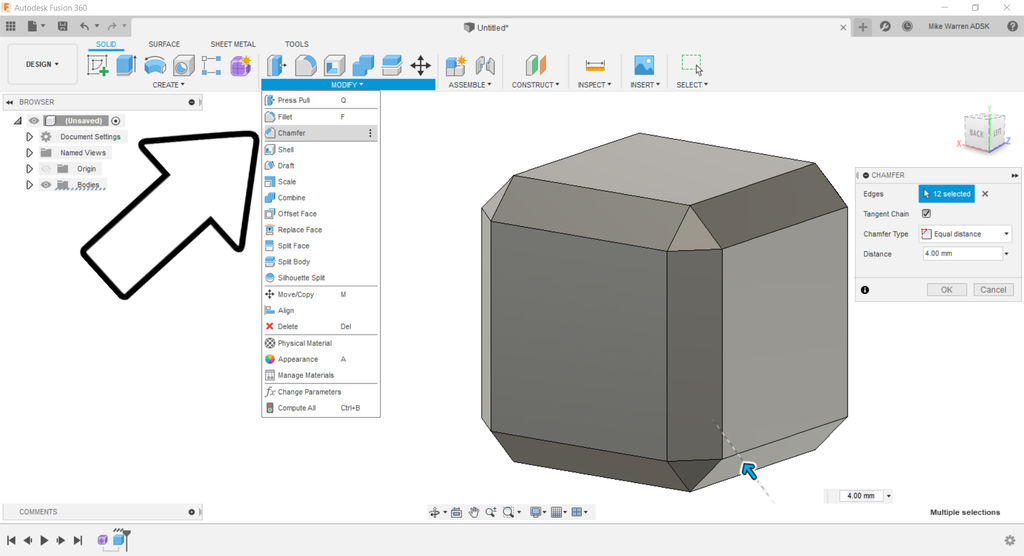
A simple box is boring, so we'll give some visual interest by adding a chamfer to the edges. Go to modify > chamfer and select all the edges of the box, then use the arrow to drag the edges inwards and giving a neat chamfer to the shape.
TO make the boom for the solar panels we'll use another primitive shape to create the cylindrical shape we need.
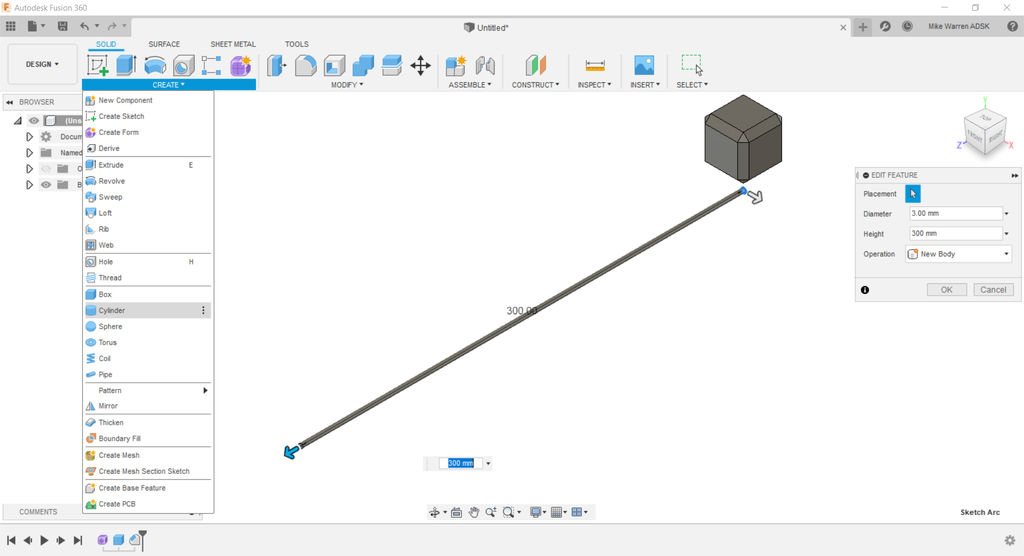
Find create > cylinder and then select one of the side planes to place the cylinder. Use the arrows to make a long and skinny cylinder shape. Remember that we can use the timeline on the bottom of the screen to edit any of these features later, so they don't have to be perfect right now.
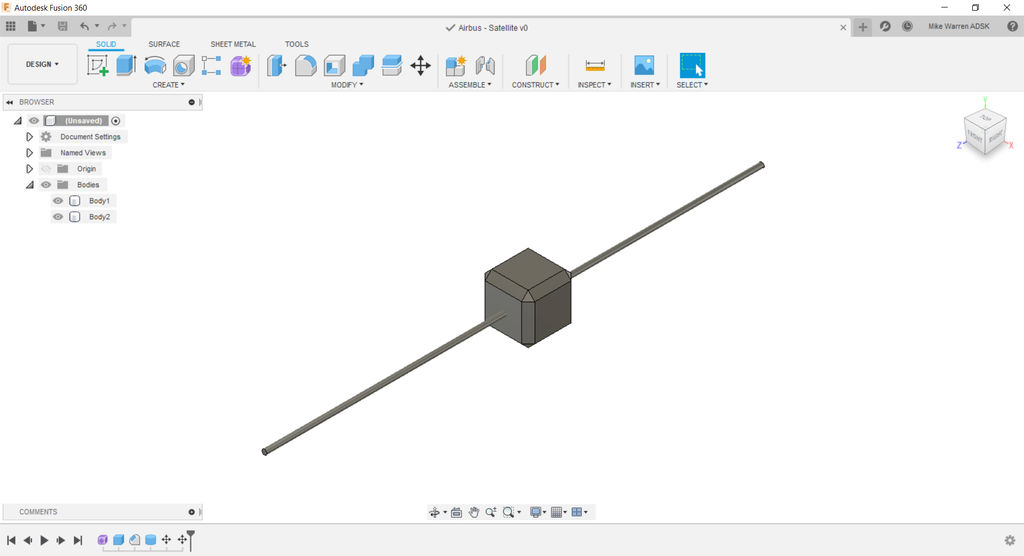
Select the cylinder body from the directory tree on the left side of the screen and move the cylinder to be centered inside the chamfer box.
Radio Dish
Now we get to use one of Fusion 360's most powerful features: sketches.
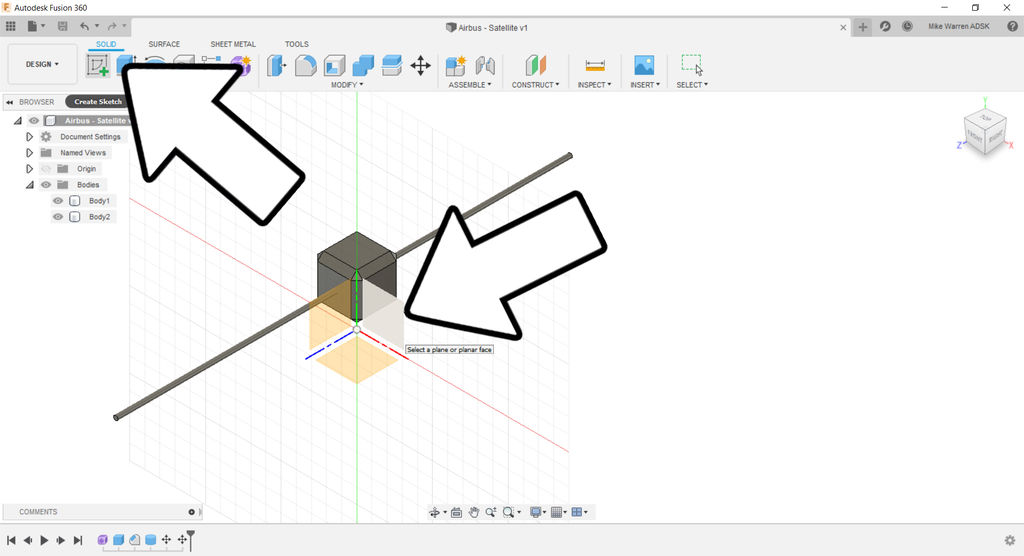
Find sketch from the top toolbar and select one of the side planes to sketch on. The view should rotate to a side view of the chamfer box.
The toolbar interface will change over to the sketch environment.
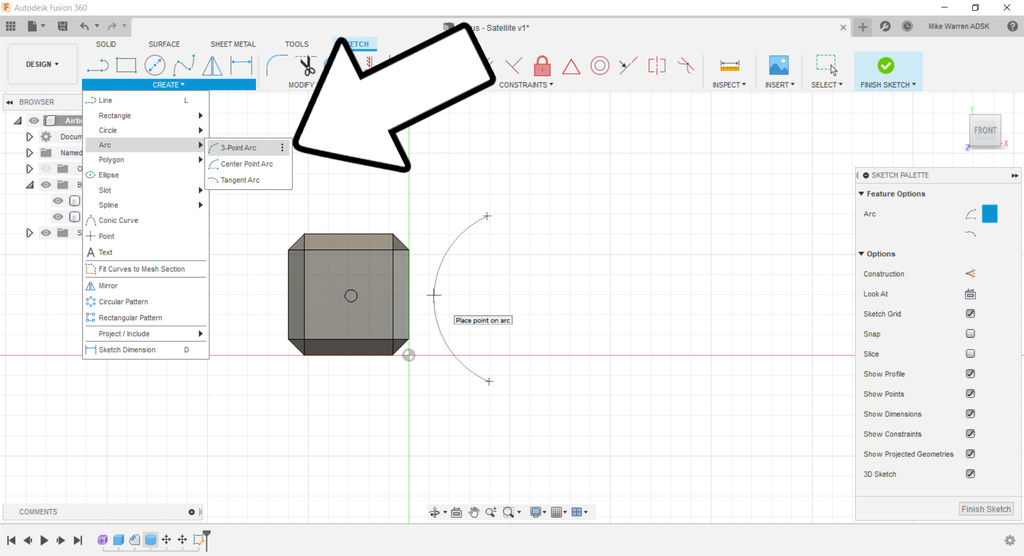
Find create > arc > 3-point arc and make an arc in front of the box, as shown above.Click OK when done.
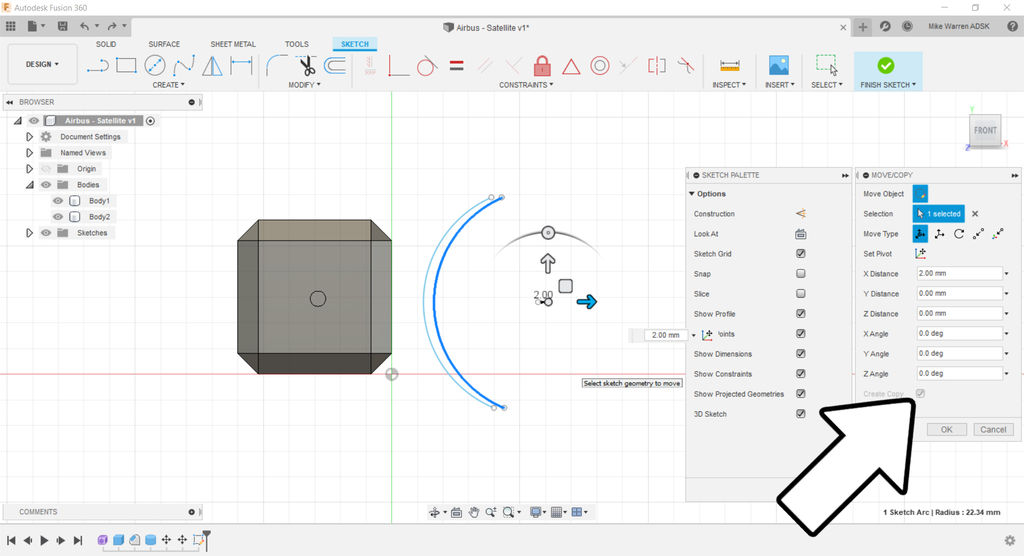
Now select the arc you just made and modify > move. In the pop-up box there's a create copy button. We can them use the arrows on screen to move the copy slightly away from the original arc. Press OK when ready.
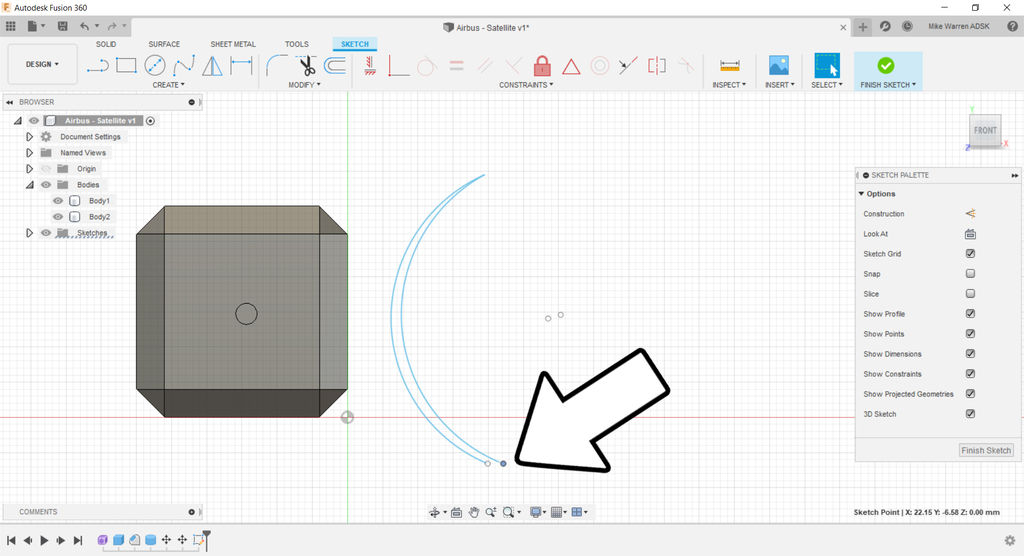
Select the arc copy and grab the end handles and move them onto the ends of the original arc, creating a scimitar moon shape. This is the basic dish shape, but we'll add a few more elements before committing to this shape.
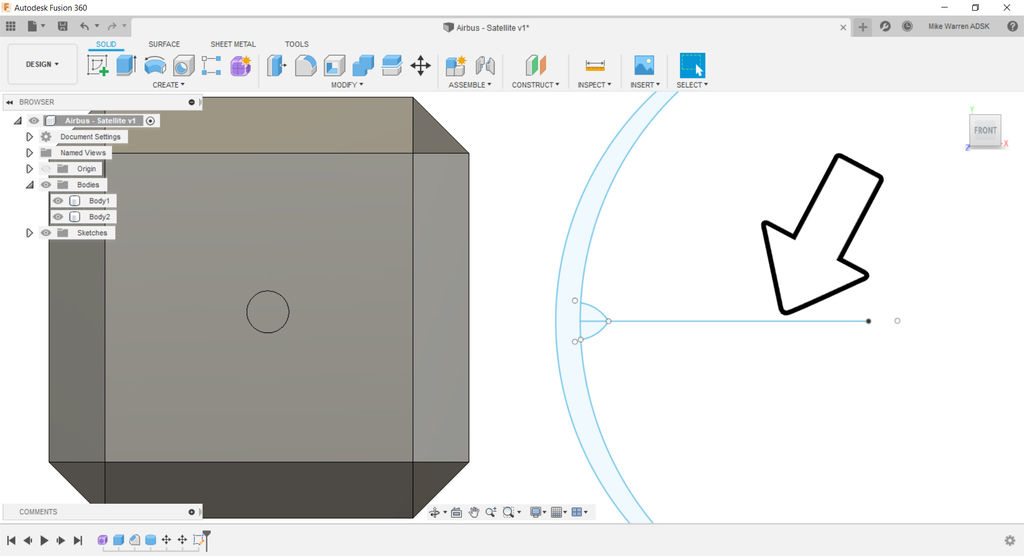
While still in the sketch environment, use the create > line tool to make a line down the center of the arcs, bisecting them. This is easy as there is a center node visible for both arcs created earlier. Draw a line from the center point of the arcs horizontally through the arcs (shown above is not through the arcs). This will be our trim line.
I used this center line as a reference to add a little bump shape I sketched with another 3-point arc.
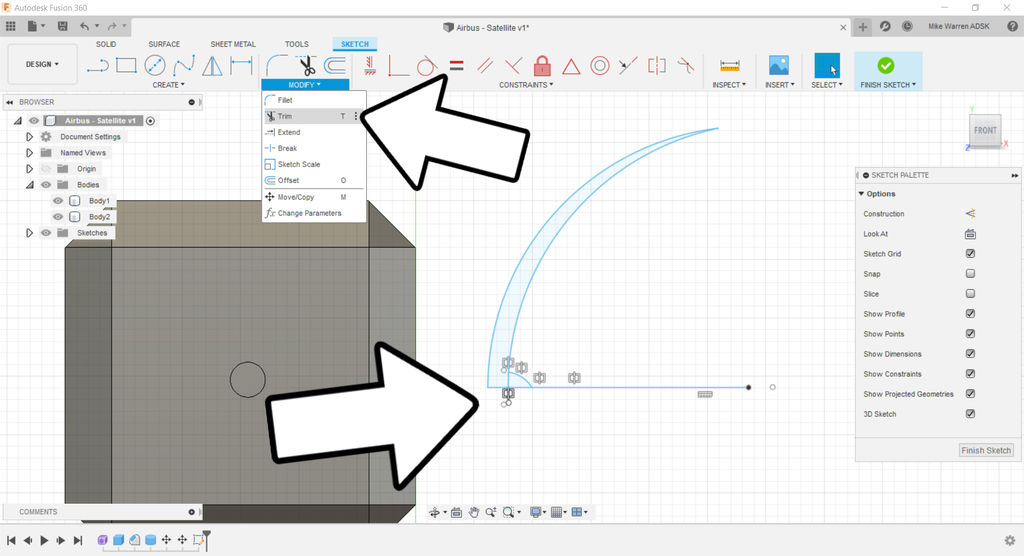
Now find modify > trim to trim away half the sketch we just made. With trim selected, hover over the lines below the center line drawn, the lines will light up red to indicate they will deleted. Click on each line to remove to lower half of the dish sketch.
When ready click the finish sketchfrom the top toolbar to return to the design environment.
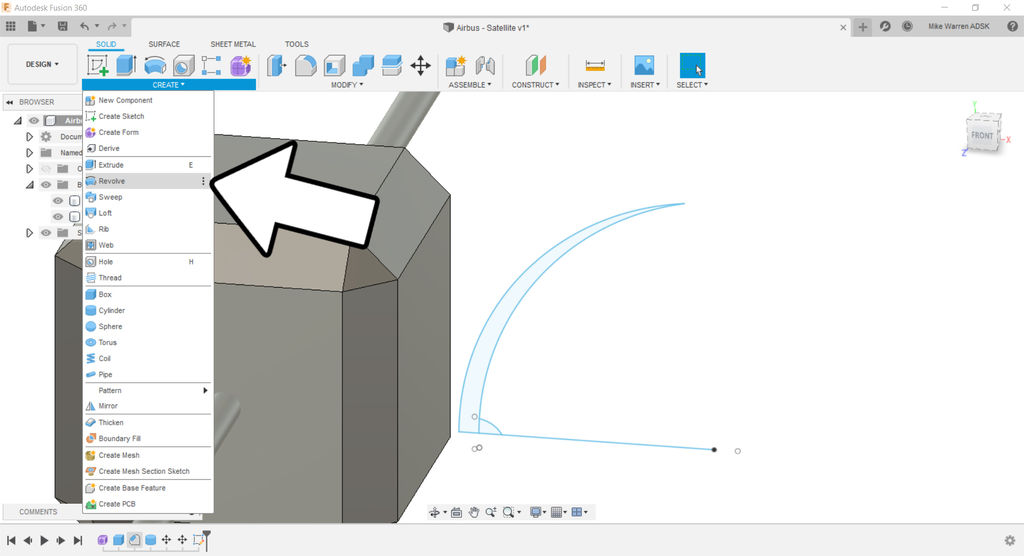
To make our dish shape, go to create > revolve, this will use the sketch we made to revolve around the center line and create the 3D shape we want.
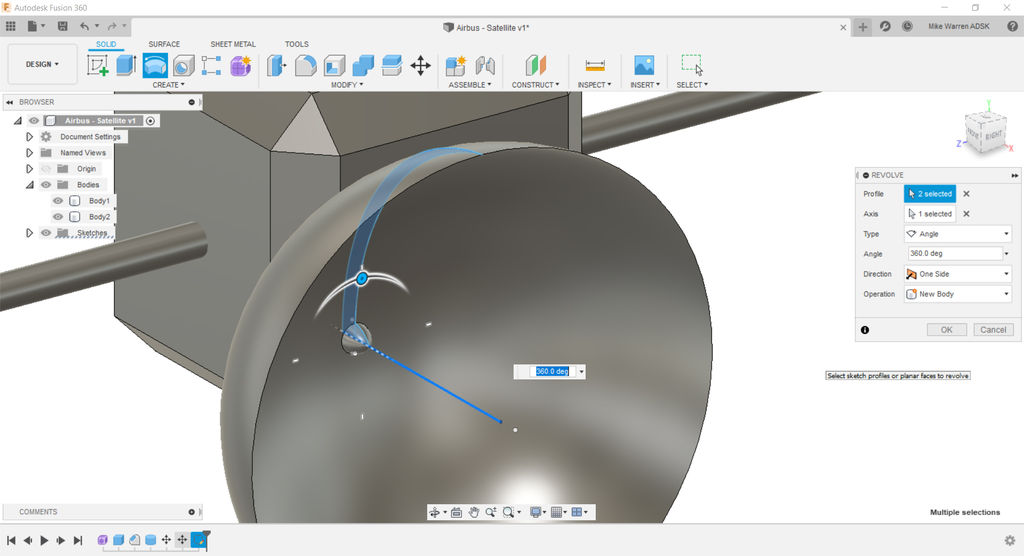
With revolve selected a new pop-up menu appears. Select the arc sketch as the profile, and the horizontal center line as the axis which the profile will be rotated around. Look at the rest of the setting here, we want 360 degrees of rotation and to make a new body. Click OK when ready to make the shape and create a new body.
Material Color
Now is a good time to take a break from designing shapes and bring some color to the design.
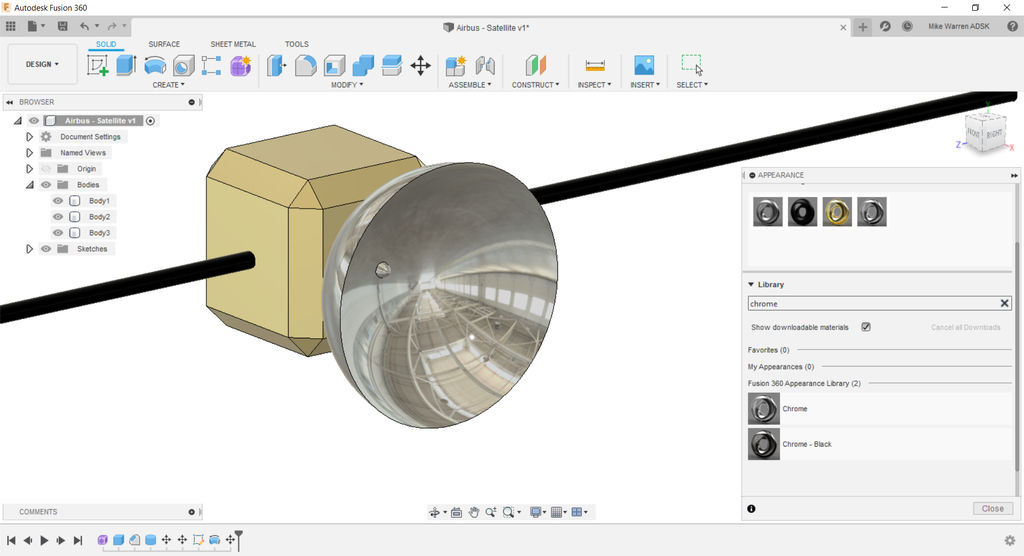
Find the color menu in modify > appearance which will bring up a new pop-up. Use the library here to find some materials that will work for your design, you can also use the search function here.
I used gold for the box, black chrome for the boom, and chrome for the dish.
Solar Array
With the body of the satellite complete we can turn our attention to the solar panels.
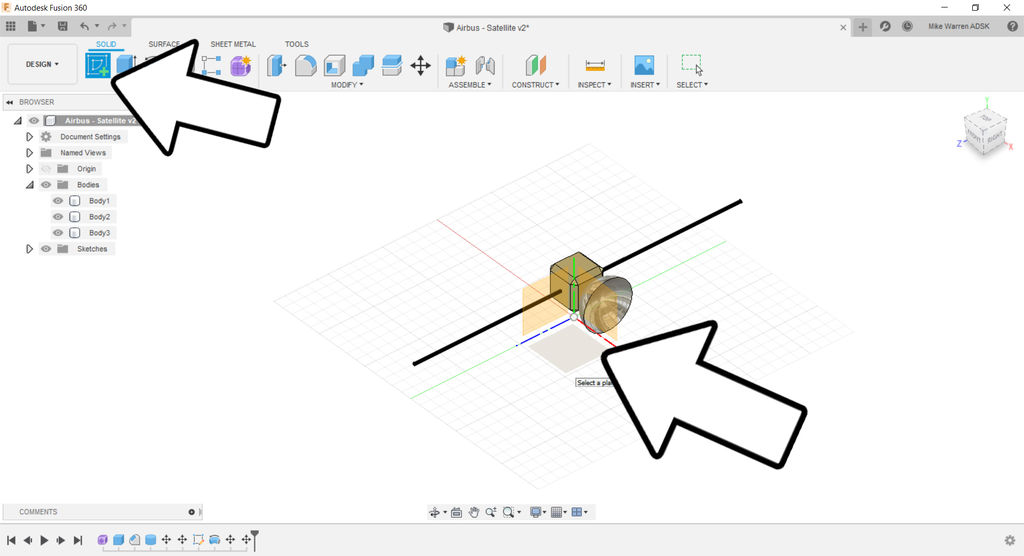
Make a new sketch and select the bottom plane as the sketch surface.
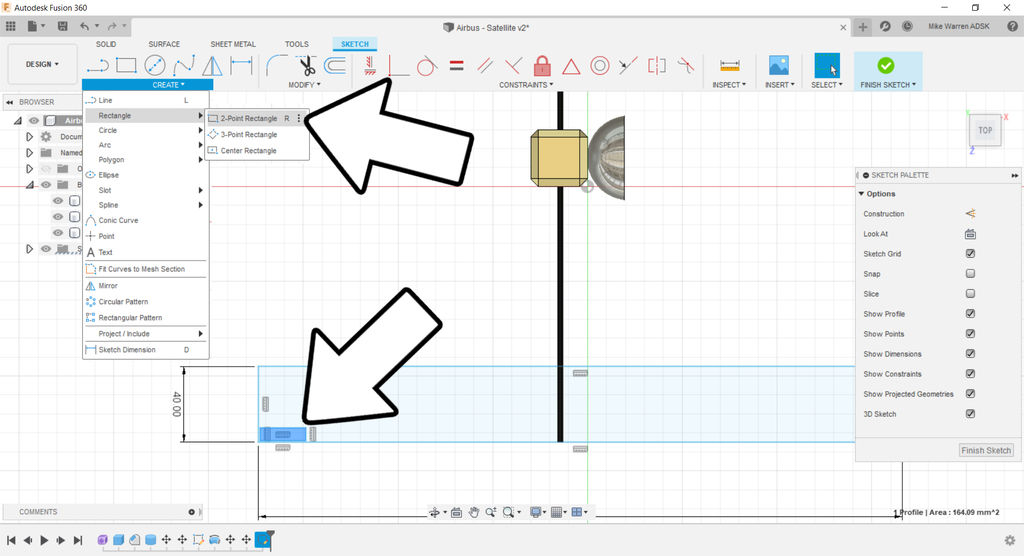
Draw a rectangle by going create > 2-point rectangle. Start with a long skinny rectangle as the base. Then make another smaller rectangle inside the larger rectangle in one of the corners.
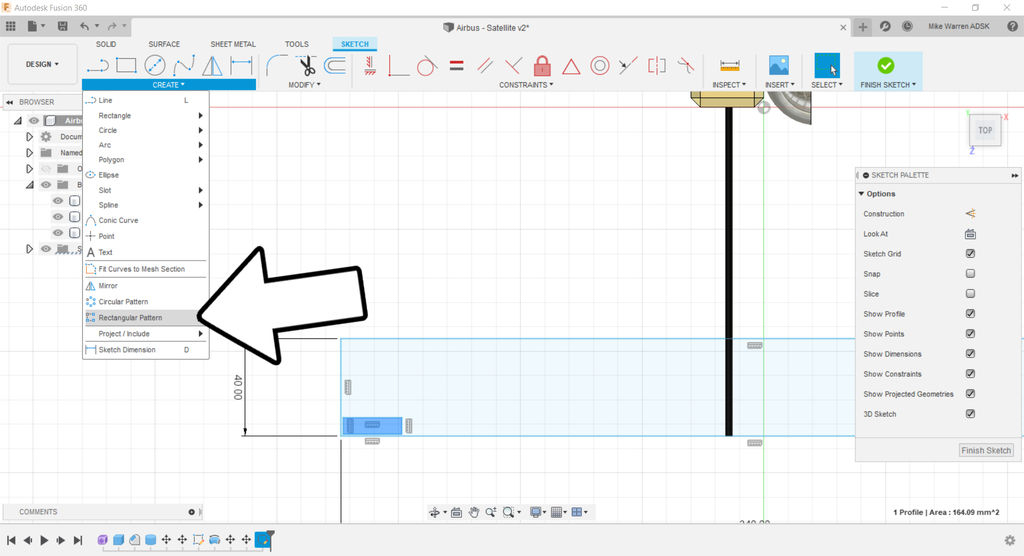
The small rectangle will be one of the solar cells inside the panel. To make an array we'll use create > rectangular pattern.
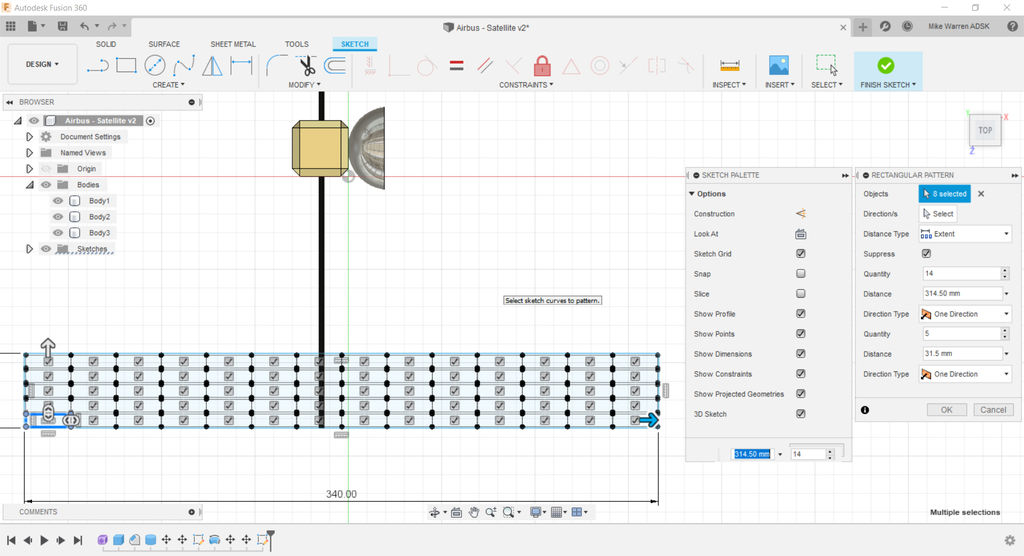
Use the arrows on screen or the numerical values in the pop-up to make a rectangular array that fits inside your large rectangle shape. Once you have your array figured out select finish sketch from the top toolbar.
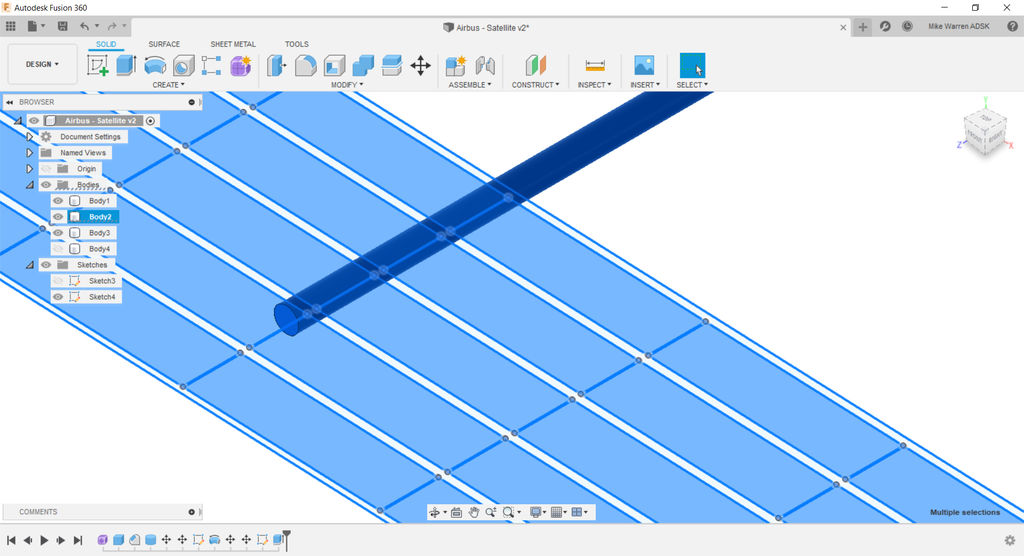
We can now create a 3D shape from the sketch by selecting the small rectangles and using create > extrude to pull the shapes up and out of the sketch.
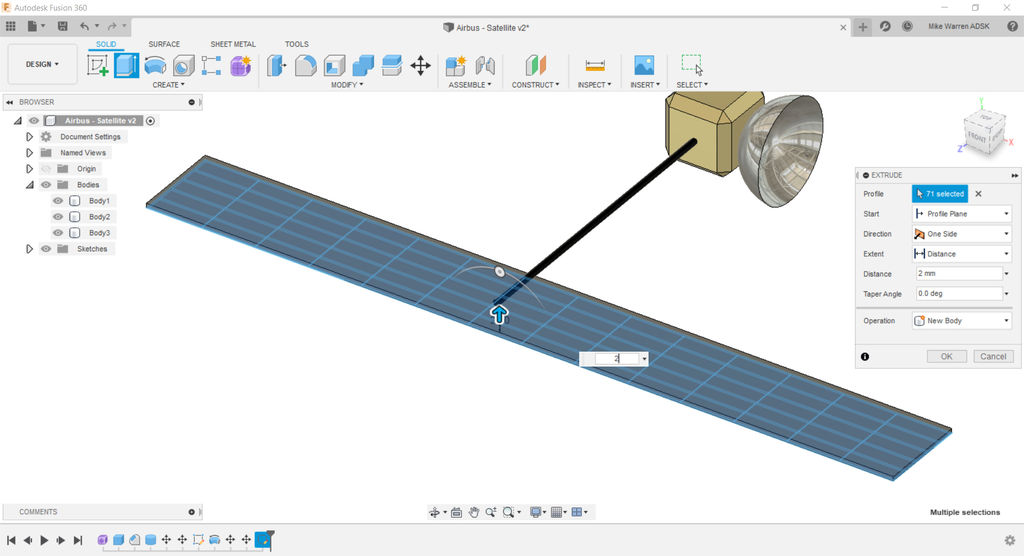
Now select the large rectangle and repeat create > extrude, using a similar but smaller extrude value than with the small rectangles. We need some height difference between these two bodies so they are visible.
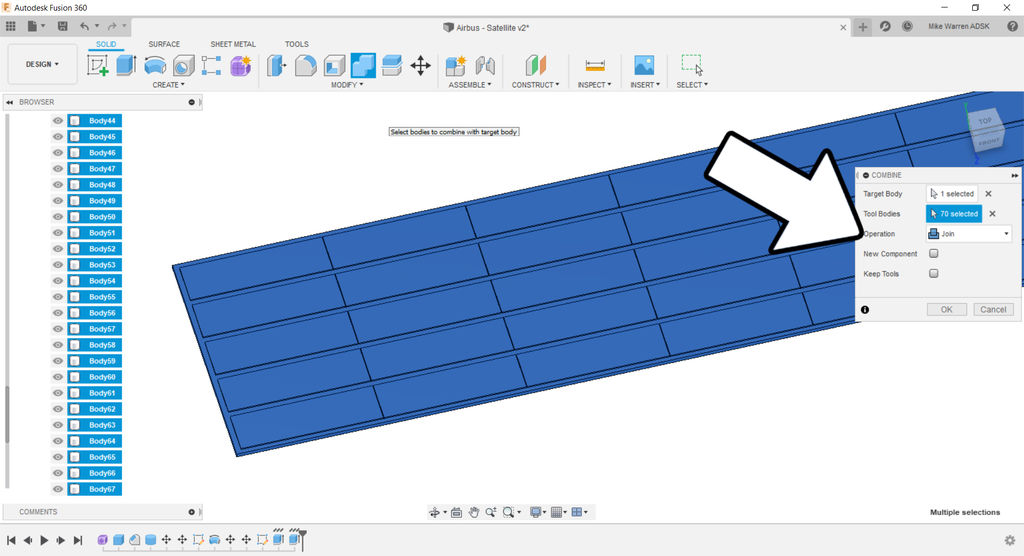
Each solar cell rectangle is its own body. To make management of these bodies easy select them all and find modify > combine to group the cells with the large rectangle panel, creating one body.
More Panels
With one solar panel complete we can use it to create more.
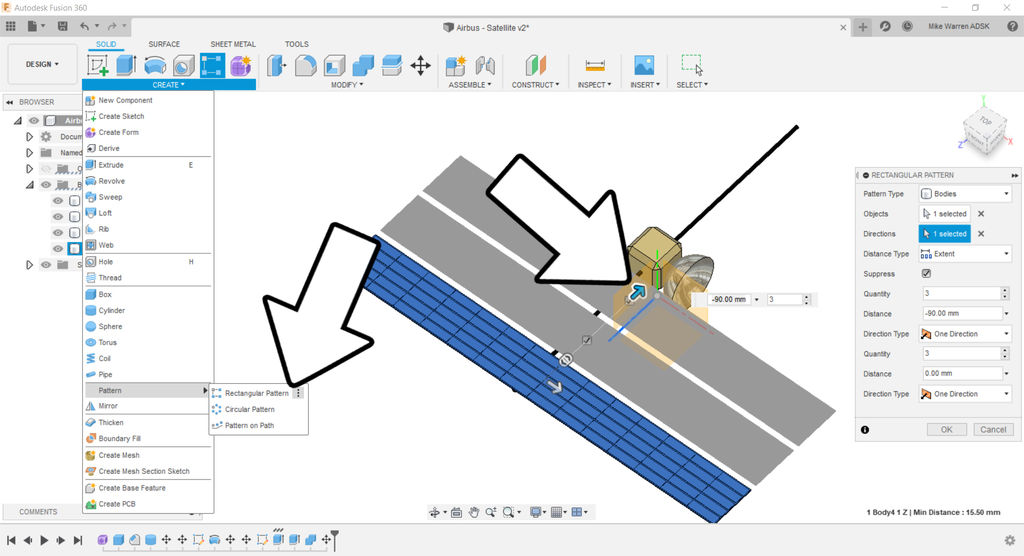
Select the combined solar panel and find create > rectangular array to make copies. Use the on screen arrows or the pop-up to define your solar array. We only need to concentrate on one side for now. Click OK when done.
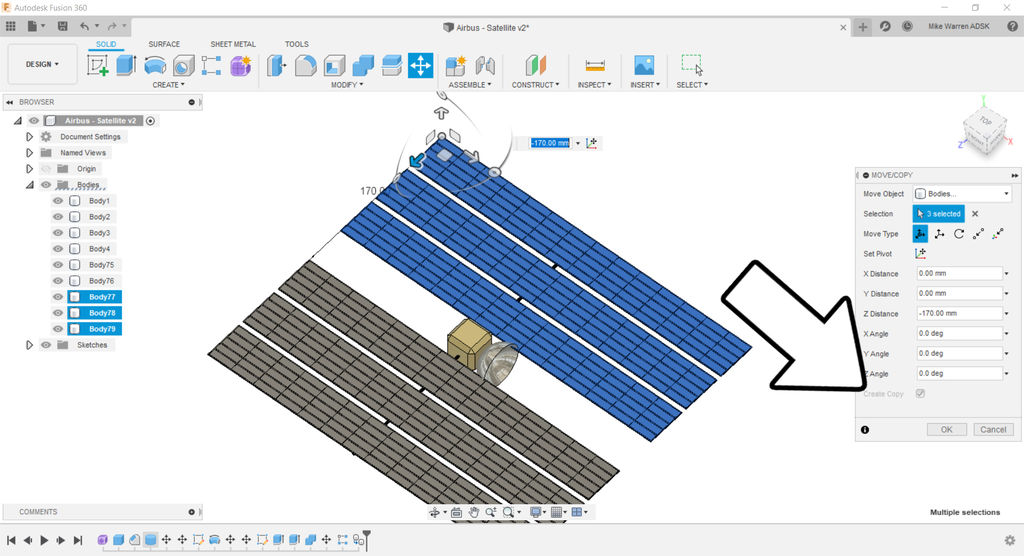
Select the solar panels on one side and use the move command, selecting make copy in the pop-up and them moving the copy to the other side of the satellite.
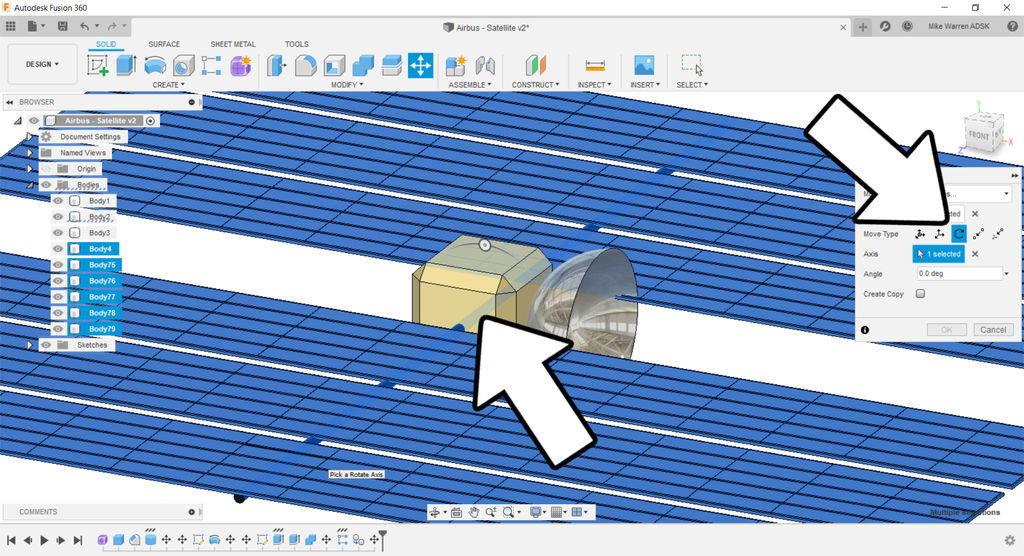
Rotate all the solar panels by selecting them all and using teh move command again, but this time selecting the rotate option in the move pop-up. Use the cylindrical boom as the axis of rotation, then use the on-screen handle to rotate the panels to the angle you like.
Add Details
With the satellite shape complete it's time to add some details.
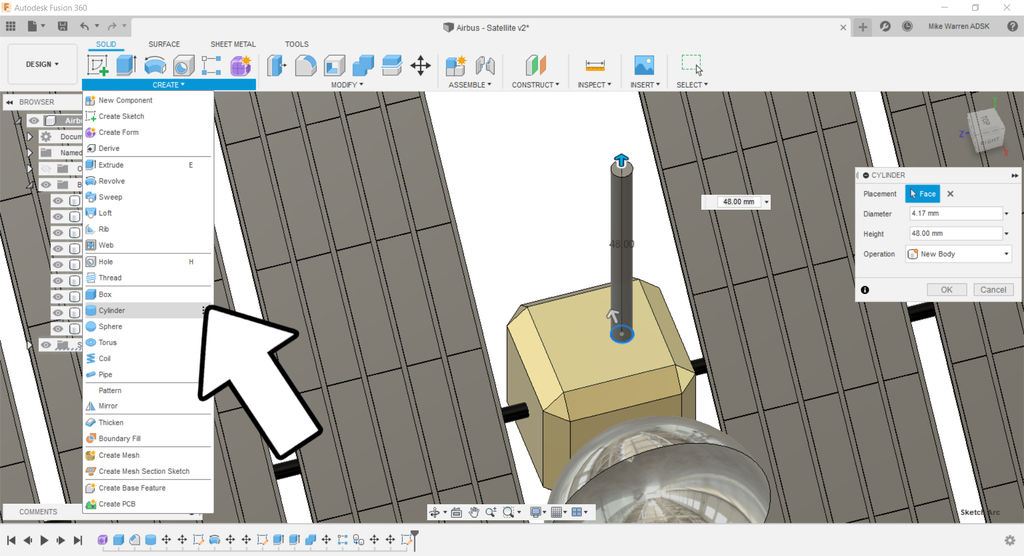
Use the create menu to add some simple shapes to your design, adding visual interest and communicating design intent.
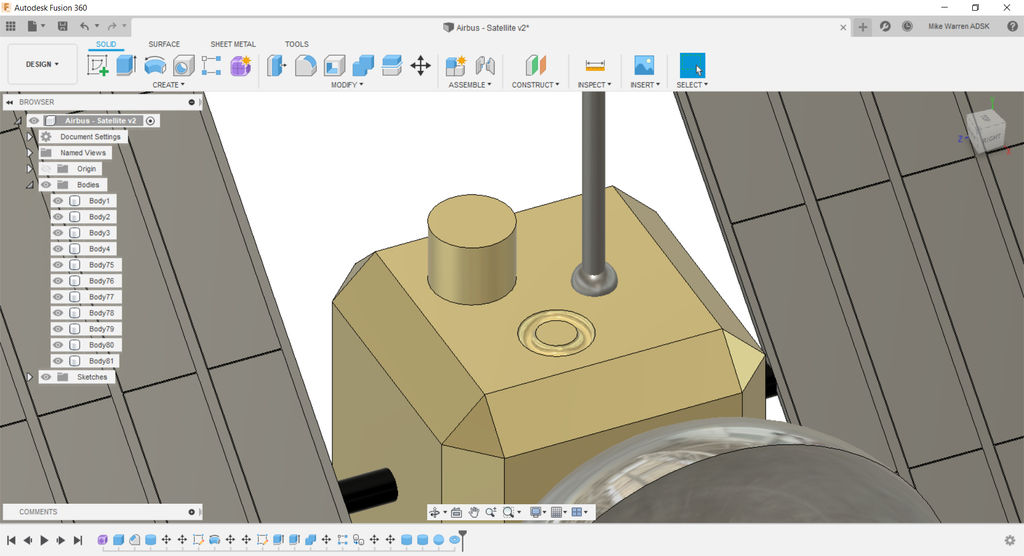
In the image above I added an antenna, and created a circular cut out to give my satellite some dimension. Continue adding elements to your design until you are satisfied.
Render
When you've spent the time refining the shape and added color to the areas of your design, we can render the output and see what it could look like beyond just a computer drawing.
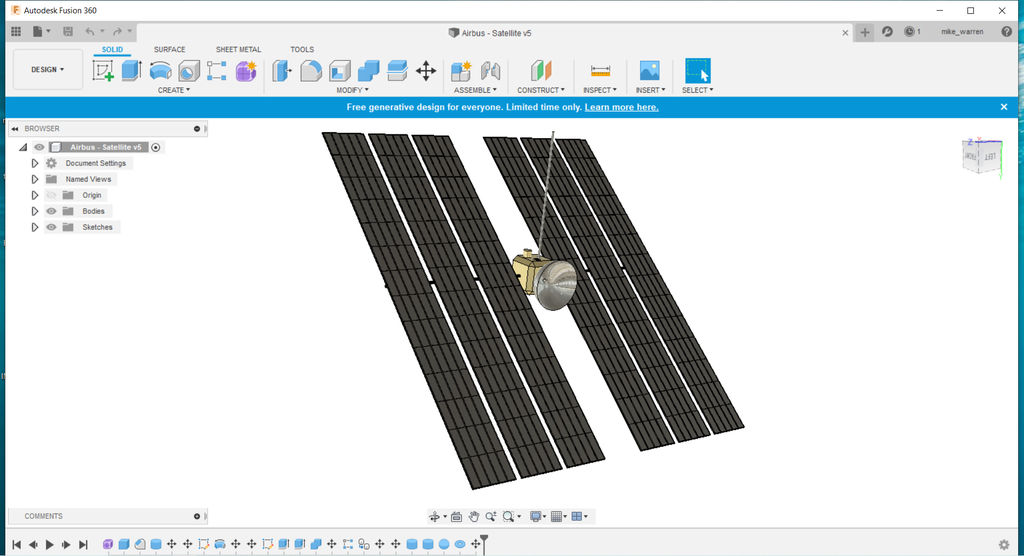
Change the interface from design to render, which will bring up a new environment for us to make changes to.
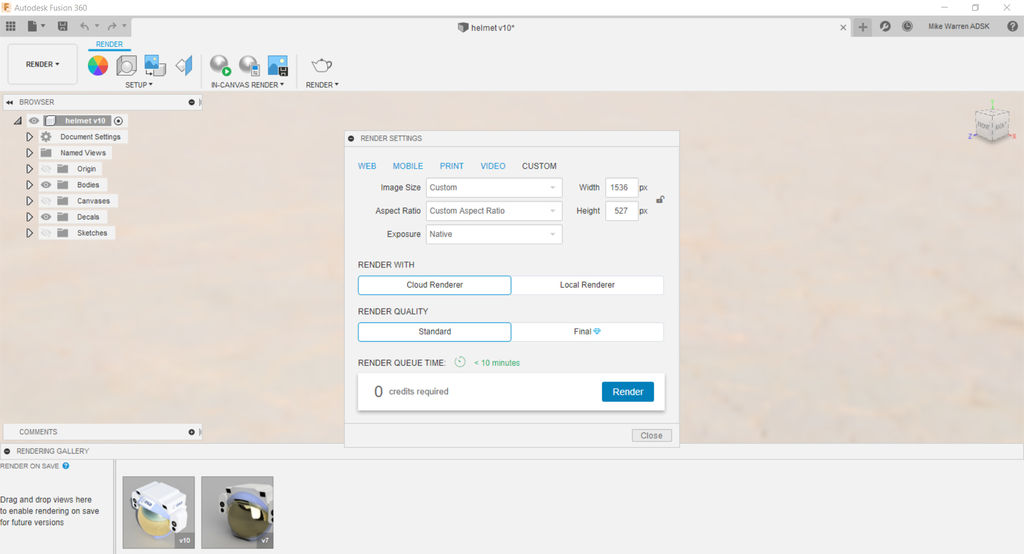
In the new top toolbar find setup and make any changes to the lighting and background that you like. When you're ready click the render icon from the top and use standard render quality, and then click render.
The design will be rendered in the cloud and returned to you. This can take a few minutes, depending on the complexity of your design. Below is what my design looks like.
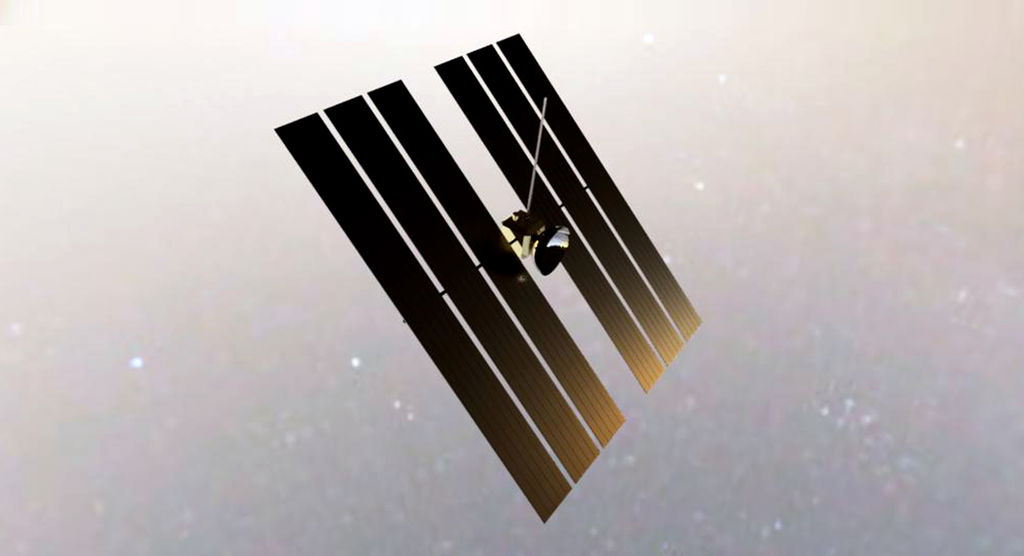
When you are done, upload your satellite designed in Fusion 360 in the comments below.Happy making :)
Out of This World!
This tutorial was created as part of the Moon Camp Challenge, a yearly 3D design competition by the European Space Agency and the Airbus Foundation, in partnership with Autodesk.
If you're up for the challenge, head out to the competition platform here, find many other moon related 3D design tutorials and submit them to potentially win amazing prizes!