Design a Space Helmet in Tinkercad
by Airbus Foundation in Teachers > 3D Design
19990 Views, 27 Favorites, 0 Comments
Design a Space Helmet in Tinkercad
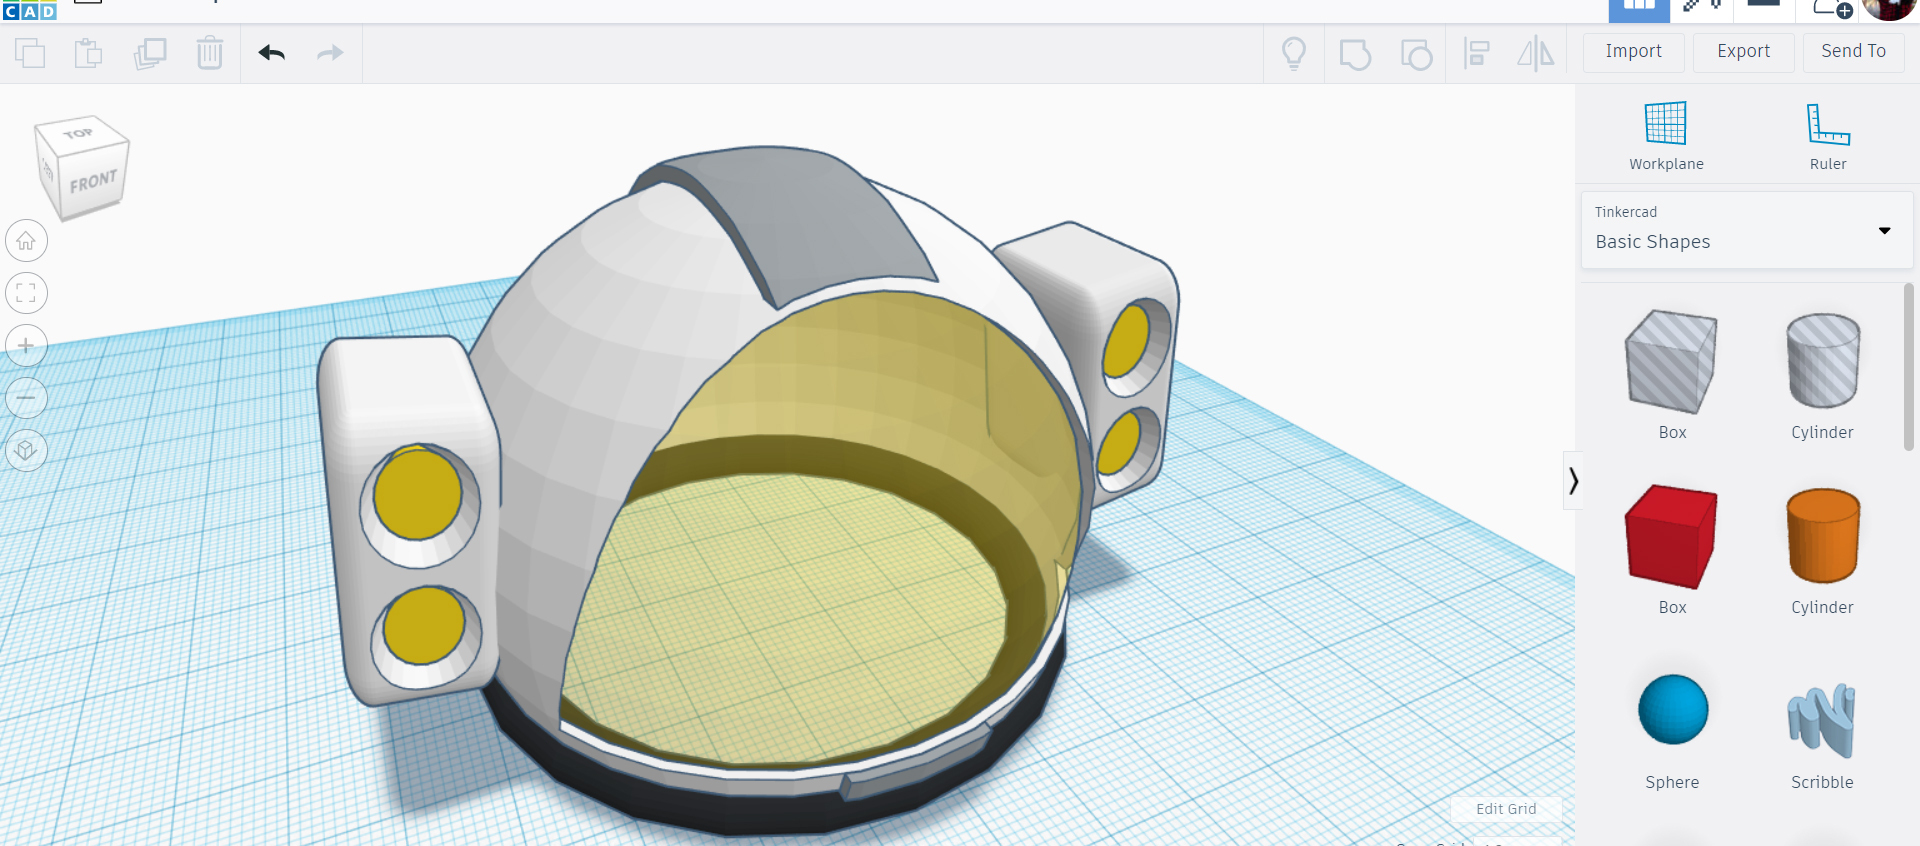
To protect themselves from the cold vacuum of space, astronauts need to have a helmet that provides safety but also functionality in order for them to perform their duties. The space helmets of the future will serve the same function as the ones we use today, but will need to include all kinds of new technology which will enhance any mission they are called on.
Gasping for air on the Moon
With no atmosphere and no air, holding our breath isn't an option on the moon! You'll need a breathing apparatus to get around. Though houseplants and algae could generate enough oxygen inside your moon pod, outside, you’re still on your own.
The future of space travel lies in the hands of designers and engineers, just like you. In this Instructable we'll explore designing a Space Helmet using Tinkercad, a fun way to explore design by combining shapes to make your model. Think of it like digital building blocks.
Below is the Space Helmet we will be making together. Take a moment to interact with the model below and see it from all angles before we get started.
The moon is closer than ever with new advancements in space technology. The next breakthrough in space design could come from a designer such as yourself. Let's get making this Space Helmet!
Basic Helmet Shape
Go to Tinkercad and start a new design.
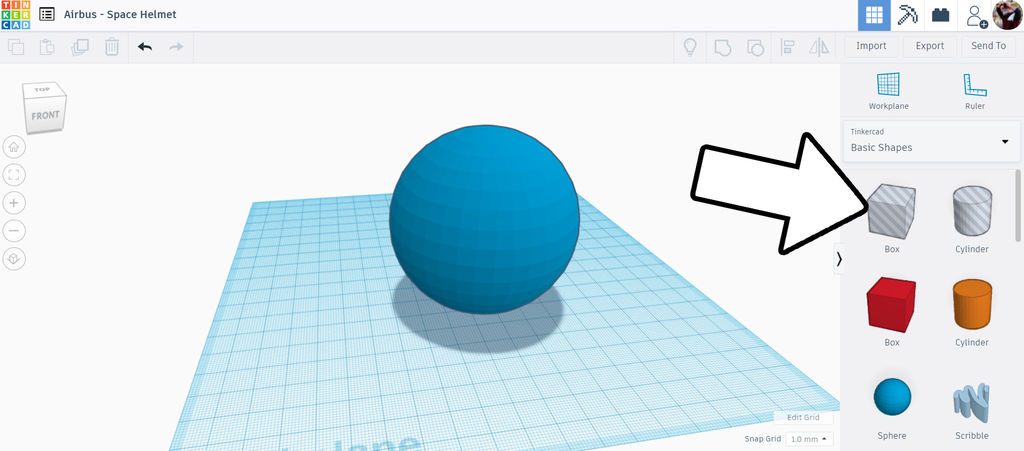
From the shape library on the right side of the screen, drop a sphere and a box hole onto the workplane. We will use the box shape to trim off the bottom of the sphere.
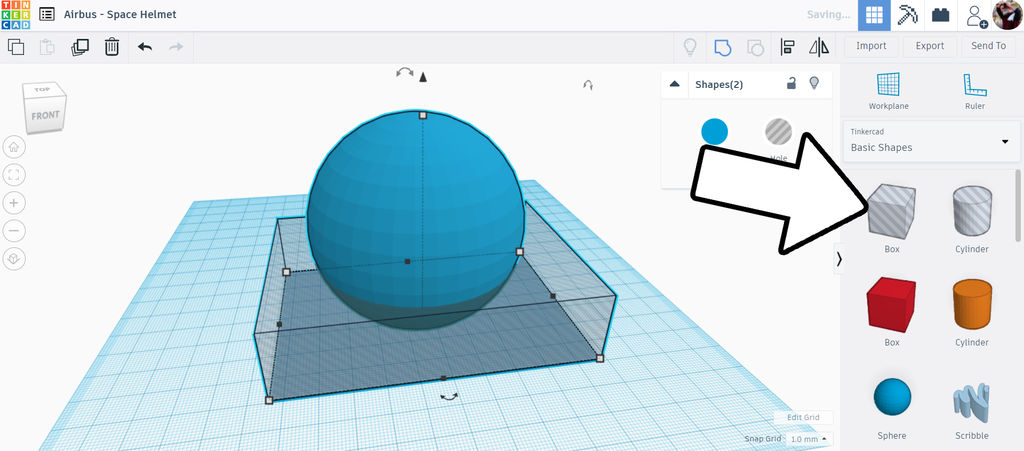
Select the box hole and use the white handles on the corners to stretch the shape out larger than the sphere. Use the white handle on the top to change the height of the box, you want to trim off the bottom 1⁄4 of the sphere.
When ready, select both shapes and use the group command from the top toolbar (or ctrl + G).
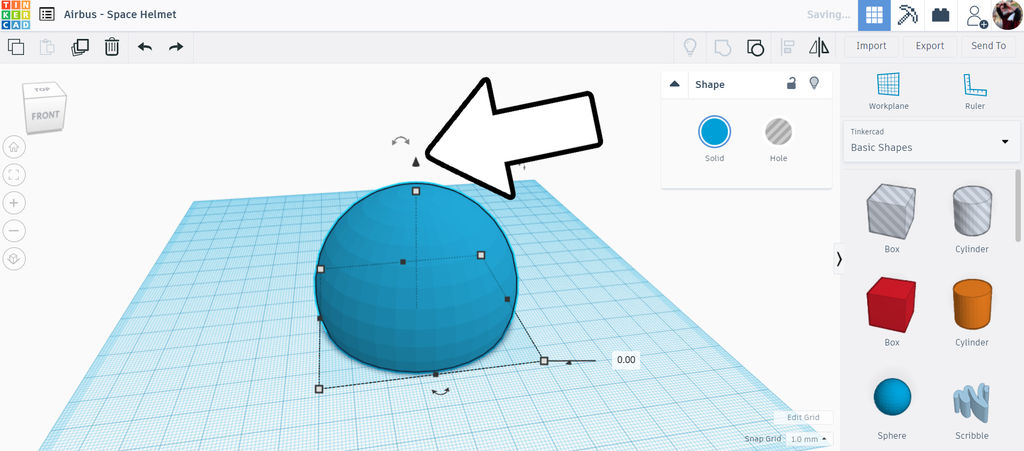
After grouping you'll notice that the chopped sphere is floating above the workplane. Select the chopped sphere and use the arrow on the top of the shape to drag the shape down to the workplane. You'll know it's resting on teh workplane as the distance meter that appears when you drag it down will reach 0.00.
Duplicate + Resize
Next, let's make some copies of this chopped sphere. Select the sphere and duplicate (ctrl + D), then drag the duplicate to one side.
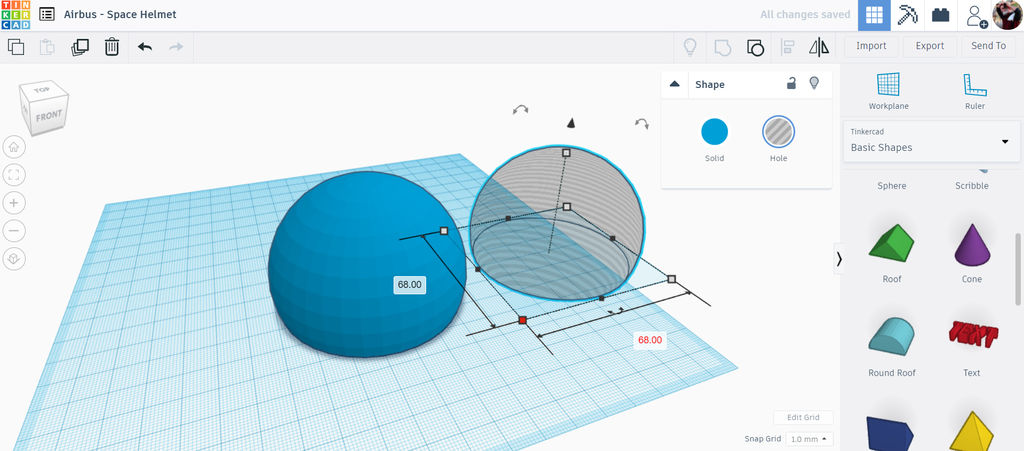
Now make another duplicate. If you push ctrl + D again right after the fist duplicate you will make another one that automatically is off to the side.
Change one of the duplicates to a hole shape by selecting it and using the color pop-up to make it into a hole. The second duplicate you can change the color to gold and then use the transparent button to change the opacity.
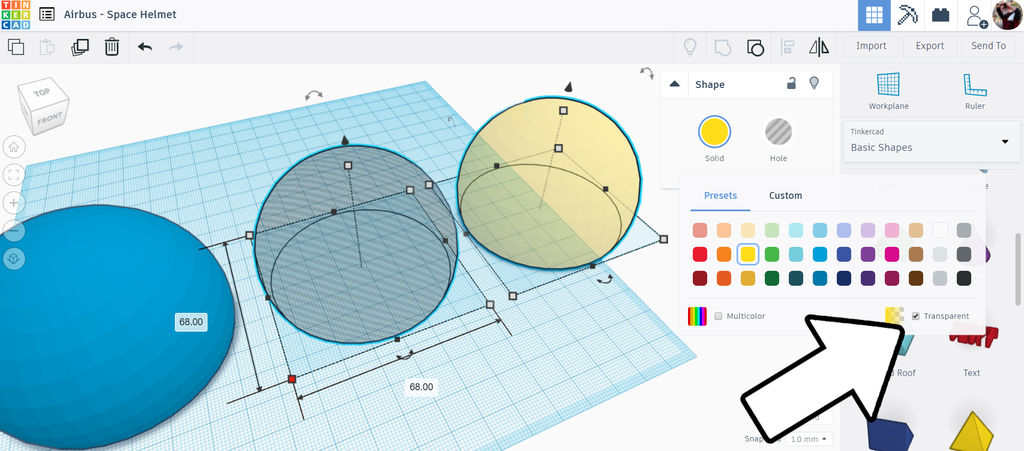
Select both duplicates and resize them by holding down the shift key and pulling the white handle inwards. Holding the shift key constrains the scaling so that it is uniform. We want the duplicates to be only slightly smaller than the original. We can achieve this by starting to scale by dragging, then releasing the mouse and manually entering in a value in the numerical box on screen.
For example, if my original chopped sphere was 70mm in diameter, the duplicates should be 68mm in diameter.
Align and Combine
With the duplicated spheres resized, select the resized hole sphere and the original sphere, then select the align tool from the top toolbar.
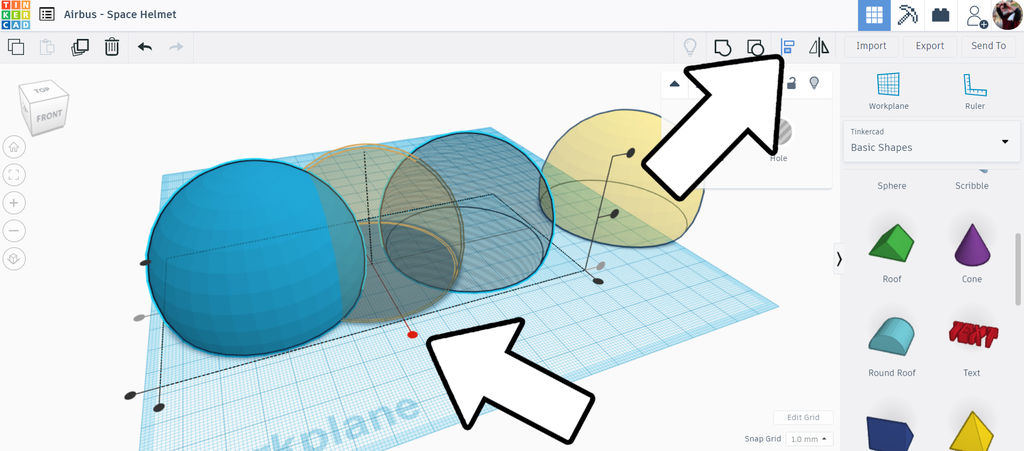
You will see a grid appear below the two shapes you have selected. We want these shapes to align with each other in both axes. Select the middle node of the grid below the shapes to snap them together in that axis, repeat as needed so both shapes sit centered on each other (the smaller one will disappear inside the larger one).
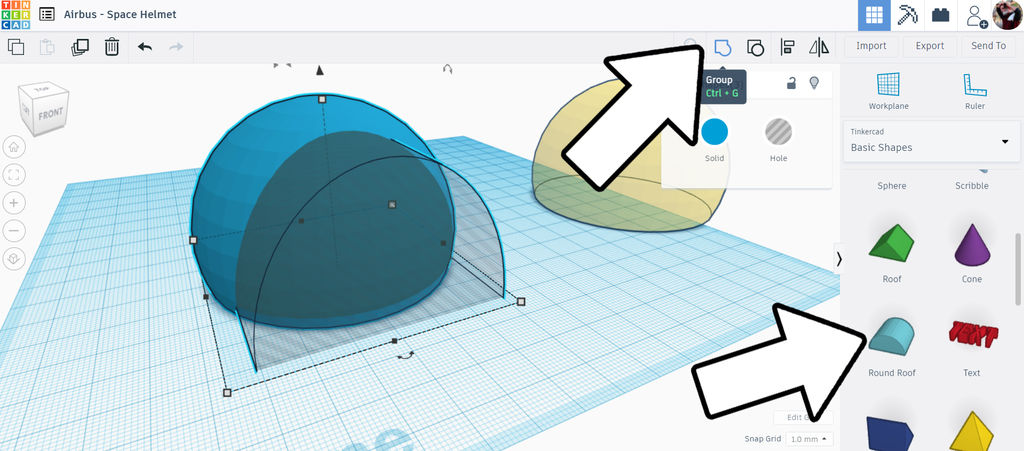
Drop a rounded roof shape onto the workplane and resize it as needed to make a rounded opening in the front of the chopped sphere. You may want to use the align tool again here to center up the shapes. Make sure to lift the rounded roof shape off the workplane slightly, this will be the bottom portion of the helmet by the chin.
When you're ready, select the chopped sphere with the smaller hole sphere inside, and the rounded roof, and group them together.
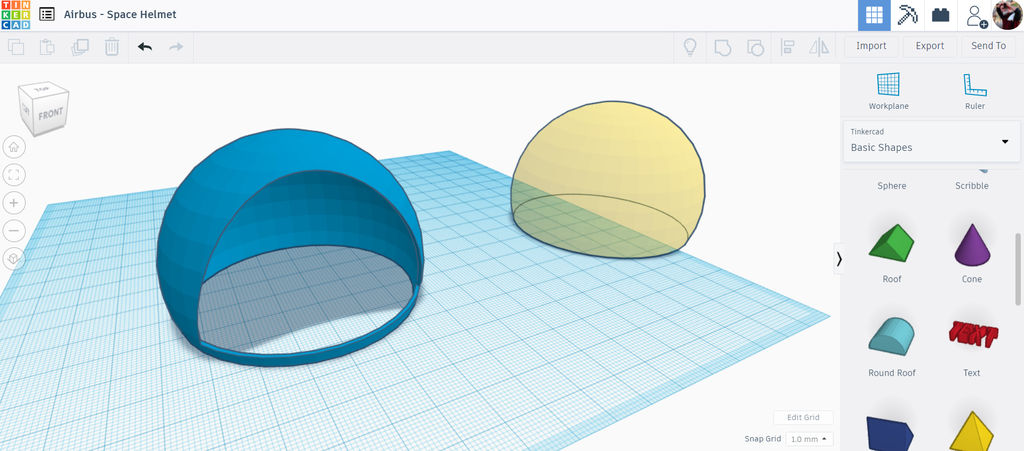
Here is what the 3 shapes look like when they are grounded together, the yellow chopped sphere in the background will be the visor added later.
Add Visor + Color
With the shell of the helmet made we can move the visor into the shell.
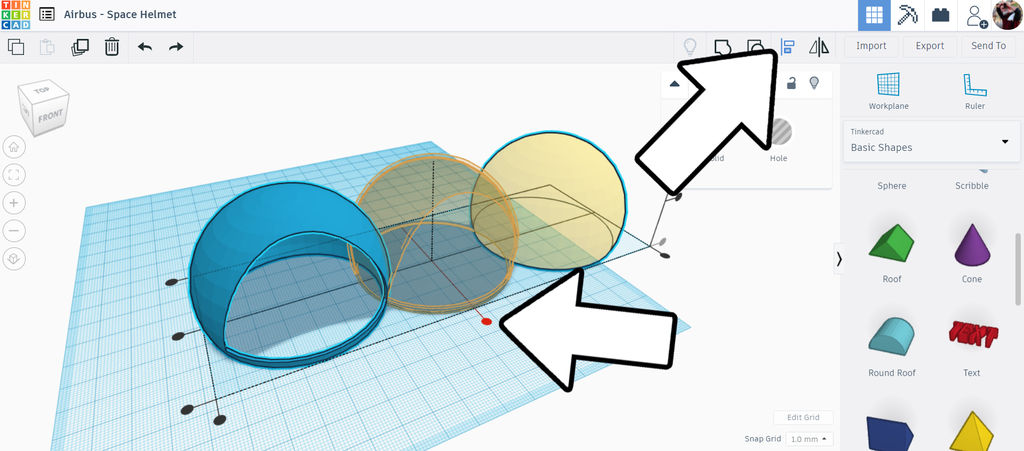
Select the shell and the visor sphere and use the align tool to bring the two together. Don't group them together.
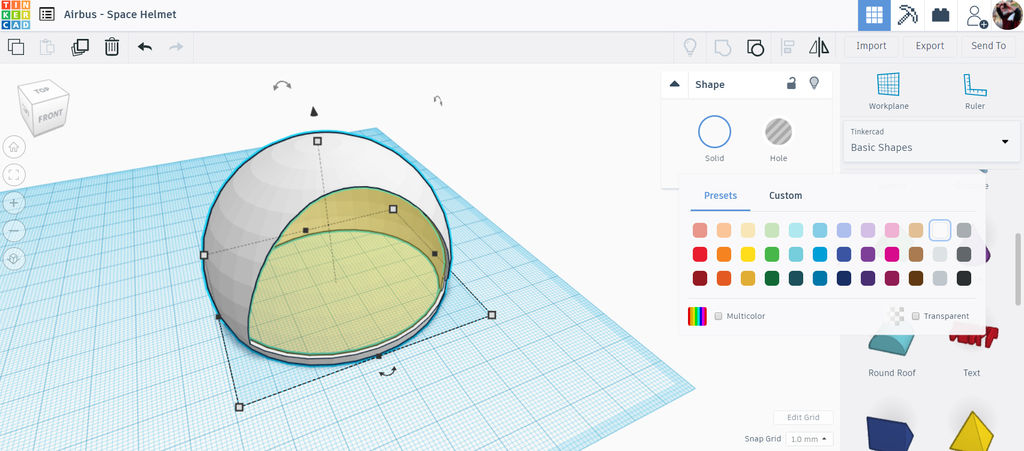
Now is a good time to add some color to the shell to look like a real space helmet. Select the shell and choose a color from the pop-up menu on the right. I chose white.
Helmet Collar
The helmet design is coming together, but needs a few more elements to achieve the design we want. Let's add a collar around the bottom of the helmet.
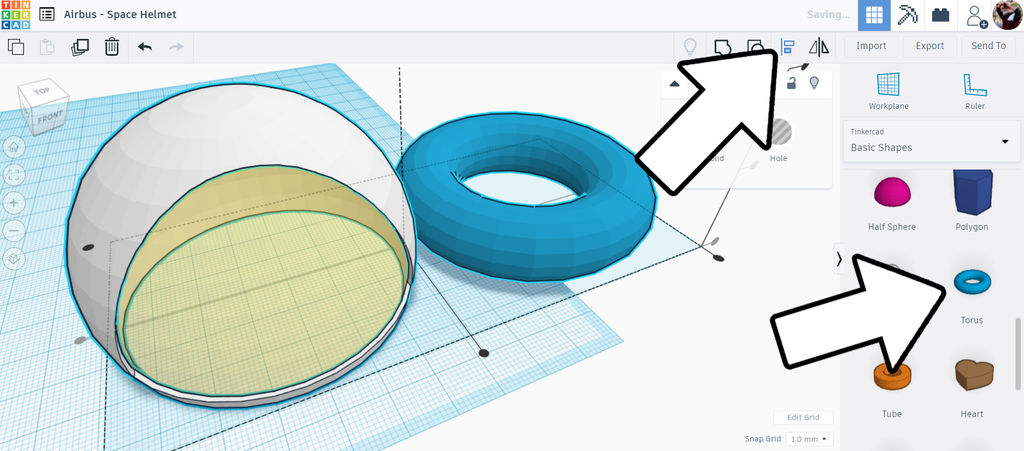
Find the torus shape from the library and drop it onto the workplane. With the torus selected, move the sliders around on the pop-up menu to reduce the thickness of the torus, then grab the handles and resize the torus to be slightly larger than the bottom of the helmet. Using the align tool here is helpful to keep things lined up.
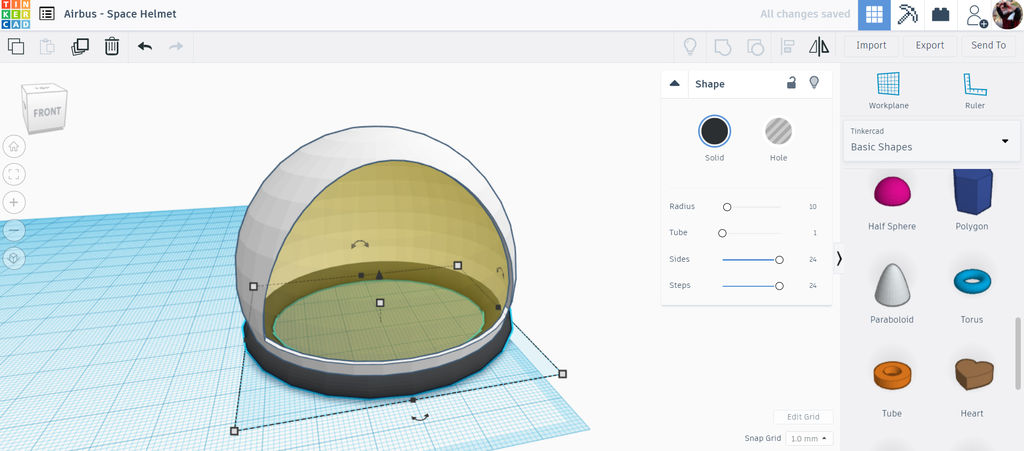
Change the color to black and move the torus height to the bottom of the helmet. Looking good!
Helmet Stripe
The helmet shape is great, but looks a little boring with no visual interest on the top. Let's add a stripe to make this helmet more exciting.
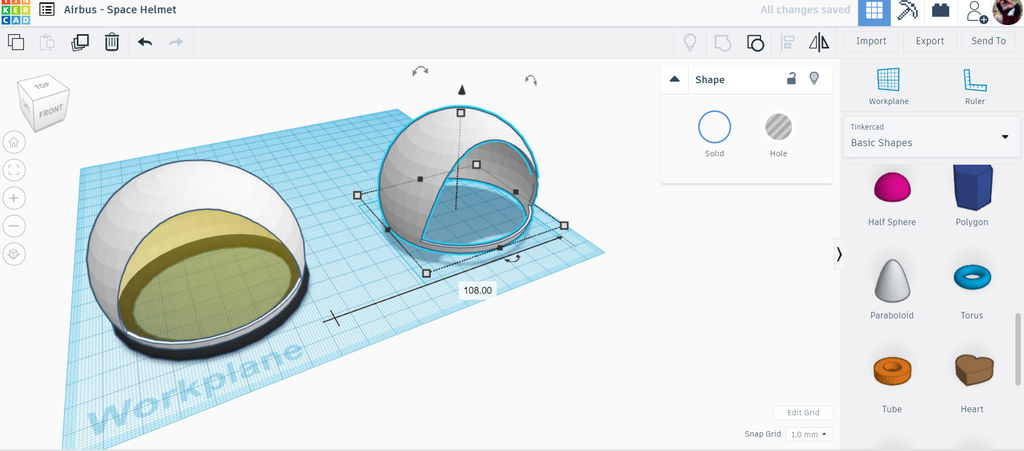
Select the shell of the helmet and duplicate the shell, then move the copy off to the side.
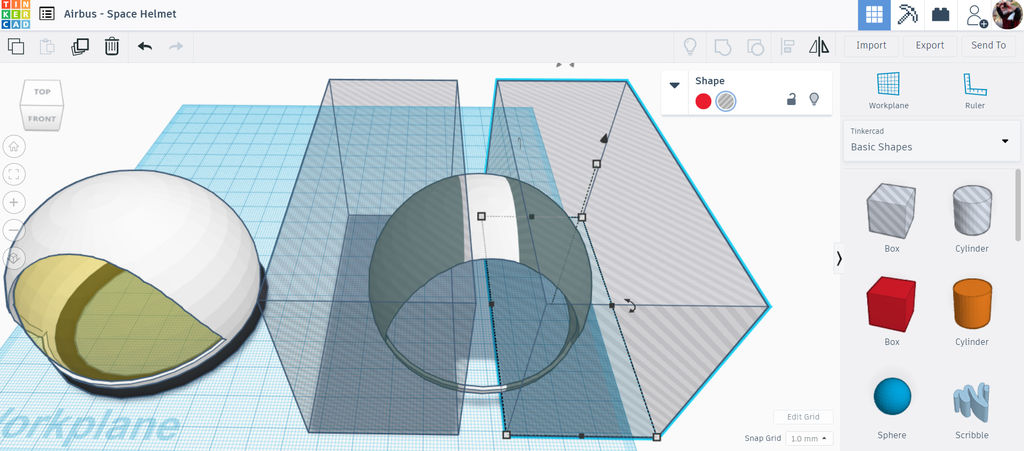
Drop a box hole into the workplane and stretch it out so that it covers almost one half of the shell duplicate. Make a copy of the box hole and move it to the side of the helmet, leaving a small section of the shell along the middle uncovered by the hole boxes.
Select both hole boxes and the shell duplicate and group them together, leaving a stripe of helmet.
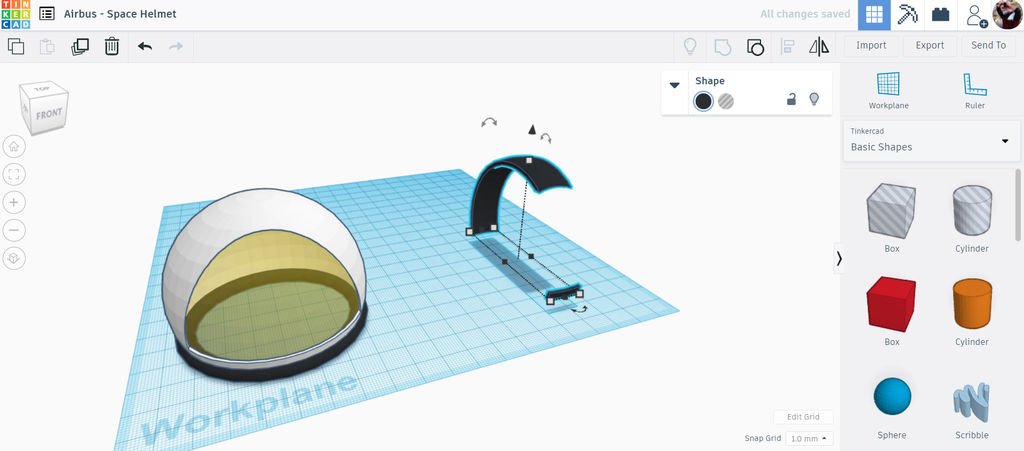
Here is what mine looks like, colored black.
Scale Stripe
Now we need to align these elements back together again. Select everything and align so that the shapes sit on top of each other.
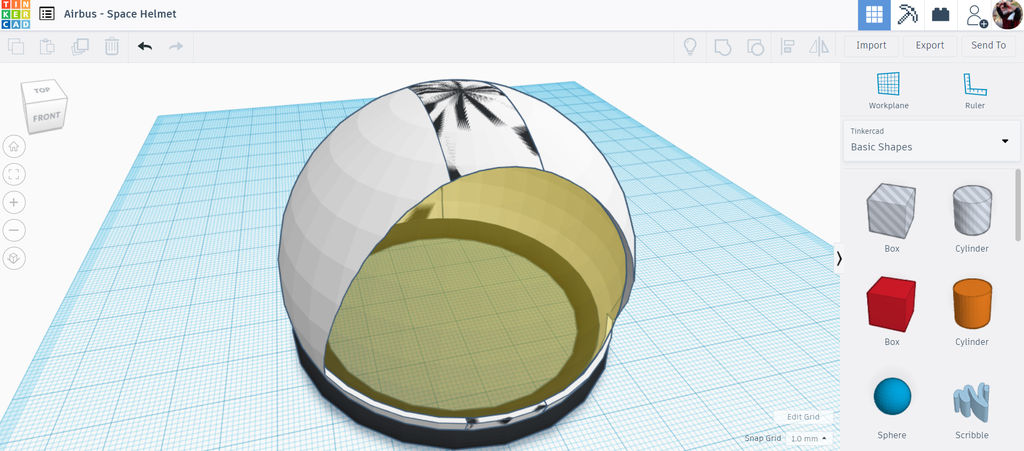
Something doesn't look right here. Because the stripe was made from a duplicate of the shell they are the same size and are sitting inside each other. To fix that we'll select just the stripe and resize it to it's slightly larger than the shell.
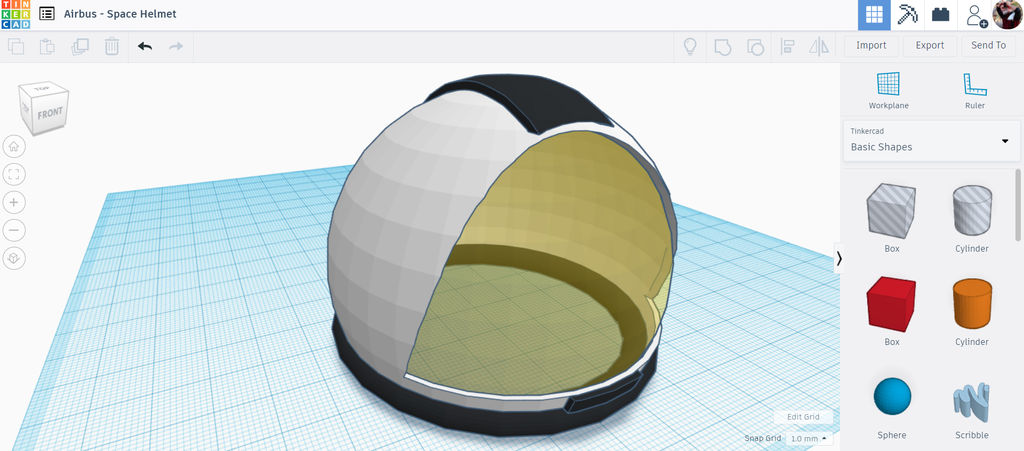
With the stripe selected, grab a corner handle and hold shift + alt and drag outwards. The shift key will constrain the scaling to be uniform, and the alt key means to scale from the center of the shape outwards (which keeps the aligned location locked).
You only need to make it slightly larger, so you could type in a number manually into one of the numerical boxes instead of dragging.
Helmet Accessories
Now we can add some accessories to the helmet to really bring this deign to life. For my design, I wanted to have an instrument or light cluster on each side of the helmet.
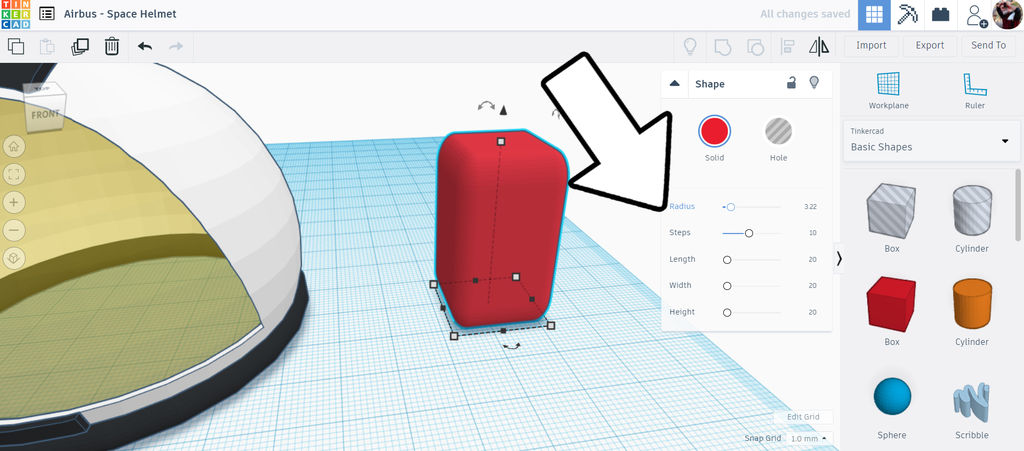
I started by dropping a box onto the workplane, then moving the radius slider on the pop-up to round over the edges.
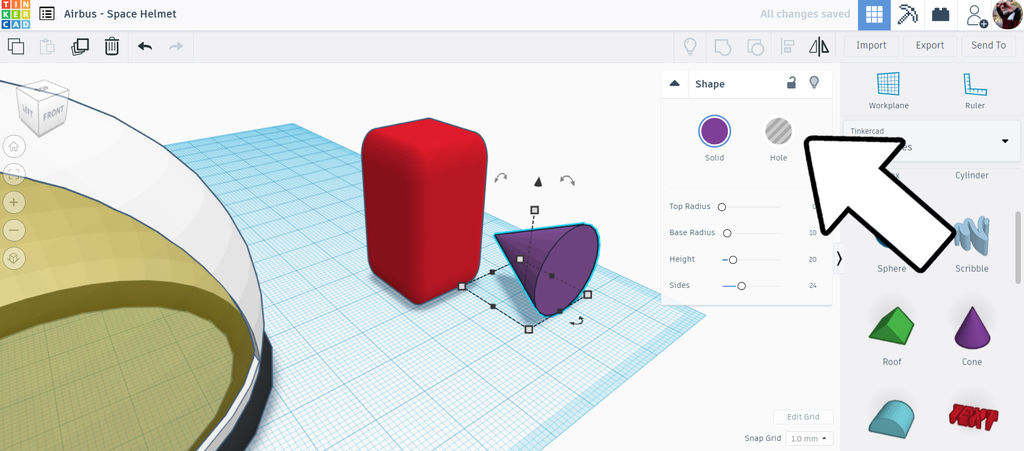
Next I dropped a cone shape onto the workplane and rotated it by 90°. The align tool was used again to line the two shapes up. I then changed the cone to a hole from the color pop-up menu,
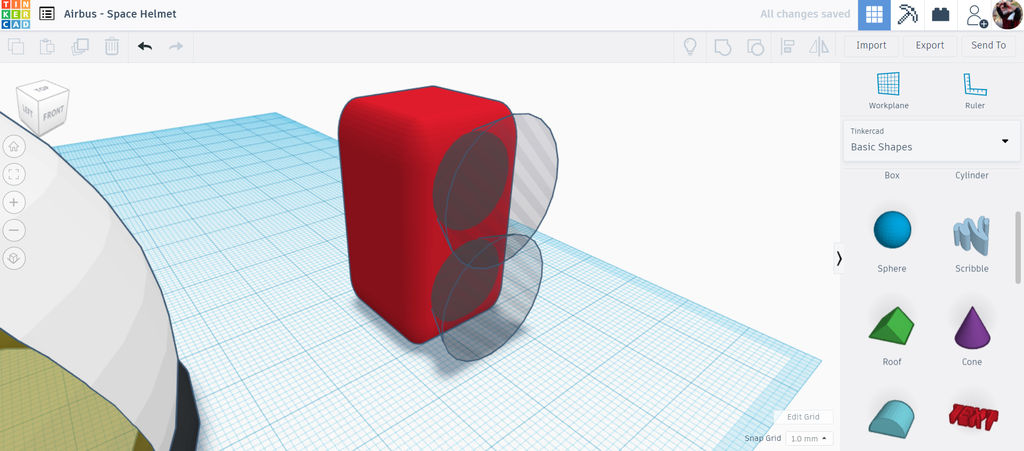
The cone was duplicated and the copy was lifted upwards so the two cones were stacked. The cones and rounded box were all selected and grouped to carve out the cone shape from the box.
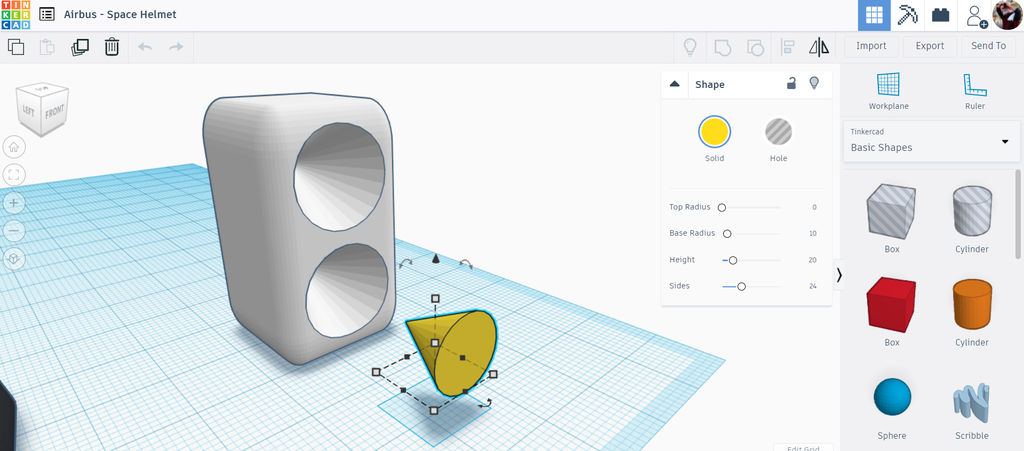
A new cone shape was dropped onto the workplane, then rotated and placed like before. I changed the color of the cone to yellow and the carved box to white. The cone was resized to fit inside the cone-shapes carve out.
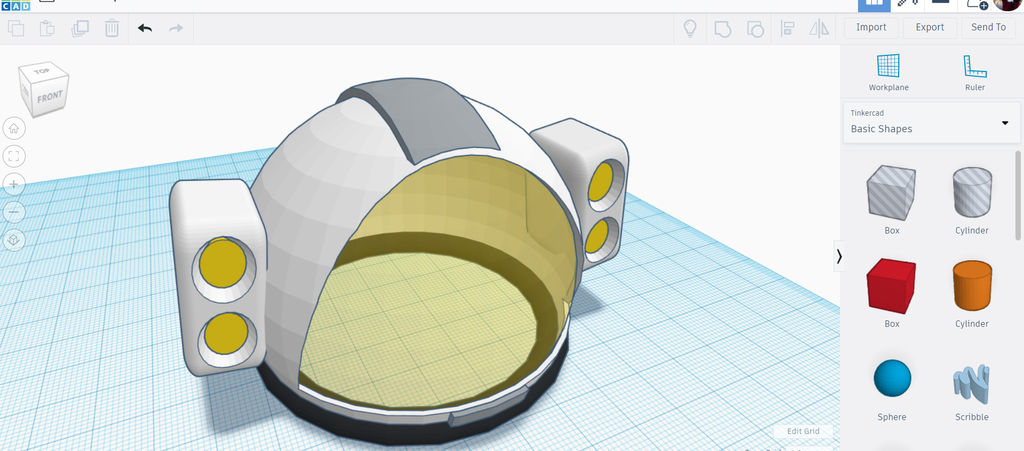
Once I had the design the way I wanted the entire assembly was selected and move to the side of the helmet. I made a duplicate of this and moved the copy to the other side so there were lights on both sides of the helmet.
This space helmet is complete and ready to explore the final frontier of space! What design choices did you make with your space helmet?
Take Your Design to New Heights!
This tutorial was created as part of the Moon Camp Challenge, a yearly 3D design competition by the European Space Agency and the Airbus Foundation, in partnership with Autodesk.
If you're up for the challenge, head out to the competition platform here, find many other moon related 3D design tutorials and submit them to potentially win amazing prizes!