Design a Space Helmet in Fusion 360
by Airbus Foundation in Teachers > 3D Design
9084 Views, 21 Favorites, 0 Comments
Design a Space Helmet in Fusion 360
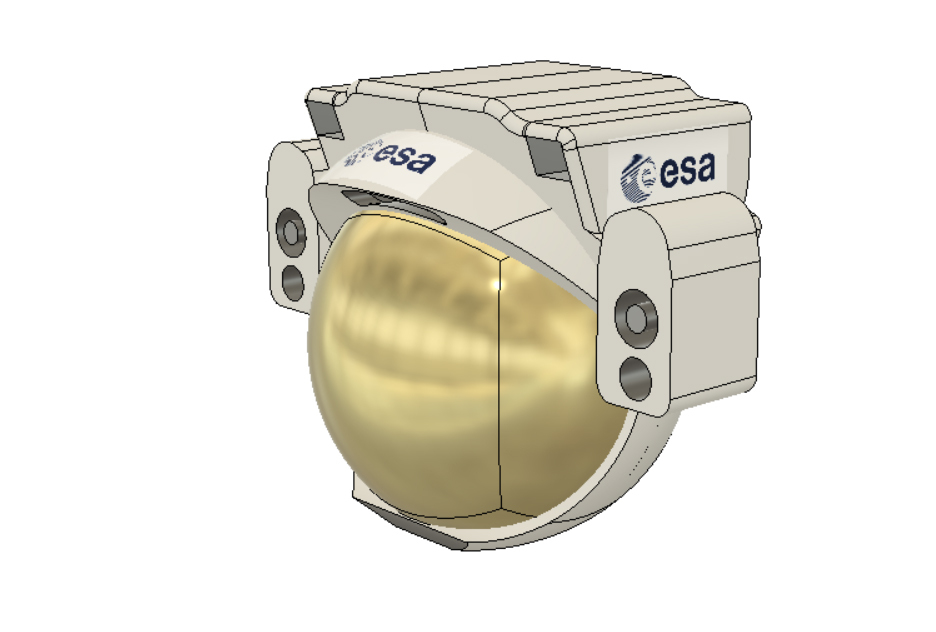
To protect themselves from the cold vacuum of space, astronauts need to have a helmet that provides safety but also functionality in order for them to perform their duties. The space helmets of the future will serve the same function as the ones we use today, but will need to include all kinds of new technology which will enhance any mission they are called on.
Gasping for air on the Moon
With no atmosphere and no air, holding our breath isn't an option on the moon! You'll need a breathing apparatus to get around. Though houseplants and algae could generate enough oxygen inside your moon pod, outside, you’re still on your own.
The future of space travel lies in the hands of designers and engineers, just like you. In this Instructable we'll explore designing a Space Helmet using Fusion 360, a professional computer aided design program that has everything you need from parametric design to rending your final design.
Below is the Space Helmet design we will be making together. Take a moment to interact with the model below and see it from all angles before we get started.
The moon is closer than ever with new advancements in space technology. The next breakthrough in space design could come from a designer such as yourself. Let's get making this Space Helmet!
Reference Canvas
Start by downloading Fusion 360, and making a free account.
Fusion 360 works by creating 3D models from 2D sketches on a workplane. Since Fusion 360 is parametric, you can make changes to your sketches at any time and the 3D shapes derived from those sketches automatically updates to he new values. You may find using this feature helpful if your design isn't working the way you want.
To make the space helmet accurately we'll use reference photos of other space helmets to base out design around. That way we're sure to get the overall shape right before diving into any new design direction we want to go. Conduct an image search to find some space helmets you like, then put those photos into a folder on your computer. For the best results find images of helmets either head on or in profile.
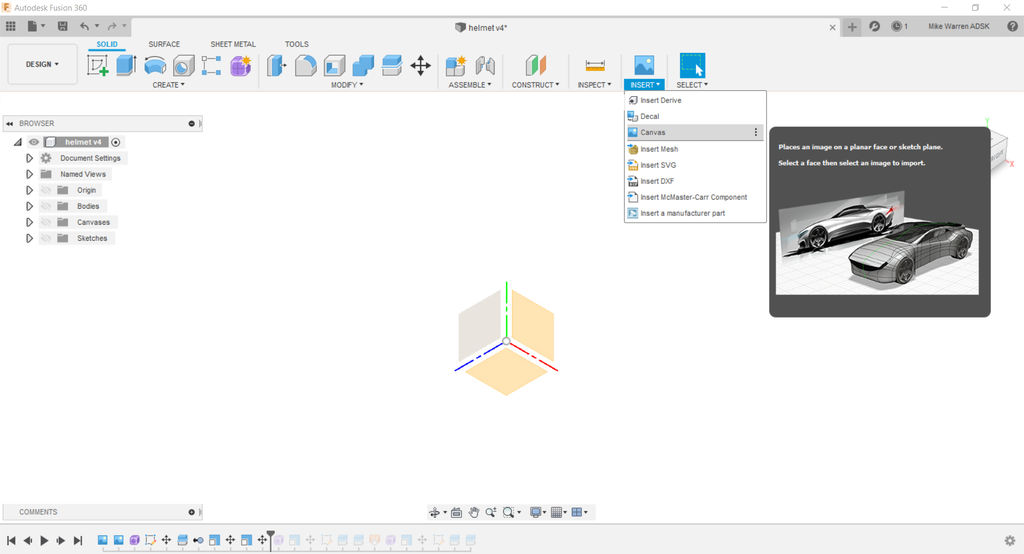
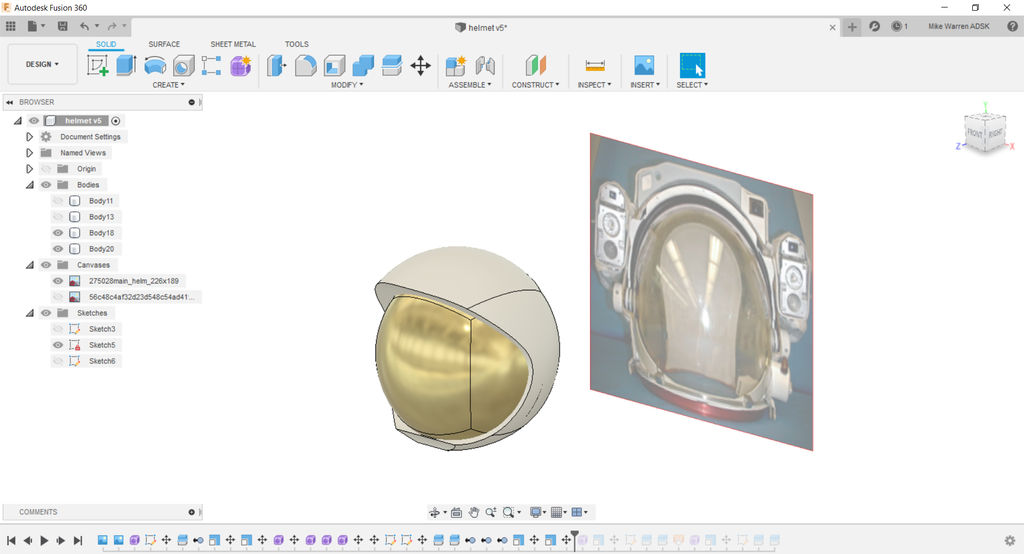
In Fusion 360 in the top toolbar find insert > canvas to add a reference photo. You'll be asked which plane you want the image to appear on. I chose two images, on perpendicular planes, one head on and one in profile. The images are not of the same helmet, and that's okay. These are just for reference.
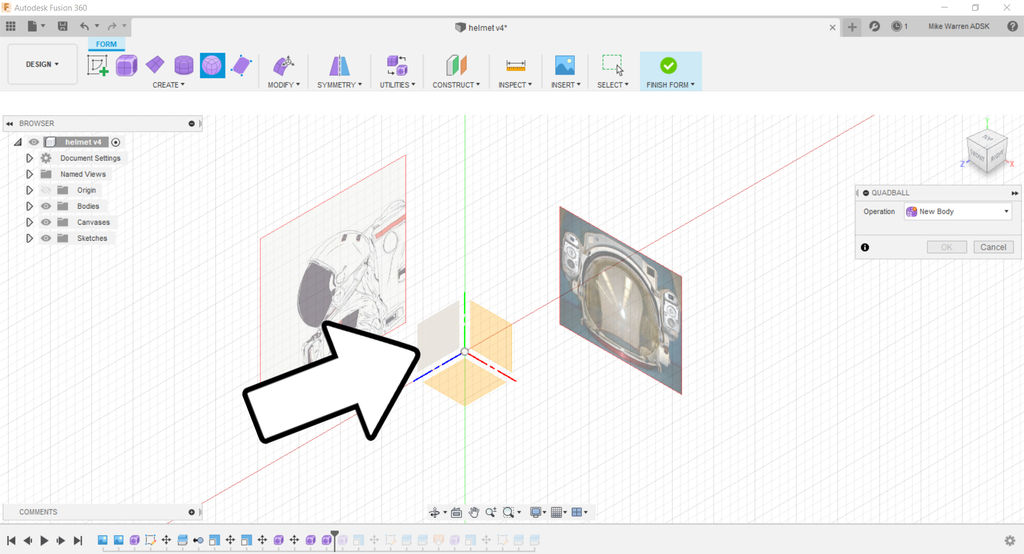
Once one reference photo is added, add the other using the same command insert > canvas. Add the other photo to the other plane on the workspace.
With our two reference photos on the workspace we can begin constructing our helmet.
Basic Helmet Shape
Most space helmets are spherical in shape, so that's where we will start. In the top toolbar find create form which will switch the toolbars to the form layout. You'll notice the icons change, too.
The icons now display a few basic shapes we can use, we'll select the sphere icon and drop a sphere into our workspace on the profile of the helmet reference image.
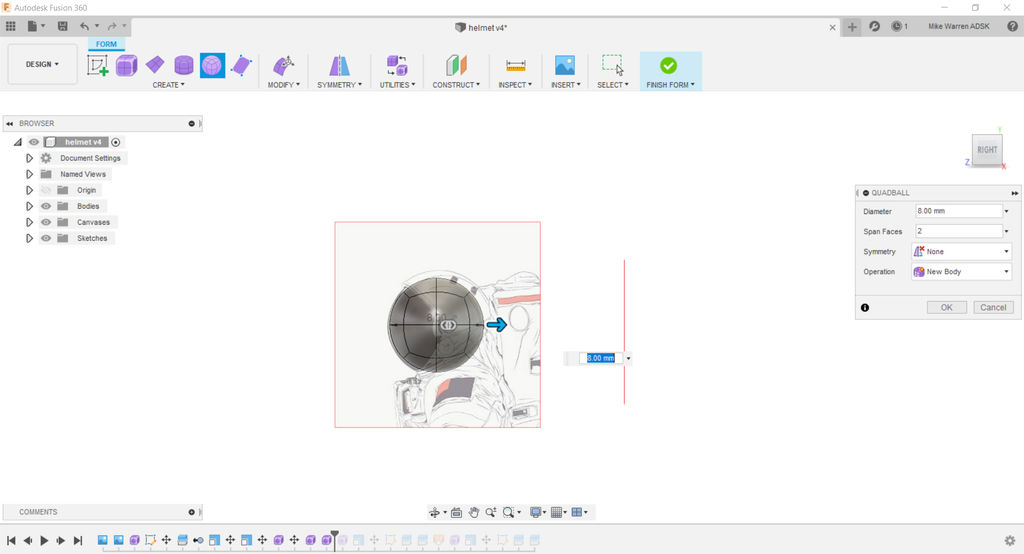
There is an arrow we can use here to resize the sphere to meet our reference photos. It doesn't have to be exact, as we can do some scaling afterwards. The smaller arrows inside the sphere are for incresing the density of the mesh (the thin black lines on the sphere), we want to keep things simple now, so don't make the mesh dense as it will just slow down the design process at this stage.
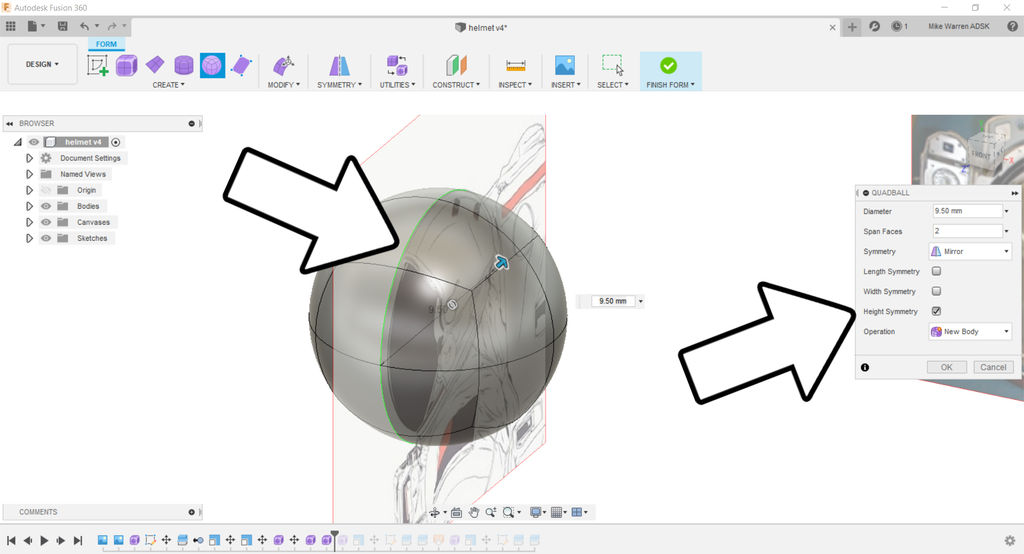
Before committing to the shape take a look at the options panel that has opened up after placing the sphere. There's an option for symmetry which we want to include, make sure your sphere has height symmetry chosen. This means that any action done on one side of the sphere will be done to the other side, keeping the shape symmetrical.
When you're ready, click the finish form button on the top toolbar, it has a green check icon.
Make Cut Outs
With the basic shape in place we can start making some design choices. From the top toolbar make a new sketch on top of the profile reference photo that has the sphere you just placed.
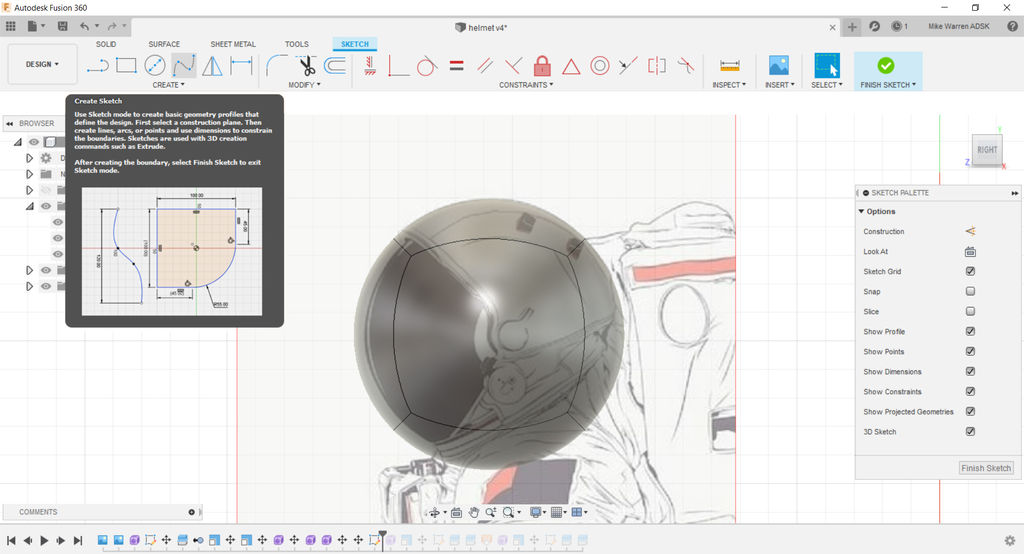
We'll use the spline tool to follow some of the lines of the reference image and refine the overall shape, and make the visor cut out. Find the spline drawing tool in the sketch tool set on the top toolbar.
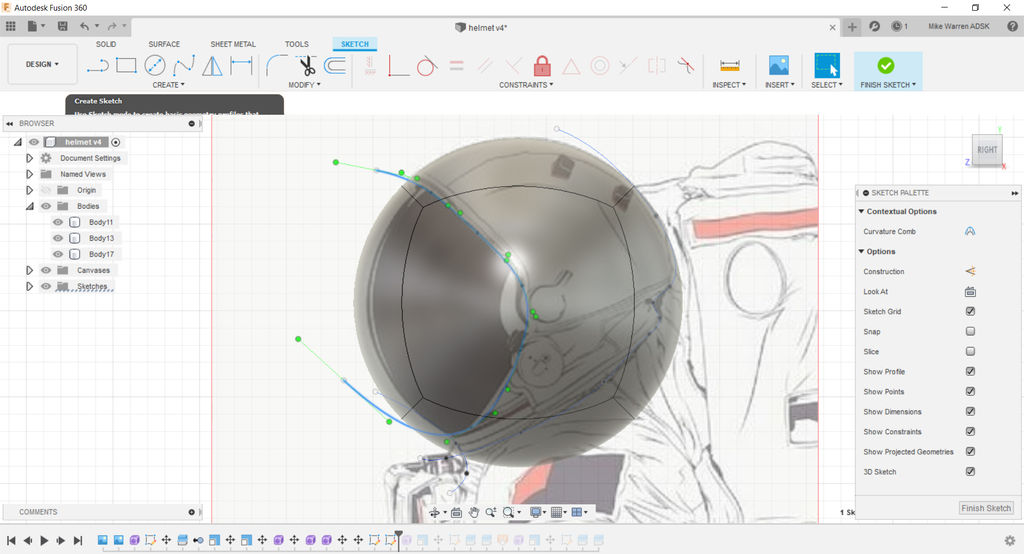
Starting with the visor section, a spline was drawn the follows the contour of the visor, making sure to start and end the spline outside of the helmet shape and sphere. The ends of the spline need to be outside the image to make sure that our slicing command that we use later cuts through the entire shape, this is our insurance that it will.
When you've finished the spline for the visor, click the check mark that appears at the end of your spline to complete this geometry.
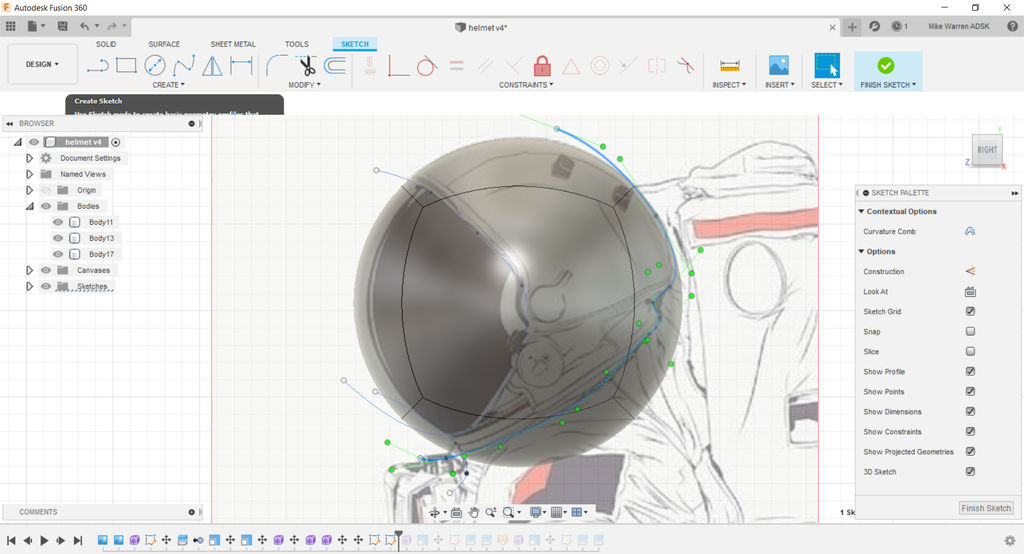
Next, make a new spline shape that follows the neck line of the helmet, all the way up the back side of the helmet, with the ends of the spline geometry beginning and ending outside the reference image and sphere. Use the check mark when done with this spline and then click finish sketch from the top toolbar to go back to the design interface.
Split Body
To make the cut outs from the splines we just made we'll use the split body command.
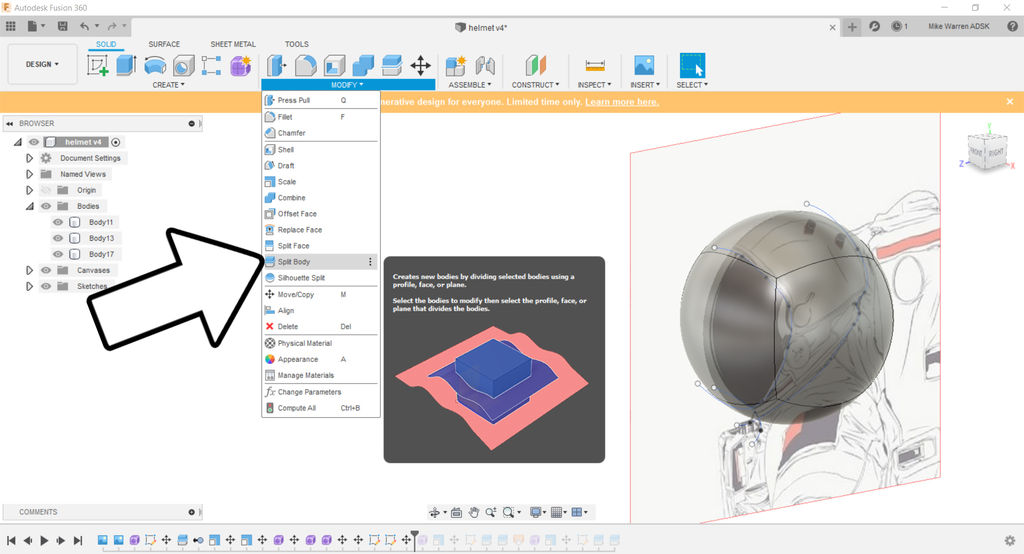
From the top toolbar find modify > split body.
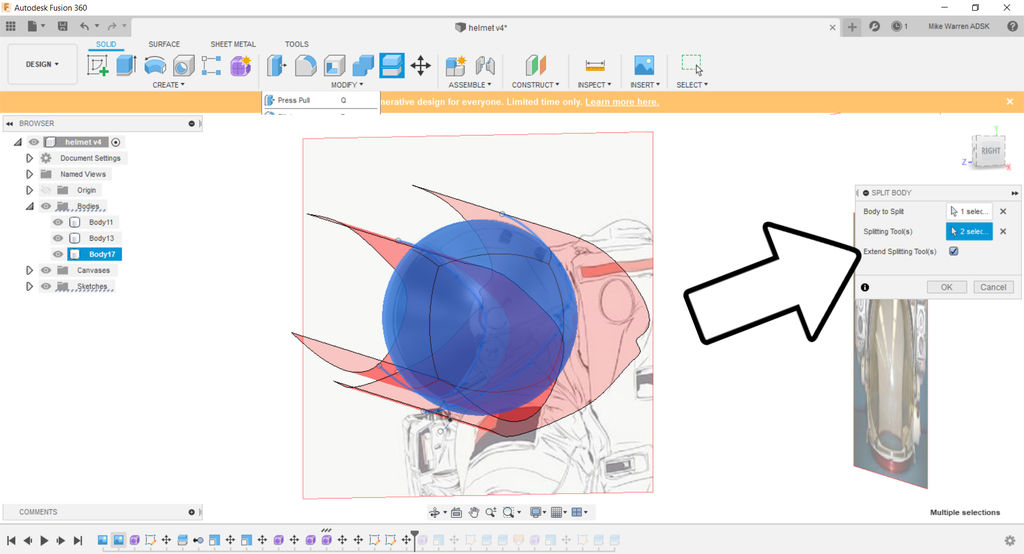
A pop up window will appear and ask you to select the body to split, the sphere, and the splitting tools, the two spline sketches we just made. Make sure the extend splitting tool box is checked.
Click OK. It won't look like anything has happened, but if you look closely the sphere now has split lines where the spline geometry was. This will now allow us to remove/edit these specific areas of the sphere.
Remove Bottom of Sphere
Looking at the sphere from the side we can see the spline geometry has now been translated to the sphere, splitting the body along those lines.
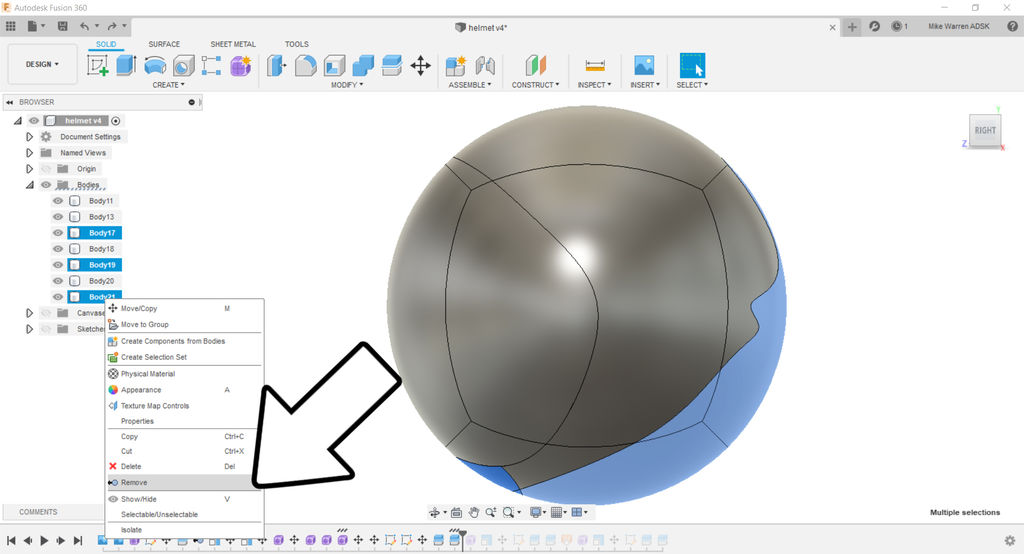
In the directory tree on the left side of the screen you can open up the bodies tab and see the separate bodies that make up the sphere. For this design, I co not want the portions in blue in the image above. I found these bodies in the tree and right-clicked > remove from the design.
Scale Visor
Now we can edit the visor part of the helmet. Find the visor part of the helmet in the bodies tree on the left side of the screen and select it.
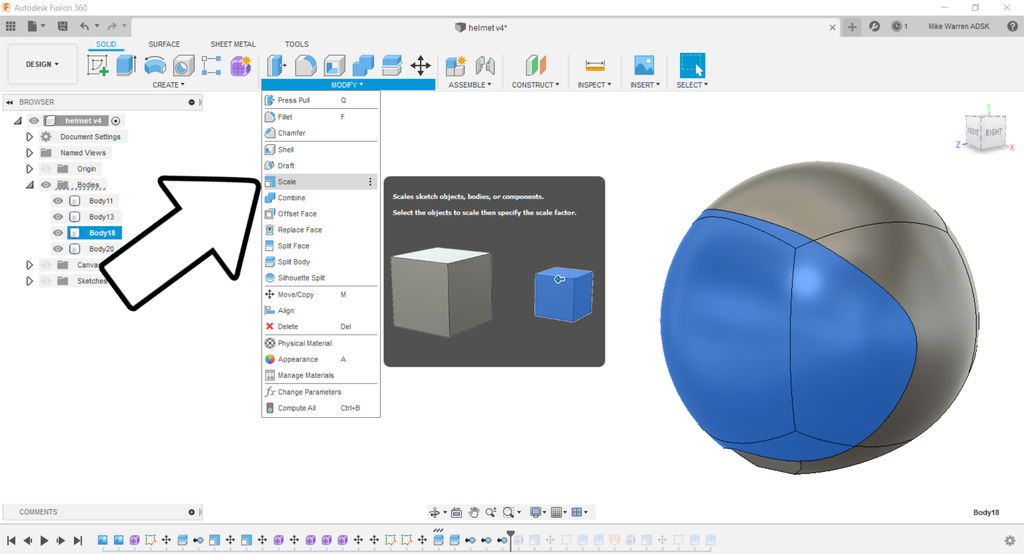
From the top toolbar chose modify > scale.
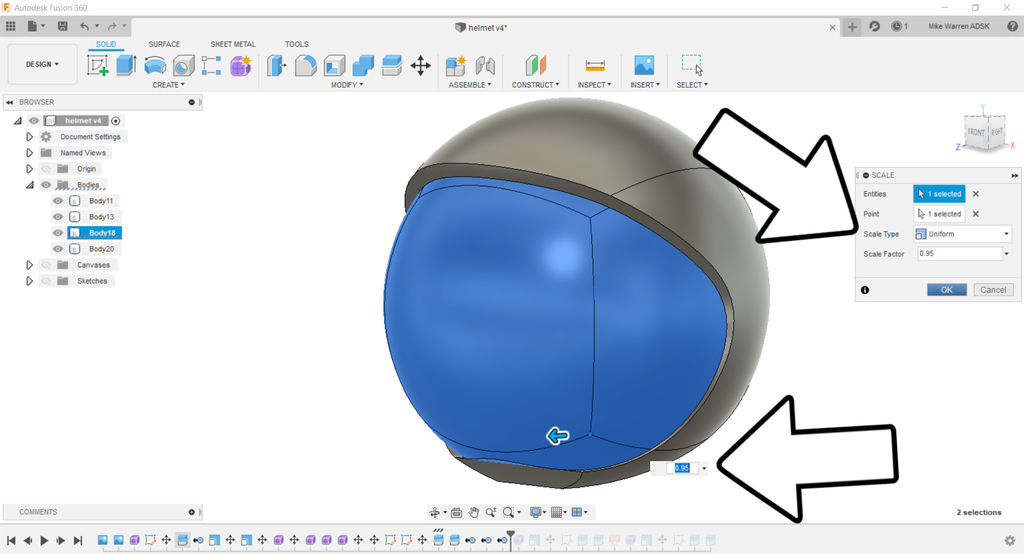
A new pop up window appears and you can modify the parameters of the scale command. I chose uniform scaling and chose a scale of 0.95, meaning 95% of the original size. Click OK to accept the scaling.
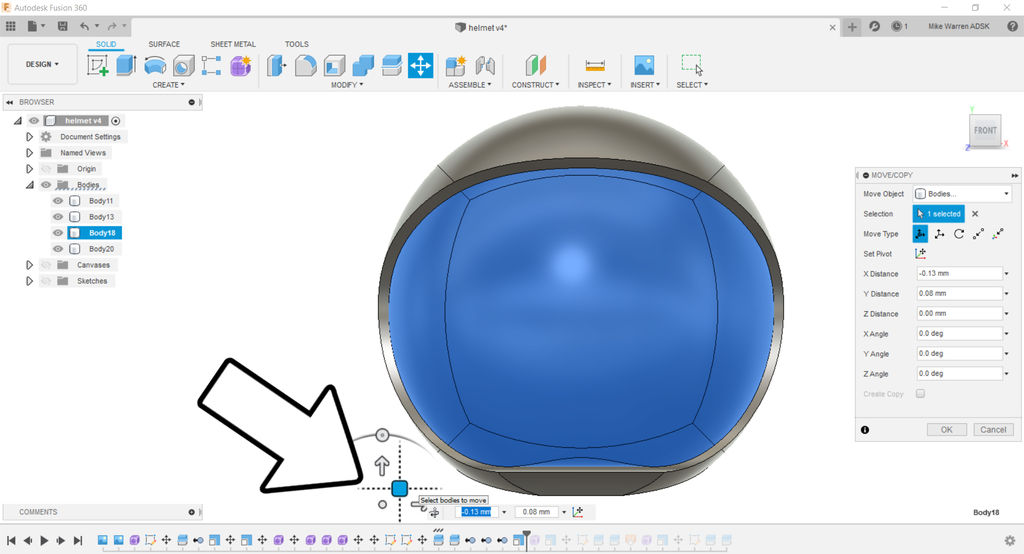
Even thought the scaling was uniform the visor moved slightly off center. Click the visor body and move it back into place, centered on the helmet.
Appearances
Though the basic shape of the helmet is coming together, it may be hard to visualize. Let's change that by adding some color to the model to help us see the design.
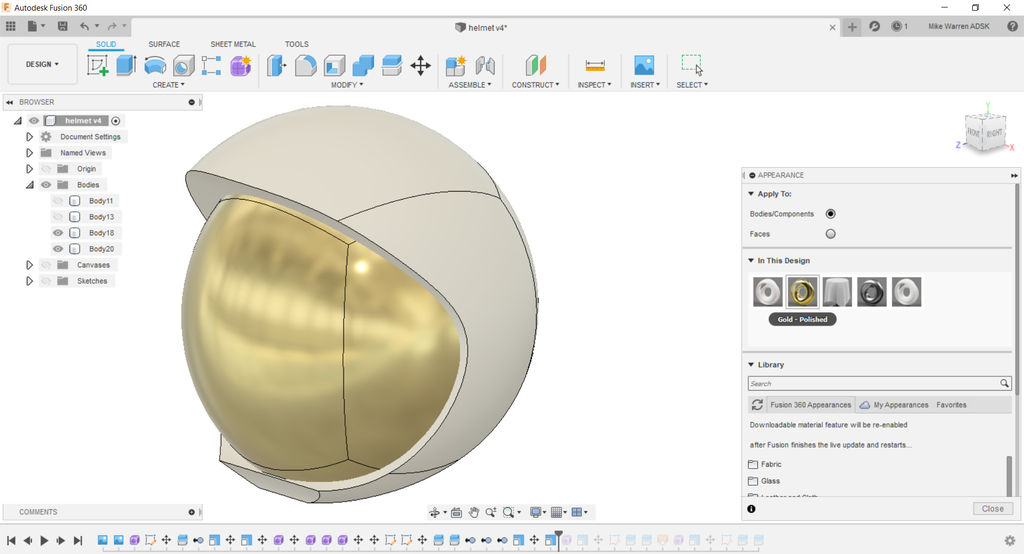
From the top toolbar find modify > appearance which will bring up a pop up that has all kinds of materials to chose from. Browse the selection, or type in a material in the search bar to find something you like.
Click and drag the material you like directly onto the model, the colors will update immediately.
I chose gold for the visor and plastic matte (white) for the helmet shell.
Helmet Details
I wanted to make an opening above the visor, on the helmet front, which could be for some future component, like a light or sensor. To make this opening I made a new sketch and chose the front face of the helmet as the plane to draw on.
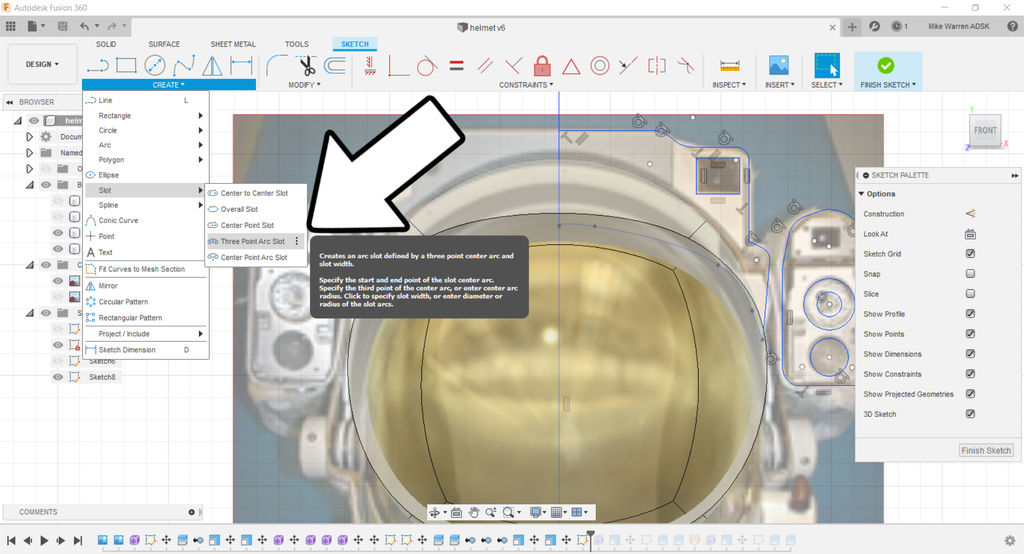
once the sketch interface is open, go to create > slot > 3-point arc slot. Then chose a start and end spots for the slot, and then a point to bend the slot towards. This will make sense as you perform the command.
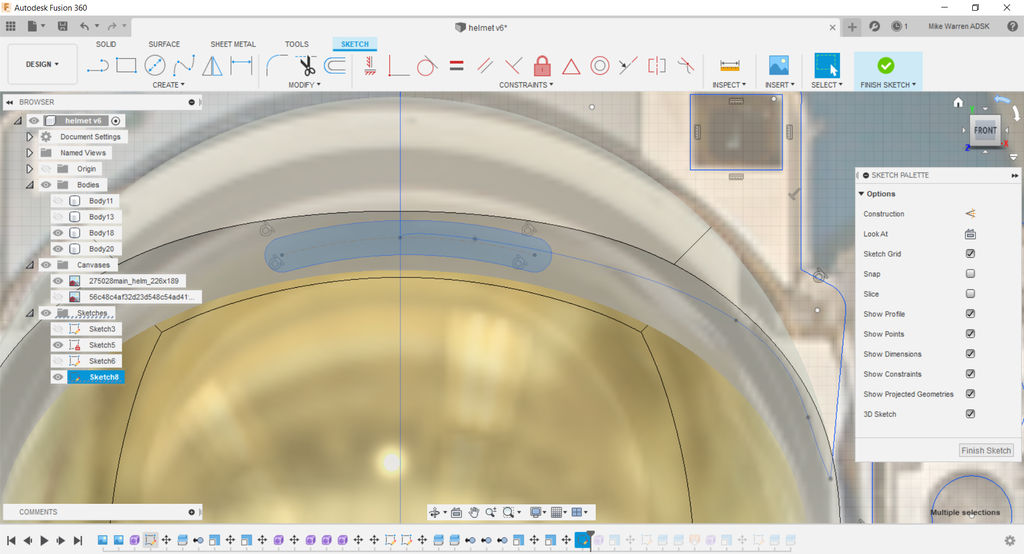
With the slot shape as we want it click finish sketch.
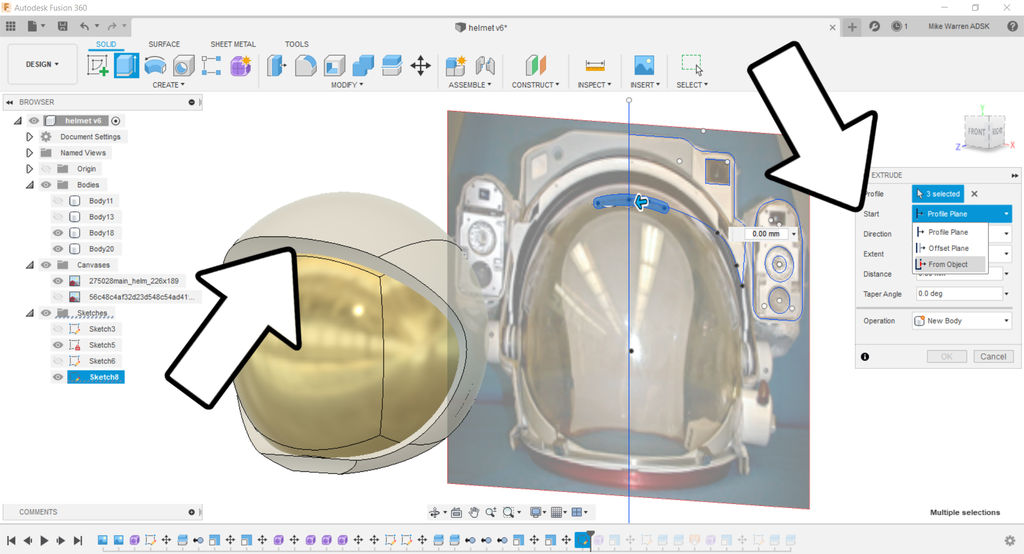
You may notice that the sketch didn't show up on the face of the helmet, but rather somewhere else behind the drawing. This is okay.
Click create > extrude to open up the extrude interface. Click on the arced slot as the profile to extrude, on the pop up find the start button and chose from object. This will allow us to have the extrusion start where we want. Chose the front of the helmet where we want the slot to be.
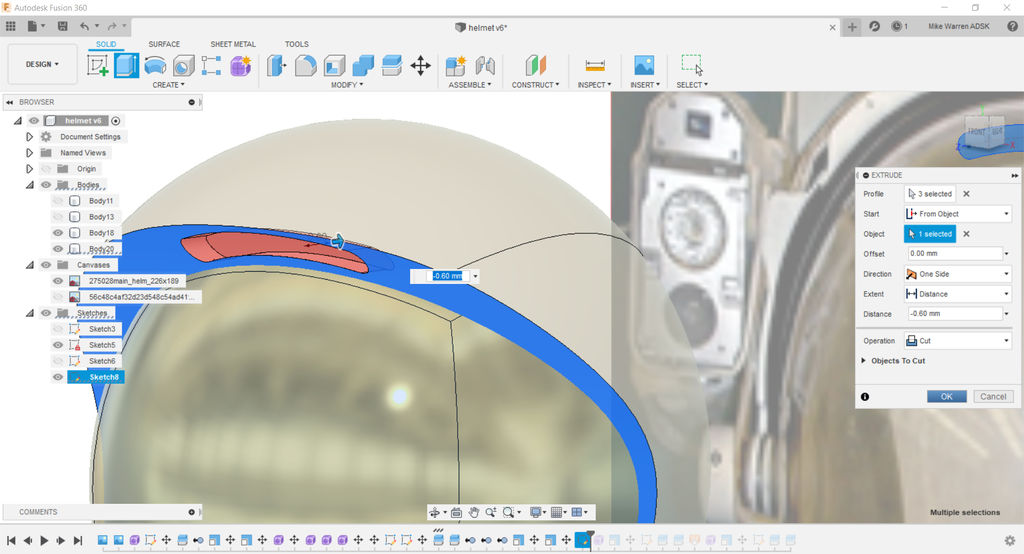
The extrusion arrow will now appear on the helmet instead of behind, I made my extrusion a cut from the popup and had it set into the helmet. Click OK to complete the slot extrusion.
Helmet Accessories
From one of the reference images we used it's clear there's a lot of stuff on modern (and future) space helmets. We'll try and include a few of these shapes in our design. After adding the basic shapes, we can make all kinds of cavities, protrusions, and areas to include all kinds of things in our design.
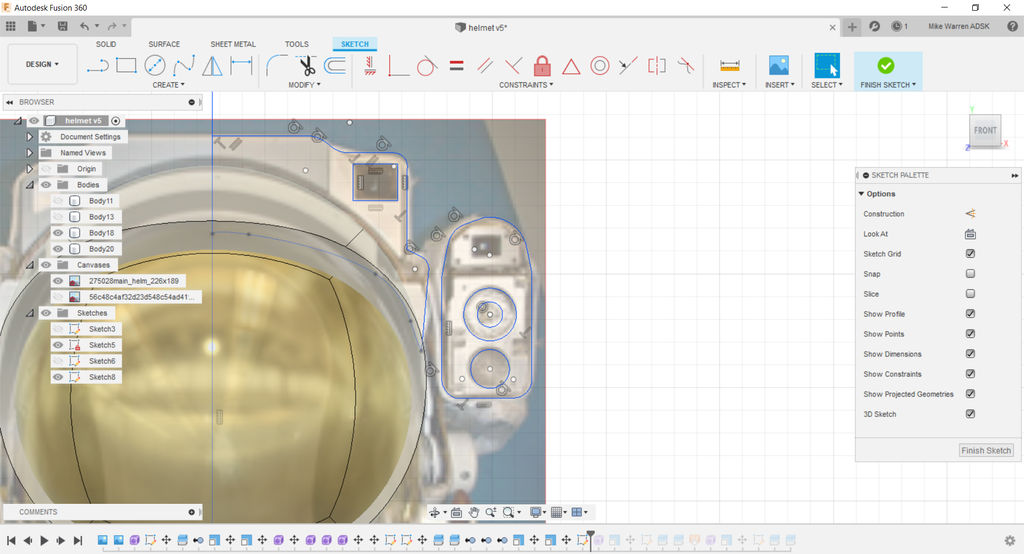
Start a new sketch and chose the head-on reference image as the plane to draw on. Before sketching any outlines, draw a vertical line through the center of the reference image, extending the line beyond the reference image. We'll use this line as our mirror line in a following step, which means we only need to draw one side of the helmet design now and we can mirror the shape to the other side.
Use the spline and line tools to outline the shapes you'd like to include on your helmet design. Make sure that any shapes you are outlining are closed, meaning that the lines of the shapes you make have no openings in them (for example, the the letter O is closed while the letter C has an opening). Sketches with openings will not be able to be extruded.
When you've got the shapes you like on one side of the helmet, finish sketch.
Extrude Helmet Accessories
From the top toolbar find create > extrude and extrude the outlines
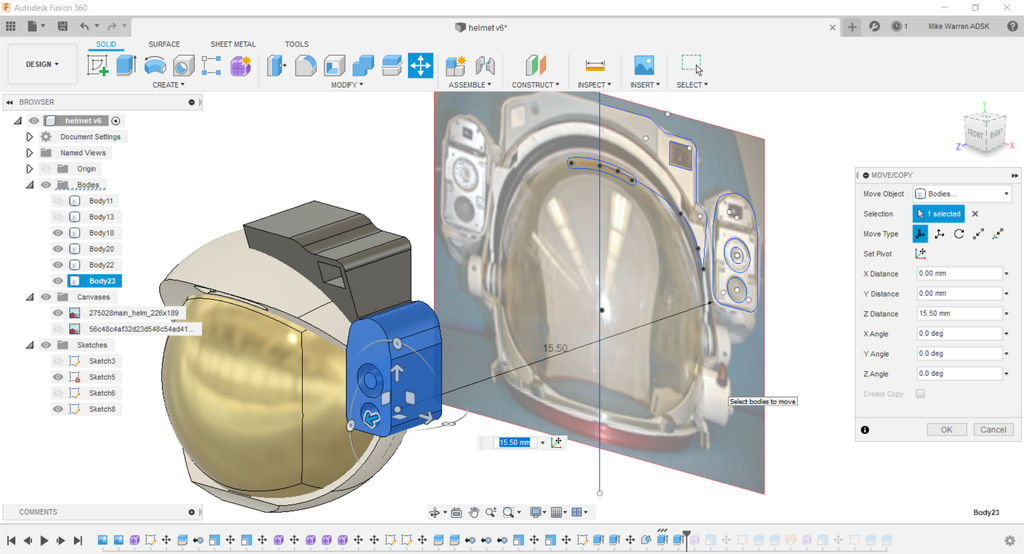
The extrusions will be pulled from the reference plane, which means we have to move them after. We can modify the shapes later, the important part now to to get the basic shapes extruded and placed to we can have a rough shape to the helmet.
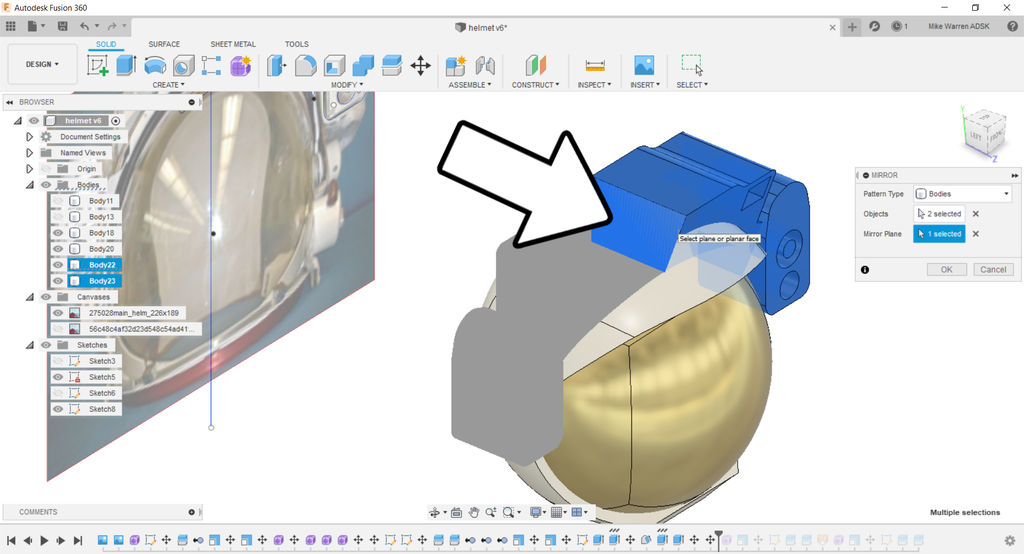
When the extrusions are in the right place, find create >mirror and chose the bodies you want to mirror. We'll use that vertical line we made earlier to mirror the components over to the other side of the helmet. If you don't see your vertical line any more then your sketch is turned off, you can enable the visibility from the directory tree on the left side of the screen.
Tidy Design
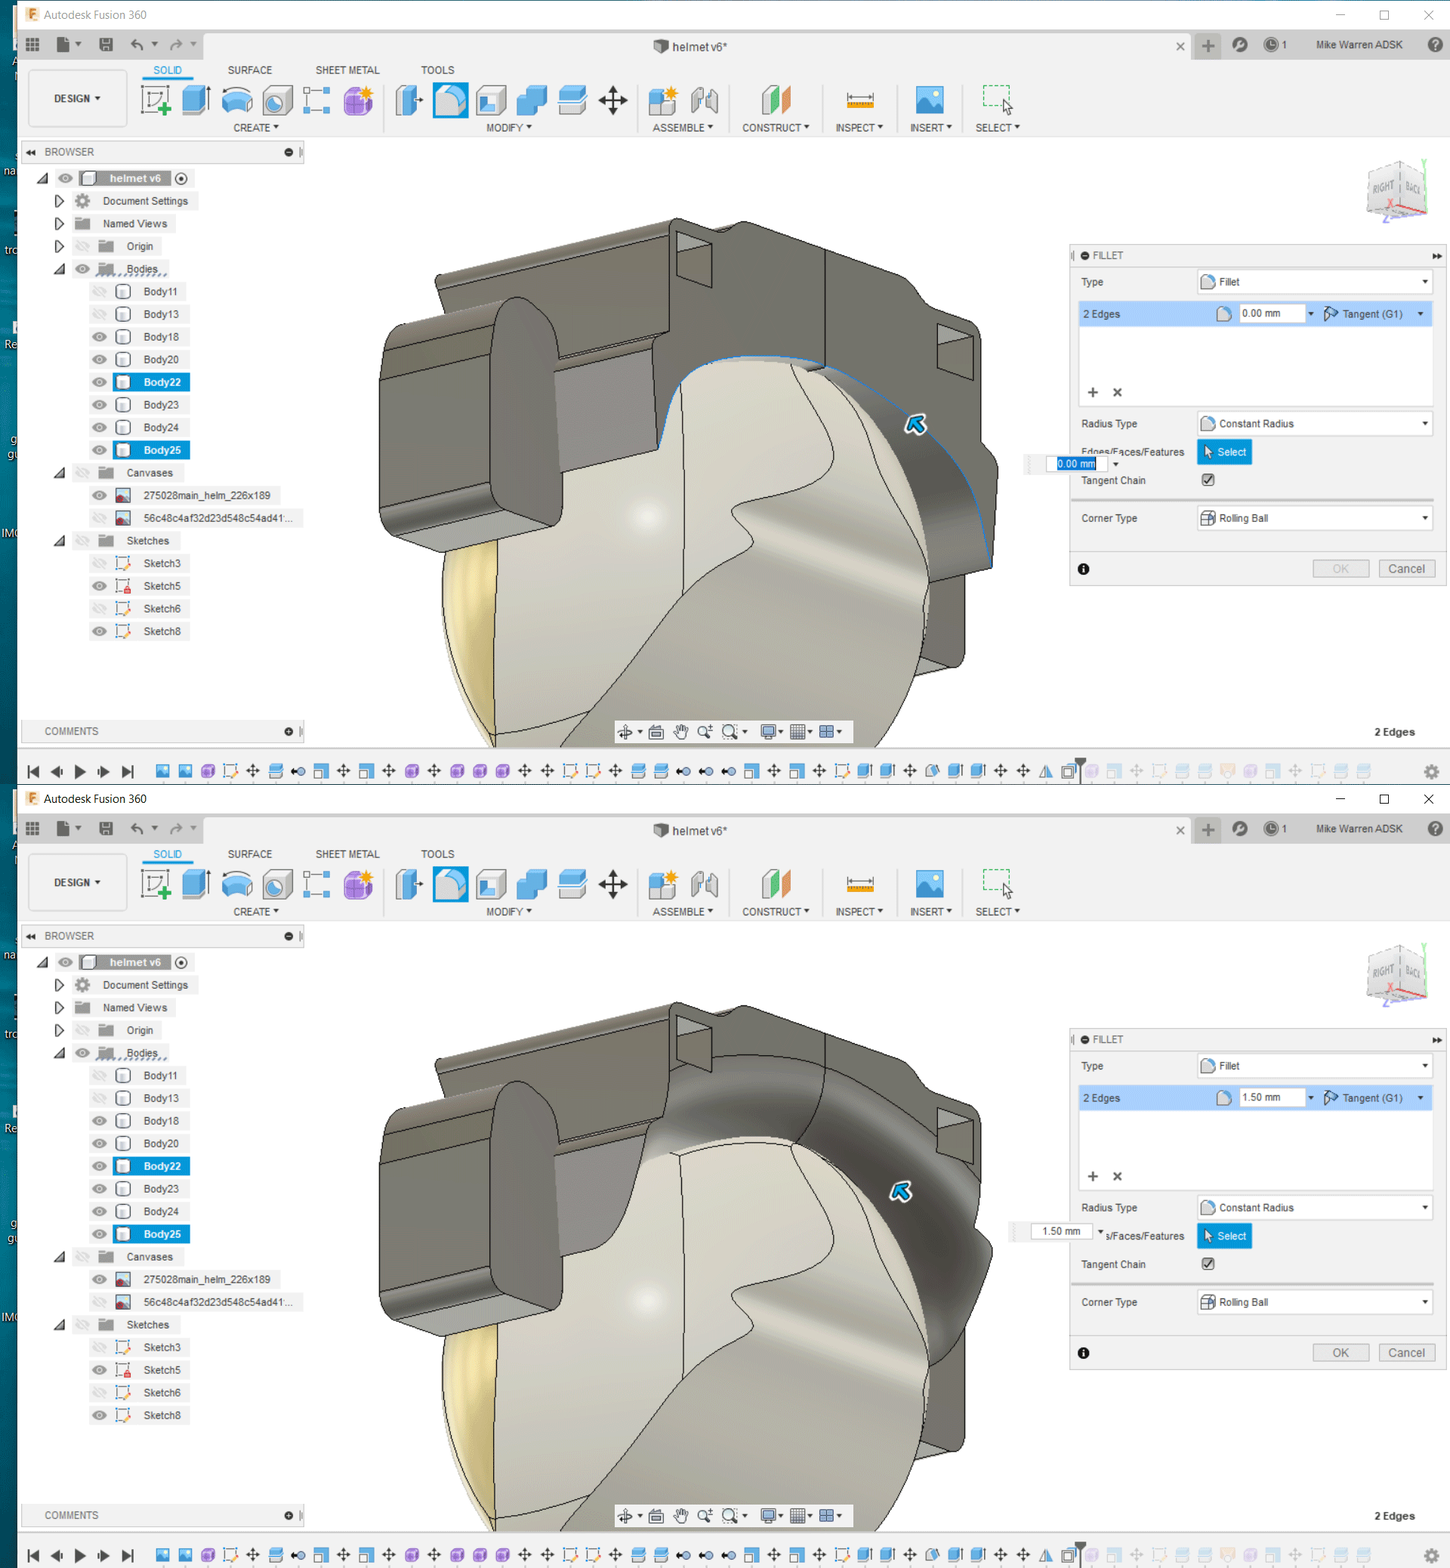
The extrusions we made are blocky representations of what we actually want. Spend some time in the modify dropdown to refine the shapes to what you like. Here's where your design can really come to life.

On this design, I used the fillet command to make a rounded back to the top body on the helmet, and add a draft to the front of the same body.
Before moving on I changed the appearance of the newly extruded parts to match the helmet color.
Add Decals
A nice touch to the design is to add decals to the helmet. Find the images you like and put them into a folder on your computer.
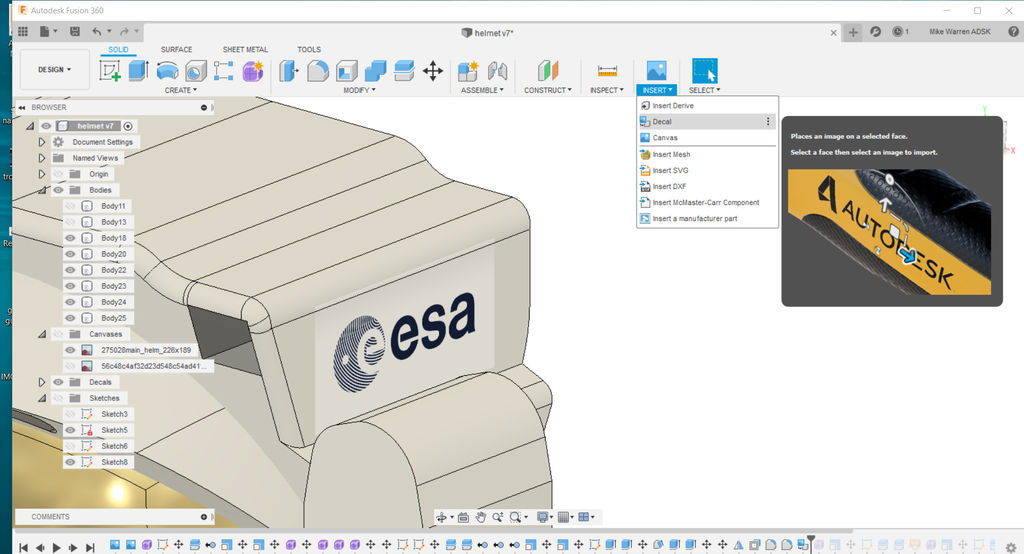
Use the insert > decal command to place your decal on any surface. Images with a transparent background work best, but any image will work here.
I found the European Space Agency icons here: https://www.esa.int/esalogo.
Render (optional)
When you've spent the time refining the shape of the helmet, all thh components, and added color to the areas of your design, we can render the output and see what it could look like beyond just a computer drawing.
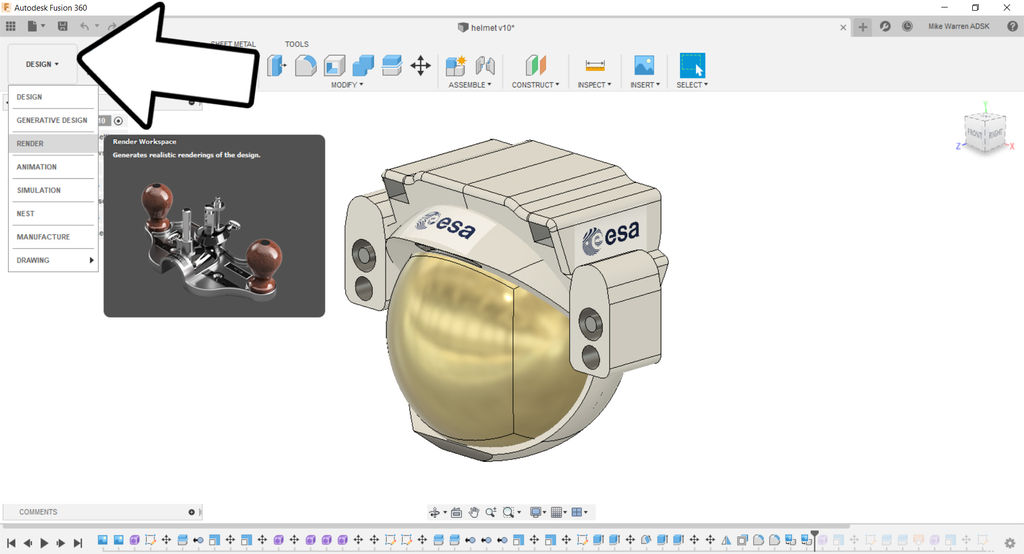
Change the interface from design to render, which will bring up a new environment for us to make changes to.
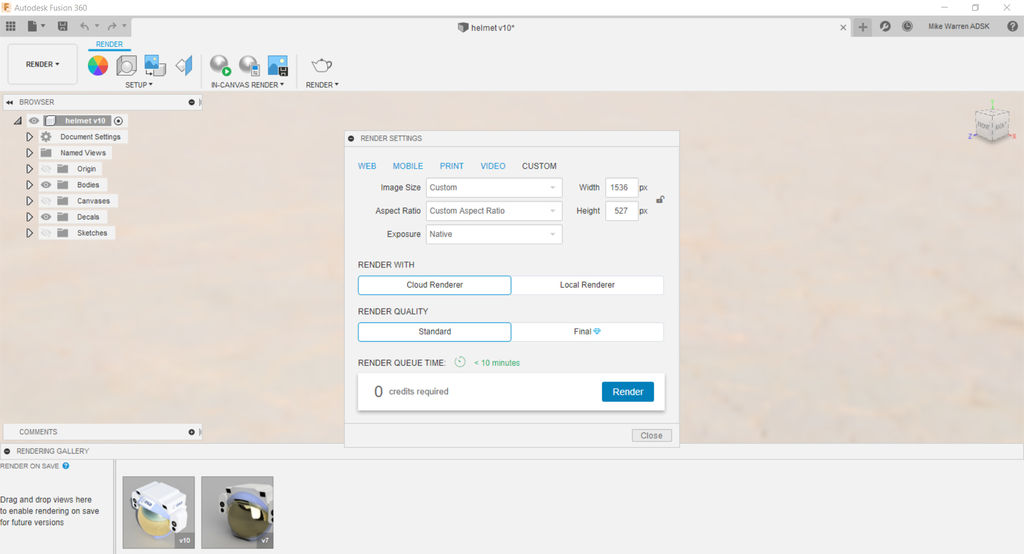
In the new top toolbar find setup and make any changes to the lighting and background that you like. When you're ready click the render icon from the top and use standard render quality, and then click render.
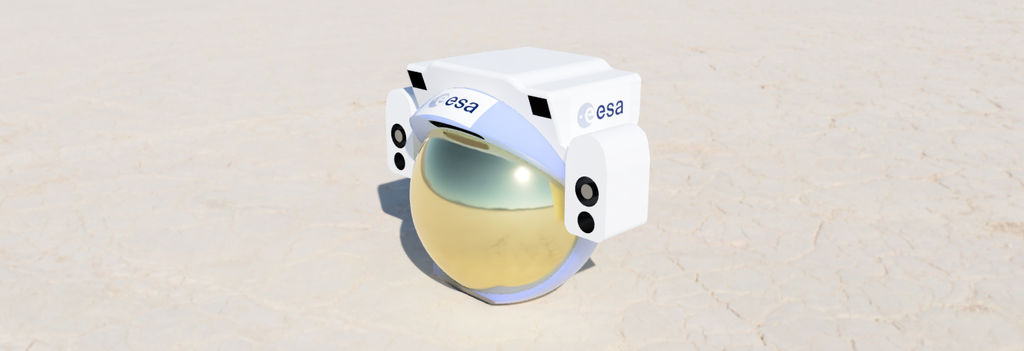
The design will be rendered in the cloud and returned to you. This can take a few minutes, depending on the complexity of your design. Below is what my design looks like.
When you are done, upload your Space Helmet designed in Fusion 360 in the comments below.Happy making :)
Take Your Design to New Heights!
This tutorial was created as part of the Moon Camp Challenge, a yearly 3D design competition by the European Space Agency and the Airbus Foundation, in partnership with Autodesk.
If you're up for the challenge, head out to the competition platform here, find many other moon related 3D design tutorials and submit them to potentially win amazing prizes!