Design a Moon Habitat in Tinkercad
by Airbus Foundation in Teachers > 3D Design
16314 Views, 22 Favorites, 0 Comments
Design a Moon Habitat in Tinkercad
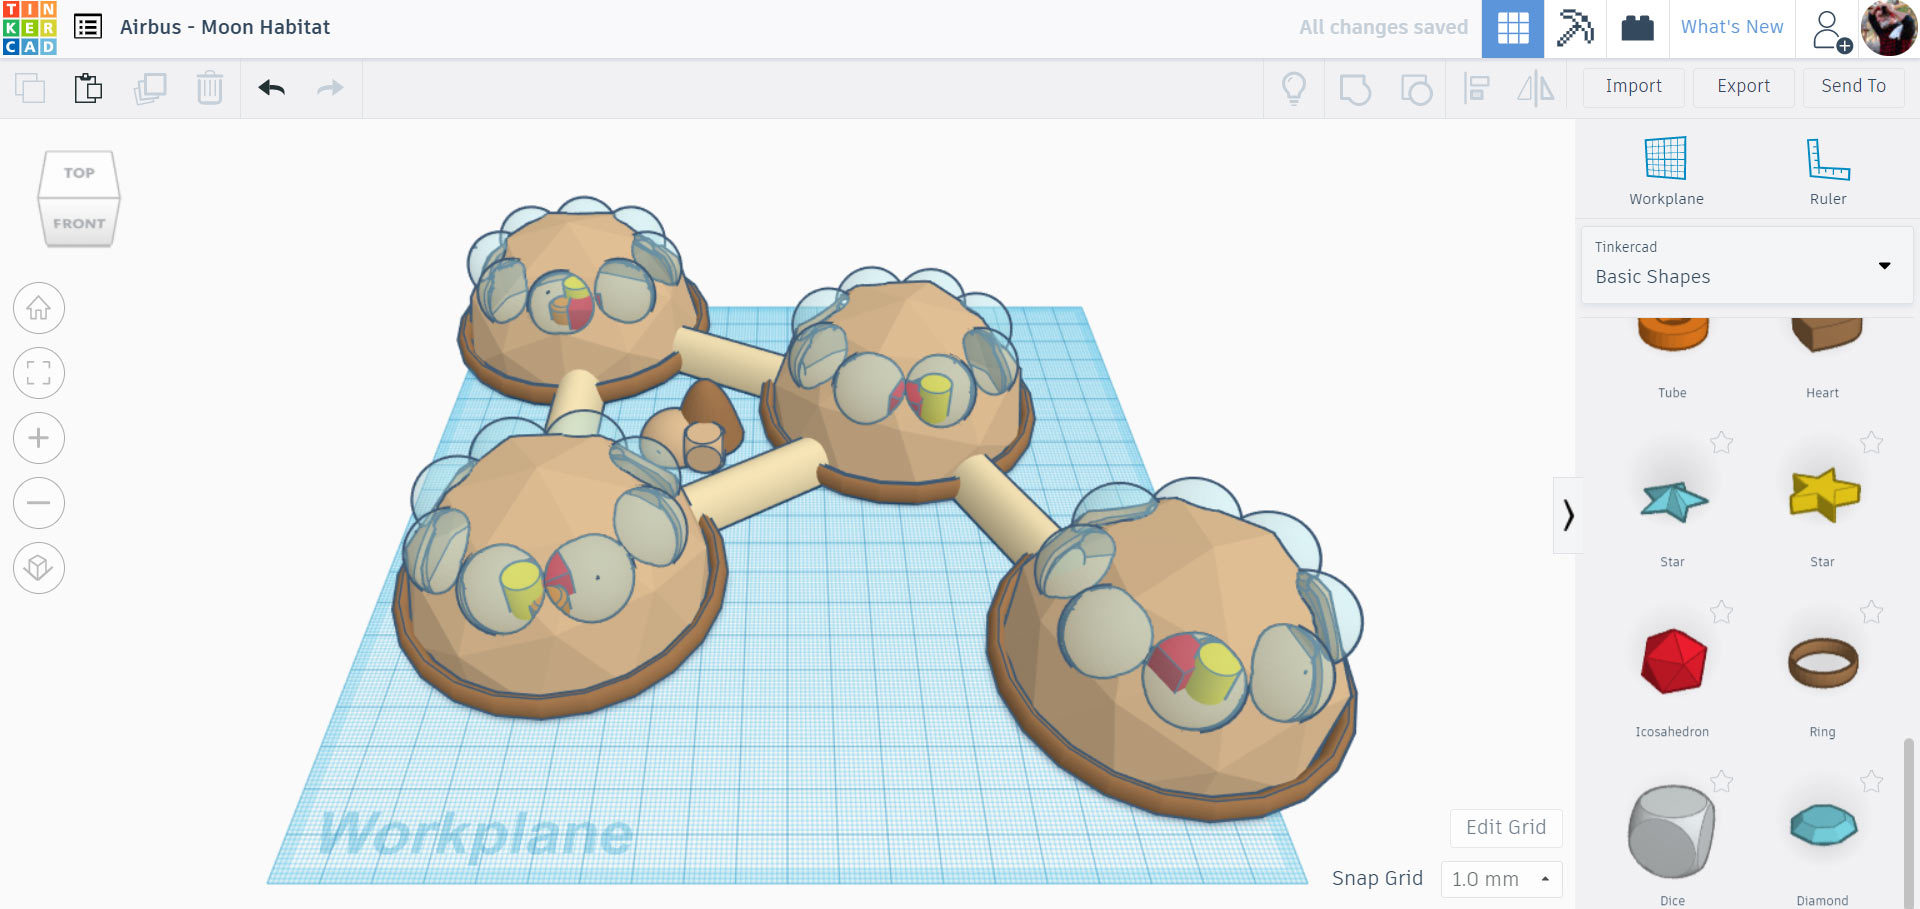
Your home away from Earth has to have a lot more than a place to eat and sleep – it’s the only structure on the Moon! How and where do you even build it? Customize, name, and expand your pioneering settlement, and ask yourself: how will these housing pods answer the needs of your Moon community?
Designing Your Home on the Moon
Your first Moon structure has a lot of roles to fill: a home base not only for sleeping and eating but for research and experiments, too.
The future of space travel lies in the hands of designers and engineers, just like you. In this Instructable we'll explore designing a Moon Habitat using Tinkercad, a fun way to explore design by combining shapes to make your model. Think of it like digital building blocks.
Below is the Moon Habitat design we will be making together. Take a moment to interact with the model below and see it from all angles before we get started.
The moon is closer than ever with new advancements in space technology. The next breakthrough in space design could come from a designer such as yourself. Let's get making this Moon Habitat!
Habitat Base
Start by going to Tinkercad.com and making a free account.
Tinkercad is a browser based program, so there is nothing to download or install. Tinkercad works by combining primitive shapes together to create new shapes. Shapes can be combined, subtracted, and moved around to create your design. It's easy, intuitive, and fun!
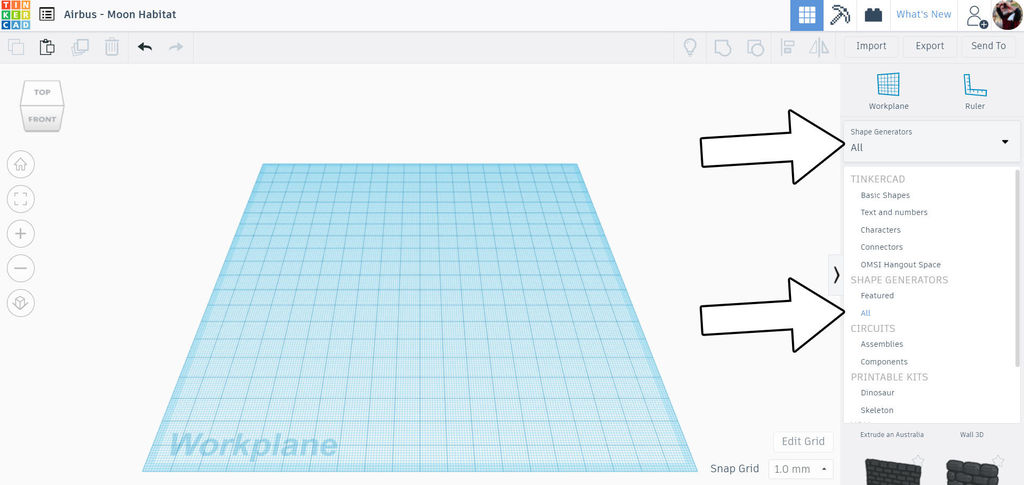
Start by finding the dropdown on the right side of the screen to change up the shape library from basic shapes to shape generators > all.
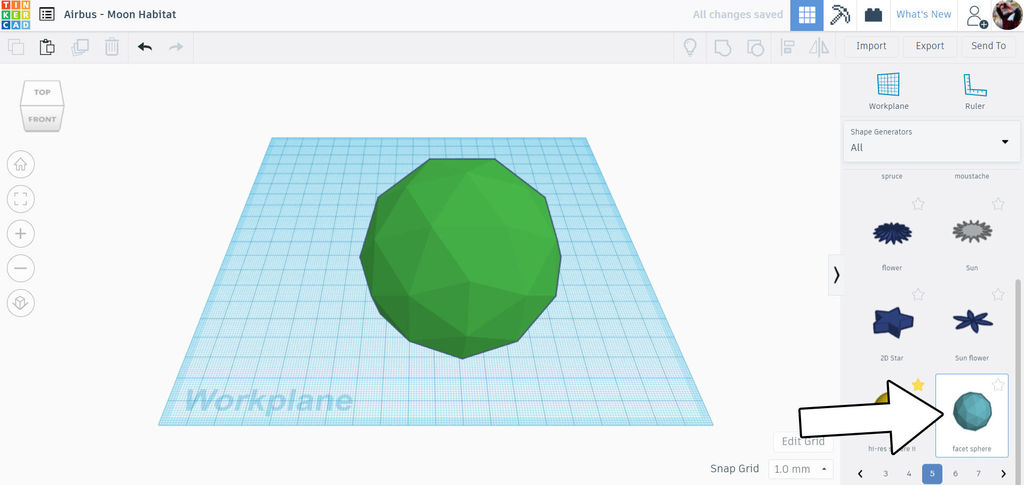
Scroll down to find facet sphere on page 5. Drag this shape onto the workplane.
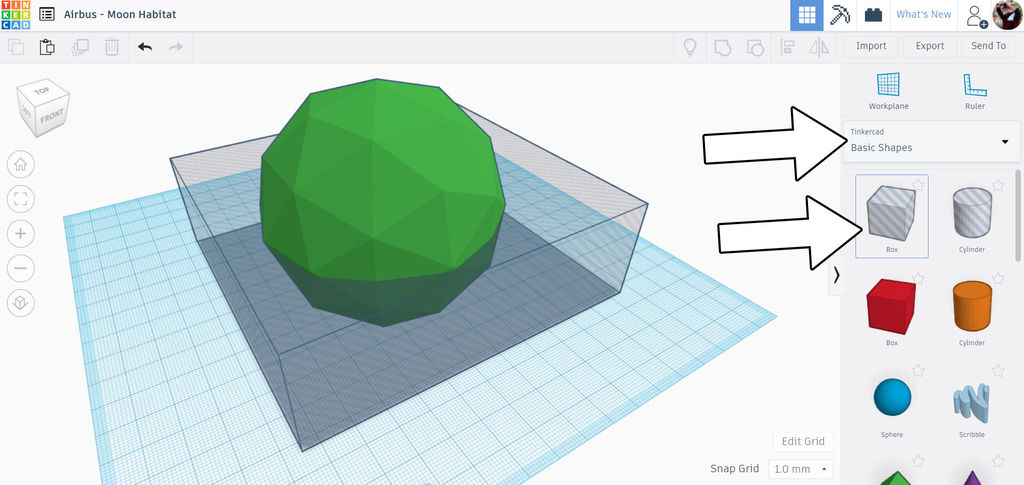
Switch the dropdown again back to basic shapes and find the hole box at the top of the shape library. Drag the hole box onto the workplane. Using the white handles when the hole box is selected, resize the box so that it's larger than the faceted sphere, then use the white handle on the top of the box to stretch it upwards so that the box is halfway through the sphere. See the image above.
Select both shapes and use the group command in the toolbar up top, or the shortcut ctrl + G.
Make Hollow
After combining select the halved sphere and use the black arrow on the top of the shape to bring the sphere back down to the workplane.
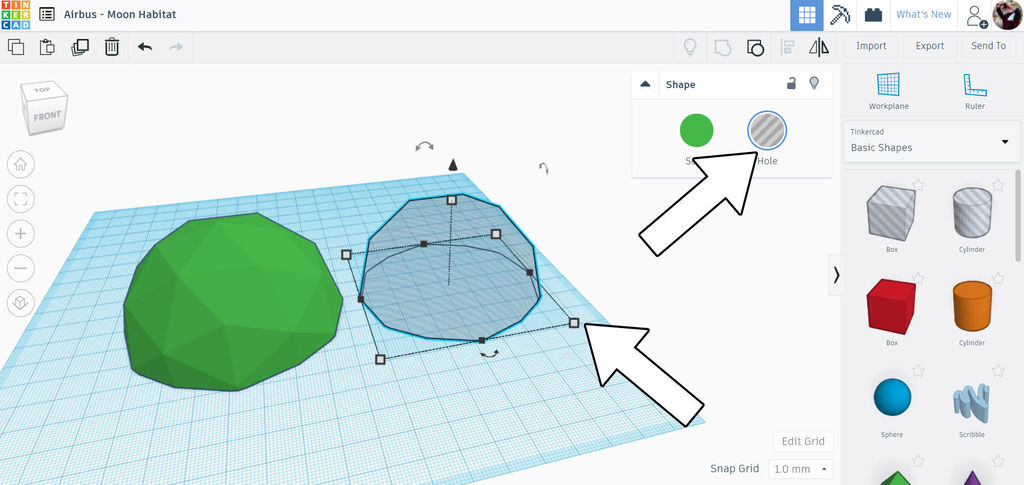
Select the half sphere and duplicate (ctrl +D) the shape. Move the duplicate to the side. Select one of the shapes and use the popup menu to change it from solid to hole.
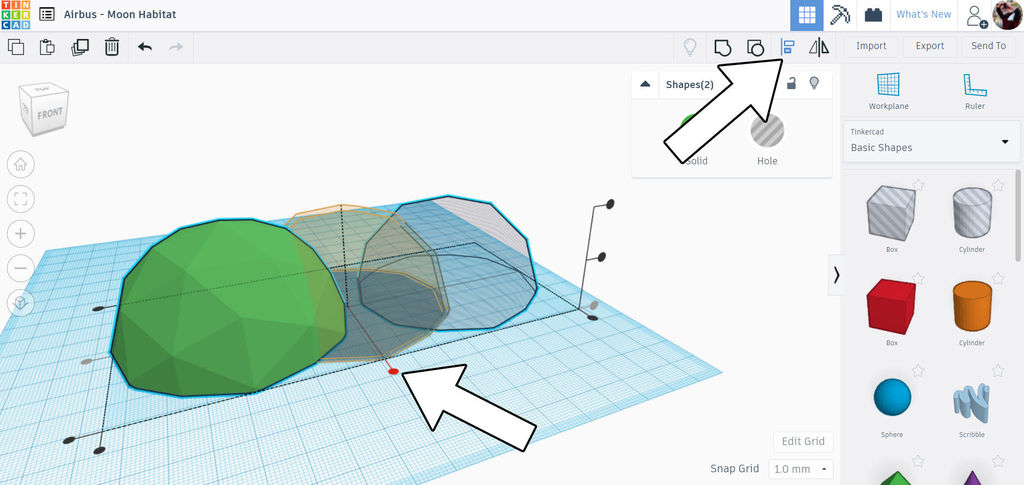
Select both shapes and use the align function from the top toolbar. Use the black dots on the workplane to align the two shapes on top of each other.
Select both shapes again and then group (ctrl + G) the shapes. If you rotate the view to underneath the workplane you can see that the shape is now hollow. We're ready to move onto the next step.
Habitat Windows
With the basic shape of the habitat complete we can make some window openings.
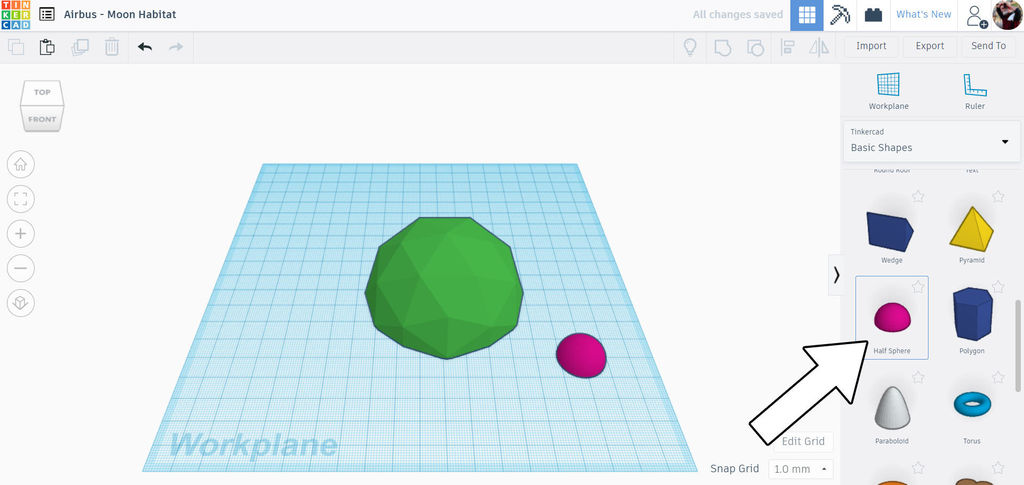
In the basic shapes dropdown, scroll down to find the half sphere. Drag this onto the workplane.
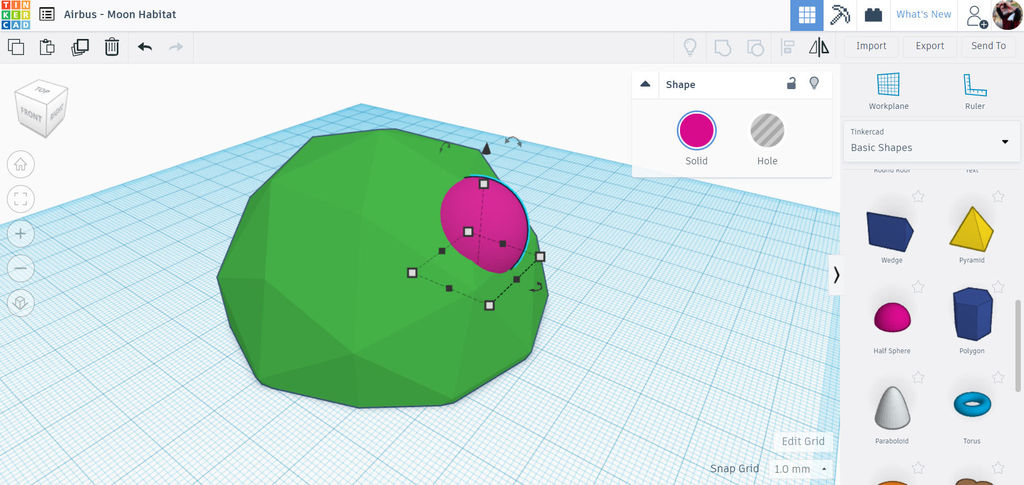
With the new shape selected, use the black arrow above the shape to lift it up off the workplane, then move the shape over the faceted sphere. Rotate the shape using the curved arrow above the shape to match the slop of the faceted sphere. See the image above.
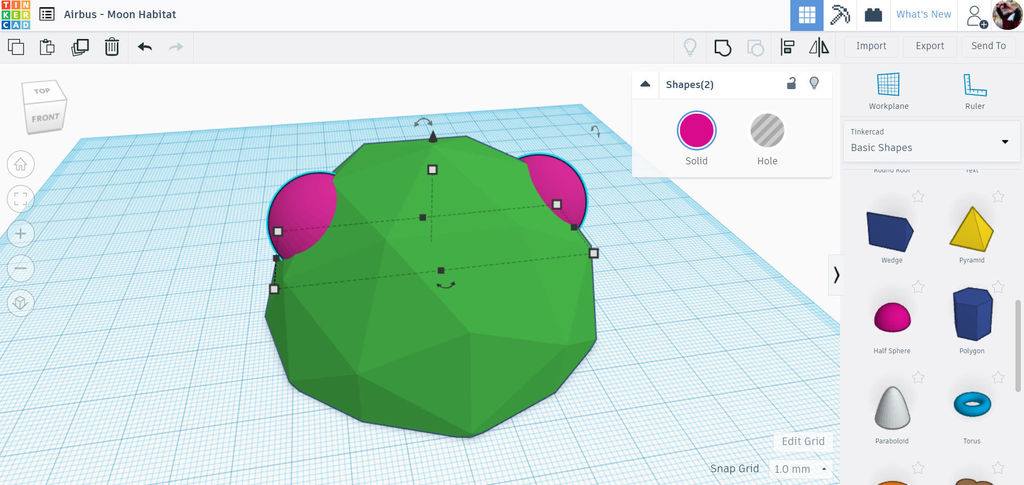
Once the half sphere is positioned on the faceted sphere, duplicate the half sphere and use the mirror command from the top toolbar to flip the shape. Move the duplicated shape to the opposite side of the faceted sphere.
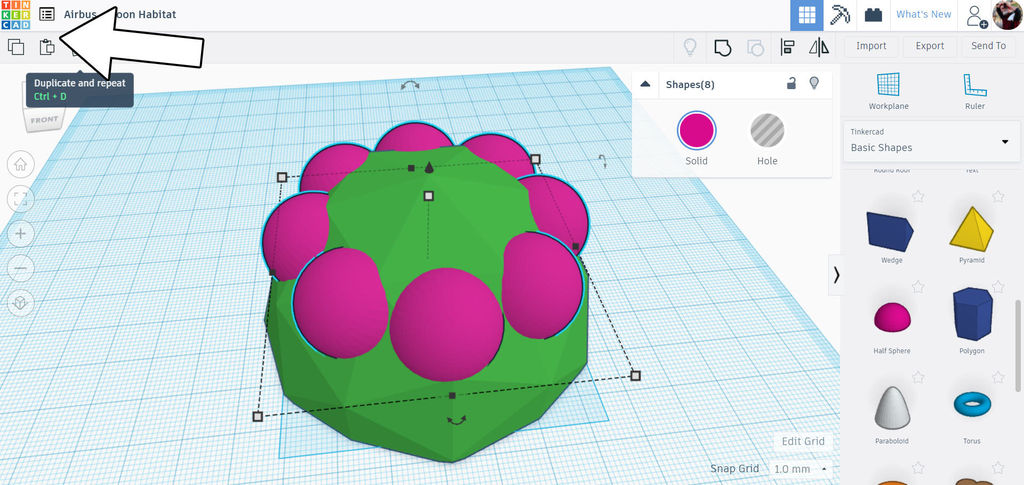
With the half spheres on either side of the faceted sphere, we can make the remaining windows. Select both half spheres and duplicate (ctrl +D), then use the rotational arrow on the bottom of the selected shapes to rotate the duplicate by about 20 degrees. You should notice the rotation "snaps" to predefined degrees as you rotate, this will help you as you want the first "snap".
Once the duplicate is in the right rotation, press ctrl +D again to repeat the duplication. This time, the program remembers your last duplication and rotation and should automatially place the duplicate the next rotational increment over. Press ctrl + D once again to make another duplicate, you should now have a nice circular array of half spheres around the top of the faceted sphere.
Select all the half spheres and group (ctrl +G).
Window Openings
We can make these windows a little more realistic by using them to make openings in the faceted sphere, then make them transparent to act like real windows.
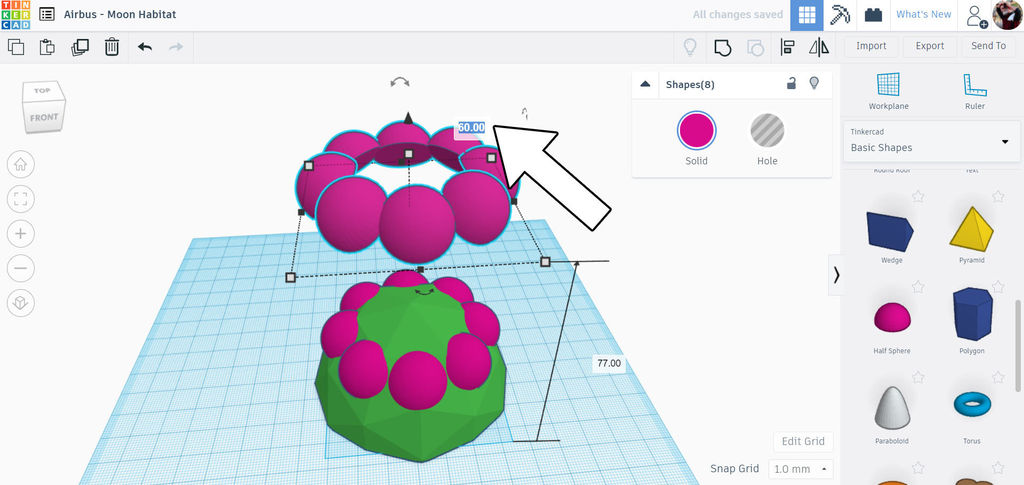
Select the half sphere windows and duplicate (ctrl +D). Move this duplicate upwards by using the black arrow on the top of the selection. Use the dimension input box to move it up a known amount, this will help to move it back by that same amount later. I used 60mm.
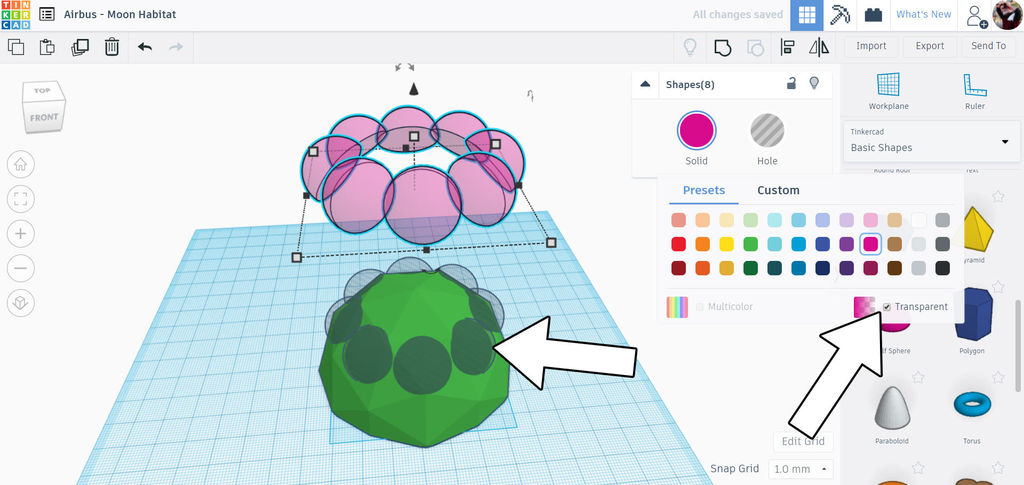
The raised array of half spheres can be changed to transparent in the color options of the pop up menu. Select the half spheres that are on the faceted sphere and change those to hole.
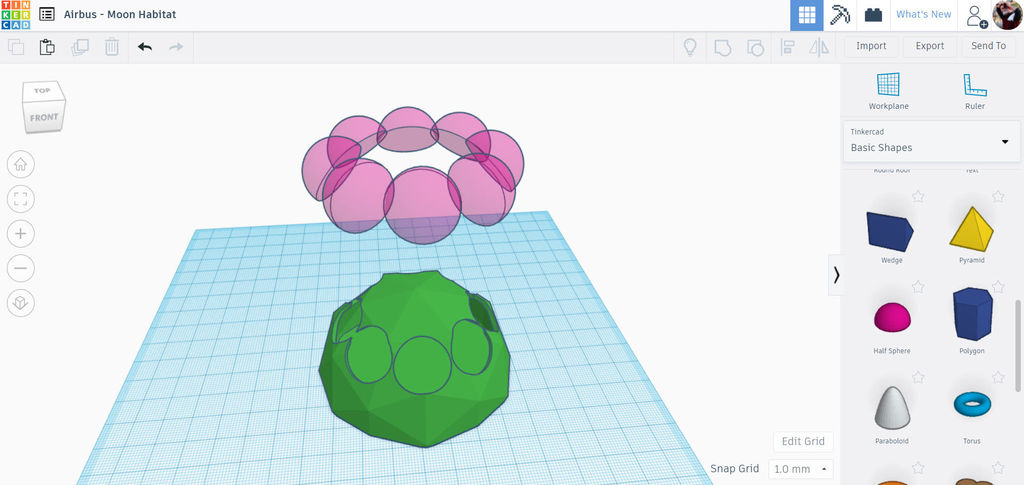
Select the faceted sphere and the hole half sphere array and group (ctrl +G).
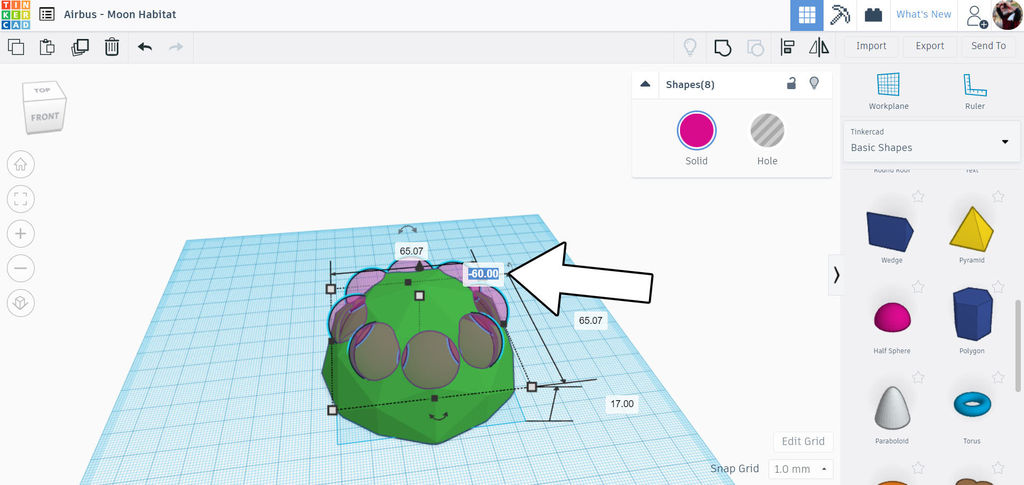
Select the raised transparent half sphere array and use the black arrow above the selection to move them back down the amount they were moved before (in my case, 60mm).
Habitat Curb
The habitat shape is looking good. Let's add a curb around the outside to clean up the design and give a little more definition to the design.
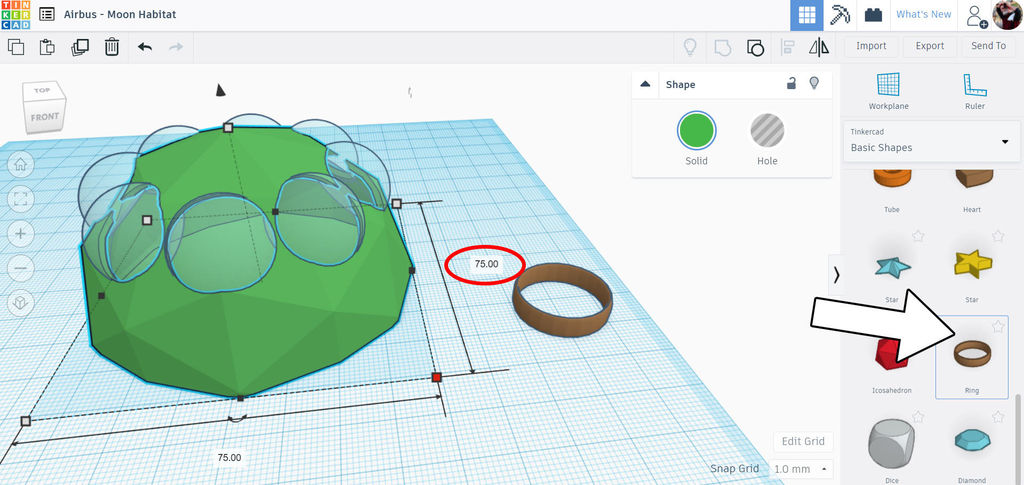
Scroll down the shape library and find the ring shape. Drag this onto the workplane.
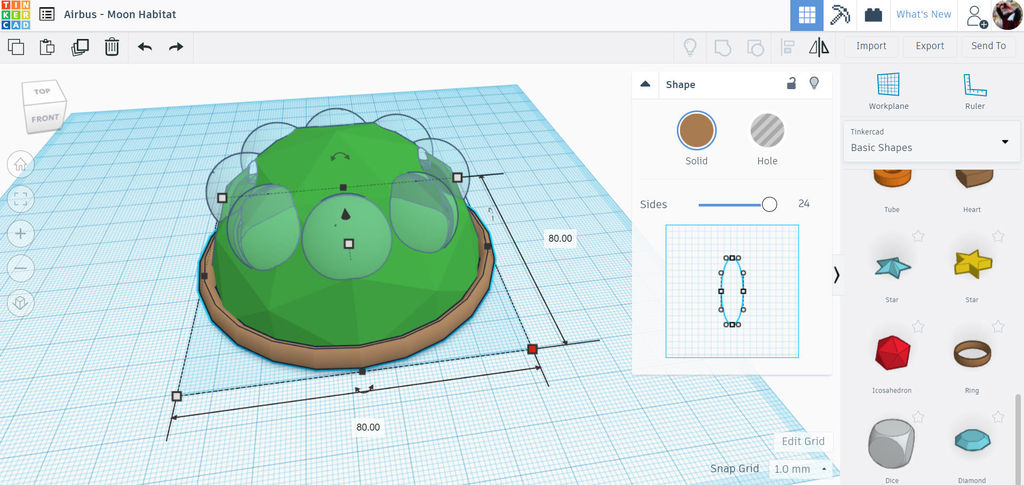
Select the ring shape and grab the white handle on the corner to resize, hold the shift key to constrain the proportions while you resize. Use the white handle on the top of the shape to reduce the height of the ring shape as needed.
Habitat Tunnels
The basic shape of the habitat is complete. Now, let's make a passageway to get in and out of this habitat module.
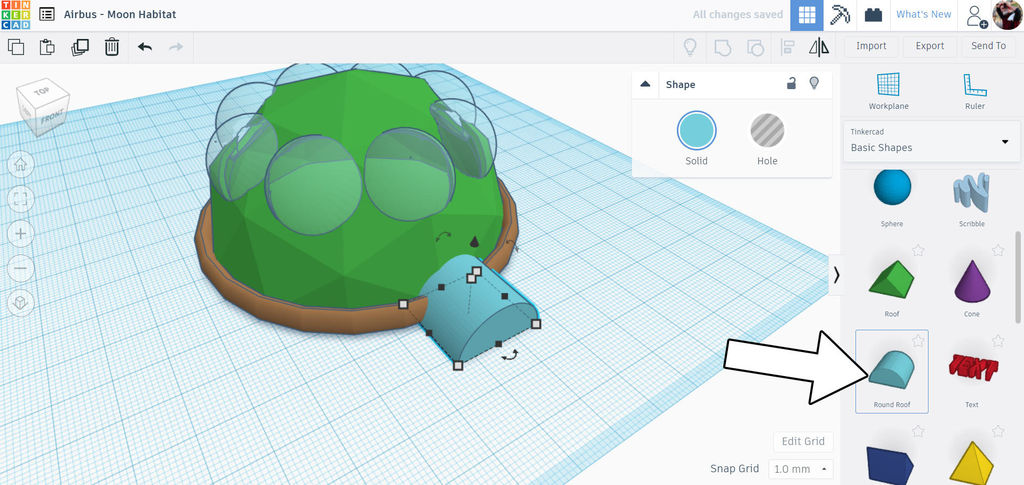
Use the library and find the round roof shape and drag it onto the workplane. Place the rounded roof shape partially inside the habitat and then stretch the shape outwards to make a tunnel shape.
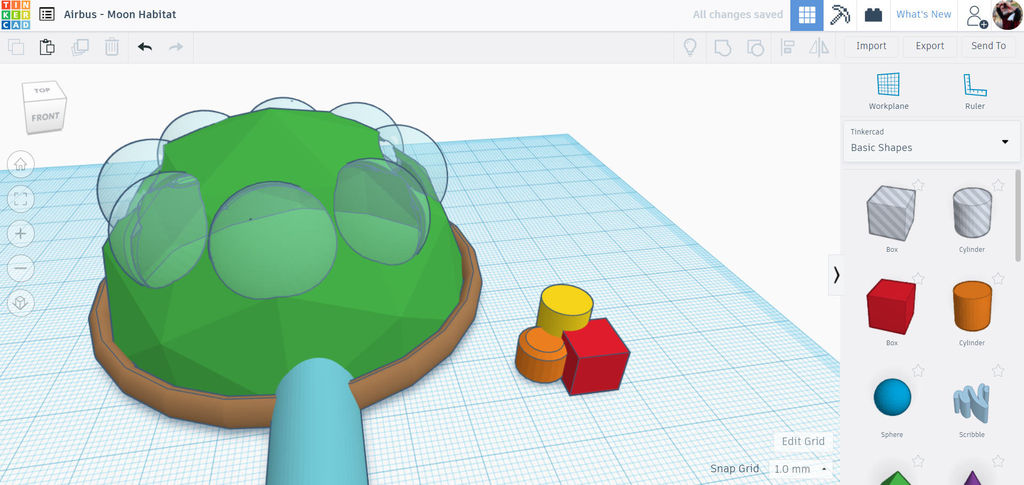
Because we can see inside the habitat I combined a few simple shapes and moved them together. This is your chance to make your own small creation to put inside your habitat.
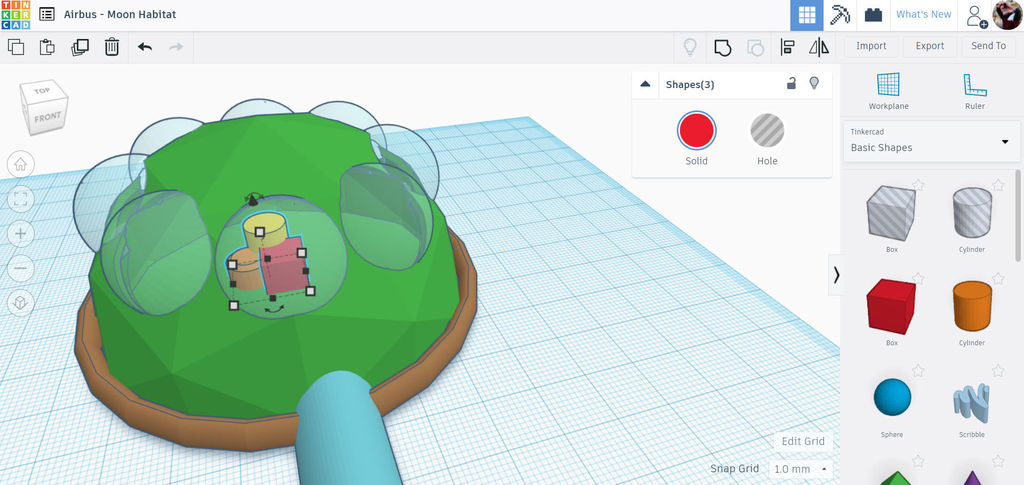
Here the shapes are put inside the habitat.
Color + Duplicate
Select each shape on the workplane and change the colors to whatever you like for your design.
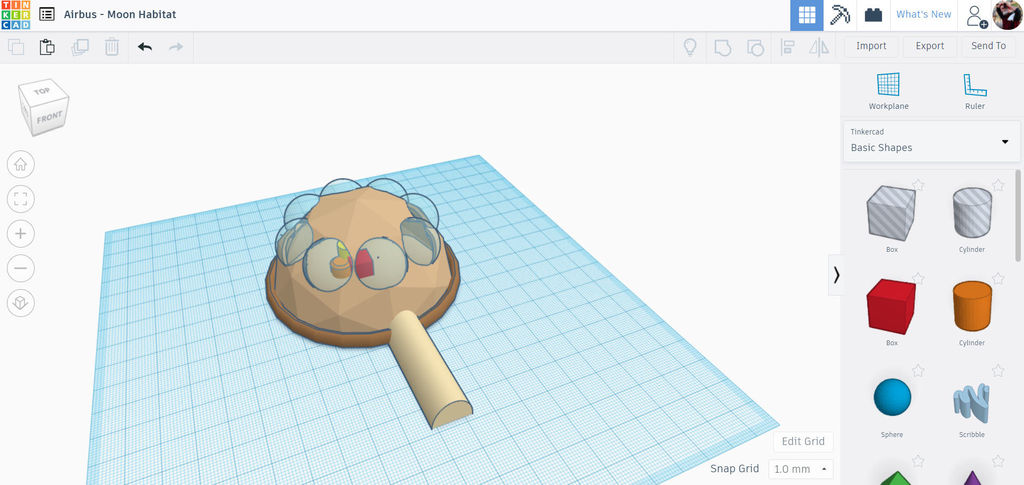
I went with a tan and brown color scheme. Next, we can make more habitat modules to fill out the moon base.
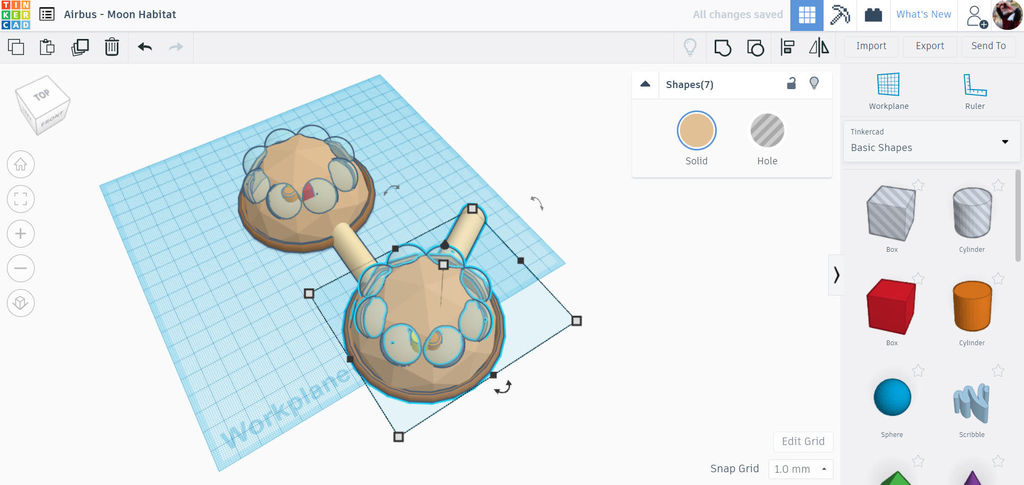
Select everything on the workplane and duplicate (ctrl +D). Move the duplication and rotate as needed. Position the copy where the tunnel ends and continue making copies as needed to fill out your moon base.
What does your Moon Habitat look like? Share a picture in the comments below and be inspired by other designs.
Happy making :)
Take Your Design to New Heights!
This tutorial was created as part of the Moon Camp Challenge, a yearly 3D design competition by the European Space Agency and the Airbus Foundation, in partnership with Autodesk.
If you're up for the challenge, head out to the competition platform here, find many other moon related 3D design tutorials and submit them to potentially win amazing prizes!