DIY Wheelchair Side Guards - Folding
by adaptwheelchairs in Living > Health
465 Views, 0 Favorites, 0 Comments
DIY Wheelchair Side Guards - Folding
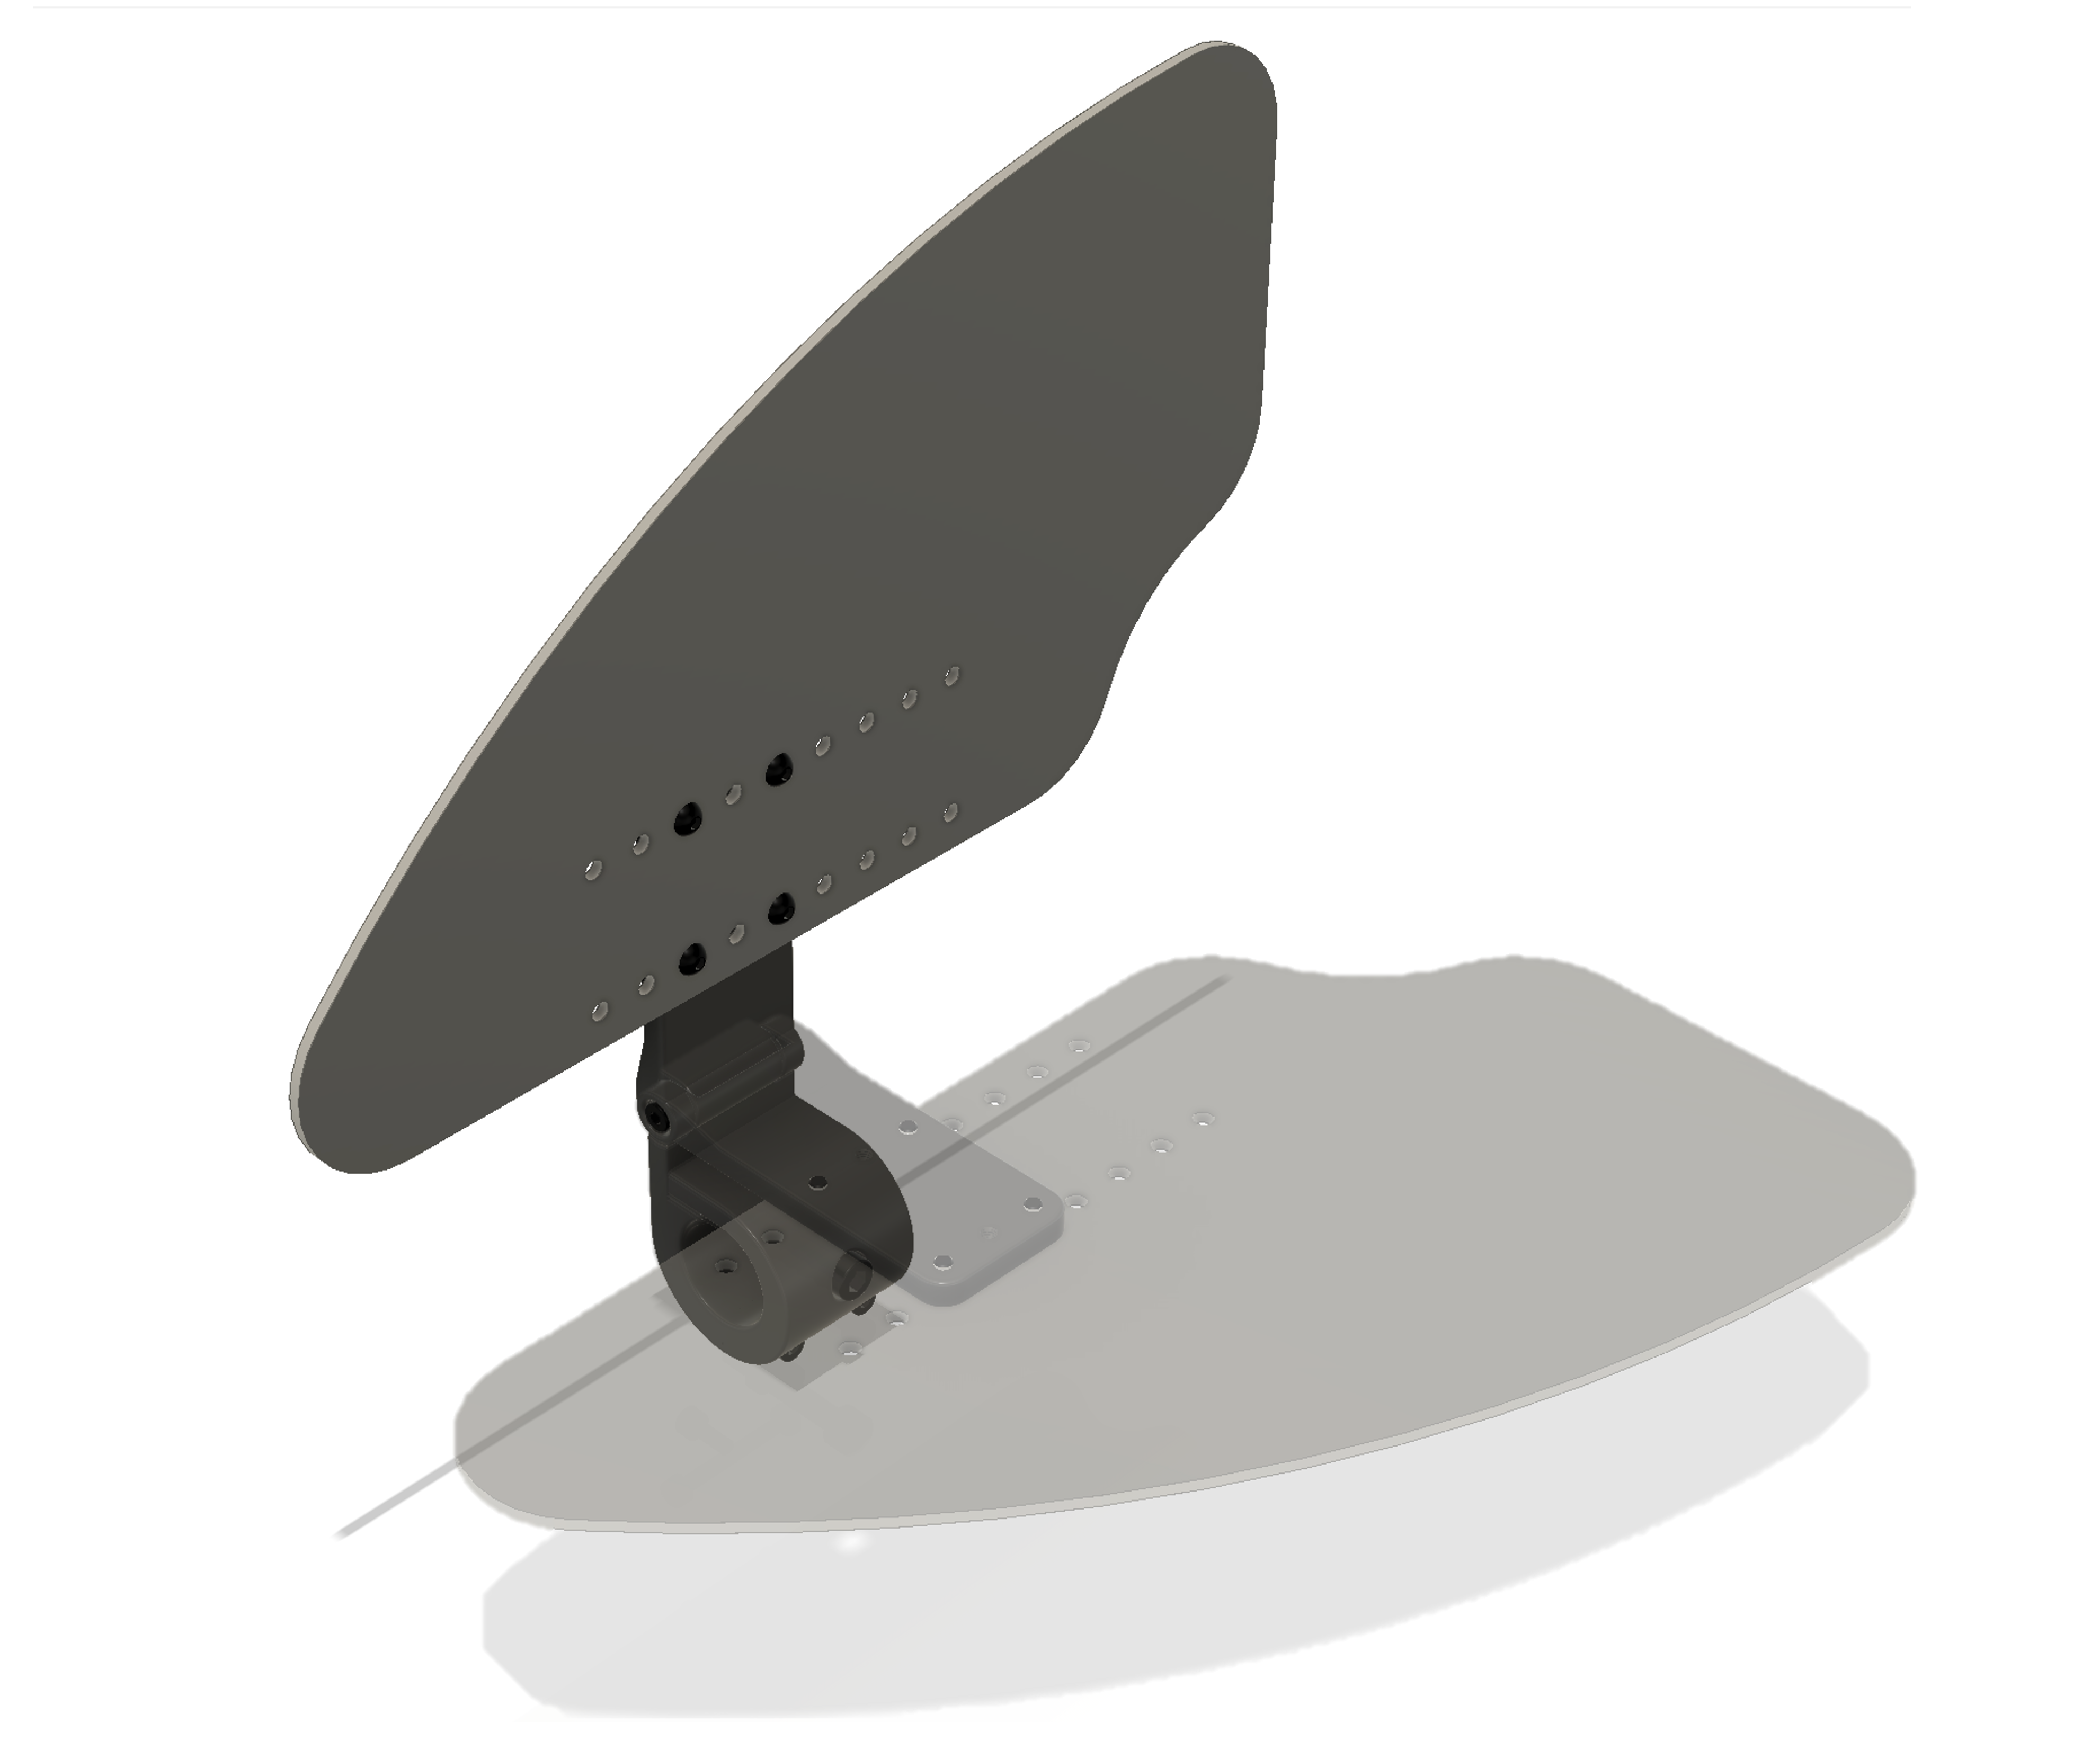
Side guards for wheelchairs are far too expensive. These folding side guards should cost under $50 for a pair (including mounts) if have someone 3D Print the mounts parts. I am working on further reducing the cost. Rigid side guard and removable side guard designs coming soon.
Supplies
Parts
- 2x Side Guards: SideGuard_XXX_vY.dxf where XXX is either Small or Large and Y is the file version number. For more details, see "Step 1: Order Side Guards" below.
- 50 in of Edge Trim.
- 2x Side Guard Mount Folding Tops: SideGuardMount_Folding_Top_v8. For more details, see "Step 3: 3D Print Side Guard Mounts" below.
- 2x Side Guard Mount Side 1: MMM_SideGuardMount_Folding_Side1_vY where MMM is the model of your chair and Y is the file version number. . For more details, see "Step 3: 3D Print Side Guard Mounts" below.
- 2x Side Guard Mount Side 2: MMM_SideGuardMount_Folding_Side2_vY where MMM is the model of your chair and Y is the file version number. For more details, see "Step 3: 3D Print Side Guard Mounts" below.
- 8x M4 x 0.7 mm x 10 mm Button Head Screws. For more details, see "Step 2: Order Fasteners and Other Parts" below.
- 4x M4 x 0.7 mm x 10 mm Socket Head Screws. For more details, see "Step 2: Order Fasteners and Other Parts" below.
- 4x M4 x 0.7 mm x 18 mm Socket Head Screws. For more details, see "Step 2: Order Fasteners and Other Parts" below.
- 2x M4 x 0.7 mm x 35 mm Socket Head Screws. For more details, see "Step 2: Order Fasteners and Other Parts" below.
- 2x M4 x 0.7 mm Nuts. For more details, see "Step 2: Order Fasteners and Other Parts" below.
- For TiLite Chairs with 1 in Tubing (Aero T, TRA, TR) and Side Guard Mounting Holes: 2x M6 x 1.0 mm x 35 mm Socket Head Screws. For more details, see "Step 2: Order Fasteners and Other Parts" below.
- For TiLite Chairs with 1.25 in Tubing (Aero Z, ZRA, ZR) and Side Guard Mounting Holes: 2x M6 x 1.0 mm x 40 mm Socket Head Screws. For more details, see "Step 2: Order Fasteners and Other Parts" below.
Tools
Note that the required hex key sizes can all be found on a typical bike multitool. The tools listed as optional are helpful in threading holes in 3D Printed Parts, but not required (the threads can be made with the screws listed above, patience, and decent hand strength).
- 2.5 mm Hex Key
- 3 mm Hex Key
- For TiLite Chairs with Side Guard Mounting Holes: 5 mm Hex Key
- Optional: M4 x 0.7 mm Tap
- Optional: M6 x 1.0 mm Tap
Order Side Guards
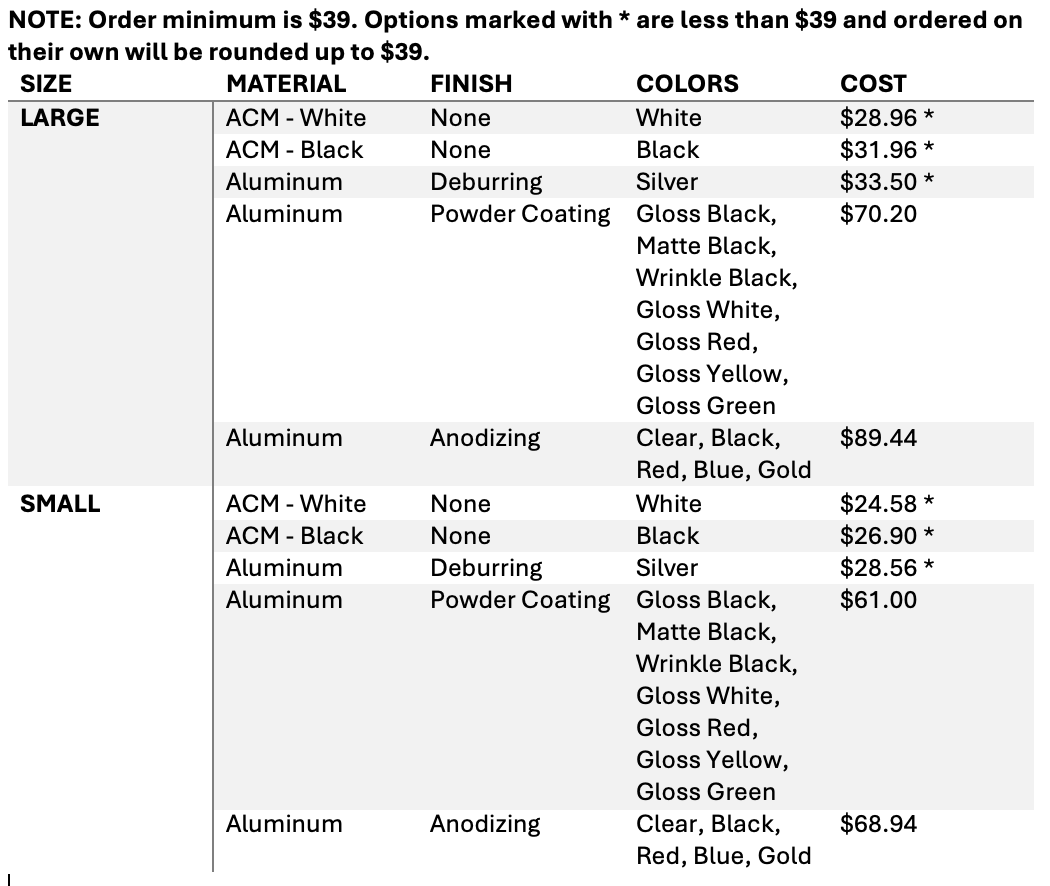
You will need to order the Side Guards from SendCutSend yourself. Note that the minimum order amount is $39, so if you only order one pair of unfinished ACM or Aluminum Side Guards, an amount will be added at the end to adjust the price to $39.
- If you don't already have an account, create an account with SendCutSend.
- Log in to your SendCutSend account.
- Click on "Parts".
- Click on "Drop Files or Upload" and select the *.dxf file for the side guard size you want.
- If you want Large Side Guards, select SideGuard_Large_v10.dxf
- If you want Small Side Guards, select SideGuard_Small_v7.dxf
- Confirm the drawing units as "INCH" and click "CONFIRM".
- Increase the quantity to 2.
- Select the material. Instructions will depend on which material you choose. See below.
- ACM. This is the cheapest option and allows you to have black or white side guards. It is thicker than aluminum (3.0 mm), but more rigid.
- Select Material
- COMPOSITES > ACM PANEL > ACM - BLACK > 0.118" (3.0MM)
- Click "NEXT"
- Add Services
- Click "NEXT"
- Add Finishing
- Select "NO FINISH"
- Click "NEXT"
- Aluminum. Aluminum side guards will be thinner (1.6 mm) and allow you more color options, but will be more expensive unless you get unfinished aluminum. You can also anodize or powder coat the aluminum if you'd like a different color, but that will cost more.
- Select Material
- Click METALS > ALUMINUM > 6061 T6 ALUMINUM > 0.063" (1.6MM)
- Click "NEXT".
- Add Services
- Do not select anything.
- Click "NEXT".
- Add Finishing
- DEBURRING is the cheapest option. Side guards will be plain aluminum. If you are only ordering 1 pair, there will be extra charges to reach the order minimum of $39.
- POWDER COATING is a painted coating. This allows you to choose a number of color options and will make the edges a bit smoother without the edge trim. It is the cheapest option if you want a color that is not black. If you want a black side guard, consider ACM below. Note: this will increase the time it takes to get the side guards by ~ 1 week.
- ANODIZING is a finishing method that is more robust than powder coating to abrasion. It also allows for some different color options than powder coating. You will likely still want edge trim as it the edge finish will be the same as the deburring option. If you want a black side guard, consider ACM below. Note: this will increase the time it takes to get the side guards by ~ 1 week.
- Add the side guards to cart.
- Ensure that the quantity is 2! (shown above the red "REMOVE" button)
- Complete the order.
- Note that the minimum order amount is $39, so if you only order one pair of unfinished ACM or Aluminum Side Guards, that will end up being the base cost.
Order Fasteners & Other Parts
Fasteners
These fasteners can be ordered from a number of places including Home Depot, Lowes, McMaster Carr, or JLCMC. Home Depot is probably cheapest if you are in the US and only making 1 pair of side guards. JLCMC is likely cheapest if you are making more than one pair of side guards or ordering in bulk for another reason.
- 8x M4 x 0.7 mm x 10 mm Button Head Screws. Home Depot (buy 4 packs); JLCMC PN: EDLG-S1-M4-L10
- 4x M4 x 0.7 mm x 10 mm Socket Head Screws. Home Depot (buy 2 packs); JLCMC PN: EDLA-S1-M4-L10
- 4x M4 x 0.7 mm x 18 mm Socket Head Screws. Home Depot (buy 2 packs); JLCMC PN: EDLA-S1-M4-L18
- 2x M4 x 0.7 mm x 35 mm Socket Head Screws. Home Depot (buy 1 pack); JLCMC PN: EDLA-S1-M4-L35
- 2x M4 x 0.7 mm Lock Nuts. Home Depot (buy 1 pack); JLCMC PN: EMLC-S1-Y-M4
- For TiLite Chairs with 1 in Tubing (Aero T, TRA, TR) and Side Guard Mounting Holes: 2x M6 x 1.0 mm x 35 mm Socket Head Screws. Home Depot (buy 1 pack); JLCMC PN: EDLA-S1-M6-L35
- For TiLite Chairs with 1.25 in Tubing (Aero Z, ZRA, ZR) and Side Guard Mounting Holes: 2x M6 x 1.0 mm x 40 mm Socket Head Screws. Home Depot (buy 1 pack); JLCMC PN: EDLA-S1-M6-L40
Other Parts
- 50 in of Edge Trim or Electrical Tape. Edge Trim Amazon (1/8" for ACM); Edge Trim Amazon (1/16" for Aluminum); Electrical Tape Amazon
- If there is not a mounting hole for the side guards, rubber anti-slip mat or electrical tape to reduce the slipping of the mounts on the frame.
3D Print Sideguard Mounts
Compatible Chairs
The Aero T mount should work for chairs with 1 inch round tube. However, you may need to omit the M6 screws for chairs with out a mounting hole or with a mounting hole of a different size. In this case, I recommend using a small piece of rubber anti-slip mat between the mount and your wheelchair frame to help prevent twisting.
Printing Yourself
Below are some notes for if you or a friend are printing the mounts yourself. I highly recommend that you look into printing these yourself to save on money. If you don't have a 3D printer, check your local library or search for a maker space in your area. We are also collecting a list of people and organizations who may be willing to print these for free or at the cost of the material. You can also ask on Reddit r/3Dprintmything. The mounts with files attached have been tested with the chairs listed in their name (TiLite Aero T, TiLite Aero Z, and Quickie Q7).
Material
Any material that is resistant to UV and is durable. PAHT-CF from Bambu has worked well for me. ASA would also likely work well. PETG worked okay, but broke after 3-4 months. PLA only worked for 1-2 months and isn't the best long term solution, but will work in a pinch.
Print Orientation
The parts should be printed in the orientation shown in the photo above (front plane on the plate) for maximum strength.
Infill
Infill should be at 100%.
Support
Support material on build plate and part. Tree supports preferred.
Post Processing
- Remove support material.
- Tap the M4 holes with an M4 x 0.7 mm tap or by slowly and carefully screwing the M4 screws into their holes.
Ordering Online
I do not recommend doing this! If you are considering this, you can probably find a pair of used side guards on ebay for cheaper.
- Download the *.step files (Top, Side1 & Side2) for the mount you want to print from this Google Drive Folder.
- Upload the *.step files to JLC3DP and select the following settings:
- 3D Technology: SLS
- Material: 3201PA-F Nylon
- Color: Black
- Build Time: 72 hr
- Qty: 2
- Product Desc: DIYEntertainment > Robot Part - HS Code 9503000
- Ensure Qty for each part is 2.
- Complete the order.
Assemble Sideguards
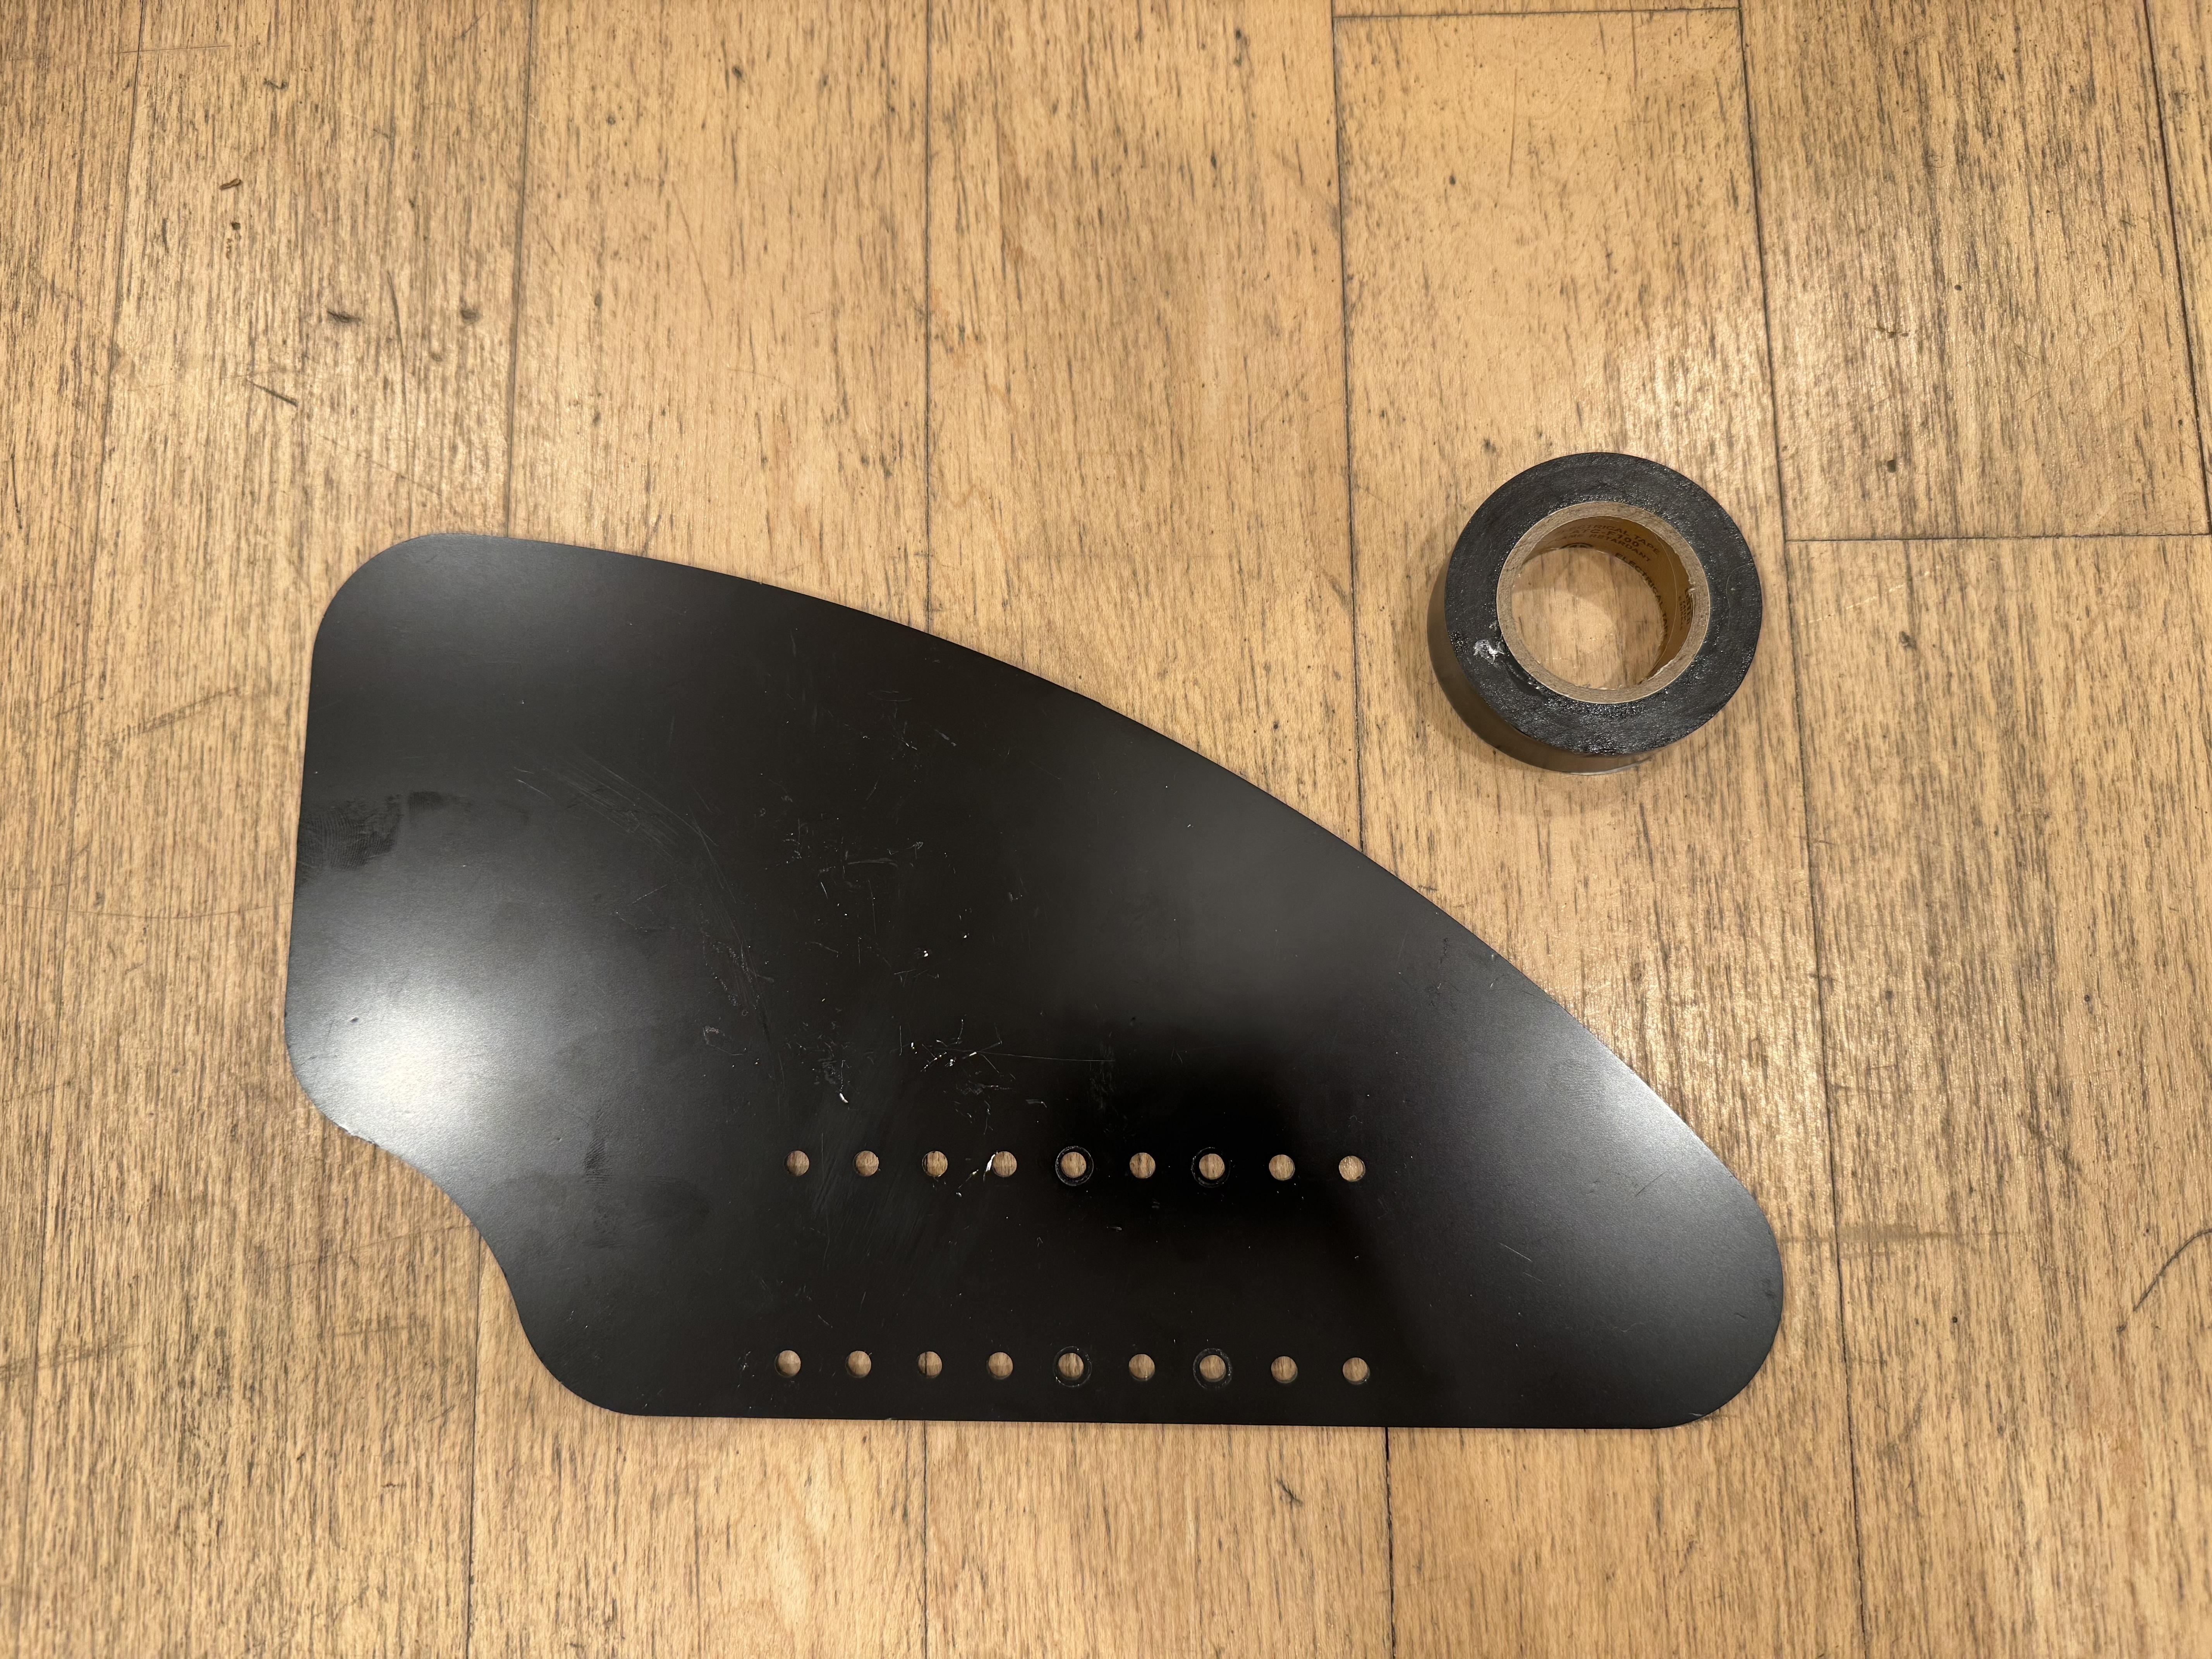
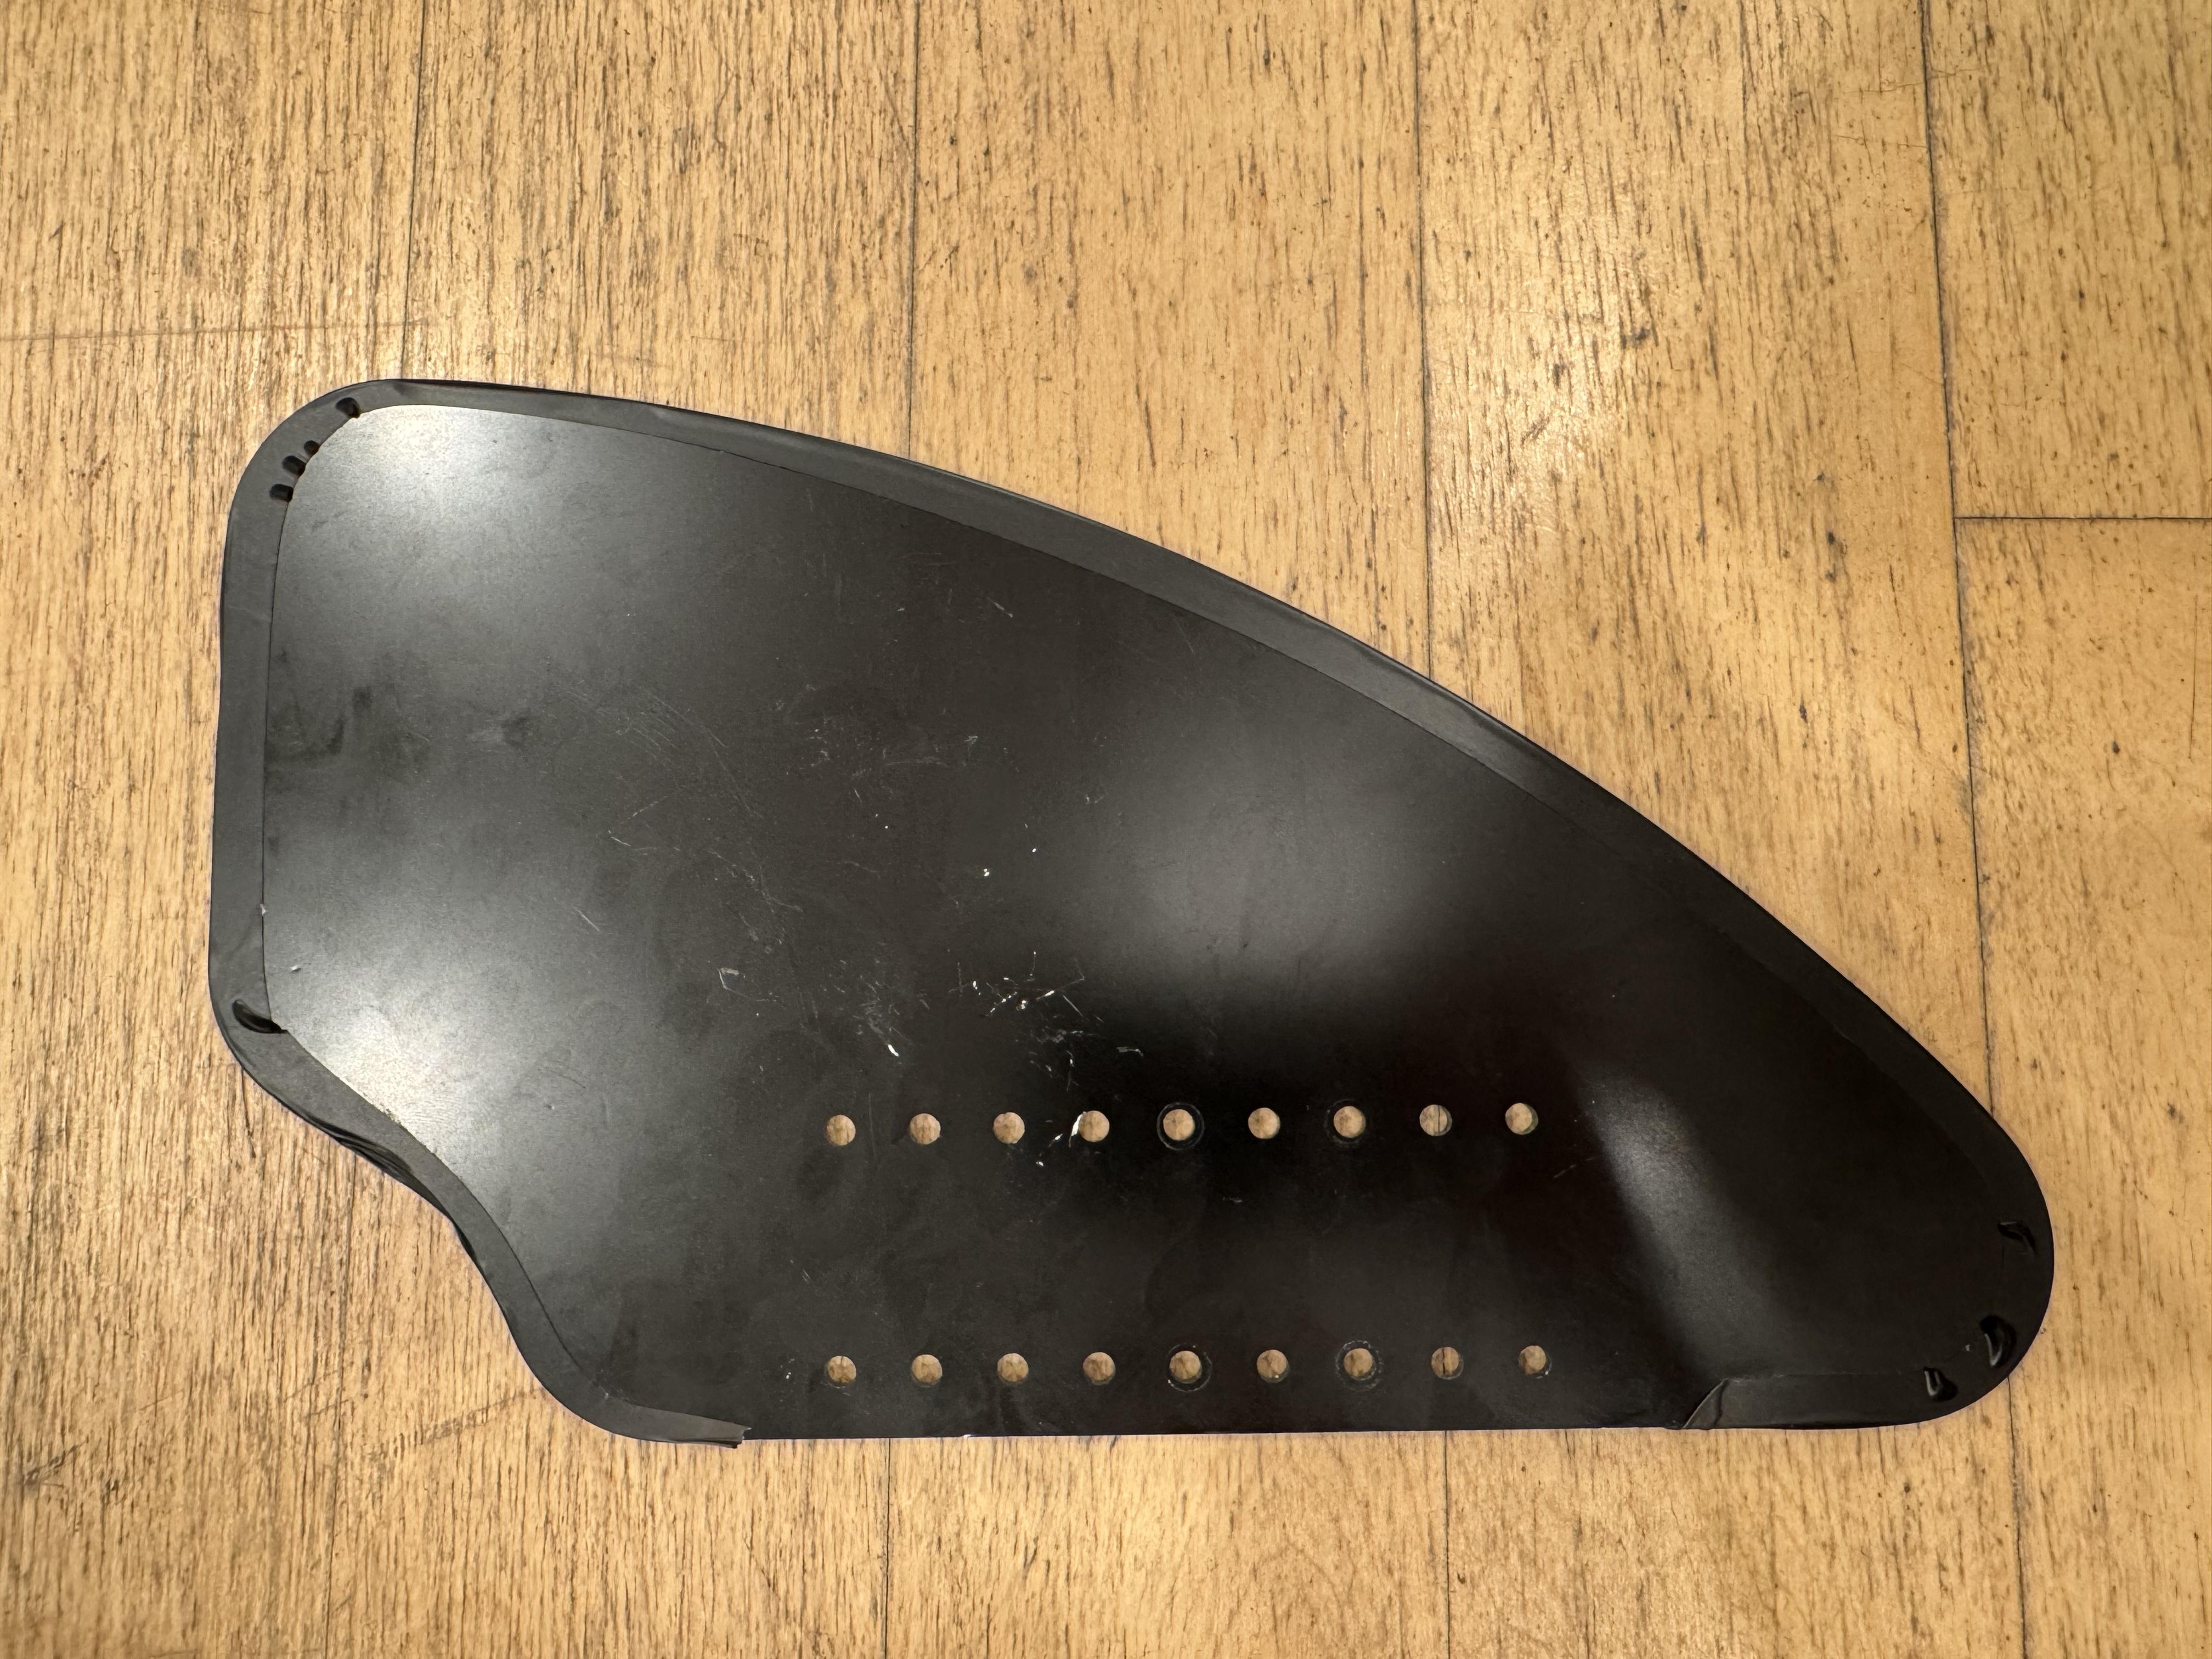
Put edge trim or electrical tape around the top and side edges of the side guards if desired. This is highly recommended as edges can be sharp.
Assemble Sideguard Mounts
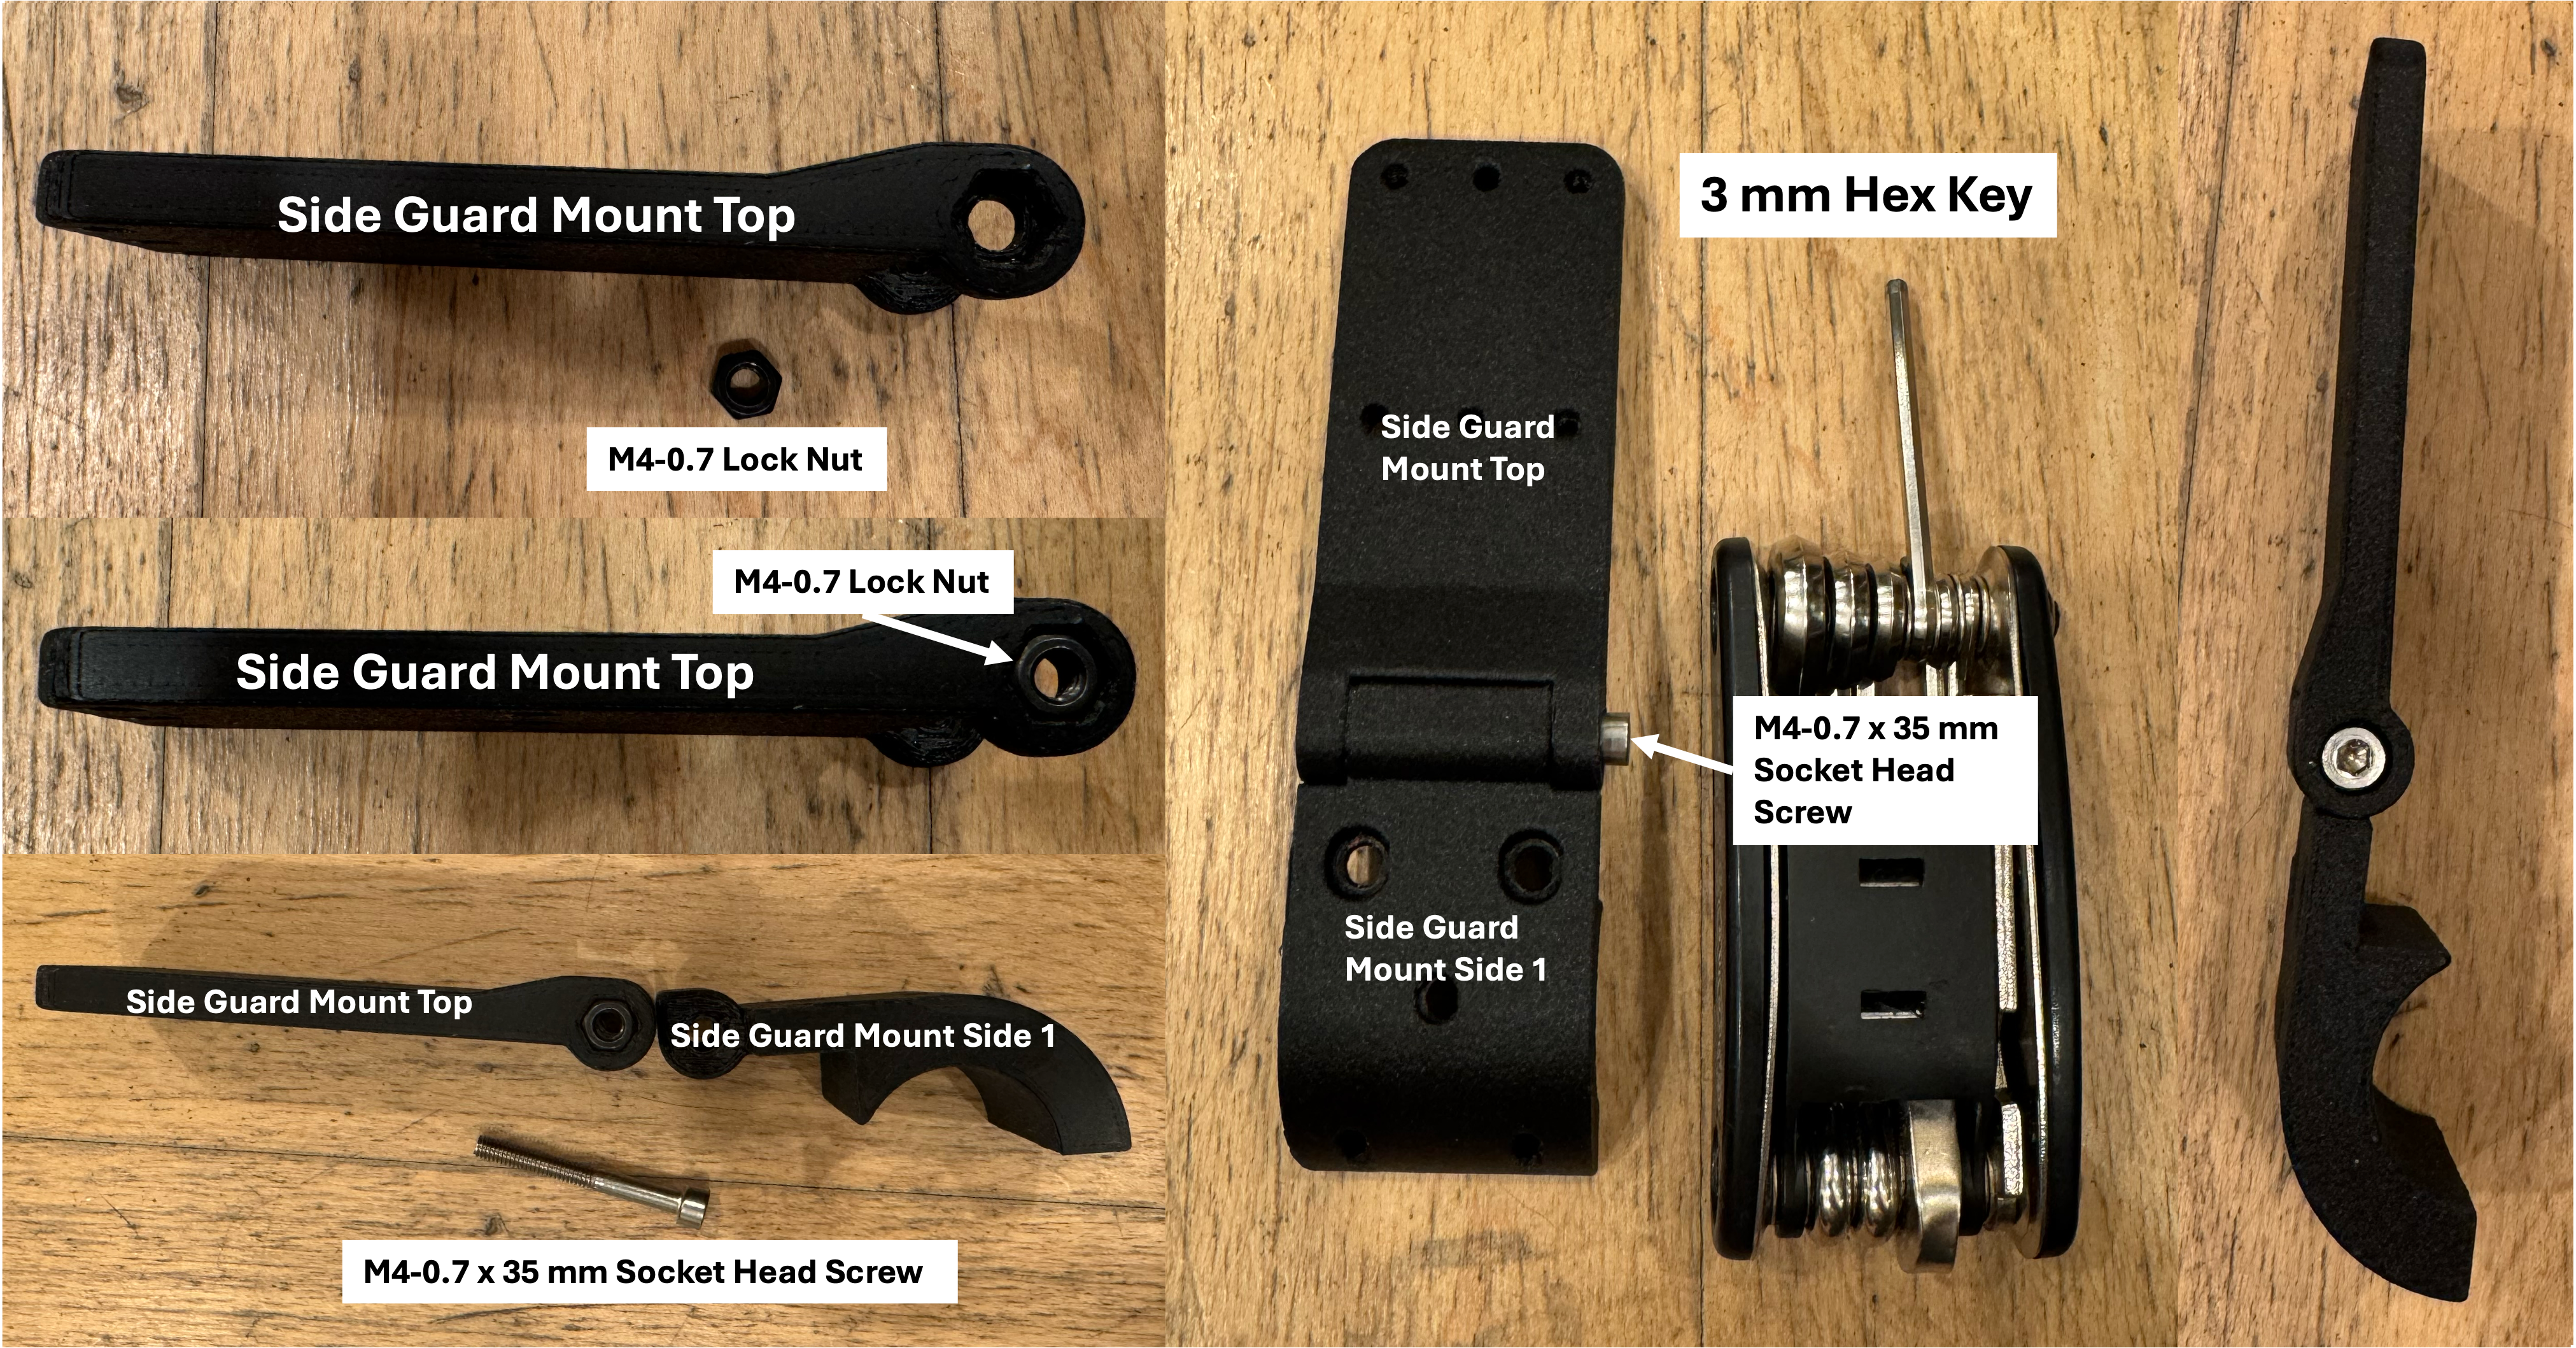
- Press the M4 x 0.7 mm lock nut in the hexagonal hole on the Side Guard Mount Top. (Photo 1)
- Put the M4 x 0.7 mm x 35 mm socket head screw through the hinge of the Side Guard Mount Top and Side Guard Mount Side 1 and screw in with 3 mm hex key until tight. (Photo 1)
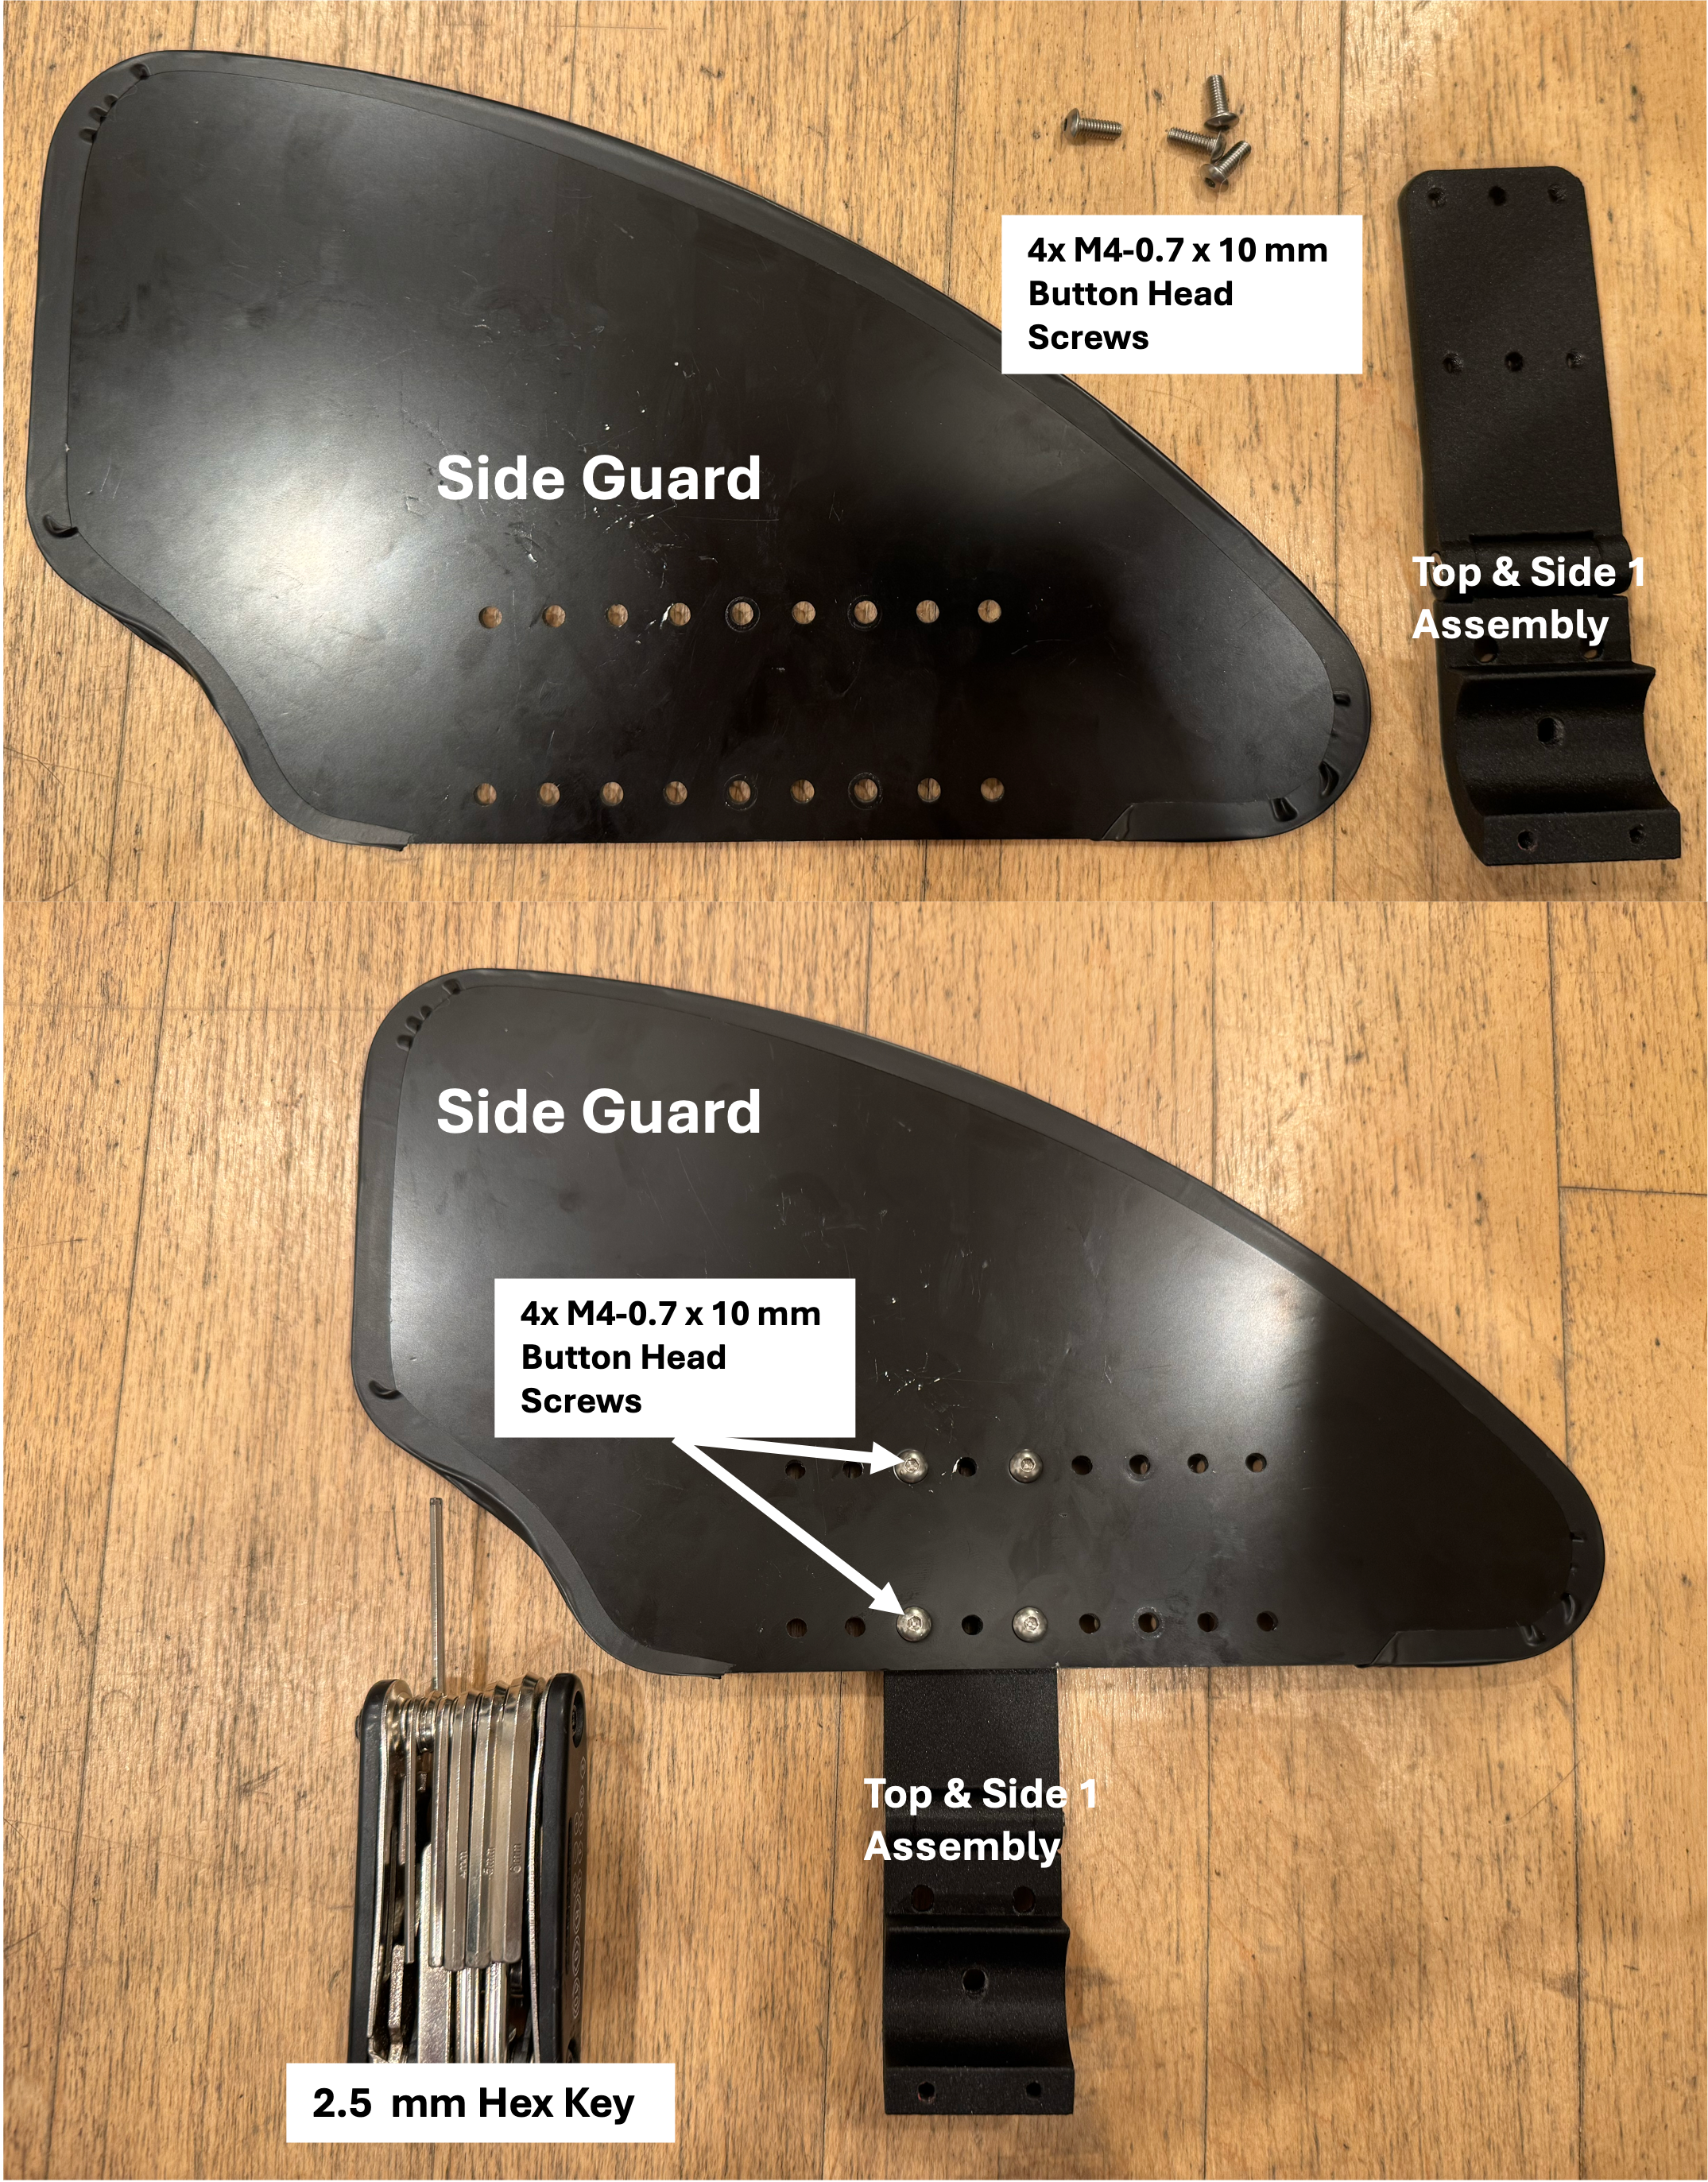
- Mount the Side Guards to the Side Guard Mount Top with 4x M4 x 0.7 mm x 10 mm button head screws using a 2.5 mm hex key. (Photo 2)
Mount Sideguards
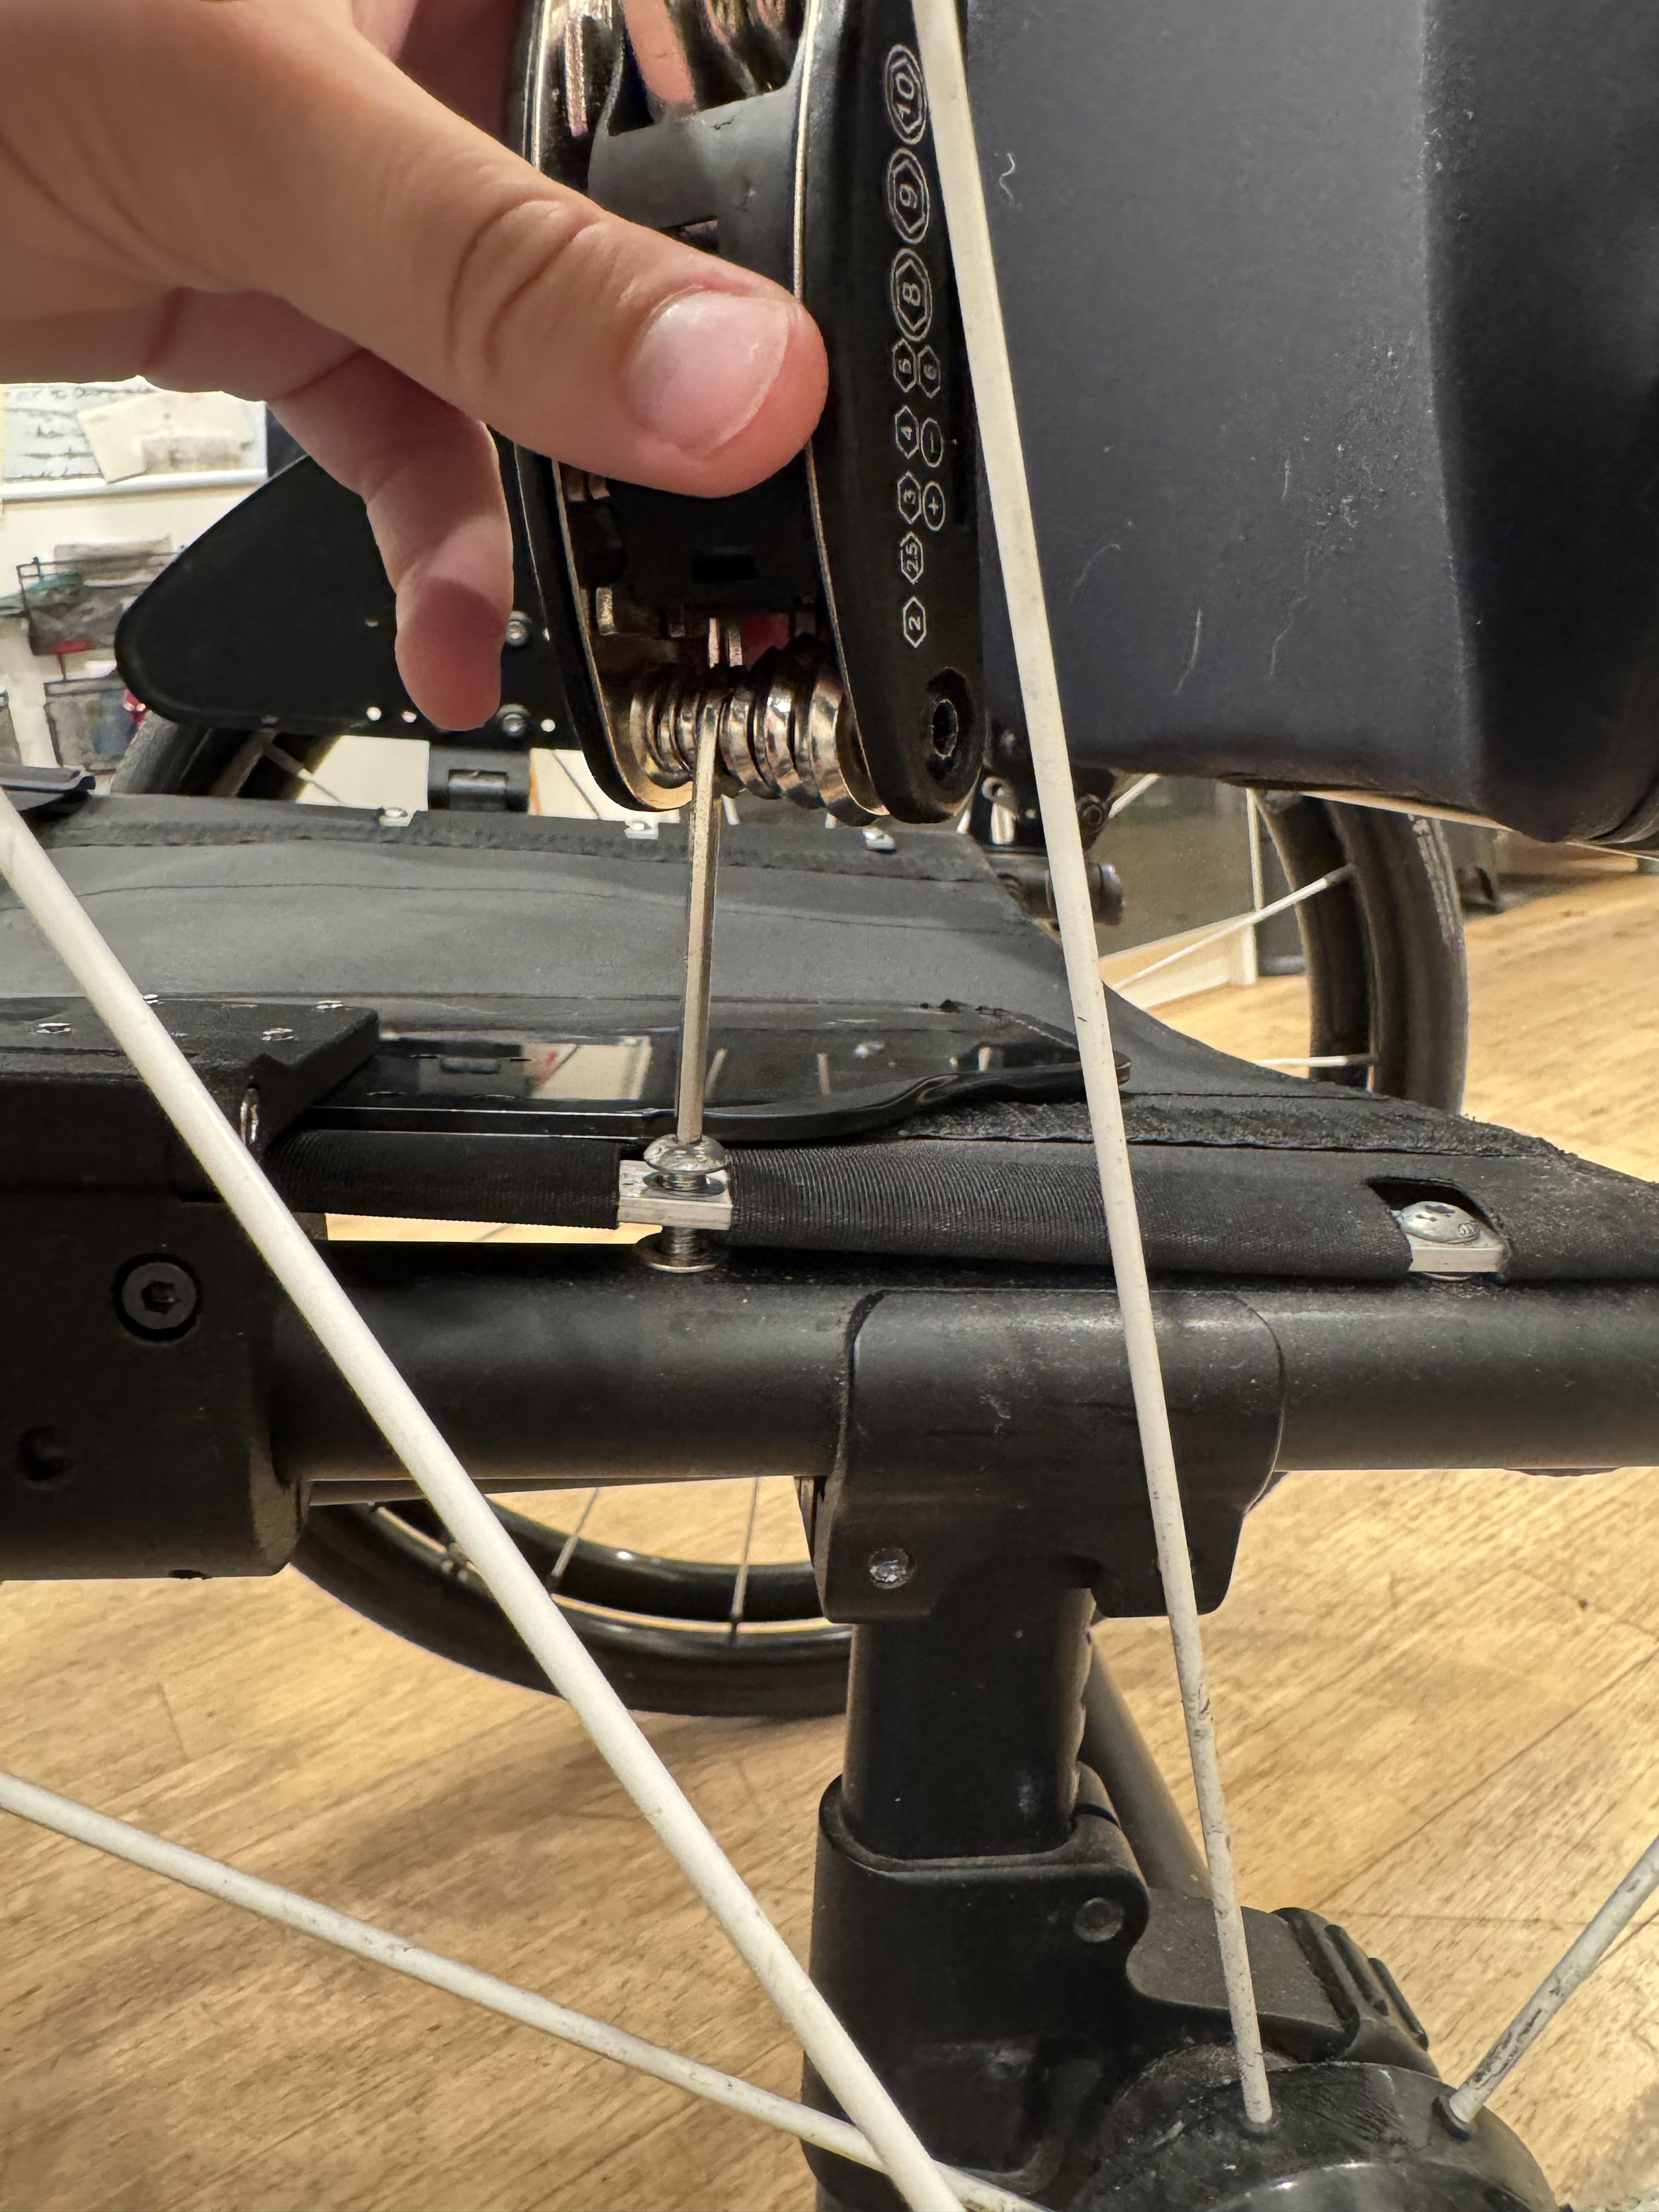
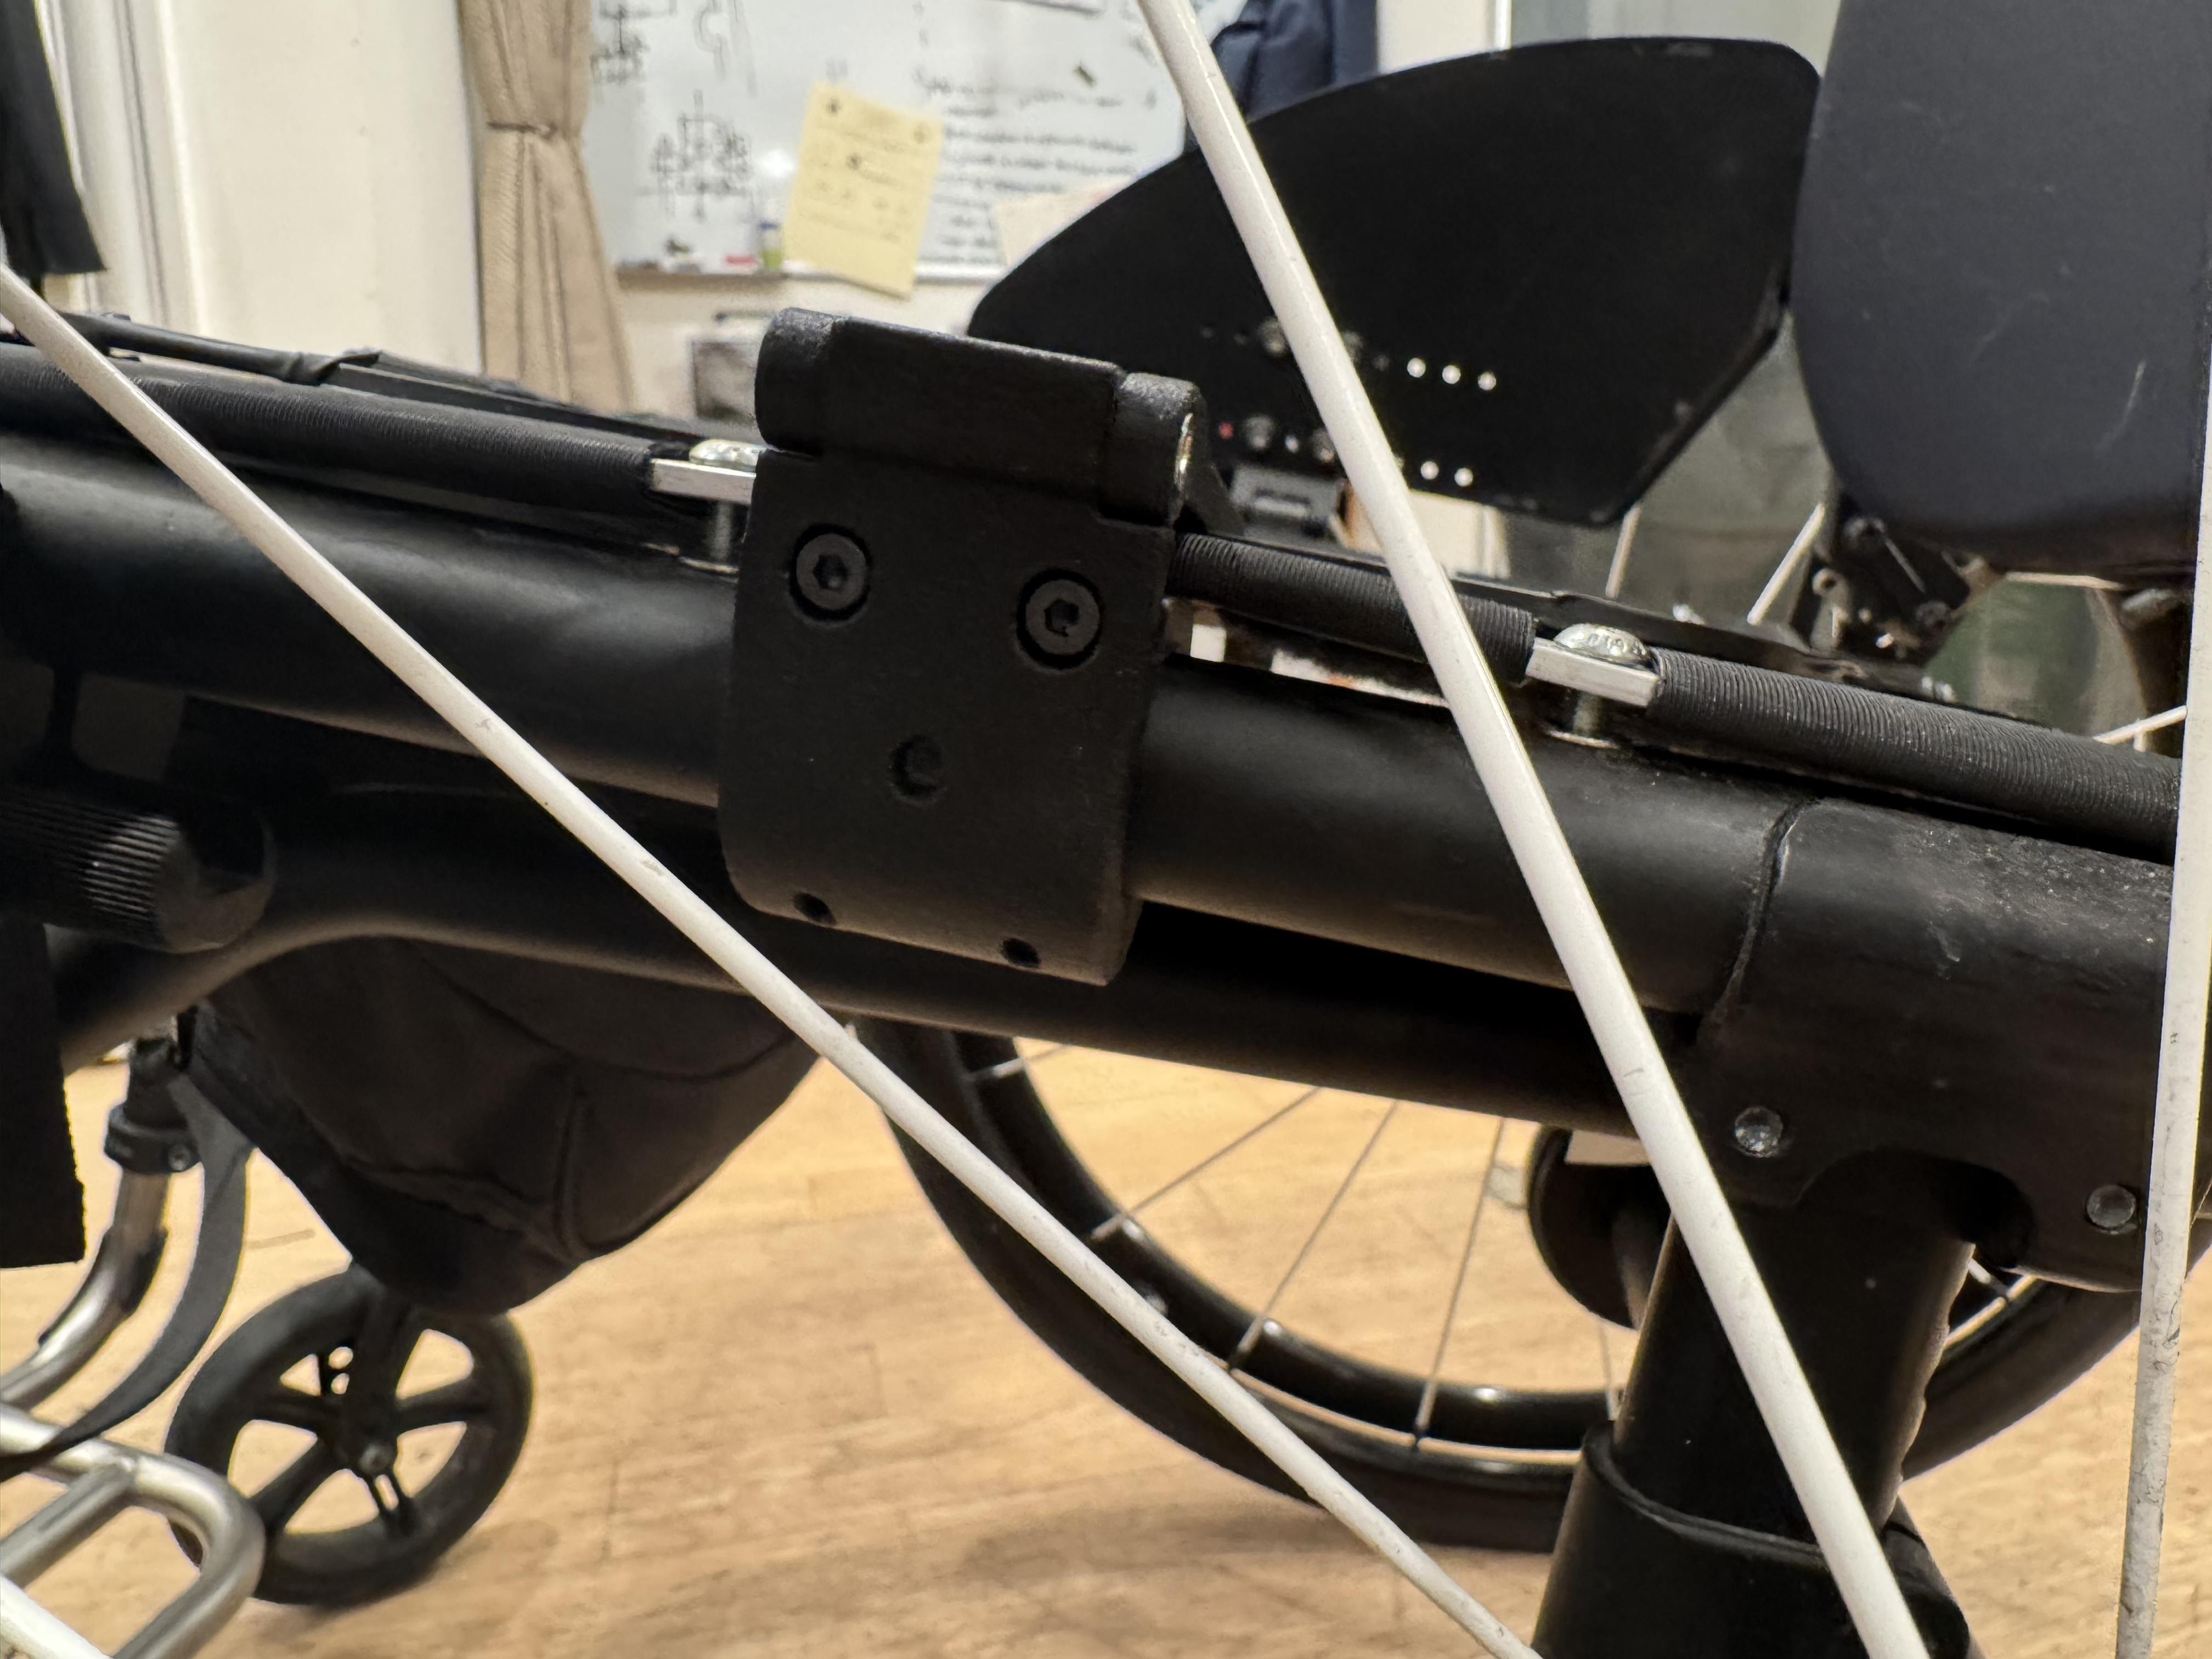
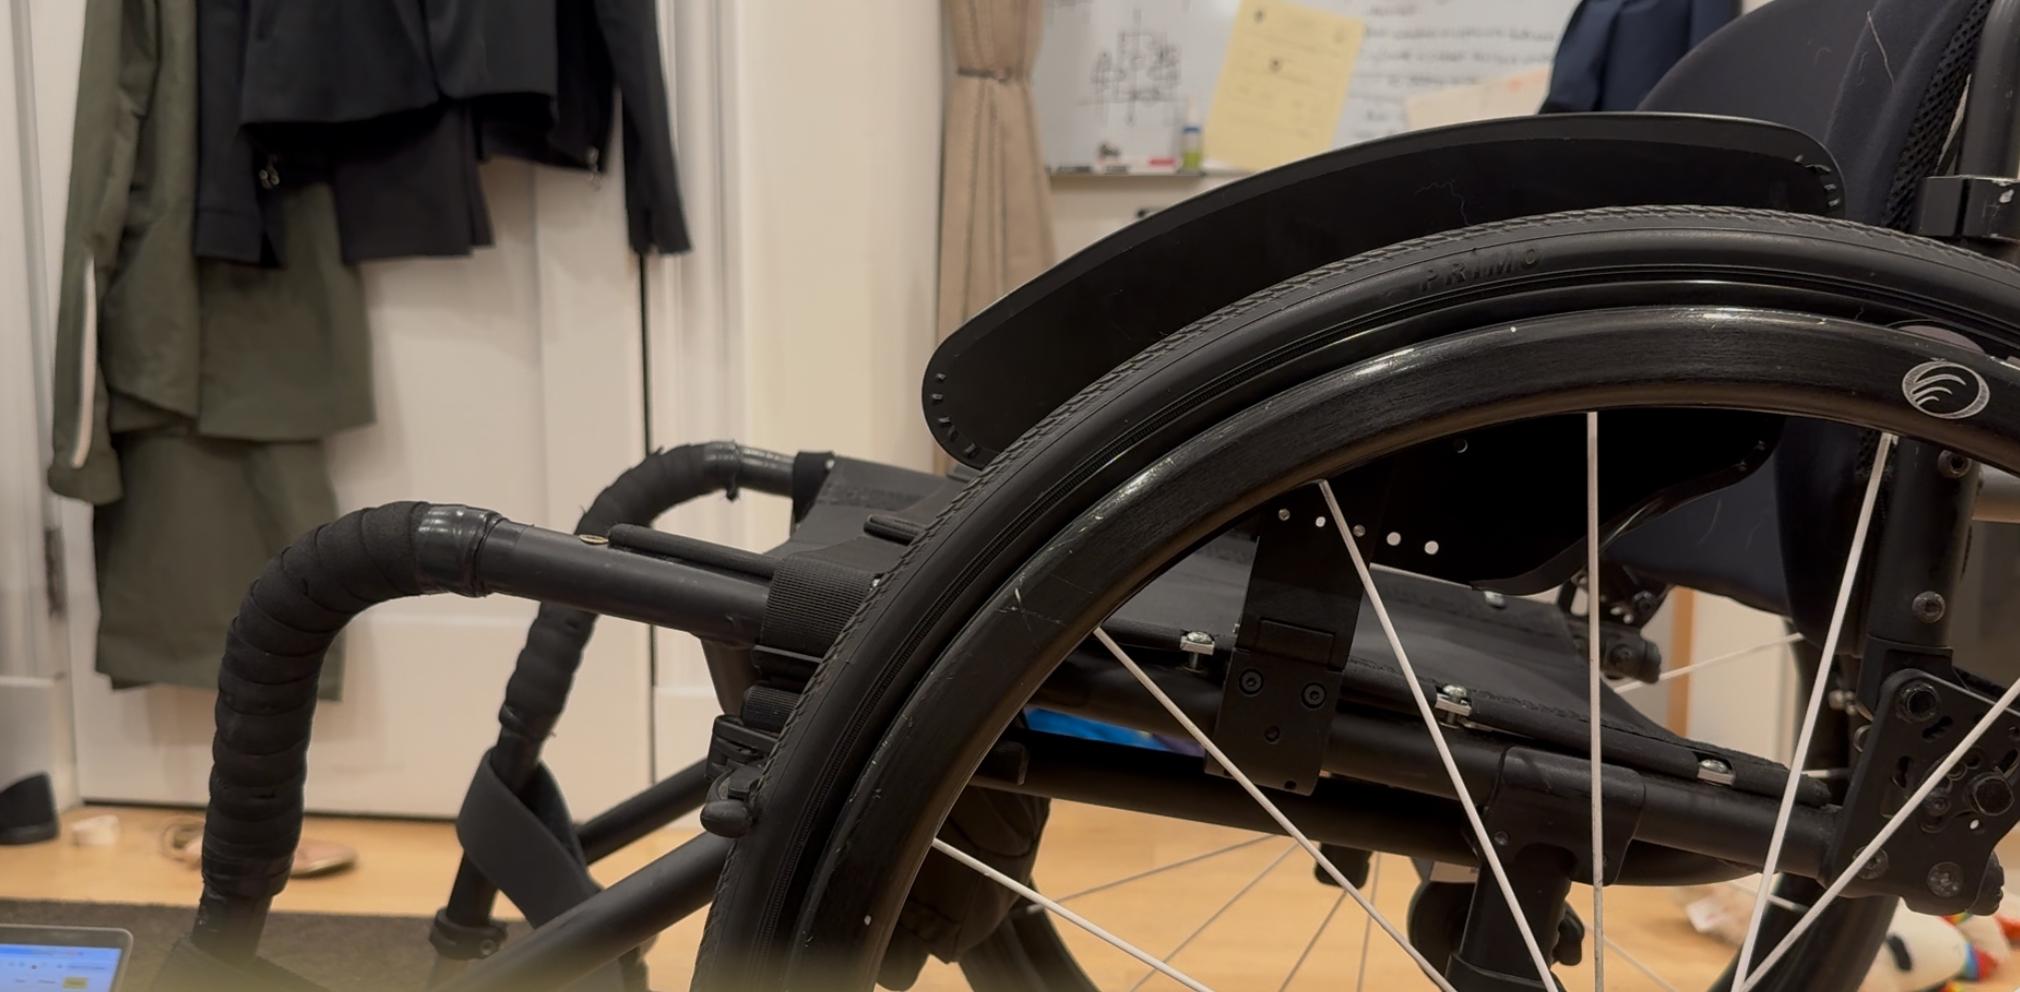
The following directions are for a single side guard.
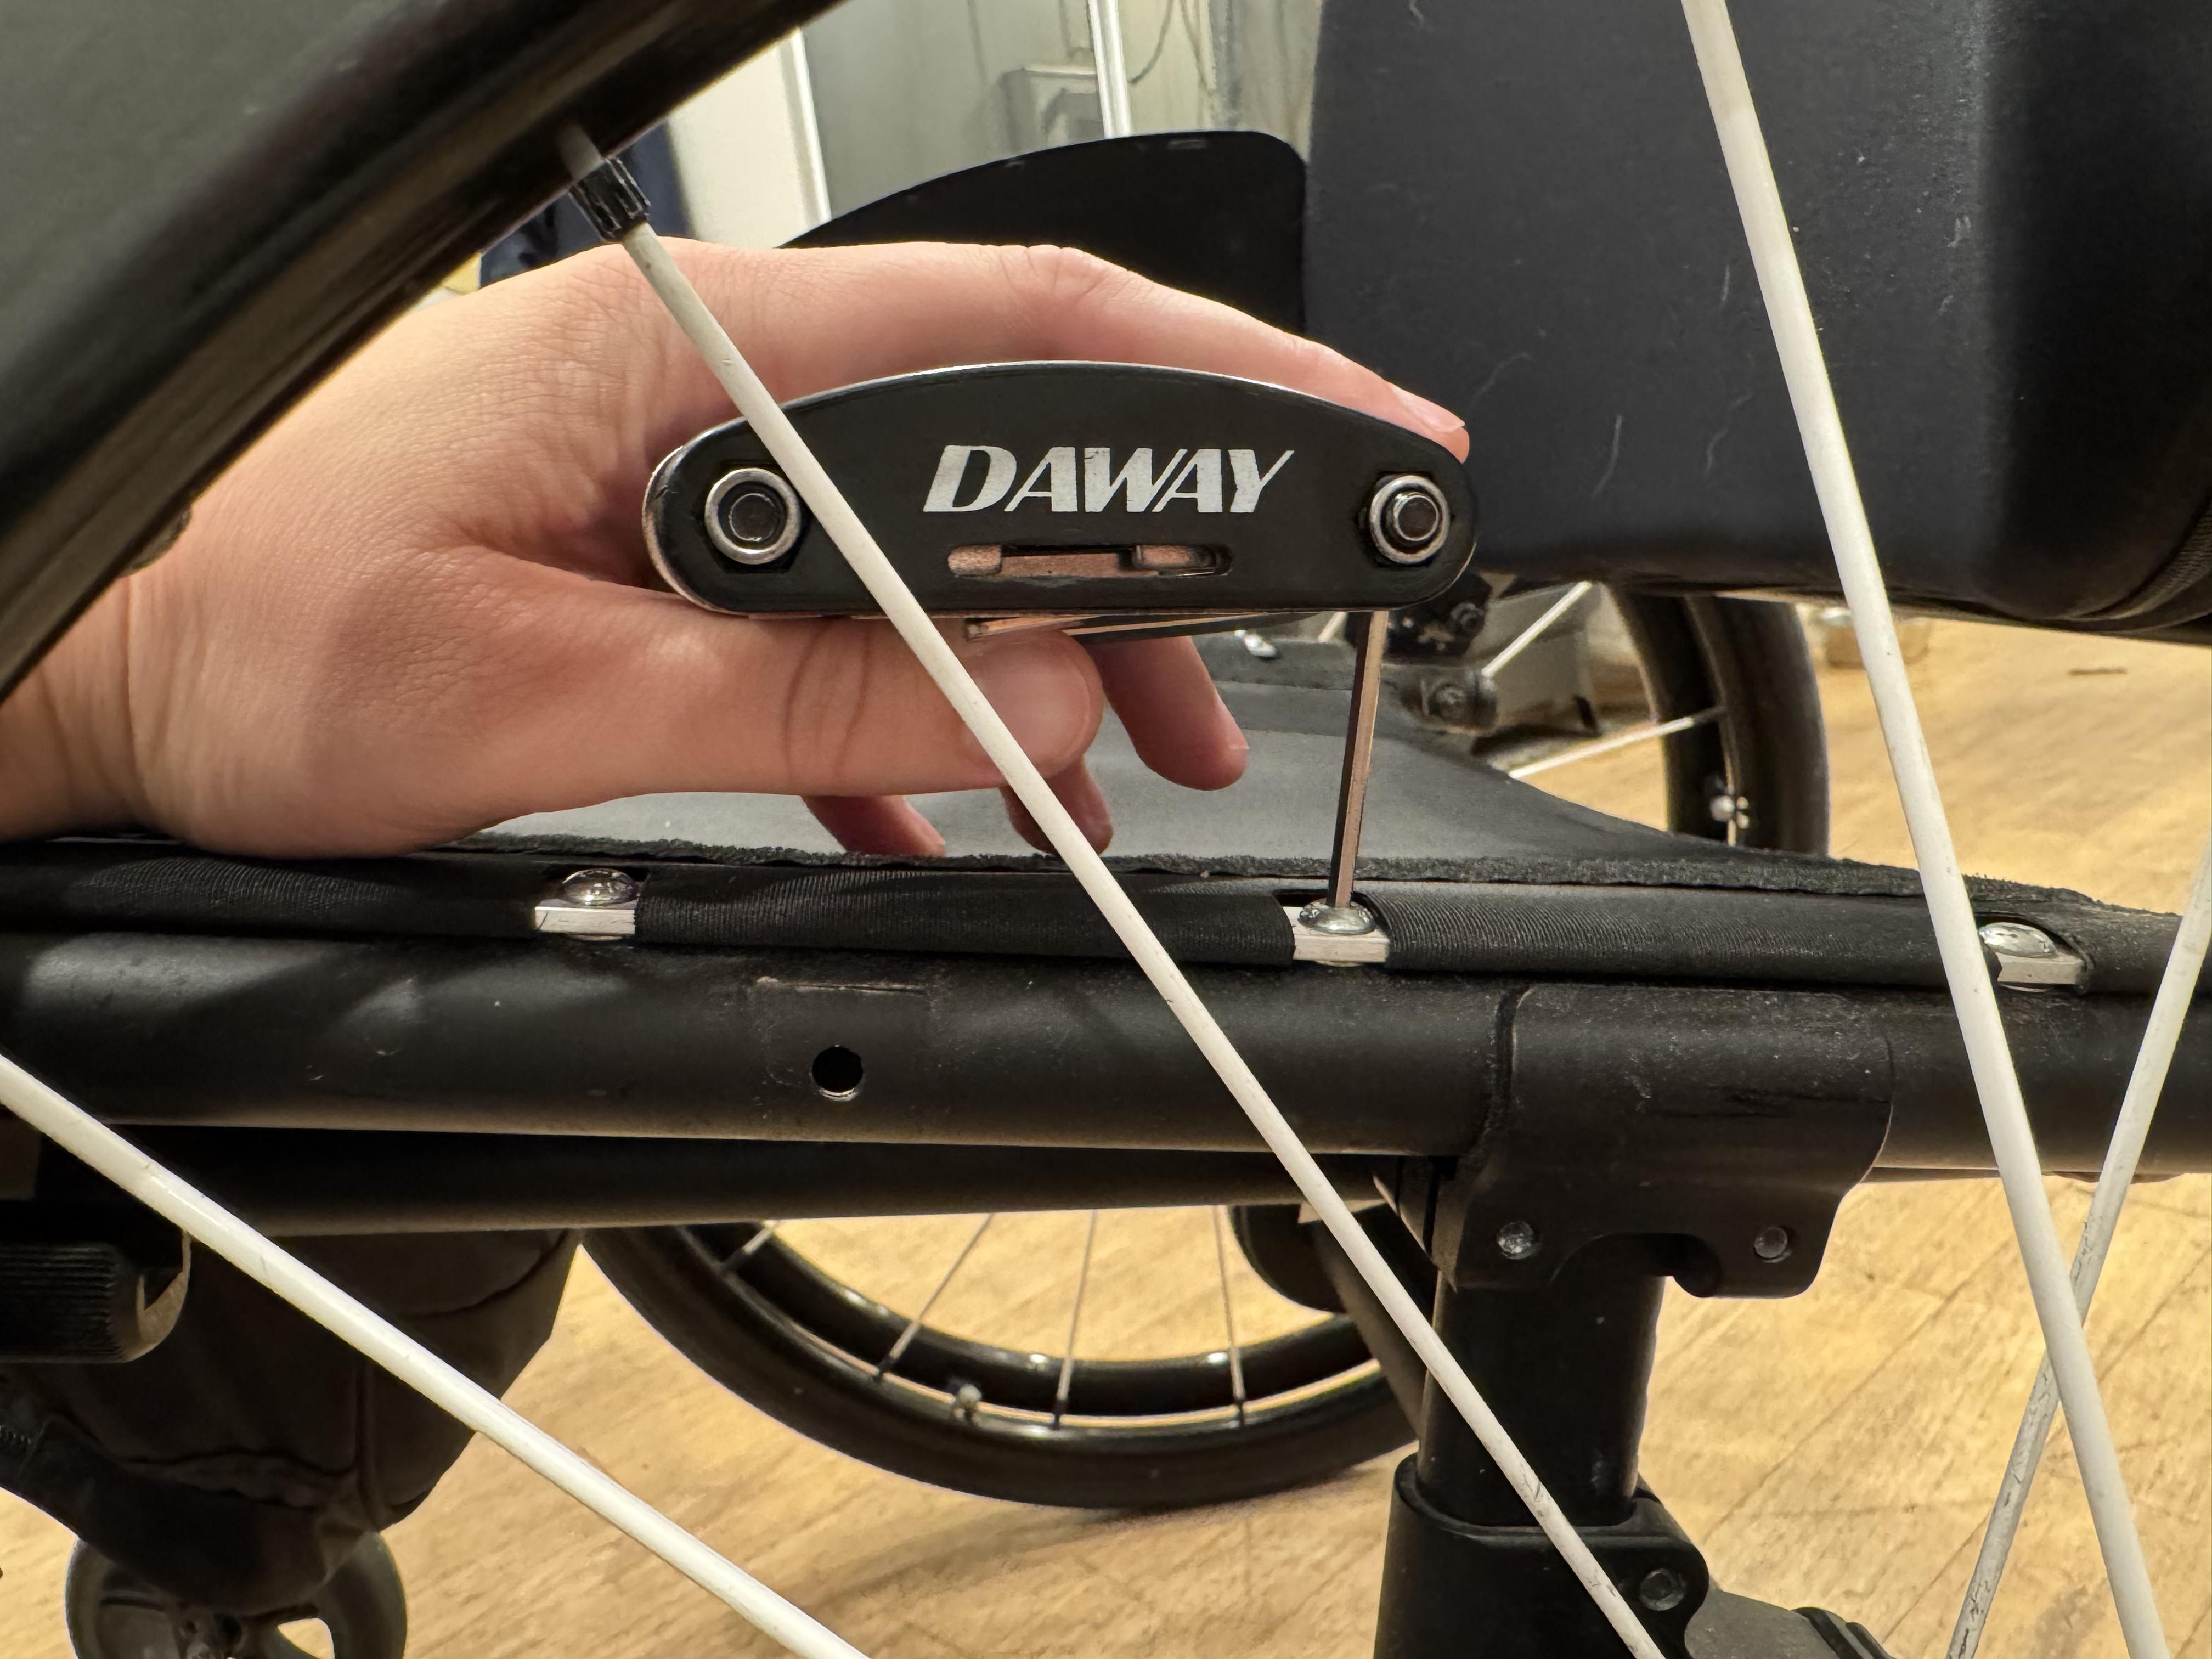
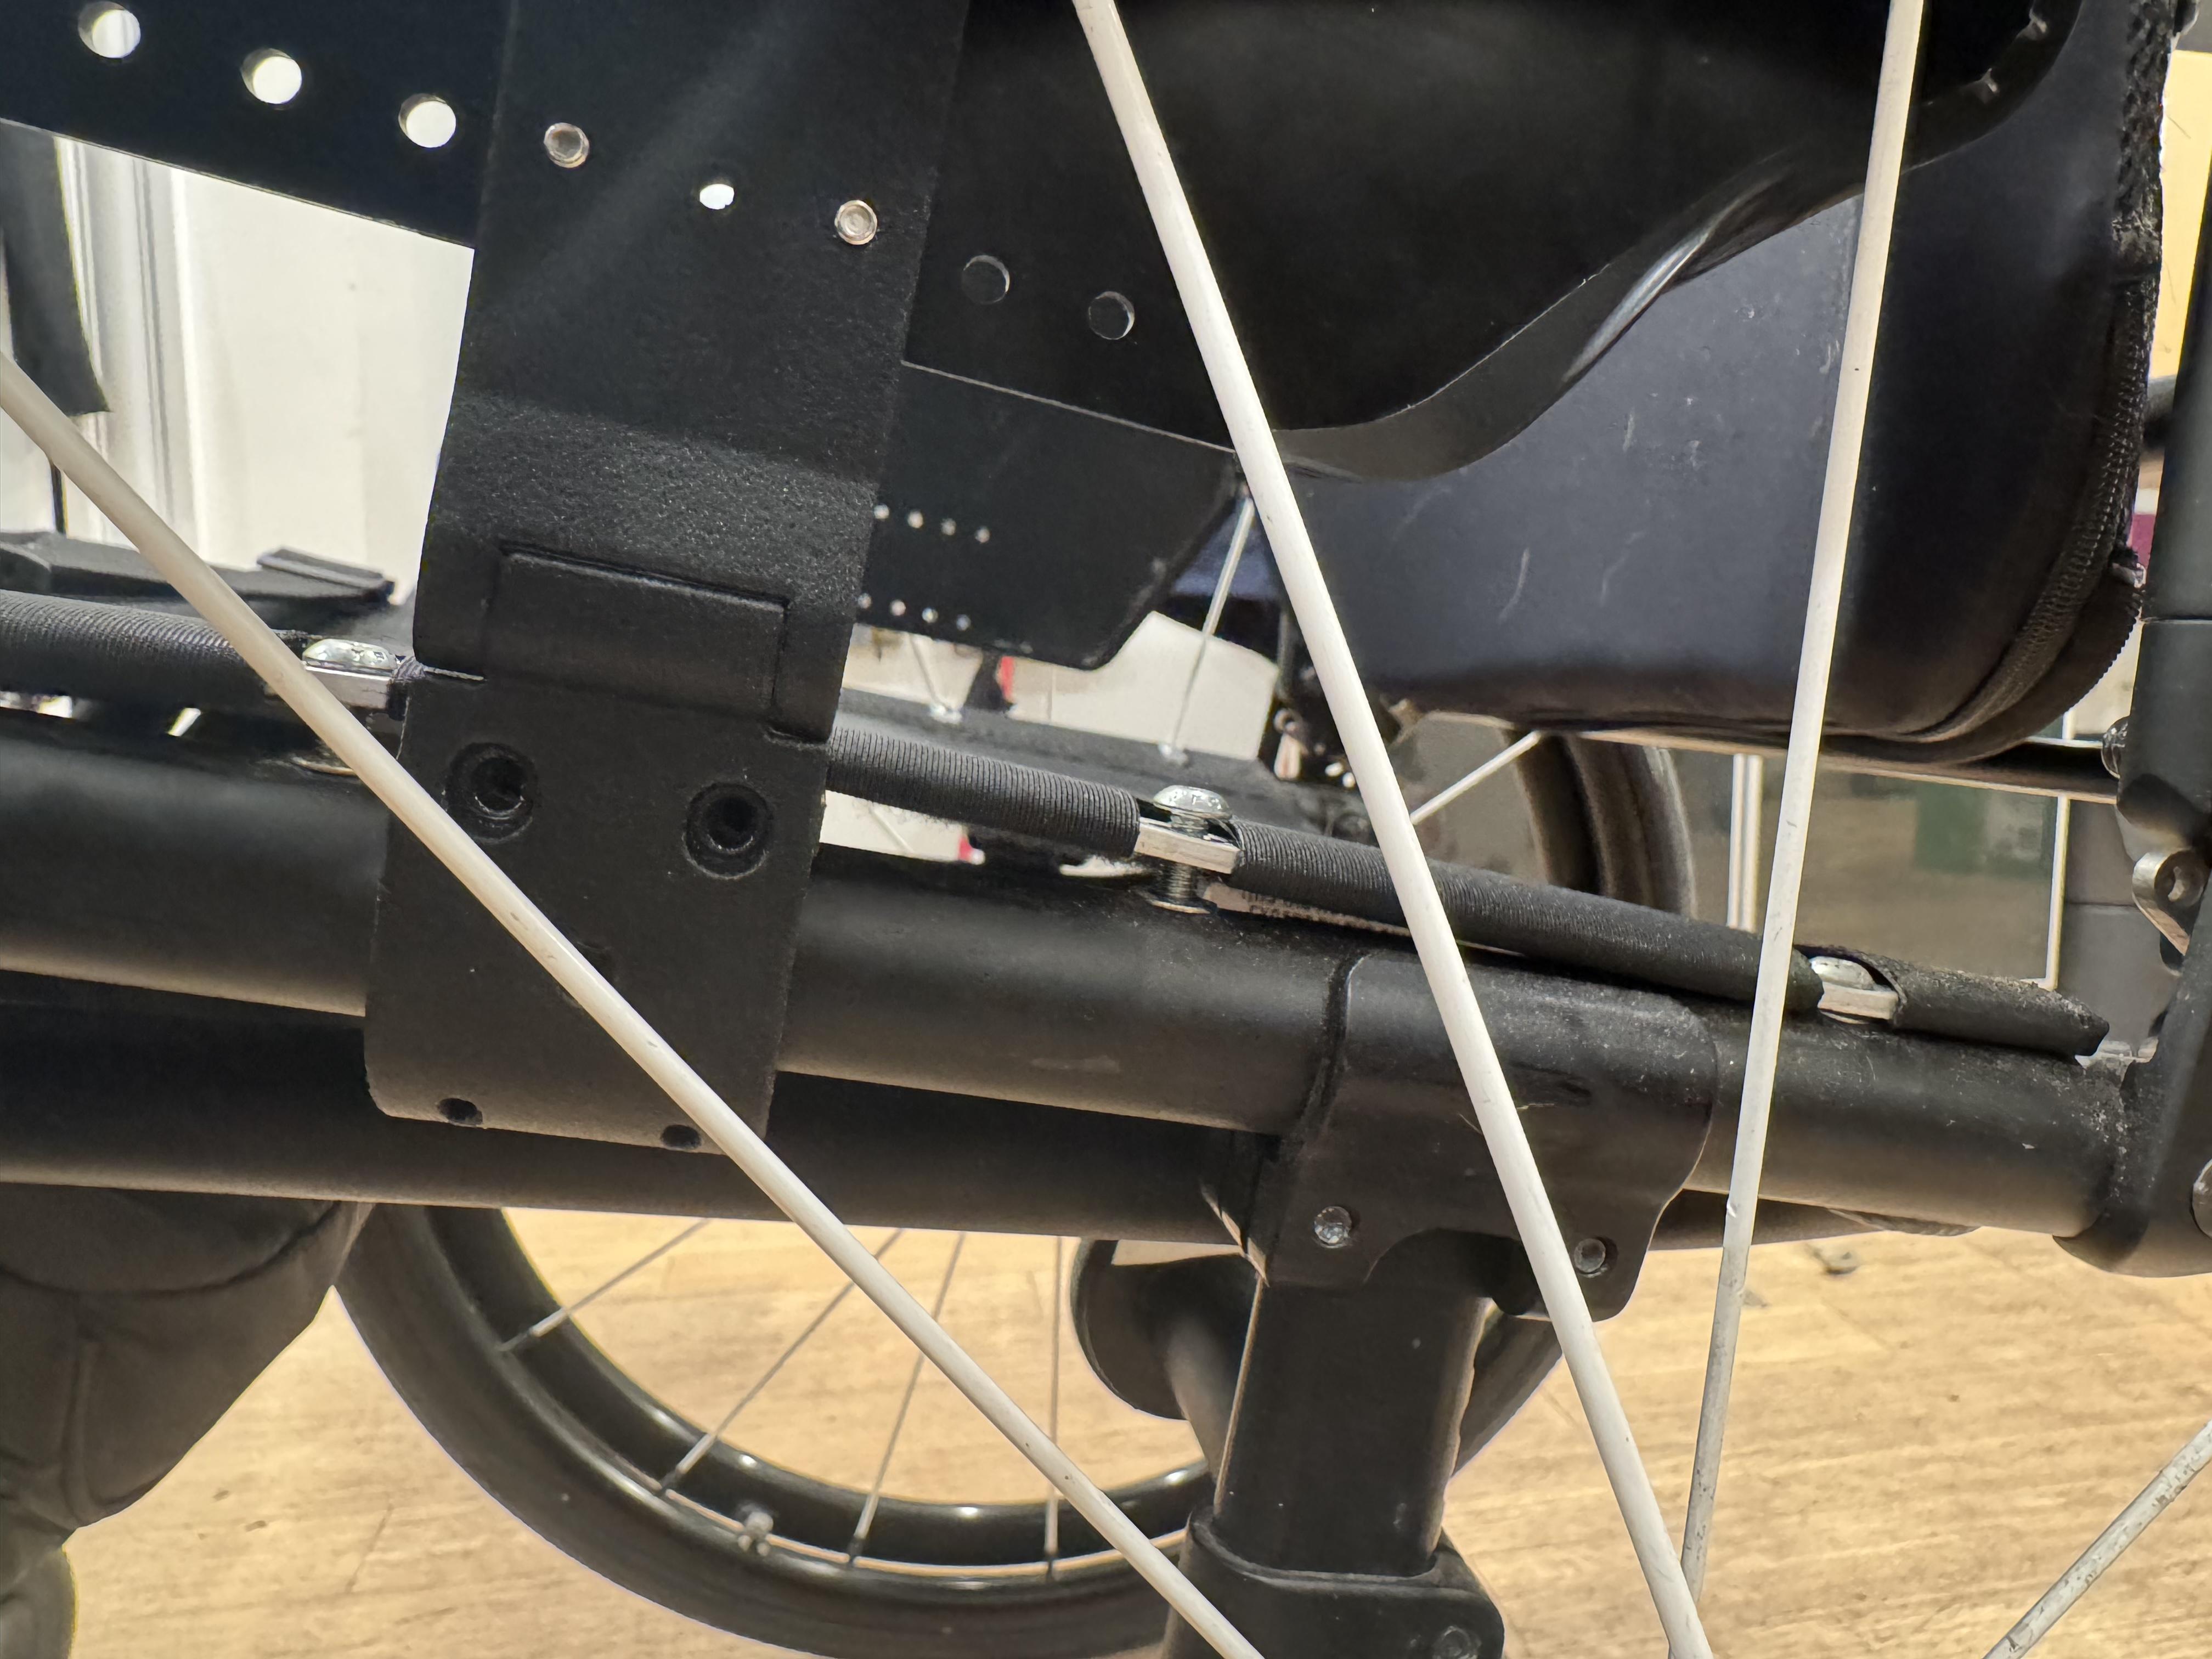
- Loosen mounting screws for your seat sling so that Side Guard Mount Side 2 can slip between the seat sling and the frame. (Photo 1)
- If there is not a hole in the frame for mounting side guards, wrap one layer of rubber anti-slip mat or a few layers of electrical tape around the frame to help prevent twisting.
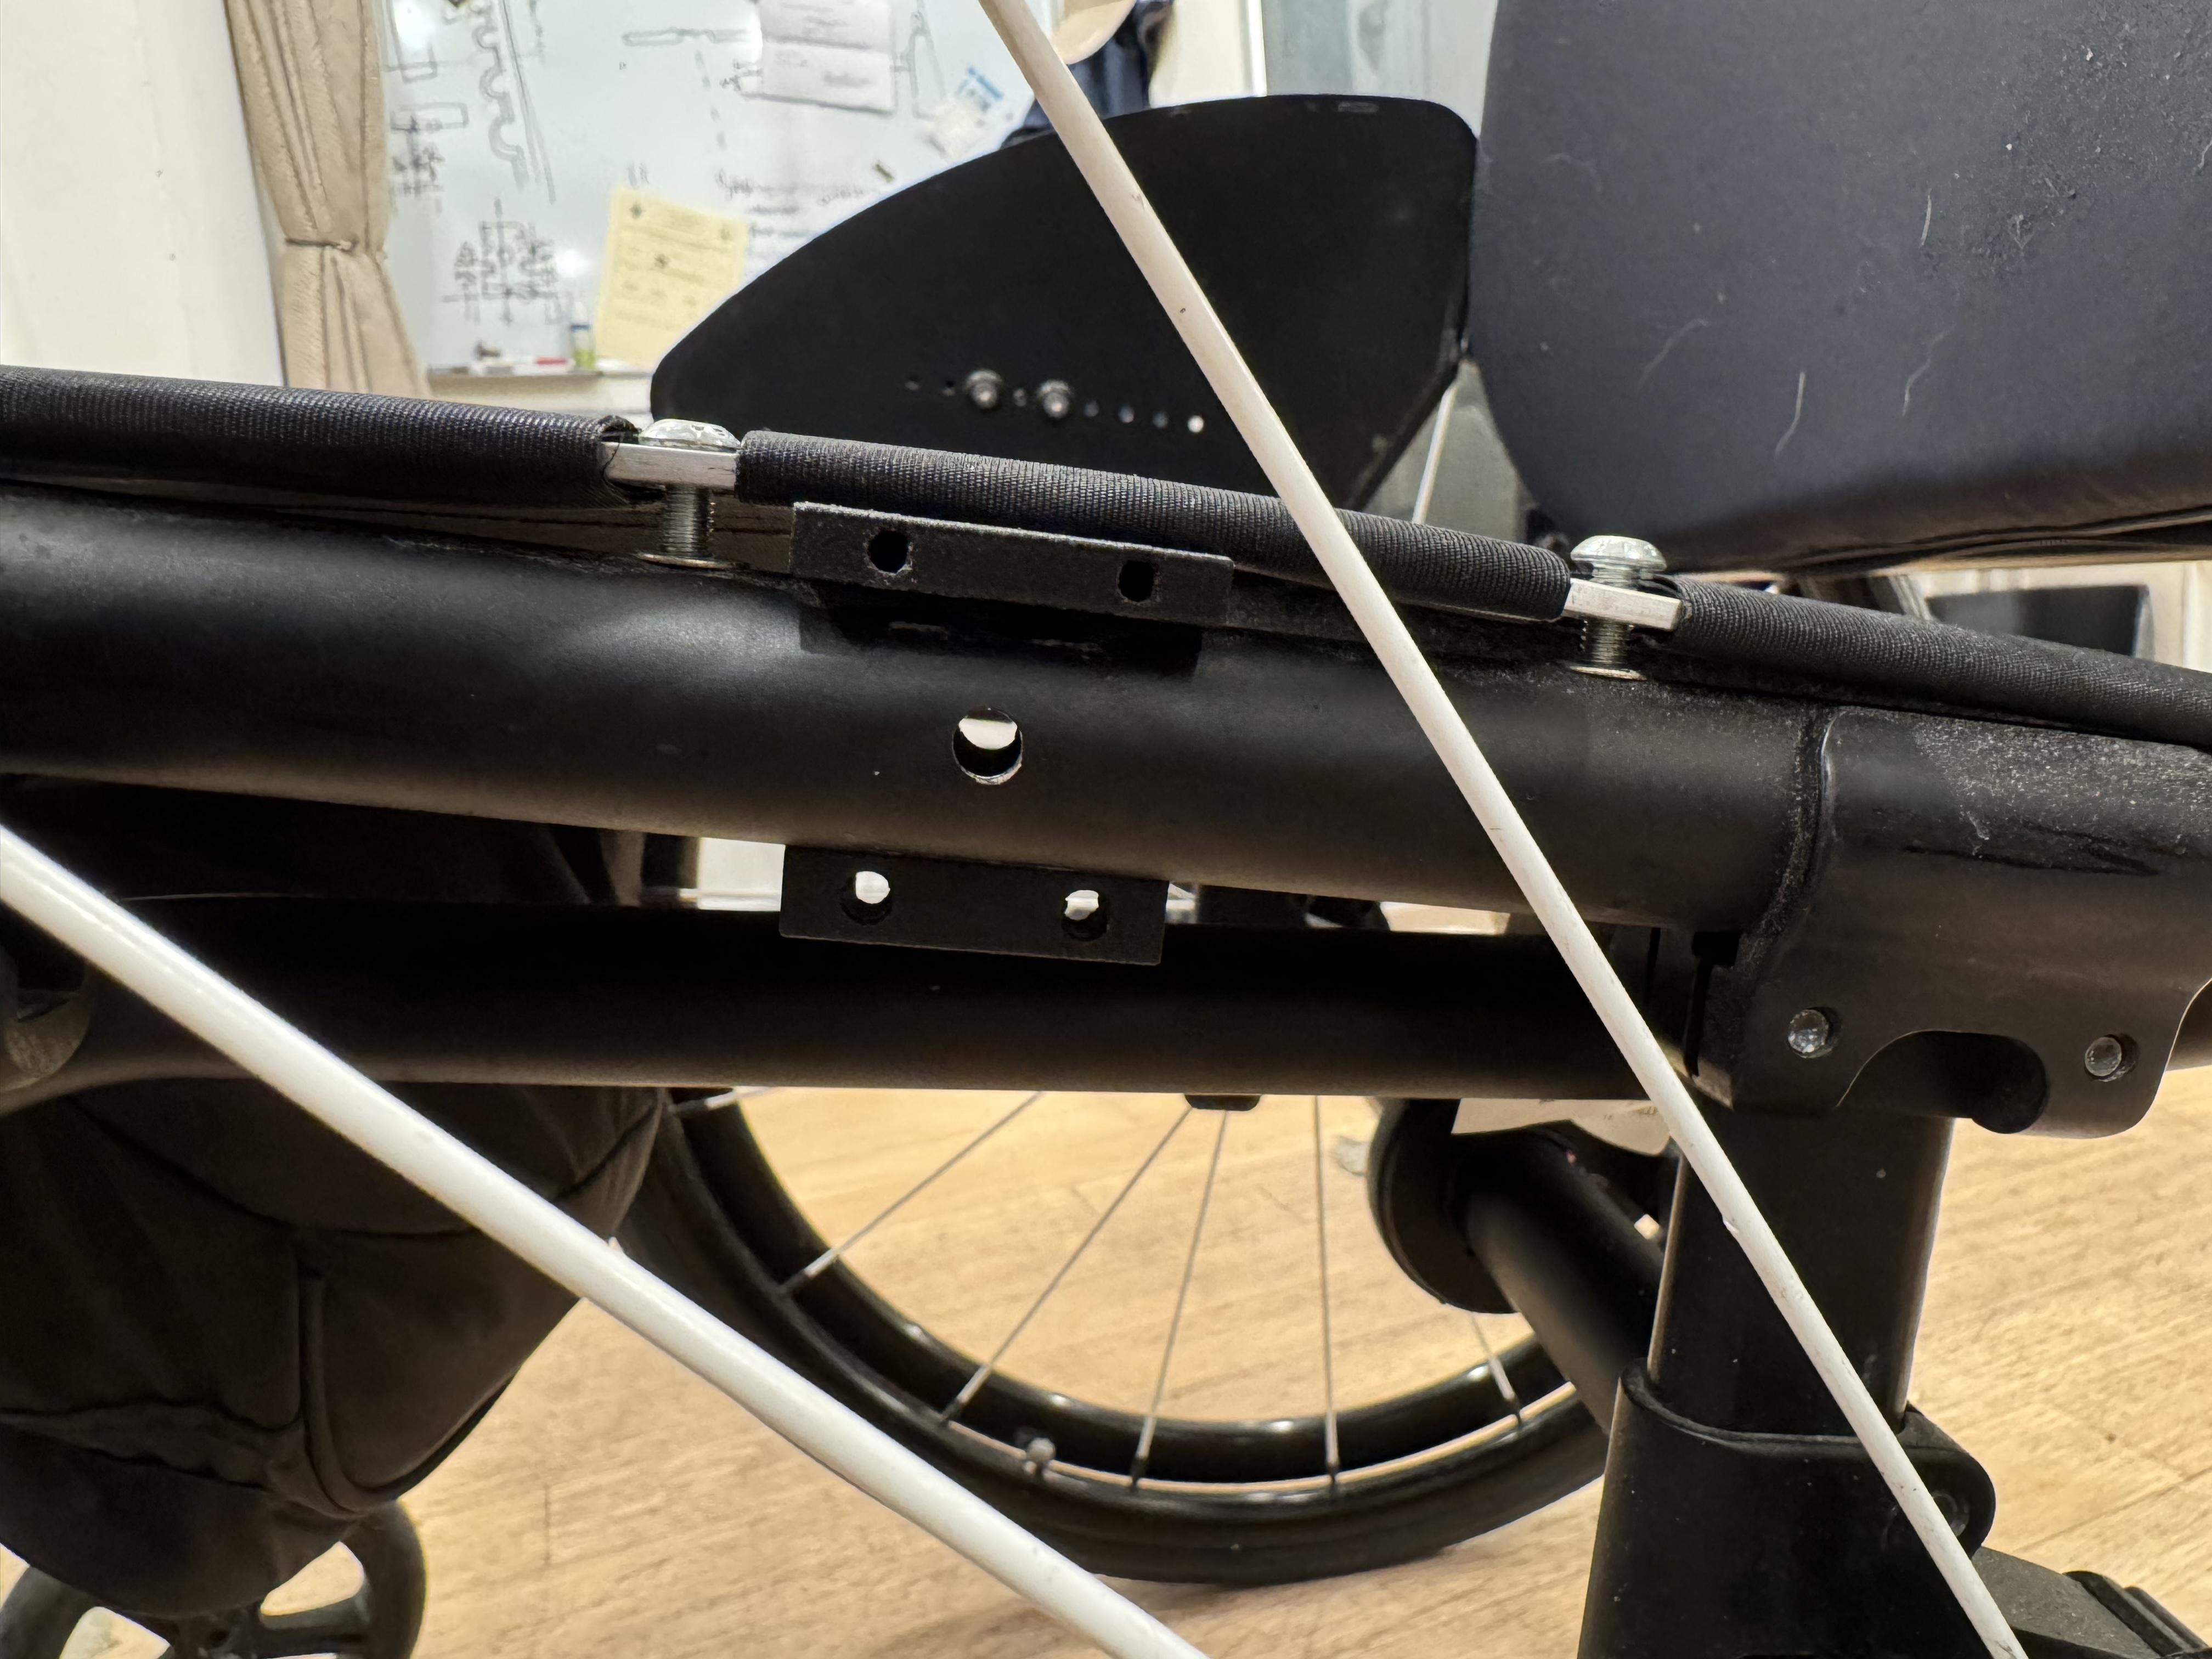
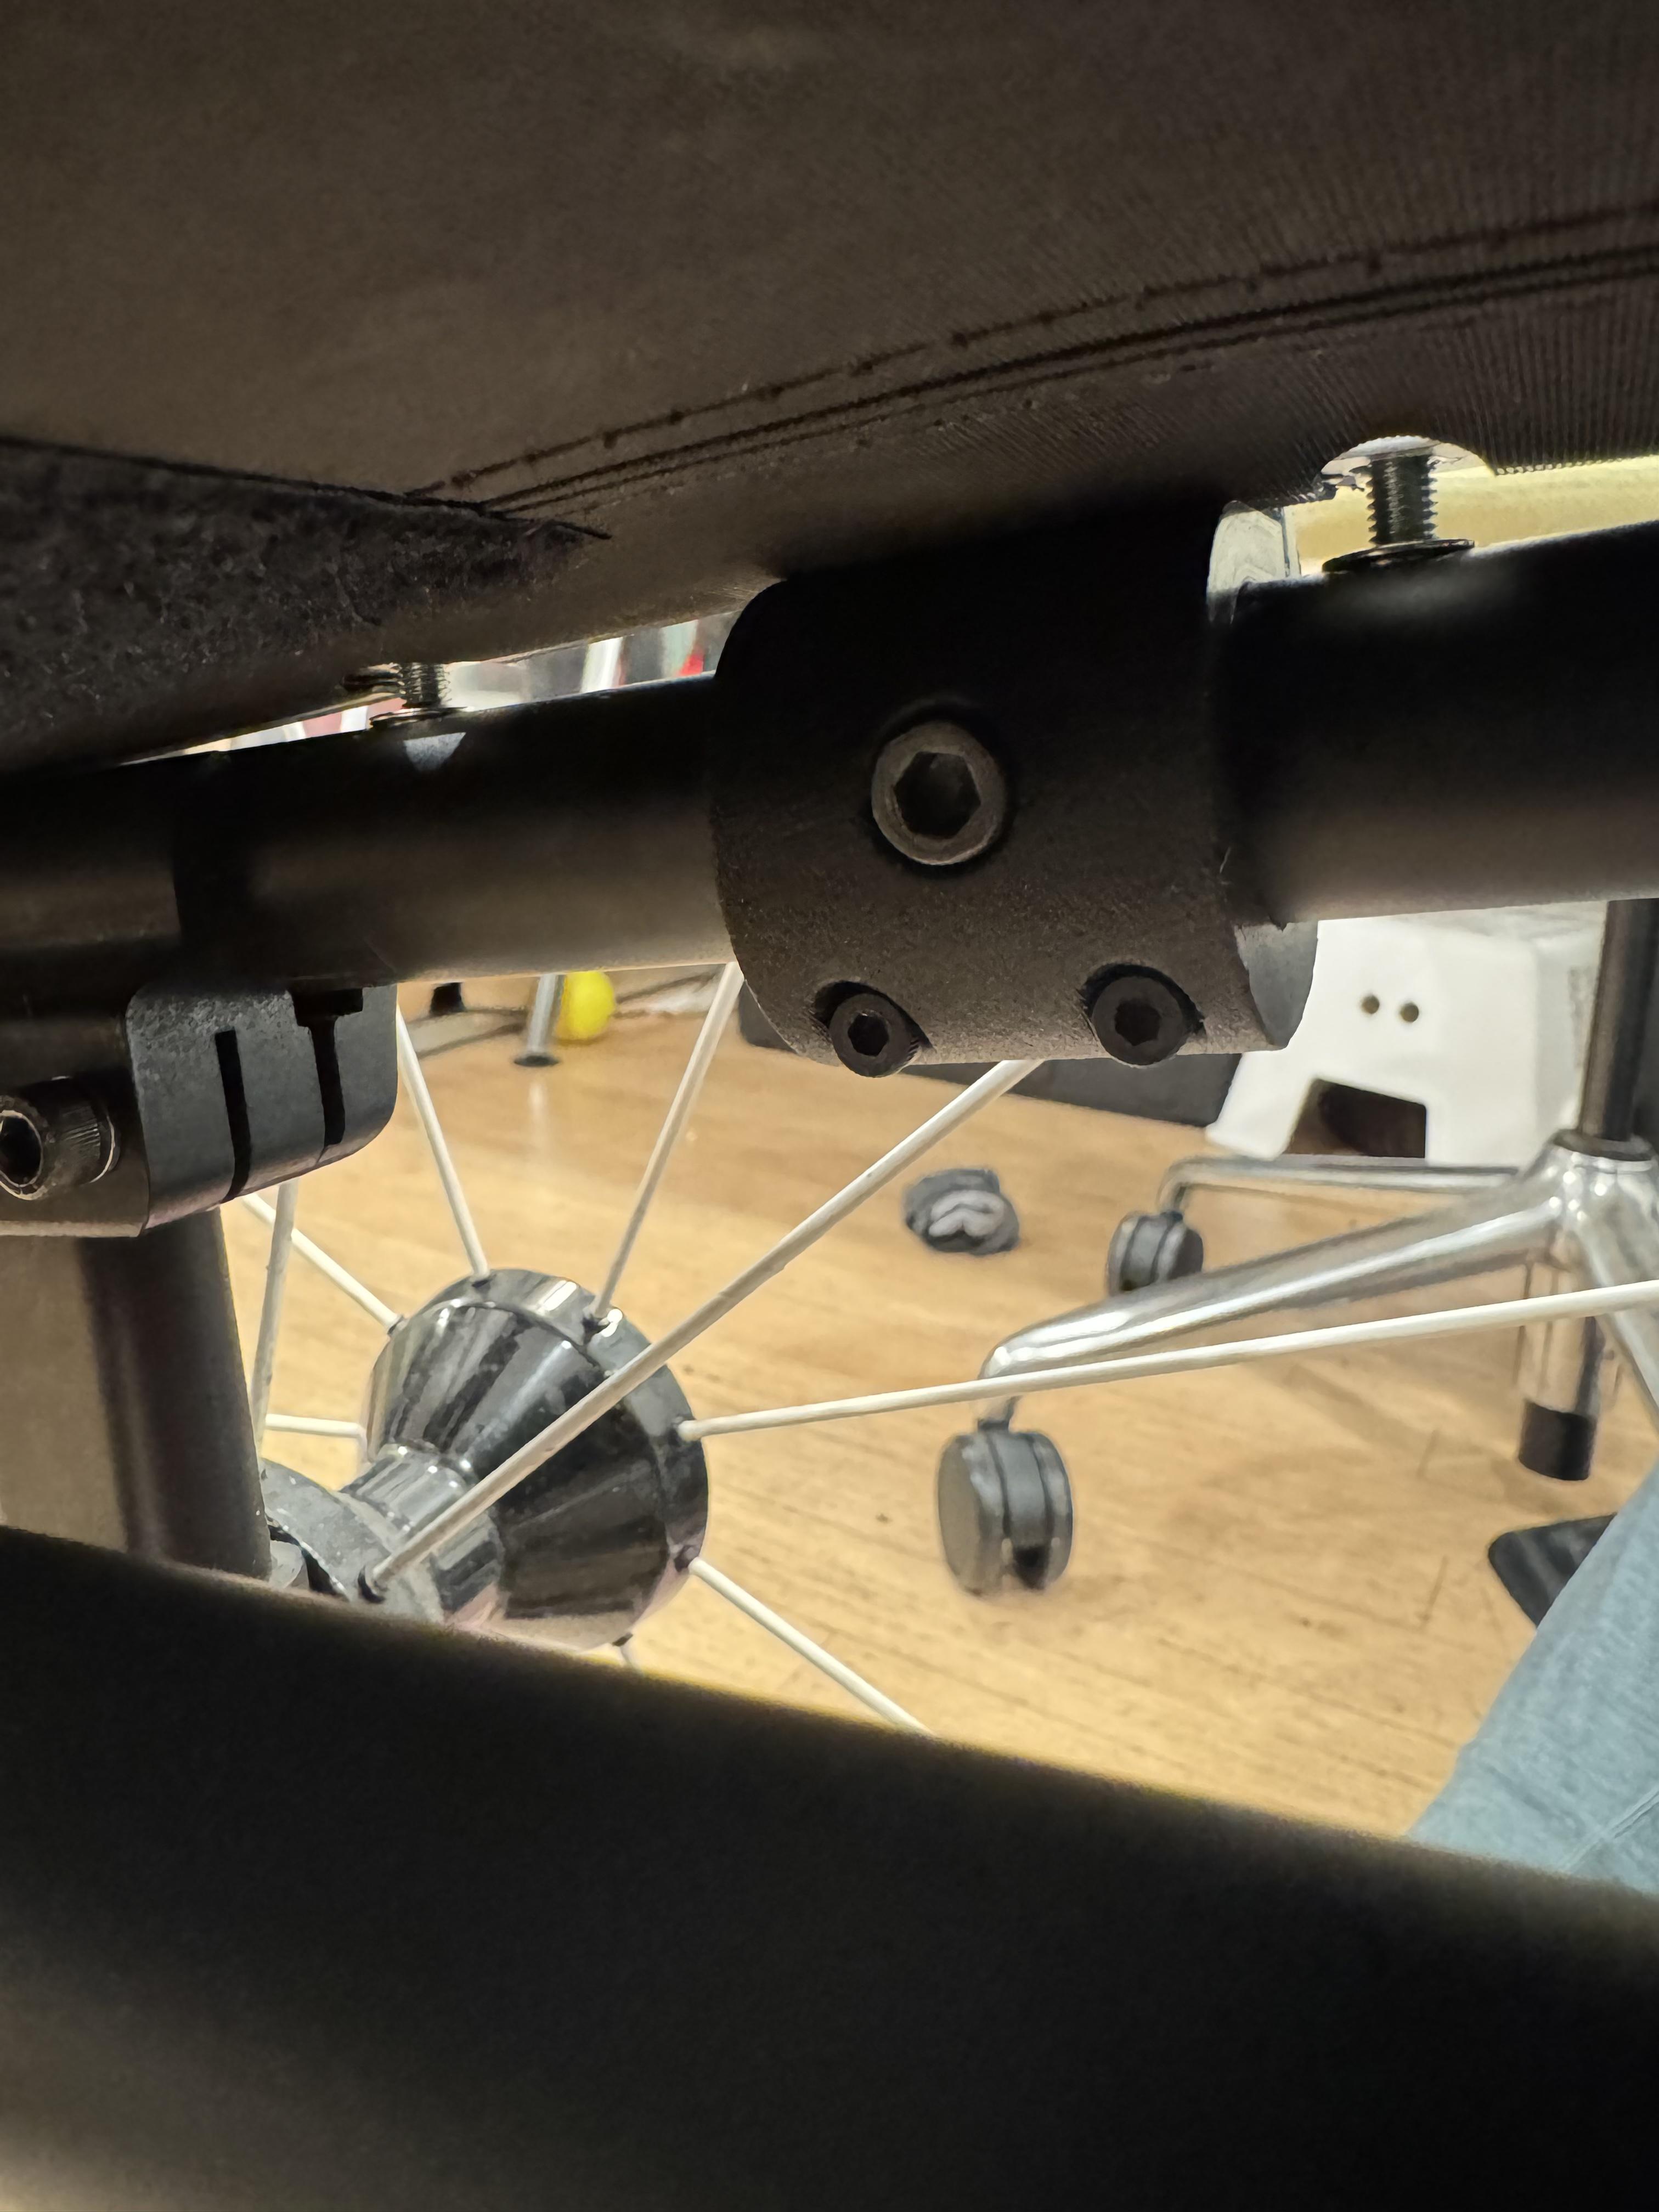
- Put Side Guard Mount Side 2 on the frame. (Photo 2)
- If there is a hole in the frame for mounting the side guards, ensure that the Side Guard Mount Side 2 aligns with this hole (Photo 2).
- Hold Side Guard Mount Side 1 in place on the frame across from Side 2. (Photo 3)
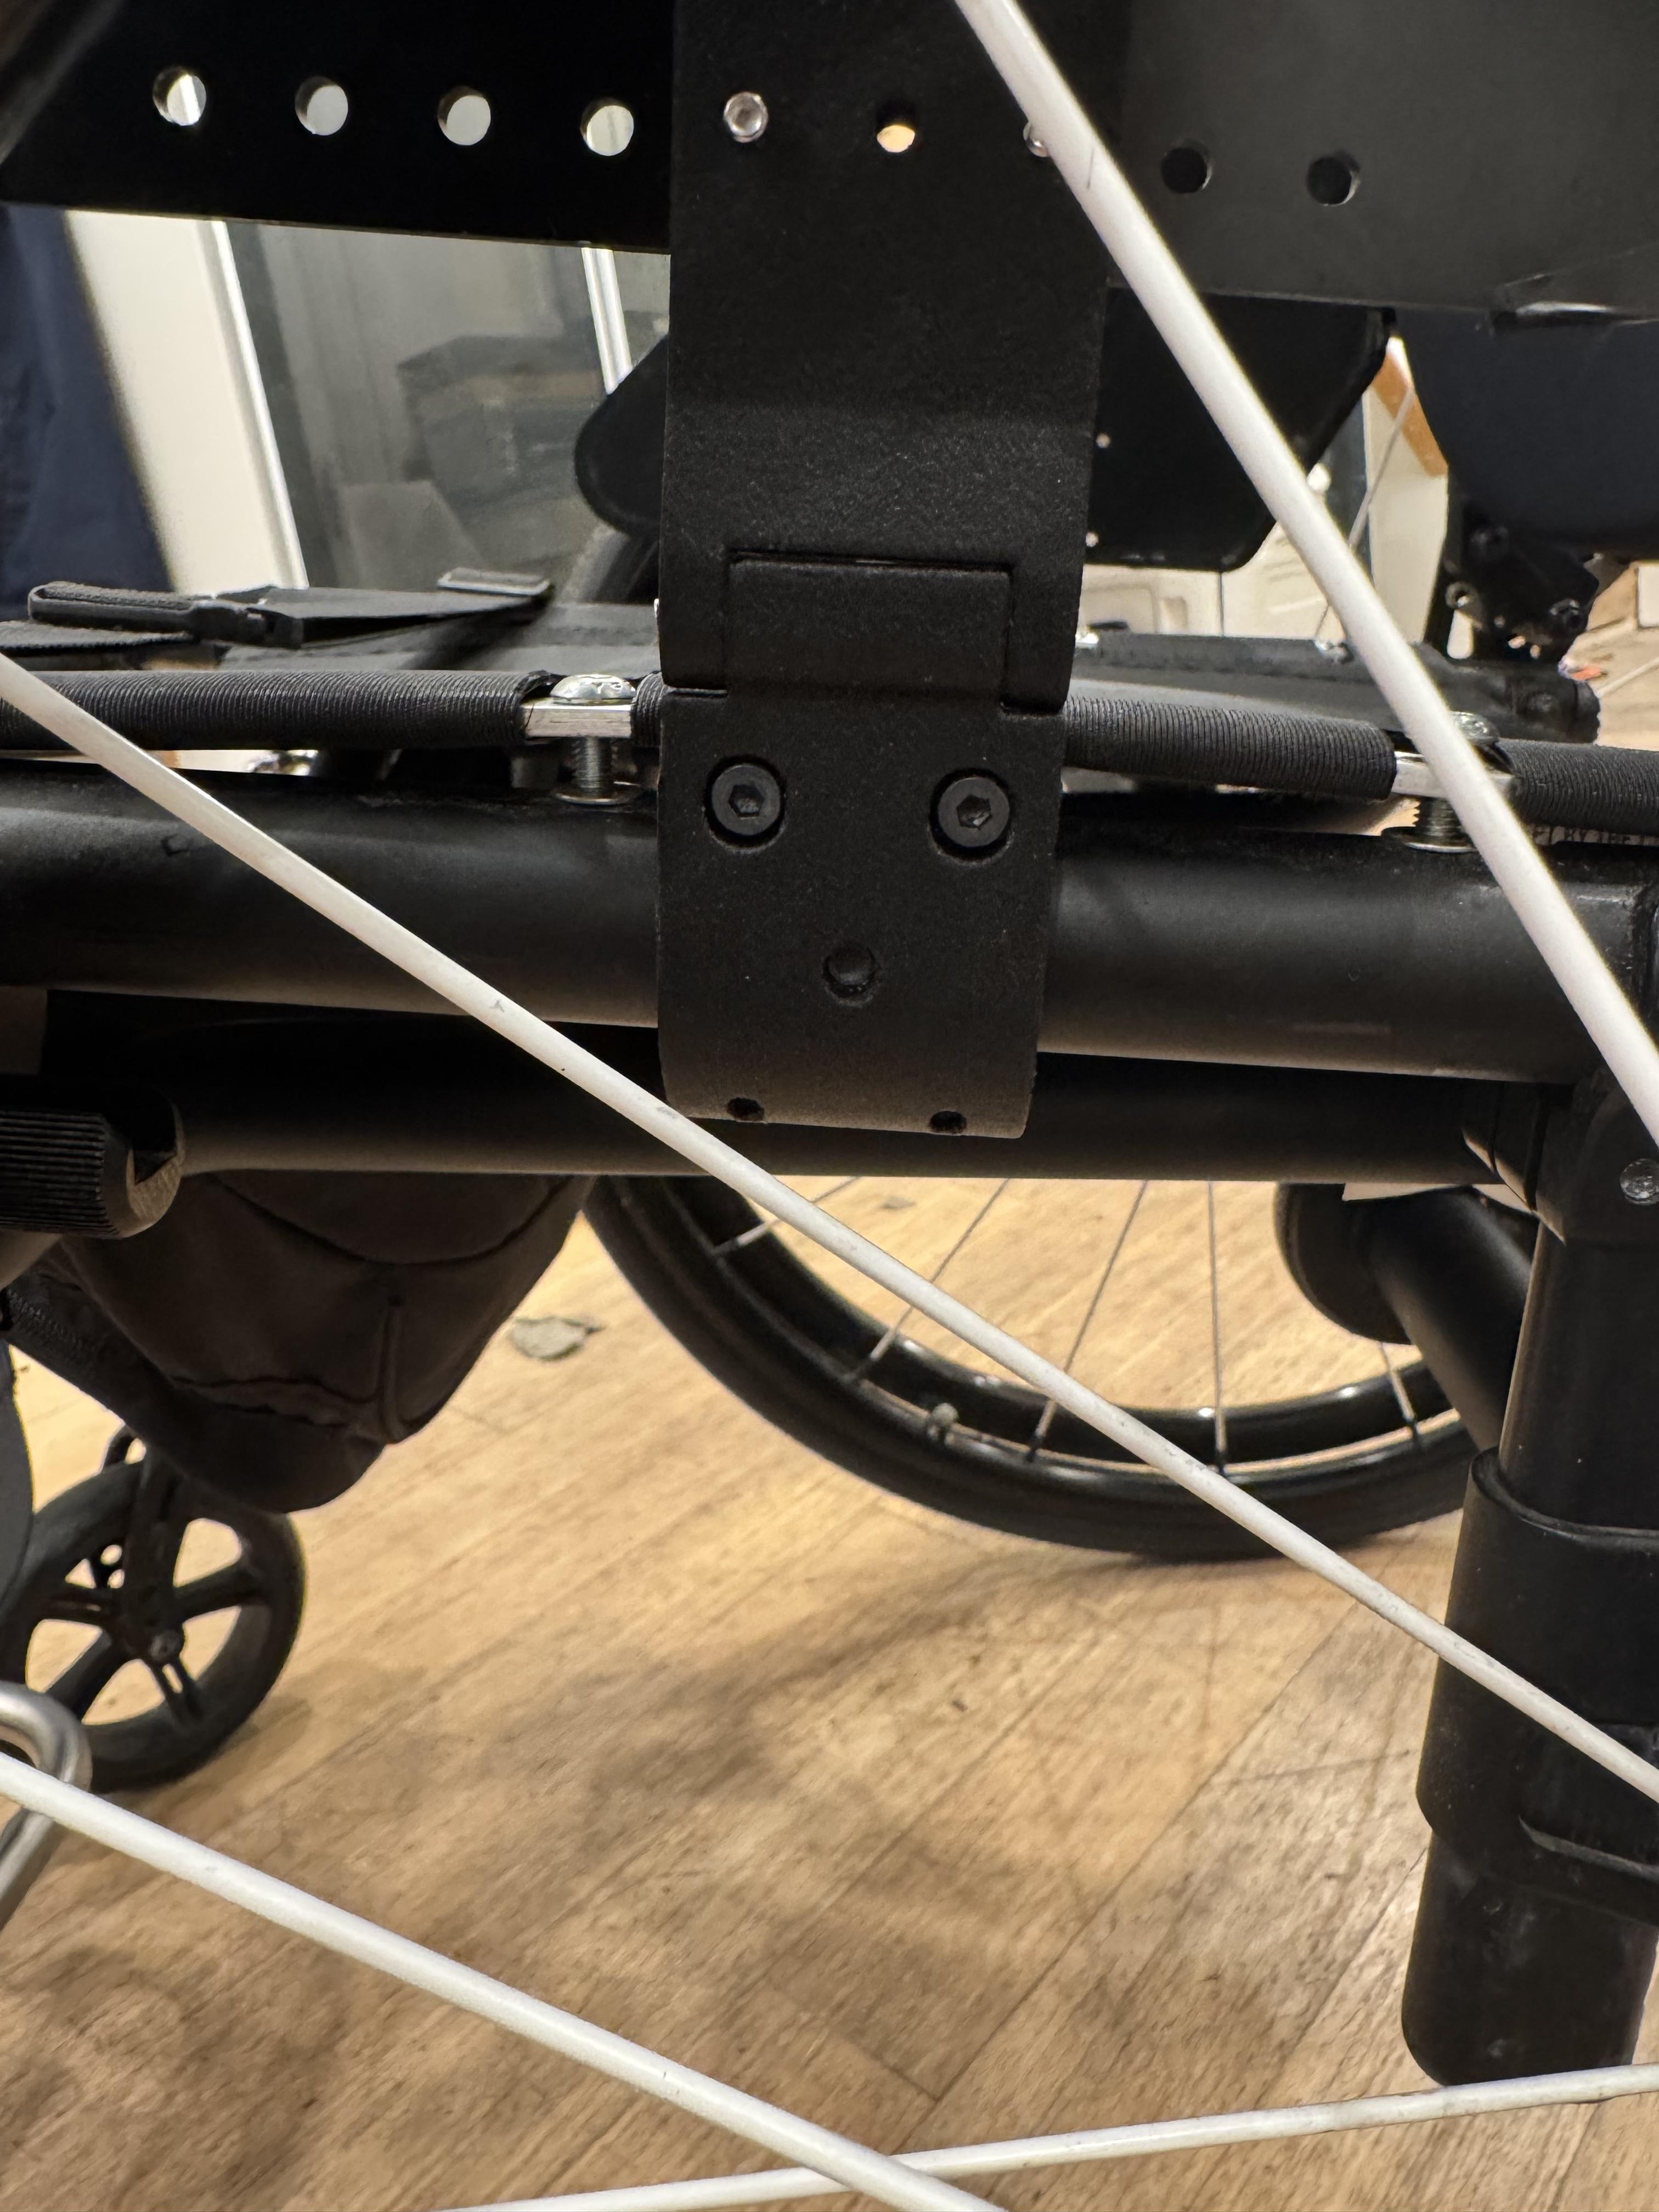
- If there is a hole in the frame for mounting the side guards, install a M6 x 1.0 mm socket head screw with a 5 mm hex key to secure the two sides together. If not, move on to the next step. (Photo 4)
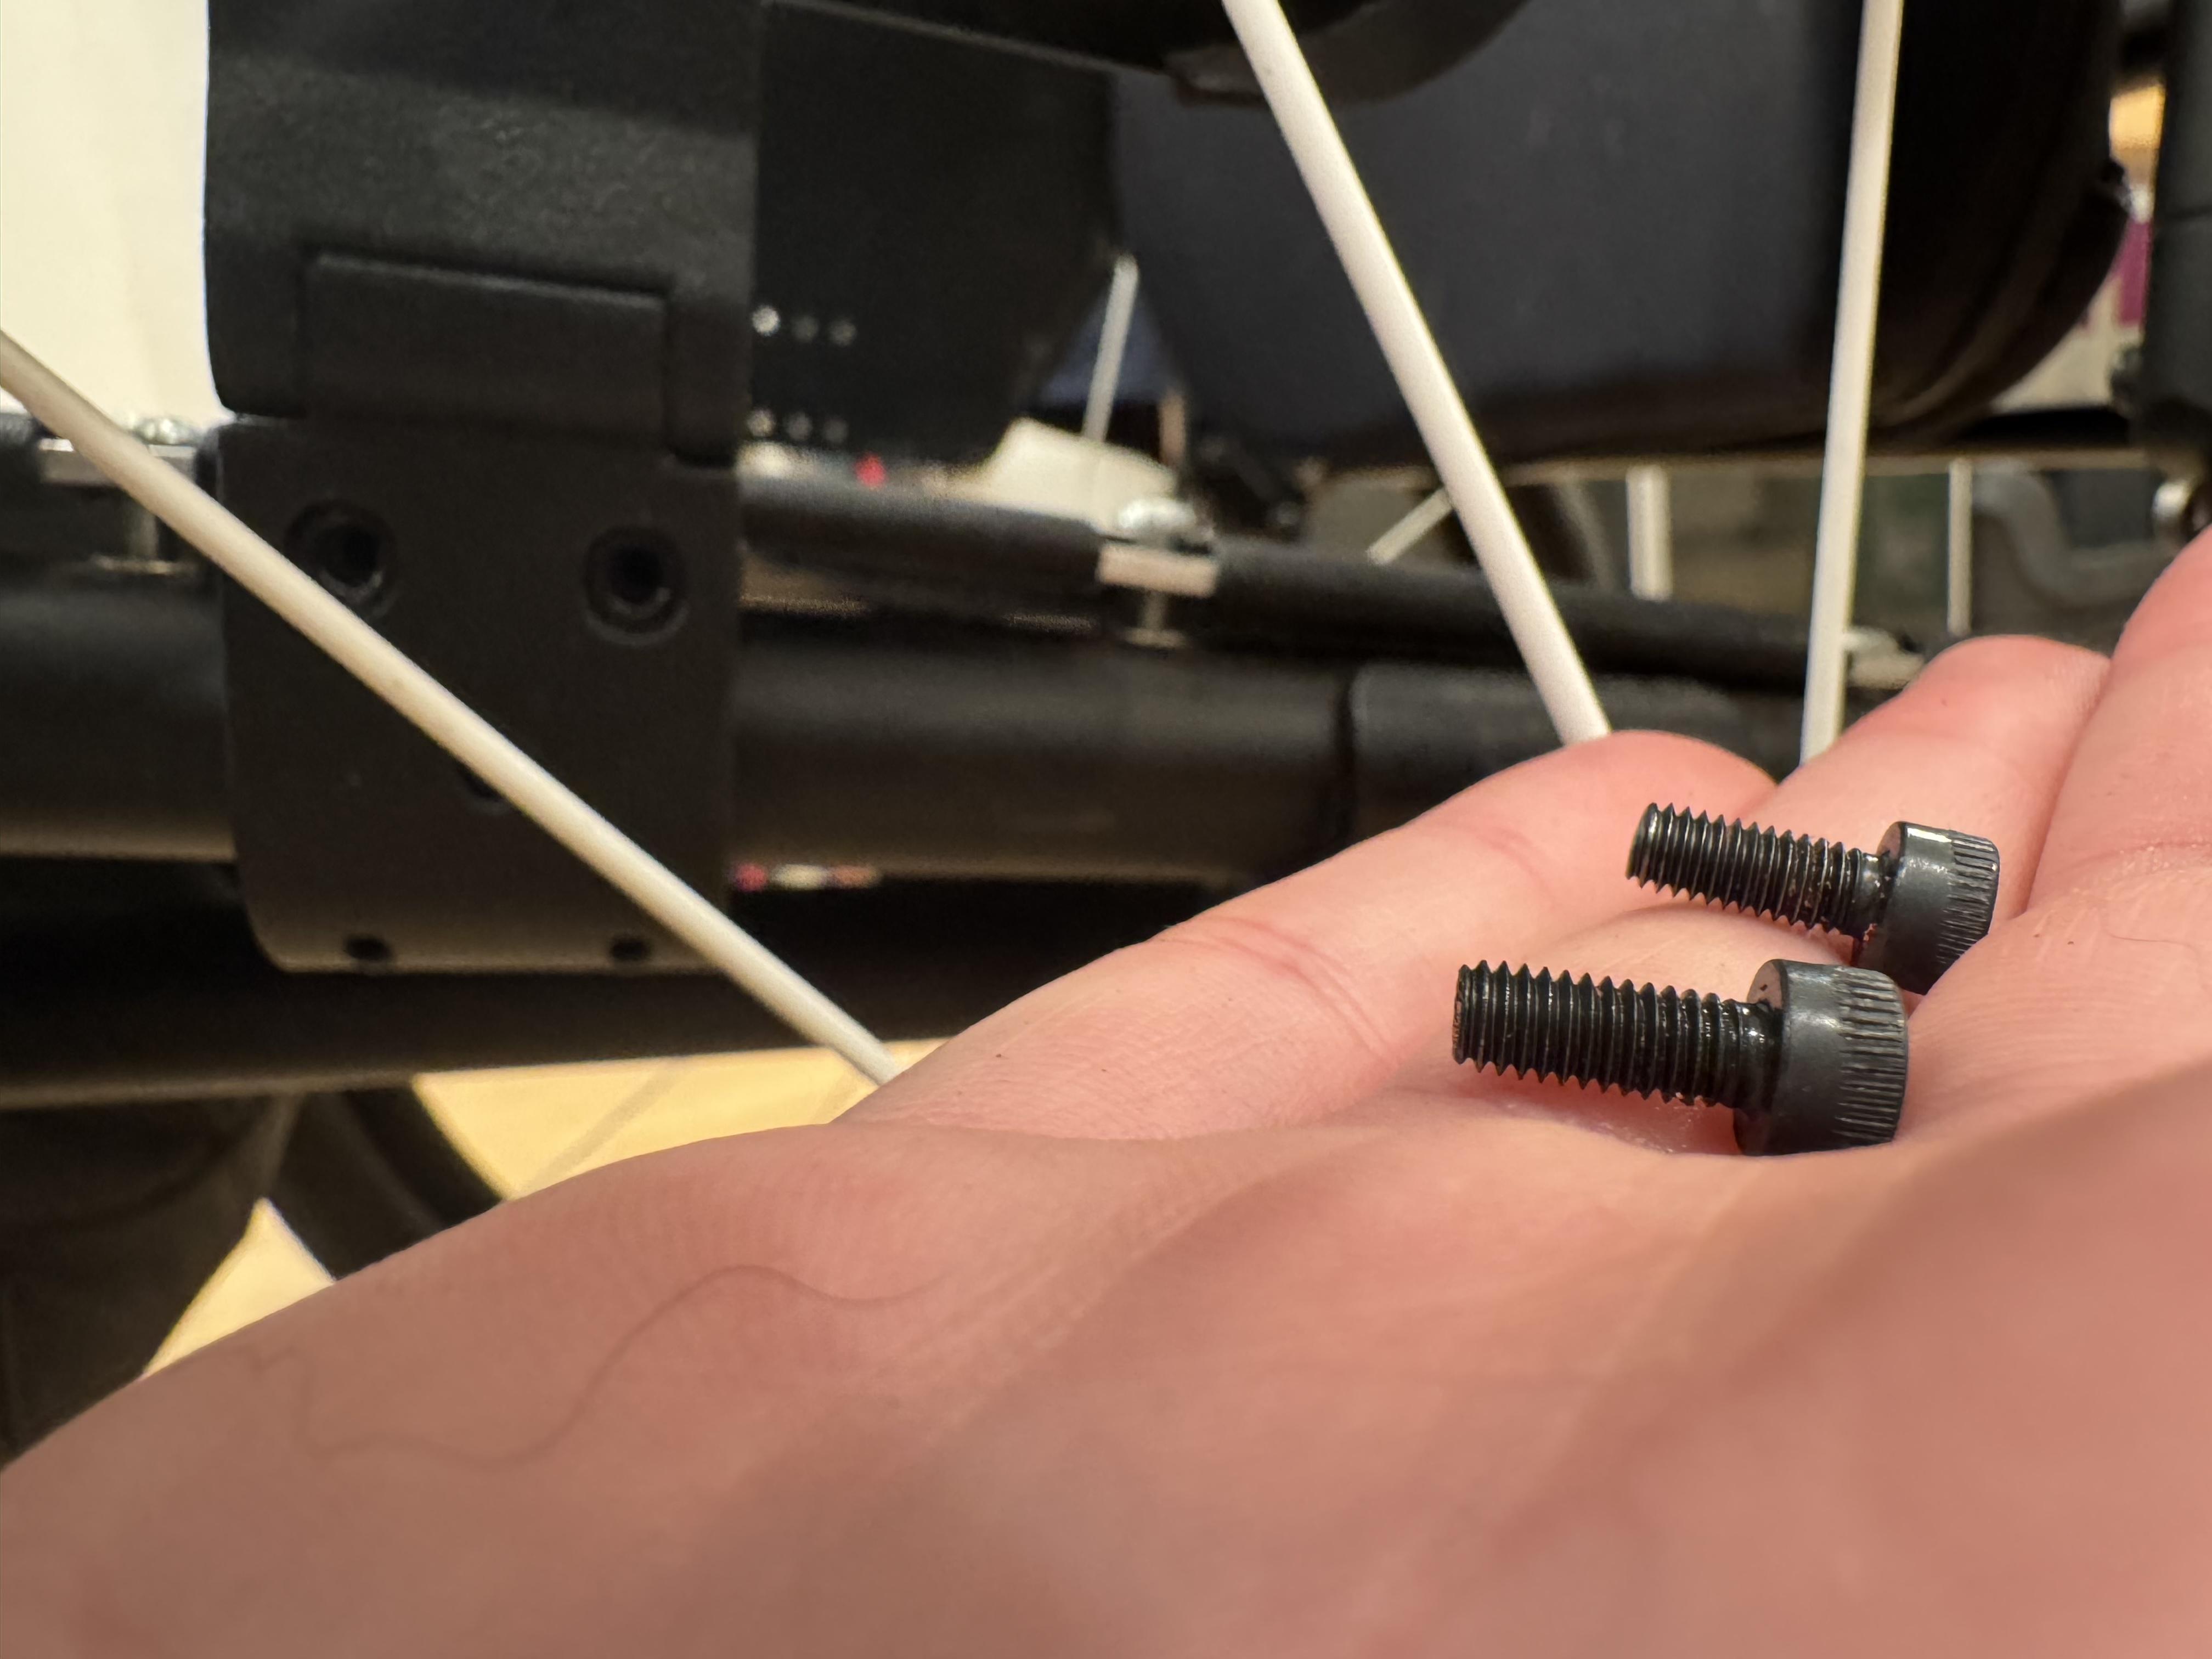
- Use 2x M4 x 0.7 mm x 18 mm socket head screws with a 3 mm hex key to connect the two sides together through the bottom screw holes. (Photo 4).
- Use 2x M4 x 0.7 mm x 10 mm socket head screws with a 3 mm hex key to connect the two sides together through the top screw holes. (Photo 5 & 6).
- Tighten seat sling screws back down (Photo 7 & 8).
Final Assembly in Photo 9.