DIY Unity Boat Movement

Ships are really cool; there is just so much variety. Unity is also really amazing. In my mind, I put those two things together, and I came up with an idea. I thought, What if I code a ship in Unity? So I did. This instructable will teach you how to design a ship that moves, floats, and looks good in Unity.
In this Instructable, you will learn
- How to make a playable boat scene in Unity
- All about the physics of making a virtual boat look realistic
- More Unity techniques and methods
Supplies
You will need the following:
- A computer that can run heavy programs
- An internet connection
- Unity(https://unity.com/download)
- Your imagination
Have all those things? All right then, let's go!
Setting Up the Editor and Files

You are first going to want to make a new Unity Project. I would recommend using Unity 6.2 or higher. Make sure to select the Universal 3D core, then click the create button. When it is done loading, you can now start adding in your assets. For my ship, I found a free colonial-style ship on the Unity Asset Store(Colonial Ship by Nokobot), but you can use any ship you have. Once you have your ship imported, you will have to add water. The Asset Store has multiple easy-to-use water shaders, but I chose URP Stylized Water Shader - Proto Series by Bitgem. Of course, if you have other water, you can use that as well. Finally, install Cinemachine 3 through Unity Package Manager. Go to the Window dropdown → Package Management → Package Manager → Unity Registry → Search Cinemachine → Install
How to add files from the asset store to Unity
When you find an asset you want to add to Unity on the asset store, there should be a big blue button that says, 'add to my assets.' Click that button. It then should prompt you to accept a license, and then a bar should appear that says 'Add to Unity.' Click that, and your Unity Editor should open to the download page. Click the Download button and then the Import button. Both buttons should be located near the center of your screen.
Adding and rendering the Colonial Ship:
To locate the ship, go to the folder Nokobot → ColonialShip → 02_Prefabs. You will see two prefabs in the folder. One of the ships has decorations (barrels, boxes, etc.), and the other is plain. Drag the boat of your choice into your prefabs folder, then drag it into your hierarchy. If your boat looks normal or bright blue, that is good. If it is bright pink, go to Window → Rendering → Render Pipeline Converter. Ensure that you check all the boxes, then click Initialize and Convert. Once that is done, drag your boat into your scene. At first, the boat is very large, so you will have to scale it down. I would recommend a 0.1 scale.
Adding the Water

Setting up and using the URP Stylized Water Shader - Proto Series:
If the video is blurry, watch it on YouTube or set the quality to 1080p
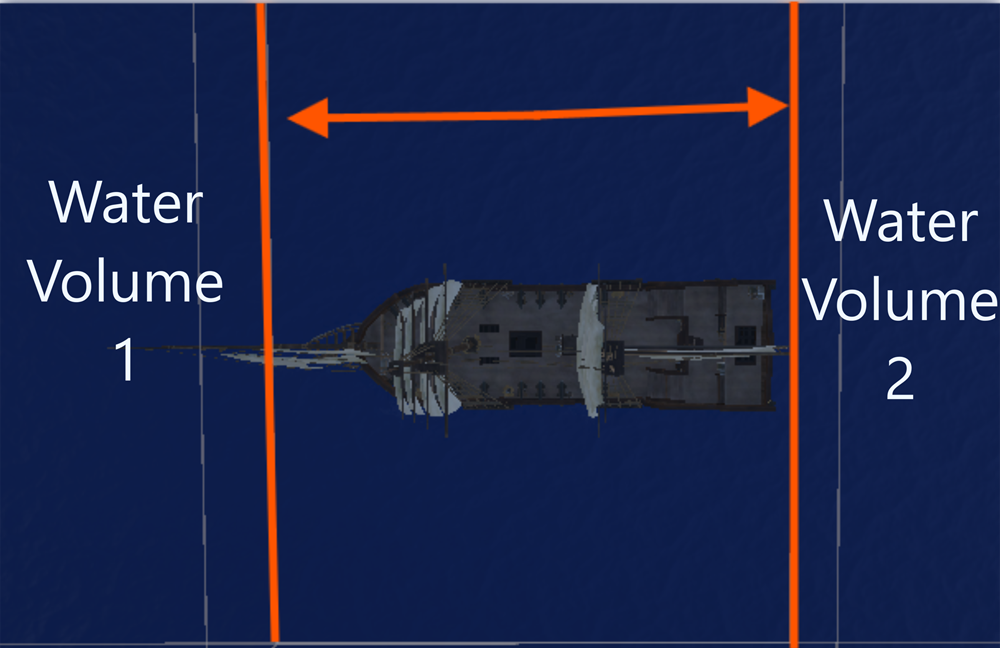
Adding additional water:
If you would like to create more than one body of water, duplicate the WaterVolume element or the water's parent element. When placing the additional water down, ensure the overlap space is a bit bigger than the ship's body, or the ship will sink when crossing the border.
You will also have to add a tag to each WaterVolume. This can be any tag. Additionally, add a script to your ship. This will make sure that your boat can interact with all of the water. Once created, add the following to your script.
Due to Insturctables' code formatting, I put the code here: https://tinyurl.com/MultiWatercsharp
Play test your game. If your ship has a script called WateverVolumeFloater for each WaterVolume, then you are all set to keep multiplying your water and proceed. Remember to tag the WaterVolume.
Creating the Input System
If you are using the old Unity input system(Input.GetKeyDown), then you can skip step 3 and go to step 4.
In Unity's new input system, you have to do some work ahead of time to ensure that your keyboard buttons trigger the script. To open the input actions window, go to Edit → Project Settings → Input System. There you will find two pre-made input maps. Delete both of them and make a new map called Player. You will find a pre-made action in the map already. Just rename that to "Forward". Also, locate the box labeled 'Action Type' and change it to 'Pass Through'. Click the plus button on the right side of the "Forward" row and then click Add Binding.


Then, in the binding dropdown, where it says 'path', type in your chosen key and continue. I used w and the up arrow for my forward action. Proceed to repeat until you have Forward, Backward, Left, and Right. (The action names are case sensitive.) You can choose any keys for your move actions.
Once you have that complete, your input system should be set!
Scripting the Boat Movement
Obviously, you can't have an immobile ship. Add a script to the parent group of your boat. I called my script ShipMovement. Also, add a Rigidbody3D and PlayerInput component to your boat. Change your Rigidbody's mass to a higher number to simulate the heavy boar effect.
Additionally, locate the PlayerInput behavior dropdown and switch it from 'Send Messages' to 'Broadcast Messages'. Also, switch the default map to Player. This will ensure that your script receives your input function properly.
Here is the code with comments so you can edit it and follow along.
Find it here: https://tinyurl.com/unityboatcode
IMPORTANT: If you are using the OLD Unity Input System(Input.GetKeyDown), please find the code at https://tinyurl.com/OldUnityInput
If your boat is not responding to some/all input commands:
You might not have entered your input actions properly. The boat movement script listens for the actions, Forward, Backward, Left, and Right. Make sure that your input actions include one action with each name from the list. Also, make sure that you added bindings(Step 4).
If you get motion sick playing your game:
Click on your ship in the hierarchy. Then, in the inspector, go to the rigidbody component and find the constraints dropdown. Then check the freeze y position box, and your ship should now not move up and down
How Does This Feel Realistic?
You might be wondering, how does this feel real? When something truly floats, it doesn't just stay on top of the water; it follows a set of rules that govern how objects act while floating.
The Floating Rules
Rule 1: An object in motion tends to remain in motion, and an object at rest tends to remain at rest until there is an outside force to stop it.
This essentially means that when an object is floating and/or moving, it will continue in its current state until an outside force stops it. In this case, the outside forces are the rudder, engine, and water resistance. This rule is why the boat takes a long time to turn, accelerate, and slow down.
Rule 2: When a floating object turns, it drifts
Because of floating rule #1, when the boat turns, it still has some forward momentum, causing it to glide sideways. Boats don't pivot like an old video game; they slide.
Rule 3: Water movement is never perfect
When something is floating, it is constantly moving. If a boat stays still, then it gives the sense that something is off. By having the boat gently move up and down with the waves, it helps the player really imagine that they are on a boat being tossed by waves.
Fine Tuning the Movement of Your Ship
If you don't know what half of the variables do, then you've come to the right spot! Really learning about the code will help you fine-tune your ship's movement to make it look super realistic.
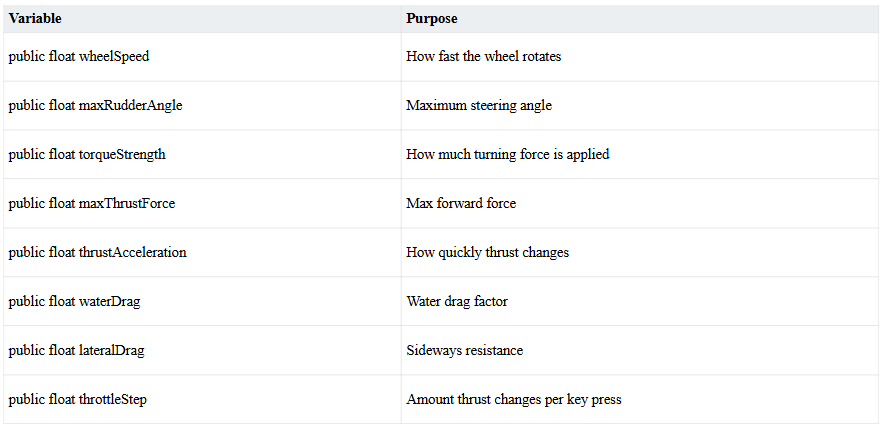
Depending on the type of boat you have, you will need different values for the physics variables. For example, if you have a jet ski, you might want to turn maxRudderAngle up. Or if you have a cargo ship, then turn maxThrustForce down and set throttleStep to something like 0.1.
Setting Up Cinemachine
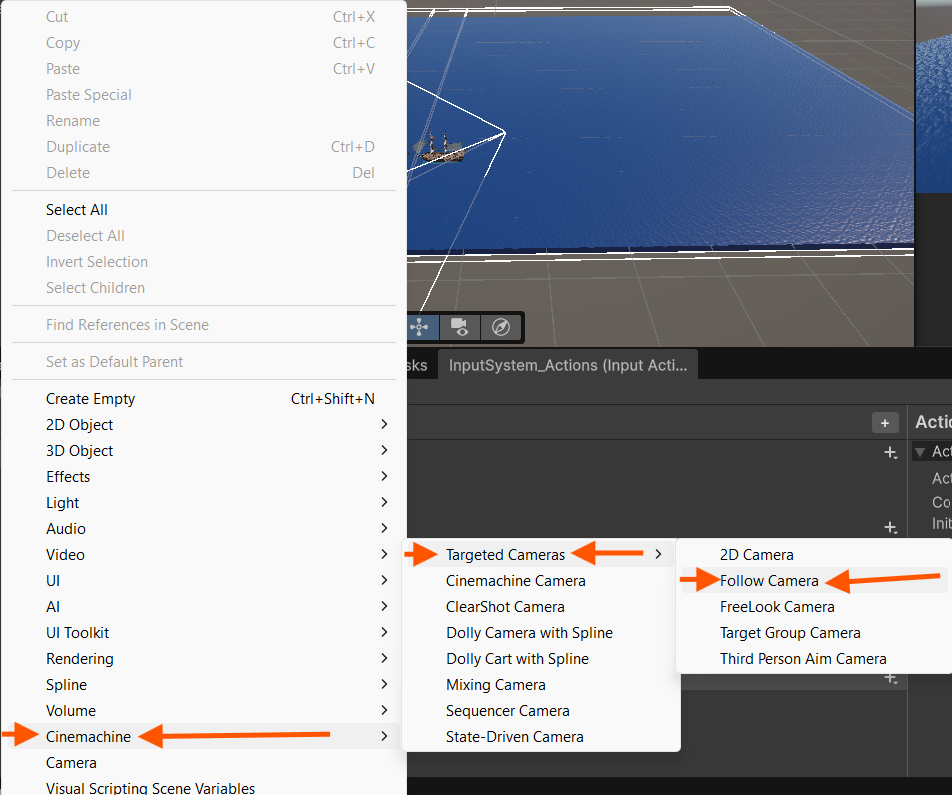
I'm using Cinemachine to make the camera follow the ship. Cinemachine makes sure that your camera moves smoothly and does not make your player get a headache. To attach Cinemachine to your Main Camera, right-click in your hierarchy, then find the Cinemachine option → Cinemachine Camera.
After that, set the 'Tracking Target' parameter in the Cinemachine Camera component to your ship's(or any other object the camera should follow) GameObject. To make sure that your camera always stays behind your boat, change the 'Binding Mode' dropdown to Lock To Target No Roll. This will ensure that your camera follows the boat smoothly. Additionally, feel free to change the camera offset to really customize how your player looks at the boat.
Congratulations! You Did It🎉
You now have a basic game with a boat that moves and floats. Customize it as much as you want. The possibilities are unlimited.