DIY UV Meter With Arduino and a Nokia 5110 Display
by educ8s in Circuits > Arduino
20899 Views, 142 Favorites, 0 Comments
DIY UV Meter With Arduino and a Nokia 5110 Display


In this Instructable I am going to show you how to build a very useful UV meter with a big Nokia 5110 LCD display using Arduino. Protect your skin from the dangers of the sun's radiation with this project!
What is the Ultraviolet (UV) Index?
The ultraviolet index or UV Index is an international standard measurement of the strength of sunburn-producing ultraviolet (UV) radiation at a particular place and time. The scale was developed by Canadian scientists in 1992, then adopted and standardized by the UN's World Health Organization and World Meteorological Organization in 1994. It is primarily used in daily forecasts aimed at the general public, and is increasingly available as an hourly forecast as well.
The UV Index is designed as an open-ended linear scale, directly proportional to the intensity of UV radiation that causes sunburn on human skin. For example, if a light-skinned individual (without sunscreen or a suntan) begins to sunburn in 30 minutes at UV Index 6, then that individual should expect to sunburn in about 15 minutes at UV Index 12 – twice the UV, twice as fast.
The purpose of the UV Index is to help people effectively protect themselves from UV radiation, which has health benefits in moderation but in excess causes sunburn, skin aging, DNA damage, skin cancer, immunosuppression,and eye damage such as cataracts. Public health organizations recommend that people protect themselves (for example, by applying sunscreen to the skin and wearing a hat and sunglasses) if they spend substantial time outdoors when the UV Index is 3 or higher; see the table below for more-detailed recommendations.
So in this instructable we will build a project that will measure the UV index in Real Time!
Building a UV meter is a great learning experience. When you finish building this project you will have a better understanding of how UV meters work, you will have a better understanding of how dangerous the sun radiation can be, and you are going to see in action how powerful the Arduino platform can be. With this project as a base and the experience gained, you will be able to easily build more complex projects in the future.
We can use this project to measure the UV index in Real Time so we can protect ourselves effectively from the sun and it's dangers!
Without any further delay, let's get started!
Get All the Parts

The parts needed in order to build this project are these:
- An Arduino Uno ▶ http://educ8s.tv/part/ArduinoUno
- A UV sensor ▶ http://educ8s.tv/part/UVSensor
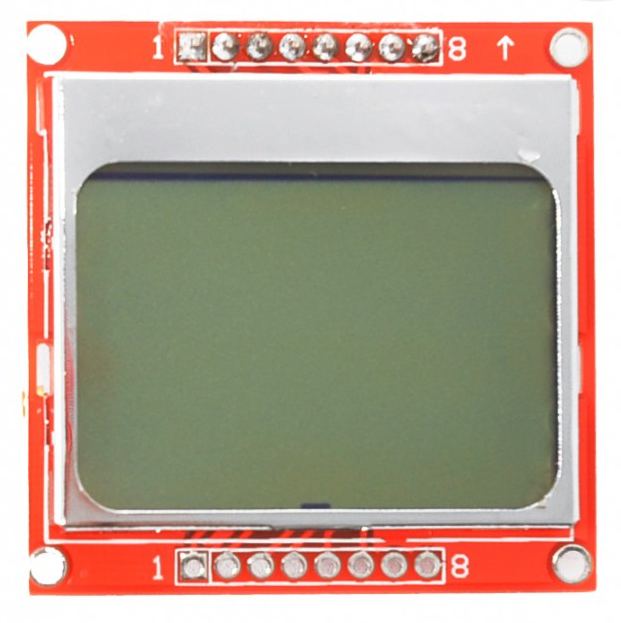
- A Nokia 5110 LCD display ▶ http://educ8s.tv/part/NOKIA5110
- A Small Breadboard ▶ http://educ8s.tv/part/SmallBreadboard
- Some wires ▶ http://educ8s.tv/part/Wires
The cost of the project is very low, it is about 18$.
The UV Sensor - UVM-30A


The UV Sensor is used for detecting the intensity of incident ultraviolet(UV) radiation. This form of electromagnetic radiation has shorter wavelengths than visible radiation. This module is based on the sensor UVM-30A, which has a wide spectral range of 200nm-370nm. The module outputs electrical signal which varies with the UV intensity, which gives your suggestion if it is a good idea to beach today.
Specification
Operating voltage: DC 3-5V
Output voltage: DC 0-1V
Test accuracy: 1 UV INDEX
Operating Current: typ 0.06mA maximum value of 0.1mA
Response wavelength: 200nm-370nm
Job stability: -20 C~85 C
- Designed specifically for the needs of high reliability and precision of measuring UV Index (UVI) occasion;
- Suitable for measuring the total amount of sunlight UV intensity;
- Control the grading standards of the World Health Organizaion UV Index;
- Detection UV wavelength: 200-370nm;
This UV sensor is an analog sensor with almost liner output, so it does not outputs the UV index directly. It's output voltage depends on the UV radiation it detects. So, the higher the UV radiation, the higher the output voltage on its output pin. The datasheet offers a graph and the values that we need in order to calculate the UV index, see the attached images.
Nokia 5110 LCD Display


The Nokia 5110 is my favorite display for my Arduino Projects.
The Nokia 5110 is a basic graphic LCD screen which was originally intended for as a cell phone screen. It uses the PCD8544 controller which is a low power CMOS LCD controller/driver. Because of this this display has an impressive power consumption. It uses only 0.4mA when it is on but the backlight is disable. It uses less than 0.06mA when in sleep mode! That's one of the reasons that make this display my favorite.
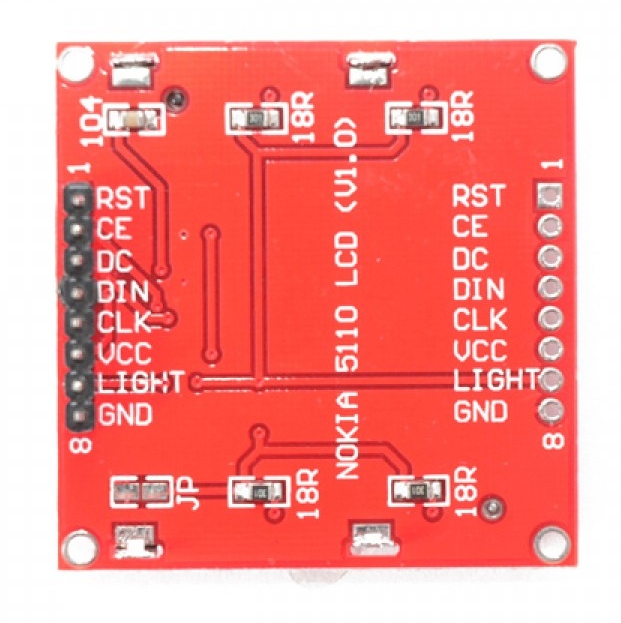
The PCD8544 interfaces to microcontrollers through a serial bus interface. That makes the display very easy to use with Arduino. You only need to connect 8 wires and use the following library:
http://www.rinkydinkelectronics.com/library.php?id=47
This impressive library is developed by Henning Karlsen who has put a huge amount of effort to help the Arduino community move forward with his libraries.
I have prepared a detailed tutorial on how to use the Nokia 5110 LCD display with Arduino. I have attached that video in this Instructable, it will provide may useful information about the display, so I encourage you to watch it carefully.
Now, let's move on!
Building the UV Meter


Let's now connect all the parts together.
At first we connect the UV sensor module. It only has 3 pins.
Connecting the Voltage Sensor
- Pin goes to Arduino's GND
+ Pin goes to Arduino's 3.3V
S Pin goes to Analog Pin 0
The next step is to connect the Nokia 5110 LCD display.
Connecting the Nokia 5110 LCD Display
RST goes to Digital Pin 12 of the Arduino
CE goes to Digital Pin 11 of the Arduino
DC goes to Digital Pin 10 of the Arduino
DIN goes to Digital Pin 9 of the Arduino
CLK goes to Digital Pin 8 of the Arduino
VCC goes to Arduino 3.3V
LIGHT goes to Arduino GND (backlight on)
GND goes to Arduino GND
Now that we have connected all the parts together, all we have to do is to load the code. A Splash screen is displayed for a couple of seconds and then we can start measuring UV Index in Real Time!
The Code of the Project

The code of the project consists of 3 files.
- splash.c
- ui.c
- UVMeter.ino
splash.c Code - Splash Screen Image
In the first file splash.c, there are the binary values of the splash screen that is displayed on the Nokia 5110 LCD display when the project boots up. Please watch the attached video I have prepared in order to see how to load your custom graphics to your Arduino Project.
ui.c Code - The User Interface
In the file ui.c, there are the binary values of user interface that appears after the the project shows the splash screen. Please watch the attached video I have prepared in order to see how to load your custom graphics to your Arduino Project.
UVMeter.ino Code - Main Program
The main code of the project is very simple. We need to include the Nokia 5110 library. Next we declare some variables. We initialize the display and we display the splash screen for 3 seconds. After that, we print the ui icon once, and we read the analog value from the sensor every second.
All the magic happens in the following function:
String readSensor()
{
  String UVIndex = "0";
  int sensorValue = 0;

  sensorValue = analogRead(0);                        //connect UV sensor to Analog 0
  int voltage = (sensorValue * (5.0 / 1023.0))*1000;  //Voltage in miliVolts

  if(voltage<50)
  {
    UVIndex = "0";
  }else if (voltage>50 && voltage<=227)
  {
    UVIndex = "0";
  }else if (voltage>227 && voltage<=318)
  {
    UVIndex = "1";
  }
  else if (voltage>318 && voltage<=408)
  {
    UVIndex = "2";
  }else if (voltage>408 && voltage<=503)
  {
    UVIndex = "3";
  }
  else if (voltage>503 && voltage<=606)
  {
    UVIndex = "4";
  }else if (voltage>606 && voltage<=696)
  {
    UVIndex = "5";
  }else if (voltage>696 && voltage<=795)
  {
    UVIndex = "6";
  }else if (voltage>795 && voltage<=881)
  {
    UVIndex = "7";
  }
  else if (voltage>881 && voltage<=976)
  {
    UVIndex = "8";
  }
  else if (voltage>976 && voltage<=1079)
  {
    UVIndex = "9";
  }
  else if (voltage>1079 && voltage<=1170)
  {
    UVIndex = "10";
  }else if (voltage>1170)
  {
    UVIndex = "11";
  }
  return UVIndex;
}
This funtion reads the analog value from the sensor and converts that value into a UVIndex String according to the datasheet. It is a simple if-else loop. Then all we have to do is to display that value on the display.
I have attached the code to this Instructable. In order to download the latest version of the code you can visit the project's webpage: http://educ8s.tv/arduino-uv-meter-project/
Testing the Project


Now that the code is loaded we can test the UVmeter out in the sun. I test it in a sunny spring day here in Greece. Of course indoors the output of the sensor will be 0.
As you can see in the attached photos, the UV Meter works fine. We see how dangerous the sun is for our skin in real time! Great isn't it? As you can see, this project is a great demonstration of what open source hardware and software is capable of. Within a few minutes one can build such an impressive project! This project is ideal for beginners and as I said in the beginning, this project is a great learning experience.
I would love to hear your opinion on this project. Do you find it useful? Are there any improvements that can be implemented to this project? Please post your comments or ideas in the comments section below!