DIY Spooky Halloween Doorbell: Easy Electronics Project With ESP32 E 3D Printed
by dbmaking in Circuits > Microcontrollers
1016 Views, 8 Favorites, 0 Comments
DIY Spooky Halloween Doorbell: Easy Electronics Project With ESP32 E 3D Printed
.png)


Welcome to this special Halloween project!
In this guide, we will build a spooky Spider Doorbell powered by an ESP32, sensors, LEDs, and a custom 3D printed case. When someoneapproaches, the spider’s eyes will glow red, an eerie eye will appear on the round display, and achilling sound will play.
This project was born with some challenges initially planned for an ESP32-C3, it had to beredesigned for the larger ESP32. Despite the setbacks, the final result is more stable and easier toassemble.
Supplies
.png)
The build requires several electronic components: an ESP32 board, an ultrasonic sensor (HC-SR04), a DFPlayer Mini for sound playback, a round GC901 display, LEDs for the spider’s eyes,resistors, JST connectors, push buttons, a power connector, and prototyping boards of varioussizes.
In addition, you’ll need threaded inserts for fixing, screws (M2 in different lengths), a microSD cardfor sound files, and, of course, the 3D-printed spider body and support structure.
Materials list:
Esp32 Wroom 30 pin: https://s.click.aliexpress.com/e/_okCfynv
Ultrasonic sensor HC-SR04: https://s.click.aliexpress.com/e/_DCnZHpX
1.28 inch round RGB 240*240 GC9A01 TFT LCD Display: https://s.click.aliexpress.com/e/_DnKdHqp
DFPlayer Mini MP3 Player Module: https://s.click.aliexpress.com/e/_DFmKYz7
4GB Memory Cards: https://s.click.aliexpress.com/e/_DCeBgBJ
3mm Red LEDs: https://s.click.aliexpress.com/e/_De5HlZr
100 ohm 1/4 watt Resistors: https://s.click.aliexpress.com/e/_DeBgJrT
Universal PCB Protoboard: https://s.click.aliexpress.com/e/_DFRjZ5n
26awg Silicone Wire Kit: https://s.click.aliexpress.com/e/_DFRjZ5n
M2 Countersunk Head Screw Kit: https://s.click.aliexpress.com/e/_DFh7Cut
M2x3.2mm Heat-Set Threaded Inserts: https://s.click.aliexpress.com/e/_DkaaZhn
JST Connectors (various sizes): https://s.click.aliexpress.com/e/_DDtcwzT
Female Pin Headers (various sizes): https://s.click.aliexpress.com/e/_DFRPeWz
Heat Shrink Tubing: https://s.click.aliexpress.com/e/_DlhnJ5f
RESOURCES AND FILES:
Download Documentation and Sketches: Link
Download STL Files for 3D Printing: Link
VSIX Plugin Link Used in the Video:
No longer working the version I used and shown in the video can be downloaded above from the “Documentation and Sketches” section.
The working VSIX Plugin version as of 01-10-25, which must be installed using a different procedure than the one shown in the video, can be found by reading the “Install” section on the GitHub page: Link
🔧 Soldering of Components

.png)
.png)
.png)
.png)
.png)
The project begins with soldering the pin headers to the ESP32 and aligning it with the 40x60perfboard. Around it, JST connectors are placed for the display, LED, power supply, and ultrasonicsensor. Precision is important because any misalignment would make the final assembly moredifficult.
The DFPlayer Mini is mounted on a separate 30x70 perfboard, connected to the ESP32 via cables.The button, used to trigger the playback of the doorbell sound, will be fixed at one-third of thelength of the 20x80 perfboard.
Downloads
🔧 Component Placement

.png)
.png)
.png)
We insert the heat-set threaded inserts into the base, securing each board with M2 screws so thatthey are firmly anchored to the 3D-printed support, ensuring stability. Next, we place the HC-SR04ultrasonic sensor on the top and secure it with 2 M2 screws; if the sensor holes are too tight, theycan simply be widened with a drill bit. On the bottom, we also place the on/off switch and thefemale power connector.
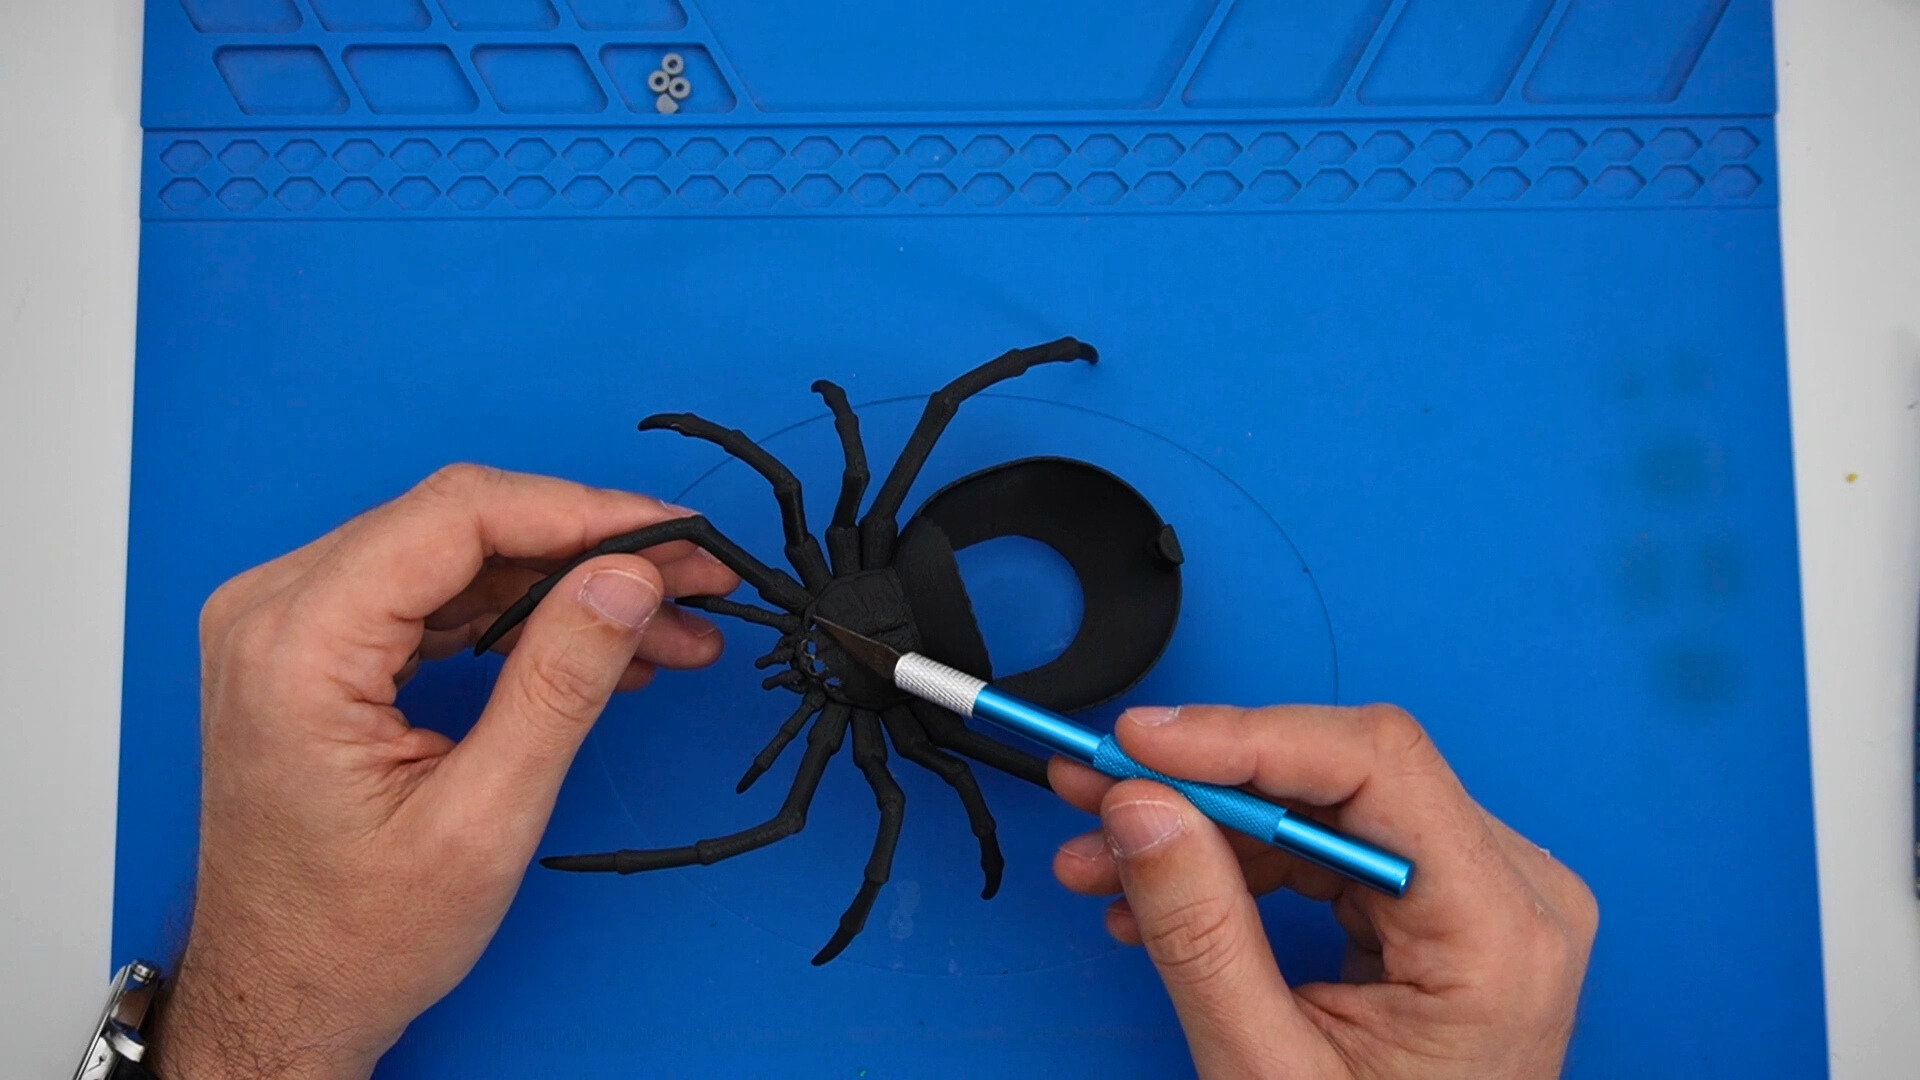
🕸️ Spider Assembly
.png)
.png)
.png)
.png)
.png)
.png)
The spider itself is the centerpiece of this Halloween doorbell. Its 3D-printed body holds the LEDsin the eye sockets, the display behind the head, and the threaded inserts for fixing it onto thesupport. The most delicate step is preparing the eye holes. Cleaning them with a small blade or cutterensures the LEDs slide in smoothly without damaging the plastic. Each LED is inserted with thenegative pins aligned upward, making it easier to solder them together later. A drop of hot gluesecures each one firmly in place. The wires from the LEDs are gathered into a JST connector, and heat-shrink tubing is used toprotect the positive leads. Once the eyes glow red, the spider’s personality truly comes alive. The round display is placed behind the spider’s head, fixed with small screws and an additionalbracket if needed for stability. Care must be taken not to overtighten, as the display is fragile.Finally, the body of the spider is mounted onto the main support with a single screw from below,giving the creature its final shape.
💻 Programming
.png)
Programming the ESP32 is as important as the hardware build. Here are the key steps in detail:
Arduino IDE Setup
- Install Arduino IDE 2.0 or higher.
- Older versions do not fully support the filesystem management required in this project.
- Add ESP32 board support:
- Go to Preferences → Additional Board Manager URLs and insert the Espressif package link.
- Then install the ESP32 by Espressif Systems boards from the Board Manager.
Required Libraries
Several external libraries must be installed to manage the display, audio, and animations:
- Arduino GFX Library →
- Provides advanced graphics functions and allows the GC901 round display to show images and animations.
- DFPlayer Mini (DFRobot) →
- Controls the MP3 module, enabling playback of audio tracks stored on the microSD card.
- Custom GC9A01 Driver →
- A special library not included in the Arduino Library Manager. It must be installed manually by adding the provided ZIP file via Sketch → Include Library → Add .ZIP Library.
Managing Images with LittleFS
To display an animated eye on the round display, we must upload image data to the ESP32’s internal filesystem:
- Install the Arduino LittleFS Upload plugin.
- Create a folder named /data in the sketch directory and place the desired image or GIF inside.
- Upload the content to the ESP32 using the key combination CTRL + SHIFT + P, then select Upload LittleFS to ESP32.
Sketch Overview
The main sketch includes three core functions:
- Ultrasonic detection:
- The HC-SR04 measures distance, triggering the sequence when someone approaches closer than the set threshold.
- LED control:
- Red LEDs in the spider’s eyes turn on immediately when the trigger distance is reached.
- Display & Audio:
- After a configurable delay, the display activates to show the creepy animated eye, while the DFPlayer Mini plays the selected audio file.
Parameters to Customize
Inside the code, several constants can be adjusted to personalize behavior:
- Detection distance (in centimeters)
- Delay time between LED activation and display animation
- Audio volume level of the DFPlayer Mini
- File paths for the audio clips on the microSD card
Result
- When someone approaches the doorbell:
- The LEDs light up instantly.
- The display shows the animated eye after a short delay.
- The sound file plays through the speaker.
- The wires from the LEDs are gathered into a JST connector, and heat-shrink tubing is used to protect the positive leads.
- Once the eyes glow red, the spider’s personality truly comes alive.
- The round display is placed behind the spider’s head, fixed with small screws and an additional bracket if needed for stability.
- Care must be taken not to overtighten, as the display is fragile.
- Finally, the body of the spider is mounted onto the main support with a single screw from below, giving the creature its final shape.
🎃 Final Assembly & Test
.png)
.png)
With all components wired and programmed, the spider body is mounted over the electronics. Thedisplay and button caps are fixed, and the front plate with the engraved label is glued in place. Powering the device brings it to life: as someone approaches, the red eyes glow, the displayreveals its chilling stare, and the chosen sound plays. A perfect Halloween addition to surpriseguests at the door!
👋 Conclusion
Despite the unexpected issues and last-minute modifications, the Halloween Spider Doorbellturned out to be a fun, spooky, and rewarding project. It combines electronics, 3D printing, andcoding into a single creation that brings a smile or a scare to anyone visiting.
I truly hope this project brought you some fun and maybe even sparked new ideas for your owncreations.
Your support means a lot: if you enjoyed it or found it helpful, leave a ❤️ and share it with someonewho might love it too!
Halloween addition to surpriseguests at the door!
To see more details about this project, watch the video on my YouTube channel.