DIY Smartphone Controlled Fire Fighter Robot
by ROBO HUB in Circuits > Arduino
1600 Views, 11 Favorites, 0 Comments
DIY Smartphone Controlled Fire Fighter Robot

.gif)

.gif)
Hello readers welcome back to another interesting yet useful instructables! Im talking about the fire fighter robot that i made which is controlled by a phone and can go in different terrains.
Imagine your backyard just caught fire and you are unsure of going near to that place and pour water in these cases a non human thing such as this fire fight robot can serve the purpose, all you have to do is use your phone to navigate to the area and this will take care of the work.
The size of this project is made small to show the capabilities but if this is built on a large scale it can serve many practical applications.
I will explain to you how this project works
Like i mentioned earlier this robot is controlled using a phone and this means the connection is instant, all you have to do is turn on the robot and tur on wifi on your phone.
When you open the application the control panel opens up and there you go, You can control in all possible directions and all these steps will not even take a minute also.
As we know robot can do the tasks in hazardous environments where humans are not willing to take the risk, if you build this you should be proud of creating such things.
For the water i have made a separate circuit so that it does not interfere with the main circuit since we are dealing with water and we know it is not a conductor of electricity and this may cause problems to us later.
The amount of time the water can be sprayed is dependent on the volume of container that we are using i used a 500ml bottle and it will last for some time but to extend this you can use large sized container.
This was all about this fire fighter robot in short and going forward we will see a detailed build tutorial and i recommend you to try building this project
Supplies


Gather these materials upfront because by doing this you will save lots of time and increase the overall project build speed
Nodemcu from here
BO motor
Wheels for hobby motor
Jumper Cables
Mini Submersible Water Pump
Battery Case with Switch
Container (upcycled water bottle)
Piece of Cardboard
Hot Glue
Arduino IDE
Programming Cable
Soldering Iron and lead
Phone
18650 battery
Small on and off switch
Nozzle of Pen
Small hose for pump
This are affiliate links from amazon and upon successful purchase i may receive a small percent of sales at no additional cost to you
Robot Base and Wheels


The base is the part that will hold the wheels and the electronics, i will be using thick corrugated board for much more durability you can add mdf wood board also
I wont recommend to use plastic frames here because it will disfigure in front of hot substances so this is the best option you can consider
Start by connecting wheels to the shaft of BO motor and secure the wheels with the screws provided, Repeat the same step for other wheel also
Add some hot glue to the edge of the frame and press the BO motor firmly on this and allow few seconds to dry completely
This will make the adhesion best and there will be no chances of this part coming off
End of this step we have the 2 front powered wheels ready and now for the rear wheels i will simply use the wheels connected to the dc motor
This will allow the wheels to run much more smoothly and it is also easy to connect to the frame
We now have the base ready and now you can work on the circuit that will eventually drive this motors
Circuit and Program


I recommend you to first upload the code to nodemcu, to do this open arduino ide and connect nodemcu board via programming cable
Copy and use the below code and by selecting proper board type and port upload the program to board and then proceed with circuit building
The circuit is very simple to understand if you have hands on experience related to building any such projects, Don't worry I will explain the circuit to you in a very simple way
The project consists of 2 different sets of circuits
The first part is the robot movement part and here also we are dealing with straight forward connections
L298N driver is connected to NodeMCU as follows
The IN1, IN2 of L298N motor driver are connected to the D1, D2 of NodeMCU board
The IN3 AND IN4 pins of driver are connected to D3, and D4 pins of the NodeMCU.
Ena to D5 and Enb pin to D6 of the board
Hobby motors are directly connected to motor driver servo pins
There will be change in direction of rotation(sometimes) at this time you can simply interchange the pins of the motor that is connect with driver board
Battery that i used is 7.4v and positive of battery will be connect to 12v pin of driver and the gnd to gnd
From the driver board 5v and gnd is connected to Vin and gnd pin of nodemcu board
The second circuit is a simple on and off circuit that will control the submersible pump water supply via the nozzle and the same i have given in the second half of the above circuit diagram
You also can replace this open circuit with a Simple small PCB, Complete your electronic projects in the best way from PCBWay
Why them? They have provided me with the best PCB, and the quality is just amazing compared to other providers in the market. They also have Color PCB printing check it out
Check Here for their Multicolor 3D printing service with this, your project becomes more interesting
A revolutionary solution that combines the best of both rigid and flexible circuitry to elevate your electronic projects to new heights.
They also offer PCBA services that specialise in prototyping and small-volume production, making PCBWay the one-stop destination for board fabrication and assembly check their services here , Try for only 29$ for 20pcs
PCBA & Online quote available with 24h delivery services
Their expertise in advanced manufacturing techniques offers seamless integration of rigid and flexible components, ensuring enhanced reliability, durability, and space-saving benefits.
Downloads
Finishing the Circuit


After we have the circuit connections ready we can move further to connect the dc motor to the driver and later finish the circuitry part
I have striped off the jumper cable and will be soldering them to the dc motor terminals, use wire splitter for this purpose
Repeat the same step for other set of motor pins and then via a small hole bring those cables to the top of the base as shown in the third image of this step
To glue the motor driver first cut and paste a small piece of cardboard to have a elevated surface and then place and glue the driver, as an alternative way you can simply use double sided adhesive also
Place the battery pack and to keep the battery in place i used some drops of hoe glue and later using a small piece of support i glued nodemcu board to the frame
Double check if any wires are disconnected or loosely connected when you are gluing the components since finding them later will be a time consuming task
Now make some adjustments so that all the wire are free from tangles and all the open ends are insulated using hot glue
Water Spray Mechanism


This is one of the main part of this robot, the submersible pump lifts the water from the container and sprays it all over and this should not happen and therefore i will be a using nozzle to spray the water to dedicated places.
The simplest nozzle alternative was from the tip of the pen body, the inexpensive pens comes with removable nozzles and that served the purpose well in our project.
Use a small amount of superglue on the sides of this nozzle and immediately insert it into the hose and allow to dry completely
Now the other end of the hose will be connected to the submersible pump outlet part, Here there was no need of any glue since the fit was exactly what was needed
Insert this whole setup inside the bottle and the wire from pump is connected to single battery using the switch and all these are glued to the outside part of the bottle.
In the end make a hole the size of the hose and insert it before closing the lid of the bottle this will avoid the spillage of liquid when the robot is working
Finally glue the entire bottle to the base frame and make sure here you are using mild hot glue for the purpose, this will complete the process of building and next we can test the project for its working
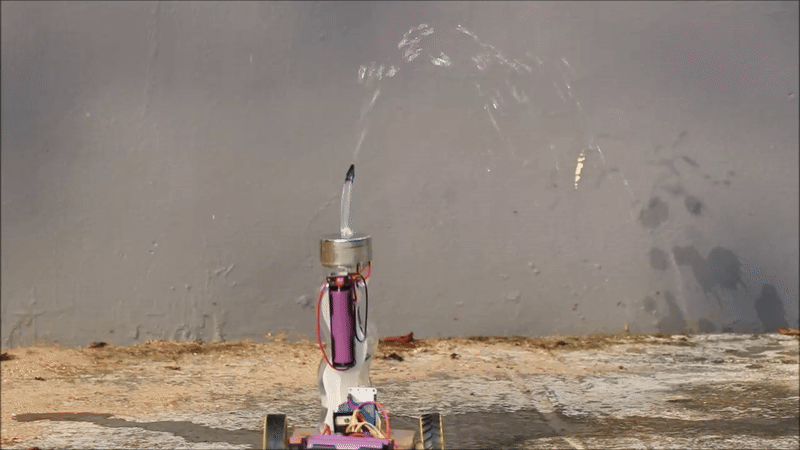
How to Use

.gif)


.gif)

Using this is too much fun and you will definitely love driving this robot but before here are few steps that you need to keep in mind! Don't worry its not that serious
Fill the water container with max level liquids so that you can have more water spray time, Close the lid and then turn on the switch
Before this make sure that the robot is connected to your phone and all the navigations are working properly, this robot can do front, back, left and right directions.
Turn on the water spray activation switch and now you have the robot ready for some actions, i have tested spraying this on a specific area on the wall and the result was good.
You can try running this robot on different terrains and see what results you will get, the 2 wheel drive was sufficient in my case but if you are using larger sized water container then you might need much larger sized containers
The rechargeable batteries used on both the robot and the water spray mechanism part had a larger backup time so that once you go ahead to complete the mission you will return only after its completed.
Thank you readers for making up till here, there is a video below that shows its working in much more detail
If you have any questions ask me in the comments.
Video of Tutorial and Testing

Like always here is the detailed step by step video tutorial to build this project and most importantly i have also included a working video that will definitely excite you.
This was all about this fire fighter robot car, I'm open to hear the suggestions from you to make another with more advanced features
Thank you for showing interest on this project and if you are building this let me know in the i made it section below.
If you feel this project is going to make someone happy don't forget to share it with them! Have a nice day.