DIY Custom Impossible Passthrough
by 3DPrintingEnthusiast in Workshop > 3D Printing
6327 Views, 58 Favorites, 0 Comments
DIY Custom Impossible Passthrough


Recently the "Impossible Passthrough Illusions" have gained quite a lot of popularity. However I noticed the designs were all very similar. There were mainly pyramids, cones, hyperboloids and chess pieces. So I decided to create some different designs and make it as easy as possible for you to create your own design as well.
I am an 8th Grade student at the Maria von Linden Gymnasium.
Download the files here: https://www.printables.com/model/1022866-impossible-passthrough-starter-pack
Supplies


Tools
- 3D Printer
- Fusion 360
Supplies
- 3D Printing Filament (PLA) in many colors
For the Assembly of ONLY the football
- Glue
- Masking tape
Main Sketch Part 1


- I started off by creating a sketch on the xy plane and drawing a rectangle
- Next I drew a circle coincident to both points on the rectangle and having a diameter of 7 mm
- After that I filleted the rectangle-circle corners
- Finally I drew a small line from the upper side of the rectangle to the lower side of the rectangle and set a few lines as construction geometry as seen in the picture
Main Sketch Part 2


- Next I patterned this sketch 8 times around the origin and set the starting point of one of the open lines of the rectangle to be coincident to the ending point of another line on the rectangle
- This way I could offset the curve by 0.7 mm (which will give the parts generous clearance) without having to break the circular pattern
- Finally I drew a large circle encompassing the entire previous sketch lines
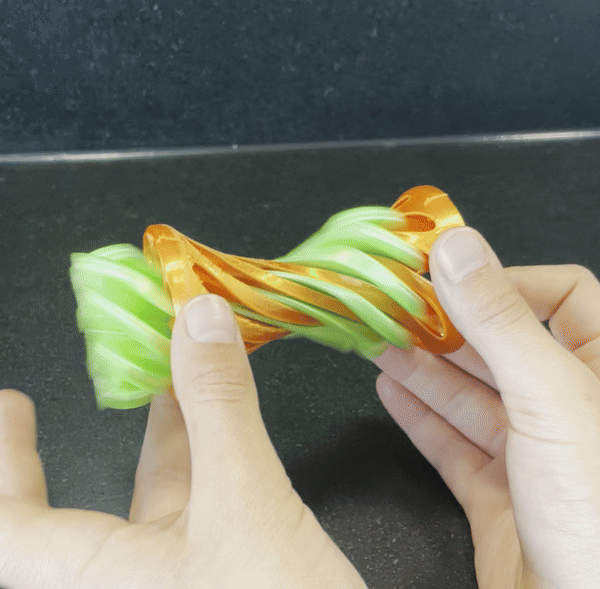
The Sweep


- To create the sweep path for the just drawn sketch profile I created a sketch on one of the side planes and created a line taller (or at least the same height) as the desired passthrough illusion.
- Next I swept both the inner and the outer profiles along the newly created path and added a twist angle. This angle depends on how long the profile is and I just played around with different values until I got one where the maximum overhang angle was around 45 degrees.
How You Can Make Your Own
Making your own Impossible Passthroughs is really easy
- First download the "ImpossiblePassthroughBase"
- Next you can either import semi cylindrical objects from an open .stl file repository like Printables or Thangs or design them yourself
- After that duplicate your design
- And finally combine the ImpossiblePassthroughBasePart1 with your model using the intersect tool and repeat this for the ImpossiblePassthroughBasePart2
- If you get more than two separate bodies after this step, make your original model a bit larger.
Making Refinements
- (Optional) Add some fillets and chamfers to make it easier to print and make it look nicer
- Depending on your model you may have to split it in half and add alignment pins (see my design of an American football for an example)
Below I have some examples:
Pyramid


I started off simple, by creating a cone shaped version
- To do this I created a sketch on one of the side planes (xz or yz)
- Next I drew an isosceles triangle and added a line down the z axis
- To finish off the cone I revolved one of the pyramid halves around the z axis and set the combine function to "Intersect". This reveals the finished cone shaped 'Impossible Passthrough Illusion'.
Download the cone shaped version here: https://www.printables.com/model/1022866-impossible-passthrough-starter-pack
Hyperboloid


I used the same method from Step 4 to create the hyperboloid only this time the sketch was more complicated.
- To start the sketch, I drew a box around the entire base and marked the z axis with another line again.
- Next I drew a circle and constrained it to be 5mm away from both corners on the right side of the rectangle and 10 mm away from the center
- After that I revolved the " |( " shaped profile around the z axis and set the join function to intersect
- Finally, I filleted some basic edges to give the final print a more streamlined appearance
Download the hyperboloid shaped version here: https://www.printables.com/model/1022866-impossible-passthrough-starter-pack
Cactus


The cactus was made in a similar way to the hyperboloid:
- I drew a sketch in the shape of a cactus with the pot using splines (cactus) and lines (pot)
- Next I revolved the cactus sketch around the z axis and intersected it with both parts of the base created in Step 3
- After that, I filleted some sharp edges
- While printing, some parts tended to get ripped off from the build plate and so I created a 1 layer tall bed adhesion helper using 2 circles and little tabs patterned around the origin
Download the cactus shaped version here: https://www.printables.com/model/1022866-impossible-passthrough-starter-pack
American Football


The American football wasn't much different either. However modeling the entire football and printing it would require support material and would ruin the surface finish. That's why I decided to model only one half, print it twice and glue both halves together.
- I started by uploading a picture of a football into Fusion 360 using the canvas tool
- Then I traced the shape using splines
- After that I revolved one half (actually a quarter of the entire football) around the z axis and combined the resulting body with the two bodies created in Step 3
Download the football shaped version here: https://www.printables.com/model/1022866-impossible-passthrough-starter-pack
Alignment Tool for the Football


In the previous step I decided to print the football in two halves. However aligning these halves perfectly is really difficult. I tried to add alignment pins, but they were too small and fiddly to insert. Instead I decided to create an alignment tool and little holes to insert hot glue.
- To add small holes into the bottom of the part I drew two 3mm circles on the bottom face of the football
- Next I extrude-cut these little circles into the part 1.5 mm and chamfered the edges
- After that I patterned these two features 8 times around the origin to get 16 holes for hot glue
- To created the alignment tool, I cut off the upper part of the ImpossiblePassthroughBase using a rectangle with a height of 10mm which I symmetrically extrude-intersected with the ImpossiblePassthroughBase
- Finally I chamfered all the resulting edges.
Pumpkin Part 1


The pumpkin got a little more complex. I wanted the ridges in a regular pumpkin to follow the ridges that result from creating an Impossible Passthrough Illusion. However most pumpkins have 10-12 ridges and not 16 (as in my current sweep form). That's why I had to create a new swept profile.
- To do this I created a line from the origin and patterned it 10 times around the origin
- Next I regularly connected every other connection between the open ends and encompassed the whole design in a circle
- After that I filleted all the resulting edges
- Then I drew a smaller circle and set the inner lines as construction geometry
- Finally I offset the middle sketch loop 0.7 mm (generous tolerance)
Download the pumpkin shaped version here: https://www.printables.com/model/1022866-impossible-passthrough-starter-pack
Pumpkin Part 2


- After finishing the sketch I swept the inner and outer profile along the line I created in step 3
- Then I drew a pumpkin on a pedestal on the xz plane which I then revolved and intersected with the swept bodies
- To imitate the actual ridges in a pumpkin I wanted to round off the sharp corners and tried to use the fillet tool. However this gave me some problems, which I eventually solved by not using "chain selection" and using variable size fillets
Printing


Download the files here: https://www.printables.com/model/1022866-impossible-passthrough-starter-pack
To print these designs, you can use your regular slicer settings. All the models are pre-oriented and can be printed without supports. Print them in any color of pla/petg, but it you're willing, a few color swaps at the correct heights can really enhance the appearance. My printer has terrible clearance (I haven't calibrated it yet) and I wanted my parts to slide effortlessly together, so I chose a clearance value of 0.7mm (quite large). If you notice that the parts are too loose you can adjust this in the slicer by changing the horizontal expansion value to something like +0.2 for a 0.5mm clearance (0.7-0.2). But even if the parts are very loose, the impossible passthrough illusion should work just as well.
Football Assembly


The football is the only model that requires some assembly
- To assemble the football, slide the alignment tool onto one of the halves of the football
- Then apply hot glue (or something like E6000 or Uhu Glue) to the other half
- Slide on the other half and temporarily hold it in place with some masking tape
- Repeat with the other part
What I Learned
I learned how to utilize construction geometry and the intersect tool. I also got more familiar with the sweep tool and the twist angle. This was a fun project and I really enjoyed designing and printing these great Impossible Passthrough Illusions.