DIY 3D Printed Desk Lamp
![IMG_7749.JPG](/proxy/?url=https://content.instructables.com/F8S/W9FI/J6CG641N/F8SW9FIJ6CG641N.jpg&filename=IMG_7749.JPG)
![IMG_7750.JPG](/proxy/?url=https://content.instructables.com/FU0/YXUZ/J6CG63PT/FU0YXUZJ6CG63PT.jpg&filename=IMG_7750.JPG)
![IMG_7734.JPG](/proxy/?url=https://content.instructables.com/FBQ/CFKS/J6CG63TF/FBQCFKSJ6CG63TF.jpg&filename=IMG_7734.JPG)
![IMG_7722.JPG](/proxy/?url=https://content.instructables.com/FQ0/29Z8/J6CG64BJ/FQ029Z8J6CG64BJ.jpg&filename=IMG_7722.JPG)
Recently I had changed the Bed position leaving a space for a small table, but I wanted to have a light there. But instead of buying one for my bed room, I made myself a lamp.I designed one In fusion 360.This lamp is 18.5 cm tall and takes only some watts to operate, It is fully 3D printed. Check out how I made it.
What You Will Need
![IMG_7718.JPG](/proxy/?url=https://content.instructables.com/F4U/BOYZ/J6CG64IM/F4UBOYZJ6CG64IM.jpg&filename=IMG_7718.JPG)
![Fullscreen capture 15-Aug-17 83656 PM.jpg](/proxy/?url=https://content.instructables.com/F8U/TXD2/J6CG6887/F8UTXD2J6CG6887.jpg&filename=Fullscreen capture 15-Aug-17 83656 PM.jpg)
![Fullscreen capture 15-Aug-17 83532 PM.jpg](/proxy/?url=https://content.instructables.com/F3T/0ITP/J6CG687W/F3T0ITPJ6CG687W.jpg&filename=Fullscreen capture 15-Aug-17 83532 PM.jpg)
![Fullscreen capture 15-Aug-17 83809 PM.jpg](/proxy/?url=https://content.instructables.com/F25/728H/J6CG688L/F25728HJ6CG688L.jpg&filename=Fullscreen capture 15-Aug-17 83809 PM.jpg)
- LED Strip Warm White : http://amzn.to/2vFC1M3
- Swtich : http://amzn.to/2fIkSgL
- DC jack :http://amzn.to/2uFTF5d
- Wire Stripper : http://amzn.to/2fIi1nX
- Heat Shrink : http://amzn.to/2x1nDx9
- PLA Filament : https://goo.gl/vKUQkr
- 3D printer Used : https://goo.gl/ZAFccB
Designing the Lamp
![Fullscreen capture 15-Aug-17 85211 PM.jpg](/proxy/?url=https://content.instructables.com/FPS/Z6V8/J6CG685M/FPSZ6V8J6CG685M.jpg&filename=Fullscreen capture 15-Aug-17 85211 PM.jpg)
![Fullscreen capture 15-Aug-17 85241 PM.jpg](/proxy/?url=https://content.instructables.com/FCL/COUK/J6CG6860/FCLCOUKJ6CG6860.jpg&filename=Fullscreen capture 15-Aug-17 85241 PM.jpg)
![Fullscreen capture 15-Aug-17 85305 PM.jpg](/proxy/?url=https://content.instructables.com/FY6/H91W/J6CG6863/FY6H91WJ6CG6863.jpg&filename=Fullscreen capture 15-Aug-17 85305 PM.jpg)
I Started by taking the dimension of the toilet paper and then fired fusion 360 to start the design.
If you are new to Fusion 360 take a look at Instructables Class on Fusion 360.
https://www.instructables.com/class/3D-Design-Clas...
Anyways I started with a Polygon as I wanted a Polygon as the base. Then I extruded added a slot for the DC Jack and the switch and also created the holder for the roll.
Then I designed the shade or the Diffuser by using the polygon and spiralizing it.
Tinning the Wire
![IMG_7699.JPG](/proxy/?url=https://content.instructables.com/FSG/EY2Z/J6CG64E4/FSGEY2ZJ6CG64E4.jpg&filename=IMG_7699.JPG)
![Fullscreen capture 15-Aug-17 82811 PM.jpg](/proxy/?url=https://content.instructables.com/FFB/KCIZ/J6CG687A/FFBKCIZJ6CG687A.jpg&filename=Fullscreen capture 15-Aug-17 82811 PM.jpg)
![Fullscreen capture 15-Aug-17 91818 PM.jpg](/proxy/?url=https://content.instructables.com/FB4/PSFX/J6CG6ANS/FB4PSFXJ6CG6ANS.jpg&filename=Fullscreen capture 15-Aug-17 91818 PM.jpg)
![Fullscreen capture 15-Aug-17 92030 PM.jpg](/proxy/?url=https://content.instructables.com/FAH/GD2E/J6CG6ANV/FAHGD2EJ6CG6ANV.jpg&filename=Fullscreen capture 15-Aug-17 92030 PM.jpg)
Whatever it is you are soldering, you should 'tin' both contacts before you attempt to solder them. This coats or fills the wires or connector contacts with solder so you can easily melt them together. To tin a wire, apply the tip of your iron to the wire for a second or two, then apply the solder to the wire.
Soldering the Components
![Fullscreen capture 15-Aug-17 82608 PM.jpg](/proxy/?url=https://content.instructables.com/FGH/XJ4J/J6CG686X/FGHXJ4JJ6CG686X.jpg&filename=Fullscreen capture 15-Aug-17 82608 PM.jpg)
![IMG_7712.JPG](/proxy/?url=https://content.instructables.com/FCH/G58H/J6CG64E6/FCHG58HJ6CG64E6.jpg&filename=IMG_7712.JPG)
![Fullscreen capture 15-Aug-17 83125 PM.jpg](/proxy/?url=https://content.instructables.com/F0V/NO5X/J6CG687B/F0VNO5XJ6CG687B.jpg&filename=Fullscreen capture 15-Aug-17 83125 PM.jpg)
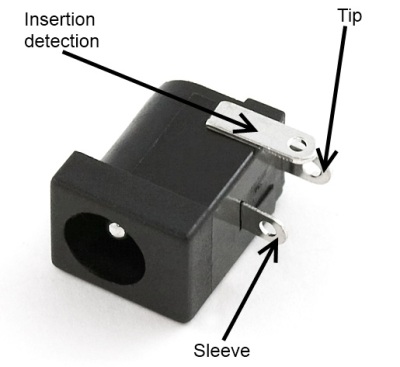
After tinning the wire it was time to solder the components.First, we take the DC Jack is connected,
The Positive wire soldered to the Tip and the ground to the Sleeve.
After soldering a Heat shrink tube is applied and shrank with help of heat gun.
Then we solder the Switch to positive wire to the Switch and the other wire is left for the LED Strip.
Slicing the Files
![Fullscreen capture 15-Aug-17 85456 PM.jpg](/proxy/?url=https://content.instructables.com/FQ2/MAO4/J6CG6868/FQ2MAO4J6CG6868.jpg&filename=Fullscreen capture 15-Aug-17 85456 PM.jpg)
![Fullscreen capture 15-Aug-17 85537 PM.jpg](/proxy/?url=https://content.instructables.com/FY2/3LP8/J6CG686A/FY23LP8J6CG686A.jpg&filename=Fullscreen capture 15-Aug-17 85537 PM.jpg)
![Fullscreen capture 15-Aug-17 85606 PM.jpg](/proxy/?url=https://content.instructables.com/F1T/2OB9/J6CG686L/F1T2OB9J6CG686L.jpg&filename=Fullscreen capture 15-Aug-17 85606 PM.jpg)
Now It's time to print the files and all the files are in the Thingiverse link below.
https://www.thingiverse.com/thing:2479937
Now it's time to slice the Model.
For Slicing the base the fill was 10% and layer height was 0.15mm
For Slicing the shade we use a feature called Specialize the outer contour also known as VAse mode.
In this mode, the printer will just print the outer wall slowing incrementing the height.
Printing
![IMG_7664.JPG](/proxy/?url=https://content.instructables.com/F18/NNSG/J6CG64BO/F18NNSGJ6CG64BO.jpg&filename=IMG_7664.JPG)
![IMG_7666.JPG](/proxy/?url=https://content.instructables.com/FB4/3KU6/J6CG64BS/FB43KU6J6CG64BS.jpg&filename=IMG_7666.JPG)
![IMG_7686.JPG](/proxy/?url=https://content.instructables.com/FWM/FPSY/J6CG64BN/FWMFPSYJ6CG64BN.jpg&filename=IMG_7686.JPG)
![IMG_7679.JPG](/proxy/?url=https://content.instructables.com/F2J/BJYH/J6CG64BU/F2JBJYHJ6CG64BU.jpg&filename=IMG_7679.JPG)
I have printed all the models on my Ender 2 printer.
Ther Ender is a Good Printer to have on ur workshop . Priced at 200$ it is easy to assemble and gives good quality print without tinkering a lot.
The Print took around 6 hours to complete.
Filing the Slots
![Fullscreen capture 15-Aug-17 91301 PM.jpg](/proxy/?url=https://content.instructables.com/F21/2DM8/J6CG6AN1/F212DM8J6CG6AN1.jpg&filename=Fullscreen capture 15-Aug-17 91301 PM.jpg)
![Fullscreen capture 15-Aug-17 91356 PM.jpg](/proxy/?url=https://content.instructables.com/FON/ELA9/J6CG6AN7/FONELA9J6CG6AN7.jpg&filename=Fullscreen capture 15-Aug-17 91356 PM.jpg)
![Fullscreen capture 15-Aug-17 91321 PM.jpg](/proxy/?url=https://content.instructables.com/F2N/53ZY/J6CG6AN4/F2N53ZYJ6CG6AN4.jpg&filename=Fullscreen capture 15-Aug-17 91321 PM.jpg)
The slots might be a bit tight, therefore it can need filling .This was my case with the DC jack slot.
I gently filled it with a square file so that it can accommodate the DC Jack.
Note : Remeber not to fill hardly it might make the slot un uneven.
Fitting the Components
![Fullscreen capture 15-Aug-17 84026 PM.jpg](/proxy/?url=https://content.instructables.com/FM3/E1LF/J6CG688O/FM3E1LFJ6CG688O.jpg&filename=Fullscreen capture 15-Aug-17 84026 PM.jpg)
![Fullscreen capture 15-Aug-17 83933 PM.jpg](/proxy/?url=https://content.instructables.com/FSX/3PL5/J6CG688N/FSX3PL5J6CG688N.jpg&filename=Fullscreen capture 15-Aug-17 83933 PM.jpg)
FIx the Switch, apply gentle push and it will slide inside.The take the DC jack and repeat the same process to fit it into the slot
Wrap the Led Strip
![Fullscreen capture 15-Aug-17 84219 PM.jpg](/proxy/?url=https://content.instructables.com/FSZ/KG1C/J6CG688P/FSZKG1CJ6CG688P.jpg&filename=Fullscreen capture 15-Aug-17 84219 PM.jpg)
![Fullscreen capture 15-Aug-17 84403 PM.jpg](/proxy/?url=https://content.instructables.com/FGZ/9Y57/J6CG688Q/FGZ9Y57J6CG688Q.jpg&filename=Fullscreen capture 15-Aug-17 84403 PM.jpg)
![Fullscreen capture 15-Aug-17 84538 PM.jpg](/proxy/?url=https://content.instructables.com/FF4/G7ZU/J6CG685K/FF4G7ZUJ6CG685K.jpg&filename=Fullscreen capture 15-Aug-17 84538 PM.jpg)
Start by removing the 3m sticking tape paper attach a part of it on 35 degrees.
Then slowly start revolving the LED strip around the Roll .Take ur time to make sure the gaping is as uniform as possible.If not possible you and try again but try it to be aligned as spiral as possible.
Solder the LED strip now to positive wire coming out from the switch and the Ground from the jack.
If you like this project show us love @ https://www.facebook.com/makewithRex
and Subscribe to our channel for weekly projects. @www.youtube.com/PrajjwalNag