Cutting Cable With a Streaming Media Box! (XBMC/Kodi)
by pc1975 in Circuits > Raspberry Pi
581689 Views, 1204 Favorites, 0 Comments
Cutting Cable With a Streaming Media Box! (XBMC/Kodi)

Hello fellow Instructable-rs. This is my first instructable, and I'm going to include as much detailed information along with the steps as I see necessary for those who are unfamiliar with XBMC/Kodi. Much of this information is my own opinion, and just how I choose to do things. If you have a method that works better for you, please, by all means, do that. If you want to skip the "Why" part of my rambling and just get straight to the "How", I have highlighted the quick and dirty steps in bold print.
I am a cable cutter going on about 5 years now. I would like to share my knowledge and mistakes I've made along the way to make your transition into a cable-free lifestyle as easy and (cheap) as possible! This guide is meant to serve as training wheels to get you started on your way to becoming a cord cutting guru like me. (Jeez I've got a high opinion of myself!)
It all began for me a few years back when I went through some money trouble, and the first thing I decided to ditch was my expensive satellite service. I figured I would get things straightened out financially, and then someday I would go back to some sort of cable/satellite provider.
Well, guess what? I ditched the service, and I haven't looked back since. I don't miss it in the least, and I will most likely NEVER have cable again.
I've tried a handful of different entertainment solutions, and finally settled on XBMC as my favorite.
Before we get into the actual technical part of the instructable, let me give you the best piece of advice that I can give you when it comes to ANY tech; "Don't spend a dime to save a nickel." I'm going to focus on a building an XBMC/KODI media streamer in this write up. I have built many streamers out of good, reliable, compatible PC parts, and cobbled a few together out of older parts. If you have WORKING/COMPATIBLE parts lying around, great! USE THEM!! Save that money! If you have incompatible parts, that could possibly be made compatible, you know, with a few bucks here, and a few bucks there...STOP! It's very easy to "Ten buck" yourself to death. Work with what works! Don't build a money pit! Also keep in mind, your time is worth something, and it's a precious commodity that you can't get back!
The intended audience for this guide is the non-tech savvy, or someone who has zero experience with a Raspberry Pi or XBMC/Kodi.
***If you want to test this out before investing in any equipment, XBMC/Kodi can be installed on most Windows, Mac, or Linux PCs. If you want to install XBMC as a program to check things out first, download the respective installer for your operating system from Kodi.tv, install it on your computer, and jump straight to step #6 of this instructable. I recommend trying it out before spending any money on equipment. Everything written here is cross-platform, and should work on ANY XBMC device.***
Obtain Hardware (On the Cheap!)
I'm going to assume that if you've read this far, you're not necessarily a tech geek who has a ton of spare parts lying around with which to build a media streaming PC. If you do, that's great. XBMC/Kodi runs best, in my experience, on a compatible full PC motherboard. There are a ton of different working configurations that your media streamer can be built on, and a wealth of articles/forum discussions all over the interwebs on how to build such a PC.
Lots of people will argue that Android set top boxes are also very good or the best. Some of them indeed are very good. In my experience, most of them are...how do I say this politely? Crap.
I love you Android, I really do, but a lot of the set top Android boxes are just sweatshop junk. If you decide to use an Android box as your media streamer, research what is available. There are great Android boxes out there, but there are far more junkers than good boxes. Read reviews, and find something that works well and has a lot of support.
If you decide to go the route of building your own PC, or using an Android box, or something else, you can skip to step #6 of this guide, after you install XBMC/Kodi, of course.
I am going to cover building a media streamer with a Raspberry Pi, as it is a common piece of hardware, all of them are configured pretty much the same, and it has a fantastic amount of internet support.
So Step 1 is to get a Raspberry Pi, and all components needed to get the Pi up and running (listed below).
You will need;
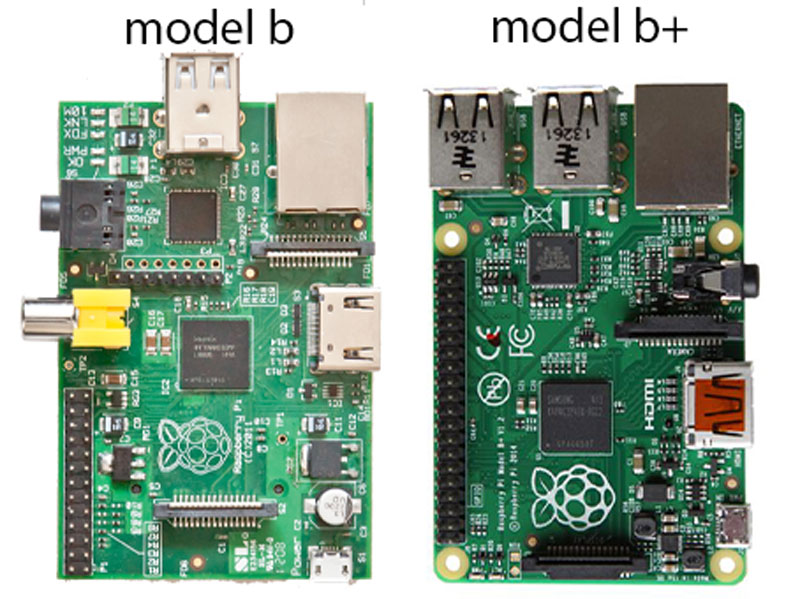
A Raspberry Pi Board (Preferably model B+)
A Power Cord (Micro USB charging cable, most "Phone Charger" style, for power)
A Micro SD Card (Or SD card for Older Raspberry Pi models)
An HDMI Cable (Or An Analog Video Cable + Y Audio cable if you have an older TV)
Most of these items will come in a Raspberry Pi Kit, along with a case to mount it all in. The case is completely optional. You can use a bare board, but I personally prefer to use a case. Electronic device nudity offends me, especially robots. Disgusting.
In addition to the parts listed above, you will also need a USB stick to install your data files to. I recommend nothing smaller than 2GB in size. 8GB or larger is optimal, in my opinion. You will also need a length of ethernet cable(optimally) or a WiFi adapter(Last Resort). Most Raspberry Pi kits include a WiFi adapter.
Items of note: Remember what I said about not spending a dime to save a nickel? Learn from my mistakes here. If you're going to build a media streamer on a Raspberry Pi, buy a Raspberry Pi KIT!!! Ok...let me rephrase that. Unless you have everything ALREADY on hand to build a complete Pi, buy a kit. Do not buy a piece here, and a piece there. You'll spend way more money buying a board, then an SD card, then a power adapter, then a case to put it in. Also, try to get a model B+, as long as you have an HDMI port on your TV, that is. The extra two USB ports will go a long way to preserve your sanity.If you don't have an HDMI port on your TV, you'll be stuck using the older model B, because it has analog video "RCA" output.
--EDIT 1/15/2015: As pointed out by TheMainMan in the comments section; the B+ does indeed put out analog video;
"The B+ can still be used with an older composite (RCA) TV. The audio jack on the B+ is a TRRS (Tip, Ring, Ring, Sleeve) which allows it to also carry video in addition to the audio. The other end of the cable will have yellow, white, and red RCA connectors. While these cables may not be as readily available today as HDMI, they were fairly common with when camcorders were common."
There ya have it, folks. Buy a B+, and make sure you have a TRRS cable. These come with Roku Players, WD TV Live boxes, etc. --
Some people power their Pis from a USB port on the back of their TVs. You can, but you shouldn't. If you do this, powering off your TV will power off your Pi. You should turn on your Pi and leave it on, only reboot it on the rare occasion that the system lags, or various other operational problems that could occur.
Prepare Your SD Card!
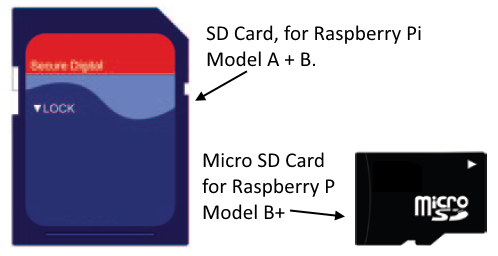
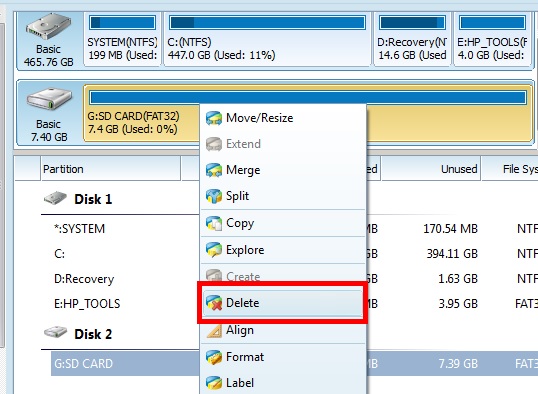
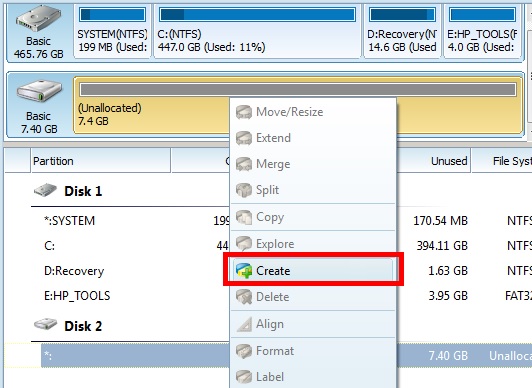
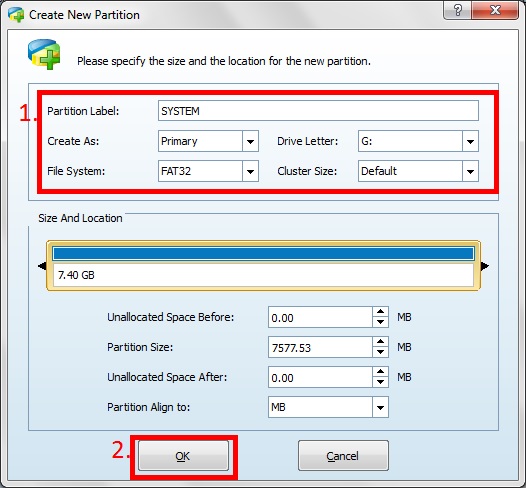
You will need to format your SD card (or micro SD card) in fat 32 format, as a primary partition, with a volume label as "SYSTEM".
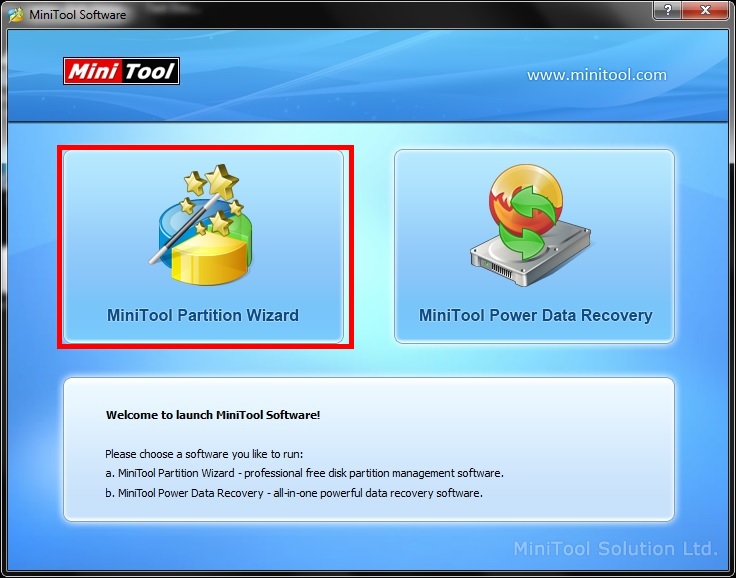
To do this, we will use Mini Tool Partition Wizard. A great piece of Software! You can download it from partitionwizard.com. The Home edition is free!
Insert your SD (or micro SD) card into your computer
Open the Mini Tool Partiton Wizard program.
Select the box to the upper left that says "Mini Tool Partition Wizard"
Right click your SD Card in the list of volumes, and delete all partitions that are on it.
Right click on the new "Unallocated" Space of your SD card, and select "Create"
A new box will popup, fill in the boxes witht he following info;
Partition Label: System
Create as: Primary
File System: Fat 32
Click on "OK"
The Box will close, click on the blue check mark in the upper left to apply all changes.
A note on selecting SD cards: I read somewhere that using a class 10 SD card will speed up how your Raspberry Pi runs, if it indeed does provide a speed increase, the difference to me seems unnoticeable. I am using a 4GB class 4 SD card. I tried an 8gb class 10 card, and as I said before, could not tell a difference in performance.
Prepare Your USB Stick!
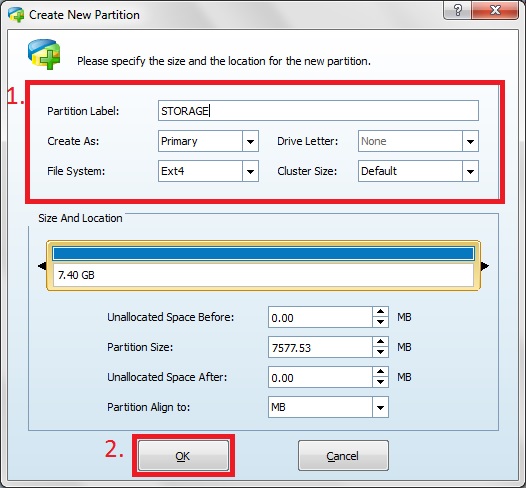

We us a USB stick installation of Openelec for the system stability that it provides. You can get away with just installing openelec to an SD card alone, but I am dead set against it. I have personally lost my installation numerous times (3 times in 1 week!) when it was installed to an SD card alone. But when installed to a RELIABLE usb stick, I have not had any data corrution at all!
Preparing your usb stick is exactly the same process as preparing your SD card (refer to step 2), except with the following partition settings:
Partition Label: STORAGE
Create as: Primary
File System: Ext4
I highly recommend using a USB 3.0 stick.
Place Openelec SYSTEM Files on SD Card
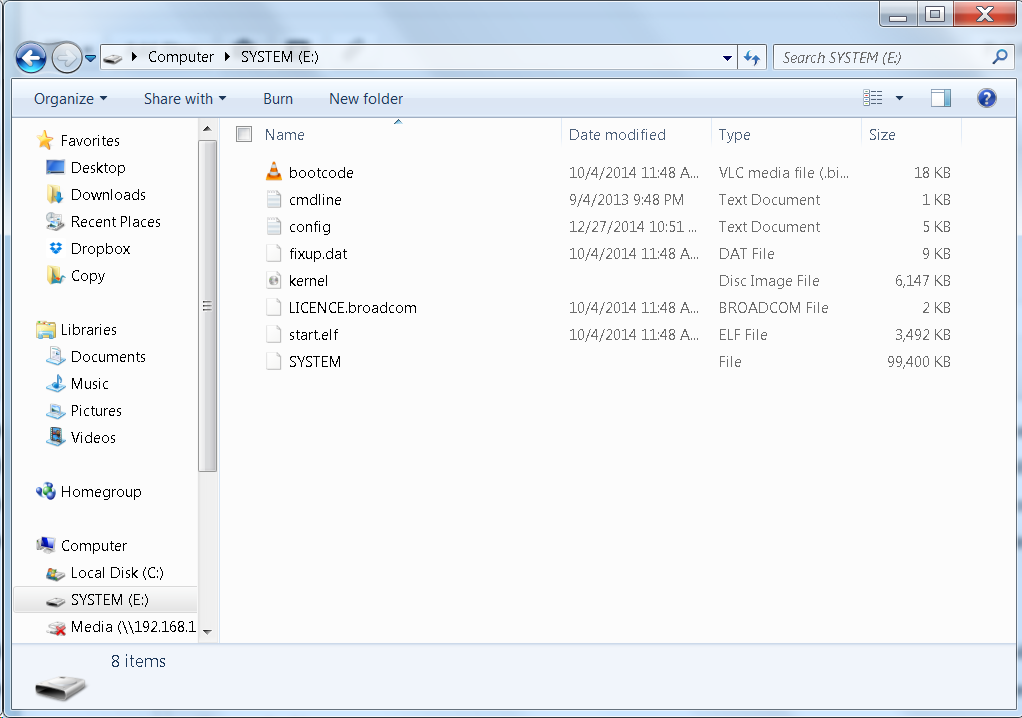
***Update 2/3/2015: This instructable was written prior to the release of the Raspberry Pi 2. The proper file set has been added for download for this model. I do not have a version 2 as of this writing, so I can't speak from experience, but in theory, these files *SHOULD* work. I did not upload an overclock configuration for the new Pi, as I do not know how it will perform under overclocking. Please make sure you download the proper file for your RPI!***
Now that our drives are formatted properly, we need to copy our Openelec files onto our SYSTEM partition (The SD/micro SD card). I have included two zip files. One is a normal install, the other is an install that will overclock your Raspberry Pi. You can read up on the pros and cons of overclocking a Raspberry Pi in more complete detail if you would like before you chose how to install. In a nutshell, overclocking makes the Pi run faster, but *can* supposedly shorten its life.
Personally, I overclock, and my Pi runs just fine. Many people will tell you that if you overclock, you will need to add a fan or a heat sink kit to your Pi as well. In my experience, the Pi doesn't get any hotter than lukewarm, even with overclocking.
I did try using a heat sink kit, and monitored temperature over a few hours. The difference the heat sinks made was barely noticeable. If memory serves correctly, the heat sinks lowered the operating temperature by a whopping 1 degree Celsius. So, it's your call. Personally, I don't use them on any new Pi's that I build. I did drill holes in my Pi's case for venting, but I don't think it was really necessary. Anything under 80 degrees Celsius is a safe operating temperature for the Pi, and mine has never gotten anywhere near that.
The files included in these zip archives are the result of the hard work of the people at Kodi.tv, and the members of the OpenELEC project. Please show them your support.
Ok, I've rambled enough. On to this step:
Extract the folder from the zip file that you downloaded, and place its contents on the root of your "SYSTEM" SD card.
(Man, that was a lot of rambling for such a simple step!!)
Boot Your Raspberry Pi Up for the First Time!
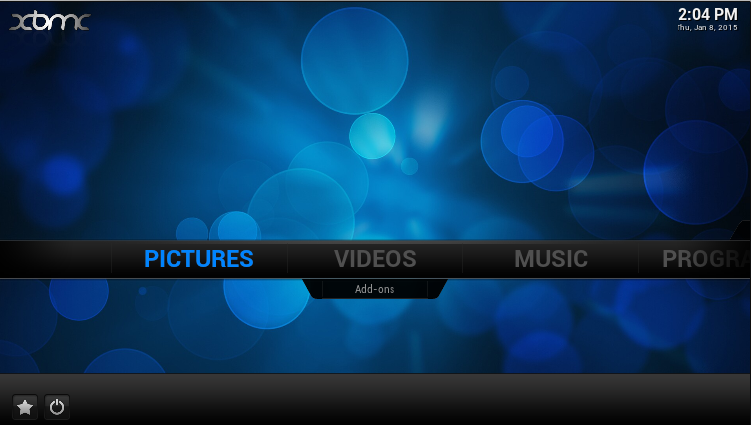
Plug your USB & SD card into your Raspberry Pi.
Plug in an ethernet cable from the Raspberry PI to your LAN. (or connect it via WiFi after it boots up. I HIGHLY recommend using an ethernet connection, though).
Connect the Raspberry Pi to your TV (Either via HDMI cable, or analog cables for older style TVs).
Plug the Raspberry Pi's power adapter into a power outlet.
On your TV, You will see the OpenELEC splash screen, and a few moments later, you will see the XBMC homescreen.
Items of note:
When you boot up for the first time, Openelec will create necessary data files on the USB stick.
Initially, you will want to have a keyboard plugged in to the Raspberry Pi for initial configuration. Later on, you can set up XBMC to be controlled with a smart phone/tablet. We will cover this later.
Why am I so against WiFi?
It's terribly unpredictable for streaming video. If you want to try it and it works well for you, awesome. I have found it to be very hit or miss, and I would rather just use the stability of a wired connection.
Install Your First Addons!
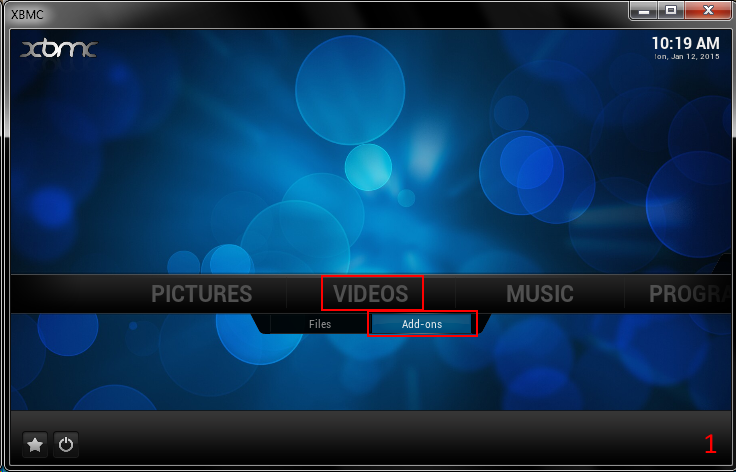
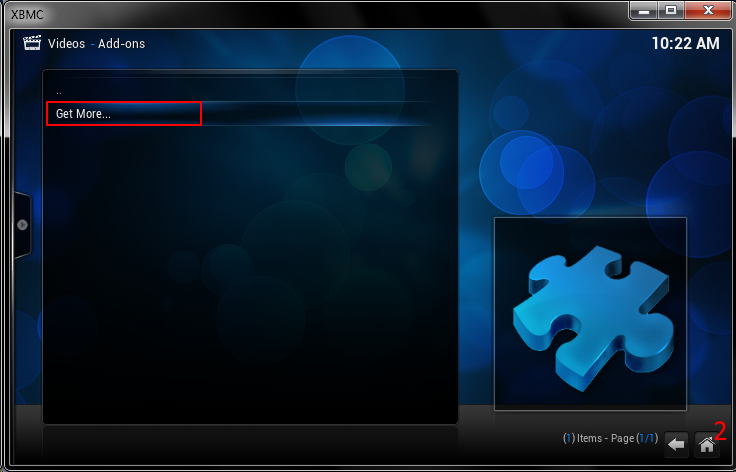
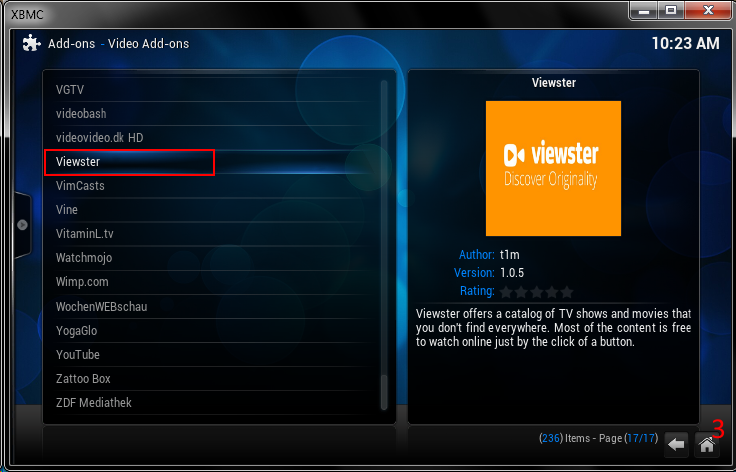
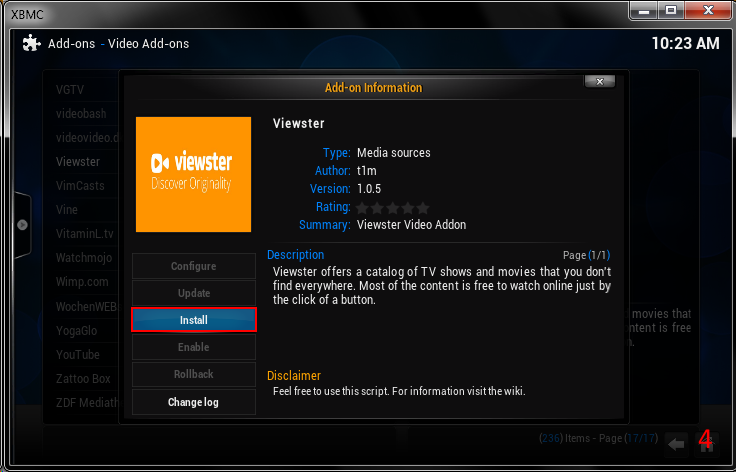
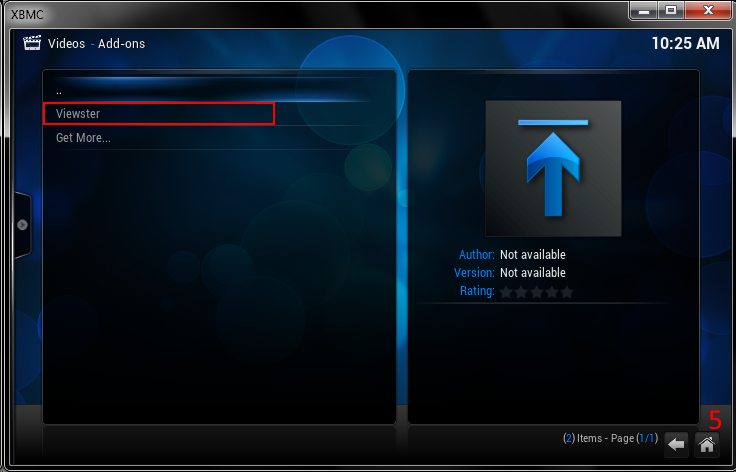
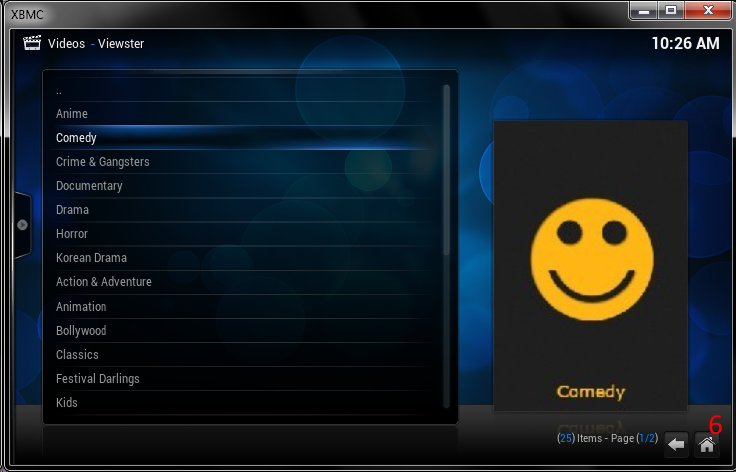
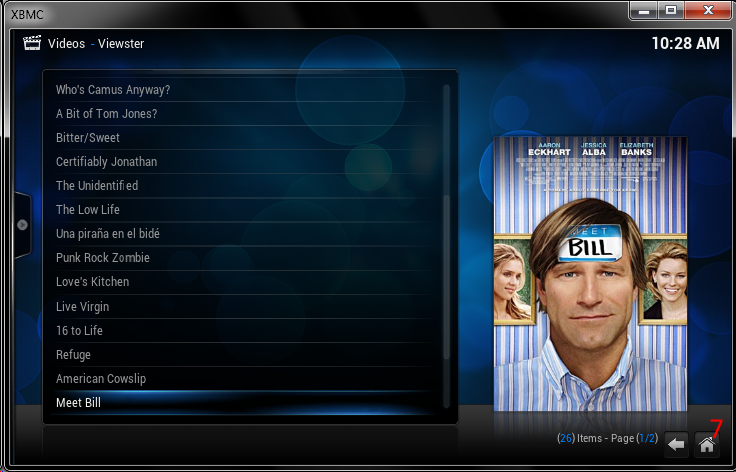
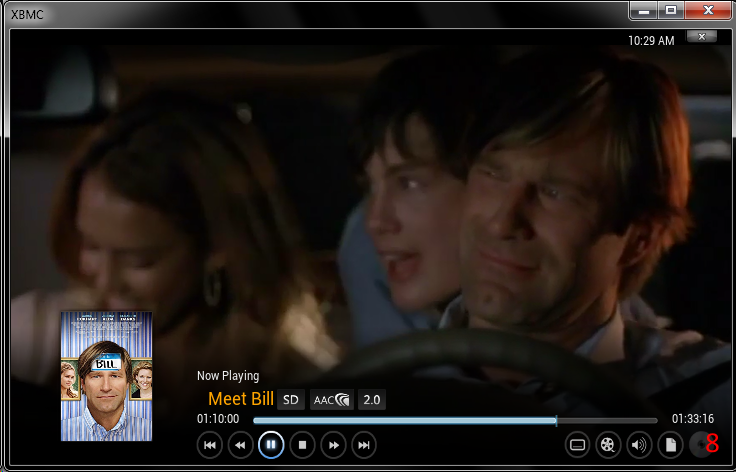
Now that you have your media center up and running, you'll need some addons for streaming video. In this step, we're going to use the built in addon repositories to install a basic addon.
We will install "Viewster" and "Youtube".
Go to Videos, and arrow down to "Addons".
A new screen will open. Select "Get more".
A list of install-able addons will populate a list. Arrow down until you highlight "Viewster". Hit enter.
Select "Install". Hit enter.
The addon will download, and install. Go back to your list of installed addons, and you will now see Viewster in your list.
Select Viewster in your list of addons, and hit enter. This will launch the addon. You will see a directory listing of various video categories. Use this directory to select a video to watch.
Repeat the above steps to install Youtube as well.
Add an Addon Shortcut to Your Home Screen.
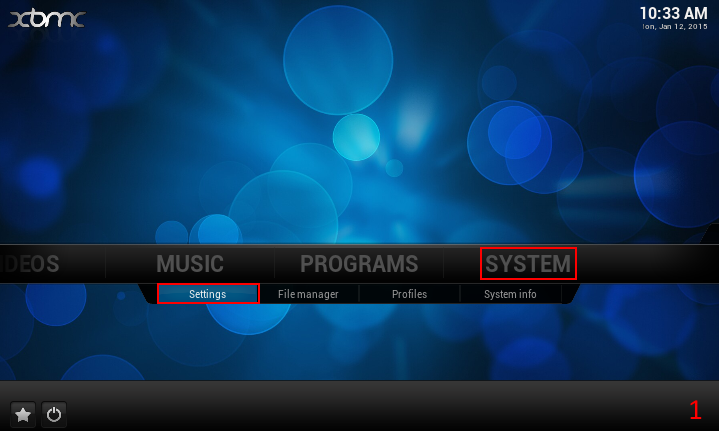
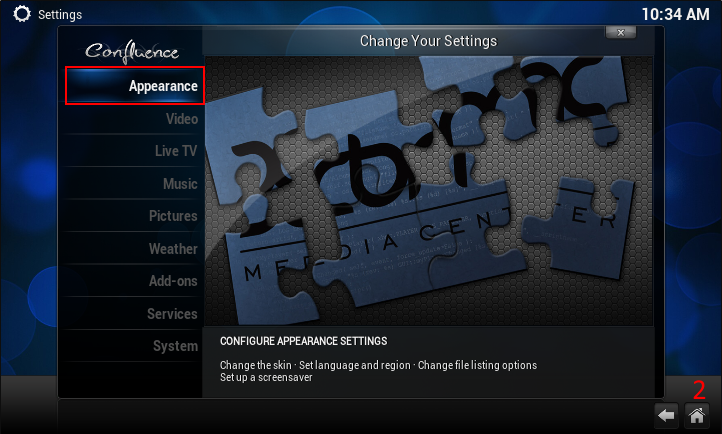
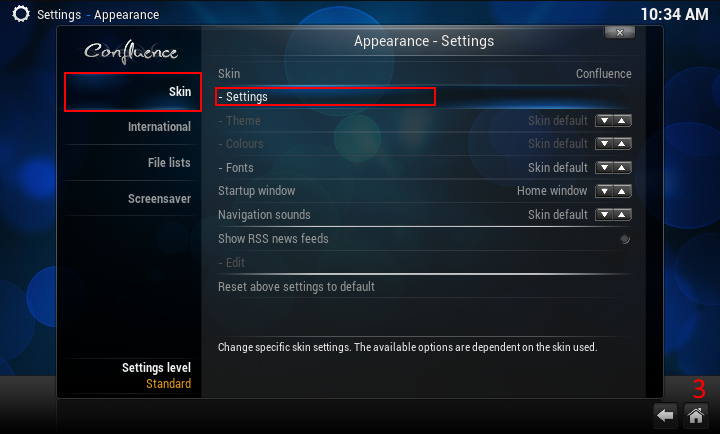
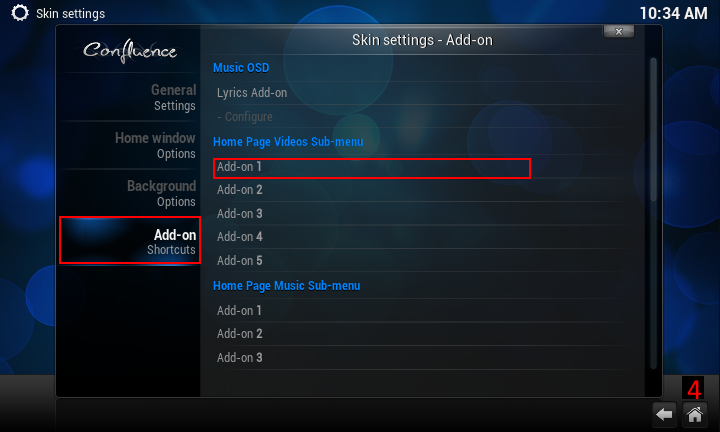
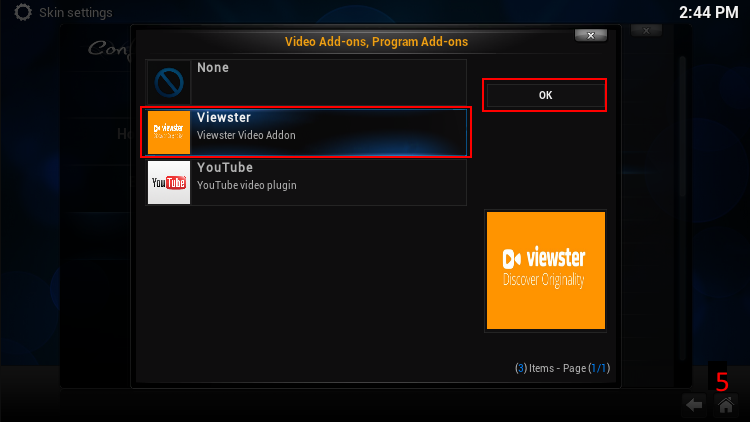
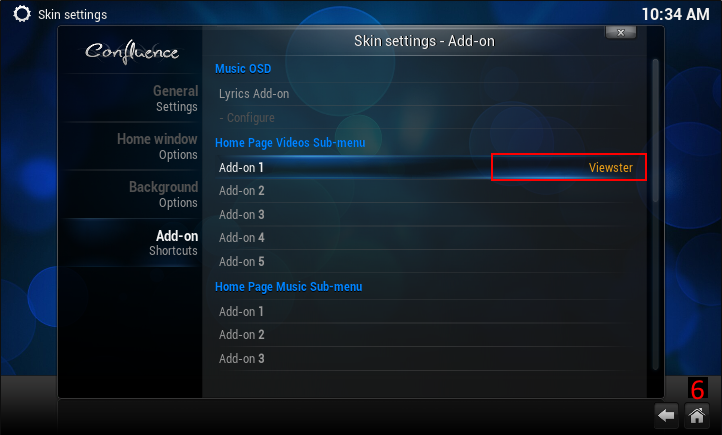
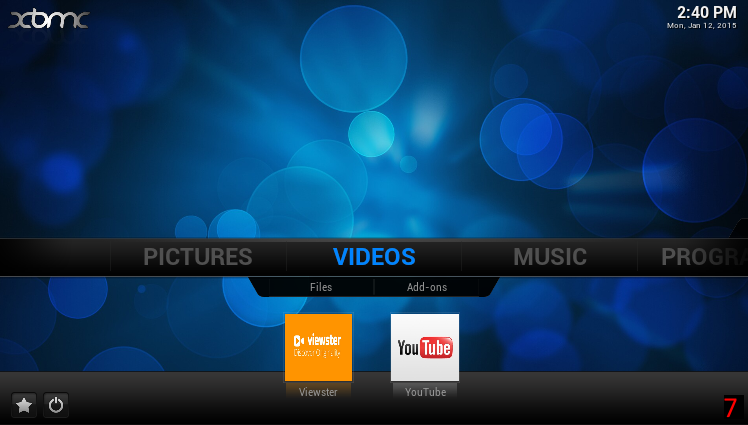
Now that you have installed some addons, it's a good idea to add some shortcuts for your most commonly used addons to your homescreen. It's a nice time saver, and who doesn't like to save time?
For this part of the instructable, we are going to add Viewster and Youtube to our "Videos" home screen.
Go to System, and arrow down to "settings". Hit enter.
Select "Appearance", hit enter.
Select "Skin", arrow right to Skin, and down to "settings". Hit enter.
Select "Addon-On Shortcuts", and arrow right to "Home Page Videos Sub Menu". Select "Add-On1" and hit enter.
A window will pop up with a list of installed addons. Choose "Viewster", and hit enter.
You will now see "Viewster" listed for "Add-On1".
Repeat this process to add "Youtube" to "Add-On2".
When you return to your home screen, you will see the "Videos" menu now has two shortcuts, "Viewster" and "Youtube" beneath it.
Add an External File Source for 3rd Party Addons.
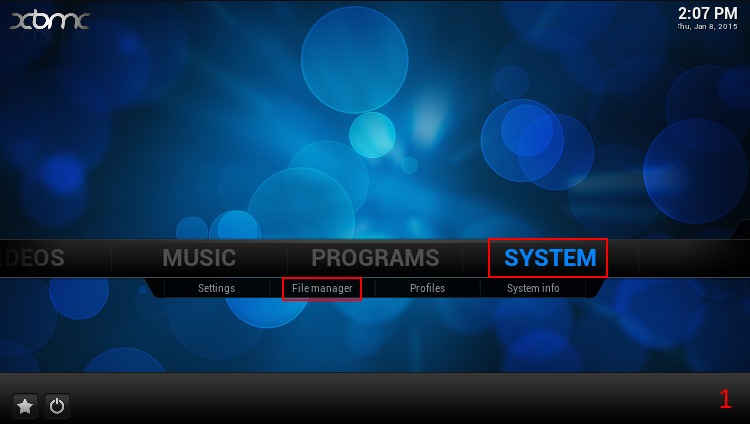
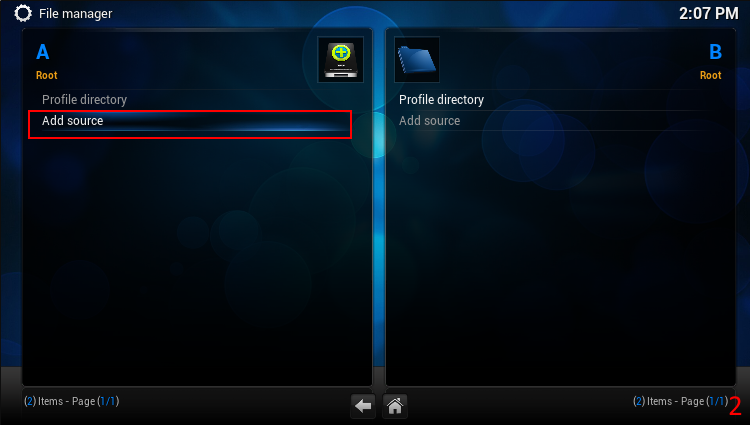
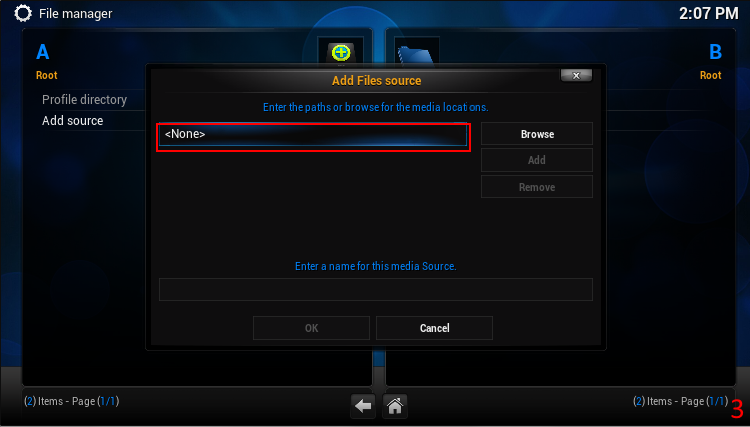
XBMC has a ton of addons that can be installed through the default repository, you should explore them. There are plenty of goodies that you will discover. However, for this step, I want to teach you how to add more sources for getting more third party addons.
I'm going to use Total Installer. It's just a personal preference. It works for all of the Addons and repositories that I use, and it's really easy to use to get new addons.
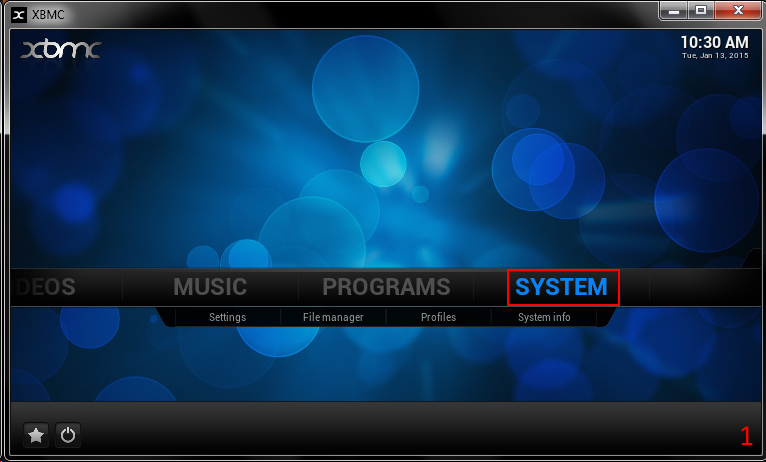
From your home menu screen, arrow over to "System"(all the way to the right)
Arrow down to "File Manager". Hit enter.
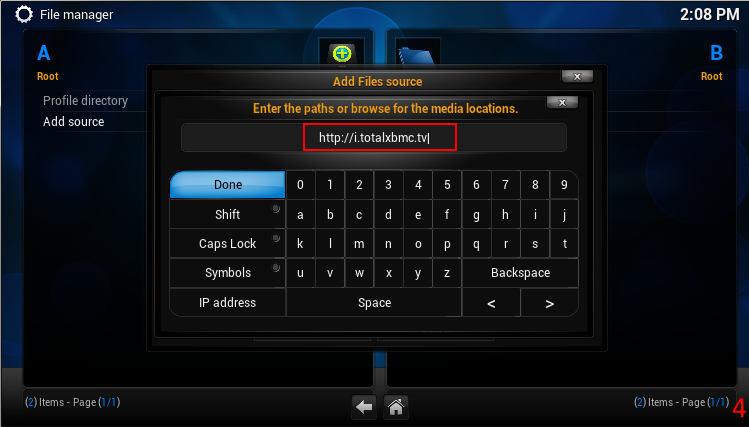
A new screen will pop up. Select "Add Source". Hit enter.
Another box will popup. Select the area that says (None) and hit enter.
Another box will popup, with a virtual keypad. In the blank space type "http://i.totalxbmc.tv" (no quotations) Hit enter.
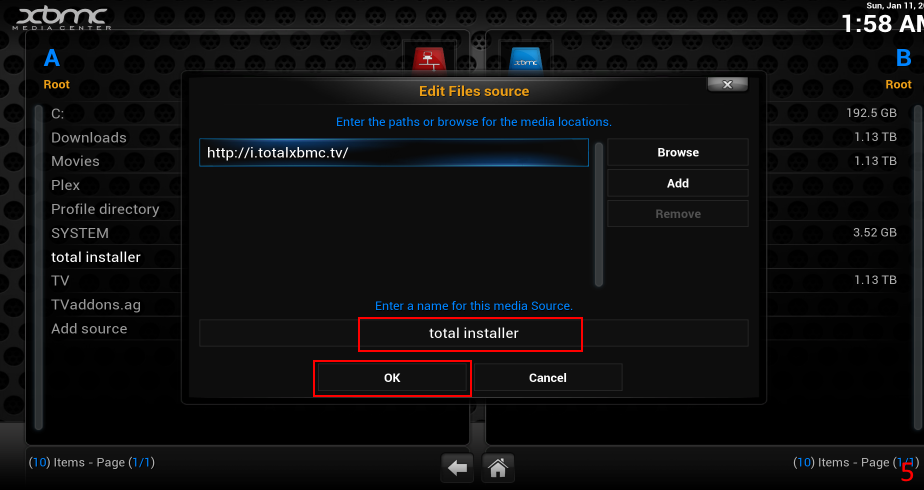
Arrow down to the box that asks you to enter a name for the source, and hit enter. Name this source whatever you want to name it, (I named it "Total Installer") and hit enter. Then Select "OK" at the bottom of the screen, and hit enter.
Install a 3rd Party Repository.
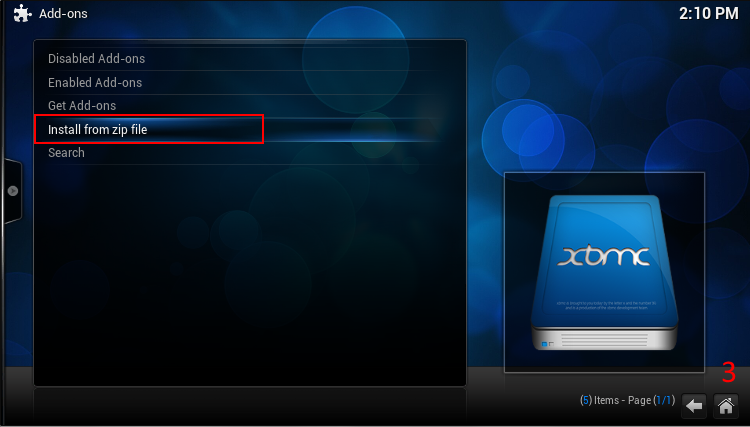
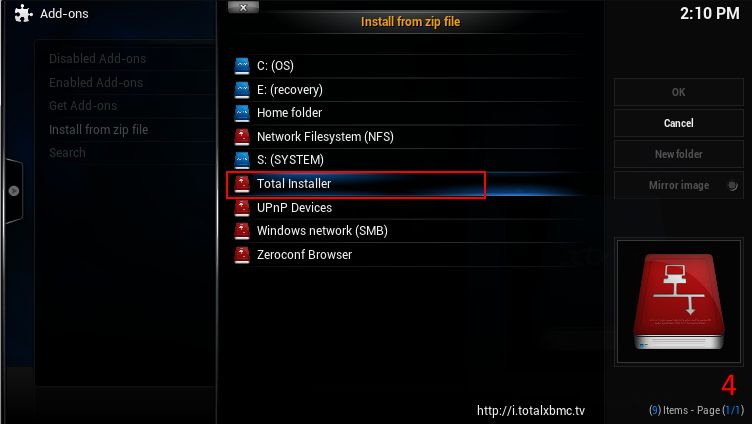
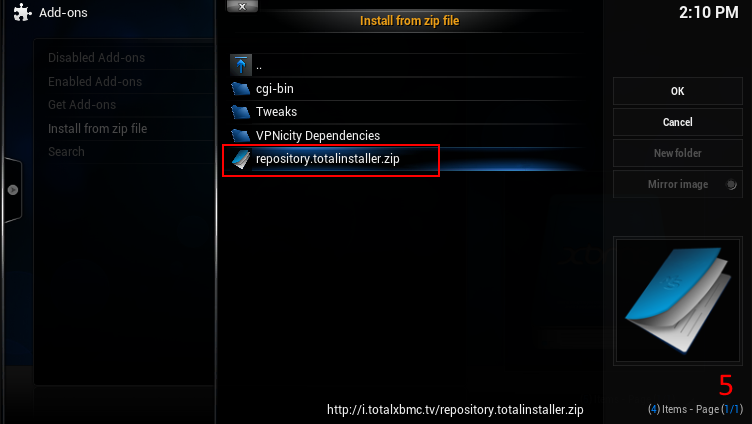
It's good to know how to add a third party repository to XBMC, it's an extra source for addons that XBMC does not have out of the box. For this part of the instructable, we are going to install the repository necessary to get the Total Installer program addon. Most individual addons can be installed if you have their respective zip files, but you will want to install the addon's repository because the author of the addon can send your addons automatic updates that way.
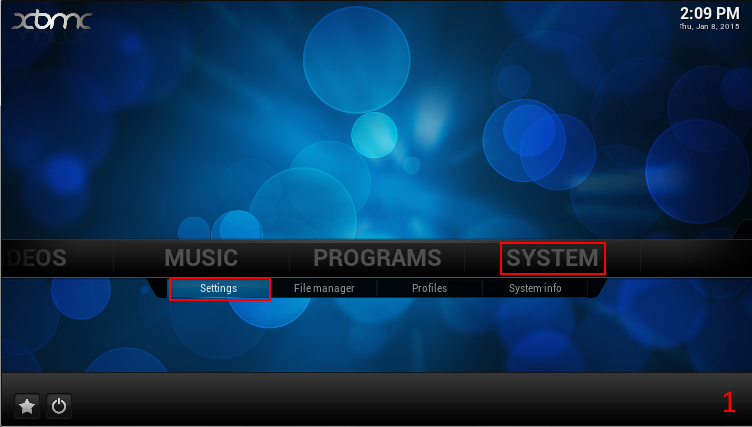
Go to System, Arrow down to "Settings", hit enter.
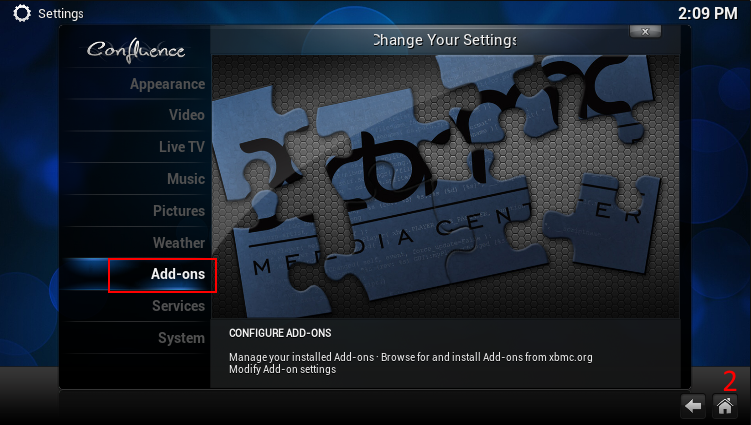
Go to "Addons", hit enter.
Go to Install from Zip File, hit enter.
Select "Total Installer" (Or whatever you named your external source) and hit enter.
Select "repository.totalinstaller.zip" and hit enter.
The Total Installer repository is now installed.
Note: You can download and install individual repositories or addons as needed, but in my experience Total Installer has everything I've ever needed for XBMC, and it's generally much quicker to get an addon through Total Installer. I have never personally had a problem using Total Installer, either. Total Installer also automatically installs an addon's respective repository.
Install the "Total Installer" Program Addon
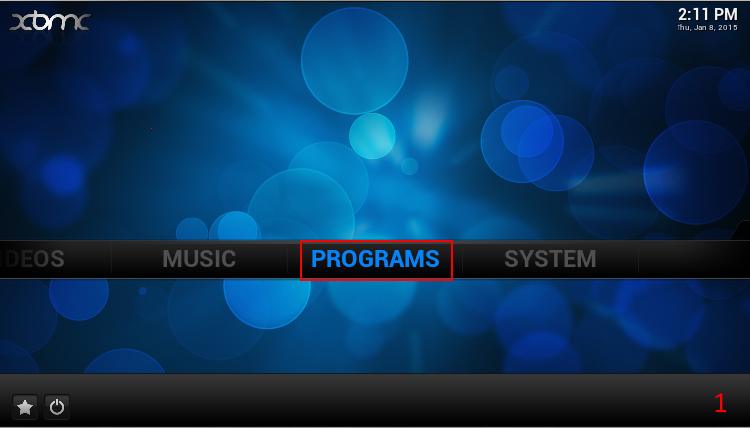
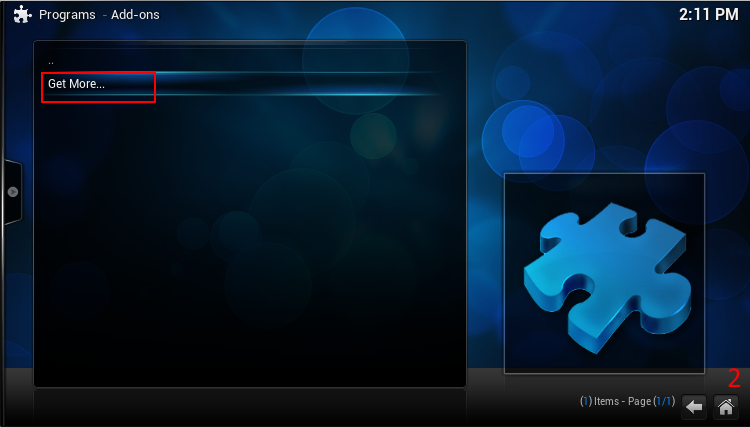
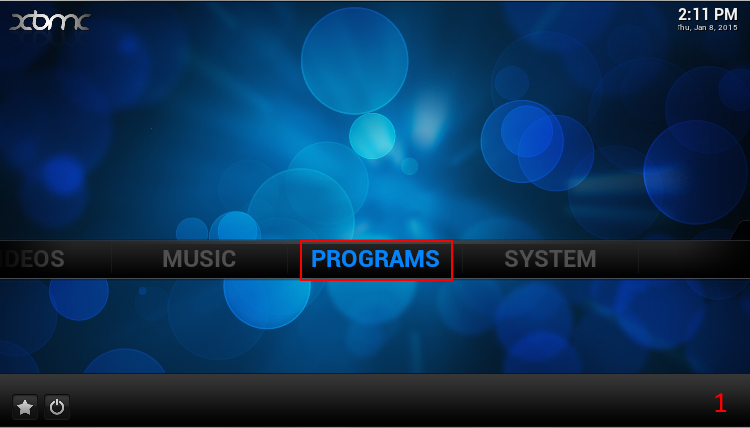
Go to Programs. Hit enter.
Go to "Get More". Hit Enter.
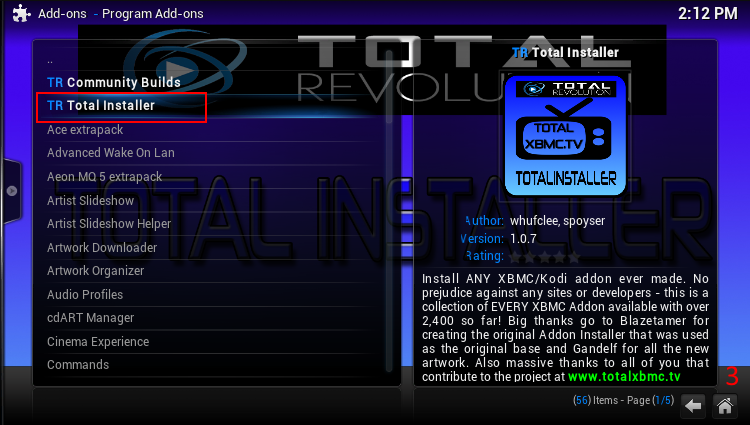
Select "TR Total Installer" Hit Enter.
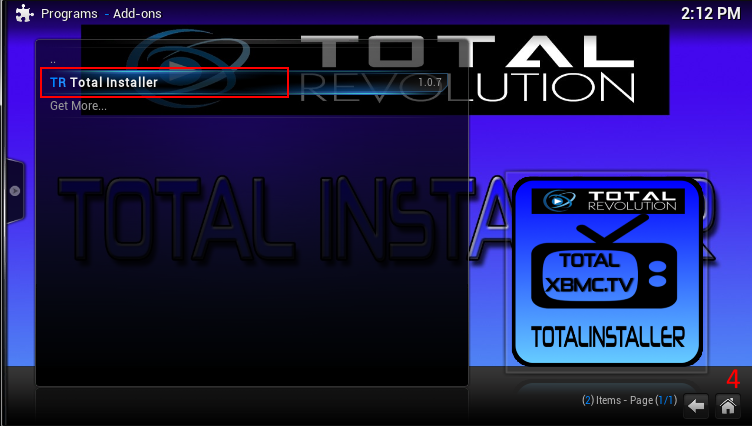
After a few seconds, the addon will become enabled, and now under programs, you will see "TR Total Installer" in the Programs addons list.
Install the USTVNow Addon
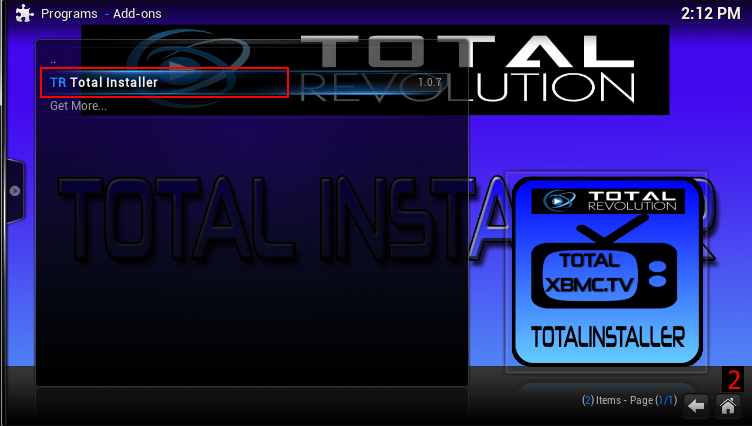
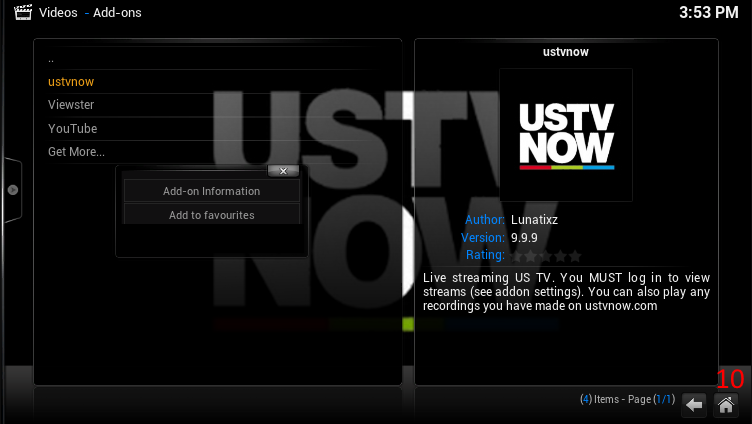

USTVNow is a service that streams TV channels over internet. They offer a paid service with 28 channels, and a free service that gives a handful of basic channels.
Go to ustvnow.com and sign up for a free account. Remember the email/password that you sign up with. This free account will give you the basic channels.
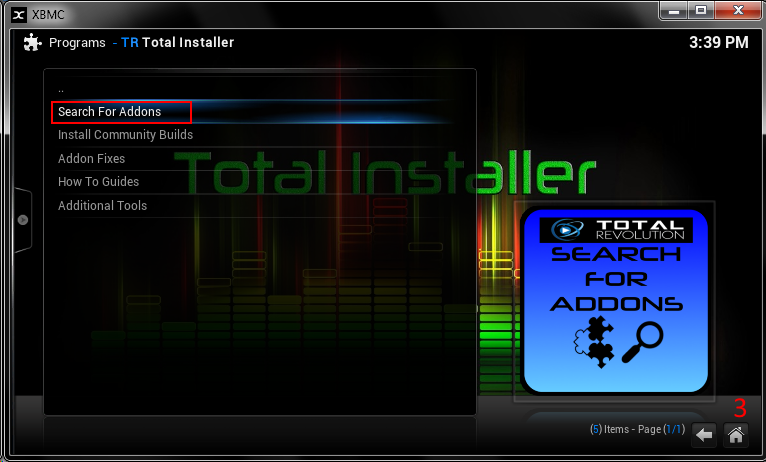
In XBMC, go to Programs, and then Total Installer.
Select "search for addons". Hit enter.
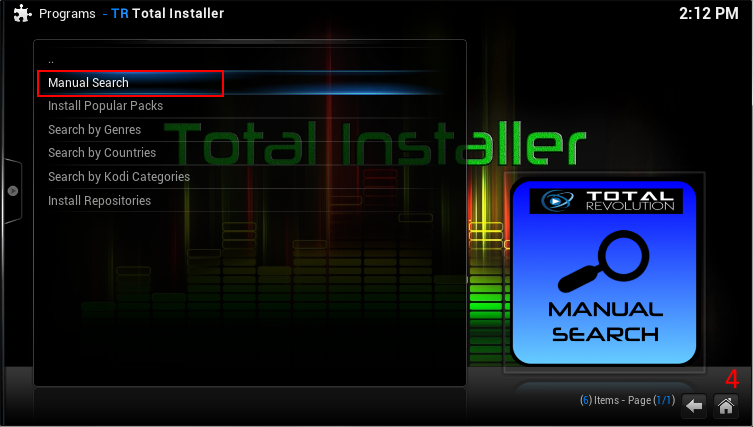
Select "Manual search". Hit enter.
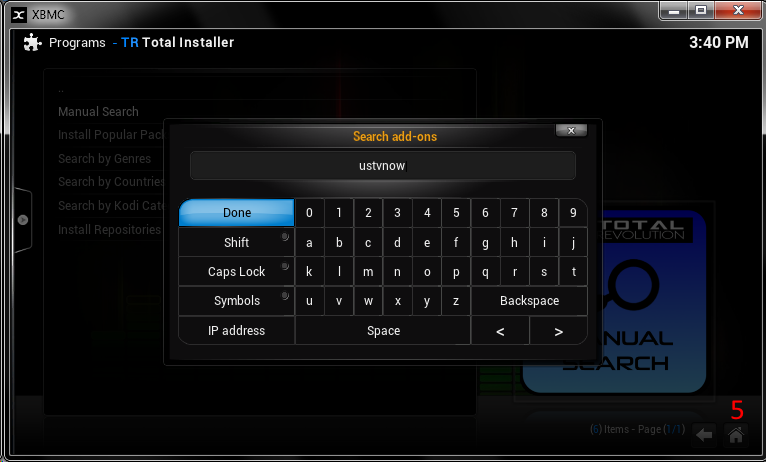
In the popup box, type "ustvnow". Hit enter.
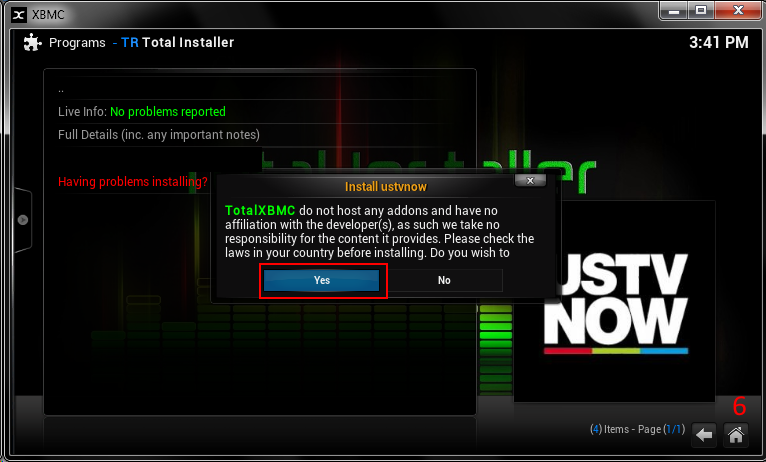
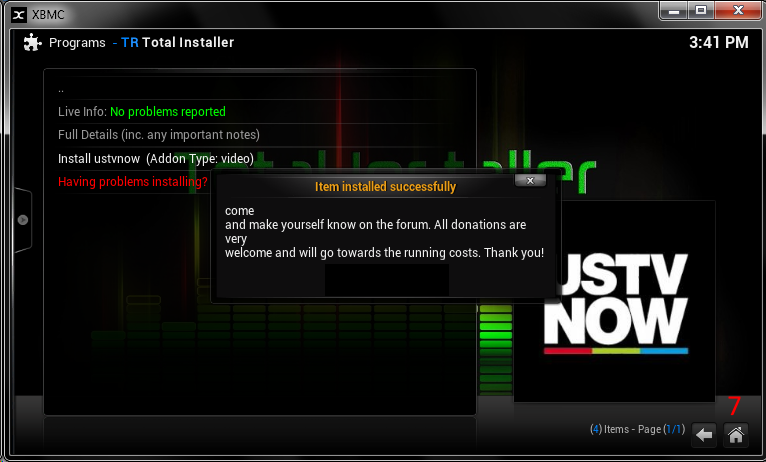
The list will populate with search matches. Select "ustvnow". Hit enter. Follow the on screen prompts to install the addon.
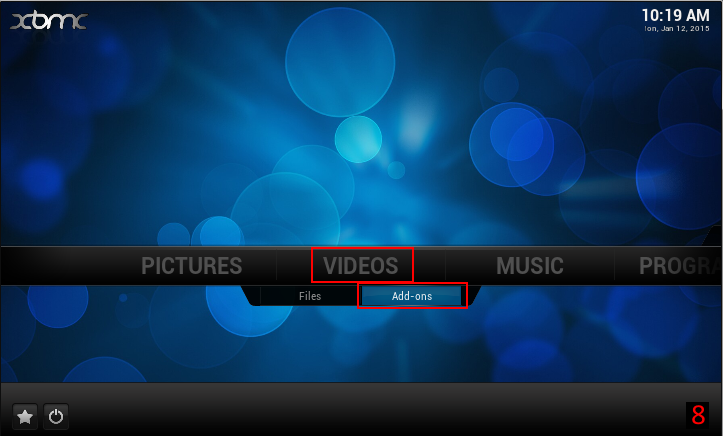
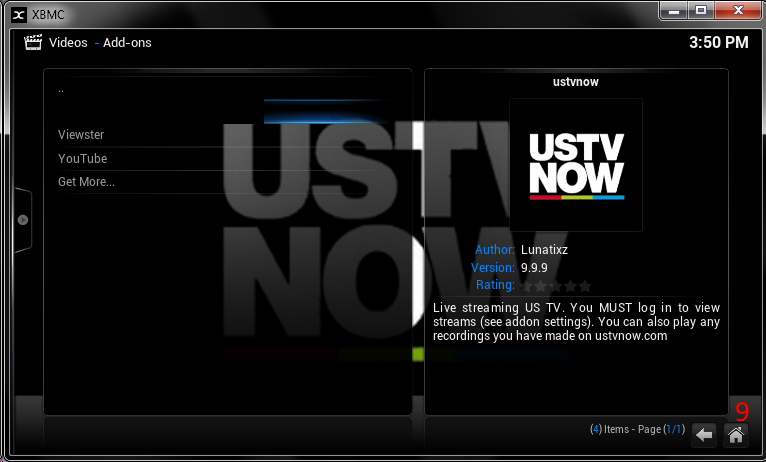
Now we need to configure ustvnow. Go to videos, and arrow down to addons.
Highlight "ustvnow" and push the "c" key, to bring up the context menu.
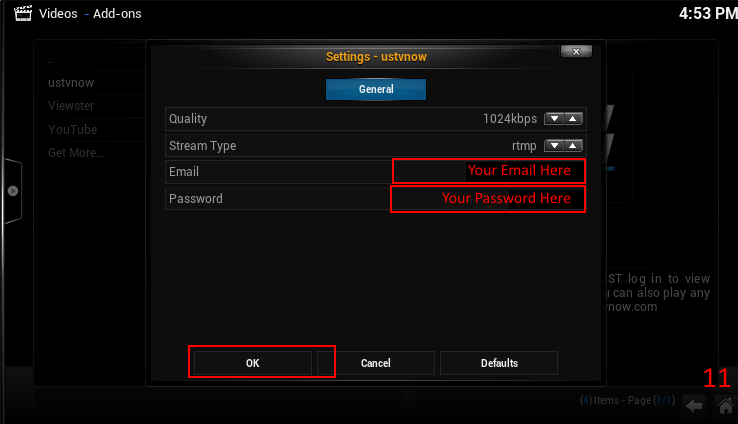
Select "addon settings"
In the box that pops up, enter the email and password that you used to sign up with at ustvnow.
Go to the bottom of the box, and select "Ok".
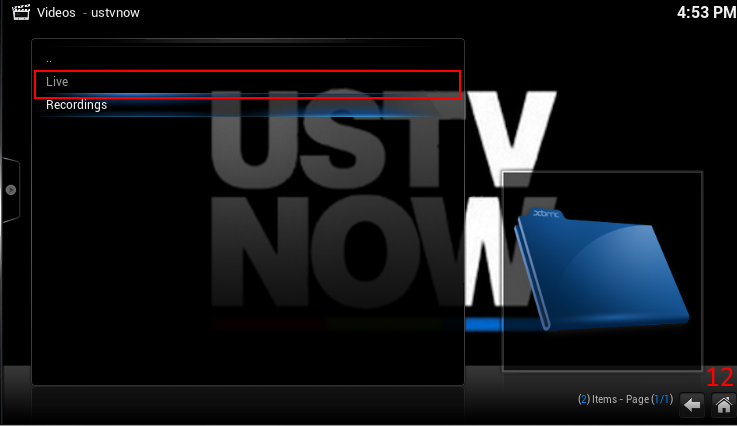
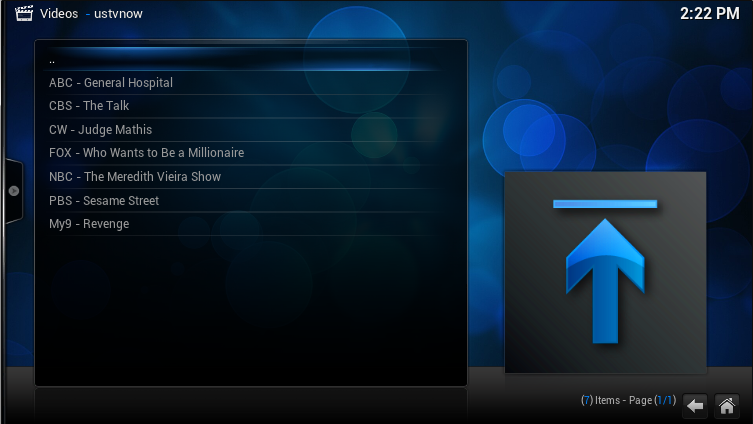
Now select ustvnow to open the addon. You should see a list that says "live" and "recordings". Select "live". You should see a list of channels.
Select any channel, and hit enter. The selected channel should start playing.
***Don't forget to add a shortcut for this addon to your homescreen!***
Install an Electronic Program Guide.

So now that you have a few live TV channels, you want to know what's on, right?
You have a few options for this for EPGs. PseudoTV Live has a good built-in EPG, along with many other VERY useful options, but a little complicated for new users. I'm personally a big fan of On-tapp TV, but it has a monthly fee for its use.
So, for this part of the instructable, we're going to install and configure FTV Guide as our EPG. It's fairly simple to use, and free.
Use Total Installer to search for and install the FTV Guide addon. (Don't forget to create a home screen shortcut!)
After FTV Guide is installed, launch it.
You'll see a list of channels. Many of them that we don't have streams for, so I like to disable them in the list. You can leave them, if you prefer(You can look for more addons to fill out these channels of you'd like).
I'm a neat freak. So I'm going to disable all of the channels except for the ones that we have from USTVNow.
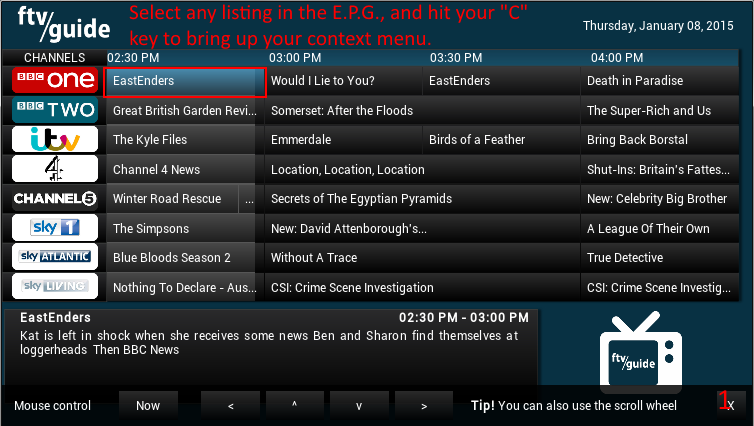
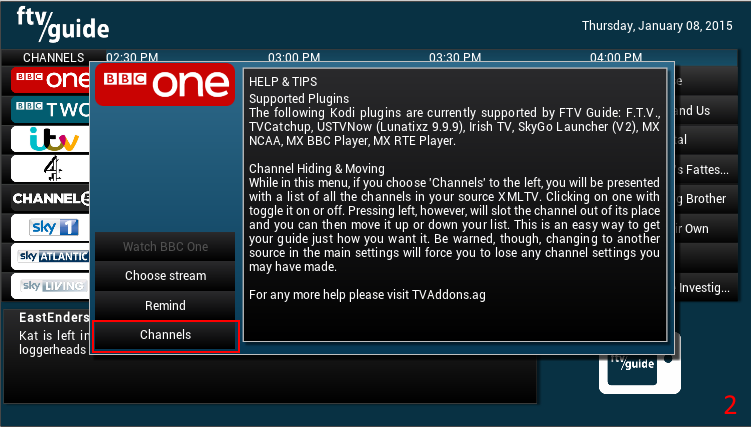
To do this, highlight any of the listings in the guide, and press your "C" key to bring up your context menu for this addon.
Go down to the button that says "Channels" and hit enter. This will bring up a list of enabled channels.
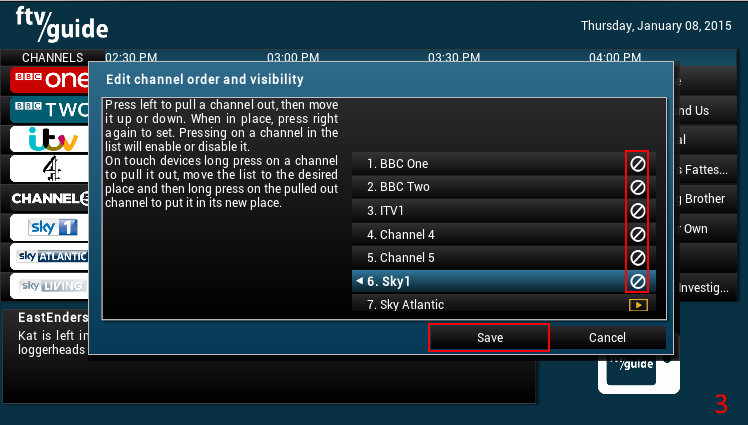
Select a channel in the list, and hit enter. This will put a white strike out symbol by it. Repeat this process until you have strike out symbols by all of the channels that you want to disable. ***When you are done, DON'T FORGET TO SAVE!!***
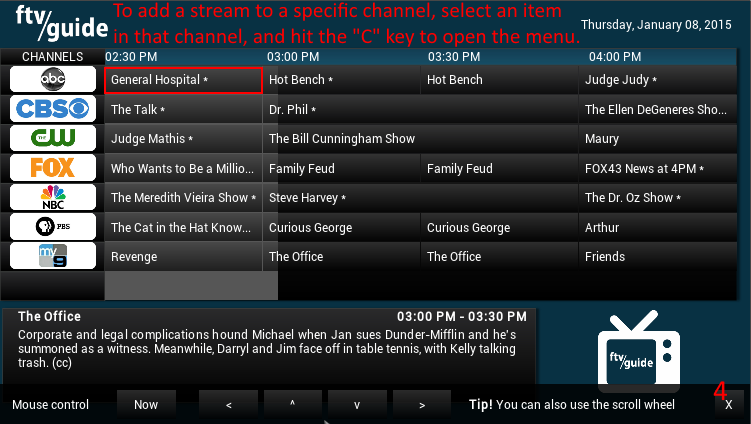
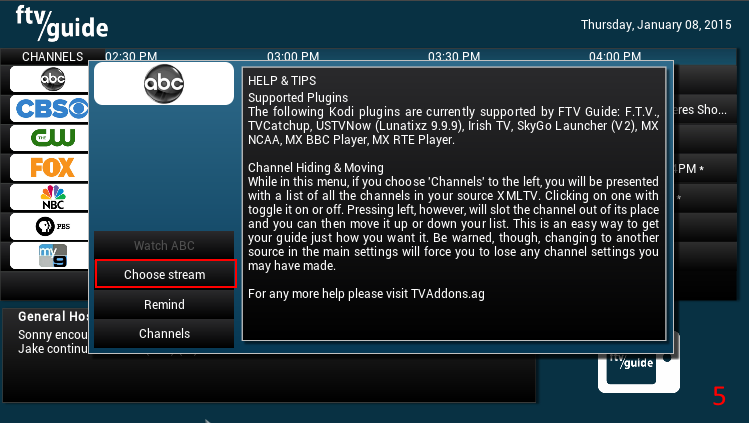
When you have your list of channels ready, select listing info from a channel that you want to add a stream to, and hit your "C" key to bring up your context menu.
Select "Choose Stream"
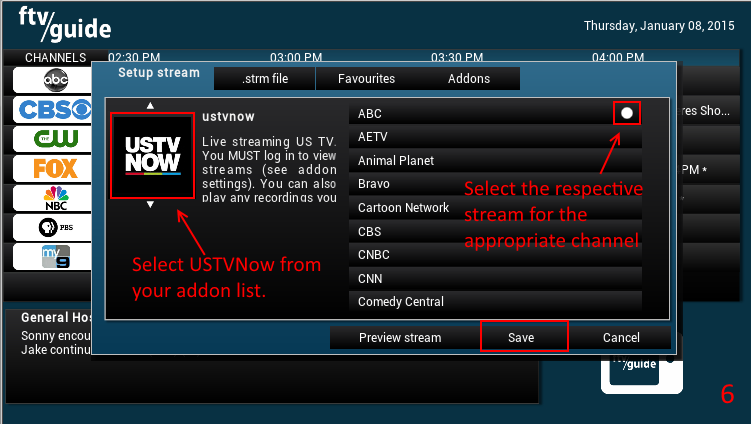
A window will popup, select the addon with the stream that you want to set for that channel, in this case, it would be USTVNow.
Select the respective stream, for the selected channel. Make sure that the stream has a white dot to the right of it.
Select "Save" to finish setting the stream.
Repeat the process to set streams for the rest of your channels.
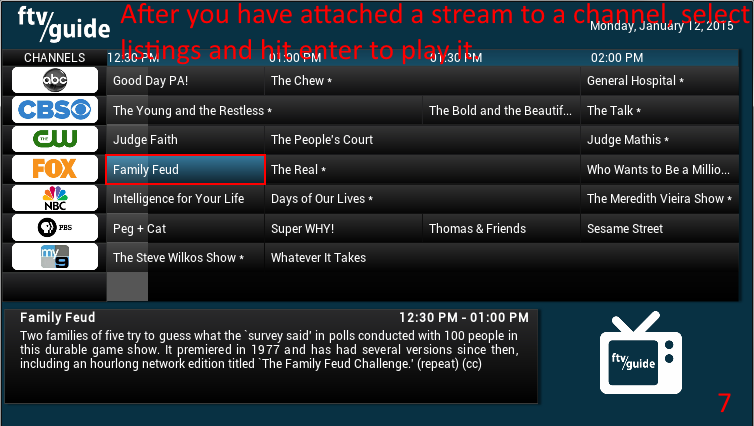
Now, when you select a listing from the EPG, it will launch that channel. You just made your own cable box. Neat, huh?
Configure Your Smartphone/tablet As a Remote!
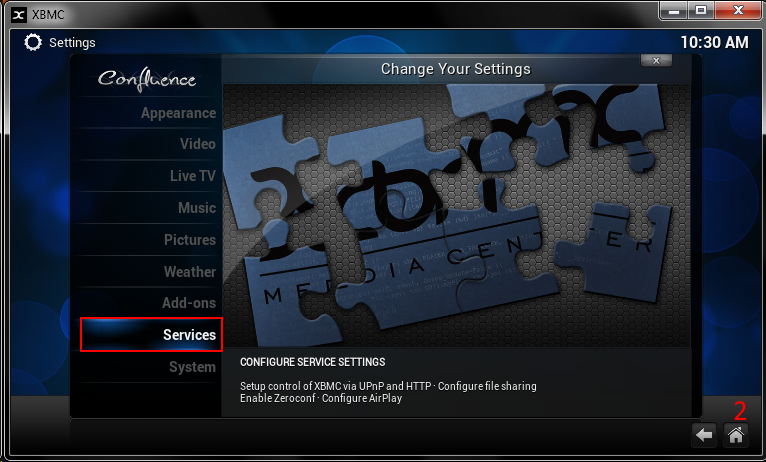
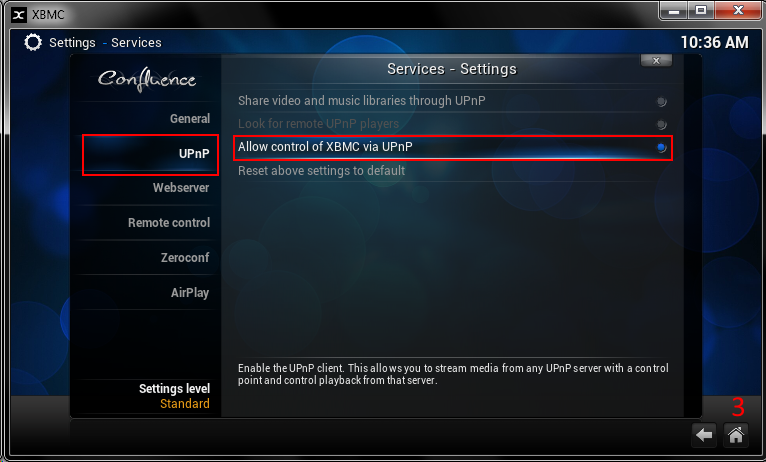
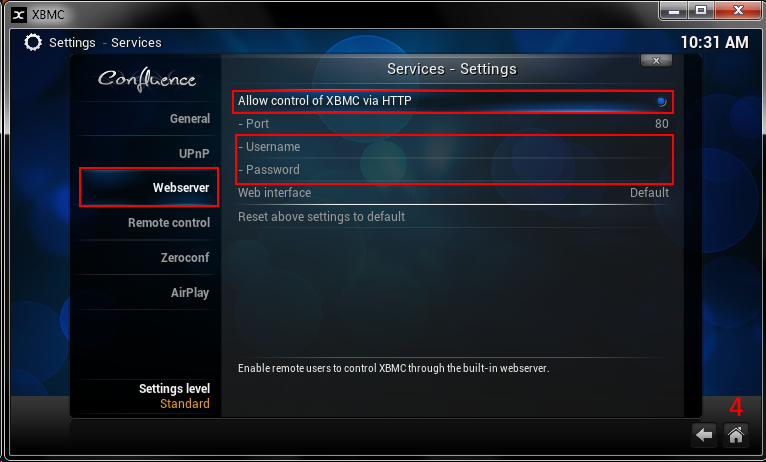
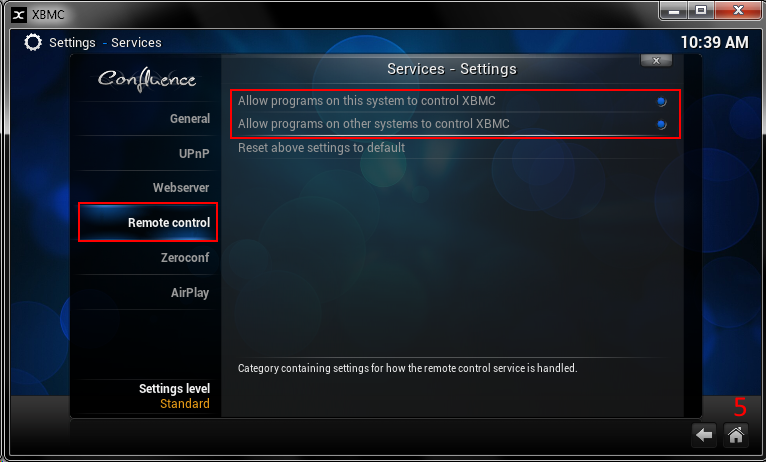
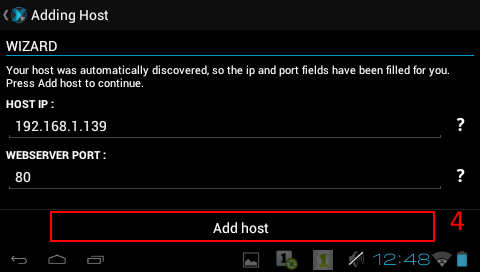
We're going to add an IP remote app to control your XBMC device. It't handy to have a compact device with so many features for controlling your system. In this part of the guide, I'm going to cover adding Yatse XBMC remote to your system. I prefer Yatse for it's abundance of features and simplicity of use.
There are plenty of other great remotes that you can use, as well. I like Sybu for iOS. XBMC Touch is also a fantastic remote control app. Use what works for you!
To use an remote control app, we will need to enable remote control in XBMC;
Go to "System". Hit enter.
Go to "Services" Hit enter.
Under the following categories, make sure the following are checked;
UPnP - "Allow Control of XBMC via UPnP"
Webserver - "Allow control of XBMC via HTTP", here you can also change your port number if you choose. You can also set a username/password (which I recommend).
Remote Control - "Allow programs on this system to control XBMC" and "Allow programs on other systems to control XBMC"
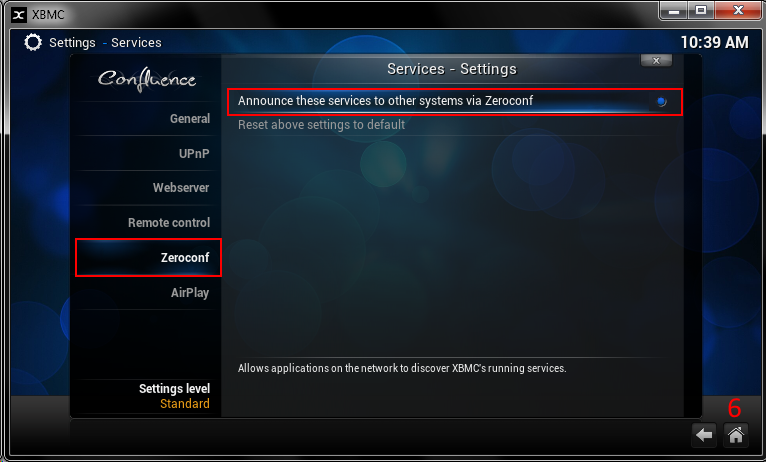
Zeroconf - "Announce these services to other systems via Zeroconf"
***Now, we need to configure the Yatse app on your phone/tablet.***
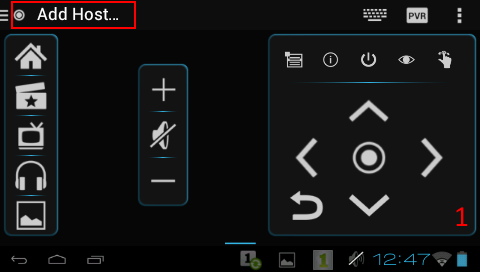
Open the app, and tap "Add Host" in the upper left.
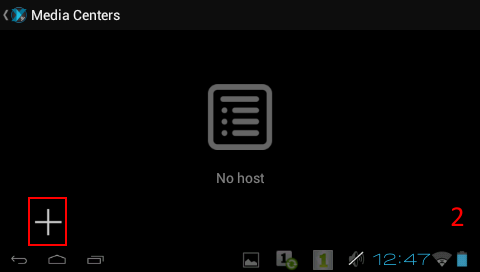
Tap the "+" sign in the lower left.
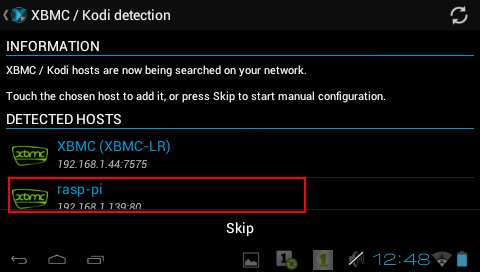
The app will auto detect the XBMC host machines on your network. Tap the XBMC device you want to add. In this case, I want to add "Rasp-Pi".
Tap "Add Host"
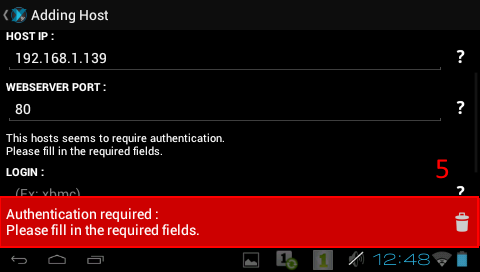
If you set a password, authentication will fail, this step is normal. Tap the red bar that says "Authentication required" to continue.
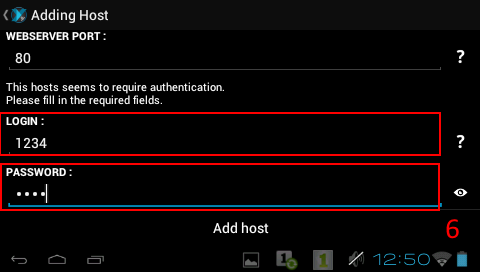
Enter your login and password that you set in XBMC.
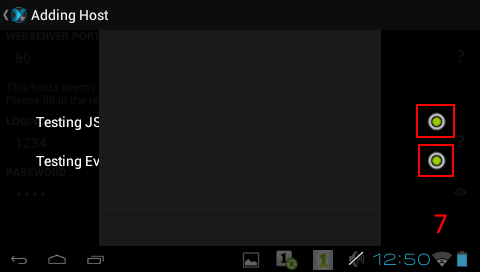
The remote app will run some authentication tests, when both orbs turn green, it will advance to the next screen.
Tap Finish.
You will now see your machine in the list of controllable hosts. Back out of the wizard.
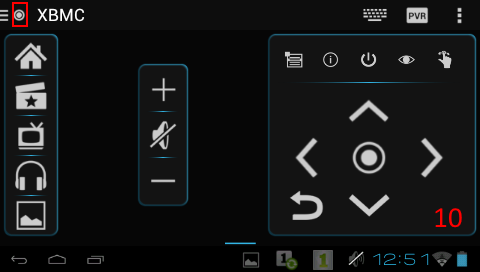
You can now control your XBMC machine with this remote.
Items of note: Keep an eye on the small orb by your machine's name in the upper left corner. If it's white, you should be good. If it's red, you may need to kill and restart the remote app(this happens occasionally). If that does not work to resolve connection issues, you may need to reboot your XBMC machine(This happens less frequently).
You've Only Just Begun...
Congratulations! You just built your first media streamer, you're well on your way to becoming one of the enlightened. Enjoy the fruits of your labor, and (politely) tell your cable company to get bent!
Enjoy your savings!
However, you've just seen the tip of the iceberg with what you can do with XBMC/Kodi. Play around with it!
From here, I recommend(google these):
-Try out different skins (I prefer Confluence Customizable Mod).
-Setting up a media library on your LAN (for those pesky times when you have an internet outage!)
-Emulating the "Channel Surfing Experience" with Pseudo Tv Live
-Installing a Karaoke addon to entertain guests at parties!
-Enable "Airplay" support, to emulate a "Chromecast" style feature!
-Add a mail checker
-Customize the RSS feed on your home screen
-Exploring more addons; there are so many to choose from!!