Customize a ChatGPT Assistant Using a RaspberryPi 4b, OpenAI, Azure Speech Services, the Azure Voice You Like and Your Description of Its Personality
by pdp12 in Circuits > Raspberry Pi
23117 Views, 71 Favorites, 0 Comments
Customize a ChatGPT Assistant Using a RaspberryPi 4b, OpenAI, Azure Speech Services, the Azure Voice You Like and Your Description of Its Personality
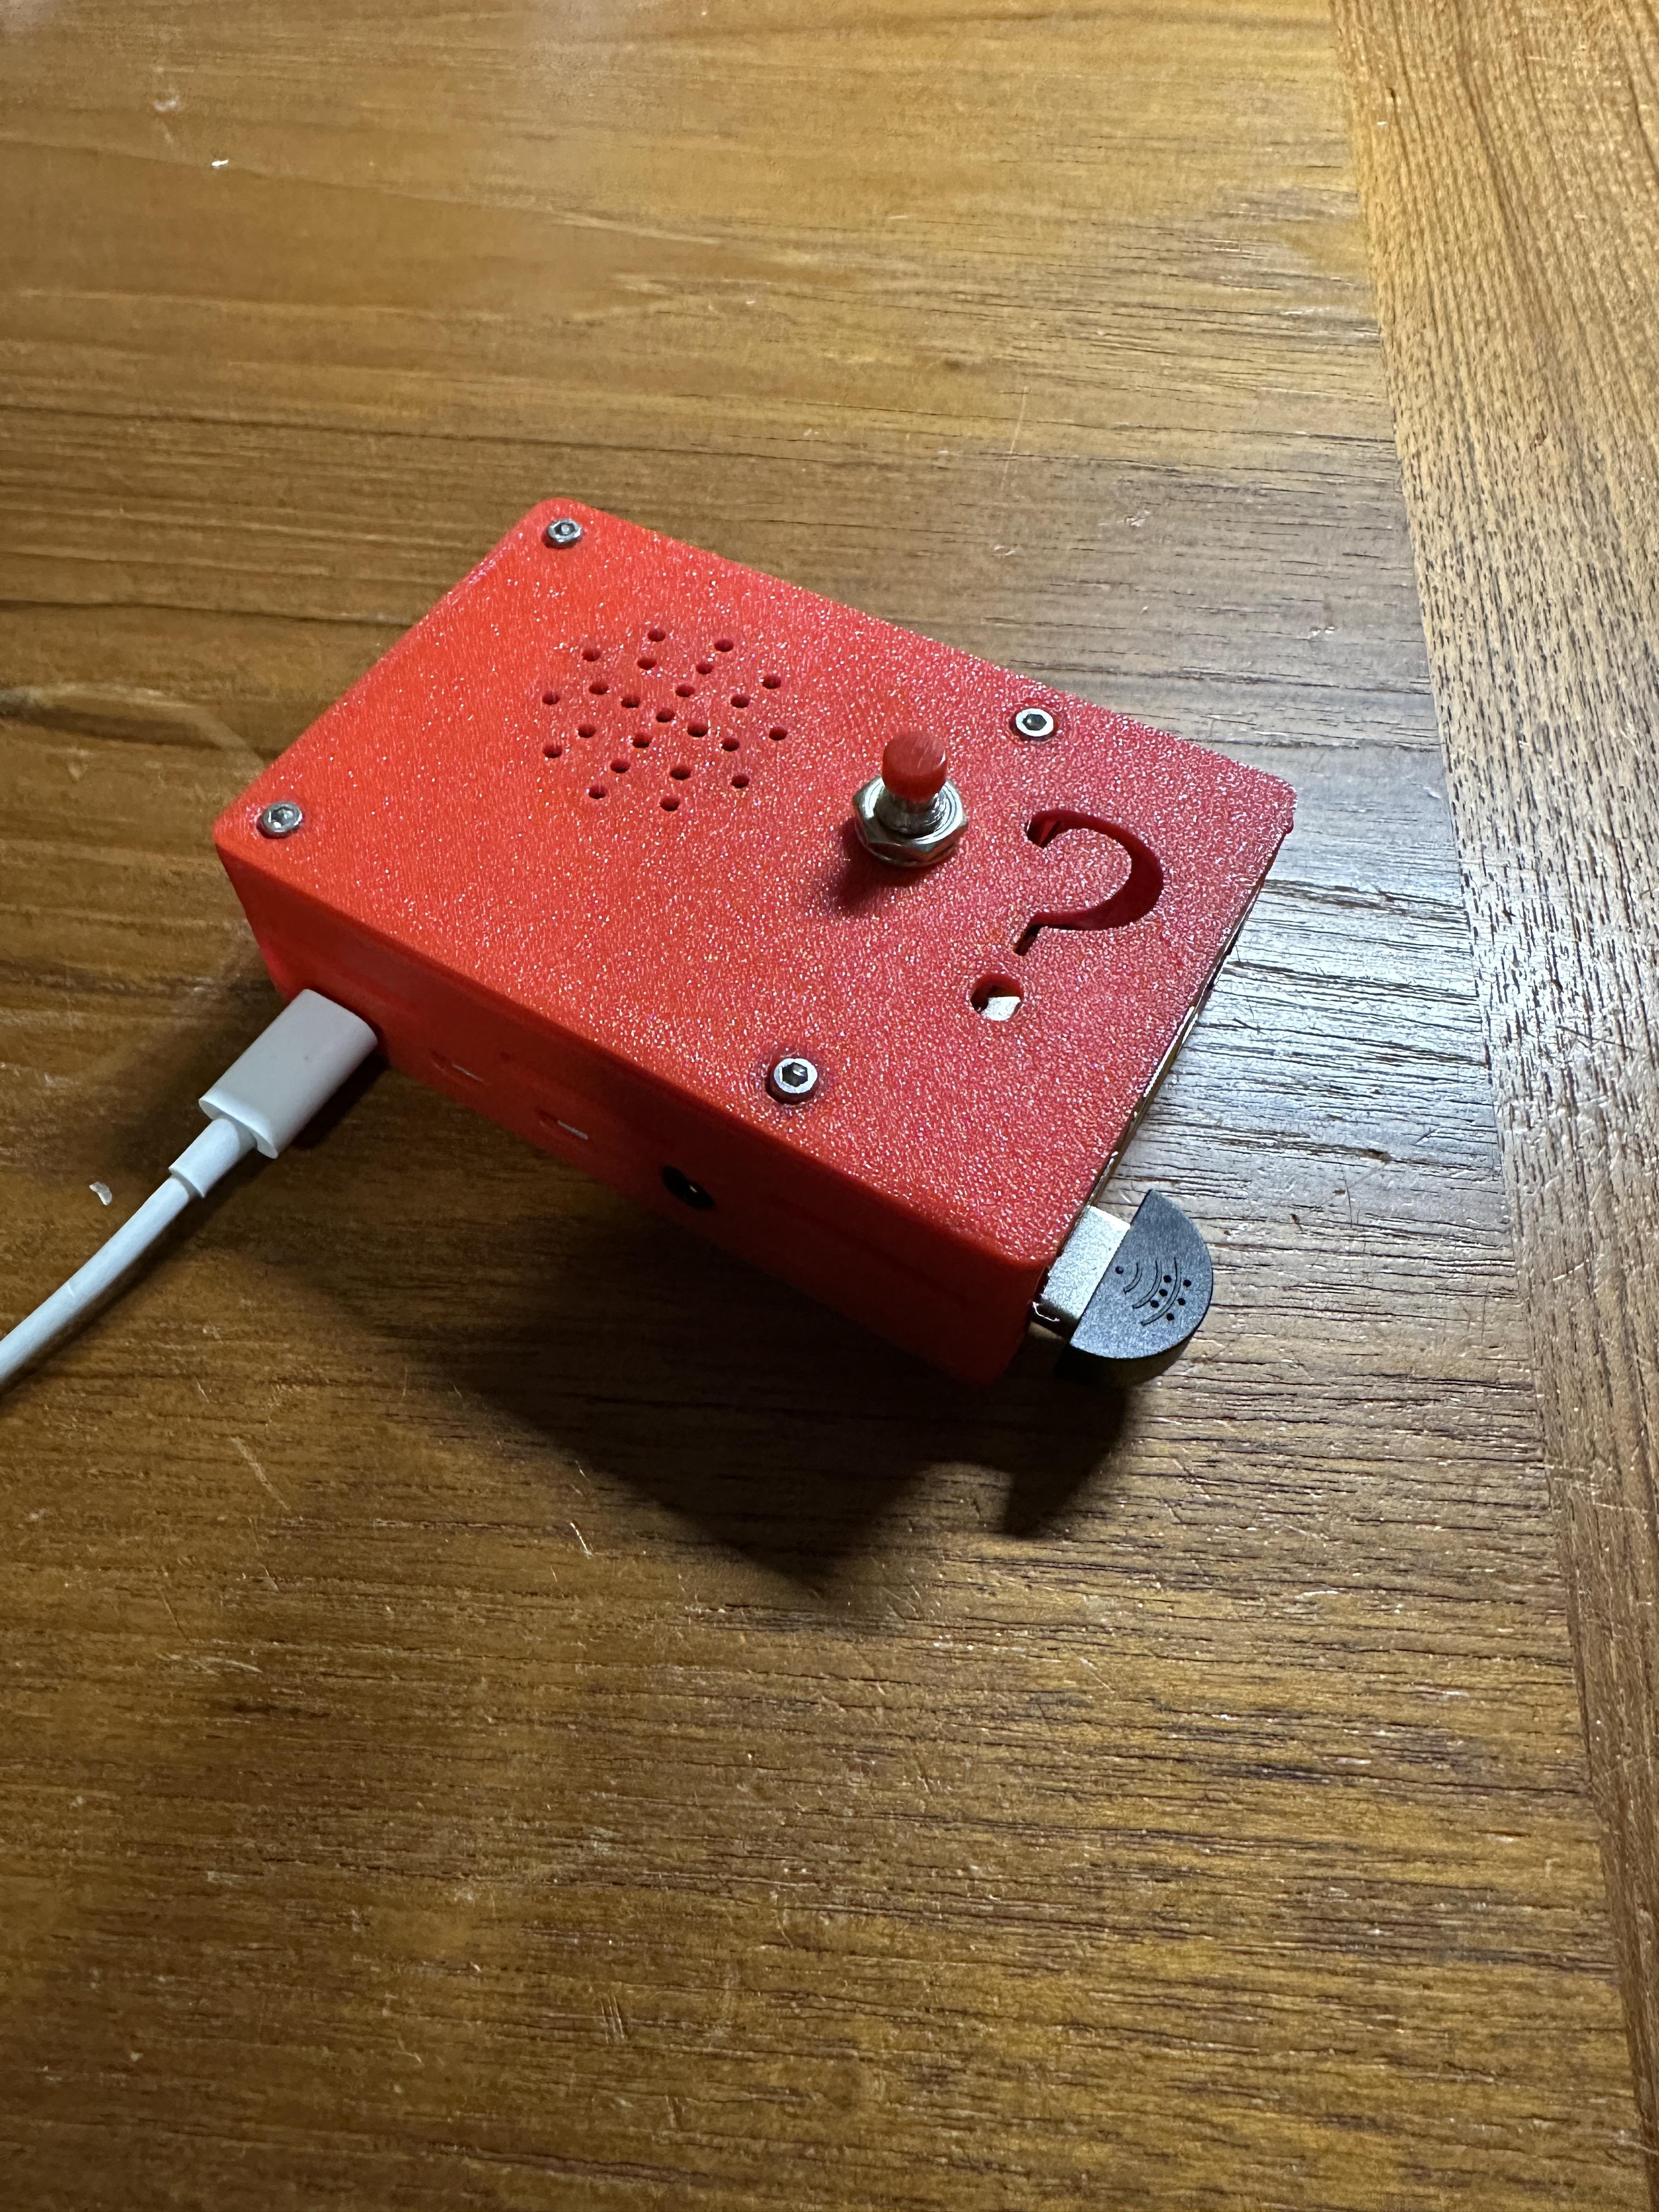
The Raspberry Pi 4 is a terrific little computer and it has enormous potential for use in all kinds of projects. One project that I was working on involved using it to be an interface for ChatGPT using voice input and audio output.
I followed the "Robotic AI Bear Using ChatGPT" project (https://learn.adafruit.com/robotic-ai-bear-using-chatgpt) laid out by Melissa LeBlanc-Williams on the Adafruit site but I didn't want to use a Gund Bear to house the RPi. I felt that it would be even more useful as a separate stand-alone device.
You can see a video of the final build in operation on YouTube here.
Supplies
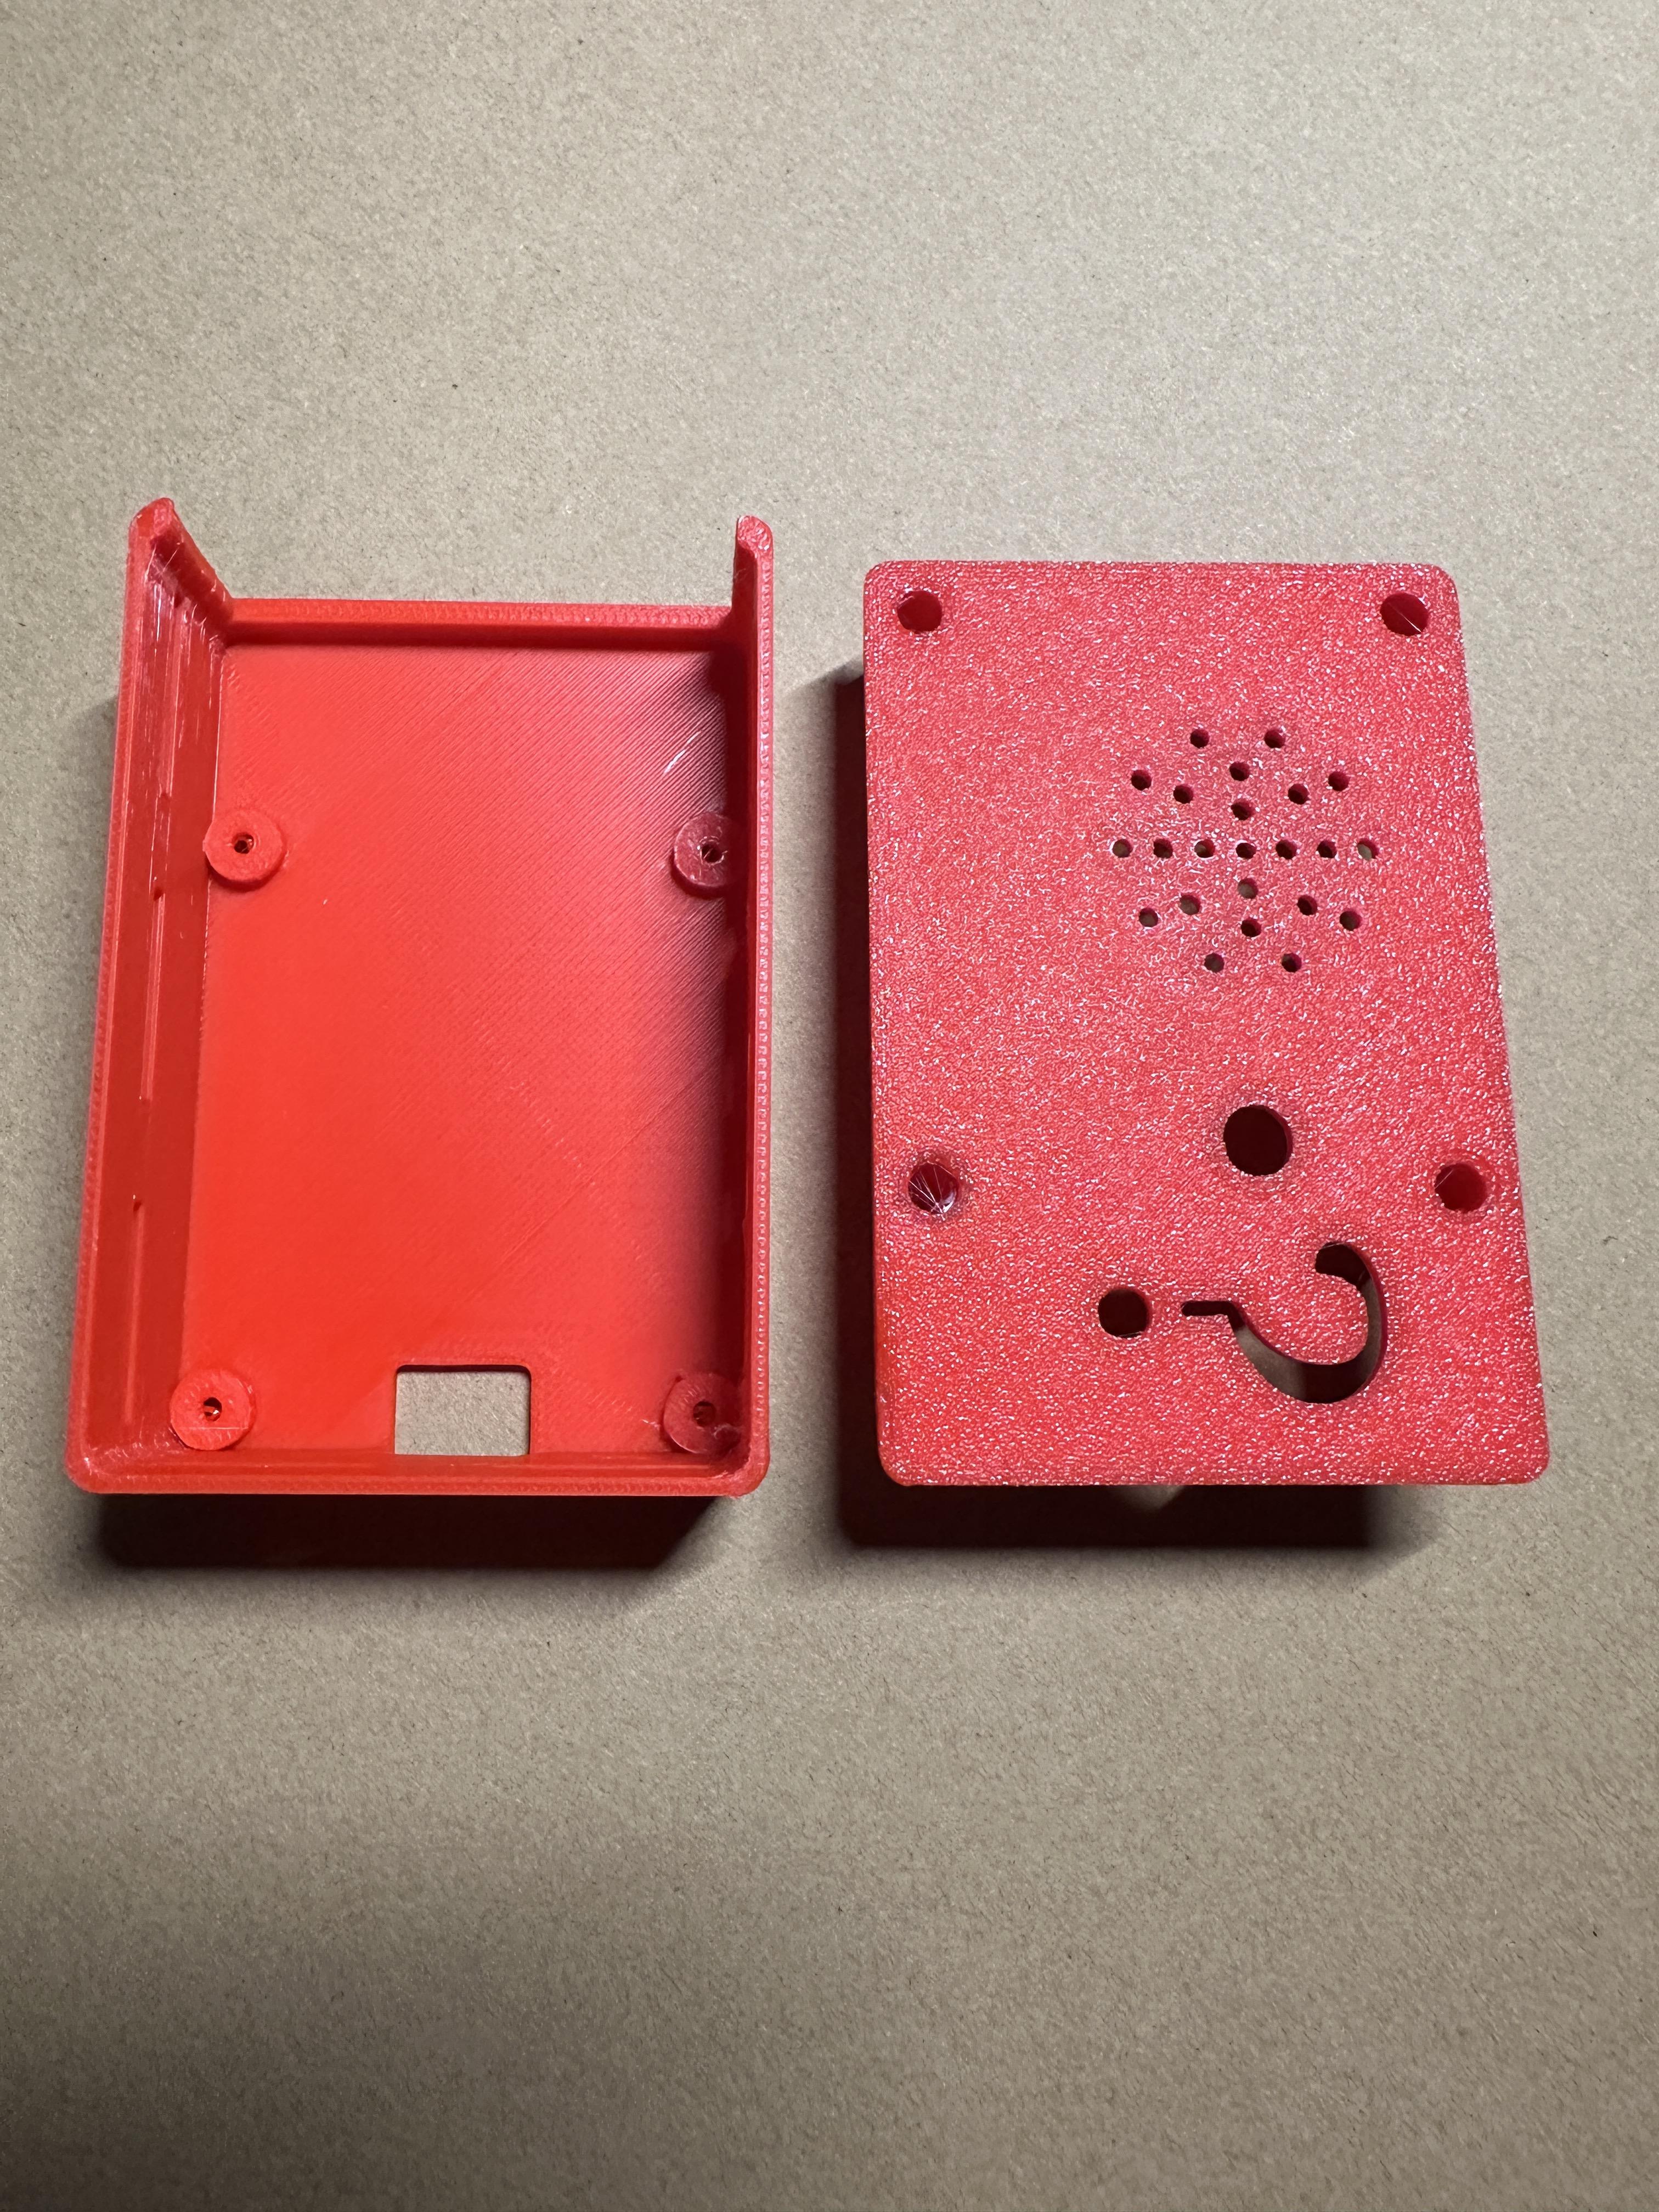
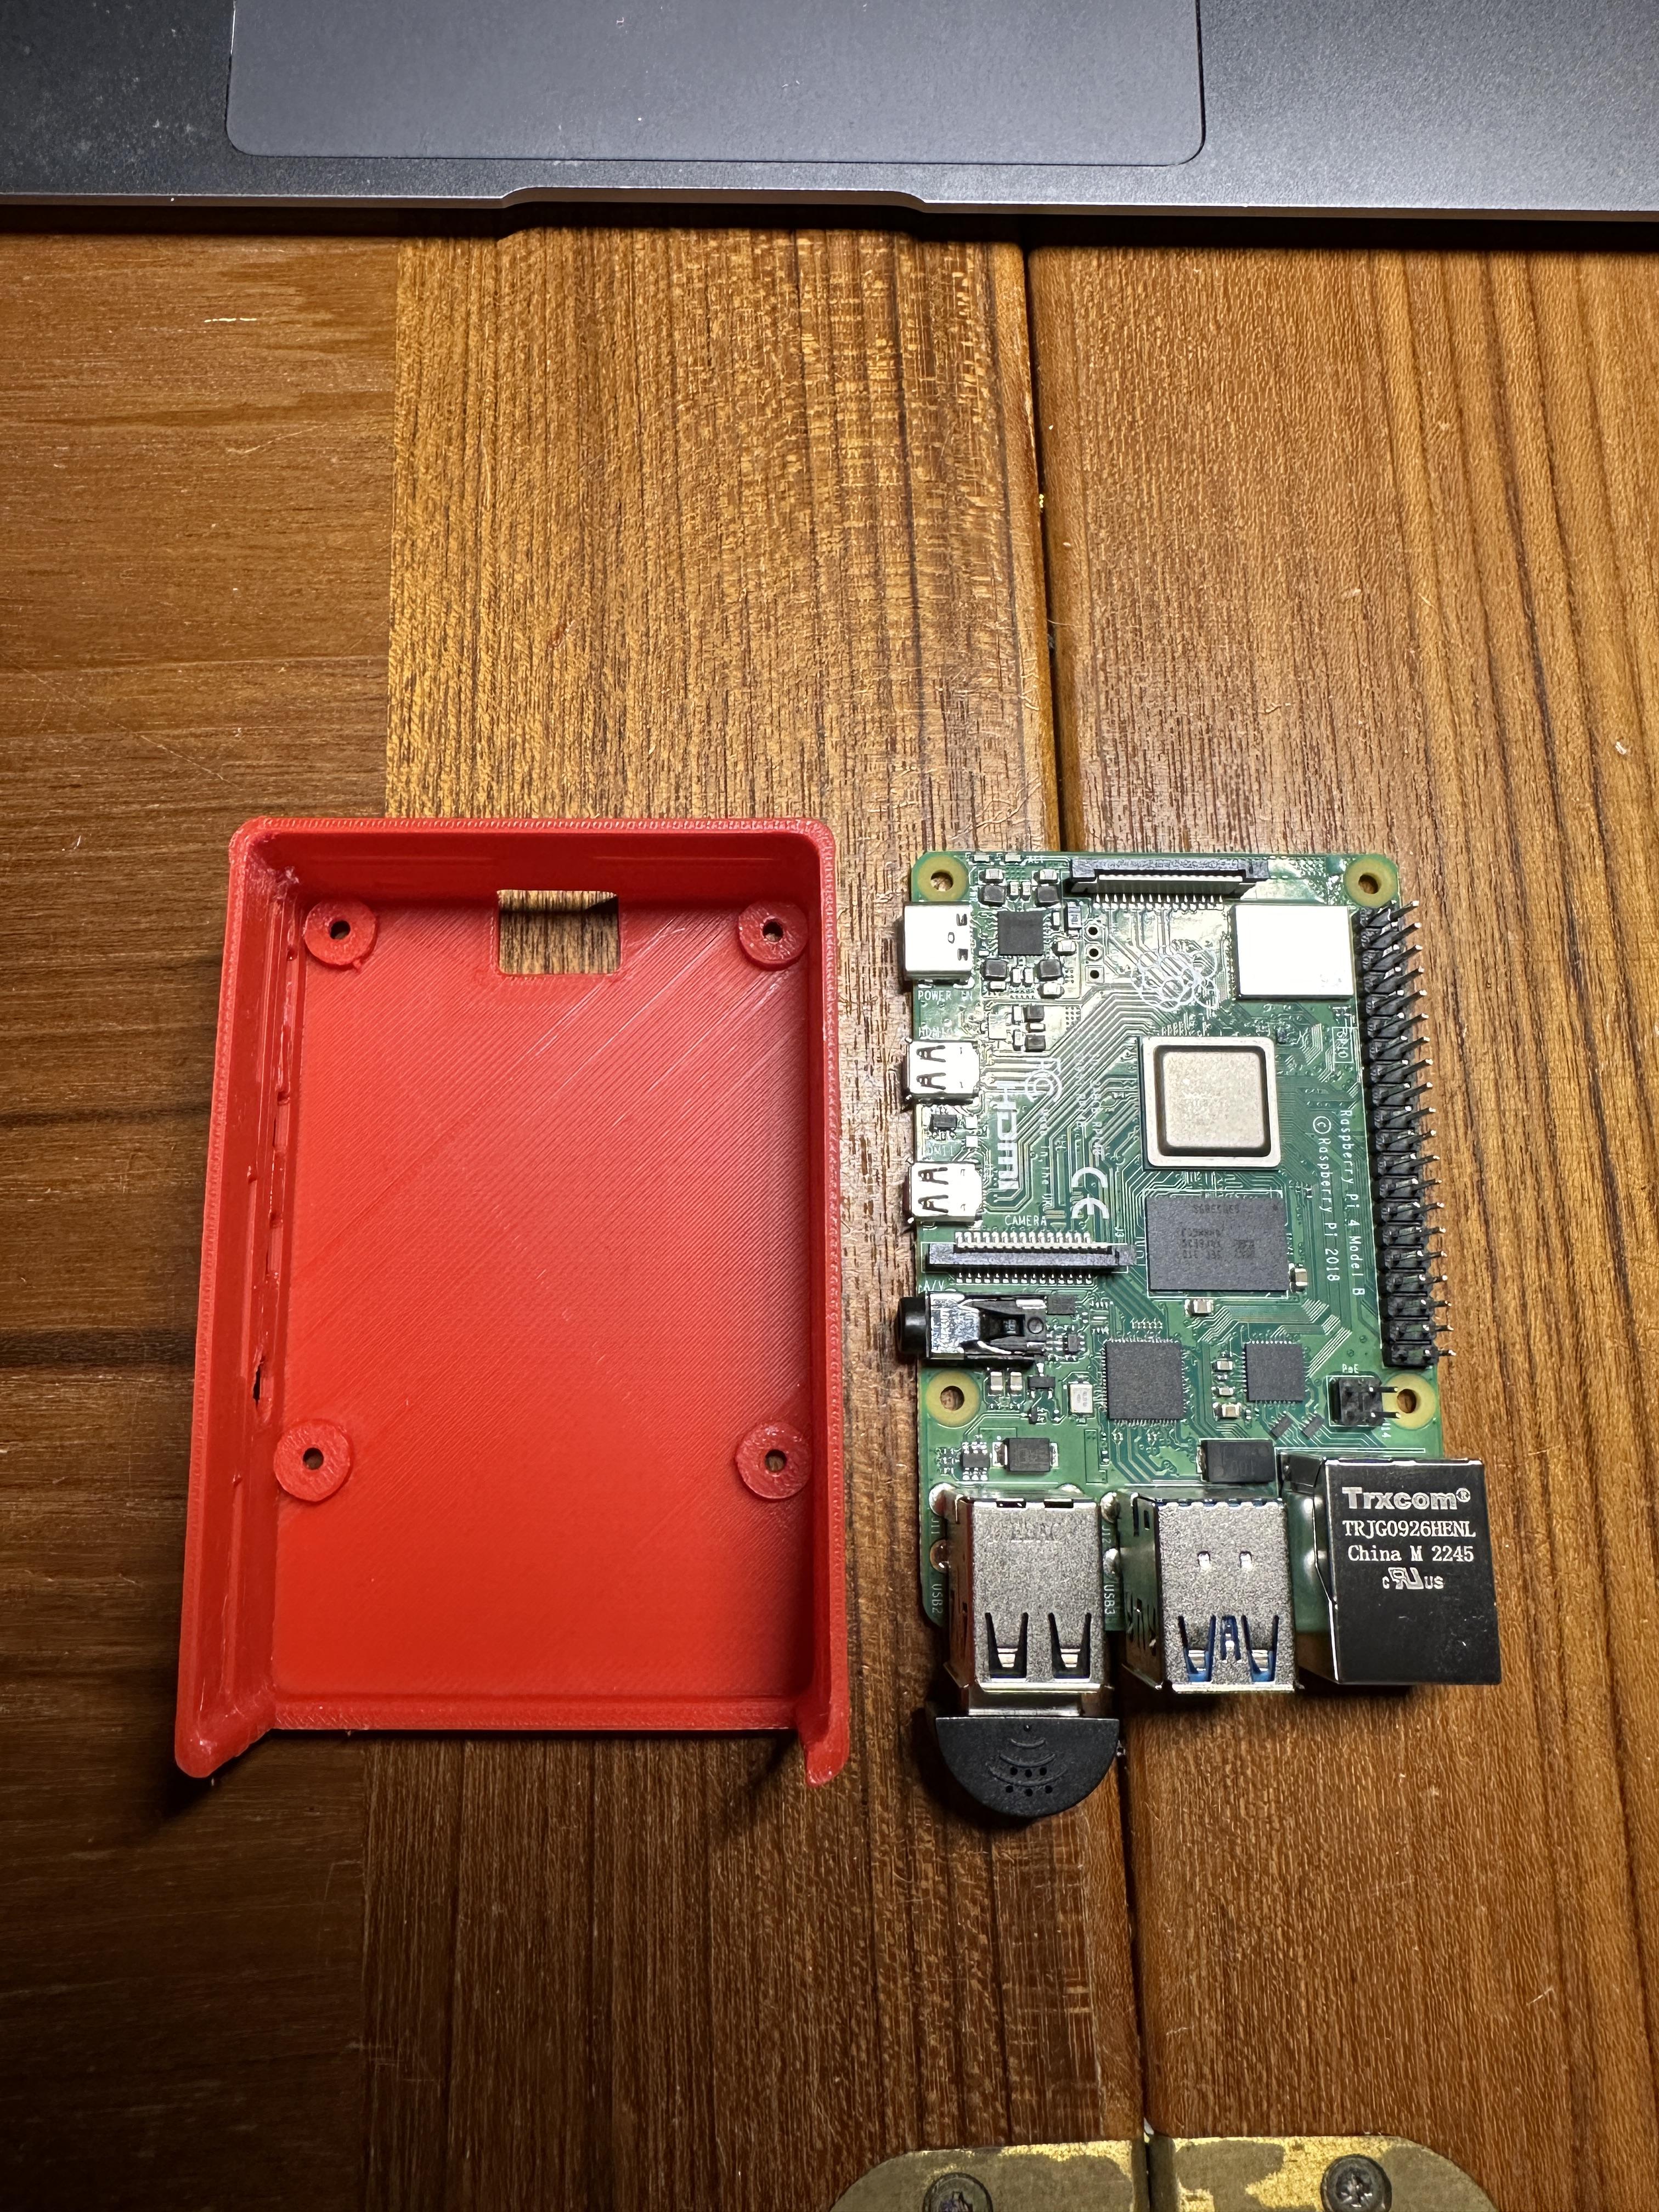

Parts List:
- 3D printed parts:
- 1 Top
- 1 Bottom
- 2 Speaker Retainers
- Raspberry Pi 4 (any memory) - $59.99 on AliExpress
- Micro SD Card - 8GB or more
- Mini speaker - $1.95 on Adafruit
- 3W I2S Audio Amp - $5.95 on Adafruit (MAX98357A)
- 100K Ohm resistor
- Piece of double-sided tape or hot glue to hold amp to case
- Mini USB Microphone - $5.95 on Adafruit
- 7 Dupont wires, one end female, other end doesn't matter, it will be cut off
- 4 screws (M2.5 28mm, I use 20mm + a spacer)
- 4 nuts (M2.5)
- 2 small screws for the speaker retainers
- Python program
Connect the Parts
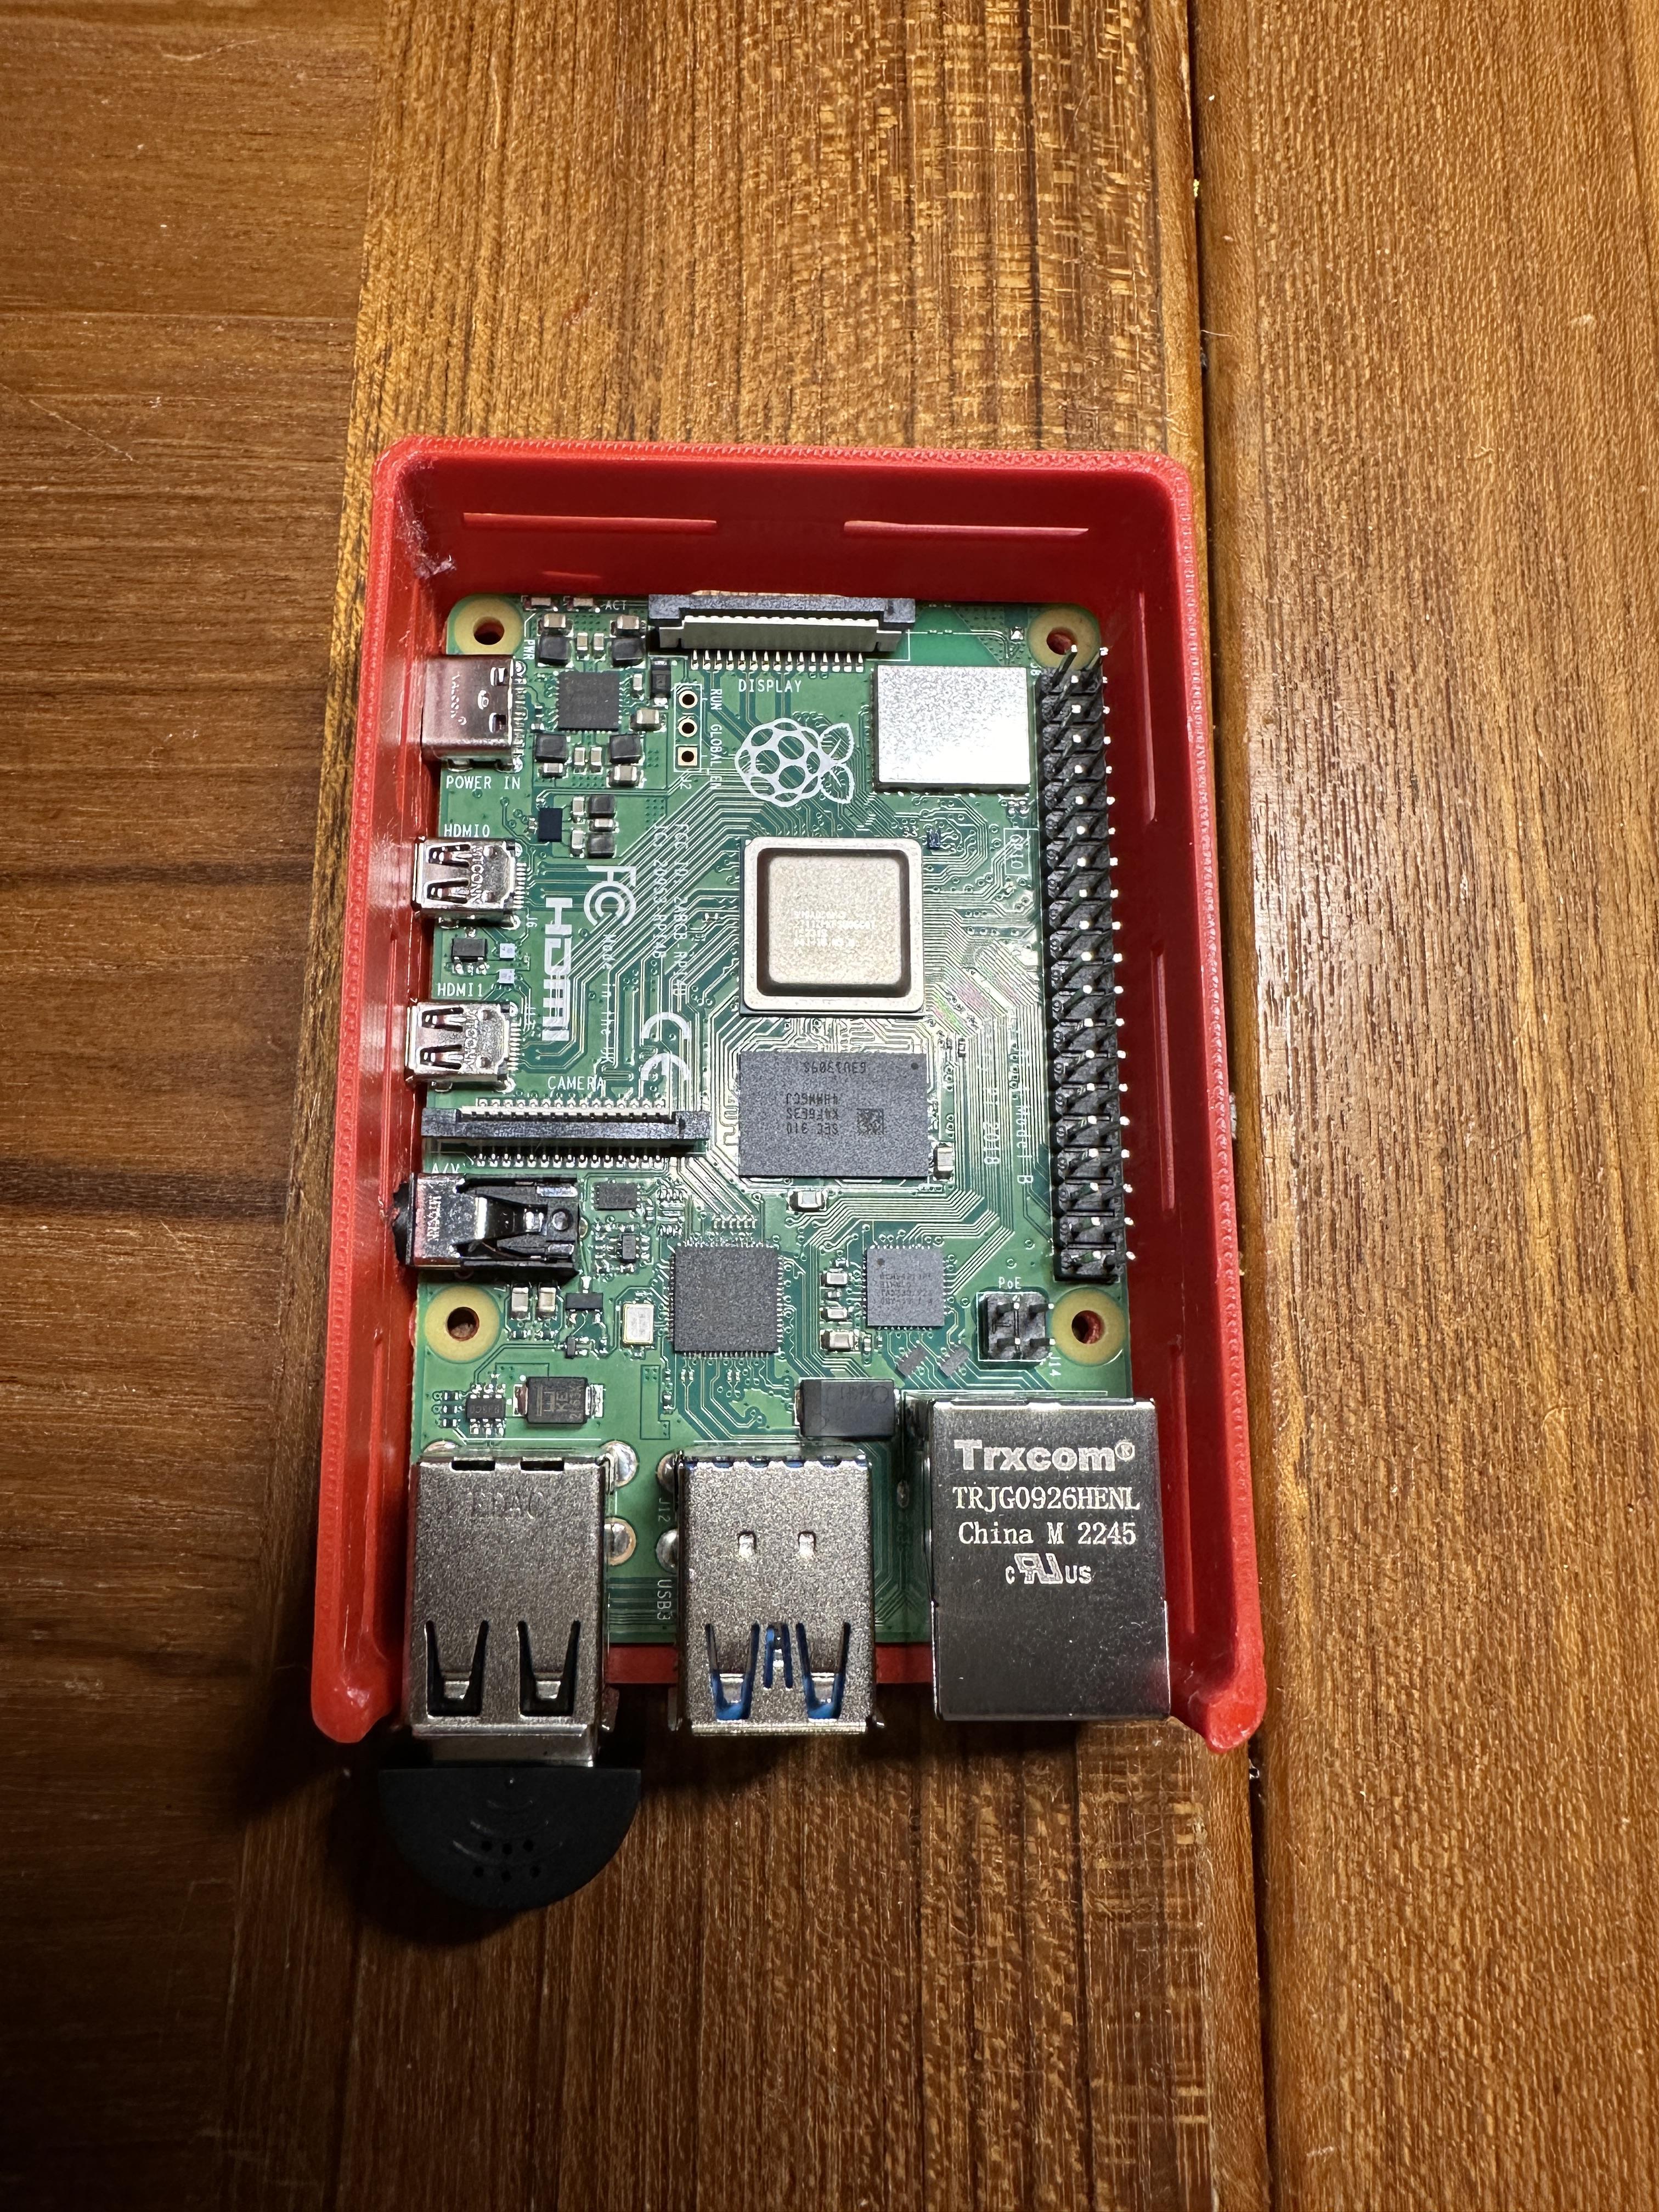
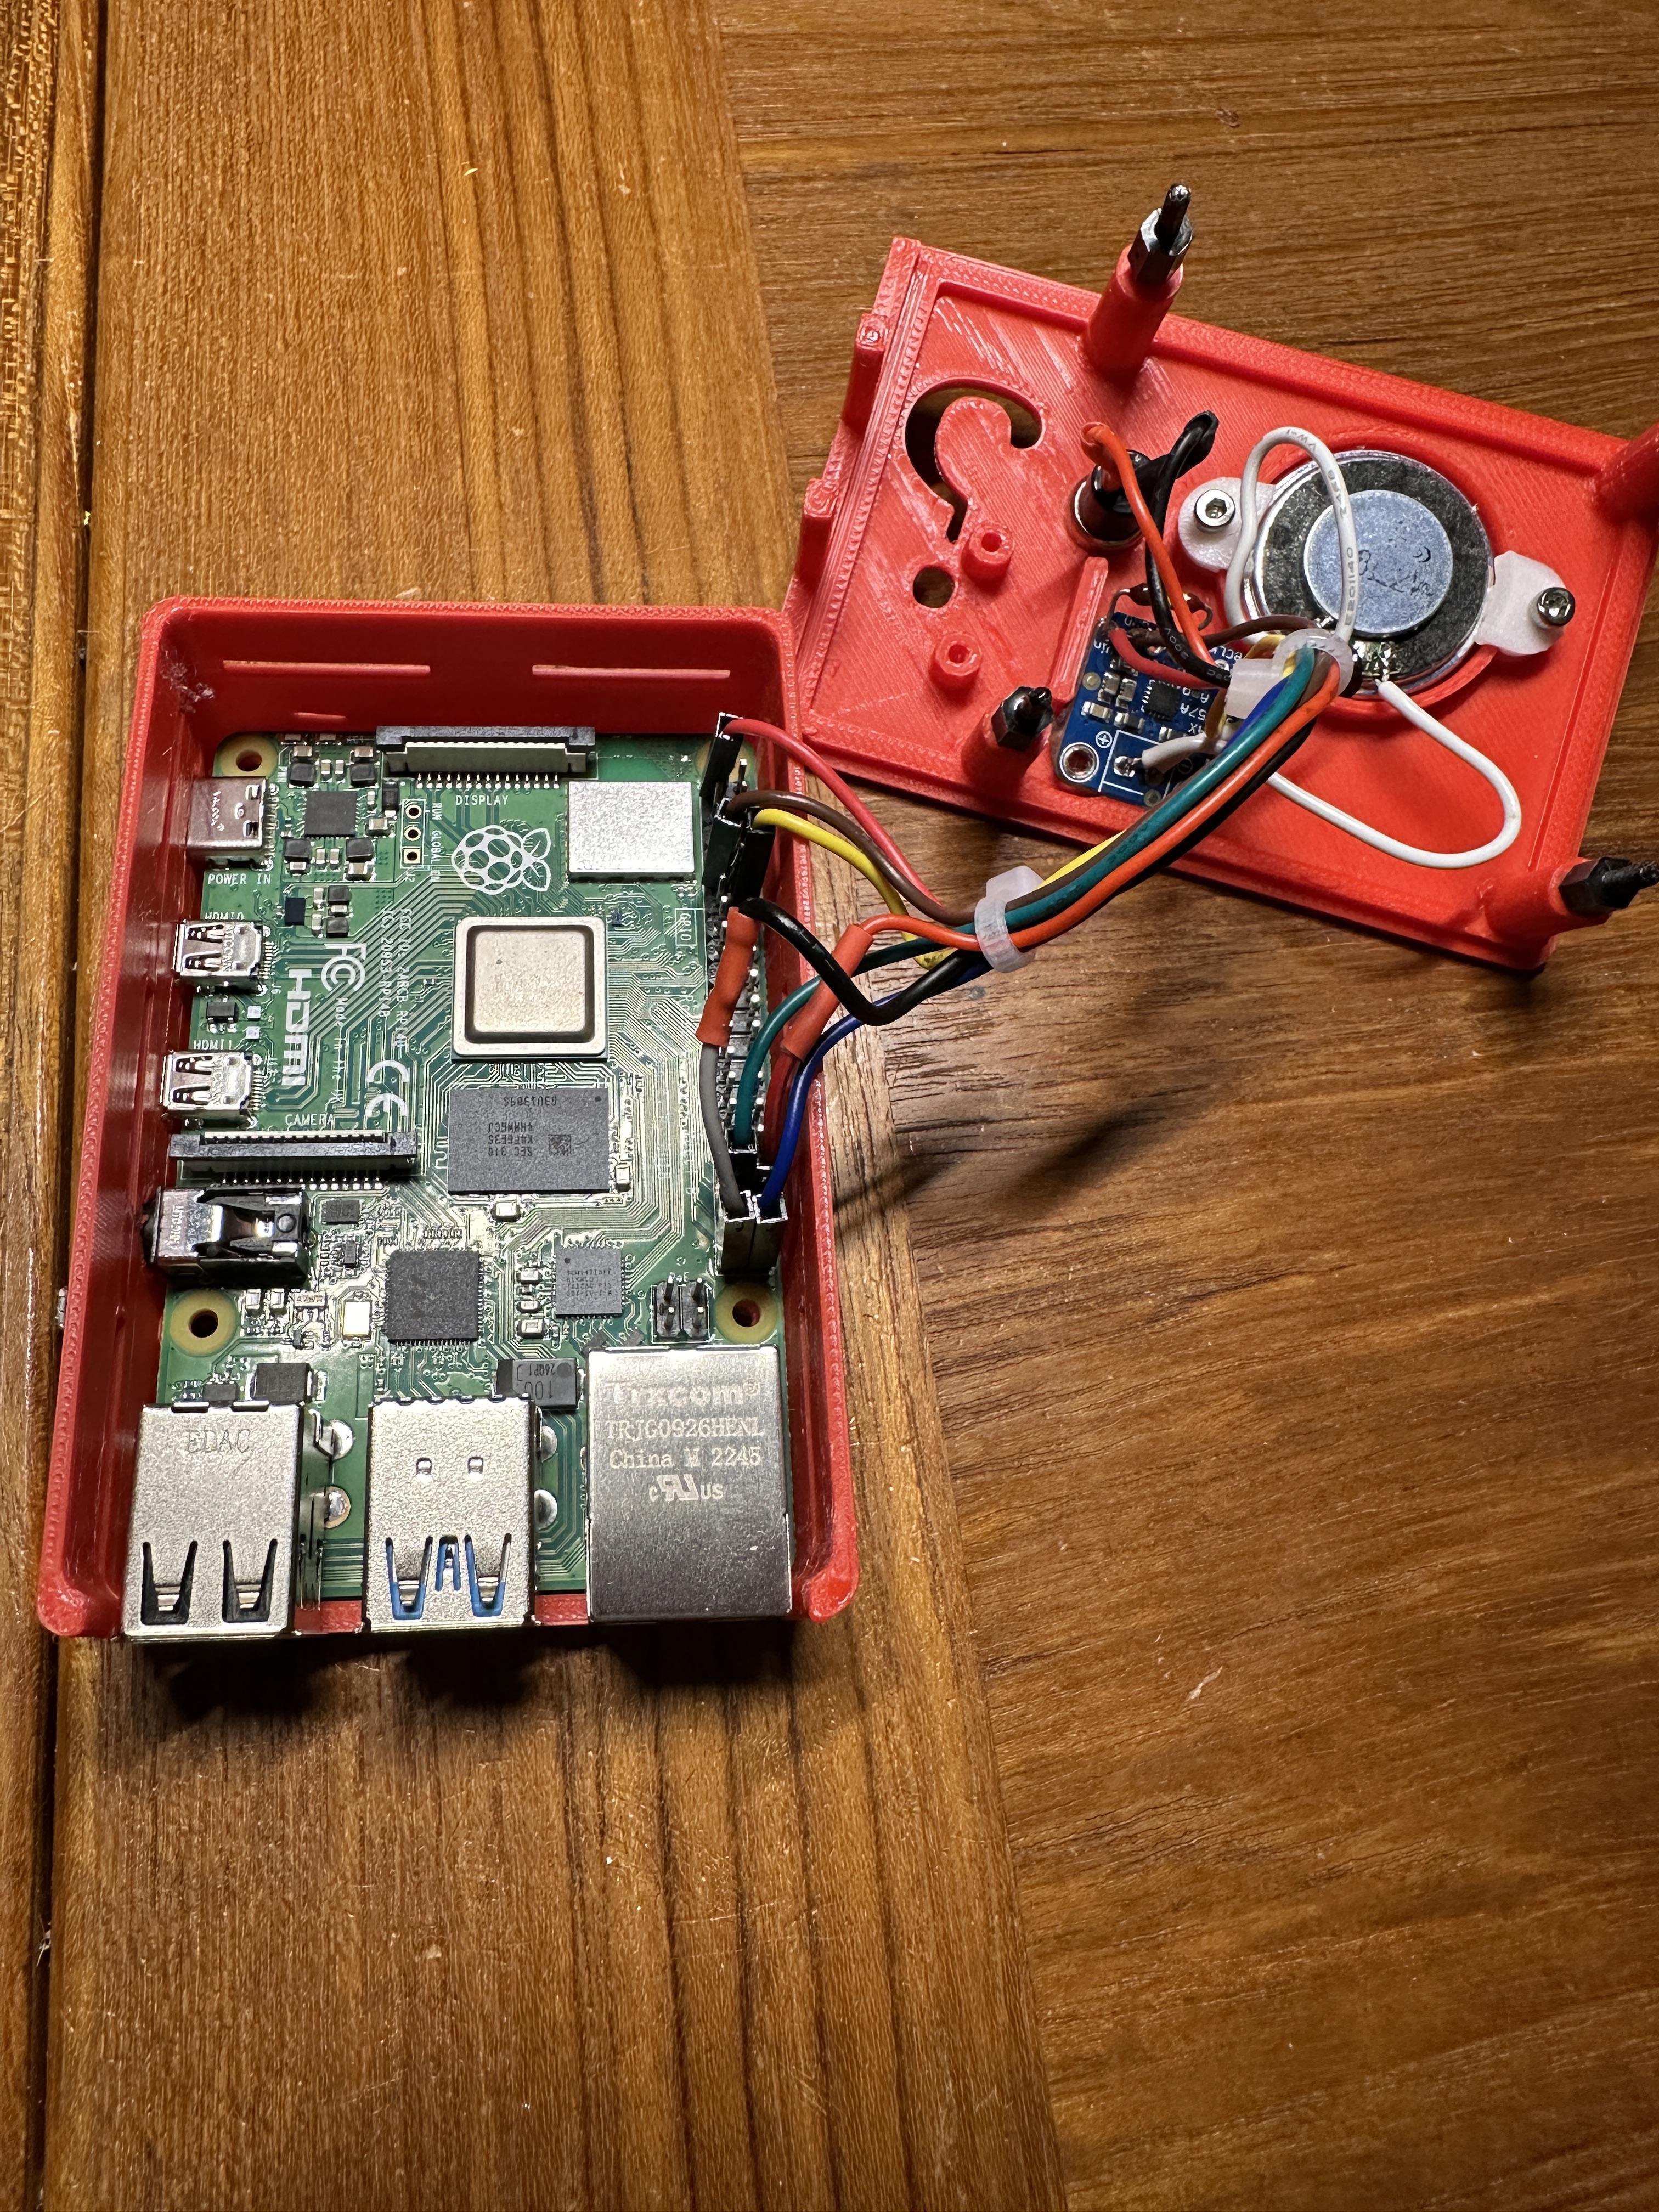
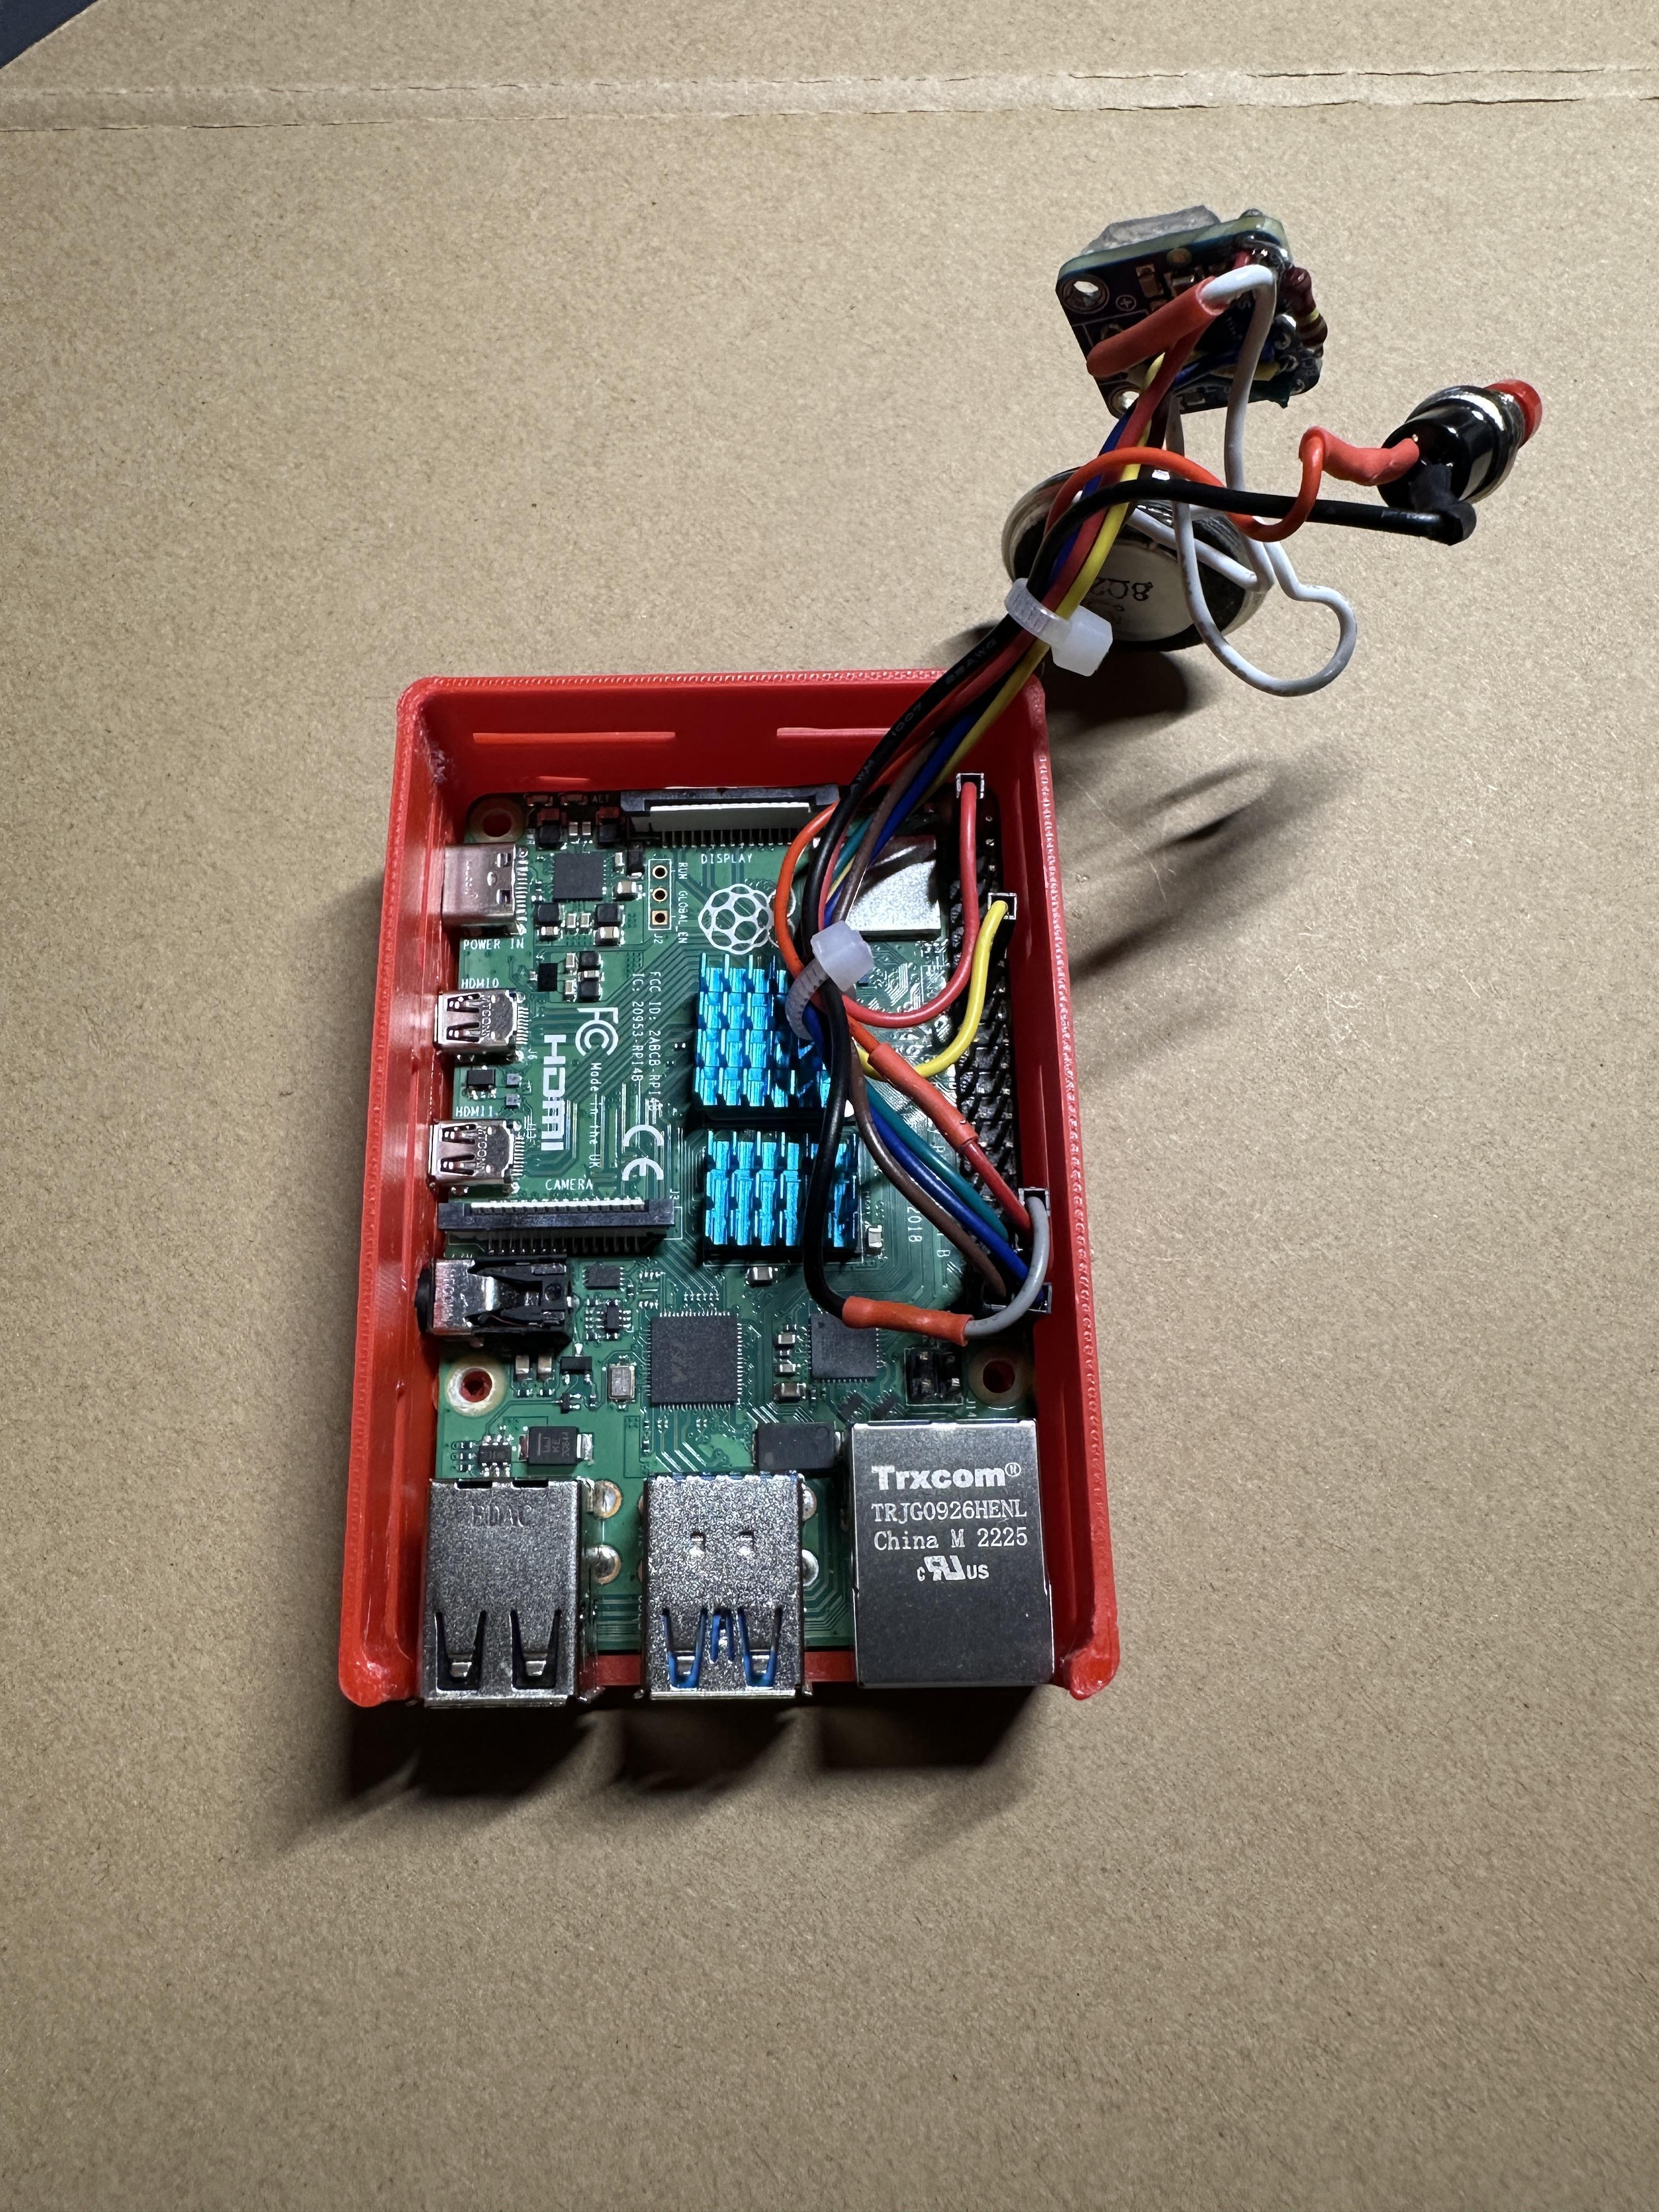
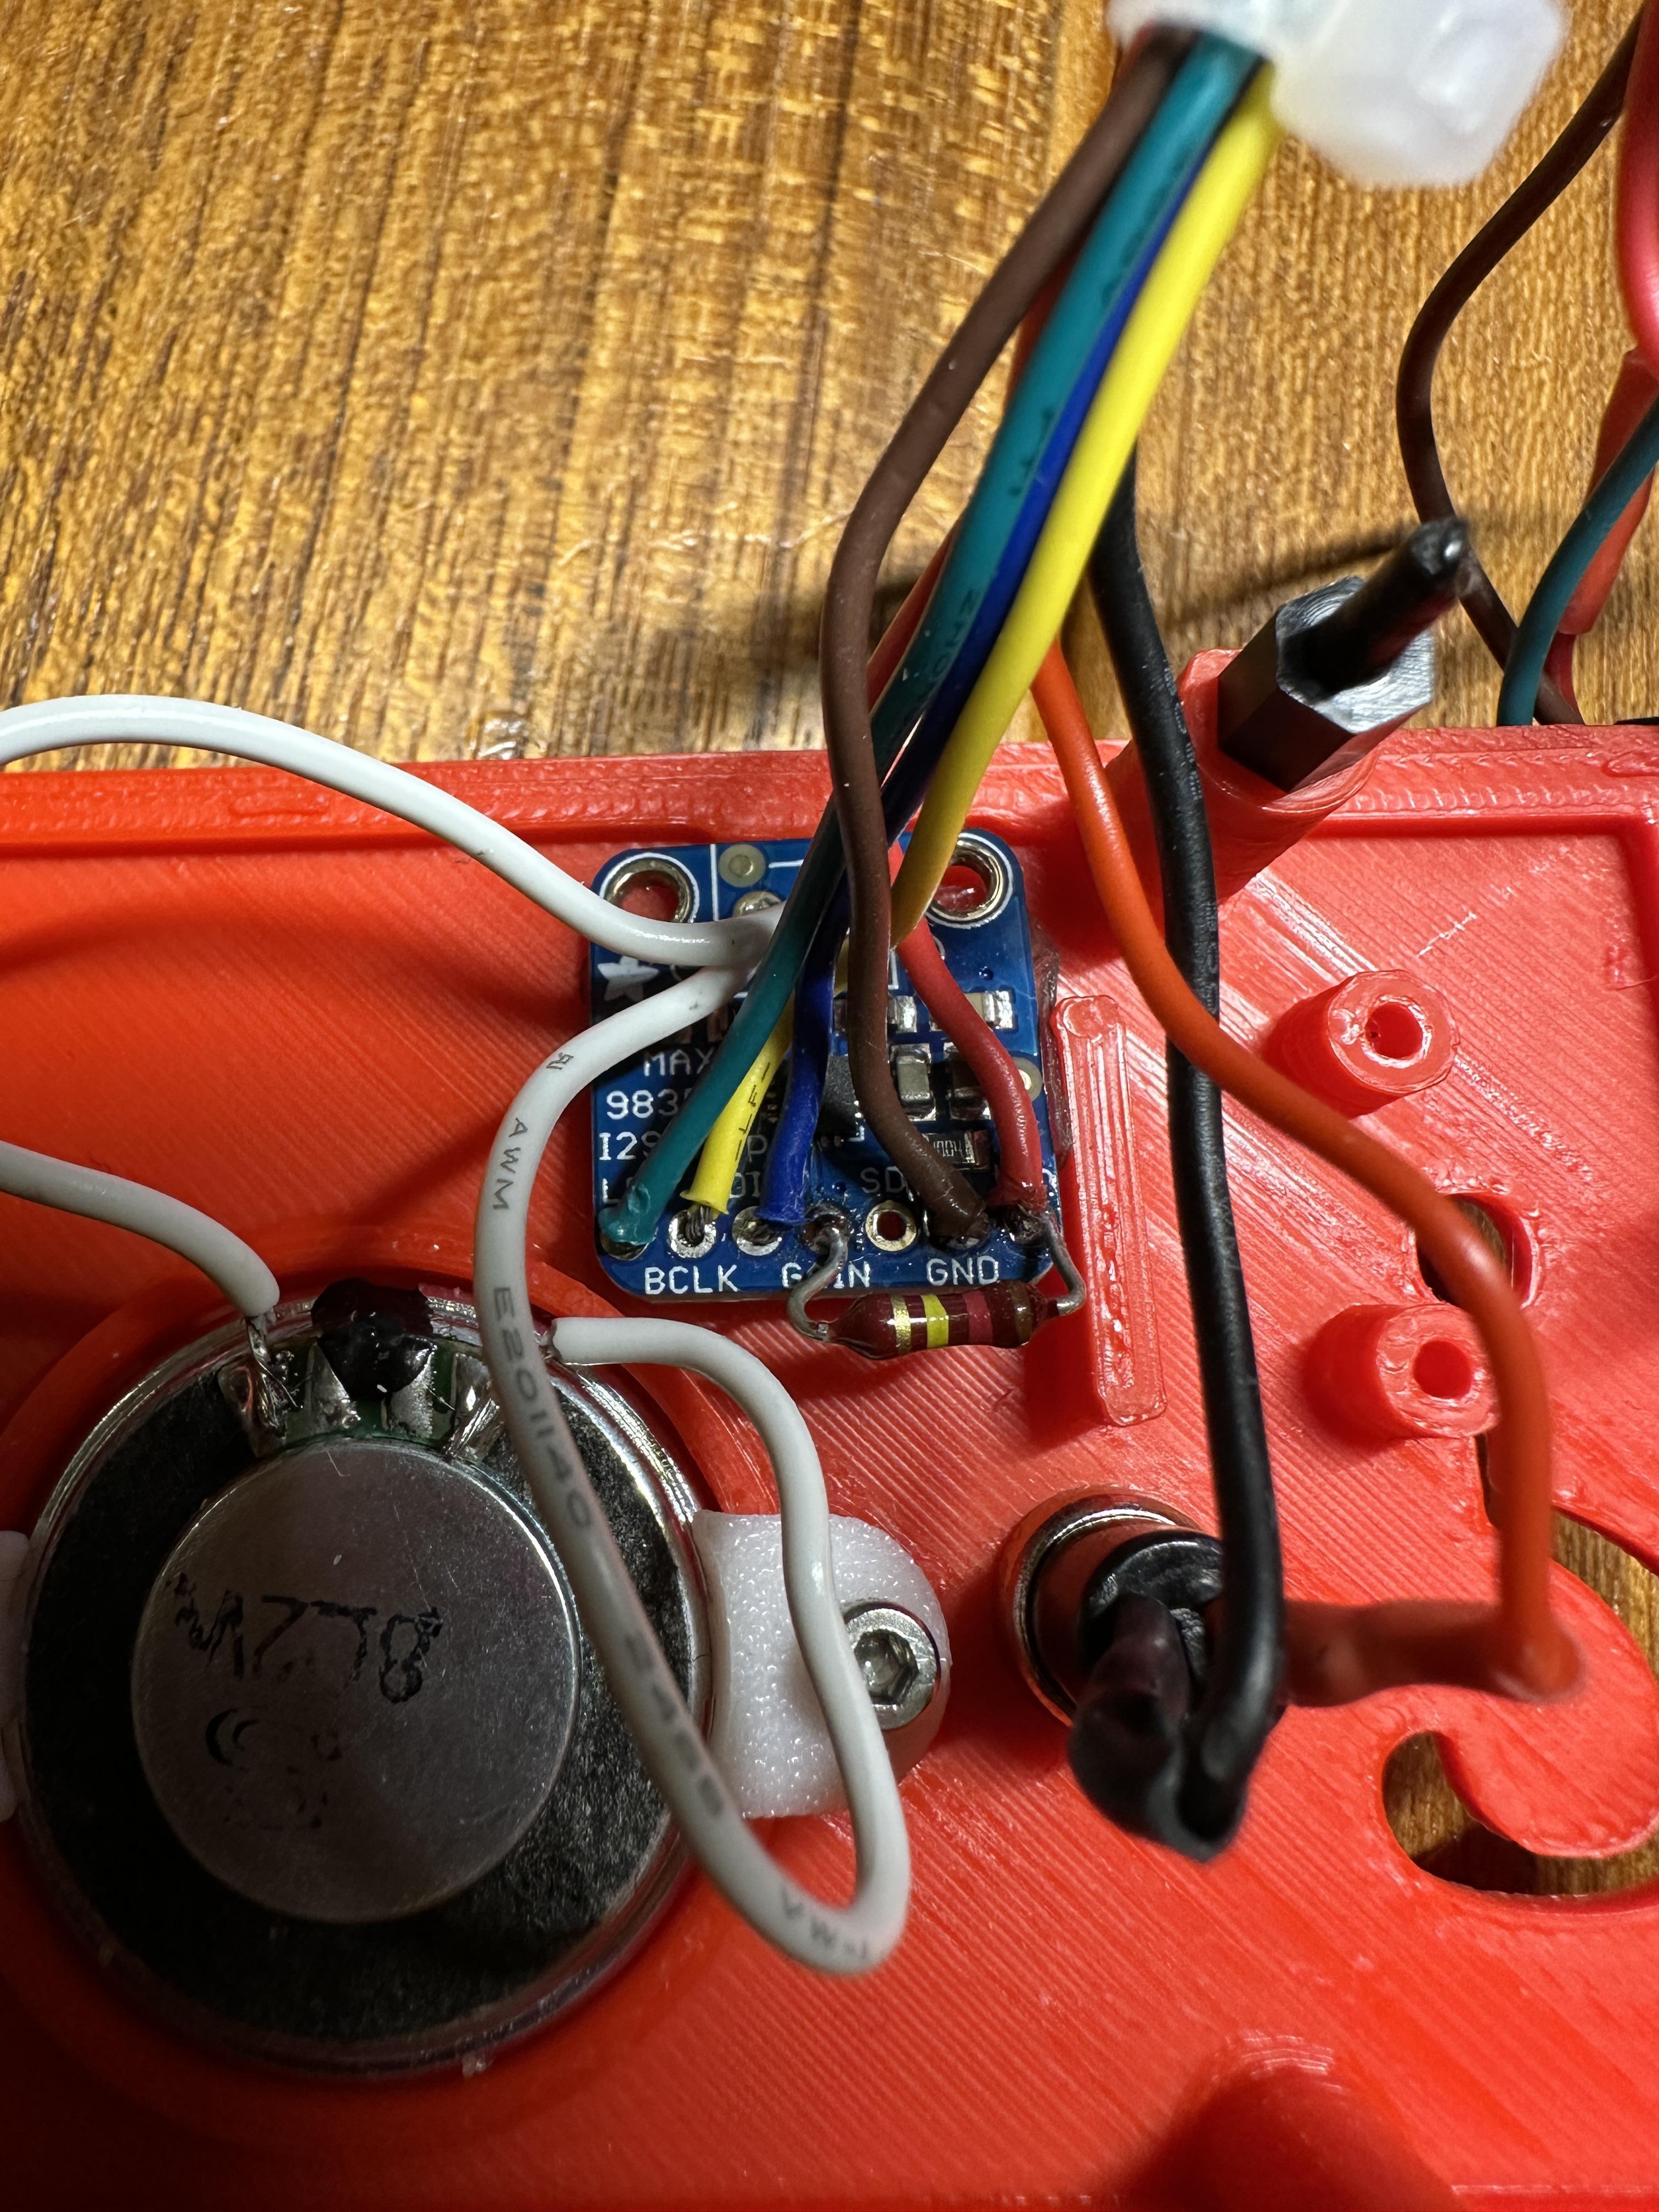
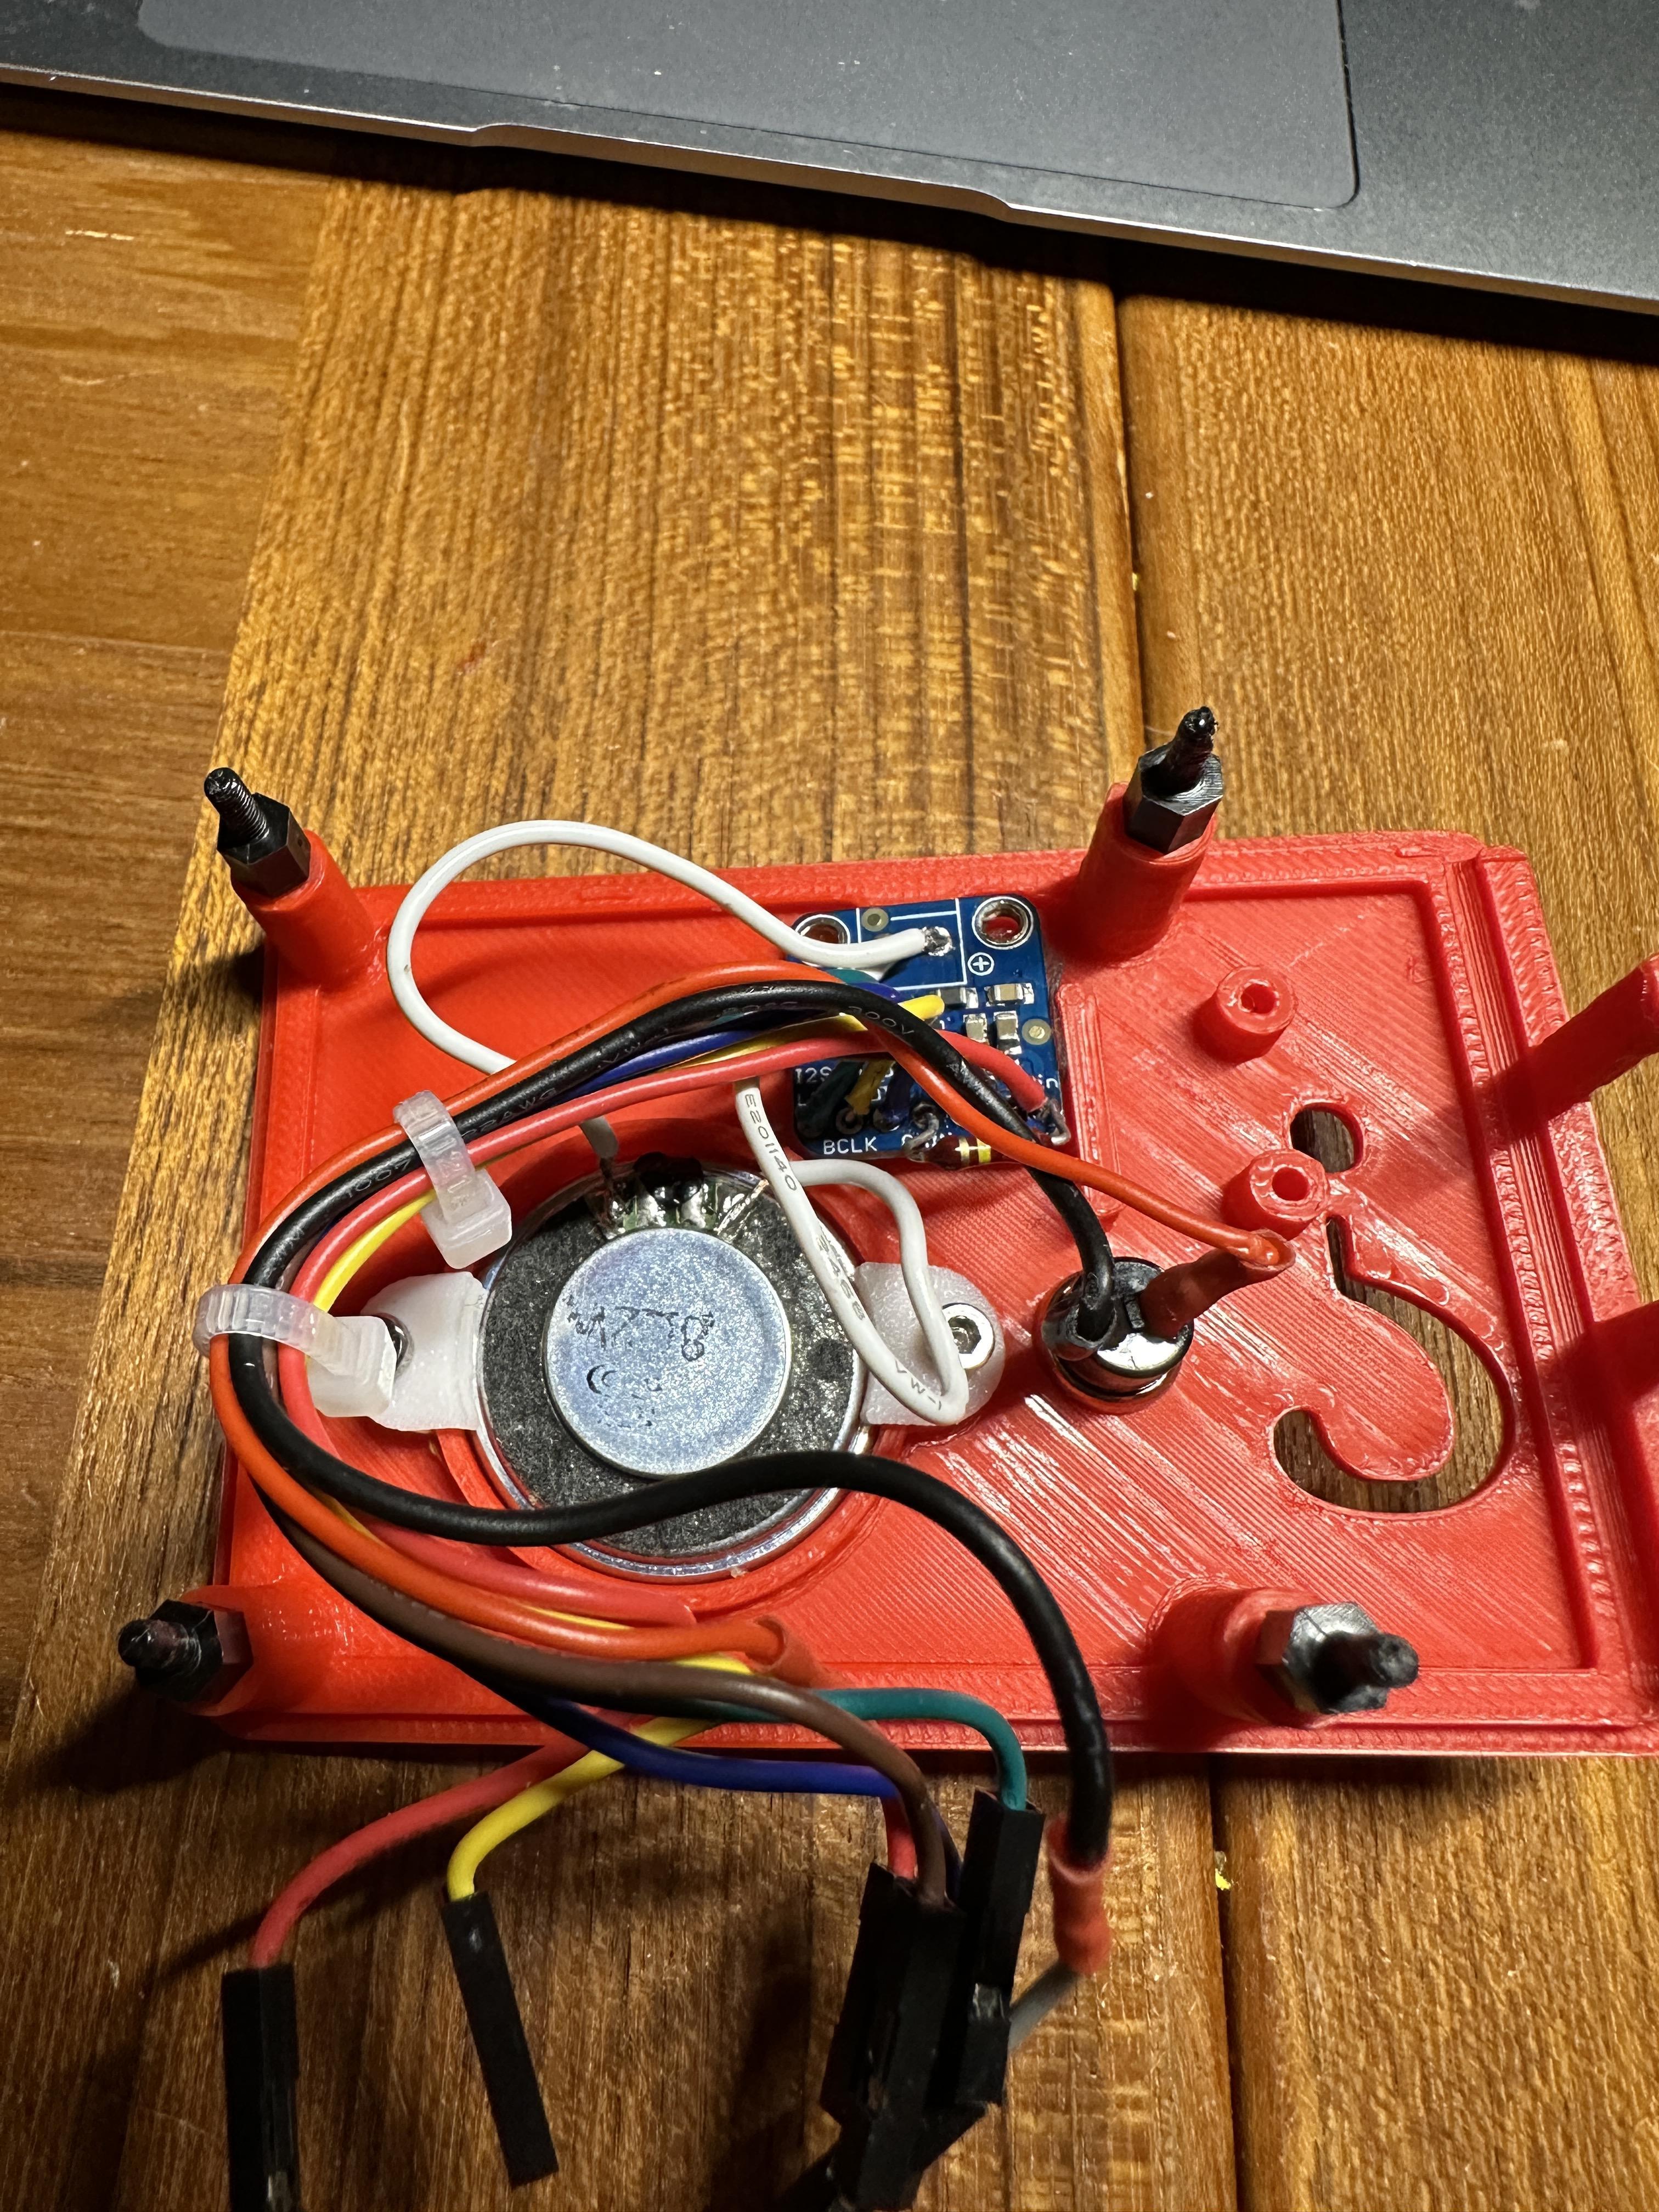
This is a pretty easy build that only requires a few wires to be soldered. Start with 7 Dupont wires about 120 to 150mm long. One end needs a female connector to attached the Pi's GPIO pins and the other will be cut off. At the end that is cut off, trim a bit of the insulation so the bare end can be soldered to the amp, or push button switch.
The wires will be connected as follows:
- Yellow from BCLK on amp to GPIO 18
- Green from LRC on amp to GPIO 19
- Blue from DIN on amp to GPIO 21
- Red 1 from Vin on amp to 3.3v on PI
- Black 1 from GND on amp to Ground on Pi
- Red 2 from one side of switch to GPIO 16
- Black 2 from other side of switch to Ground on Pi
Solder the two speaker wires to the + and - solder points at the top of the amp board
(see https://learn.adafruit.com/robotic-ai-bear-using-chatgpt/circuit-diagram for a visual of the wiring. Ignore anything to do with Motor Wiring)
After you attach the wires to the Pi and push the Pi into the bottom part of the case you can plug the USB microphone into any of the USB ports on the Pi.
Secure the top part of the case to the bottom part using either 28mm M2.5 screws or, as I did, 20mm M2.5 screws with a small M2.5 spacer to extend it. If you like you can just push the two halves of the case together and since it's a pretty snug fit you may decide to add the screws later or not at all.
Overview: Personalized ChatGPT Device Using RaspberryPi 4b
Accessing ChatGPT using the OpenAI API, as she did in her python program, also provides an opportunity to play around with your assistant’s attitude and voice. When you register with Microsoft Azure Speech Services you’ll try out their voices and pick the one you like.
Then, in the chat.py program you can describe the attitude you want the speaker to take. Try "angry boss", “grumpy old man” or “sweet elementary school teacher”.
More about this later.
The next step was to take the case from the Gund Bear project and modify it to fit the Pi board without the motor HAT but with enough room to accommodate Dupont wires plugged directly onto the Pi’s GPIO pins.
We will use her design for audio out which uses the MAX98357 I2S Amplifier and speaker as described in the Gund Bear project or, if you prefer, you can just plug a headset into the 3.5mm audio port on the Raspberry Pi.
Voice input will be via a USB microphone.
So now, where ever you are, as long as your phone can provide a hotspot for the Pi, you can plug in your AI box and ask ChatGPT anything!
Install Raspberry Pi OS Bullseye and Other Required Software
Note that you will need API keys from OpenAI and Azure Speech Services in order to use ChatGPT. Using the OpenAI API is not free but it is not expensive and should be less than $5/month even for heavy personal use. Microsoft’s Azure Speech Services is free.
The voice used for the output can be selected from a variety of voices available from Microsoft for free (registration required). The personality of the voice uses is set in the chat program.
Be sure to use Raspberry Pi OS (Bullseye - Legacy version)
Note: if you want to install the desktop, use the full version. If you don’t want the desktop, install the lite version. Either one will work for ChatGPT.
a) Use Raspberry Pi Imager (https://www.raspberrypi.com/software/) to install Raspberry Pi Bullseye (not Bookworm) on a micro SD card with 8GB or more of storage.
- Click on “Choose OS”
- Click on Raspberry Pi OS (other) then scroll down to:
- Raspberry Pi OS (Legacy, 64bit) (full or lite)
- Select Raspberry Pi OS (Legacy, 64-bit) - any of the 3 listed
- Click on “Choose Storage” and select your SD card
- Make sure to click the gear for “Settings” and enter the following information:
- the name of your home network
- the password for your home network
- your preferred user name, frequently just ‘pi’
- your preferred computer name. The usual name is ‘raspberrypi’ but it can be anything you like. For example, to save some typing you can use ‘mypi’.
- Click “Write”
When the imager finishes remove the SD card and Insert it into your Pi and plug in power to its USB-C port.
Give it a minute to get up and running, you can then SSH (Secure Shell) into your pi from a terminal running on your PC or Mac.
1a) make sure you are on the same network at the raspberry pi and type:
ssh user_name@computer_name.local
(for example: ssh pi@raspberrypi.local)
For a tutorial on Raspberry Pi OS you can go to: https://www.raspberrypi.com/documentation/computers/os.html#introduction
When you first boot it up you will likely get the error: WARNING: REMOTE HOST IDENTIFICATION HAS CHANGED! If not, proceed to step 2.
If you do, open the known_hosts file on your PC or Mac and delete everything in it.
To delete the contents of the known_hosts file:
Start your preferred editor and enter the path provided in the error message and remove the lines that are there:
For example, to use the nano editor: nano /Users/user_name/.ssh/known_hosts
type CTRL-K to delete each line, when done hit CTRL-X, y, return to save the changes
ssh again, enter ‘yes’ to continue, then enter your password
In order to let your Pi connect to the internet via your phone's hotspot you need to add its ssid and password to your wpa_supplicant file.
sudo nano /etc/wpa_suppicant/wpa_supplicant
add the following lines below the closing bracket that's already there:
network={
ssid="hotspot ssid"
psk="password"
    id_str="hotspot name"
}
As usual, save your edits and close the file with: CTL-X, y, return
Note that the first entry includes an encrypted version of the password you entered when you set up the Raspberry Pi Imager. You can also use a plain text password as long as it is enclosed in quotes.
Install the Python Package Manager (PIP), Update the OS
sudo apt install python3-pyaudio build-essential libssl-dev libasound2 wget
sudo apt update
sudo apt upgrade (if you get an alert, press q to quit)
sudo apt-get install python3-pip
sudo apt install --upgrade python3-setuptools
Install Adafruit Blinka
sudo pip3 install adafruit-python-shell
wget https://raw.githubusercontent.com/adafruit/Raspberry-Pi-Installer-Scripts/master/raspi-blinka.py
sudo python3 raspi-blinka.py
(Enter ‘Y’ to reboot)
Install PulseAudio
sudo apt install libpulse-dev pulseaudio apulse
check with:
pulseaudio --check -v
if it says the deamon is not running, enter: pulseaudio --start
Install Speech Recognition, OpenAI & Azure Speech Services
pip3 install SpeechRecognition
pip3 install --upgrade openai
pip3 install --upgrade azure-cognitiveservices-speech
Register With OpenAI and Microsoft’s Azure Speech Services
In this step you will get api keys needed to access their functionality via the chat python program. You’ll have to use a credit card to complete the registration with OpenAI but don’t worry, for personal use the fee is trivial, maybe a couple of dollars a month. For Azure Speech Service the registration is free.
Add your api keys to the environment file (/etc/environment) or hard code them in the Python program
1) To register with OpenAi go to:
follow the steps laid out by Melissa on the Adafruit site:
https://learn.adafruit.com/robotic-ai-bear-using-chatgpt/create-an-account-with-openai
2) To register with Microsoft’s Azure Speech Services go to:
follow the steps laid out by Melissa:
https://learn.adafruit.com/robotic-ai-bear-using-chatgpt/create-an-account-with-azure
3) Create/update the environment file in /etc and add your keys and region to it:
OPENAI_API_KEY=“YOUR_OPENAI_API_KEY_HERE”
SPEECH_KEY=“YOUR_AZURE_SPEECH_KEY_HERE”
SPEECH_REGION="eastus"
Steps:
cd /etc
sudo nano environment
enter the above 3 lines replacing the quoted text with your key values inside the quotes making sure not to delete the quote marks.
close the file with ctrl-x, y, return
Enable Audio Using Adafruit Blinka
For the audio to come through the attached speaker we need to udate Adafruit’s version of CircuitPython called Blinka and enable the MAX98357A amp that drives the speaker
1) Update Adafruit Blinka and remove potential conflicts:
pip3 install --upgrade adafruit_blinka
2) Install support for i2S DAC for MAX98357:
curl -sS https://raw.githubusercontent.com/adafruit/Raspberry-Pi-Installer-Scripts/master/i2samp.sh | bash
type y to continue then n to activate in background, then y to reboot
Copy Chat.py to Your Raspberry Pi
Copy the chat.py program from your pc or Mac to your pi’s working directory (/home/pi:
Open up a terminal on your PC or Mac and cd to the directory where you have chat.py
Secure copy the file over to your pi: (replace pi and raspberrypi with your username and computer name)
scp chat.py pi@raspberrypi.local:/home/pi
enter the password for your pi to complete the copy
Now you can make any changes to the Python program that you like.
For example, the attitude/personality of the assistant is set in the ChatGPT Parameter SYSTEM_ROLE:
SYSTEM_ROLE = (
  "You are a helpful voice assistant in the form of a sweet kindergarten teacher"
  " that answers questions and gives information"
)
The greeting you hear is set in the main routine of the chat.py program:
def main():
  listener = Listener()
  chat = Chat(speech_config)
  transcription = [""]
  chat.speak(
    "Hello! My name is Lilly and I'm you personal assistant. You can ask me anything. Just press the red button whenever you would like to talk to me"
  )
Congratulations!
At this point the chat.py will run using the USB microphone plugged into your pi along with the speaker you installed in the Pi case. To run the program enter the following command:
Python3 chat.py
Troubleshooting: if you get the error: Speech synthesis canceled: CancellationReason.Error
Error details: WebSocket upgrade failed: Authentication error (401) -- you will have to edit the chat.py file to replace the variable "speech_key" with the actual key. Change the line from:
speech_config = speechsdk.SpeechConfig(subscription=speech_key, region=service_region)
to: speech_config = speechsdk.SpeechConfig(subscription=5d61xxxxxxxxxxxxxxxxxxacbd916029, region=service_region)
Downloads
Set Up the Chat Program Automatically Run at Startup
To do this we have to create a service that makes it happen. Follow these instructions:
1) create a service file with the command:
sudo nano /lib/systemd/system/chat.service
[Unit]
Description=ChatGPT assistant
Wants=network-online.target
After=network-online.target
After=multi-user.target

[Service]
Type=simple
User=pi
WorkingDirectory=/home/pi
ExecStartPre=/bin/sh -c 'until ping -c1 google.com; do sleep 1; done;'
ExecStart=/usr/bin/python3 /home/pi/chat.py

[Install]
WantedBy=multi-user.target
Then close the nano session with ctrl-x, y, return
2) Tell systemd to recognize the new service:
sudo systemctl daemon-reload
2a) test it with:
systemctl start chat.service
the chat.py app should run
3) Enable the new service to run at boot
sudo systemctl enable chat.service
sudo reboot
After turning on the pi it should take only about 30 secs or so to hear your personal assistant’s greeting.
Notes:
to stop chat.py when you run it from the python3 command, just type CTL-C
to stop chat.py when it runs from the chat.service, you have to kill the python3 instance that’s running it:
top | grep python3
returns something like “787 pi 20 0 397512 66108 29180 R 100.0 3.5 0:10.23 python3”
whatever the first number is, that’s the process id (PID).
kill -9 787
(replace 787 with whatever the PID is)
Extra - Play Music
To get more out of your pi you can try the following:
To play internet music from the terminal:
sudo apt-get install -y mpg123
mpg123 http://ice1.somafm.com/u80s-128-mp3
Volume adjustment:
alsamixer
then hit arrows to move vol up and down or type 5 for 50% vol, 6 for 60% and so on
Extra - Install Pixel Desktop
The full version of Bullseye includes the Pixel Desktop to make your Pi a general purpose computer using an HDMI display, a keyboard (physical or virtual) and a mouse.
If you installed the lite version of Raspberry Pi OS Bullseye, however, you can still install the graphical desktop. Here’s how.
Note that you’ll need a USB mouse and a keyboard. A physical keyboard is handy but not necessary since you can use the on-screen virtual keyboard “Onboard”.
sudo apt install xserver-xorg
sudo apt install raspberrypi-ui-mods
sudo apt-get install onboard
To run the desktop at startup (whether you use it or not):
sudo raspi-config
then System Options
then Boot / Auto Login
then set startup for Desktop
Install Pi-Apps (the app store for free RaspberryPi apps):
wget -qO- https://raw.githubusercontent.com/Botspot/pi-apps/master/install | bash
Restart:
sudo reboot
Once the desktop system loads the Pi-Apps icon will appear on your screen. Double click it and select “execute”. There are quite a few apps available so explore and try different apps. I suggest Chromium to start, under Internet - Browsers.
Have fun!
Chat.py
# SPDX-FileCopyrightText: 2023 Melissa LeBlanc-Williams for Adafruit Industries
#
# SPDX-License-Identifier: MIT

import threading
import os
import sys

from datetime import datetime, timedelta
from queue import Queue
import time
import random
from tempfile import NamedTemporaryFile

import azure.cognitiveservices.speech as speechsdk
import speech_recognition as sr
import openai

import board
import digitalio

# ChatGPT Parameters
SYSTEM_ROLE = (
  "You are a helpful voice assistant in the form of a sweet kindergarten teacher"
  " that answers questions and gives information"
)
CHATGPT_MODEL = "gpt-3.5-turbo"
WHISPER_MODEL = "whisper-1"

# Azure Parameter
AZURE_SPEECH_VOICE = "en-GB-HollieNeural"
DEVICE_ID = None

# Speech Recognition Parameters
ENERGY_THRESHOLD = 1000 # Energy level for mic to detect
PHRASE_TIMEOUT = 3.0 # Space between recordings for sepating phrases
RECORD_TIMEOUT = 0

# Import keys from environment variables
openai.api_key = os.environ.get("OPENAI_API_KEY")
speech_key = os.environ.get("SPEECH_KEY")
service_region = os.environ.get("SPEECH_REGION")

if openai.api_key is None or speech_key is None or service_region is None:
  print(
    "Please set the OPENAI_API_KEY, SPEECH_KEY, and SPEECH_REGION environment variables first."
  )
  sys.exit(1)

speech_config = speechsdk.SpeechConfig(subscription=speech_key, region=service_region)
speech_config.speech_synthesis_voice_name = AZURE_SPEECH_VOICE


def sendchat(prompt):
  completion = openai.ChatCompletion.create(
    model=CHATGPT_MODEL,
    messages=[
      {"role": "system", "content": SYSTEM_ROLE},
      {"role": "user", "content": prompt},
    ],
  )
  # Send the heard text to ChatGPT and return the result
  return completion.choices[0].message.content


def transcribe(wav_data):
  # Read the transcription.
  print("Transcribing...")
  attempts = 0
  while attempts < 3:
    try:
      with NamedTemporaryFile(suffix=".wav") as temp_file:
        result = openai.Audio.translate_raw(
          WHISPER_MODEL, wav_data, temp_file.name
        )
        return result["text"].strip()
    except (openai.error.ServiceUnavailableError, openai.error.APIError):
      time.sleep(3)
    attempts += 1
  return "I wasn't able to understand you. Please repeat that."

class Listener:
  def __init__(self):
    self.listener_handle = None
    self.recognizer = sr.Recognizer()
    self.recognizer.energy_threshold = ENERGY_THRESHOLD
    self.recognizer.dynamic_energy_threshold = False
    self.recognizer.pause_threshold = 1
    self.last_sample = bytes()
    self.phrase_time = datetime.utcnow()
    self.phrase_timeout = PHRASE_TIMEOUT
    self.phrase_complete = False
    # Thread safe Queue for passing data from the threaded recording callback.
    self.data_queue = Queue()
    self.mic_dev_index = None

  def listen(self):
    if not self.listener_handle:
      with sr.Microphone() as source:
        print(source.stream)
        self.recognizer.adjust_for_ambient_noise(source)
        audio = self.recognizer.listen(source, timeout=RECORD_TIMEOUT)
      data = audio.get_raw_data()
      self.data_queue.put(data)

  def record_callback(self, _, audio: sr.AudioData) -> None:
    # Grab the raw bytes and push it into the thread safe queue.
    data = audio.get_raw_data()
    self.data_queue.put(data)

  def speech_waiting(self):
    return not self.data_queue.empty()

  def get_speech(self):
    if self.speech_waiting():
      return self.data_queue.get()
    return None

  def get_audio_data(self):
    now = datetime.utcnow()
    if self.speech_waiting():
      self.phrase_complete = False
      if self.phrase_time and now - self.phrase_time > timedelta(
        seconds=self.phrase_timeout
      ):
        self.last_sample = bytes()
        self.phrase_complete = True
      self.phrase_time = now

      # Concatenate our current audio data with the latest audio data.
      while self.speech_waiting():
        data = self.get_speech()
        self.last_sample += data

      # Use AudioData to convert the raw data to wav data.
      with sr.Microphone() as source:
        audio_data = sr.AudioData(
          self.last_sample, source.SAMPLE_RATE, source.SAMPLE_WIDTH
        )
      return audio_data

    return None

class Chat:
  def __init__(self, azure_speech_config):

    #Setup Button
    self._button = digitalio.DigitalInOut(board.D16)
    self._button.direction = digitalio.Direction.INPUT
    self._button.pull = digitalio.Pull.UP
    audio_config = speechsdk.audio.AudioOutputConfig(use_default_speaker=True)
    self._speech_synthesizer = speechsdk.SpeechSynthesizer(
    speech_config=azure_speech_config, audio_config=audio_config
    )
    if DEVICE_ID is None:
      audio_config = speechsdk.audio.AudioOutputConfig(use_default_speaker=True)
    else:
      audio_config = speechsdk.audio.AudioOutputConfig(device_name=DEVICE_ID)
    self._speech_synthesizer = speechsdk.SpeechSynthesizer(
      speech_config=azure_speech_config, audio_config=audio_config
    )

  def deinit(self):
    self._speech_synthesizer.synthesis_started.disconnect_all()
    self._speech_synthesizer.synthesis_completed.disconnect_all()

  def button_pressed(self):
    return not self._button.value

  def speak(self, text):
    result = self._speech_synthesizer.speak_text_async(text).get()

    # Check result
    if result.reason == speechsdk.ResultReason.SynthesizingAudioCompleted:
      print("Speech synthesized for text [{}]".format(text))
    elif result.reason == speechsdk.ResultReason.Canceled:
      cancellation_details = result.cancellation_details
      print("Speech synthesis canceled: {}".format(cancellation_details.reason))
      if cancellation_details.reason == speechsdk.CancellationReason.Error:
        print("Error details: {}".format(cancellation_details.error_details))


def main():
  listener = Listener()
  chat = Chat(speech_config)
  transcription = [""]
  chat.speak(
    "Hello! My name is Lilly and I'm you personal assistant. You can ask me anything. Just press the red button whenever you would like to talk to me"
  )
  while True:
    try:
      # If button is pressed, start listening
      if chat.button_pressed():
        chat.speak("How may I help you?")
        listener.listen()

      # Pull raw recorded audio from the queue.
      if listener.speech_waiting():
        audio_data = listener.get_audio_data()
        chat.speak("let me think about that")
        text = transcribe(audio_data.get_wav_data())

        if text:
          if listener.phrase_complete:
            transcription.append(text)
            print(f"Phrase Complete. Sent '{text}' to ChatGPT.")
            chat_response = sendchat(text)
            transcription.append(f"> {chat_response}")
            print("Got response from ChatGPT. Beginning speech synthesis.")
            chat.speak(chat_response)
          else:
            print("Partial Phrase...")
            transcription[-1] = text

        os.system("clear")
        for line in transcription:
          print(line)
        print("", end="", flush=True)
        time.sleep(0.25)
    except KeyboardInterrupt:
      break
  chat.deinit()

if __name__ == "__main__":
  main()