Custom Earrings Using Midjourney
by jeracoo1 in Craft > Jewelry
1265 Views, 25 Favorites, 0 Comments
Custom Earrings Using Midjourney


Here are some of the finished product
Supplies
UV Resin
Wooden Skewer
Photo Paper
Scissors
Jump Rings
2 pairs of Pliers
Nail Board
UV Light or Just place in the sun -WARNING -ENSURE IN VENTILATED AREA DO NOT PLACE IN DIRECT SUN IN AUSTRALIA OR OTHER HIGH UV COUNTRIES IT WILL BURN
Earring Board
Black Paint
Paintbrush
4x6 Photo Paper or print at the store
Drill
Drop Earring Findings
Join the Midjourney Discord - Skip If You Know How to Use Midjourney
1: Join the Discord
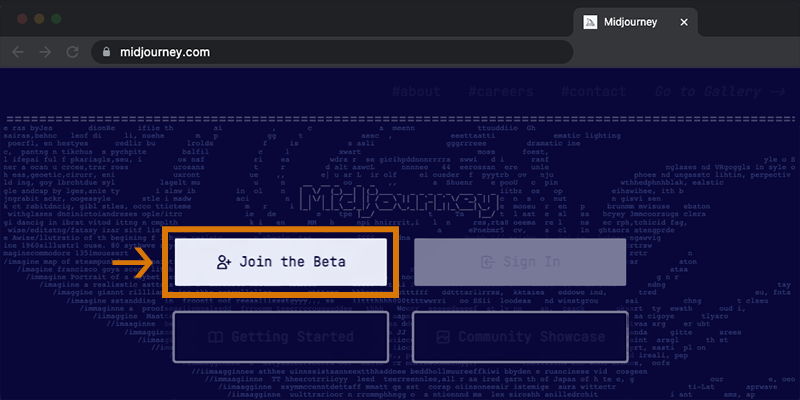
Go to Midjourney.com, select Join the Beta, or go directly to the Midjourney Discord.
Discord Accounts
Before joining the Midjourney Discord server, you must have a verified Discord login.
Learn how to create your account. or Learn how to verify your account.
2: Find a Newbies Channel
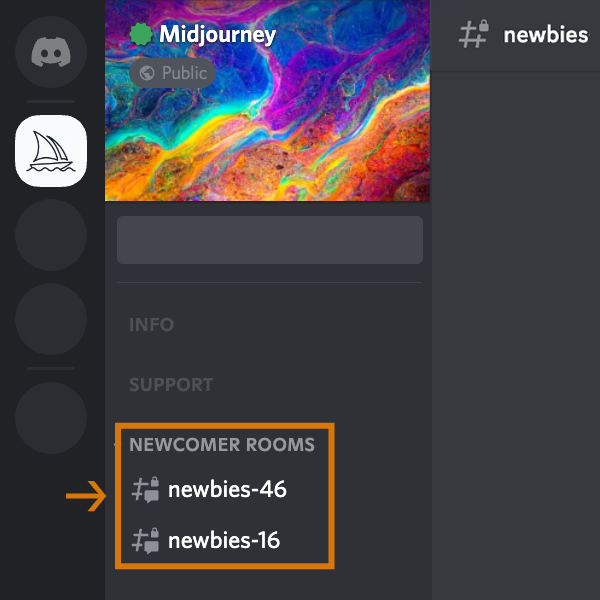
On the Midjourney Official Server
Select any newbies-# channel visible in the left sidebar.
On Other Servers
You can generate images with the Midjourney Bot on any server that has invited the Bot. Look for instructions on your server on where to use the Bot.
3: Use the /imagine Command
About Discord Commands
Interact with the Midjourney Bot on Discord using a {{glossary.Command}}. Commands are used to create images, change default settings, monitor user info, and perform other helpful tasks.
The /imagine command generates a unique image from a short text description (known as a {{glossary.Prompt}}).
Using /imagine
- Type /imagine prompt: or select the /imagine command from the slash commands pop-up.
- Type a description of the image you want to create in the `prompt` field.
- Click return to send your message.
- The Midjourney Bot will generate a pop-up asking you to accept the Terms of Service. You must agree to the Terms of Service before any image will be generated.
Respect the Community Guidelines. Community guidelines apply wherever the Midjourney Bot is used.

If you don't see a pop-up when typing the /imagine command, try logging out, updating the Discord app, and logging back in.
Commands only work in bot Channels. Commands will not work in regular channels like #trial-support.
:::(Info) Prompting Tip!
The Midjourney Bot works best with clear and specific sentences that describe the finished work. It does not work well with conversational style lists of requests. Rather than providing specific instructions, such as 'Show me a picture of lots of blooming California poppies, make them bright, vibrant orange, and draw them in an illustrated style with colored pencils,' try describing what you want in a more straightforward manner, such as 'Vibrant orange California poppies illustrated with colored pencils.
:::
4: Processes the Job
The Midjourney Bot takes about a minute to generate four options.
Generating an image activates the free Midjourney trial.Trial users can make roughly 25 Jobs before needing to subscribe.
A Job is any action that uses the Midjourney Bot. Jobs include using the /imagine command to create a grid of images, upscaling images, or creating image variations, all use your free trial time.
Use the /info command to check your Fast Time Remaining to see your remaining Trial time.
5: Upscale or Create Variations
After the initial image grid has finished generating, two rows of buttons appear:
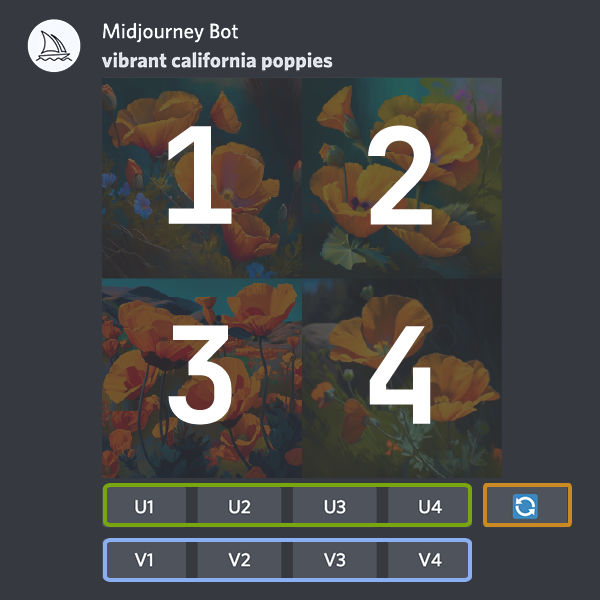
U1 U2 U3 U4
U buttons upscale an image generating a larger version of the selected image and adding more details.
V1 V2 V3 V4
V buttons create slight variations of the selected grid image. Creating a variation generates a new image grid similar to the chosen image's overall style and composition.
🔄
The 🔄 (re-roll) reruns a Job. In this case it would rerun the original prompt producing a new grid of images.
6: Rate Images
After using upscaling an image a new set of options will appear:
🪄 Make Variations 🔍 Light Upscale Redo 🔍 Beta Upscale Redo ↗️Web
Make Variations: creates a variation of the upscaled image and generates a new grid of four options.
Beta/Light Upscale Redo: redo the upscale using a different upscaler model.
Web: Open the image in your gallery on Midjourney.com
😖 😒 🙂 😍
7: Save Your Image
Click on the image to open it to full size, and then right-click and choose Save image. On mobile, long tap the image and then tap the download icon in the top right corner.
All images are immediately available to view on midjourney.com/app
Sign In with Discord to view.
Create the Image We Want


Ok next step now that we know how to use midjourney is to create the image we want.
The format we shall use is
/imagine prompt:"place entire image in circle", insect, batman
Breakdown
1) "place entire image in circle" - This Makes it so we get a nice circle, which will be roughly 30mm wide
2) insect - This will be the theme, so we might have it as say stained glass, or any other medium
3) batman - Subject, so we would usually have the subject of the piece here, such as a famous characters name, or animal type or whatever you.
Now in regards to this, you can do quite complex instructions, though with too much information it may ignore earlier prompts, which means you may not get the right circle shape we're after.
Ok so now we've pressed enter and have 4 shapes presented to us, we then hit U1, U2, U3, U4 or any combination of these for the image we like the most.
It will then generate that image for us in a larger size.
After the image has been generated, we download that image using the steps from step 1.
So we'd click or tap the image to make it larger, and then click open in browser, then we could right click and download it somewhere.
We'd do this for each image we'd like to print.
Theme List You might like, though you can use whatever you can think of
- Abstract
- Abstract expressionism
- Academic art
- Action painting
- Analytical cubism
- Art deco
- Art nouveau
- Ashcan school
- Baroque
- Bauhaus
- Caravaggism
- Classicism
- Color field painting
- Conceptual art
- Constructivism
- Contemporary
- Cubism
- Dada
- De Stijl
- Expressionism
- Fauvism
- Figurative art
- Fluxus
- Futurism
- Geometric abstraction
- Gothic
- Graffiti art
- Hard-edge painting
- High Renaissance
- Impressionism
- Installation art
- Kinetic art
- Land art
- Light and space
- Lowbrow
- Magic realism
- Mannerism
- Minimalism
- Modernism
- Naive art
- Neo-expressionism
- Neo-impressionism
- Neo-pop art
- Neoclassicism
- Op art
- Orientalism
- Outsider art
- Performance art
- Photorealism
- Pointillism
- Pop art
- Post-impressionism
- Precisionism
- Realism
- Regionalism
- Renaissance
- Rococo
- Romanticism
- Social realism
- Street art
- Superflat
- Surrealism
- Symbolism
- Tachisme
- Theosophical art
- Tonalism
- Video art
- Viking revival
- Young British Artists (YBAs)
- Art informel
- Nouveau réalisme
- Fluxus
- Arte Povera
- Support/Surface
- Situationism
- MADI
- New Leipzig School
- Hyperrealism
- Digital art
- Algorithmic art
- Pixel art
- ASCII art
- Fractal art
- Glitch art
- Virtual reality art
- Augmented reality art
- Video game art
- Cyberpunk
- Steampunk
- Gothic art
- Art brut
- Photomontage
- Photogram
- Kinetic sculpture
- Sound art
- Interactive art
- Bio art
- Landscapes of the soul
- Frottage
- . Engraving.
Creating a Printable Photo File


Ok so we now have all of the images we want to print and turn into earrings.
Next step, place them into either the template attached to this step, either using paint or photoshop or some other photo or paint editing program, or use a service like https://www.picmonkey.com to size and place the images for you, you can get a free trial for a few days.
Now save your image, you may wish to make multiple different ones, depending on how many earrings you want to make.
Each 4x6 photo will create 6 pairs of earrings.
Print these photos now, either at home with a photo printer or at a store that has cheap photo printing.
Cutting


Now cut out each one.
Then place it on the nail board, so that when you apply the resin it doesn't run off due to the surface tension being higher due to it's suspension on said nail board.
Use the wooden skewer to push the resin if it's not covering it completely, it shouldn't overflow while on the nail board.
Then place it in the sun or use a uv lamp to get it to dry, takes a little while.
Then drill a small hole with your drill
Then using 2 pliers, grip to the left and right of one of the jump right, then twist so that the jump ring opens.
If you've bought jump rings that are already open, that's awesome.
Then loop the open jump ring into the hole in the photo we've cutout into a circle.
Then insert the earring finding.
Then close the loop using both of the pliers.
Then you're done yay.