Cricut Precision Jig
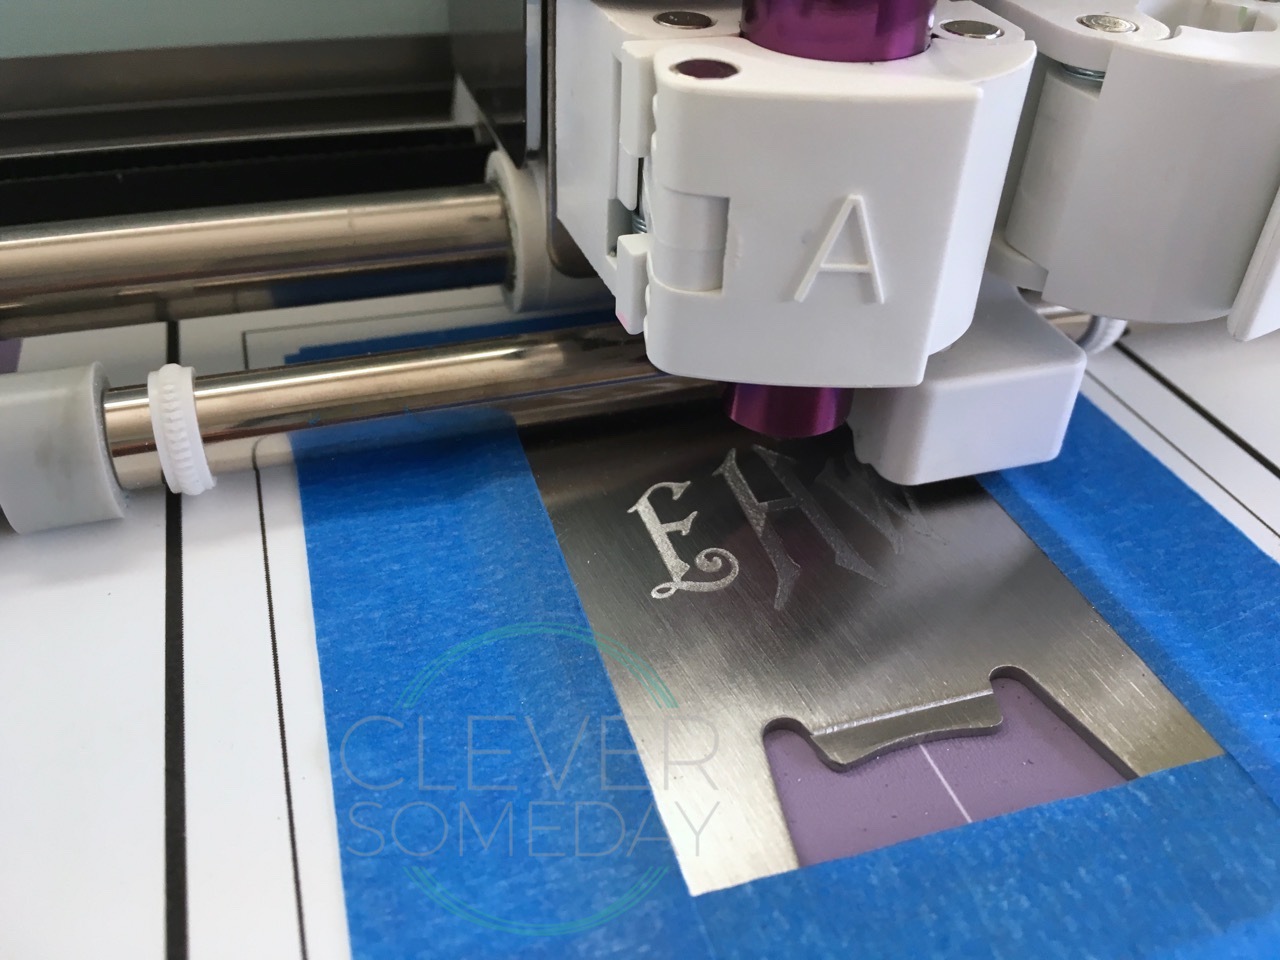
The goal of this Instructable is to teach you how to accurately and repeatably “hit a target” with your Cricut by making and using a reusable jig.
If you haven’t worked with the current Cricut models much, you may be surprised to learn that Cricut Design Space does not have an automatic or straightforward way to position a tool action precisely with respect to the cutting mat, an item on that mat, or with respect to a previous action. Fortunately, this jig system will allow you to work around that limitation by leveraging the sensor technology normally used for print then cut.
As an example for this Instructable, we’ll make a jig for engraving on bottle opener blanks in score mode, but this is not intended to be a comprehensive engraving tutorial. The general jig technique presented here is easily adaptable for anything that requires precise placement, such as cutting or writing on precut blanks, embossing with a stencil, or cutting one page at multiple settings, for instance.
Materials and Tools
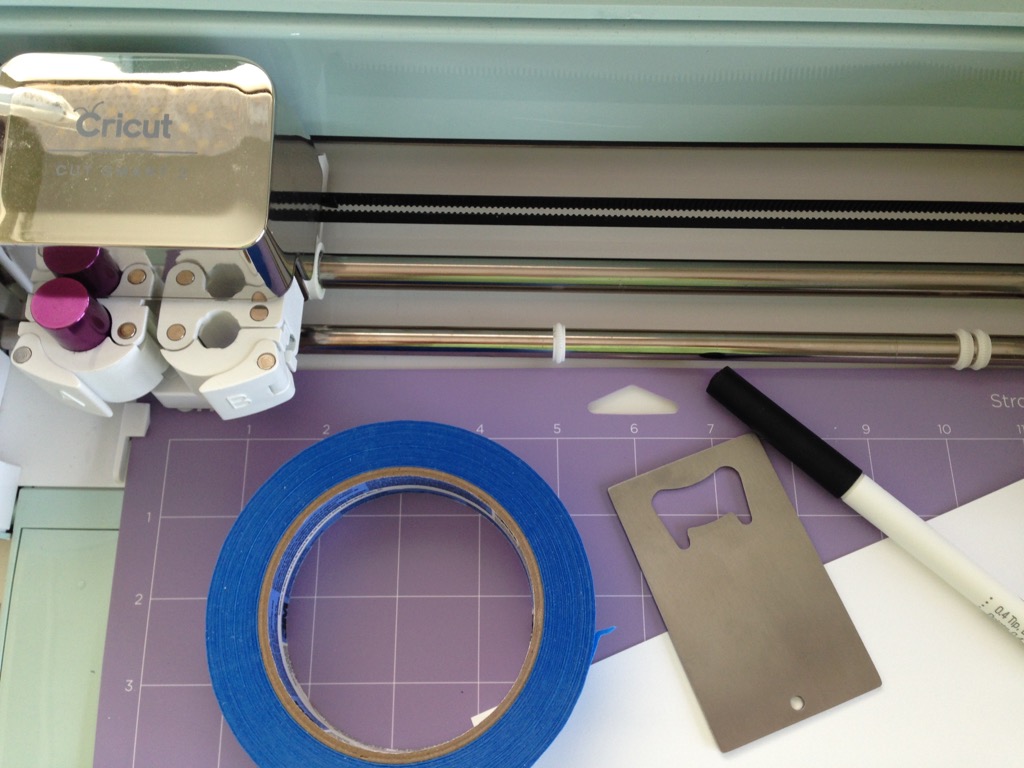
This Instructable assumes you have a Cricut Explore series machine, a computer running Cricut Design Space (steps may differ for mobile app) and that you have a working knowledge of both. You will also need (affiliate links):
-A Cricut regular or strong grip mat in good condition
-A printer
-An 8-1/2 x 11 sheet of medium to heavy white, matte finish card stock (must be both printable with your printer and cuttable with your Cricut)
-Any color Cricut pen (Cricut Explore One also requires a pen adapter)
-A blank less that 0.1 inches thick (I am using a bottle opener blank from CraftChameleon.com)
-An appropriate tool for your machine and project (I am using a Pazzles engraver that fits the accessory side of my Explore Air 2)
-Tape to secure your blank (double sided tape, painter's tape or both, depending on your project)
Disclaimer: Be aware that Cricut will not cover damage to your machine that was caused by any 3rd party product, including tools and blanks. Please follow prudent safety practices for the actions you are performing, such as wearing safety glasses when engraving.
Creating the Jig: the "Target"

Open a new project in Cricut Design Space and create (with basic shapes) or import a cuttable shape for your target blank at true size. (Some blanks vendors will provide a corresponding .svg or other digital file for their products.) Be sure to slice out holes or other details that will be important for placement of your design.
It's a good idea to test cut the shape into card stock and verify that your blanks fit snugly inside the resulting cutout. Adjust size and recheck as necessary until you are satisfied with the fit. As you test, also note which material settings work best for your card stock.
Color the final target shape a light color (to save ink while maintaining visibility), set it to Print, and delete any other interim versions.
Creating the Jig: the "Bounding Box"
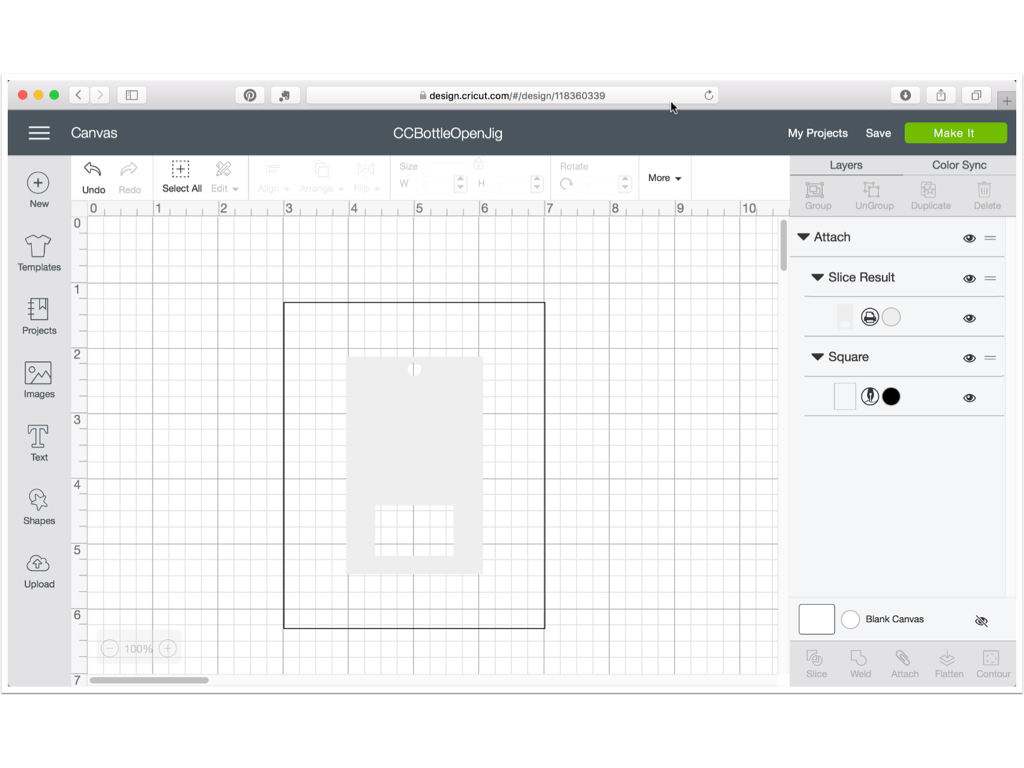
Insert a square from the Basic Shapes palette and set it to Write. Unlock it and resize it to leave at least a 3/4 inch margin around your blank on all sides (so there’s room for tape later), but no larger than 6.75 x 9.25" (the maximum for print then cut). Send the rectangle to the back. Select the target shape and the rectangle and Align>Center, then Attach. In case you are wondering, this "bounding box" dictates positioning, provides and delineates the safe zone for tape or markings, and aids in centering your design safely.
Save your file with a descriptive name, preferaby ending in “jig.”
Creating the Jig: Printing
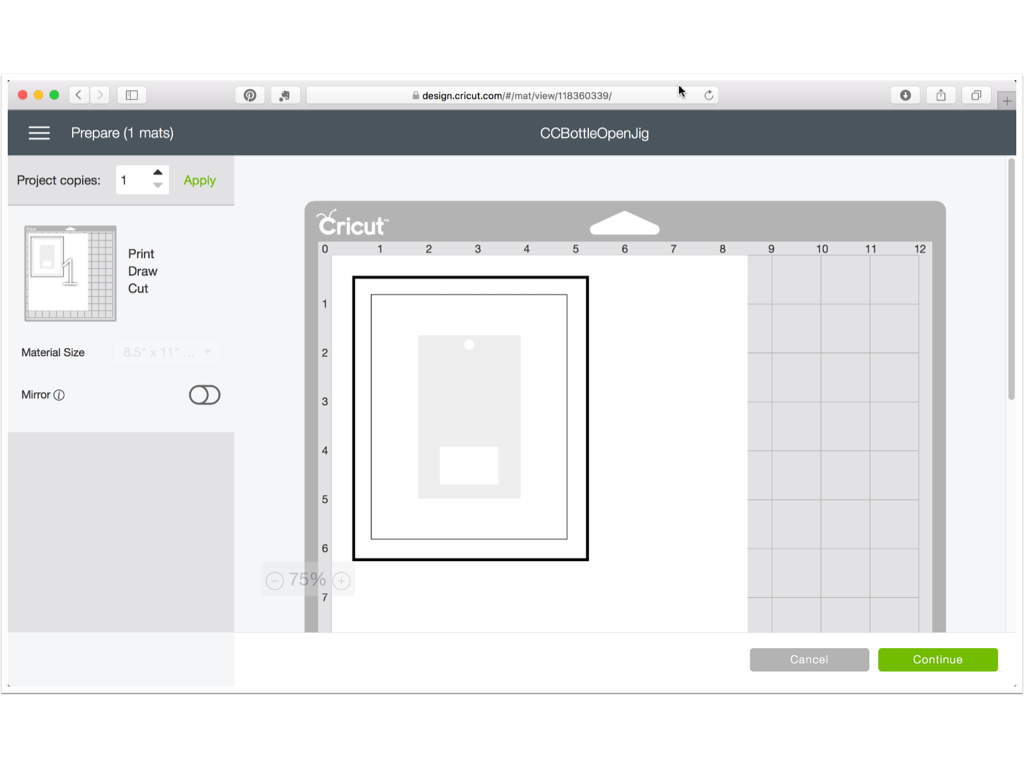
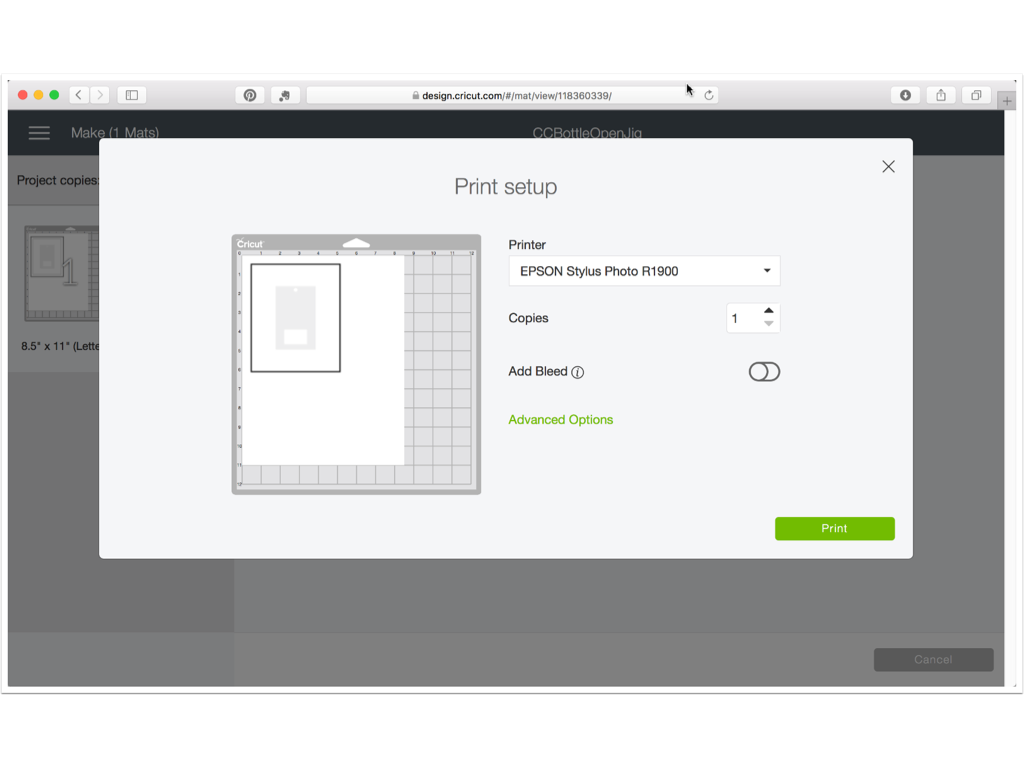
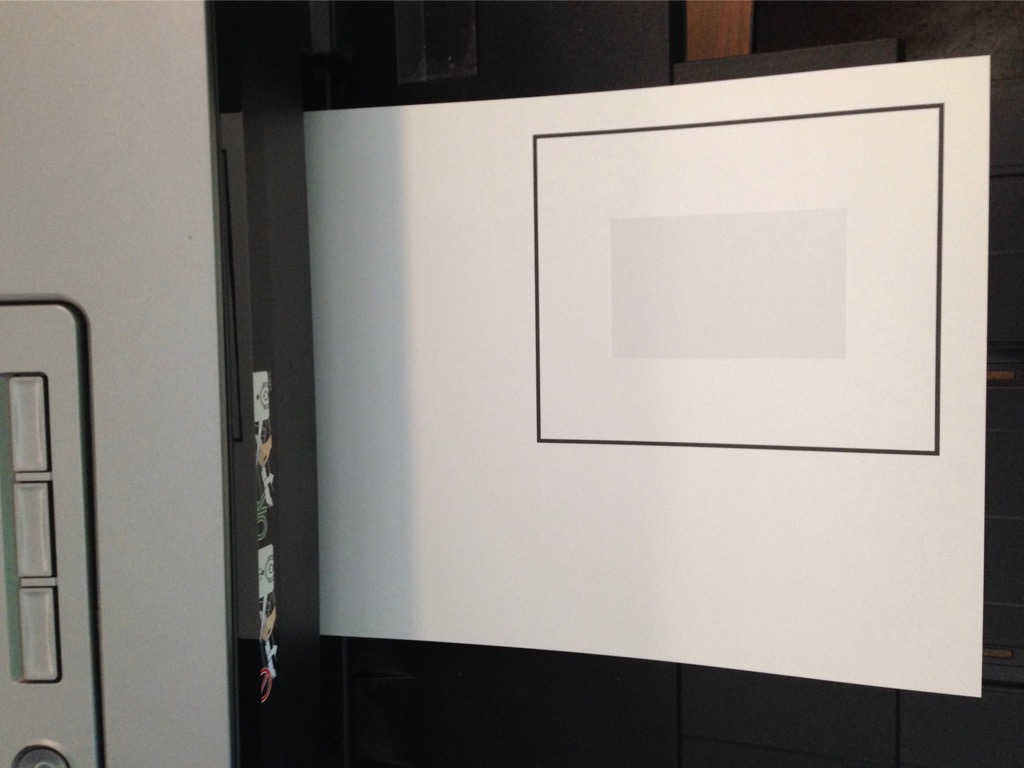
Click Make It then click Continue. Load card stock into your printer and click Send to Printer. Select your printer and click Print.
Creating the Jig: Writing and Cutting
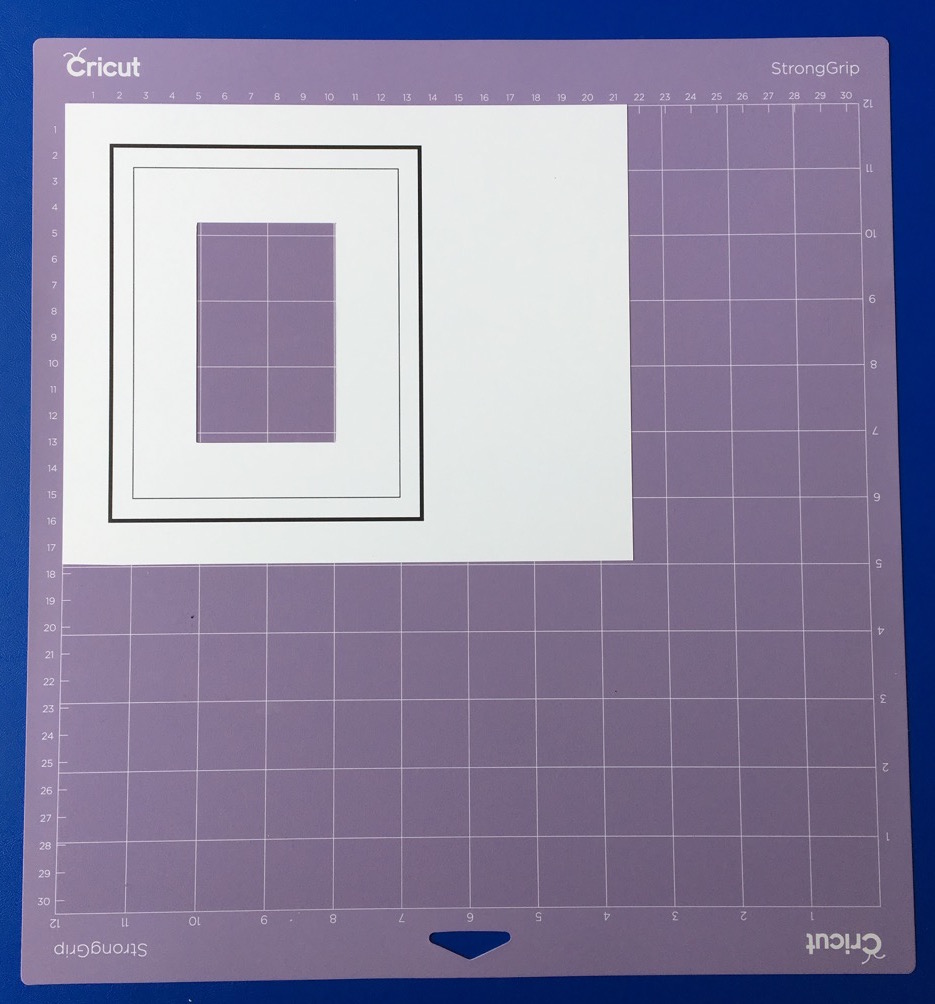
Load the printout onto the mat and follow the prompts to adjust to the material setting appropriate to your card stock, load tools and mat, and press Go. The Cricut will draw the bounding box with the pen and then cut out the slot for your blank.
Remove the cutouts. You may leave the jig on the mat or remove and replace it at any time. You may trim the jig at the bottom or right as long as you leave a margin of 1/2 inch or more outside the sensor mark. Do not lose track of which corner is the upper left, however.
Preparing the Design: the Corresponding File
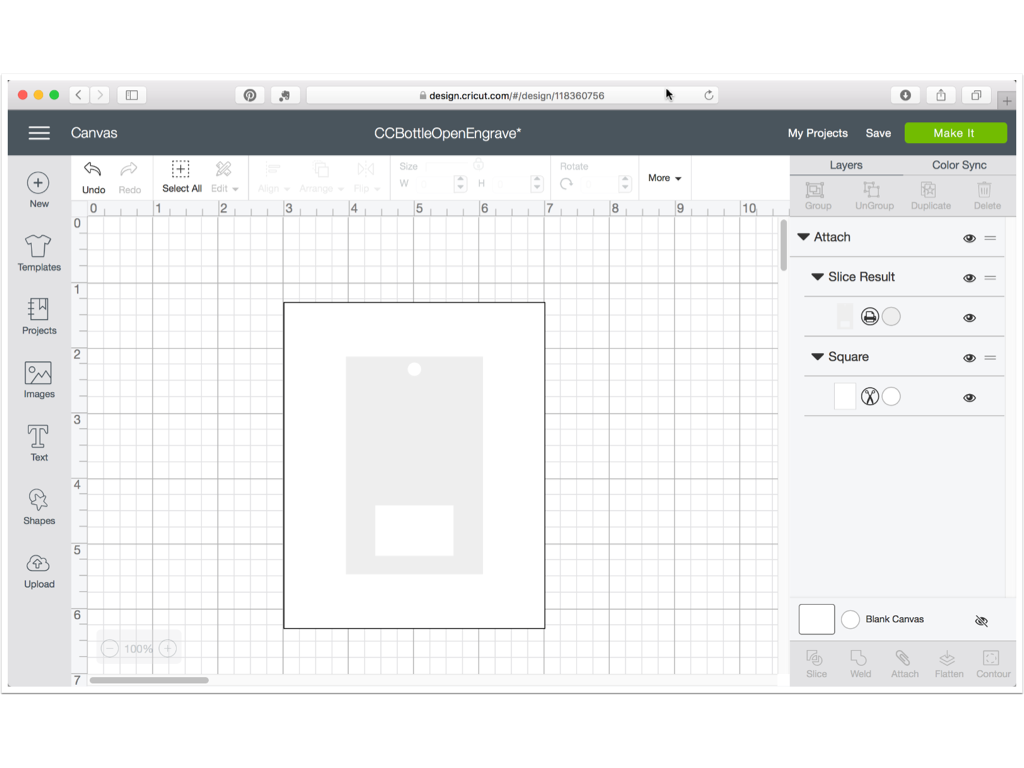
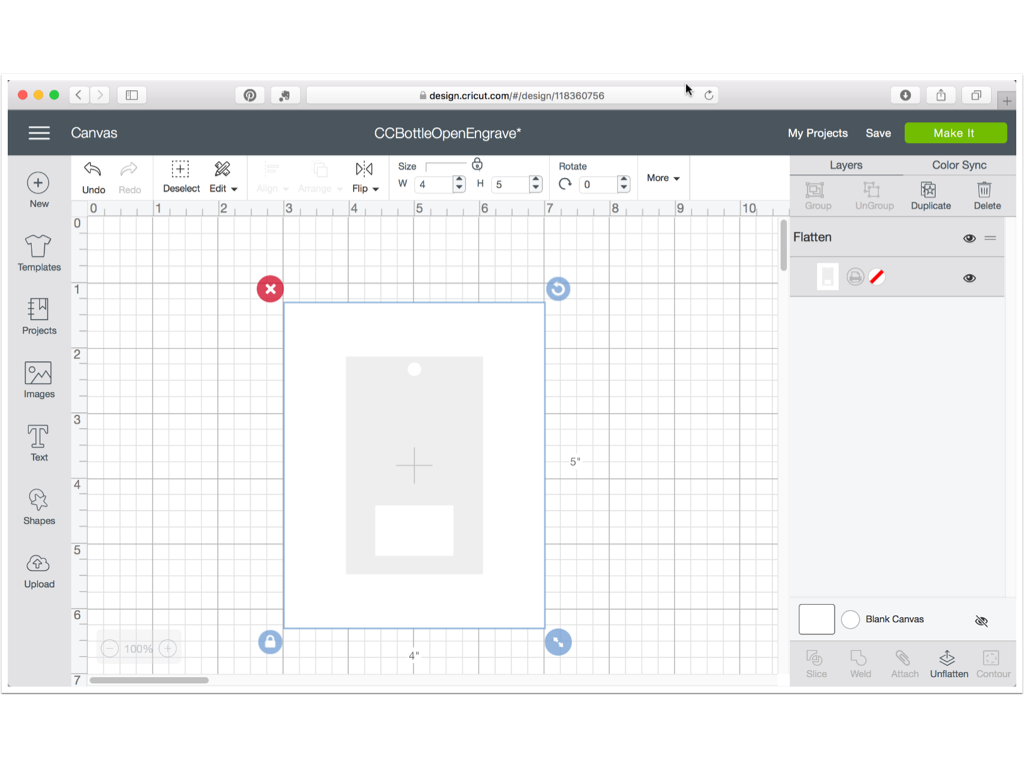
When the jig has been created successfully, click Save>Save As and give the derivative file the same name but replace "jig" with “engrave.” This will help you find and distinguish corresponding files.
IMPORTANT: the target shape and bounding box must keep their exact relative positions across the whole process in order for the jig system to work. Keeping them attached or flattened prevents accidental shifting.
Select the bounding box by clicking on its layer in the Layers Panel, change it to cut and its color to white. (If the now solid bounding box covers the target shape, drag its layer's handle and drop it below the target's layer to change the stacking order.)
Select the attached set and click Flatten. Save the file.
Preparing the Design: the Engraving Layers
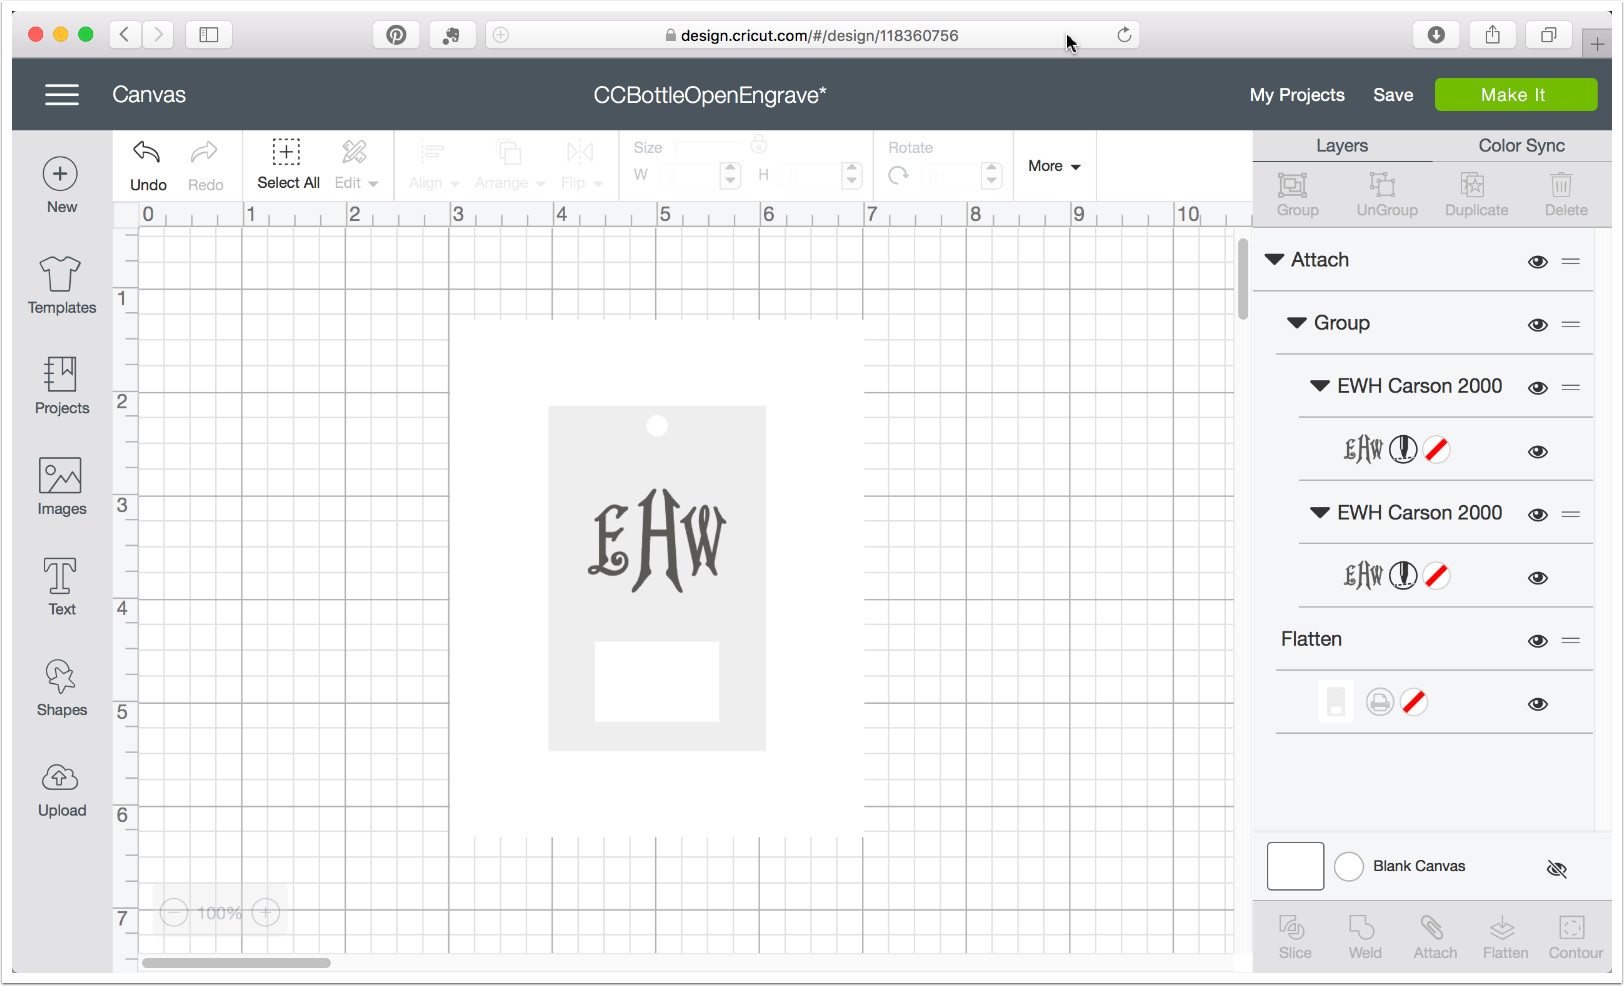
Import or create your engraving design and set it to score. (Please note that the engraving design shown here is filled with a tight crosshatch created in Silhouette Studio Business Edition.)
Tip: Because multipass settings do not apply in score mode, you may want to duplicate, center and group multiples of your engraving layer to achieve a deeper effect per run.
Size and position the engraving layer/group atop the image of your blank. Tip: Select all and center horizontally, then select just the engraving, hold down the shift key for constraint, and drag up or down to the desired vertical position.
Select All and click Attach.
Double check that all engraving layers are set to score, and that the only other visible layer is a flattened set. Use Save>Save as to save a new version of the file, perhaps adding a word or phrase to describe the design you have prepared.
Using the Jig: Loading
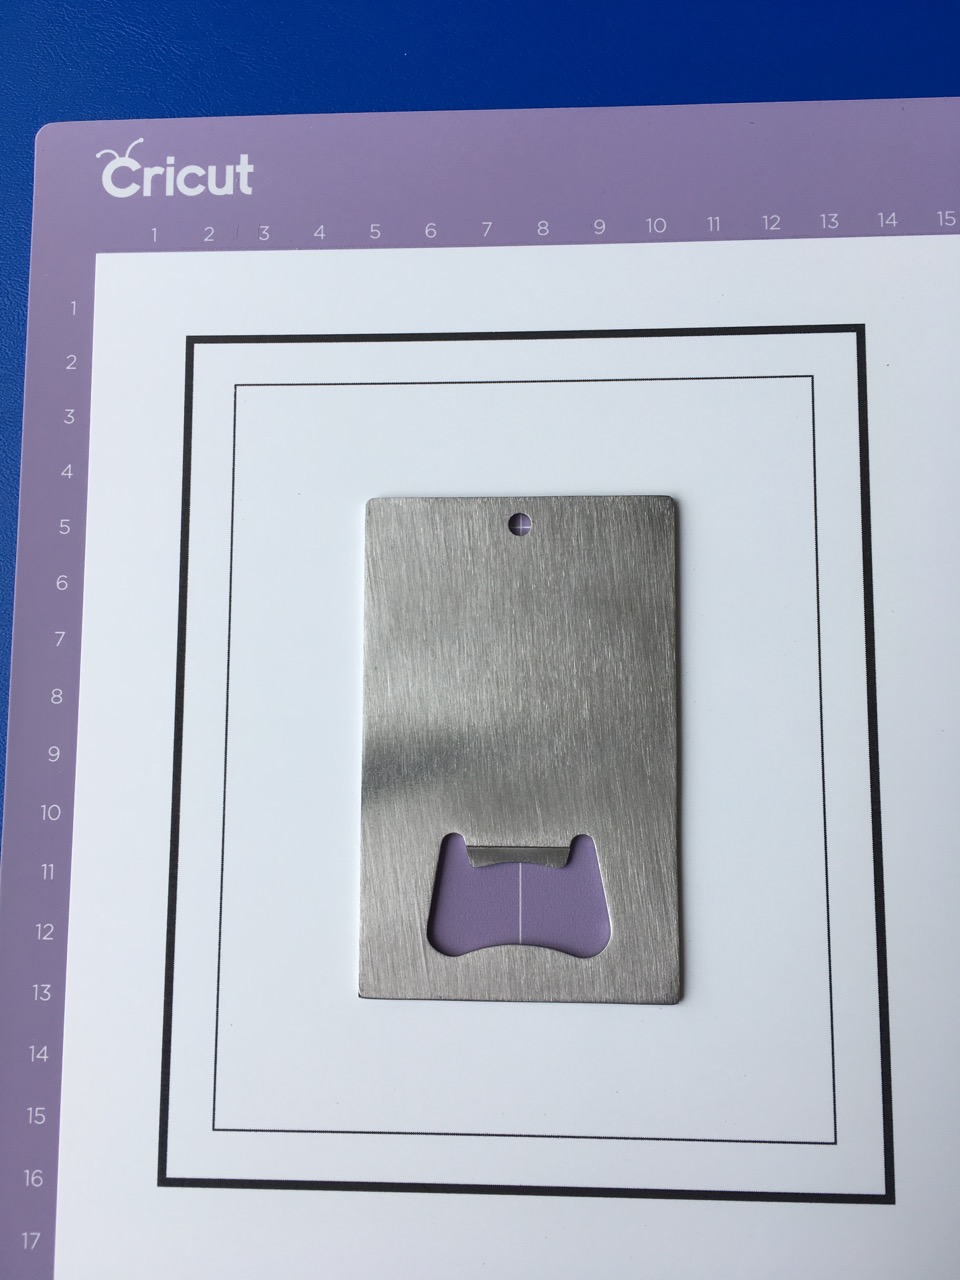
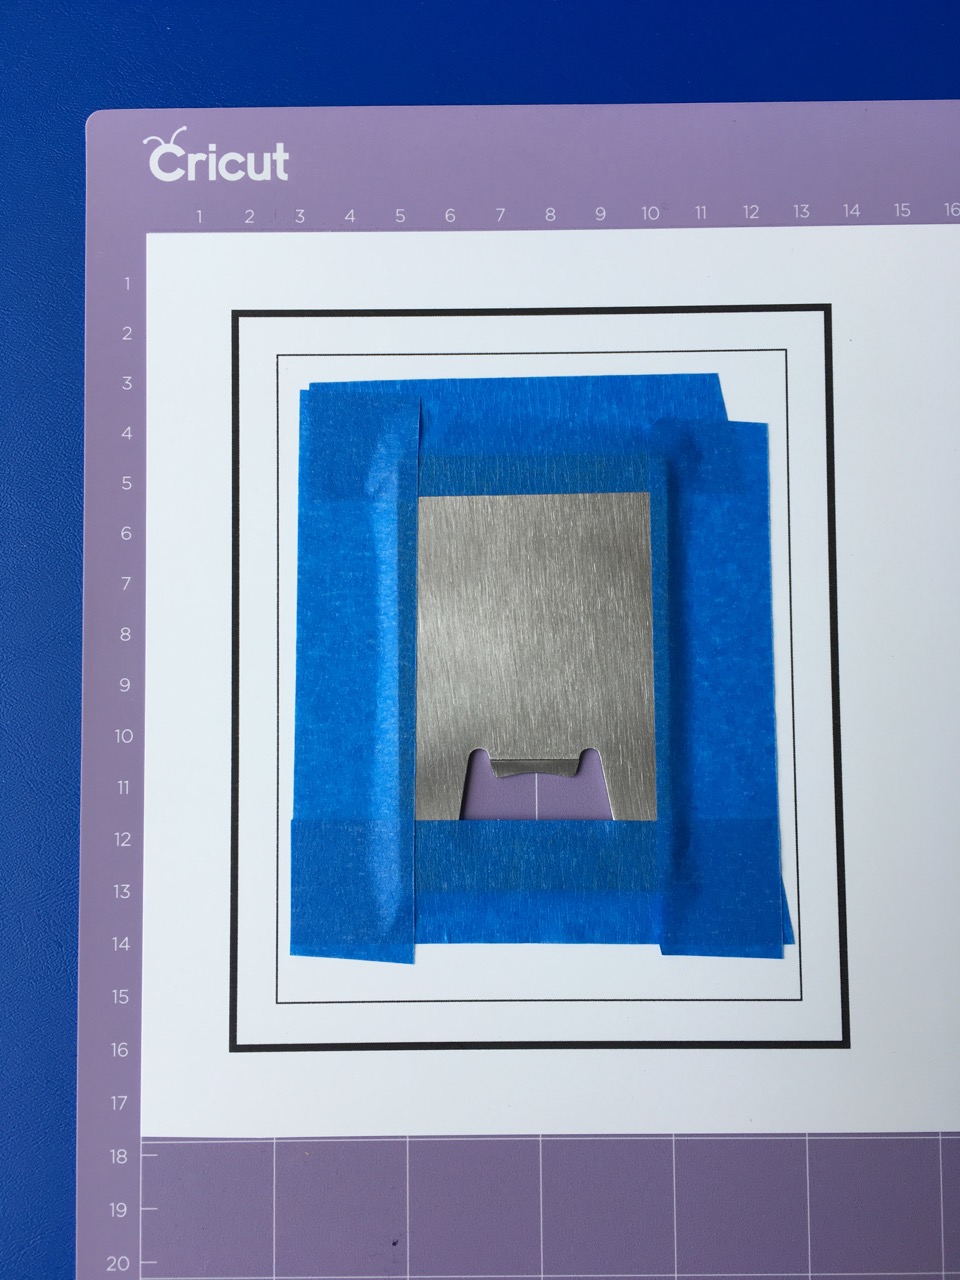
If you removed the jig from the mat, replace it in the normal (upper left) position. Put double-sided tape on the back of the blank and install it carefully into the open slot of the jig. Double check that the blank is in the orientation that corresponds to your file.
Secure/protect the top edges of your installed blank to the jig with painter's tape. Anywhere inside the pen-drawn box is safe for tape or annotations.
Using the Jig: Sending the File
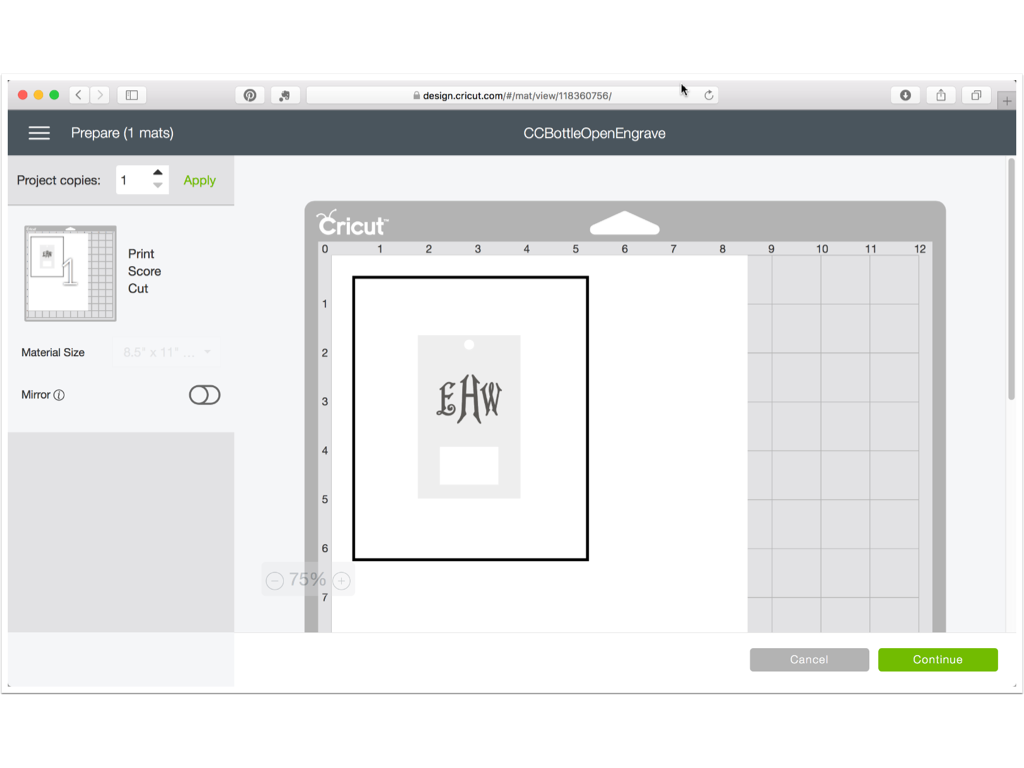
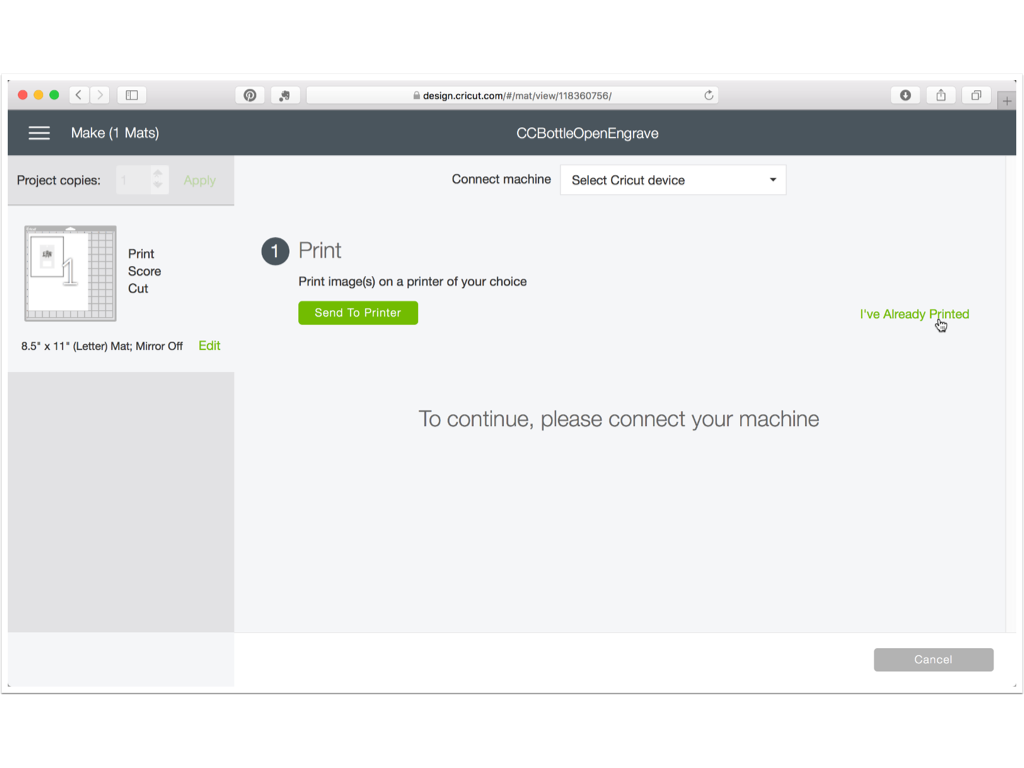
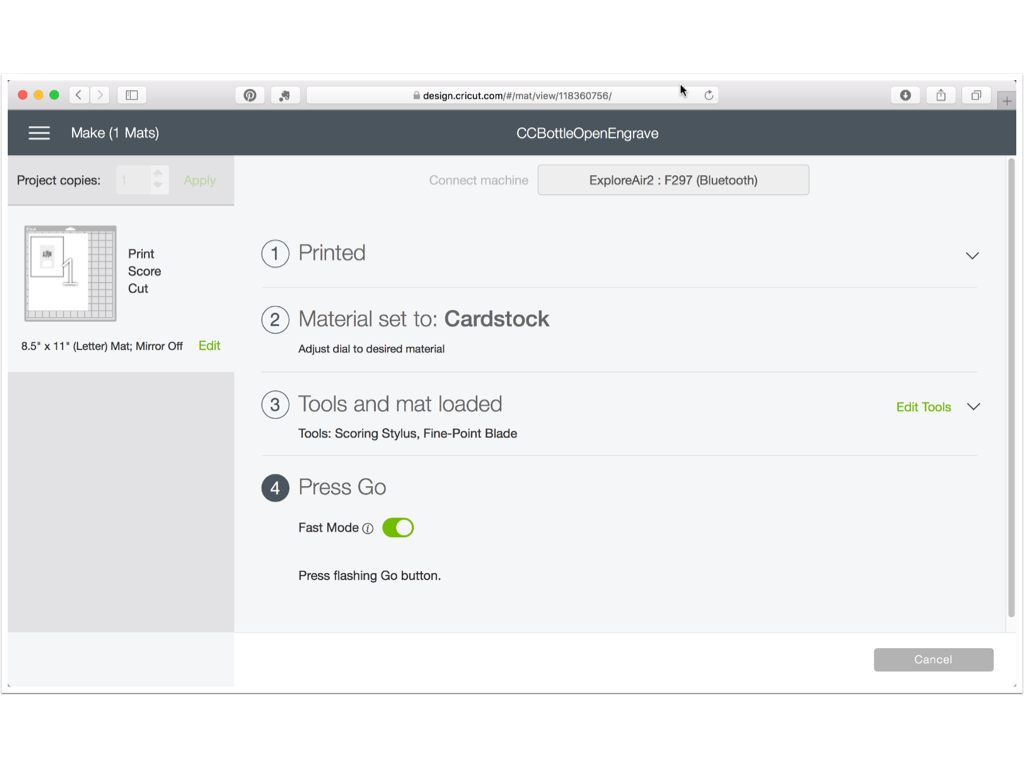
Click Make It, (you will see Print, Score and Cut in the actions list, but we will only be scoring) click Continue then click "I’ve already printed."
Select a material setting (I use the Cardstock dial setting for engraving)
Load tools based on your model as follows:
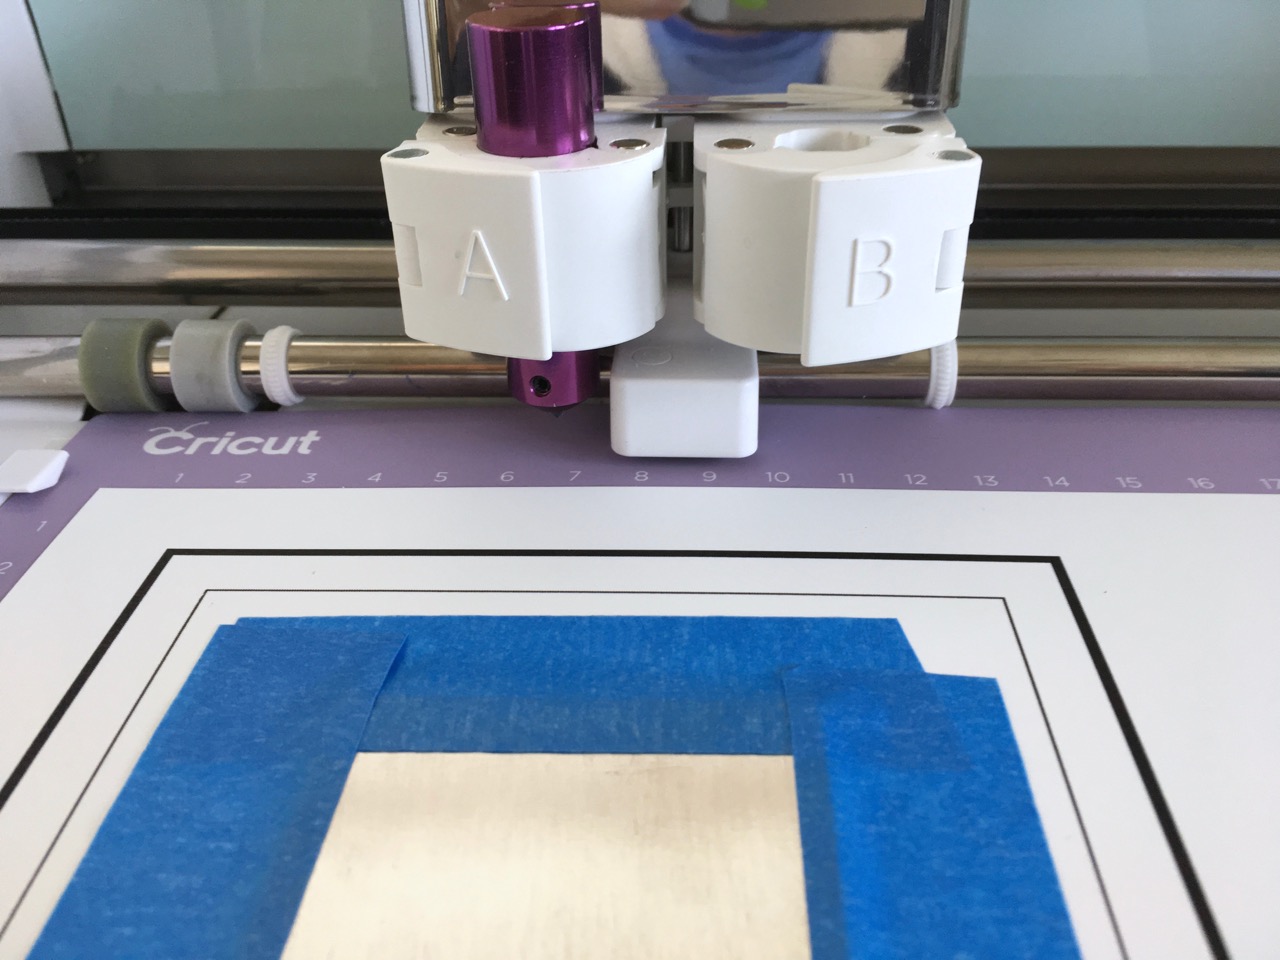
Explore/Air/Air2 - load engraver in A clamp, IMPORTANT: remove blade from B clamp
Explore One - load engraver into the (only) clamp (when using Chomas tool, use a rubber band or o-ring to raise the tool slightly from flush).
Adjust the star wheels so that there is enough clearance for the blank to travel comfortably between them.
Load the mat. Double check that the cutting blade is not installed. Press the Go button.
Using the Jig: Engraving the Design
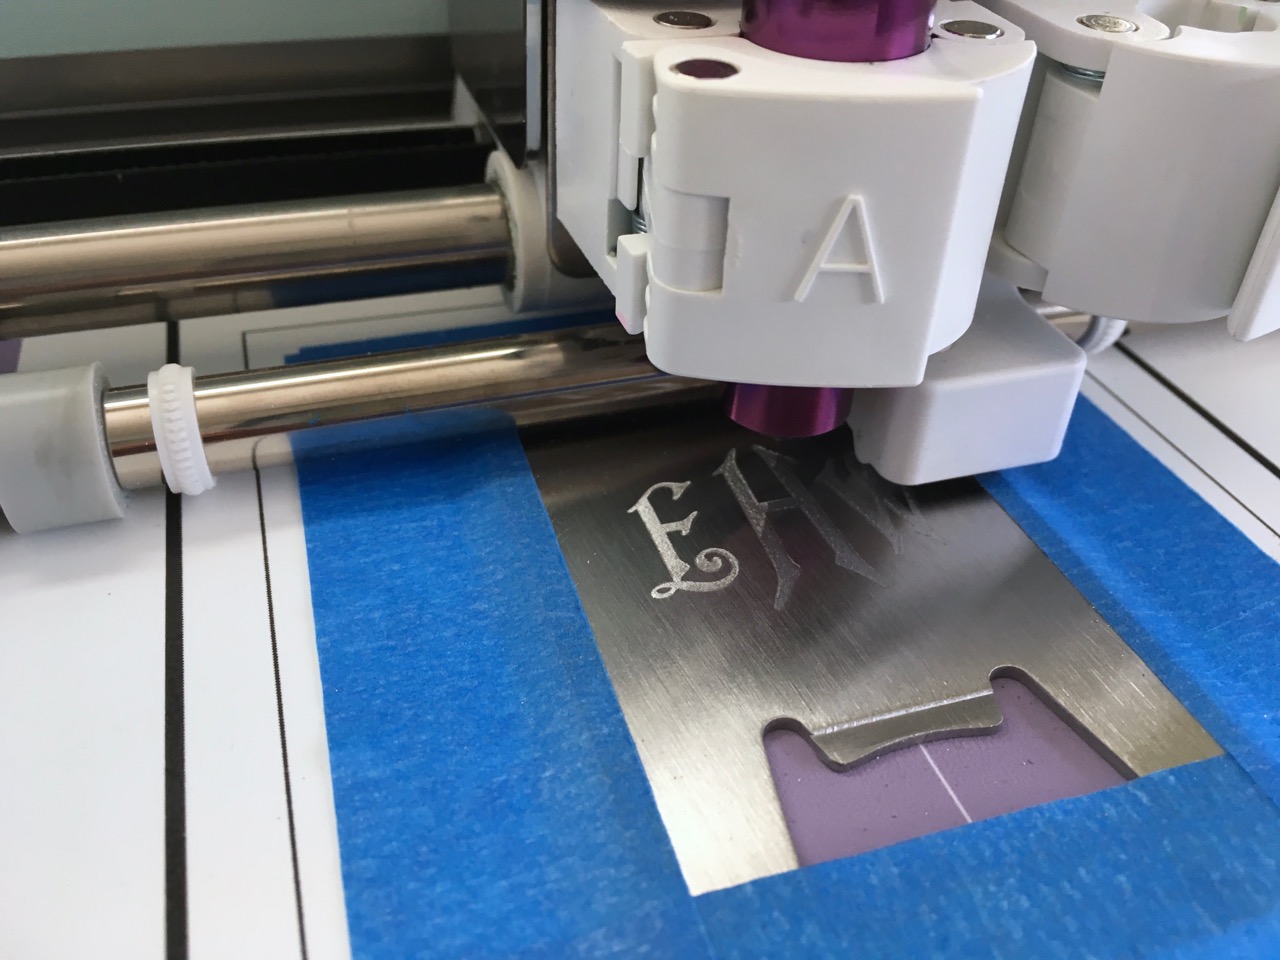
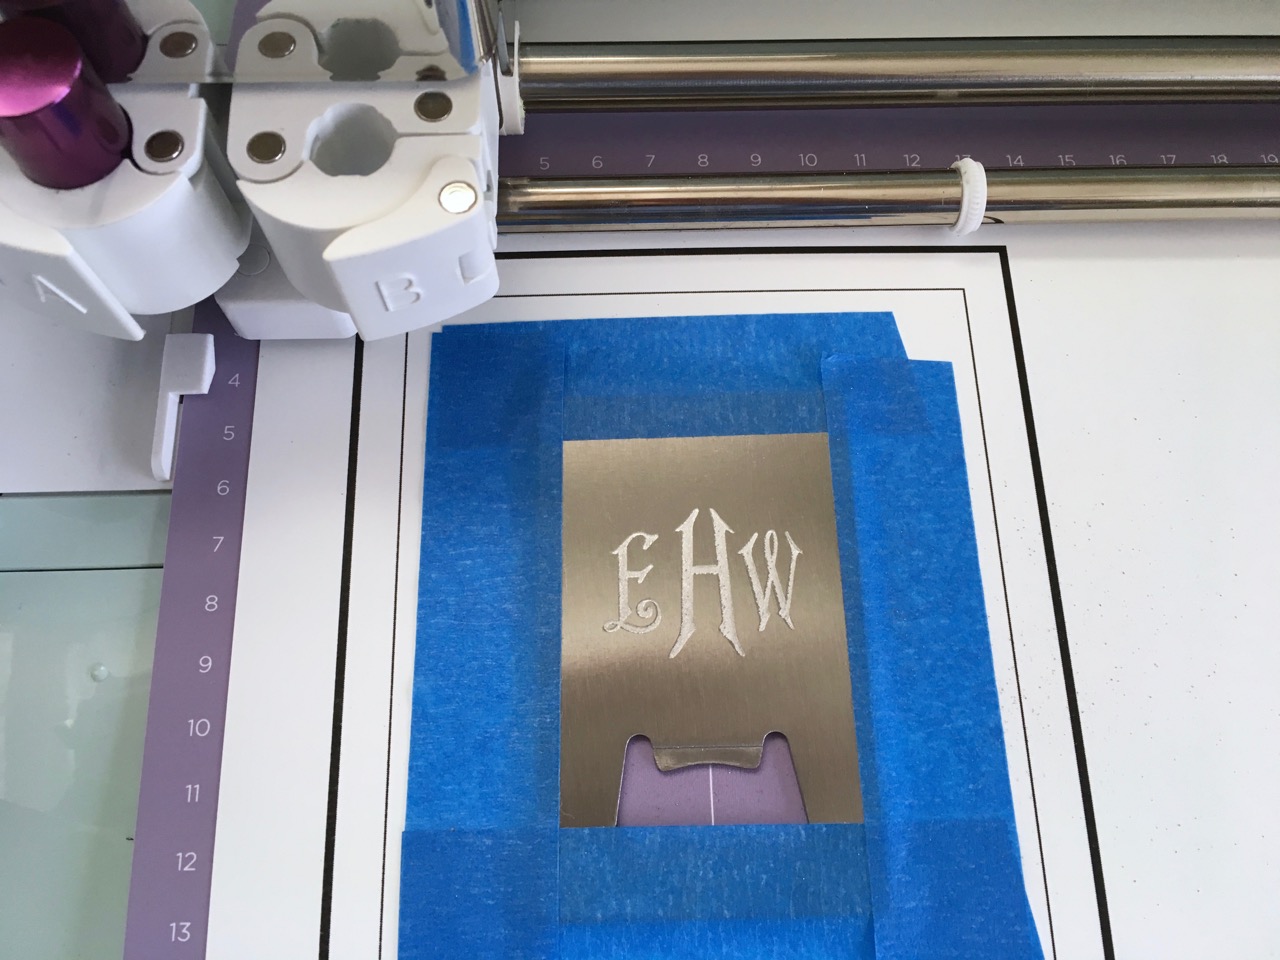
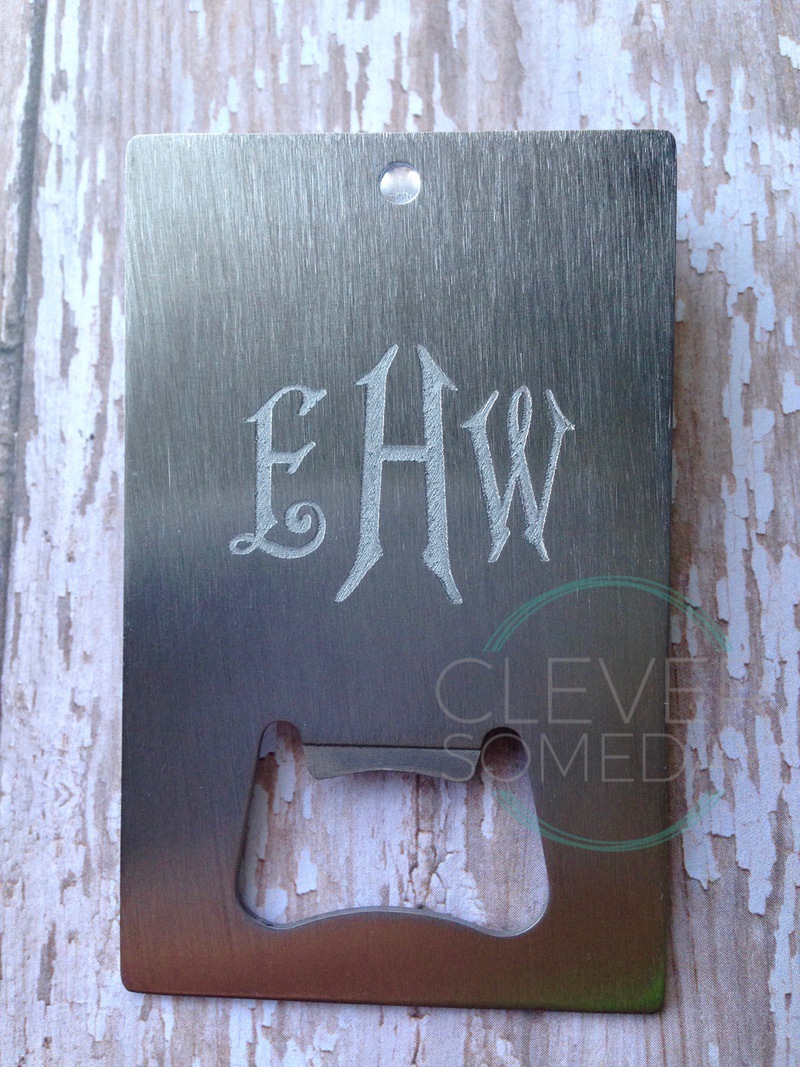
The Cricut will draw the mat in and back out, watch closely to verify that your blank clears the star wheels and the bar. Immediately thereafter, the sensor mark detection sequence will begin and if successful, etching will follow. Monitor the detection process to be sure the sensor mark is correctly detected and that engraving lands in position on the blank as planned. Continue the engraving as you normally would (monitoring, pausing to remove dust if necessary, etc).
When the engraving pass is finished, the Explore/Air/2 models will "air cut" (without a blade) the bounding box and stop. On the Explore One, however, when engraving is completed you will be prompted to install the blade. Instead, remove the engraver, leave the clamp empty and press the Go button to finish. As usual, additional passes can be initiated by pressing the Go button instead of unloading the mat.
Using the Jig for Other Actions
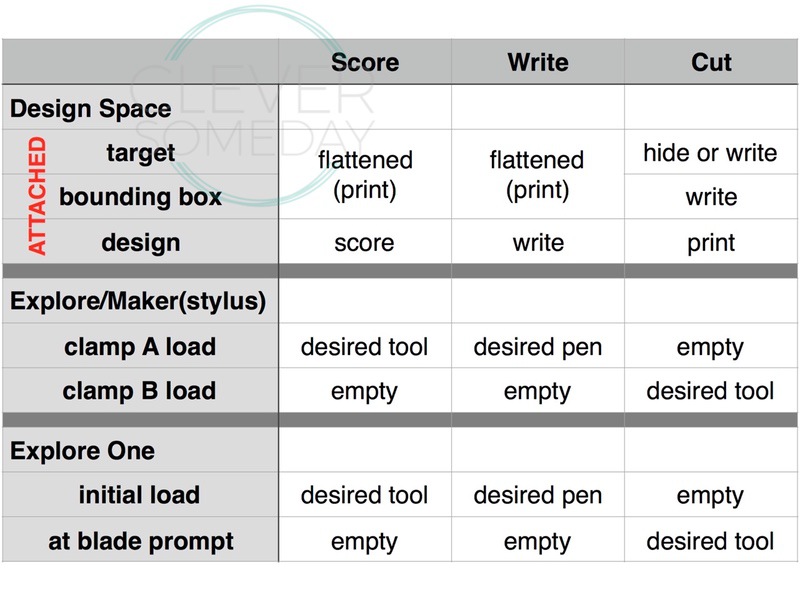
The steps for creating a jig to score, write or cut on a target item are the same, but the steps for setting up the corresponding file, and loading tools into the machine to use the jig are different. Refer to the chart above to use a jig for writing or cutting actions.
Reusing the Jig
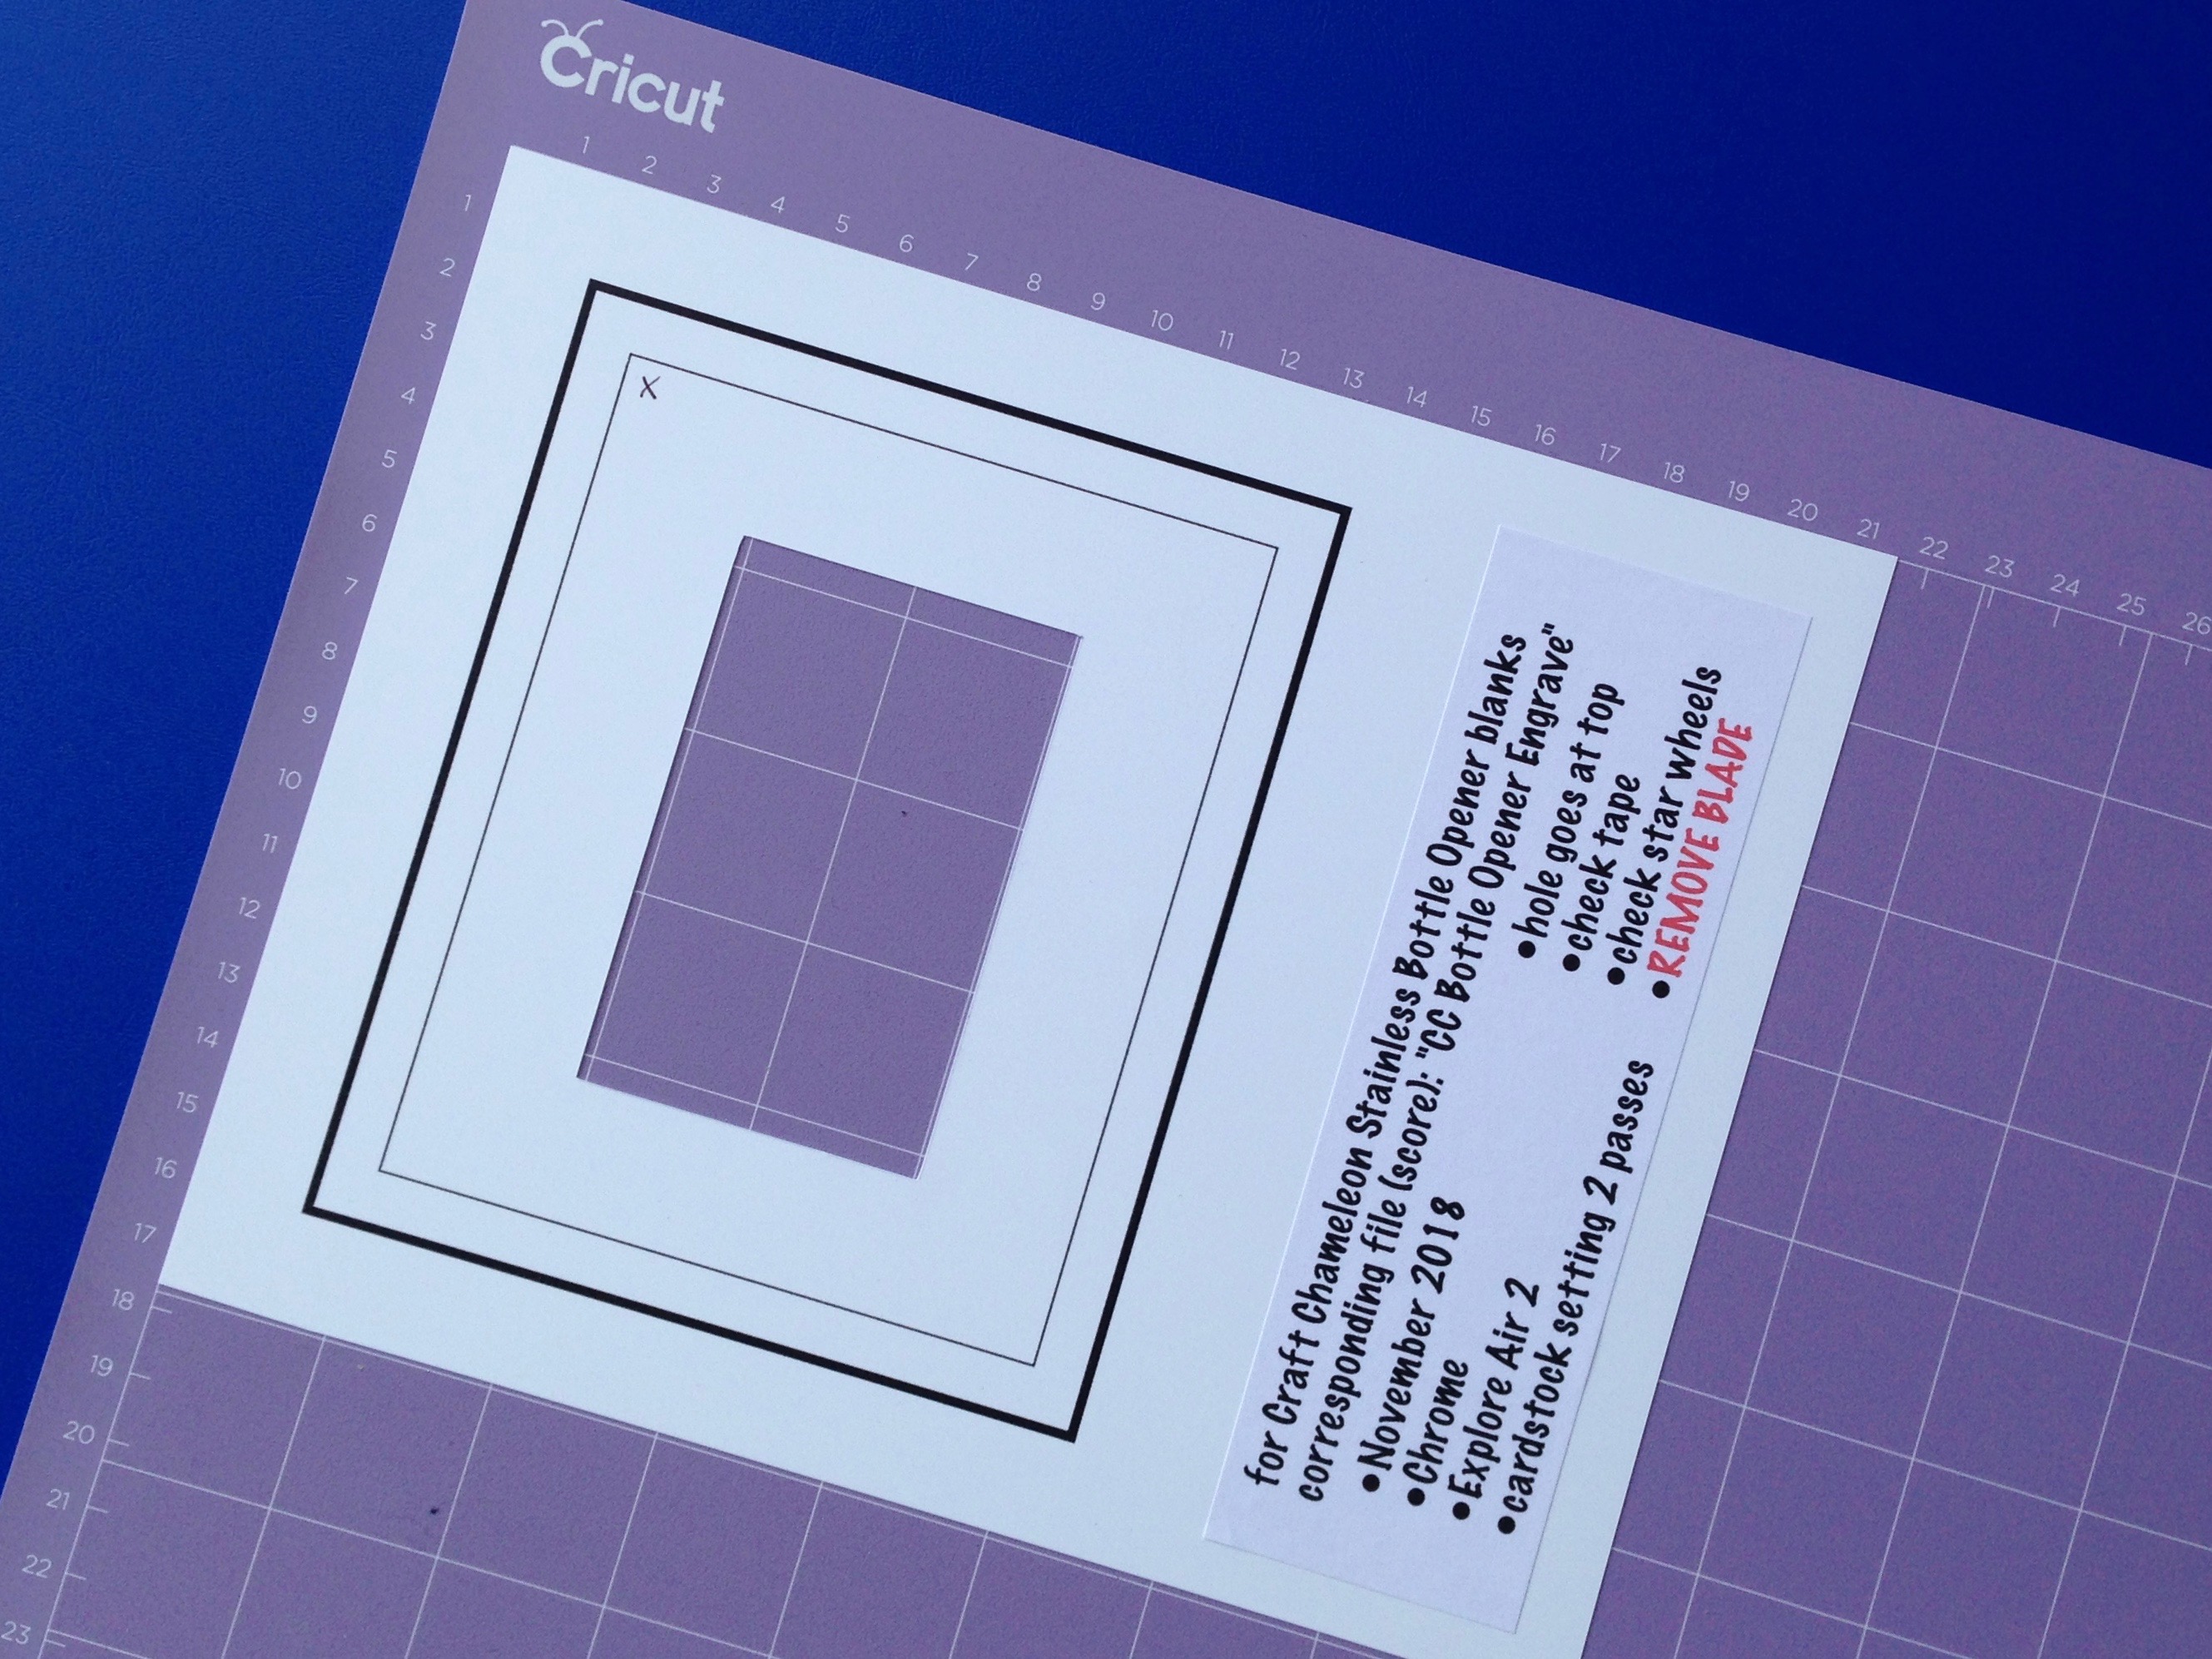
A jig can be reused any time, even after removing it from the mat, as long as it stays in good condition and you still have the corresponding project file (assuming Cricut has not changed the sensor mark format). It is probably best to use a jig with the same browser and cutter that created it, though I have had no issues interchanging them. You may want to mark each jig with the name of its corresponding file and other information to help you keep track of them. Be sure to keep any annotations inside the bounding box or well outside the sensor marks.
Keep in mind that Cricut Design Space does not have a means to copy and paste between projects. That means that to engrave the same blank with a different design you will want to open the corresponding file for that blank's jig first, save it under a new name, and then add or create your new engraving design, so as not to overwrite the original or an existing design.
As long as your jigs do not contain imported shapes, you can share the project files with other Cricut owners. Here are the links to the files for this example:
CC Bottle Opener Jig
Please visit my CleverSomeday blog for links to other jigs as they are added. Advanced Design Space users can refine and enhance their jigs by including multiple slots, thumb notches, built in annotations, etc, that suit their particular projects and work styles.
I look forward to seeing the creative ways Instructables readers use this sensor jig technique to further what is possible with a Cricut machine.