Creating and Programming Meter GUI Widgets Using Tkinter (ttkbootstrap) and Python
by xanthium-enterprises in Design > Software
687 Views, 0 Favorites, 0 Comments
Creating and Programming Meter GUI Widgets Using Tkinter (ttkbootstrap) and Python

In this Instructable, you will learn how to create radial meters using Python, the Tkinter GUI toolkit, and the ttkbootstrap library. These meters are inspired by classic analog dials commonly found on vintage control panels, such as those in old vehicles, aircraft cockpits, and industrial machines.
One of the key benefits of radial meters is their intuitive design. With just a quick glance, users can easily interpret how much of a particular resource has been used and how much remains. This makes them particularly useful for monitoring variables that change frequently or need to be observed in real time. Typical use cases include visualizing metrics like speed, pressure, temperature, RAM or CPU usage, battery level, fuel consumption, and more.
A great practical application of such a graphical interface is in robotics. For example, if you are working with a Raspberry Pi-powered robot, you can use Tkinter (ttkbootstrap) based radial meters to visualize parameters such as the robot's current speed and battery level.
Supplies

You will need a Python Interpreter,You can download it from CPython
If you are on another platform like Linux ,Linux is already installed. So no need to worry about it.
Before running any of the code in this example,Make sure that ttkbootstrap is installed on your System
You can install it using
On Linux ,You may need to install the pip package manager first using
Source Codes
Source Codes for building the meter can be freely downloaded using the below Link.
Create a Radial Meter in Tkinter

Now, we are going to create a simple meter using the ttkbootstrap library, which extends Tkinter by adding modern themes and styled widgets.
This simple meter will serve as a foundation, and you can later expand it
The Code is shown below
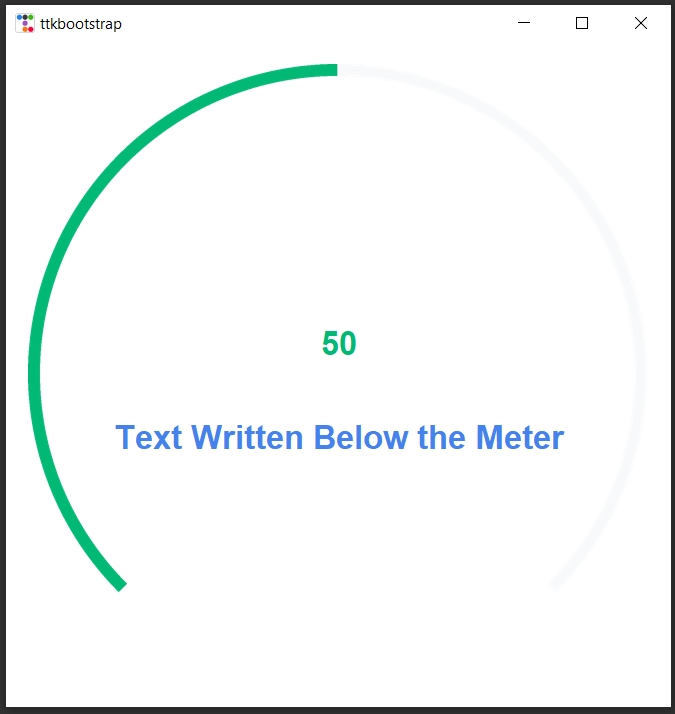
If you run this code it will create the following Output.
Now we will explain the basic parameters that govern the Tkinter Meter first and then explain modifying specific parameters in the subsequent steps.
This line of code creates a Meter widget using the ttkbootstrap library. The Meter widget is typically used to visually represent a value or progress, much like a speedometer or gauge.
We need to fill the Parameters into this meter widget to change its look and feel which we will explain in the below steps
Changing the Size of the Tkinter Meter and Adding Padding


Now that you have created the Meter,We will learn how to change the size of the tkinter (ttkbootstrap) meter widget and we will also learn to add padding to the Meter widget So they remain some distance away from the Window Margins.
Here i Will show only the Parameters that are required to control the size ,Please assume rest are there in the code.
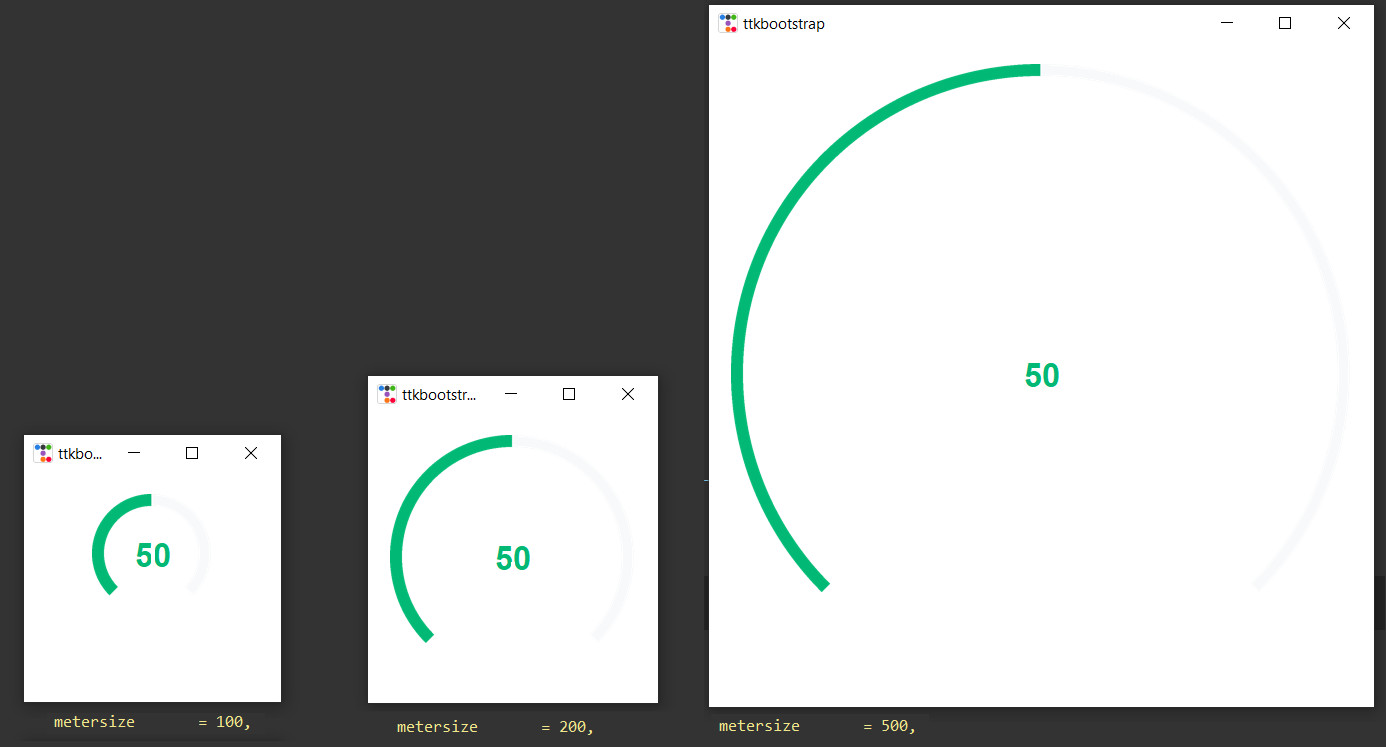
You can use the metersize parameter in the meter() class to change the size of the meter.The values are given in pixels.
This means that the size of the meter will be 500 pixels.
Here metersize determines the diameter of the circular or semicircular gauge. A larger value will make the meter appear bigger on the screen.
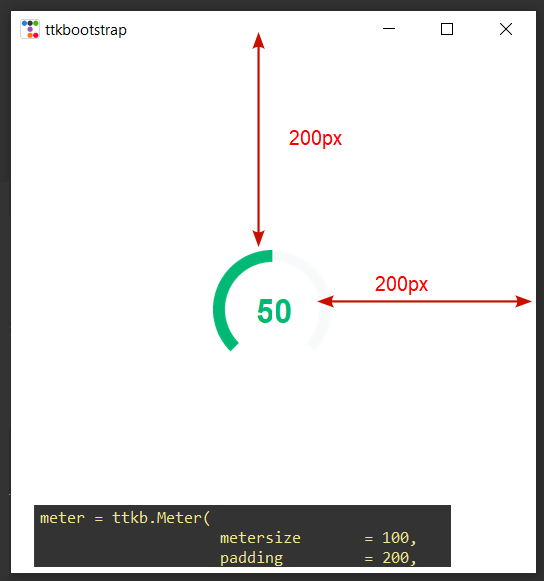
You can use the padding parameter to place the meter away from the window edges.
Here padding = 20 pixels.This adds a margin or padding around the meter. If you increase this value, the meter will be farther from the window edges.
Here is an example of different padding settings.
Changing the Size of the Meter Dial of the Meter Widget


Here we will learn to change the parameters of the ttkbootstrap meter dial like dial thickness ,stripe thickness and many others that govern how the value is displayed on the meter.
So first we will learn to change the Dial thickness of the ttkbootstrap Meter.
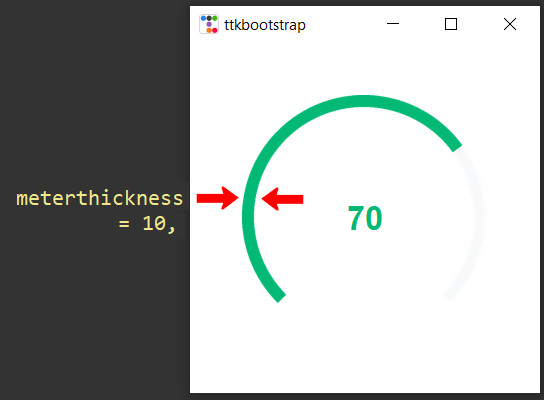
Here you can do that by using the parameter meterthickness which sets thickness of the meter dial (the outer ring of the gauge).
Here is the code segment to do that
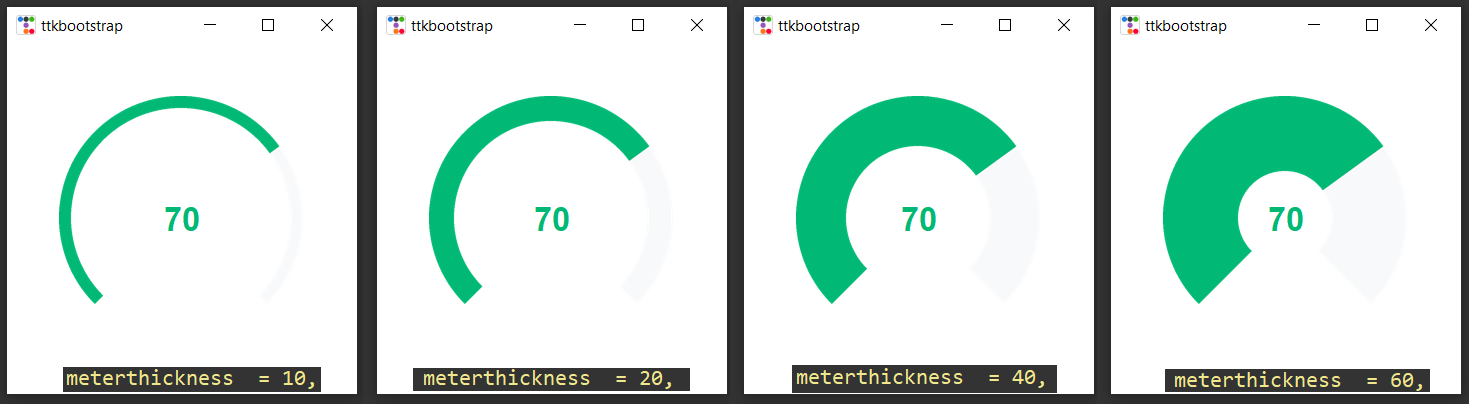
A higher value of meterthickness will make the outer ring of the meter thicker, giving it a bolder look. A smaller value makes the ring thinner
Here is an image that illustrates how the dial thickness changes as the meterthickness parameter varies.
Changing the Stripe Thickness of the Ttkbootstrap Meter Dial

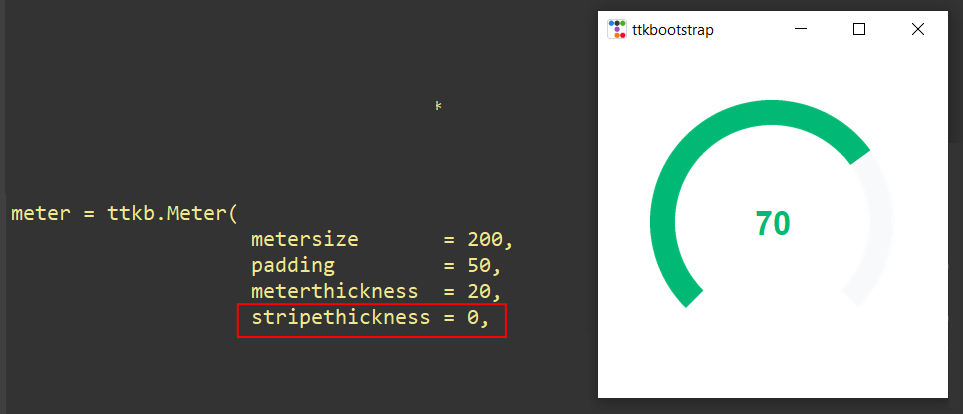
Here stripethickness parameter controls the thickness of the stripes inside the meter dial.
You can have two types of meter dial,one is the continuous type one and the other is the one with segmented dial.
If the stripethickness is set to 0, the stripes blend together, creating a seamless, uninterrupted ring with no visible separation between them, as shown in the image below
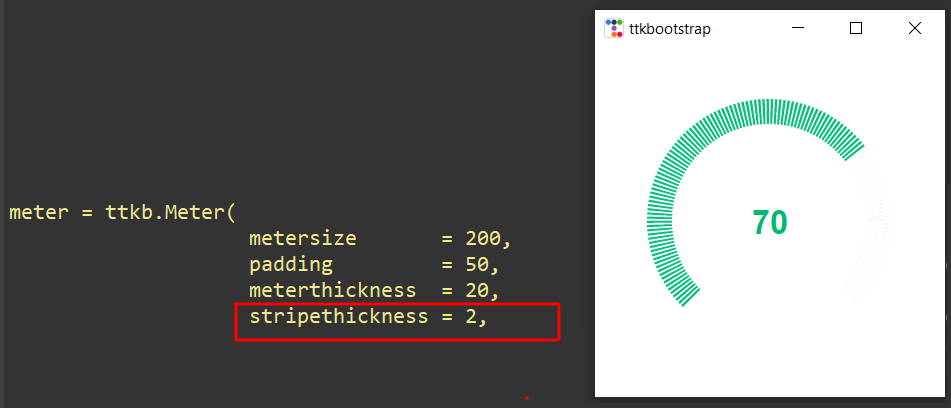
For stripethickness values greater than 1, discrete, clearly defined strips become visible, as shown in the image below.
However, please note that setting stripethickness to 1 does not produce any noticeable effect,this is a quirk in the library itself
As you increase the value of the stripethickness, the individual stripes become progressively thicker and more spaced out, resulting in fewer strips overall. This effect is visually represented in the image below, where the increasing stripethickness causes each stripe to widen, reducing the total number of visible stripes in the ring

Full Code is available from our Github Repo.
Switching Between Semi Circle or Full Circle Meter

The ttkbootstrap meter widget is available in two distinct types
- Semi-circle Meter (as shown in the examples above)
- Full-circle Meter
To choose the desired meter type, you can use the metertype parameter within the ttkbootstrap meter() method. The two options you can set are:
Semi-circle shaped Meter
The image below demonstrates the semi-circle type meter. This type of meter fills in a counterclockwise direction, beginning from the leftmost point and moving towards the right. The layout is designed such that:
- The least value (0) is displayed at the far left.
- The maximum value (100) is positioned at the bottom right of the meter.
As the meter's value increases, the visual filling of the semi-circle moves from left to right. In the example shown, the meter is displaying a value of 70, indicating that it is about 70% of the way towards the maximum value.
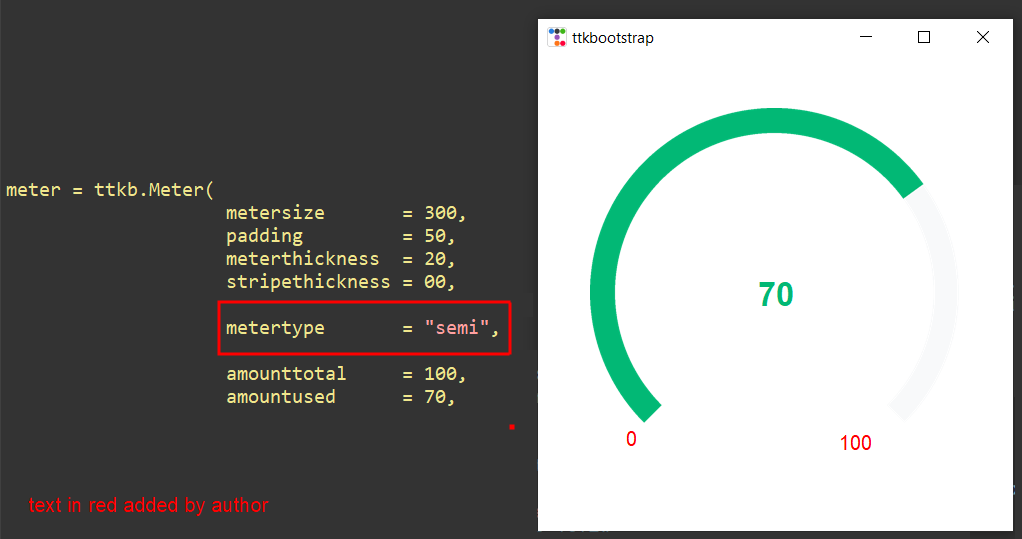
In comparison to the full-circle meter, the semi-circle meter tends to save on screen real estate, making it ideal for situations where only a portion of the full circle is needed to convey the desired information.
Full Circle ttkbootstrap Meter
The image below illustrates the Full-circle meter configuration. In this setup, the meter fills in a clockwise direction, starting from the top right and moving around the circle.
In the full-circle layout:
- The minimum value (0) is located at the top-right of the meter, marking the starting point.
- The maximum value (100) is positioned at the top-left, completing the circular path.
As the meter value increases, the filling progresses from right to left, gradually sweeping around the circle. In this example, the meter is displaying a value of 70, which is shown as a portion of the circle filled up to 70% of the total capacity, indicating the current progress

Full Code is available from our Github Repo.
Dynamically Updating the Tkinter Meter Values at Runtime

In this section, we'll demonstrate how to update the value of the meter while your application is running, so you can see the changes happen in real time. This is particularly helpful for interactive applications where the meter value reflects ongoing changes, such as user input or data updates.
There are two main ways to update the meter's value dynamically:
- amountusedvar.set(value): This method is best for updating the meter’s value on the fly, such as when it's driven by user actions like a slider or an input field. It allows for real-time adjustments as the app is running.
- configure(amountused=...): This method is more suited for initial setup or when you need to refresh the meter’s value as part of a UI update. It’s typically used for one-time changes rather than continuous dynamic updates.
Updating the Meter Value Dynamically with amountusedvar.set(value)
To update the meter value dynamically during runtime, we'll focus on using the amountusedvar.set(value) approach. This method allows you to modify the meter’s value in response to live events or user interactions.
If you want to retrieve the current value of the meter, you can use meter.amountusedvar.get(), which returns the current value stored in the amountusedvar variable. This is useful if you need to access the value at any point in your program.
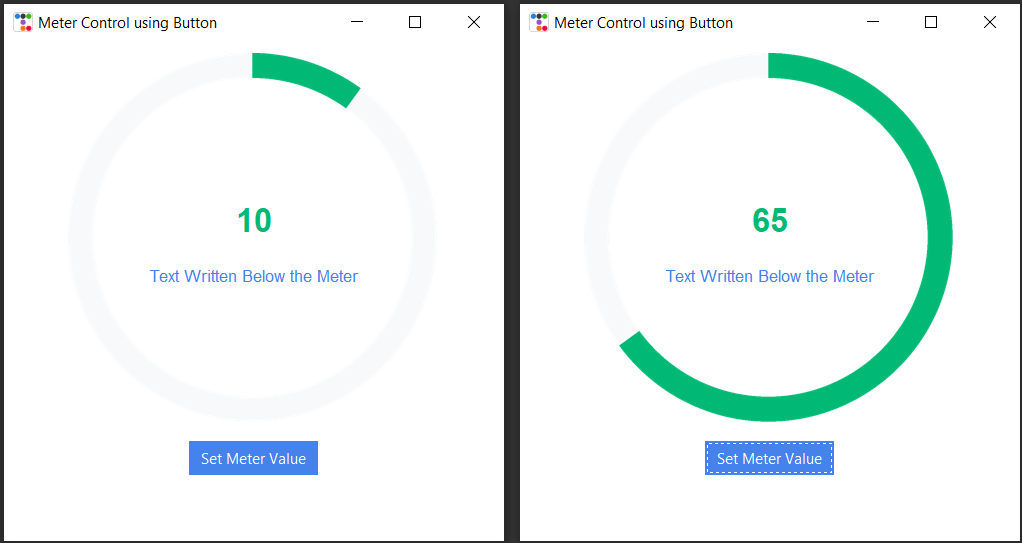
Here’s a basic example that demonstrates how to set the meter’s value to 65 during runtime using the amountusedvar.set() method
This code will immediately update the meter to show the value 65. You can call this method whenever you need to change the meter’s value,
In our application we will be putting this inside the Event handler of a ttkbootstrap button. So when you push the button the event handler will run and the meter will update to 65.
To know more about how to configure the tkinter ttkbootstrap button do check our complete ttkbootstrap tutorial here
Here is the Code for that.
Full Code is available from our Github Repo.
In addition to dynamically updating the meter’s value using the amountusedvar.set(value) method, you can also use the configure(amountused=...) method to set or update the meter’s value. While amountusedvar.set(value) is ideal for real-time, interactive updates, the configure method is typically used for one-time setups or UI refreshes.
The configure method is more commonly used when you're initializing the meter or when you want to update its settings at a later time, as opposed to during continuous user interaction. It’s useful for changing the meter’s value in response to specific conditions, or when you're setting the value during the setup of the application.
Using the configure Method
With the configure method, you can set or update multiple properties of the meter at once, including its value, appearance, or other attributes. This method is particularly helpful when you want to update the meter in bulk, or when you need to adjust its value after initial creation.
Here’s the basic syntax for the configure method
This sets the value of the meter to the specified value. Unlike amountusedvar.set(value), which is a direct method for updating the value, configure is often used when modifying or refreshing the entire meter widget.