Creating a Meeting in Microsoft Outlook
by ntigges in Circuits > Microsoft
694 Views, 0 Favorites, 0 Comments
Creating a Meeting in Microsoft Outlook
Welcome! Have you ever needed to set up some time with a co-worker or a manager, but you weren't sure on how to accomplish this? After reading this instructable you will be able to confidently schedule a meeting in Microsoft Outlook in both a physical setting or a remote setting utilizing Microsoft Teams.
Supplies
Laptop/Desktop with Microsoft Office installed
Opening Outlook
Outlook can be found under your Windows Start Icon or it may be pinned to your taskbar at the bottom of your screen. When you locate the icon, double click to open the application.
Locating Calendar Icon on Opening Screen

When Outlook launches you will first see the Mail screen. Our task today is to locate the Calendar Icon, you will find this in the lower left-hand corner of your screen. Double click on the icon to launch the calendar portion of Outlook.
Selecting New Meeting

At the top of the calendar screen, you will have a toolbar that contains many options. In order to create a meeting invite, you will locate and click the second icon from the left side of the screen, New Meeting.
Entering the Title of the Meeting

When the New Meeting window opens, your cursor will begin on the line Title. Here you will want to enter a short, clear, and concise title of your meeting. This is an important step to ensure that the recipients open your invite and have a basic understanding of why you are requesting to meet with them.
Selecting Required Attendees
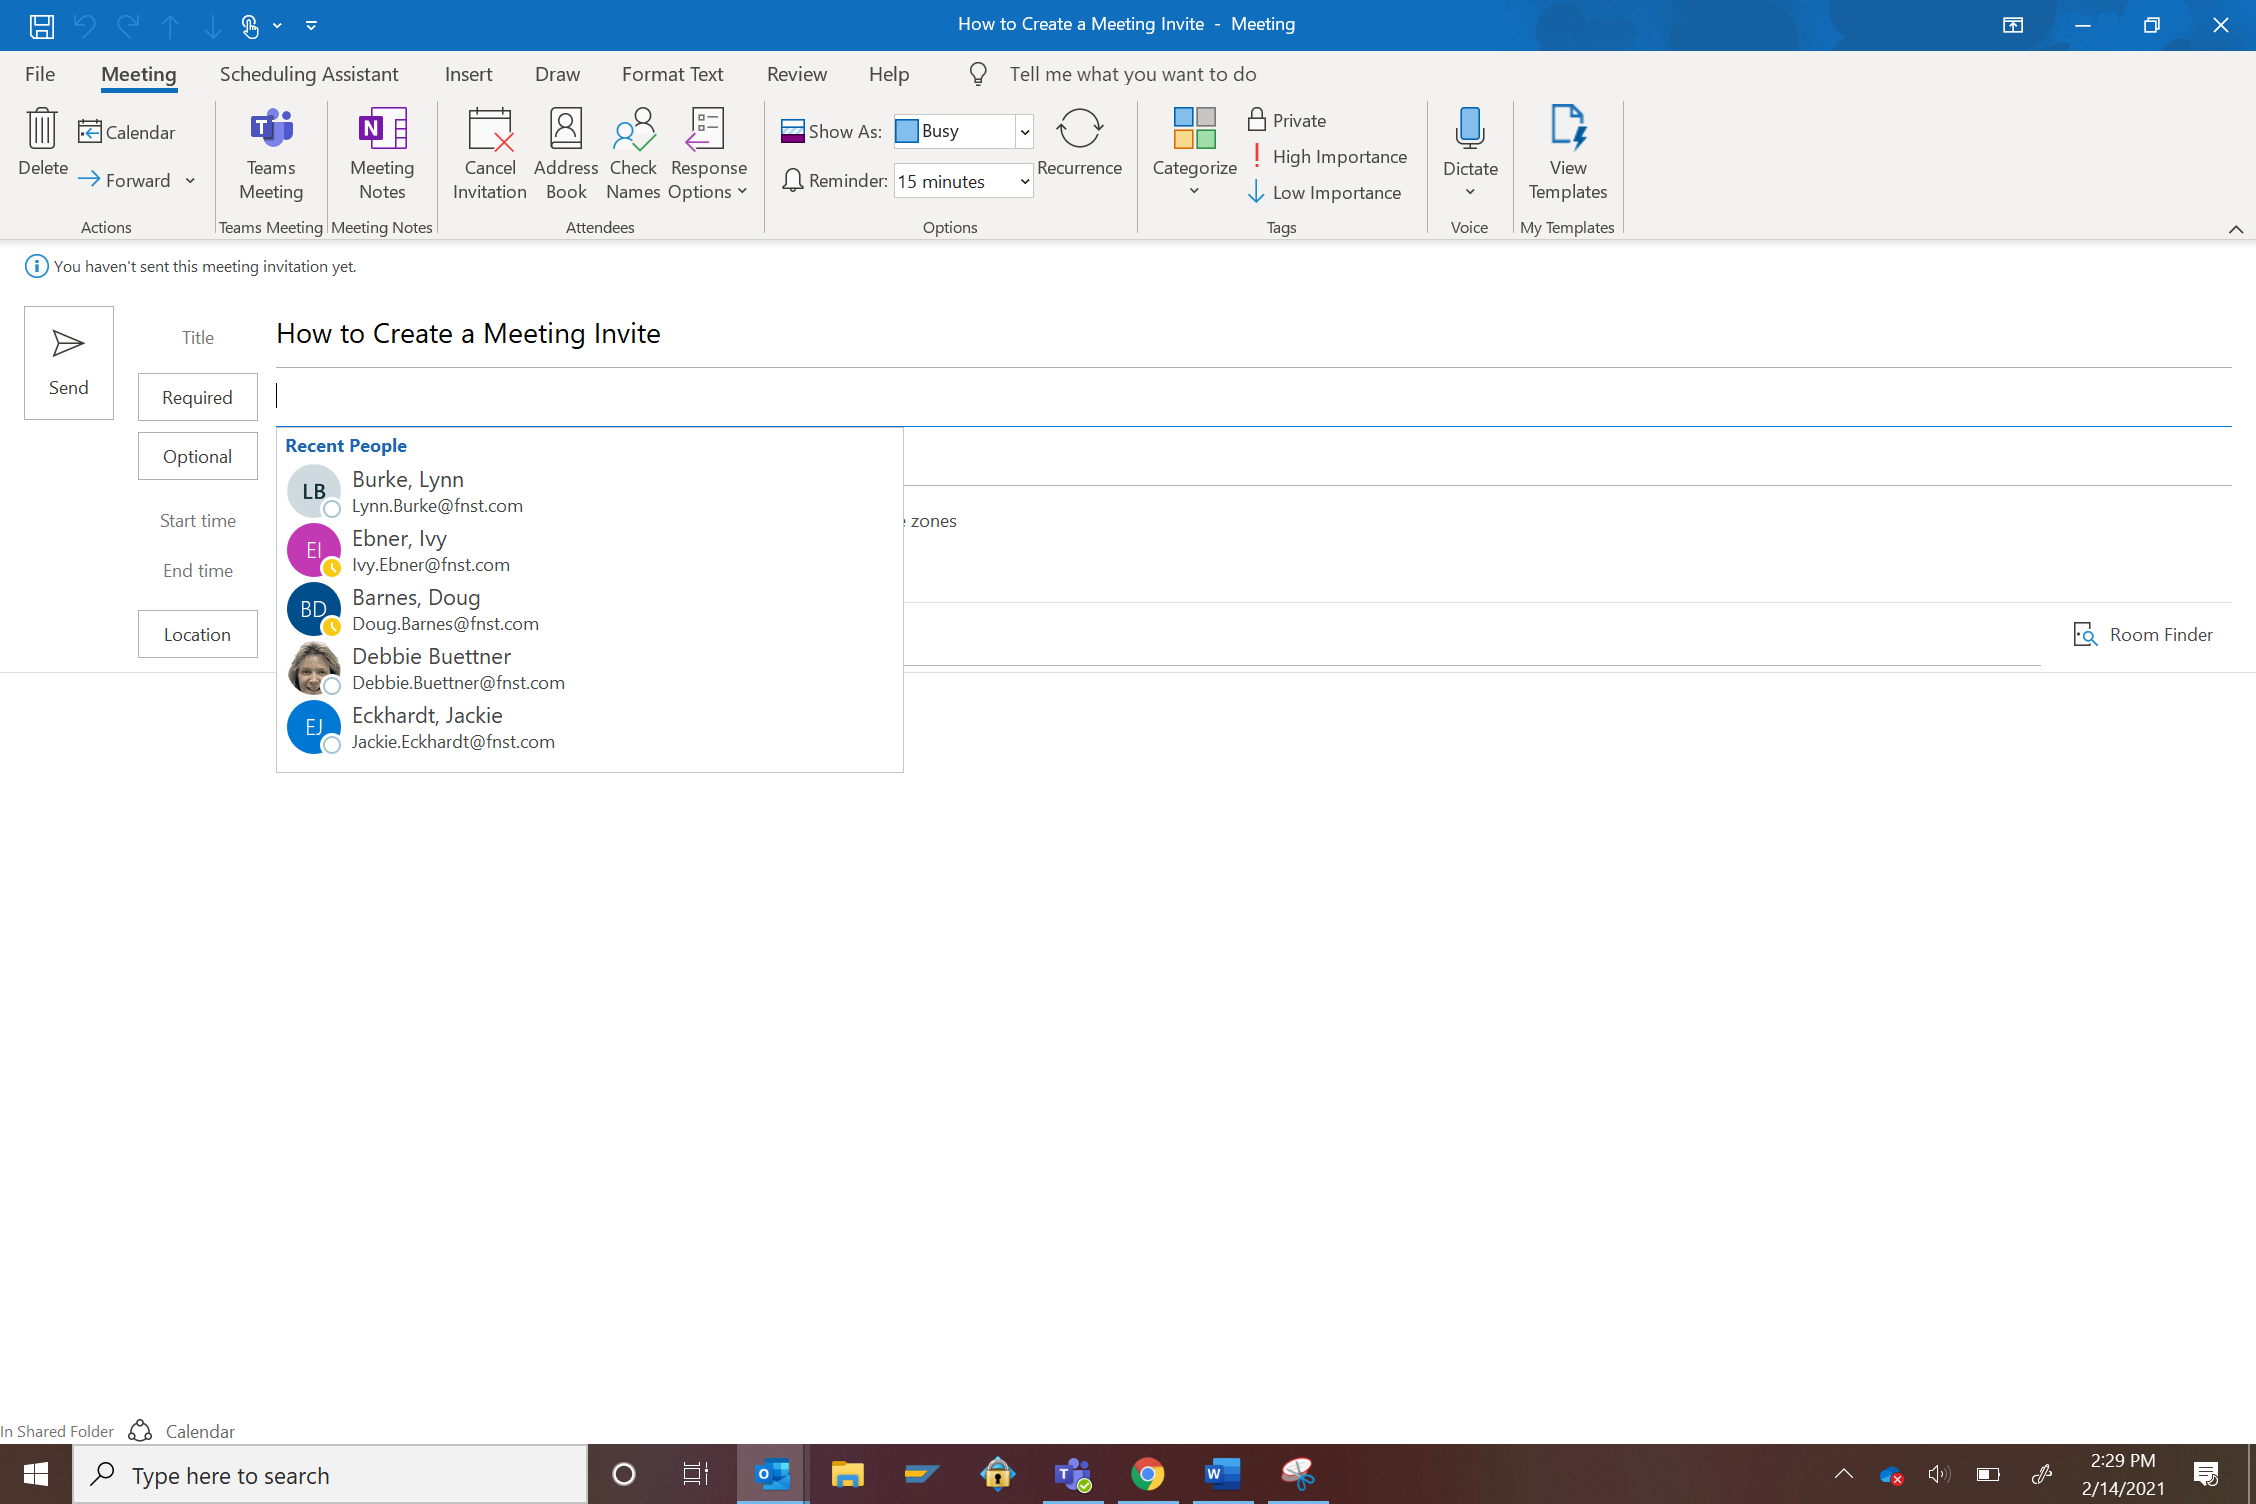
After you enter a title, you will move your cursor to the next line down titled, Required. In this field, you either enter the email of the recipients that you are requesting their presence or a drop-down will populate with the most used contacts from your address book.
Selecting of Optional Attendees
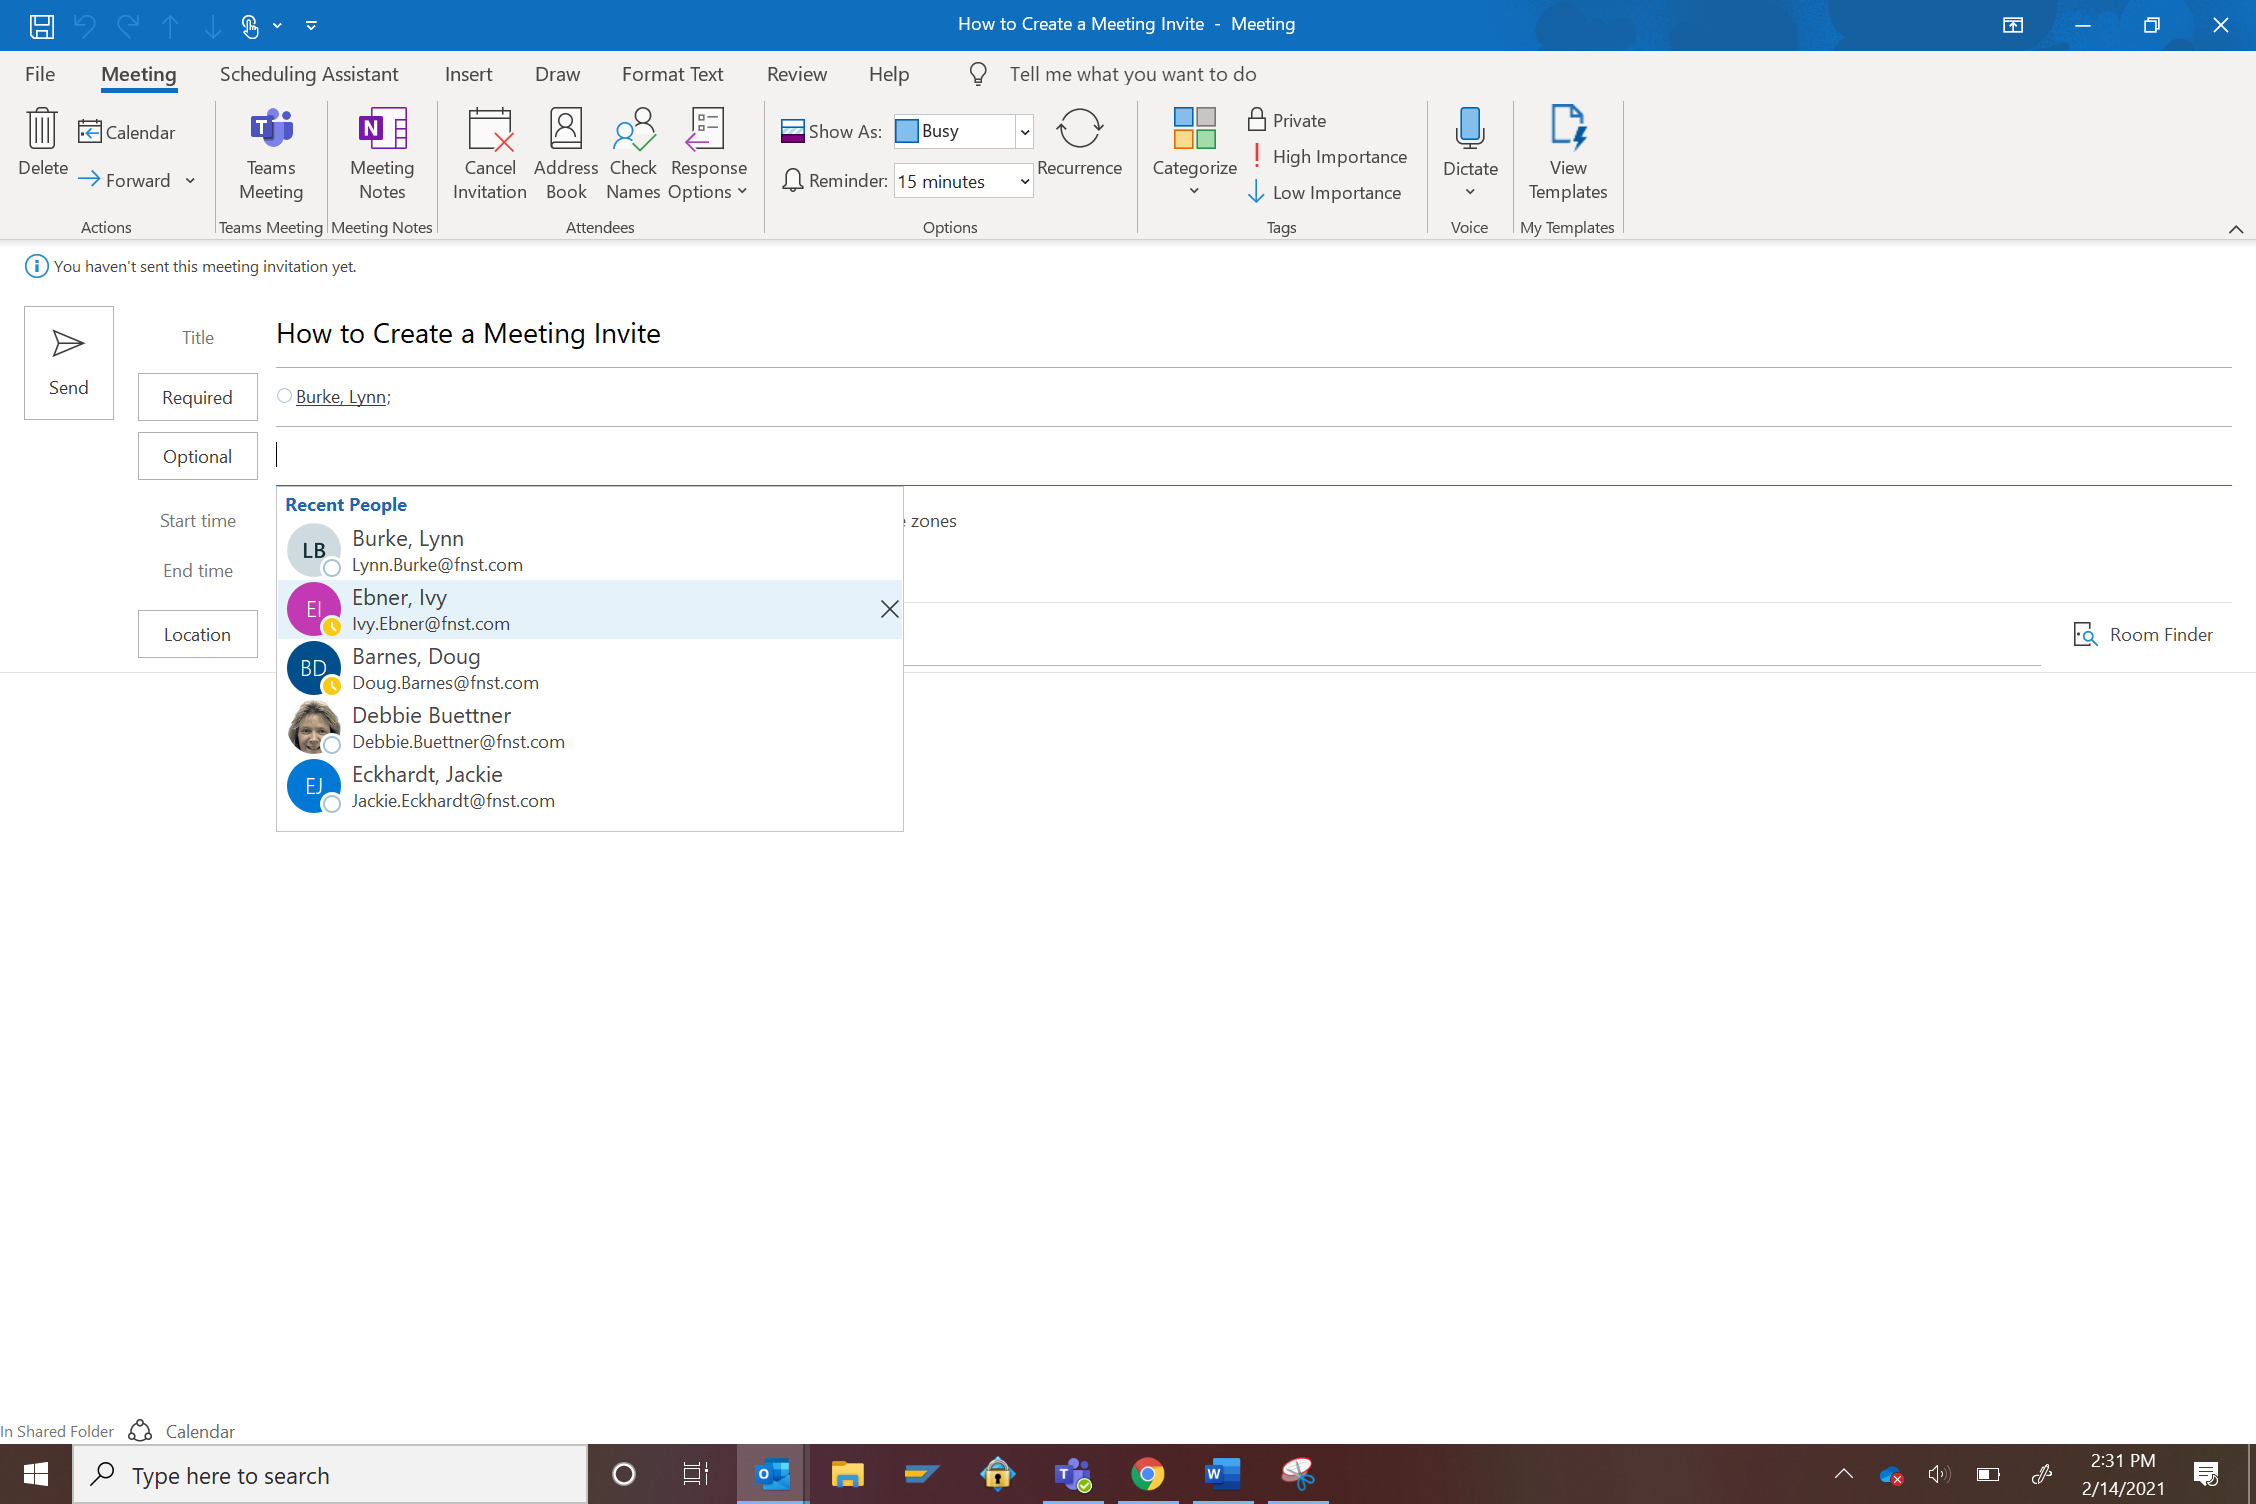
The next line down is labeled, Optional. This field is used to add attendees to the meeting invite that you may not require their presence but if they would like to join they are welcome or it may be to create awareness for coverage of a required attendee. You will use the same method as the Required field to enter names or email addresses.
Selecting Date and Time
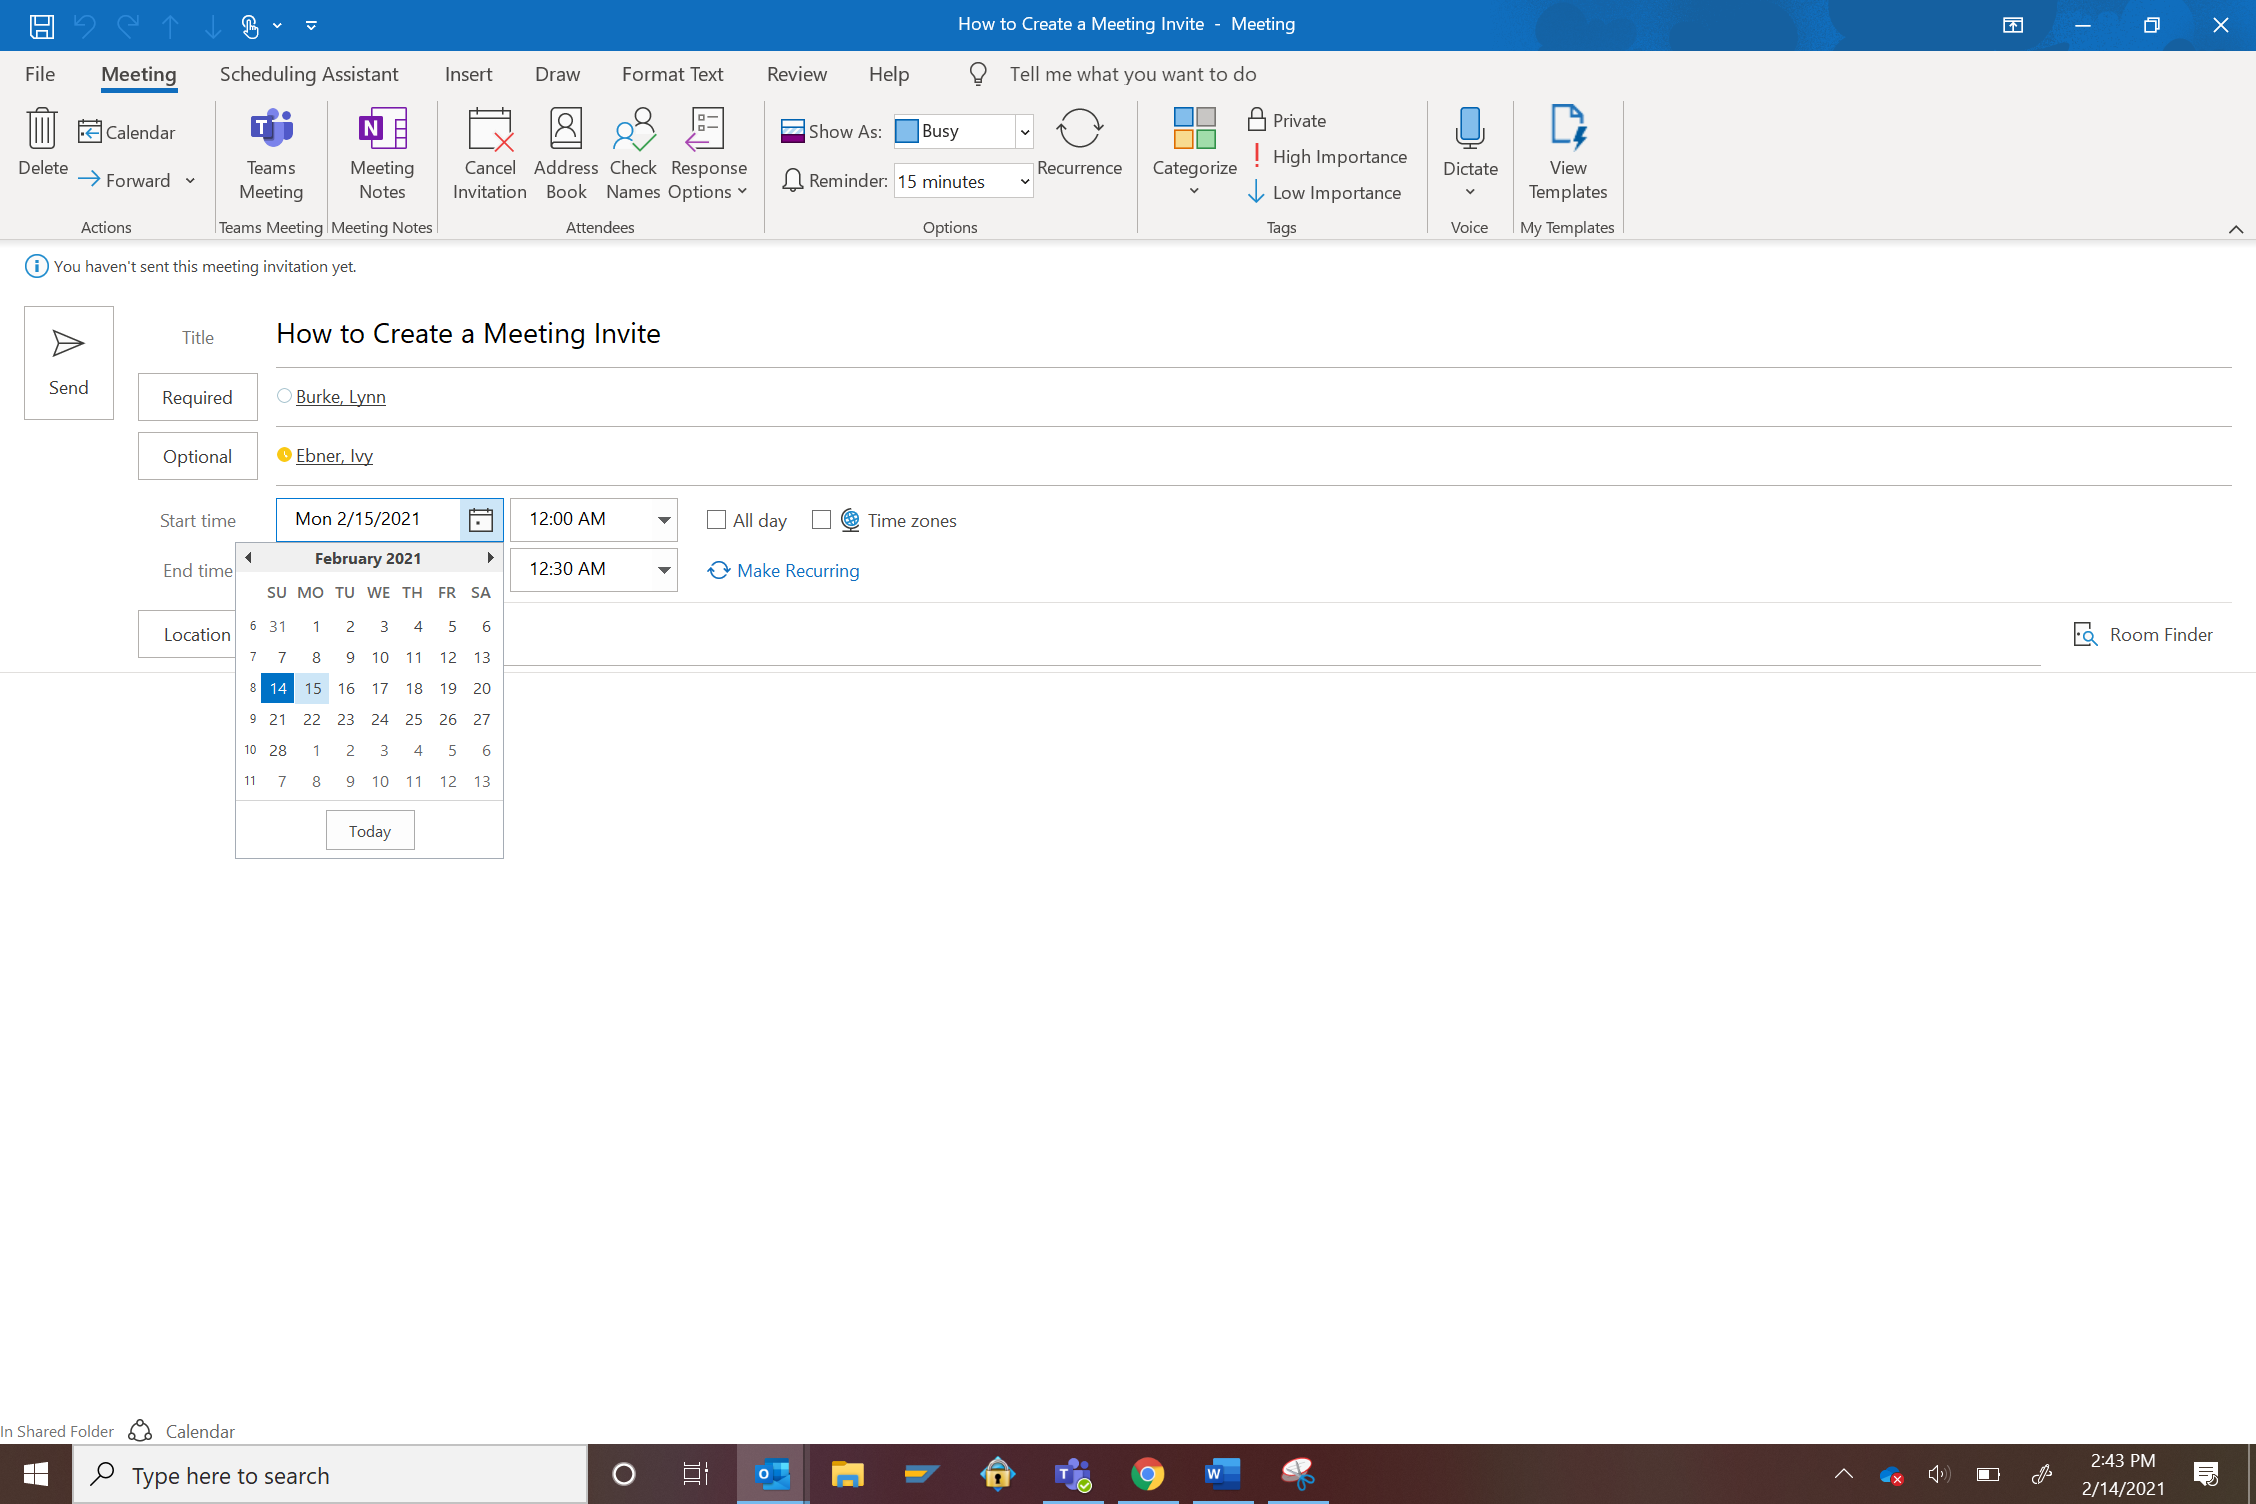
The next line down is Start time, here you will select a date and a time to begin the meeting. Prior to setting the meeting you should have created an agenda or have an estimated time of how long you plan on the meeting lasting.
You will click on the small calendar icon in this line and select the date requested by clicking on the date within the calendar. Then move to the start time and this selection is a dropdown, you will click and scroll up or down to find the time you want and then click on this time.
Utilizing Scheduling Assistant
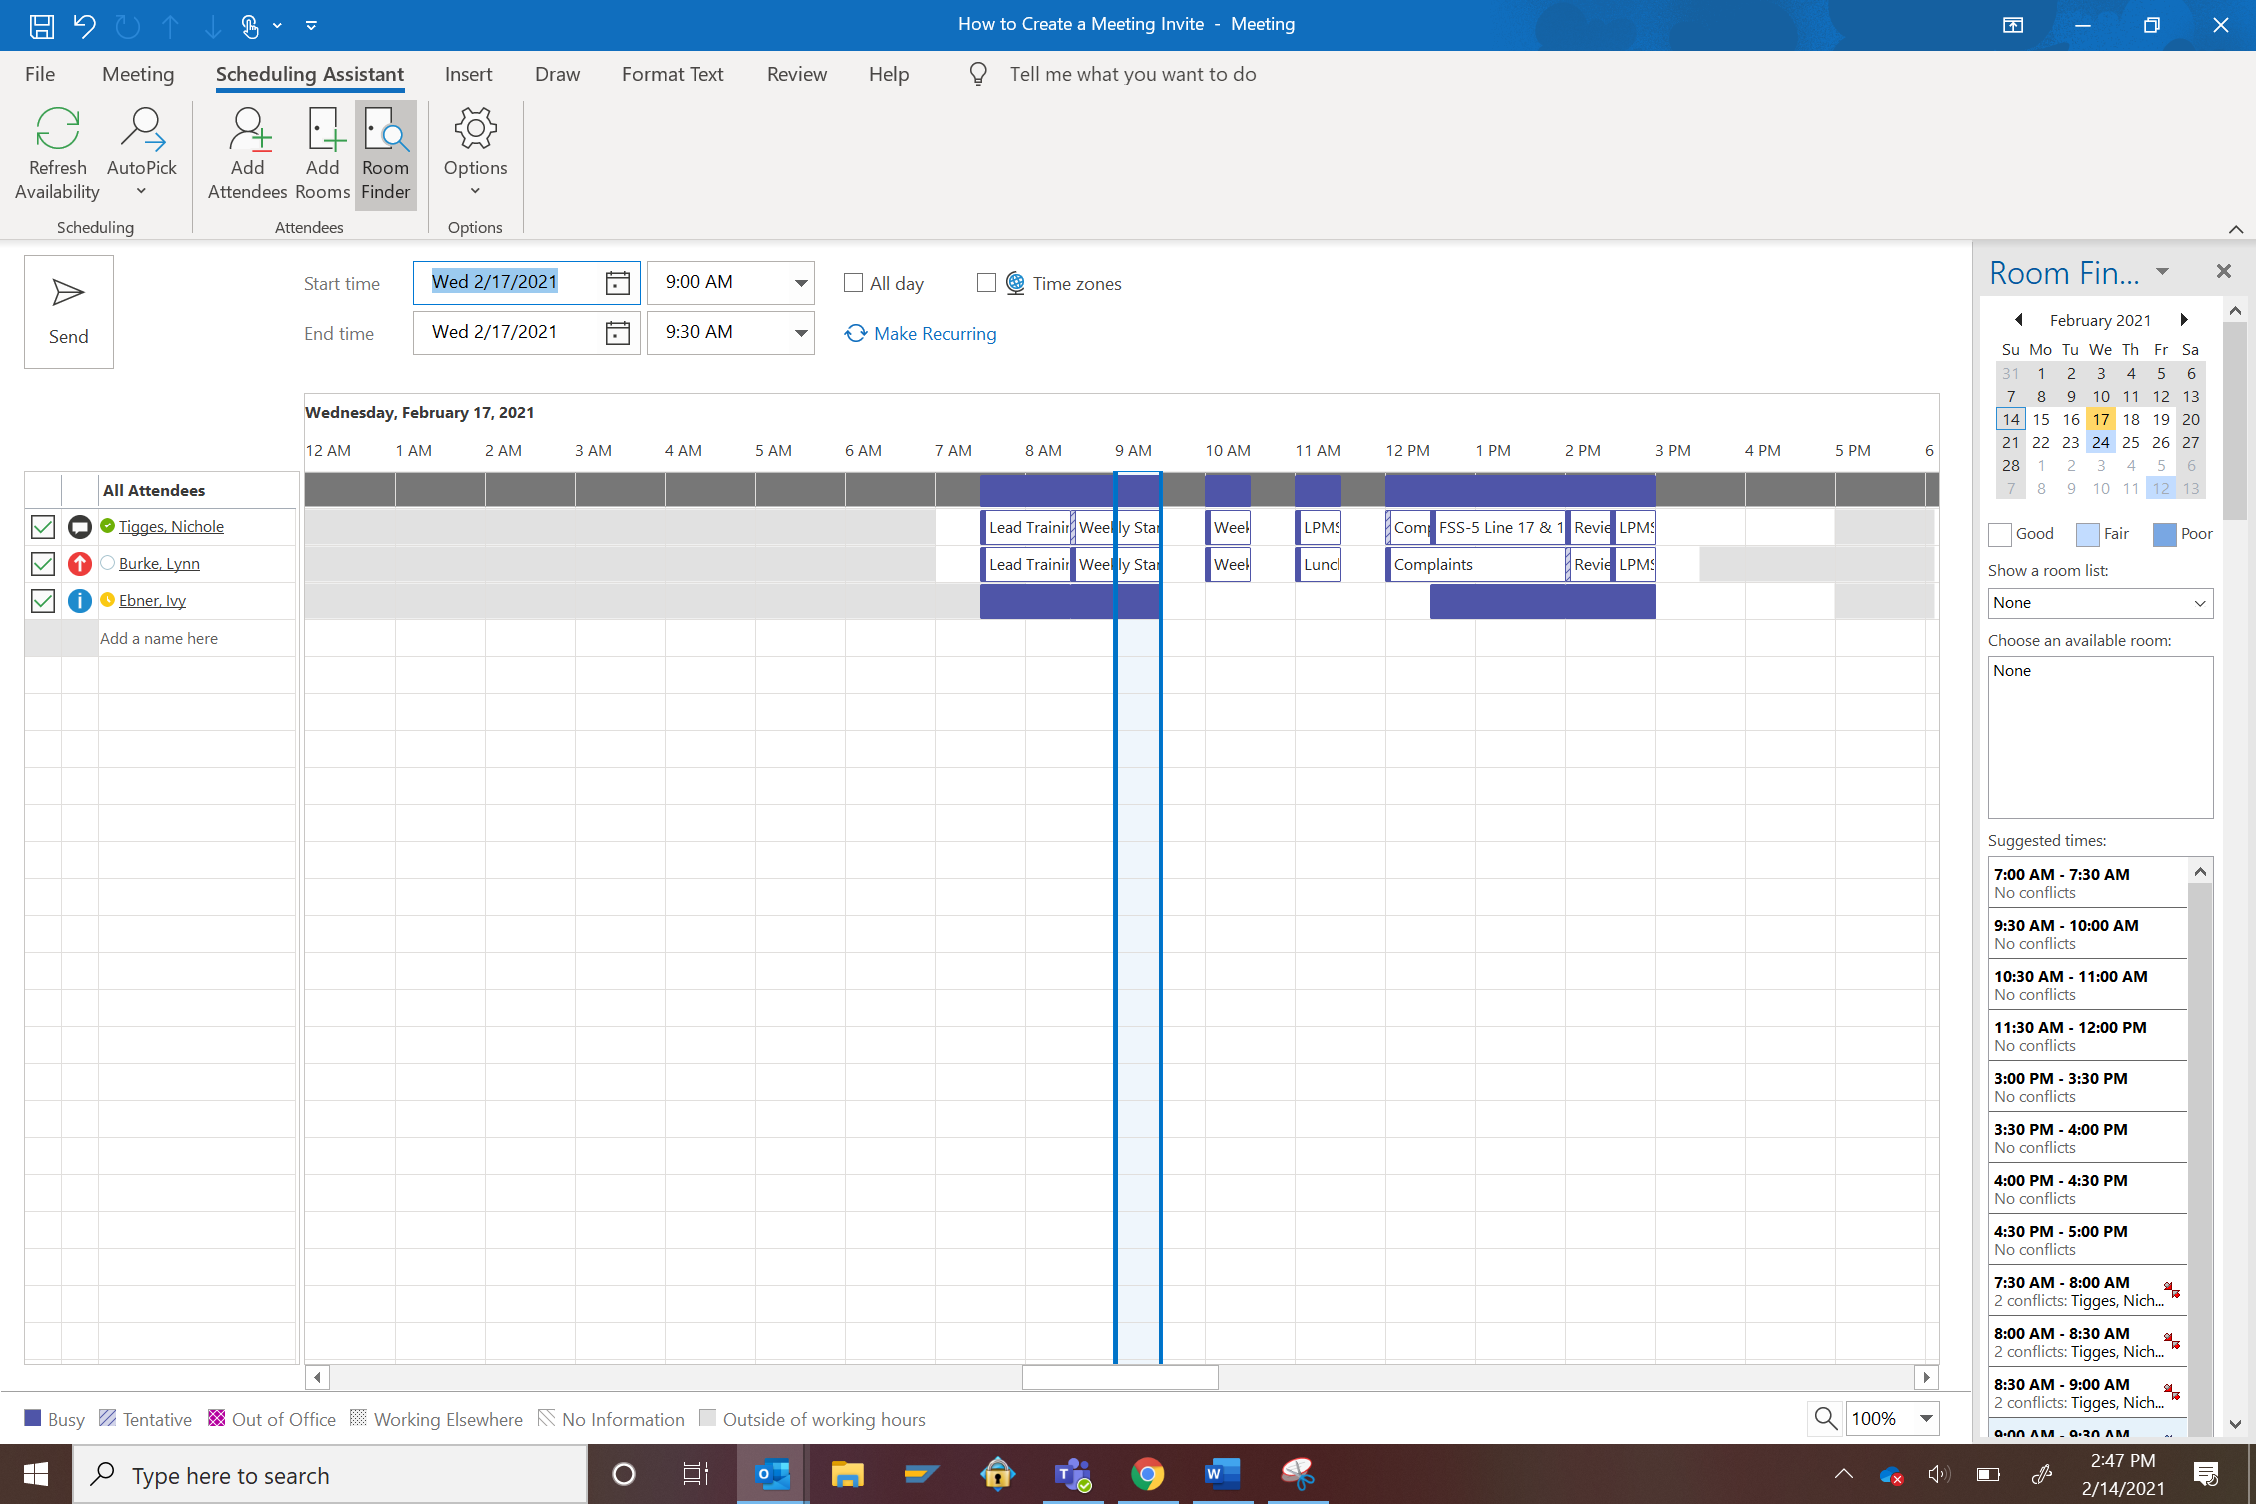
Now that you have set a time for the meeting, you will need to see if your attendees are available. In order to do this, you will utilize the Scheduling Assistant tab that you can find in the top toolbar, third option over. Click Scheduling Assistant and this will bring up the availability of the attendees and organizer.
In the example above, all attendees are busy during the requested time of 9 am, in this case, you will need to move the meeting to an open time.
Moving a Meeting Time in Scheduling Assistant
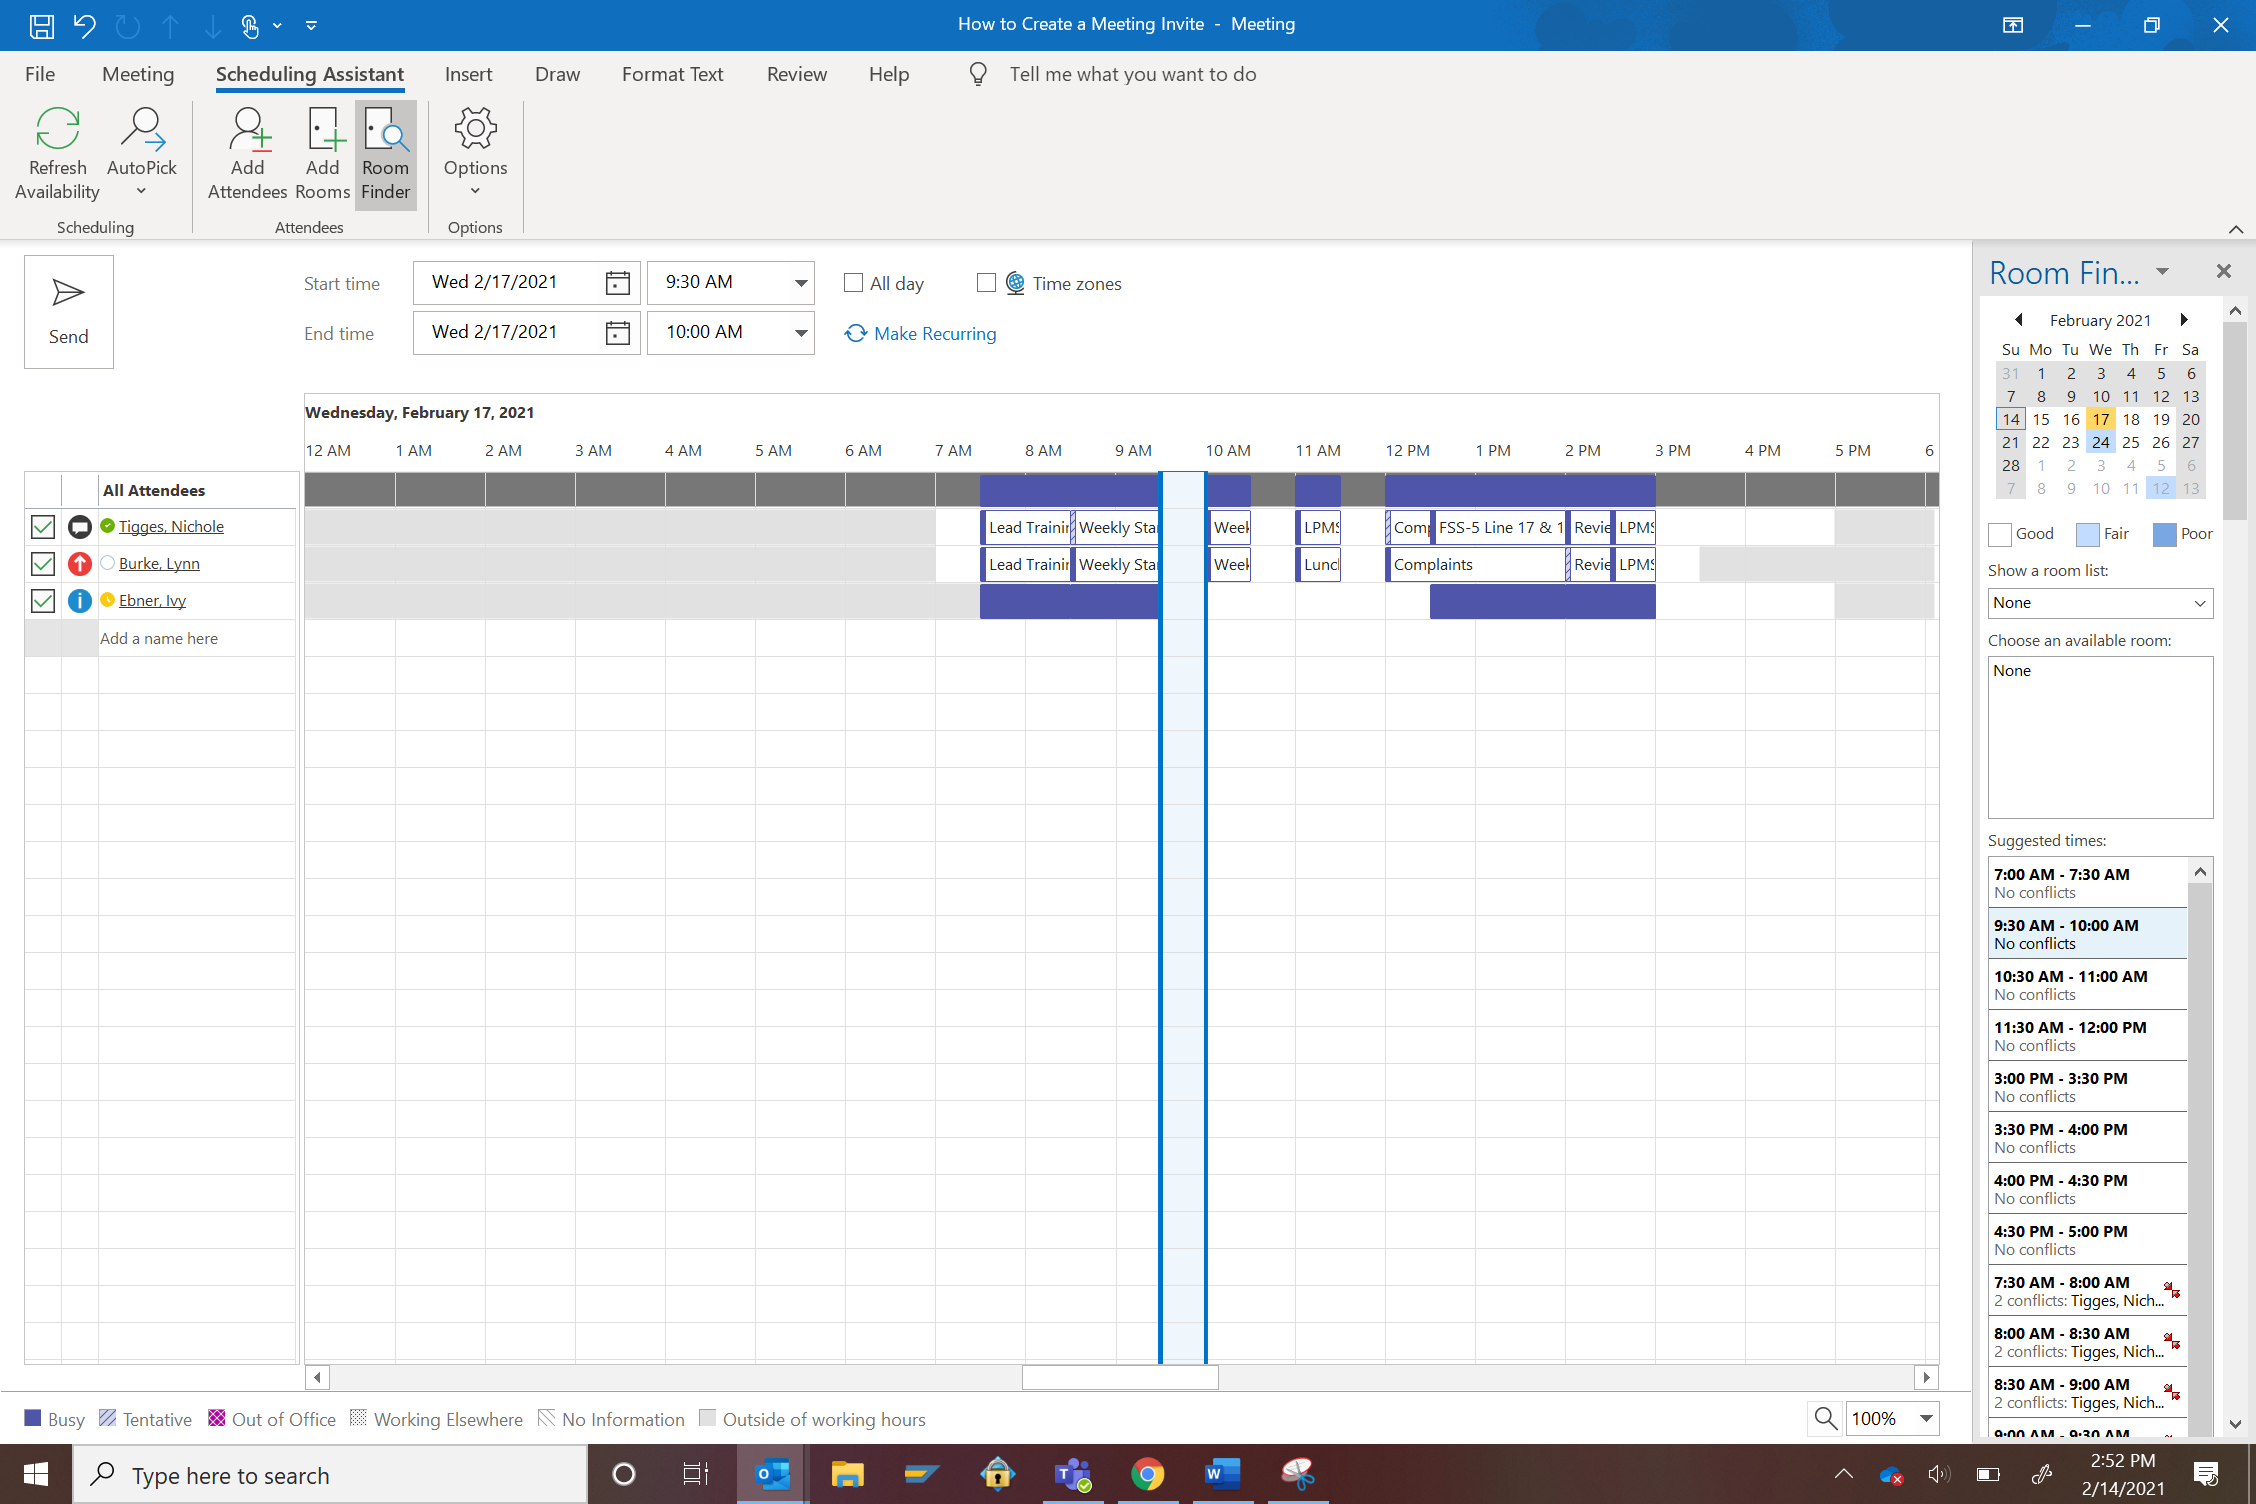
As noted in the last step, all attendees were unavailable at our requested time. But we can see the time available from 930am- 10 am is open for everyone. We know this because of the open white space during this time frame.
To move the time of the meeting to this new time, we move our cursor to the area of 930a-10a and click once. This will adjust our meeting time and start date, in this function you are able to scroll forward and backward into other dates, not just within the original date.
Finding an Available Meeting Room
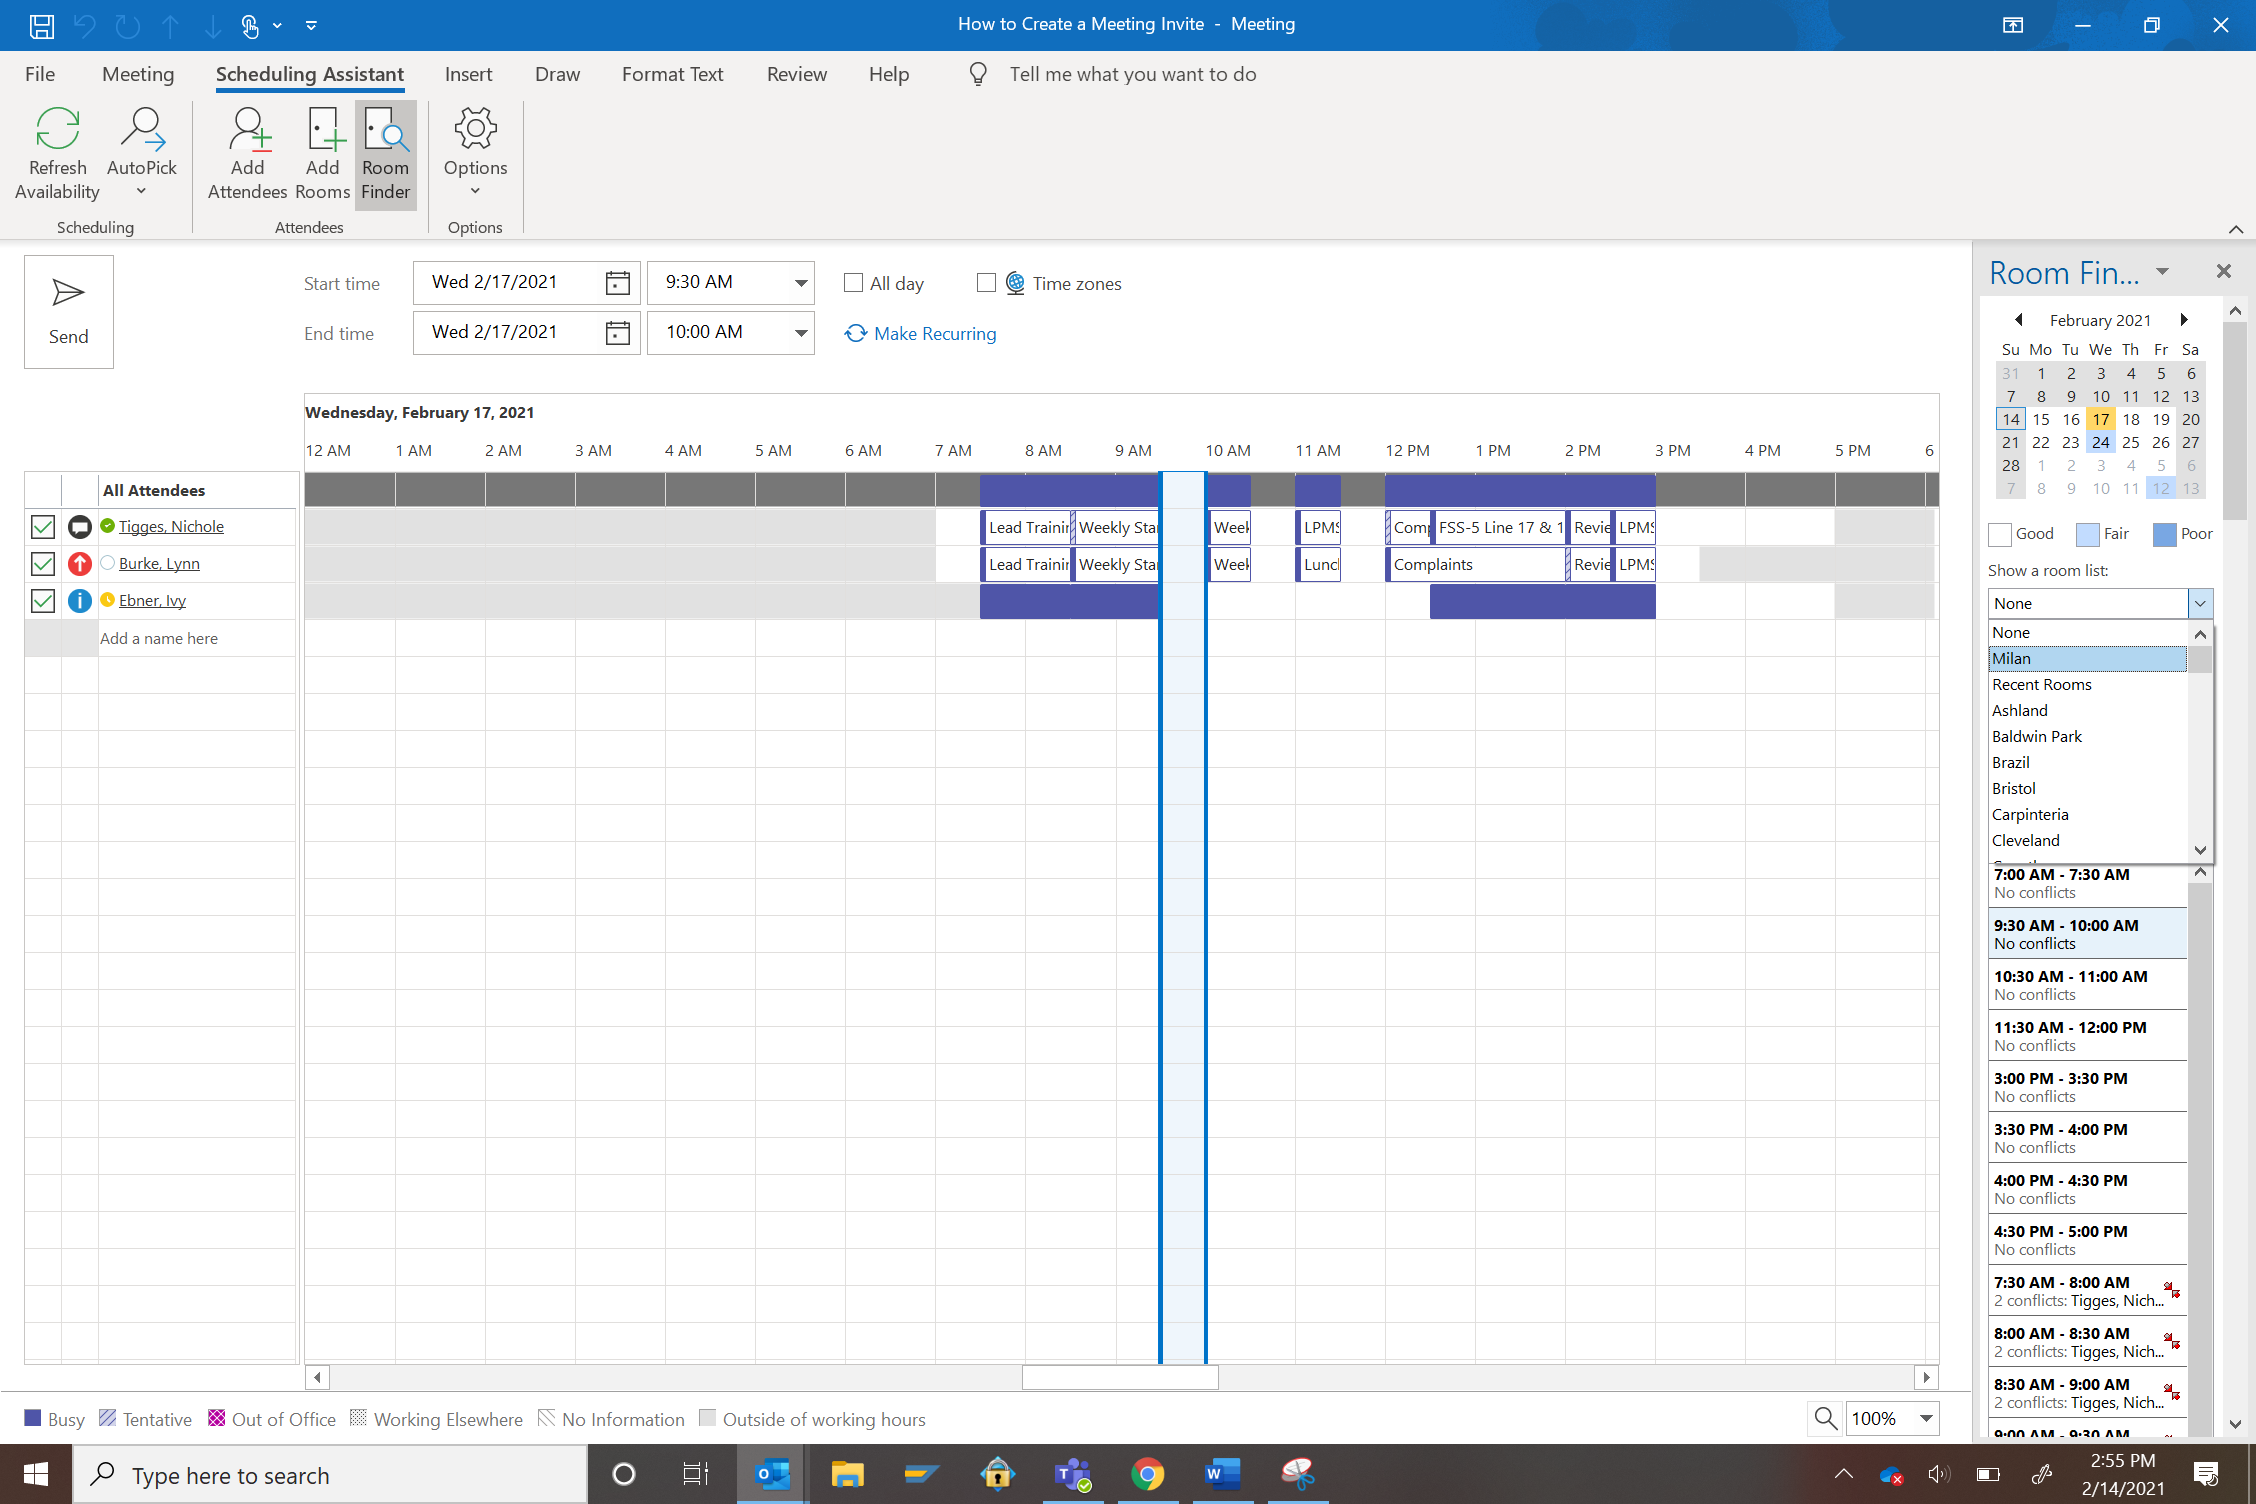
Now that you have scheduled time for your meeting. You will want to add a physical meeting room for your participants to gather if they choose.
Look to the right of the screen you will see Room Finder above the Calendar, and below the Calendar, you will see Show a room list. In our instance, we are in the Milan facility. You will move the cursor to the drop-down arrow within Show a room and scroll down until you see Milan. Then click on Milan. This will show you all of the meeting rooms that are available during your proposed meeting time. Click on the room you want to reserve, this will block it out for the meeting.
Adding a Teams Meeting Option
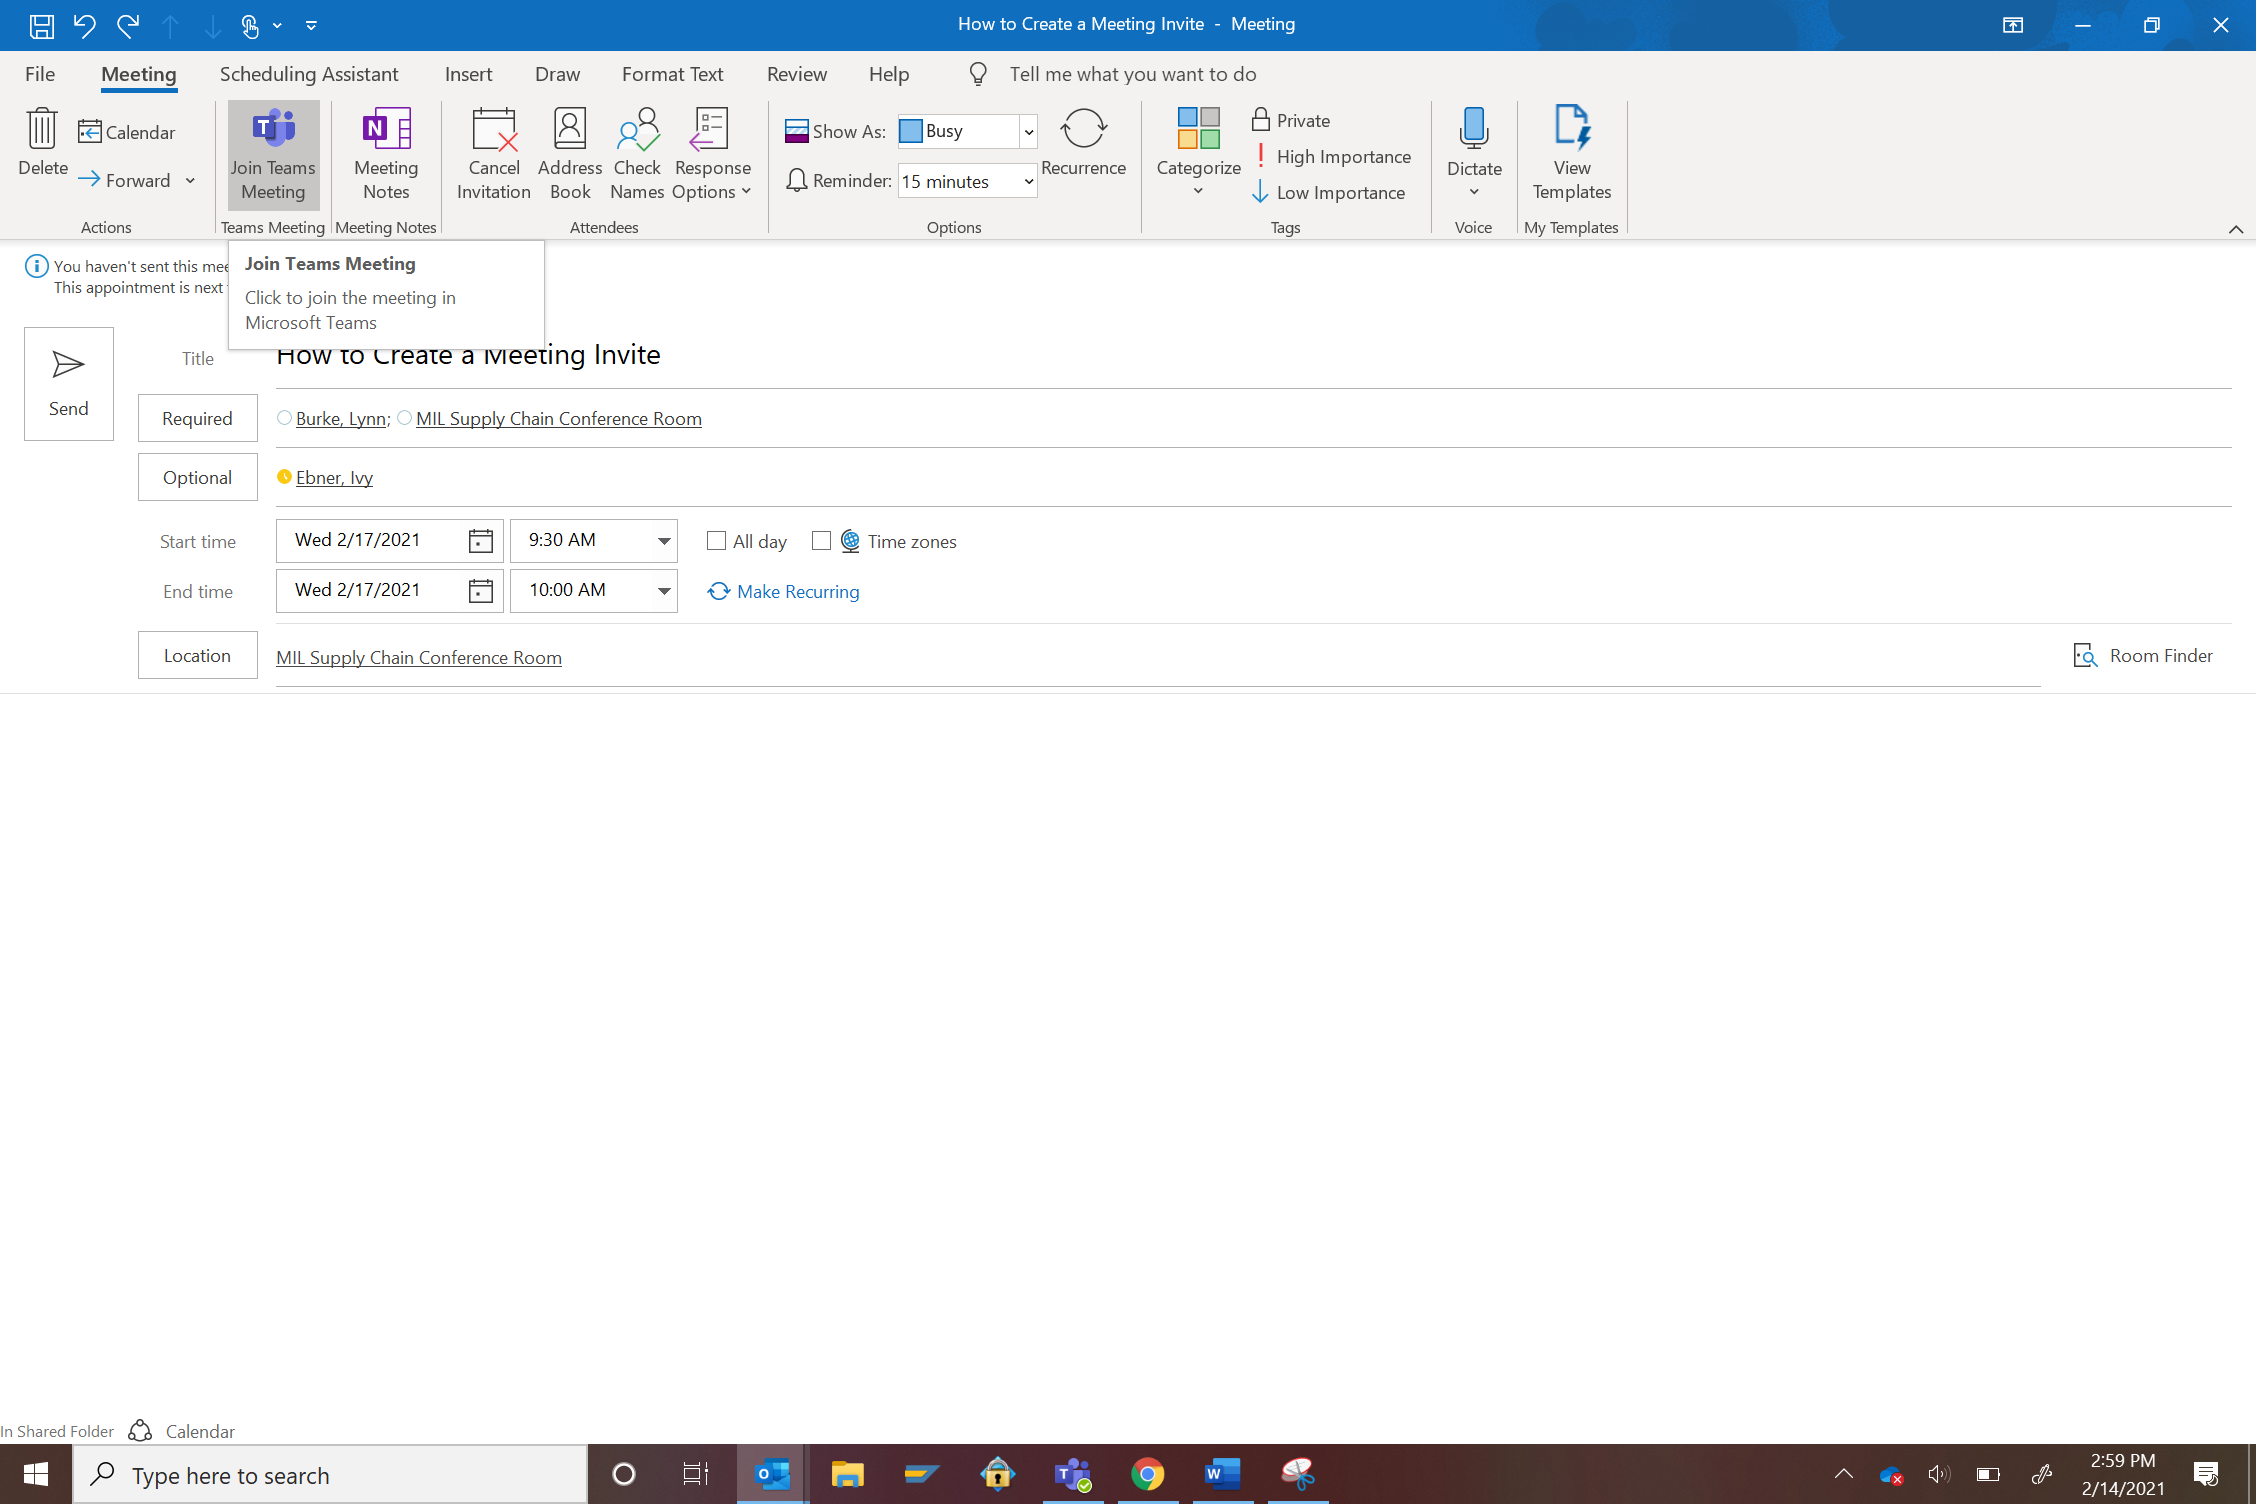
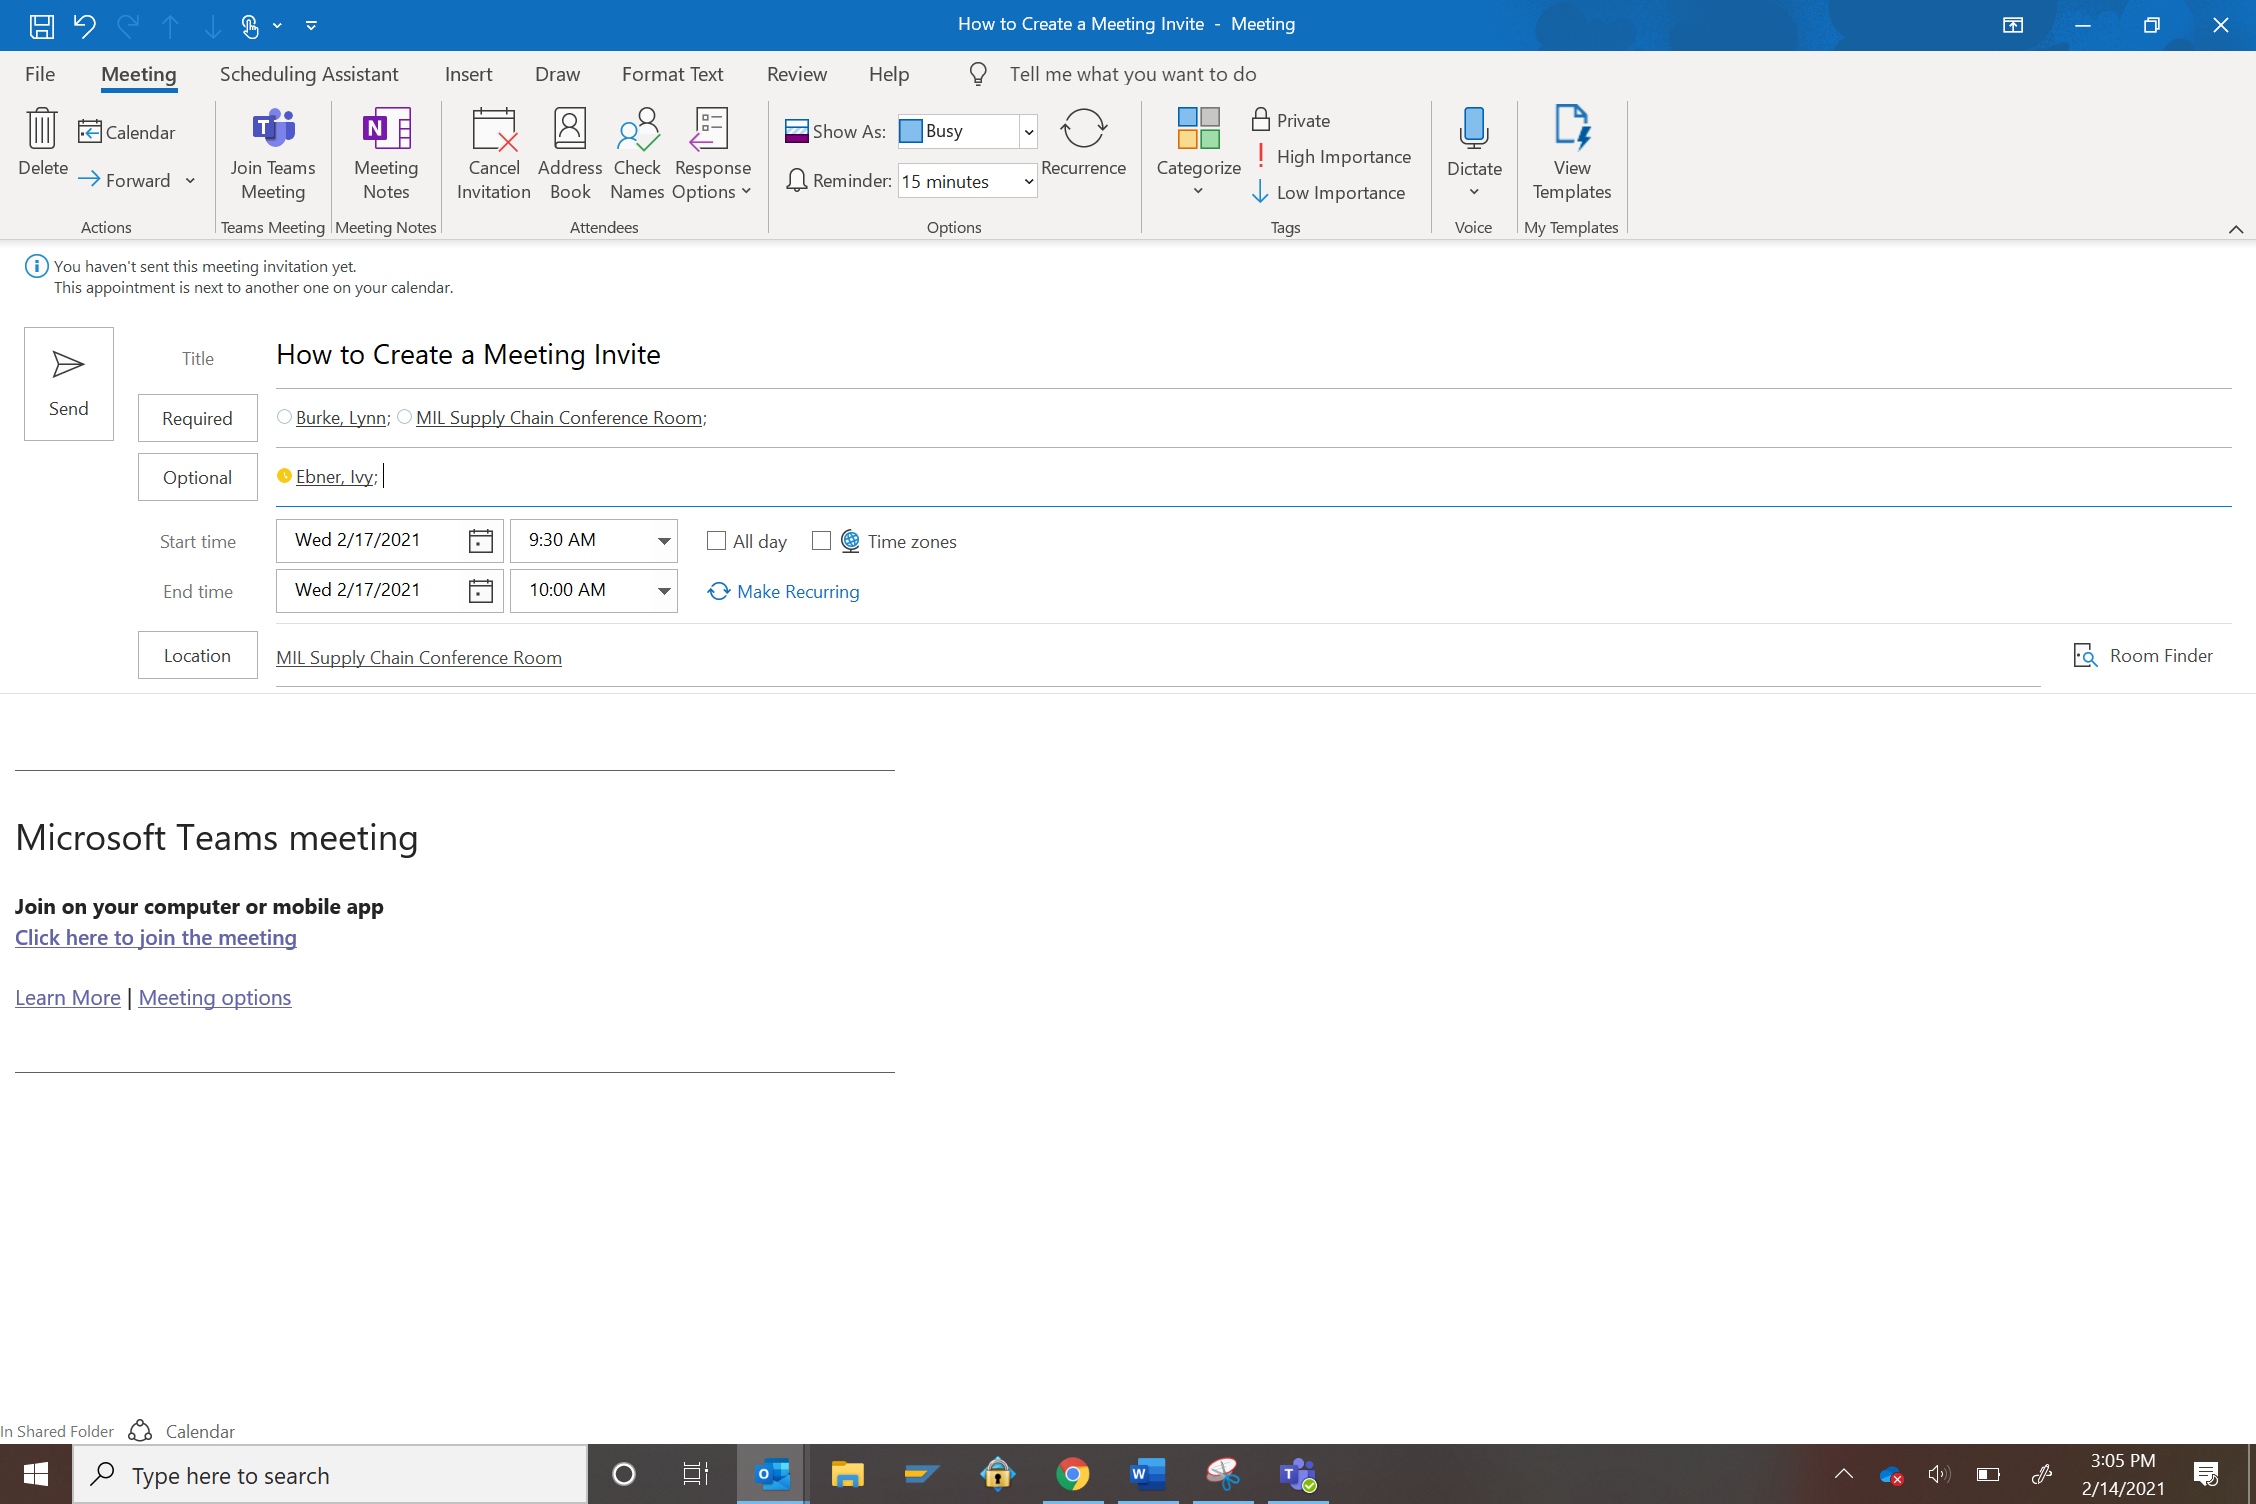
After you have selected the meeting room, you are done in Scheduling Assistant. Move your cursor into the top toolbar and click on Meeting. This will take you back to the main screen of the meeting. Here you will see within the toolbar, located under the Scheduling Assistant tab- Teams Meeting. Click on this option and it will add a link within the body of your invite for attendees to log on if they choose not to join in person.
Body of the Meeting
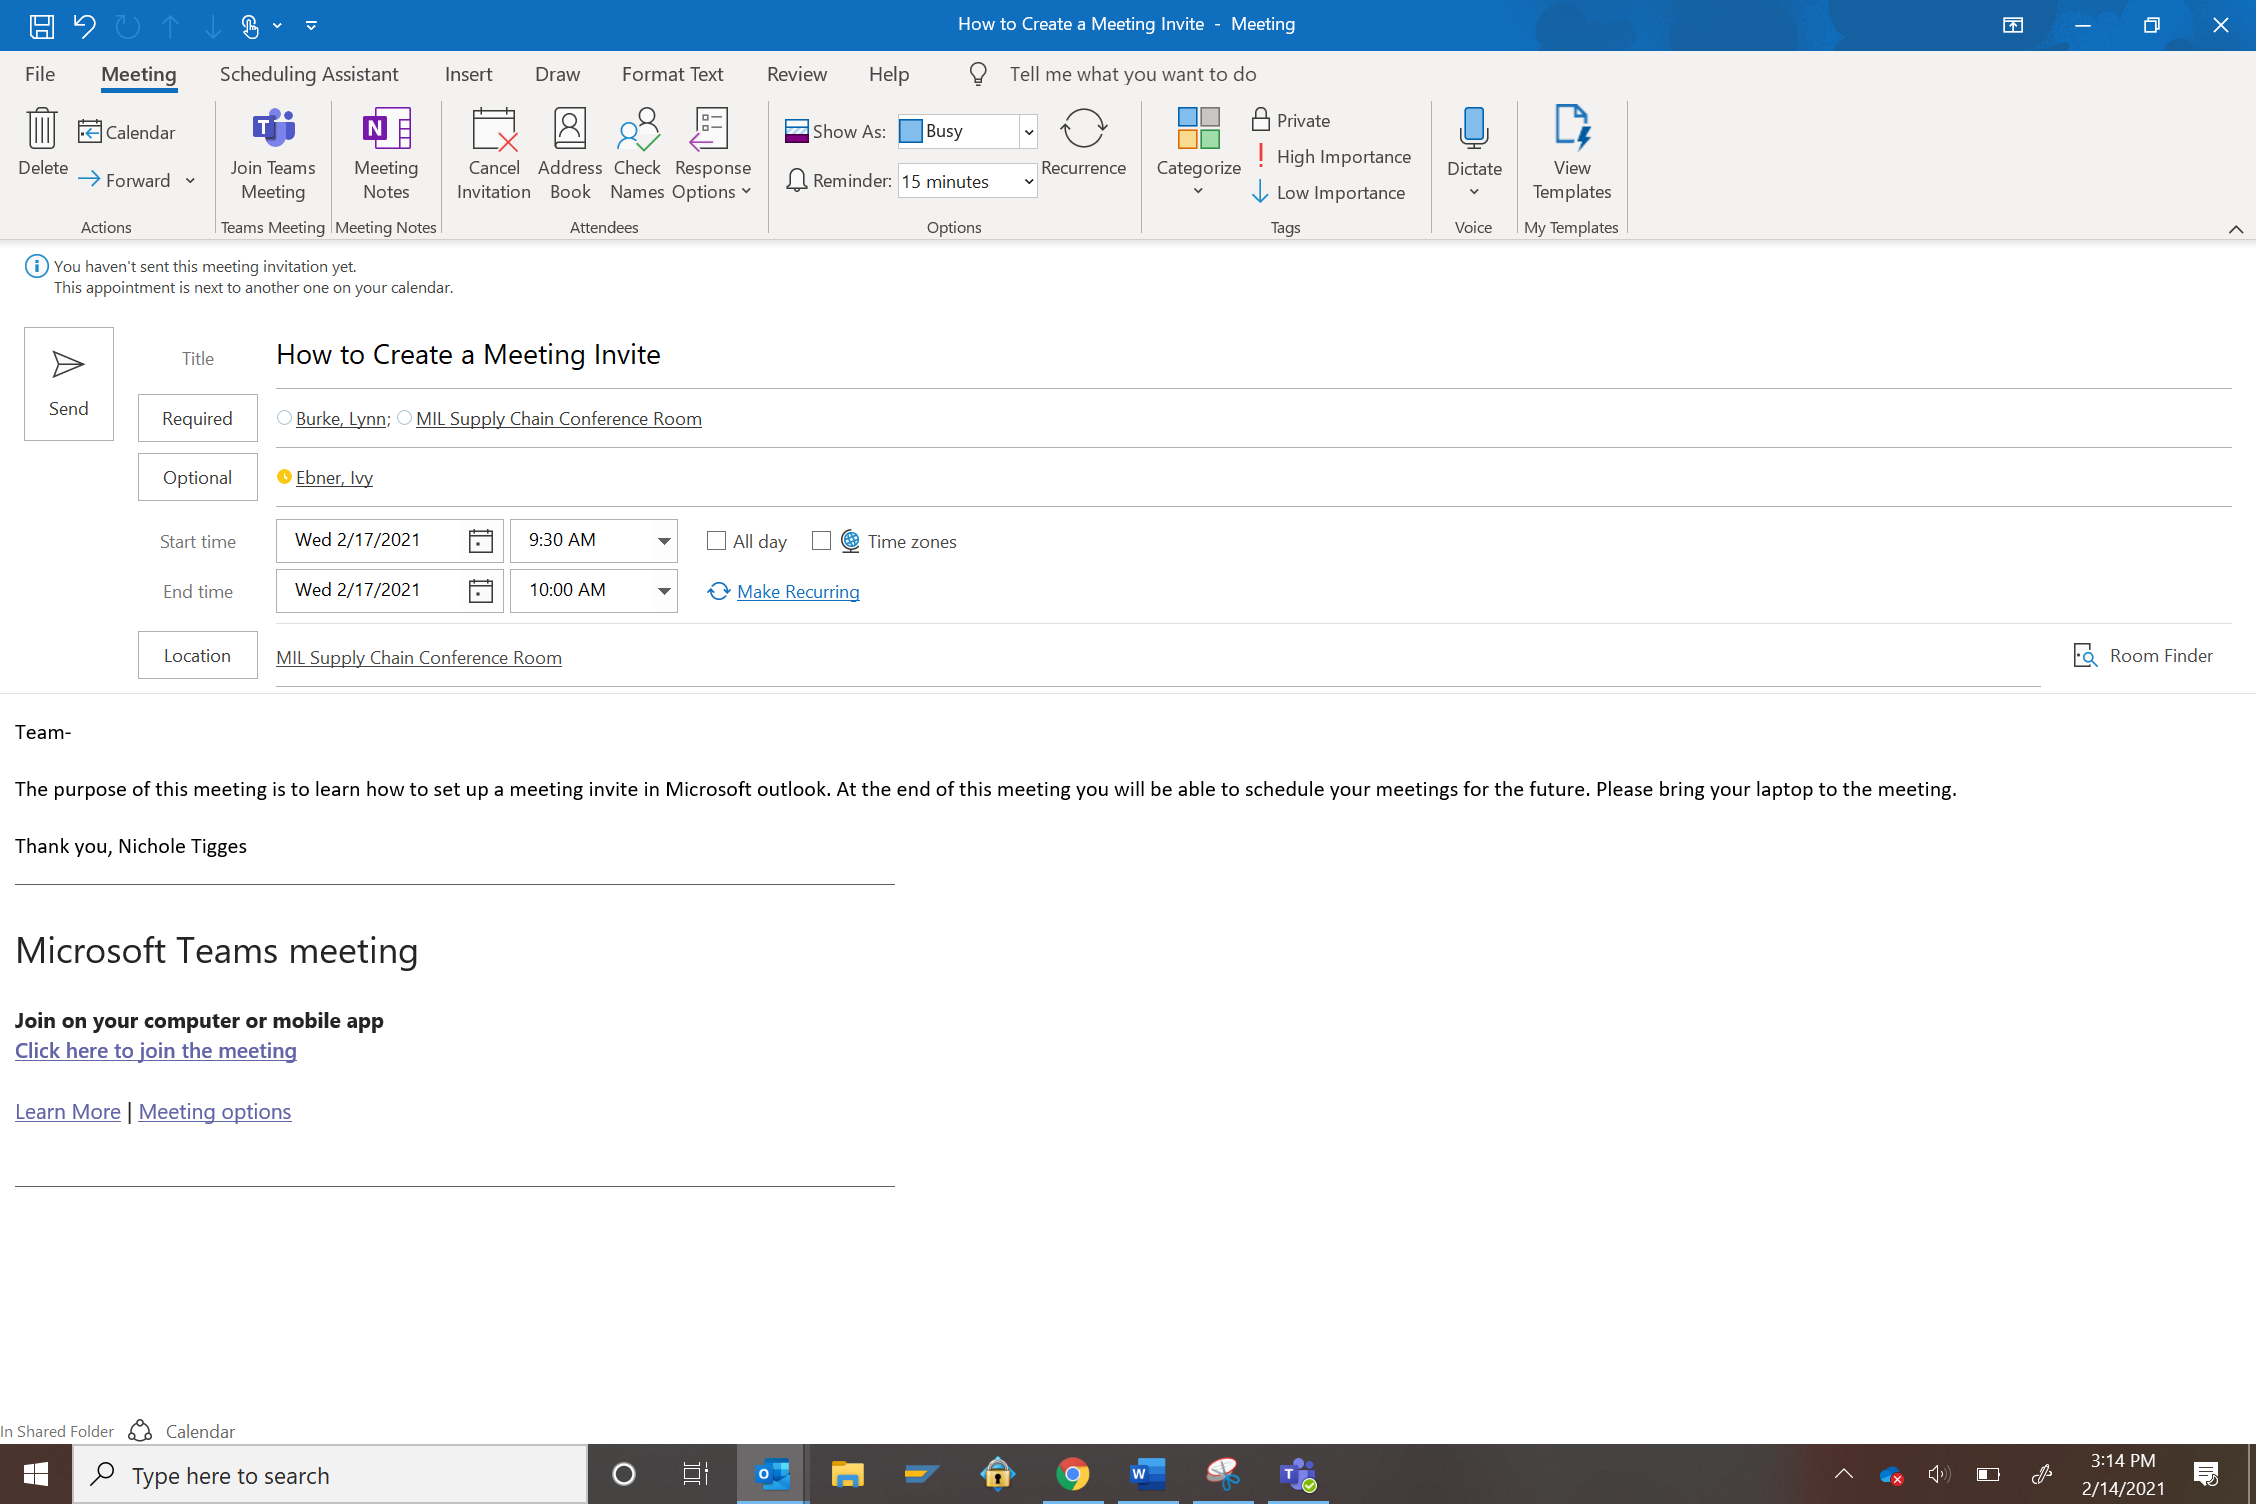
Before you send out the invite, you will want to add either a proposed Agenda for the meeting or at minimum a short blurb on the purpose of the meeting. This enables your attendees to be prepared with any information they need to come with to the meeting. This should be written in professional language.
In order to type in the body, move your cursor to the white section (above the Teams meeting prompt) and click. This will allow you to freely type within this space.
Final Step & Future Abilities
Now that your meeting invite is scheduled, has the required and optional attendees attached, gives a purpose of the attendees time, it is time to send the invite out. To do this you will click the arrow icon labeled Send, next to the Required icon.
Congratulations! You have now sent your first meeting invite.
Once you are comfortable with the basics, there are many other options to explore within the meeting invite such as Read receipts, different fonts, adding in images, setting up a reoccurring meeting, and many more exciting tools that will help organize your day.