Creating YouTube Videos and Audio Recording Process
by tekmakeruk in Circuits > Computers
515 Views, 9 Favorites, 0 Comments
Creating YouTube Videos and Audio Recording Process

I see many poorly produced videos on Youtube and other channels, so I thought I would share how to get the basics right to improve your audience retention and just generally make yourself look like a professional videographer. This is just the basics so don't panic. I show you how to process and produce audio and video using freely available and free packages. The process is similar in any editor!
Supplies
Hardware
Camcorder - these generally give more predictable results than mobile phones, a necessity if you want shake-free scenes. Buy one within your budget, sturdy enough to be shake-free and light enough to take out with you.
Microphone and Mic stand/anglepoise bracket. Sound can make or break a great video, even a budget (£20) condenser mic like mine can give great audio (used with 45V power supply or mixer) or a budget moving coil mic. Use a stand, split shield and cradle to eliminate unwanted sounds.
Headphones - check your test recordings and footage regularly, headphones guarantee that you can hear everything and are cheaper and more portable than studio monitors. Great for outdoor shots too. Buy AKG, Audio Technika, Beyer Dynamic, Bose, Senheisser etc, use what the pros do even if its a cheaper one. My AKG K240 Professional cost ~£40 second hand.
Software
Audio editing - Audacity, Windows, Mac and Linux. Totally free and never out of place, can manage multiple tracks, filters and effects and file conversions.
Video Editing - there are many free packages out there. My favourite is KdenLive, Windows, Mac and Linux. Very capable yet easy to learn program. Watch a few tutorials before you start, it saves a lot of frustration.
Two monitors - not too expensive these days, go for at least 22 inch screens, reputable brands and IPS screens at least. I have a VonHaus twin stand which is awesome for around £55. Edit on one, monitor the video on the other.
Condition Your Audio in Audacity.
Audio is rarely perfect as recorded, two things are almost essential if you are not in a soundproof studio.
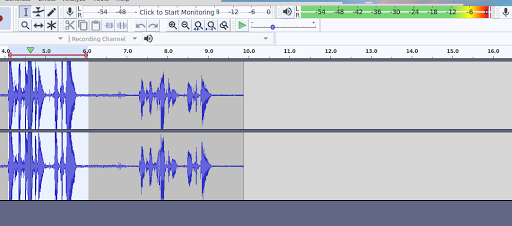
Levels.
make sure that the level meters are not spending much time in the red section, -6Db upwards
Ideally re-record but if that is not possible limit the damage by highlighting all of the clip 'ctrl +a' and select Effects, Amplify and reduce the volume until it is not clipping and just edging into the red occasionally.
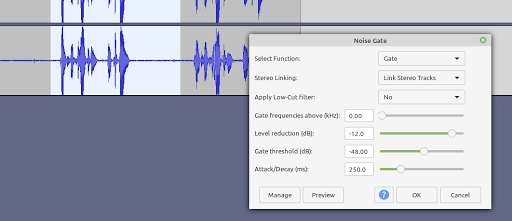
Background noise removal.
If you can see the level meters twitching when you are not talking then you have background noise and it is easily removed. Listen on headphones and turn them up a bit, here it now? Download the Nyquist Noise Gate from https://wiki.audacityteam.org/w/images/7/75/Noisegate.ny.
Adjust the gate threshold and click preview until you only hear silence when not talking, set gate frequencies above 250hz to eliminate other noise. Takes some experimenting but well worth it.
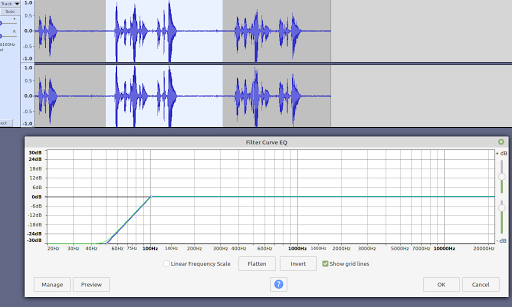
Popping.
Next, try recording "Peter Piper picked a pickled pepper" and see how many times your mic makes a popping noise. Click effects, filter curve, we can roll off frequencies under 100 or 250Hz as they play no part in speech other than to be annoying. Test a few settings until you get the result that you want. Highlight a short sample to test then try with the full recording before committing to save.
Save your project so that you can work with the original audio again and export your result as a .ogg file which is lossless (so as not to degrade it further in processing) and easily imported into KdenLive.
Download any music that you need to use. BUT if you want to monetise your channel only use audio from YouTube copyright free music at https://www.youtube.com/channel/UCht8qITGkBvXKsR1Byln-wA.
Edit and Produce Your Video in KdenLive
(Since making this video I have moved over to Wondershare Filmora X for video editing)
Plan the sequence that clips need to be shown in and ideally name them accordingly like this
1 - intro sequence
2 - title screen
3 - fade into equipment scene
4 - exit sequence
Click Project, Settings and set the video format the the appropriate one, 1080p 25 FPS in mp4 format is ideal for YouTube. Don't use 4K if you do not have a 4K video camera, it is pointless and generates massive files which will take hours to render. Also Youtube's compression reduces quality too.
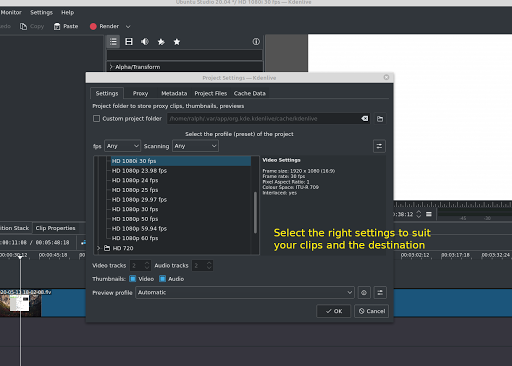
Import your clips one at a time as they take a few seconds to import. Save the project as soon as possible to preserve the setup. If you are importing 4K clips or have a slower PC then setup proxy clips so you can preview everything in 720p without taxing your machine, the final render will be in the projects selected mode.
Pull your clips on to the timeline starting with your entry or title scene, then the action scene itself.
Save the project regularly, maybe as new versions. Do NOT rely on auto-recover.
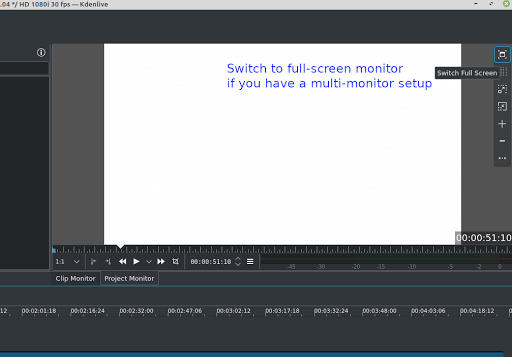
If you have more than one monitor take advantage of the full-screen monitor mode. Much easier to work with and preview the render.
If you are importing processed audio then import it and put it on the next track to the one it came from, synchronize it by muting the original or comparing it and sliding the new audio back and fro until it is synched. If you need to lose the original audio then right click the clip, select split audio and delete the audio track only.
Once you have a scene with new audio group the audio and video Ctrl+ g then trim the ends before splitting it to suit your workflow.
Ensure that you watch the project fully before committing to render.
Before rendering, remove inactive and disabled tracks and muted audio, they will all add to the rendering time.
Never upload anything to your channel with mistakes and bad edits in. It is unprofessional and will lose you viewers or equally bad get bad comments.
Congratulations, you are now a video producer. You will never stop learning new tricks and skills and hopefully this will help your channel to grow.
Become a Video Star!
Once you have uploaded to YouTube do ensure that your video still looks and sounds great as some quality is lost by their rendering process. Then take the time to write a clear title and appropriate description, then add to a playlist that describes the category of your video. Then most importantly add the right keywords. I made this mistake and my traffic increased a lot once I had entered great keywords that people might search for. That is how you get in the hallowed 'Suggested Videos' page!