Creating Watermarks in Photoshop
by scthornt in Circuits > Cameras
6960 Views, 10 Favorites, 0 Comments
Creating Watermarks in Photoshop

In this tutorial, I will be explaining how to create a watermark using Adobe Photoshop. In these following steps are detailed instructions on how to create a layer, a copyright logo, text box, and how to make the watermark blend in with any background.
Choosing Your Background

Open or create a desired image. This will be the background that the watermark will be placed over. The intent of the watermark is to be able to blend in with any background no matter the brightness or color. So don't be worried that your image may be too dark or busy for the watermark. For these instructions, I've chosen a simple black background to adequately show each detail.
Creating a Layer
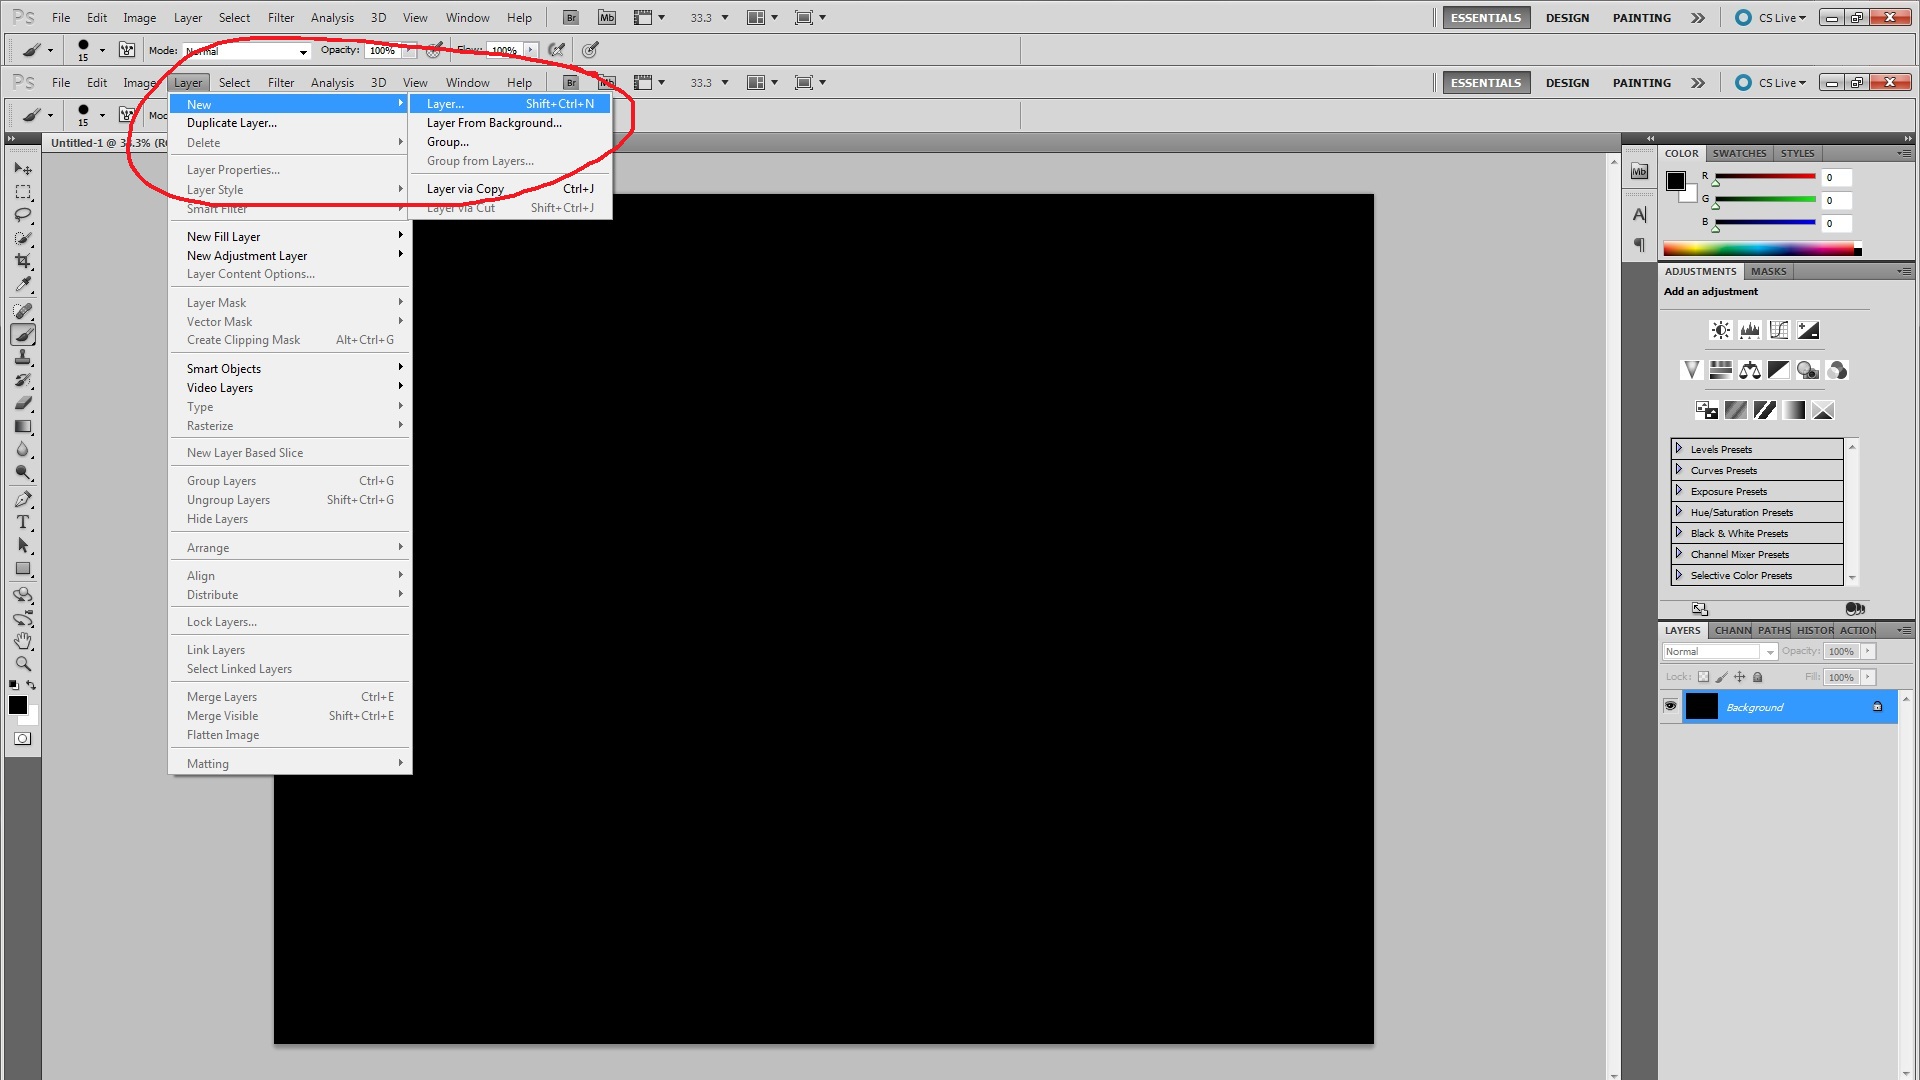
This is one of the more important steps of these instructions. In this step, you will be creating a layer in which your watermark will be placed in. Layers are used to overlay different images over the original background layer. For this project, we will use layers for the copyright logo and the desired text you wish to use along with the copyright. After creating the initial layer, it is important to highlight the background layer, click "Ctrl A" which selects all of the image, then copy and paste the image into your new layer. Now you will have two layers, the background layer and the new layer, that look exactly the same.
Finding the Shape Tool
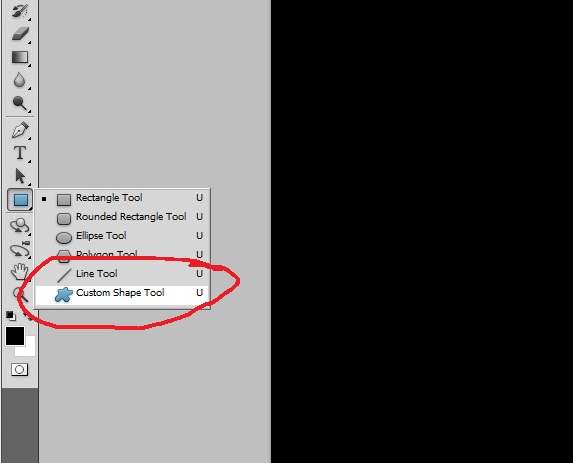
The Shape Tool is located towards the bottom third of the tool bar along the side of your Photoshop window. Initially the Shape Tool will have the Rectangle Tool selected. So when clicking the Shape Tool, click the bottom right hand corner where the little black triangle is located. This will give you a separate window with different selections of shape tools. This is where you will find the Custom Shape Tool. Once Custom Shape Tool is selected, you will be able to find the copyright logo shown in the following step.
Locating the Copyright Logo Shape
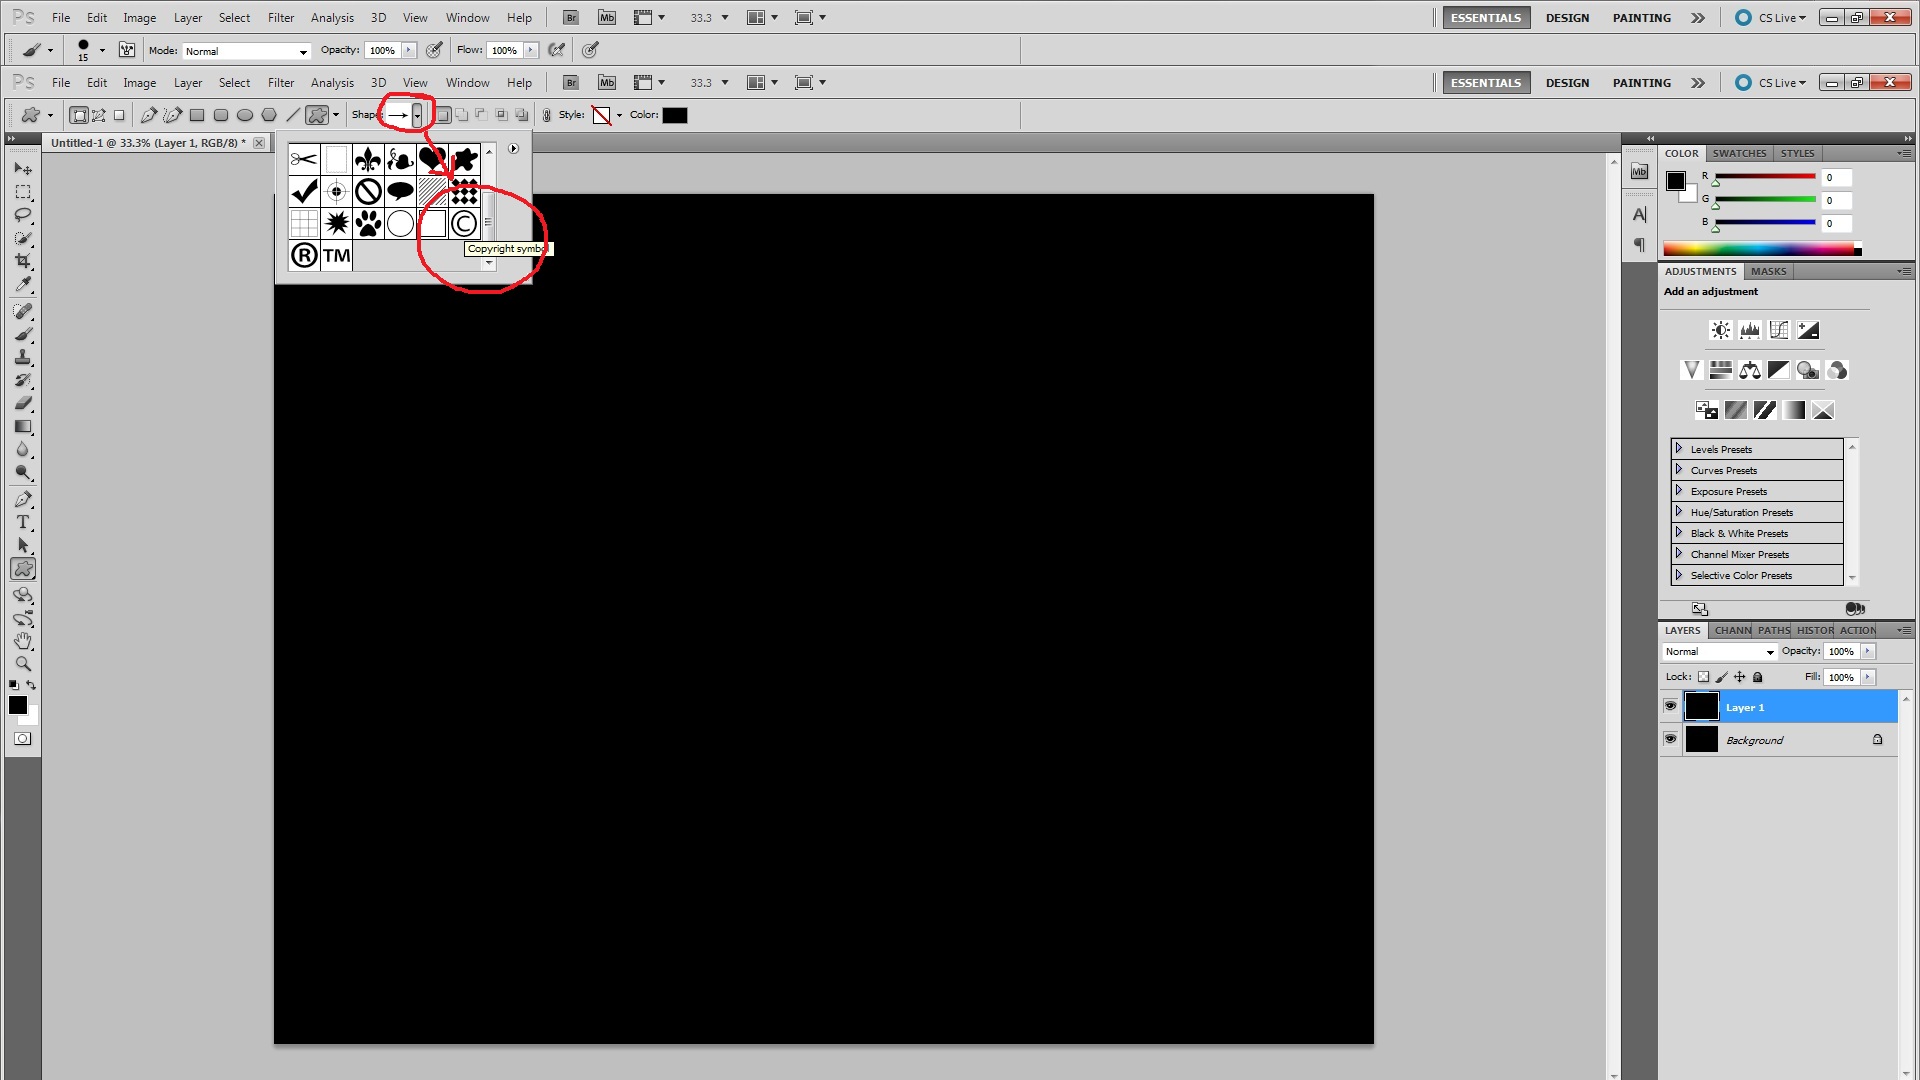
At the top of the Photoshop window underneath "View" in the tool bar, there is an option for selecting a specific shape. Clicking on this option will give you access to a drop down window where you will find the desired copyright logo. The copyright logo is located at the very bottom of the drop down window, so you will have to scroll down. It is important to include this logo when creating a watermark to insure an image's safety. If you want to create a fun watermark for a project, there are plenty of other logos in the drop down window that can be used. It's recommended that you use a copyright logo, if your image is going to be accessible by the public.
Placing the Copyright Logo

Once you have picked the copyright logo, or a logo of your choice, you can now place it in your project. It is suggested that you use another layer for this step. For now, it does not matter where on your image the logo is placed. By holding the "Shift" key, you will be able to keep the logo scaled while adjusting it's size. By selecting a color on the side tool bar, you will be able to change the color for your logo. In this case, I chose gray because it will be an easier color to blend in with the image.
Locating the Layer Style Button
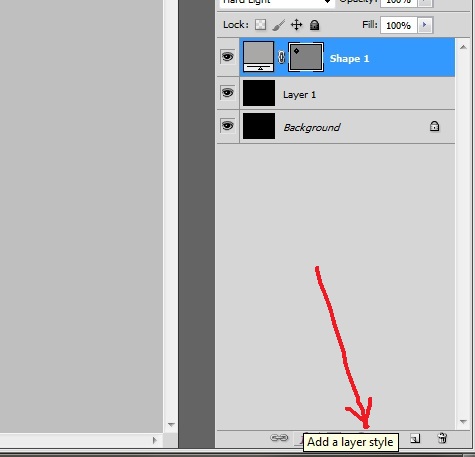
In this step, you will be selecting a layer style. Layer style will alter how the newly formed logo will look. The Layer Style button is in the bottom of the Layer window, which is usually located in the bottom right hand corner of Photoshop and is where you pick the layers you are working on.
Choosing a Layer Style
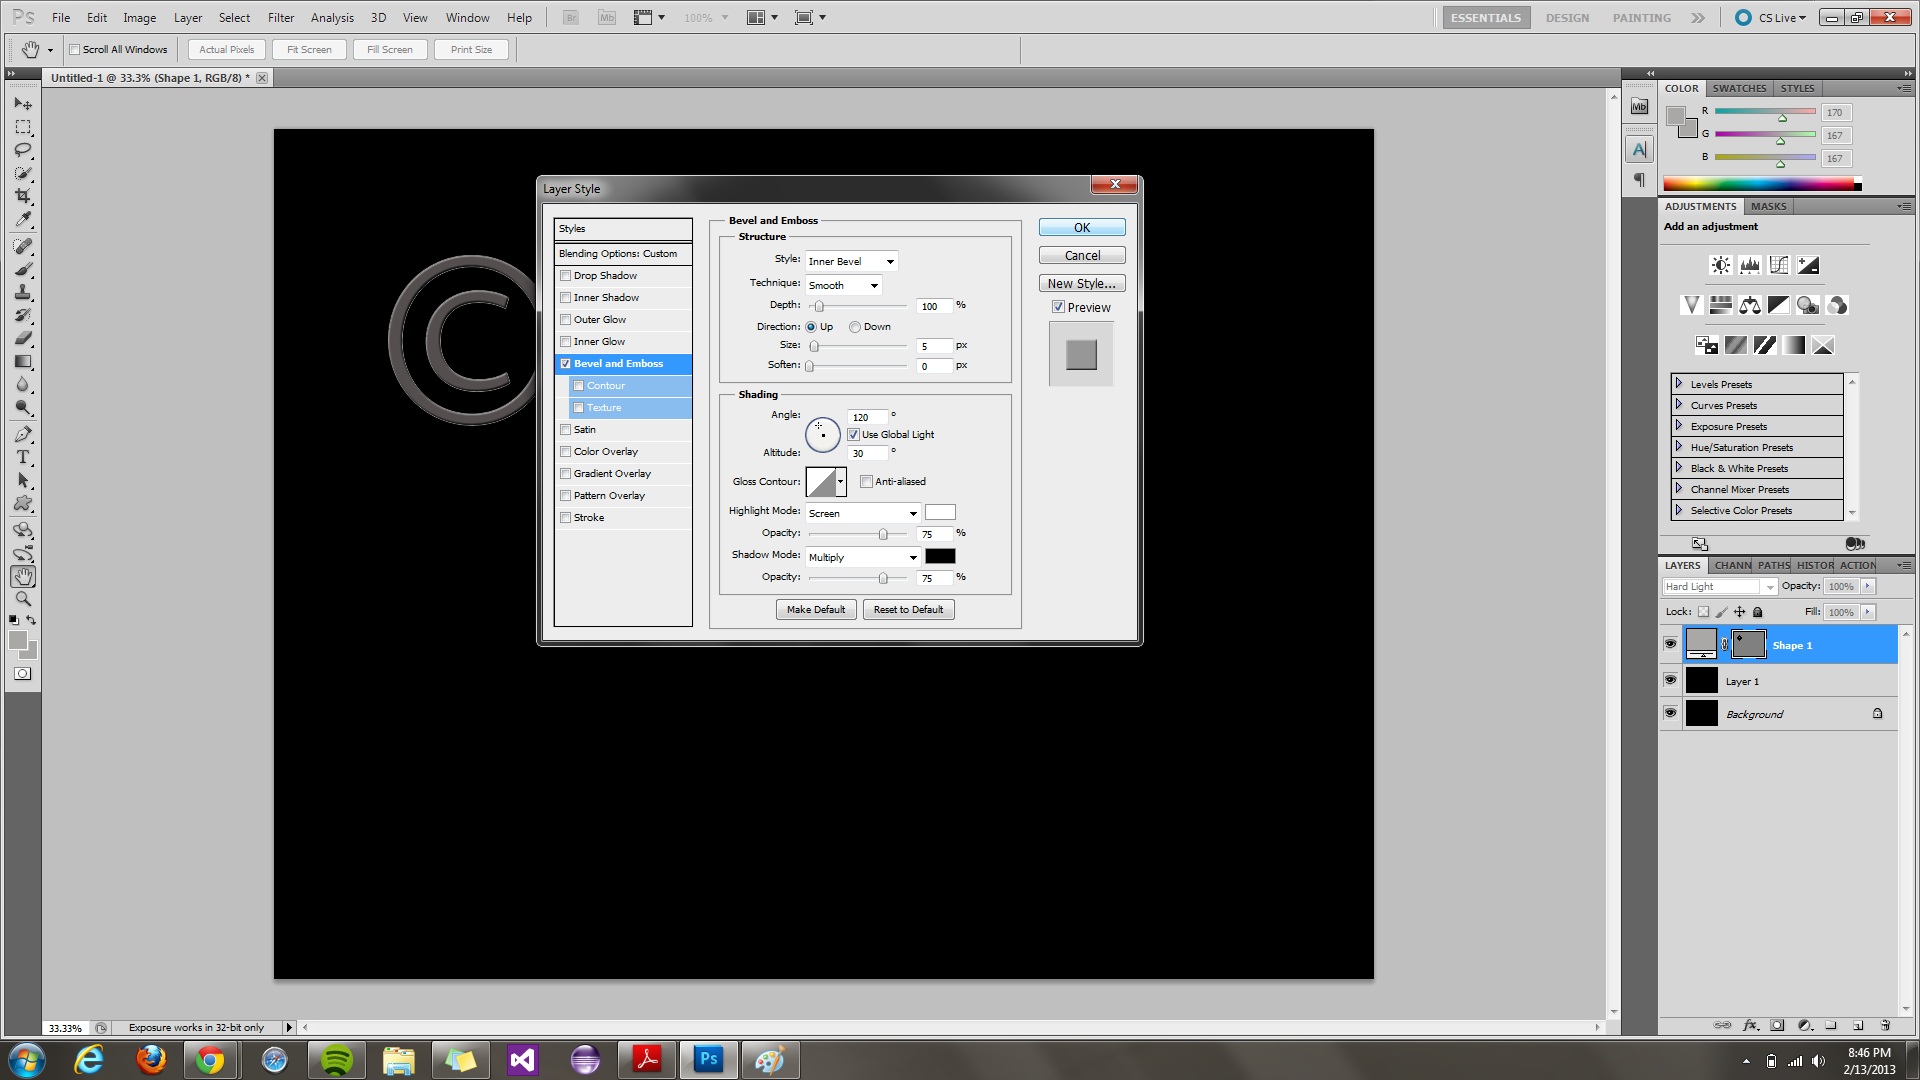
Once clicked, the Layer Style button will make a drop down window accessible where you will be able to find different choices for styles and effects. For this project, I used Bevel and Emboss, which gives the logo a slightly 3-D look while keeping it smooth. It is your personal preference when coming to layer style, so chose which ever style catches your eye. It is recommended that you use a simply layer style so that it does not make your watermark unreadable. Using an unreadable watermark may create problems when trying to find out whether your image has been stolen.
Creating a Text Box

In this step, you will be creating a Text Box where you will be able to add the text you want to be associated with your copyright logo. For the most basic watermarks, you would use plain text. More advance watermarks may use a company logo that may not be able to be duplicated with any of the available fonts. For this project we will keep it simple and use plain text.
Placing the Text Box
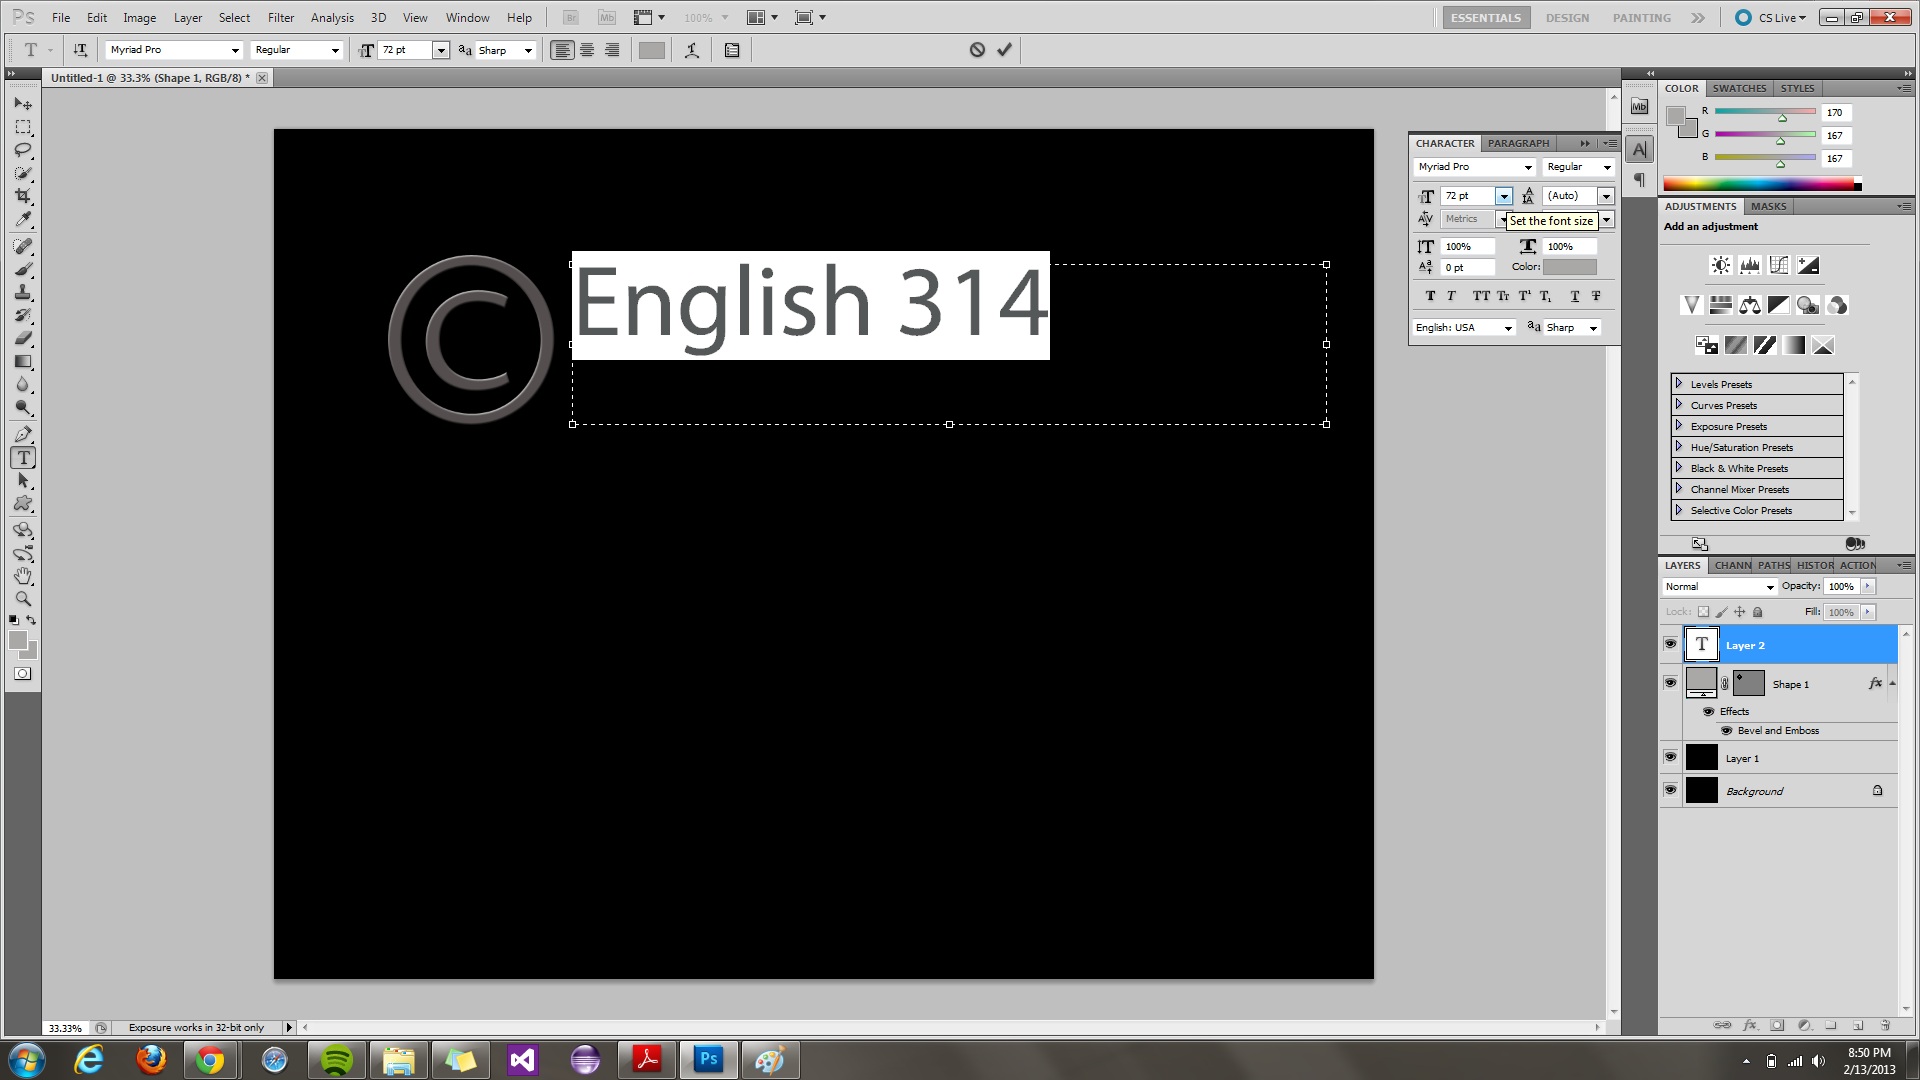
Now that you have created your desired text within your Text Box, you can move it around the layer to align it with the already formed copyright logo. You can also go into the Character window and adjust the color, font, and text size to match the copyright logo. Once you feel you have found the right location for your Text Box, you can group the copyright logo with your text. Instead of just using the group function of Photoshop we will use a method of merging layers, which will be described in the following step.
Step 10: Merging Layers
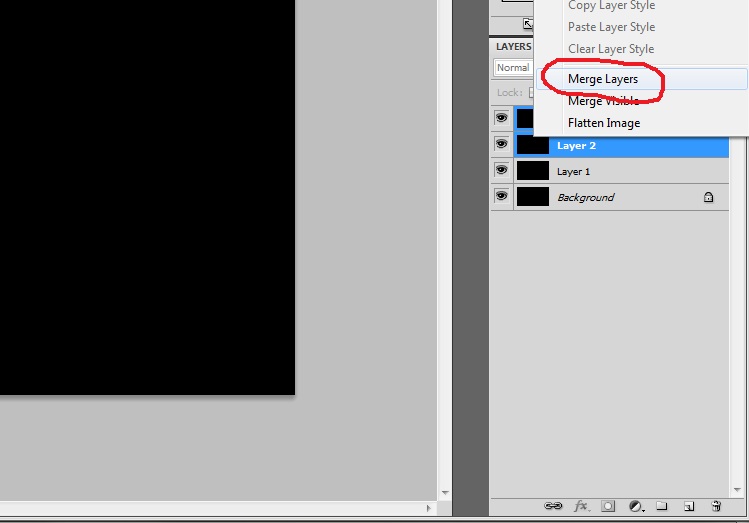
As discussed in the previous step, this step will show you how to merge two or more layers together. The reason we aren't just grouping layers together, is that merging layers helps further embed the layers into the image itself making it nearly impossible to tamper with once completed. To merge multiple layers together, go to the Layers window and hold "Shift" or "Ctrl" to select the desired layers. Once selected, right click on one of the selected layers. Towards the bottom of the window that appeared after right clicking, choose "Merge Layers." Now you have successfully merged multiple layers together.
Setting Opacity
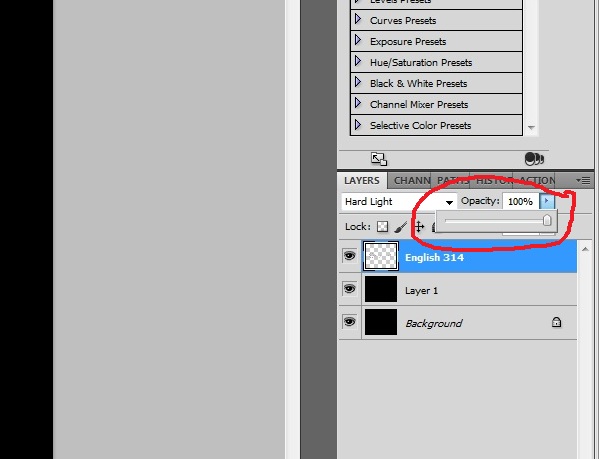
Setting Opacity is important because it helps your watermark blend into the background it is placed over. Opacity is located at the top of the Layers window. Initially opacity is set at 100%. For this project, I set opacity to 30% to show how the watermark lightens. When placed over an image that is more then just a black rectangle the image will vaguely show the part of the image it is covering up. An easier way of thinking about it is that you are making the watermark more and more see-through as you lower the opacity. This is important so that it isn't disrupting the image, but is still visible enough to be able to read.
Finishing Up
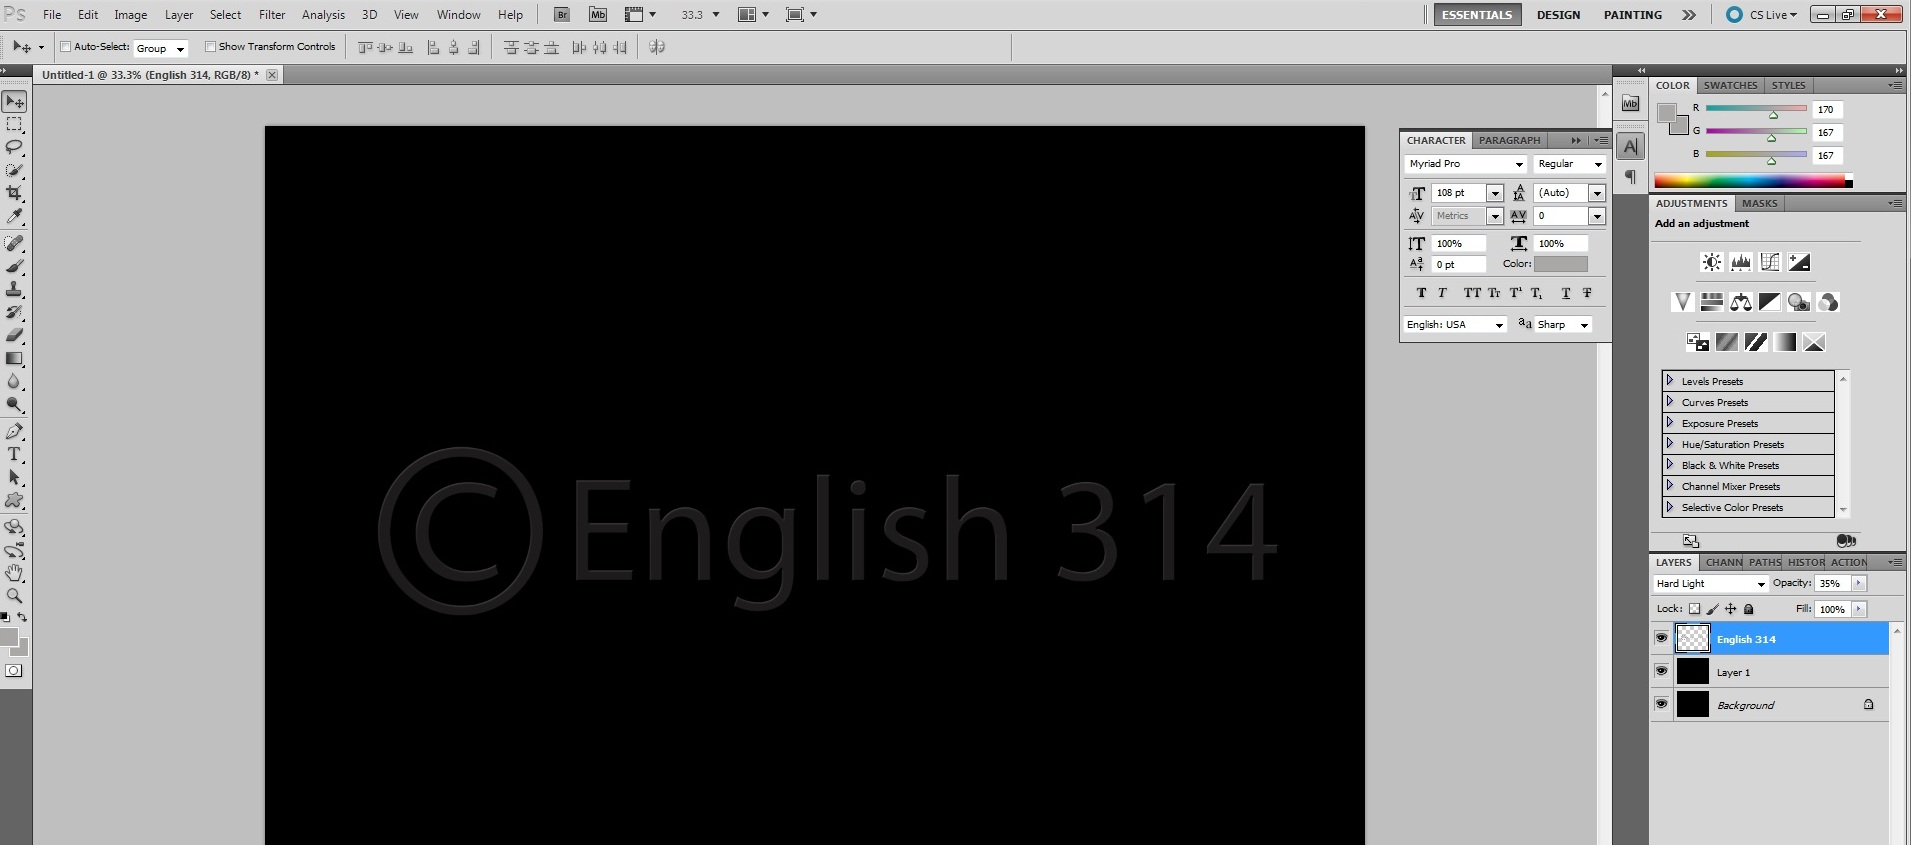
Once you have found the opacity that you find suitable, you can select all of the layers you have listed in the Layers window. As previously described, right click on the selected layers and merge them together. Now you have an embedded watermark within your image. There are many ways of creating watermarks. I found this to be the easiest and most basic way to describe how to create an effective watermark for any image. If stuck, go back to the last step where you fully understood what you were doing and start from there. The easiest way to get confused is by going through the steps to fast and clicking on something that you didn't want. It is very important that you copy the original image so you have a duplicate image to use for the watermark. This way you always have the original image to go back and edit if needed.